Today I’m sharing the Triangle Corner Pop Up Card. I have actually received several messages and comments that people wanted to see a video tutorial on how to make one. So I thought I would come up with a version that I could share to show the many different variations that you can come up with and the fun you can have with it!

This style is a much more elegant approach which is much different than a past creation I put together. I love that you can change the look and have fun playing with different stamps and elements to fit inside the design!
For this one, I have taken the Rose and Butterfly stamp sets to stamp and Copic color. I fussy cut out the images on my design. I’ve used Jurassic 100# and White 100# cardstock. The decorative paper is from the Rustic Florals paper pad. I stenciled the bottom of the Jurassic panel with a stencil using some Unicorn Horn Glitter Glaze. Both of the rose images along with the small heart circle on the easel card were popped up with some foam tape.
For the circle easel design, I’ve cut out a scallop circle with the white cardstock in the size that I thought would fit within the design. Then cut the body of the card with other circle dies in the Jurassic cardstock and then the front with some more of that Rustic Florals paper that I’ve used in the background. The sentiment below the butterfly and the hearts on the small circle were stamped from same stamp set. All of the white panels (with the exception of the scallop circle) was ink foam blending with some grey distress ink. To keep the card “locked” in this position, I’ve used the Mini Disc Magnets.
If you are interested in learning how to create one of these cards for yourself, then please be sure to check out my video below. CLICK HERE to view on You Tube.
These cards can look really intimidating, but once you see the measurements of how to put one together, they’re really easy and fun to make!
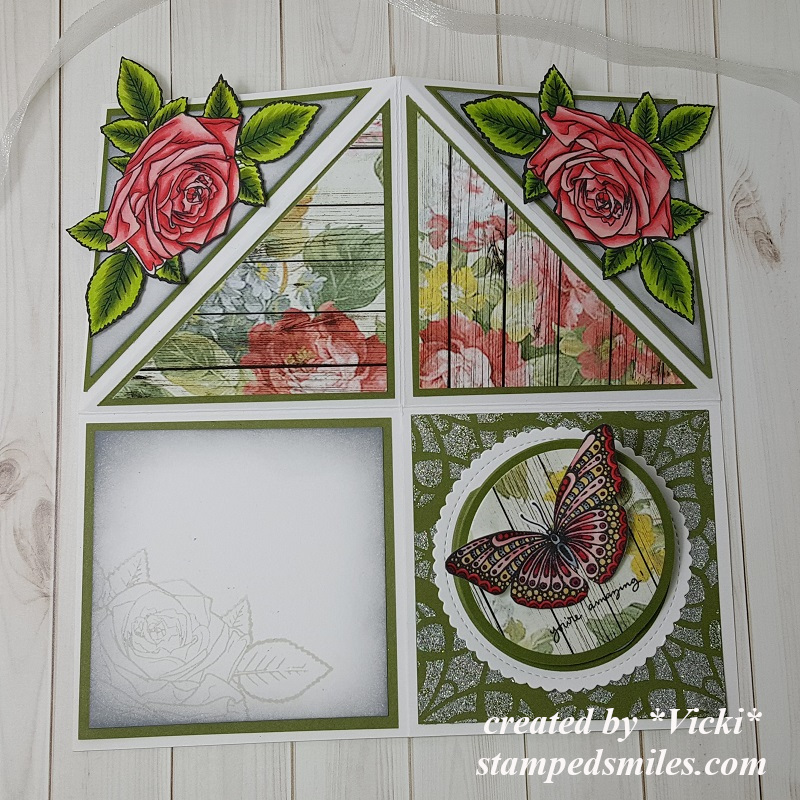
Here’s what the card looks like completely opened up. You can see on the left bottom panel that I’ve taken that rose from the stamp set again and stamped it in the corner with some grey ink after ink foam blending around the edges of it. This will be the area that I’m leaving for a personal message.
To fold it down to a 4″ square card that’s close you will start by folding down on the top and then fold it over from the right side to the left. This will completely close it up.
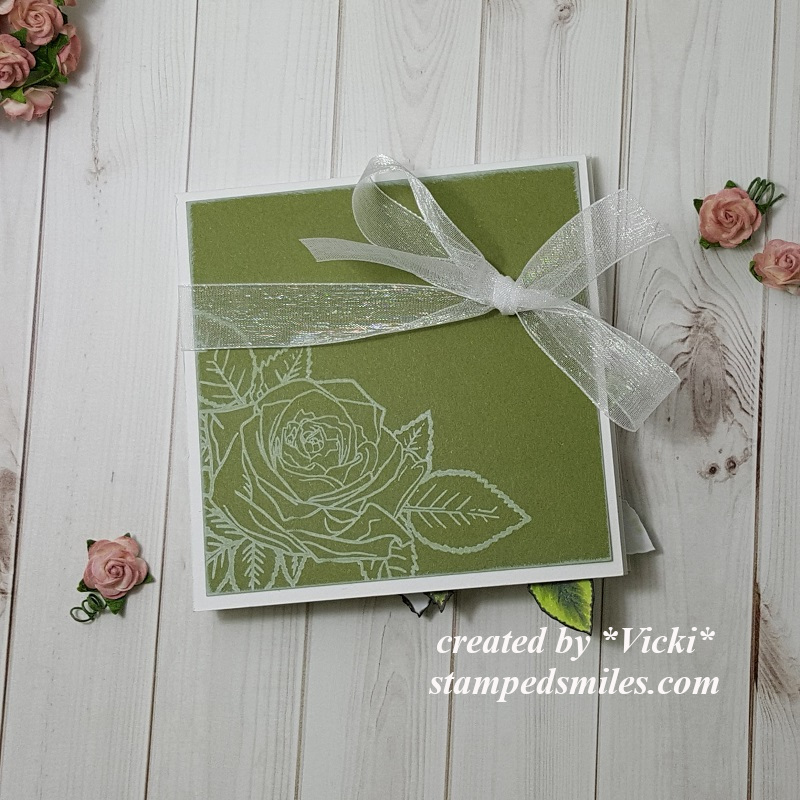
Here you can see that the card is completely closed to a 4″ square size minus the rose leaves sticking out which I don’t mind.
I took another panel of the Jurassic cardstock for the front of the card and sponged around the edges of it with the white Ink and then also stamped the rose again in the corner of it. Because I had several dimensional and extra layers on this card, I had to use a ribbon to tie it together to help it stay closed up. You might need an envelope that is slightly larger than an A2 envelope, but if you use less layers and dimension, it should fit in an A2 size envelope.
Hope you’ve enjoyed my interactive card and tutorial today! Thanks so much for dropping in with me!
Challenges I’d like to enter this card for:
- Cardz 4 Galz – #103 Wings
- Crafty Cardmakers – It’s a Bug’s Life
- Through the Craftroom Door – Anything Goes
- Try it On Tuesday – In my Garden there is….

A beautiful design and most lovely colours. The design is a stunner and will need to make one..hugs.xx
LikeLiked by 1 person
I hope you do make one Annie! I look forward to seeing it!! 🙂
LikeLike
good golly! how do you even do something like this?
this is absolutely gorgeous
LikeLiked by 1 person
You can make one Stef! Just watch the video on how make one!! 🙂
LikeLike
Gorgeous card and fantastic fold Vicki!
LikeLike
Another beautiful card. Love the triangle corner pop card. So very pretty.
Lynn
LikeLike
What a stunning card, Vicki! Incredible colors & coloring. I’m off to watch the tutorial because I want to learn how to make one of these. Thanks so much for sharing it and inspiring me.
;-D
LikeLike
You are so creative Vicki and what a stunner this is x. The look of the card is beautiful, pretty and vintagey and is amazing x.
LikeLike
What a beautiful card! Thanks for sharing your tutorial.
LikeLiked by 1 person
Thank you so much! I appreciate you watching the video! 🙂
LikeLike
So beautiful Vicki..the roses are gorgeous and the butterfly in it’s place, all of this is just so pretty..
Luv CHRISSYxx
LikeLike
This is just stunning!
LikeLike
A really beautiful card
Thanks for joining us at Try It On Tuesday challenge
Joan
LikeLike
WOW Vicki, this is stunning!! I love the the gorgeous images and they are colored beautifully, awesome fold and design as always! Great video too… I use stencils a lot and that Pixie Spray looks like a must have, thanks for all the tips!
Hugs, Tammy
LikeLike
You’ve outdone yourself with this beautiful card! I love the unique folded design and your gorgeous coloring and design! Fabulous! Thanks for the tutorial too!
LikeLike
Stunning card Vicki love the beautiful papers,design and the added little easel card -must try one of these
Carol x
LikeLike
I love the unusual shape and your images are stunning. Thanks for joining us at Cardz4galz. Love Dawn x
LikeLike
Wow, this is stunning. So is the other, and the difference in style really makes them so unique. The design, again, is impressive!!
LikeLike
OMG – beyond beautiful in every way. So many amazing elements and so much ‘lovely’ to swoon over. You are so talented. Thanks for sharing the ‘how to’ Vicki.
LikeLike
Oh, my!! What a beauty, Vicki!! Breath-taking!!
LikeLike
Wowza- I saw this one Facebook- absolutely Gorgeous!!!!!
LikeLike
BEAUTIFUL – I am anxious to go watch the video you have made showing us how to do this. I went and checked out the other card you made like this – and two entirely different subject matter. I like the floral images and the butterfly – so pretty. Thanks for sharing your talent with us.
LikeLike
A fantastic piece
Thank you for joining us at TRY IT ON TUESDAY
LikeLike
wow!
its stunning!
LikeLike
Beautiful, love how it closes down to a 4 inch square. Thanks for joining us over at Crafty Cardmakers this time…..hope to see you again
Jo x
LikeLike
Wow, wow wow!!!!! This is incredible, Vicki! I always enjoy hearing your voice when you post a video. Thanks for sharing!!!
LikeLike