February Art Journal Page-Catching Stars

Happy weekend friends!  We’ve had some great sunshine for the last few days and it’s been really nice, but it’s very unusual for us to have these warmer temperatures for this time of the year.  I will enjoy whatever it brings for sure!  But in the meantime, I’ve also been enjoying time in my craft room getting creative too!  

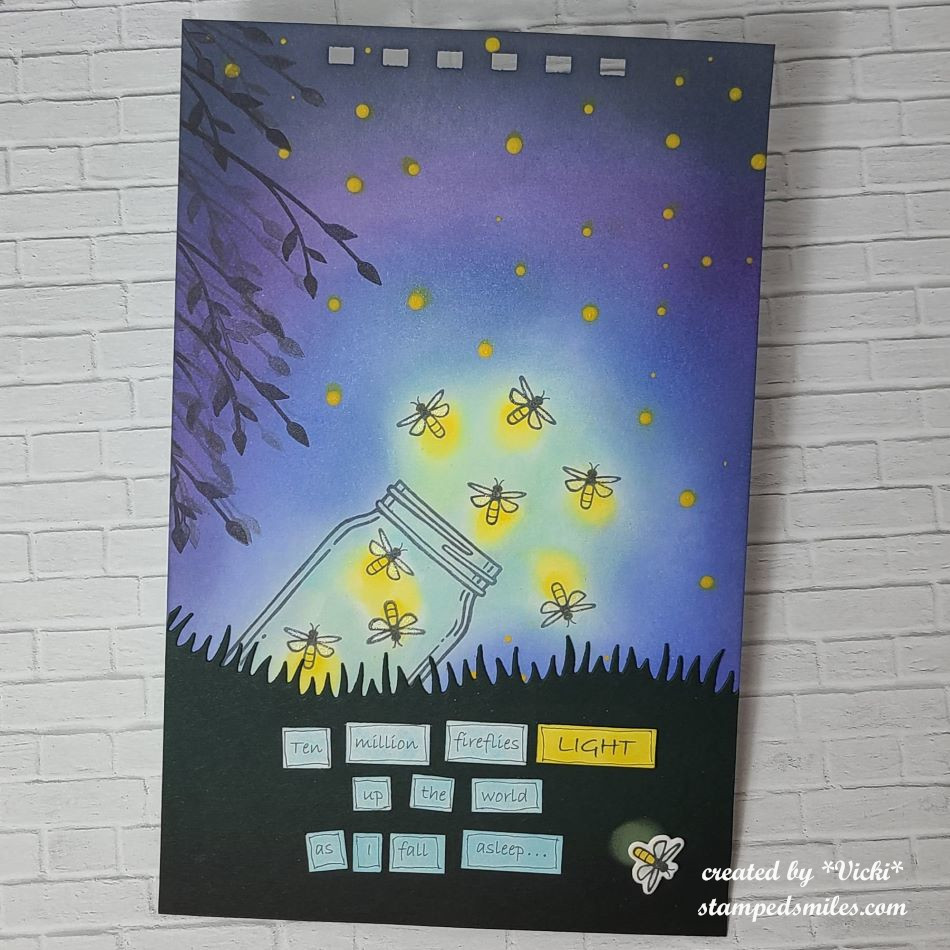
As you know, this month I’ve been sharing several art journal pages as I’ve been hosting this month’s challenge theme over at Art Journal Journey.  There is still lots of time left to join in the fun with us and share your inspiration with the “LIGHT” theme and I’d love to see your take on it!

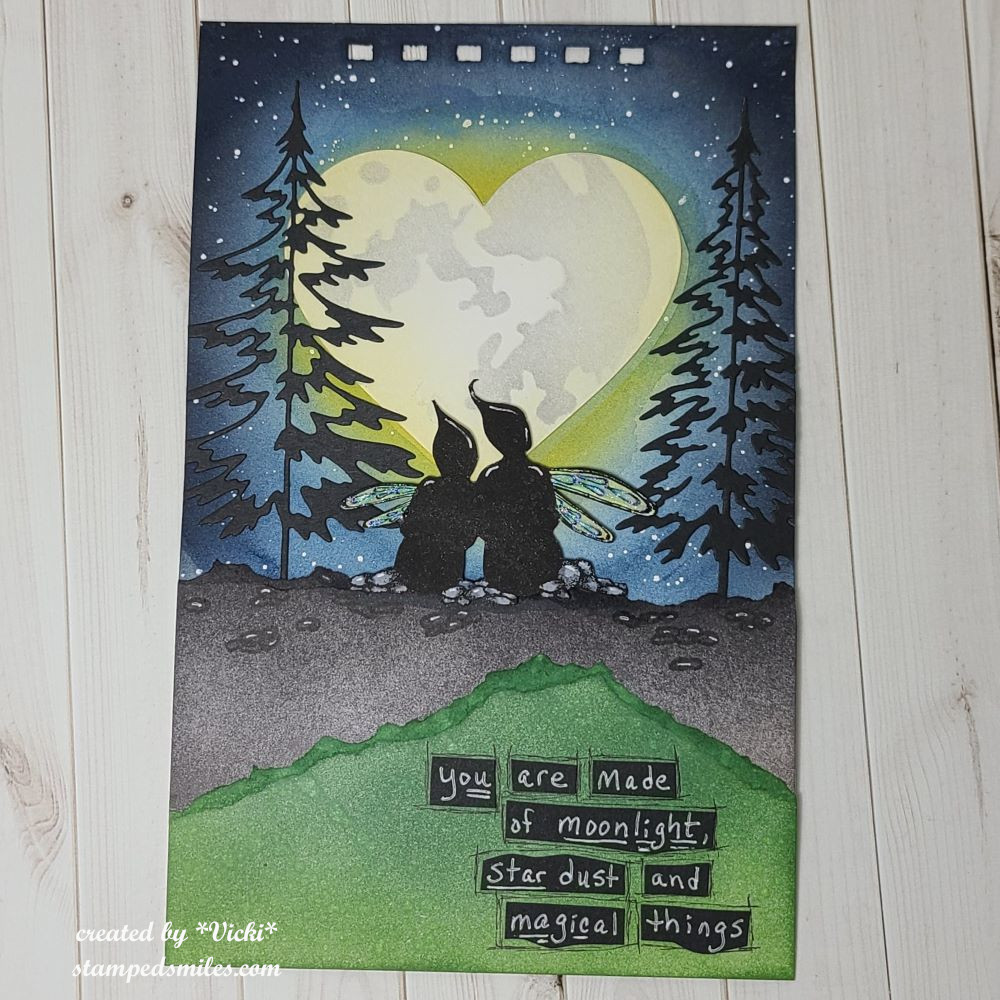
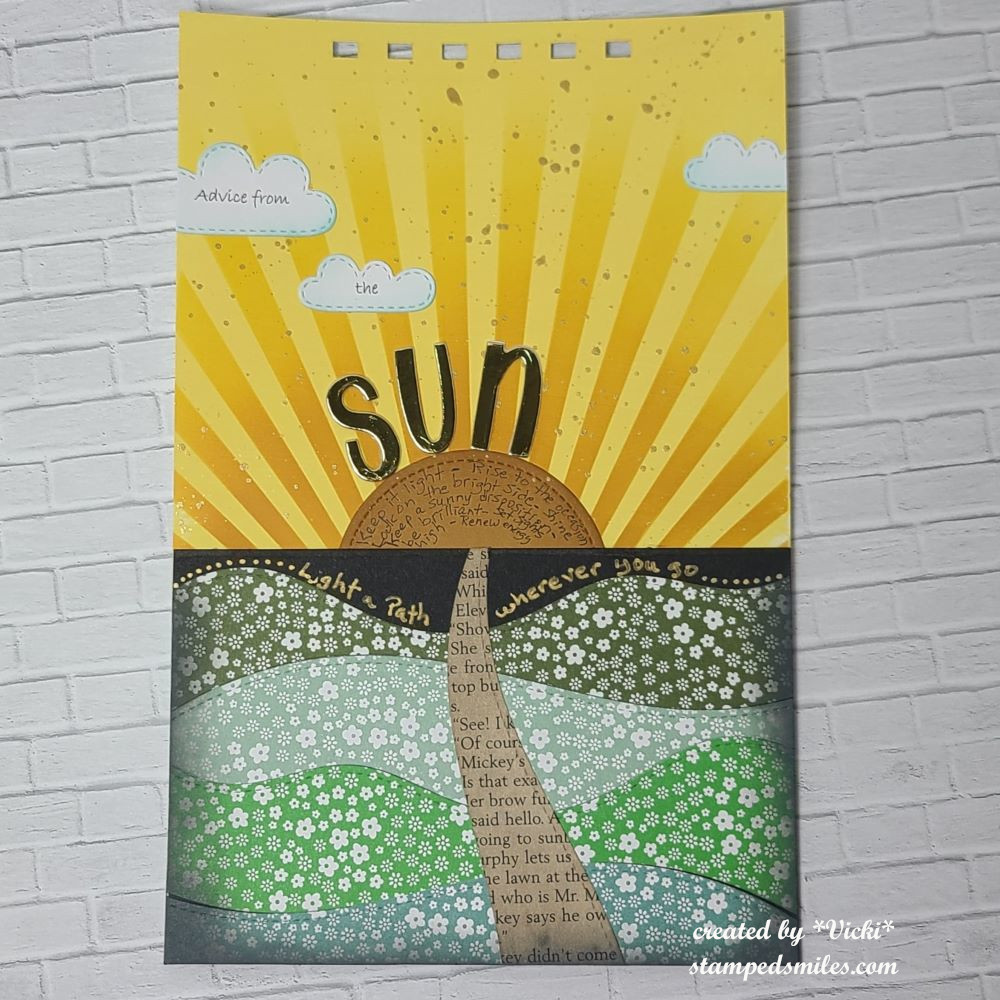
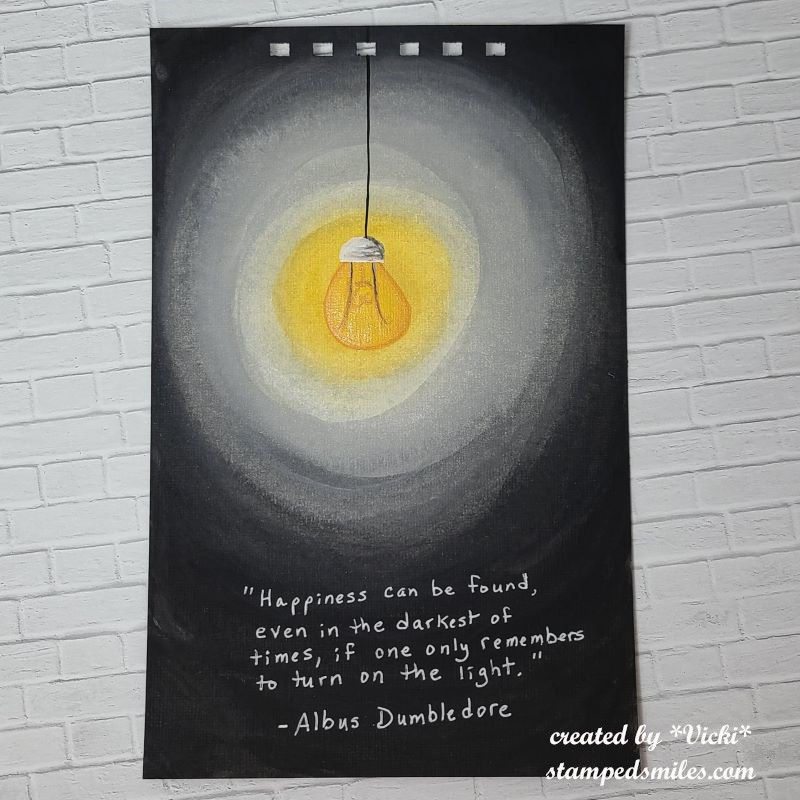
Today, I’m not only sharing my project for that, but it’s also time for our monthly Art Journal Page collaboration with my crafty friend, Carol (from Crafty-Stamper)! We get creative trying to use up our never-ending stash piles along with a prompt for each month.  I know she always has great inspiration to share, so please check out her blog too! Here’s my AJ page with the “SMASH OUR STASH” February prompt of “LIGHT” (of course!):

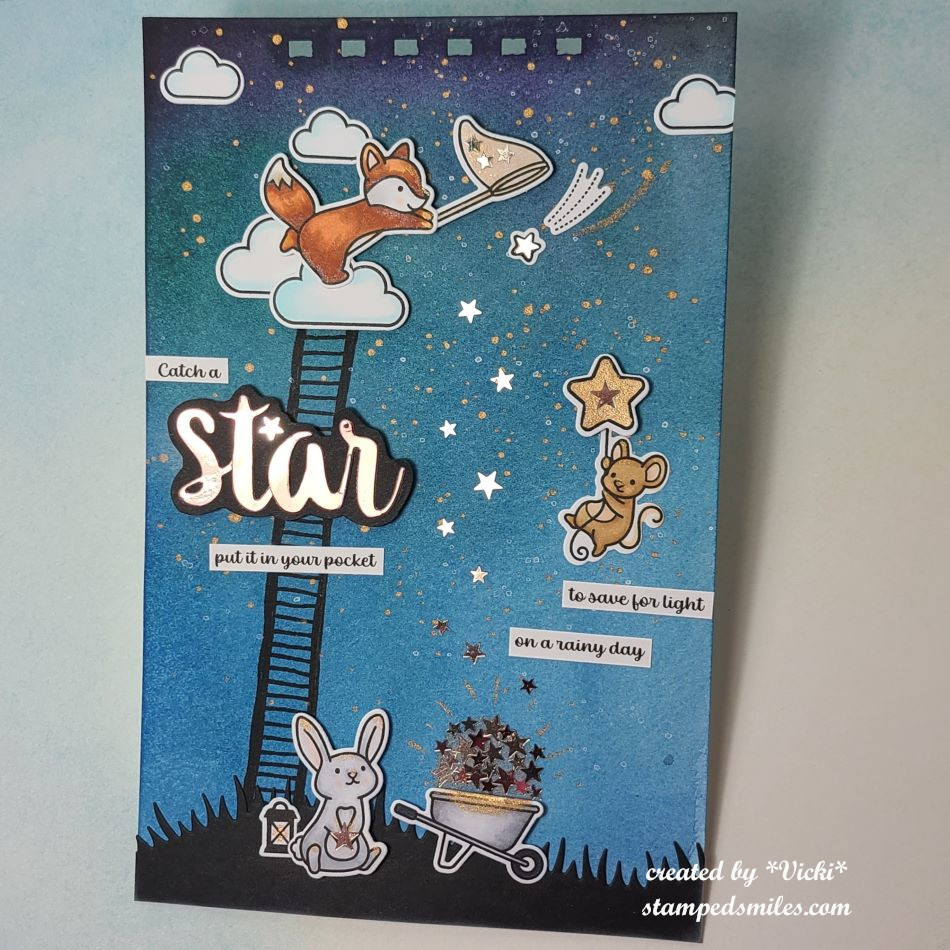
Oh my stars!  I don’t know if these guys are expecting several rainy days ahead, but they really want to be prepared for it!  For my “stash smashing” I went with using some metallics.  Do you have a problem hoarding those metallic things because they’re just so pretty?  I am guilty!  I’ve used some metallic paper to cut out the lettering, I’ve used some metallic watercolor that I avoid using so I don’t run out and those star sequins I have so many in every metallic color!

For the background:  I’ve used a 5.5″x8.5″ piece of Canson watercolor paper with the pre-punched holes at the top using my Zutter machine.  I’ve pulled out my watercolors and used shades of blues, but also dark turquoise and dark violet.  I’ve used the metallic copper watercolor to splatter over the background for those distant stars.  I also added a very light touch of this metallic watercolor on the top highlight areas of the critters, around the wheelbarrow, the net, the lantern and the star with the mouse.  (Sometimes it’s hard to capture all of the shine on a project, but this thing is very shinny and sparkly!)

But before I put all of the details on the images, I took a black marker and drew in a ladder to reach up towards the clouds so Mr. Fox could climb up to the clouds and catch his star.  I then took a grass border die and die cut a strip in black for the bottom.

All of the stamped critters and clouds came from Lawn Fawn sets.  I stamped, colored and die cut them to arrange my scene.  Some of images are popped up with foam tape for dimension.  As you can see, I’ve added tons and tons of metallic copper sequin stars filling the wheelbarrow, dropping from the sky and even the little bunny is holding his star.

Lastly, I die cut the metallic copper letters, backed them with black cardstock and popped it with foam tape over the page and printed off the quote on the computer and cut them in strips to arrange on the scene.

This was lots of fun to do as I was able to use up some of that hoarded metallic stash!  Hope you’ve enjoyed it and gotten some inspiration from it. 

Thanks so much for stopping by and enjoy your weekend!

Challenges:

  1. Art Journal Journey – LIGHT/KEEPING IT LIGHT
  2. Stamping Sensations – Animals/Birds/Creatures/Anything Goes
  3. Creative Fingers Anything Goes

Art Journal Inspiration-Fireflies and Gallery full of card classes!

Hello friends!  I hope that your week has been going great!  I had planned on posting earlier in the week, but I got so focused on completing my classes that I ran out of time!  (Check out the gallery below…LOTS of cards!)  I thought while I’m working on laundry today, I’d make a post sharing some things I’ve been doing…so grab yourself a beverage and take some time to enjoy!  First up is my art journal page:

  • Remember that I’m a guest host over at Art Journal Journey this month and the theme that I’ve chosen is “LIGHT“.  I hope you’ll stop over to see all of the wonderful inspiration that everyone has been creating with this theme and join in the fun!  

This so reminds me of Summer!  Remember as a child going outside in the dark and seeing tons of those flashing lights going off?!  I was always amazed that when I ran over to chase that flashing light, it disappeared on me and I was forever trying to capture those lights!

For the background:  I’ve chosen some Bristol Smooth cardstock in 5.5″x8.5″ pre-punched holes at the top cut with my Zutter machine.  I have started with stamping the jar and placing it where I thought it needed to be and then stamped those fireflies around it.  Starting with the fireflies, I dabbed on some yellow where they emit light and then used some soft blue around them working out with darker shades of blues as I reached the edges.  Bristol cardstock works great for ink blending with Distress Oxides.  To make sure that the yellow light was showing over the dark ink (without smudging it), I took some yellow paint and the end of my paint brush to make various sized yellow dots for the look of those fireflies in the distance.

I decided to take a leaf branch to generation stamp it along the edge for the illusion of a tree being there.  Although it looks black, I die cut a grass border in very dark green cardstock for the bottom portion of the page.  I also added another firefly at the bottom that was die cut and popped up with foam tape.  I used yellow ink for underneath his light glow.  The firefly wings have been covered with a glitter brush pen.

For the bottom lettering:  I printed it off my computer and then cut out each word, added some color with inks over them and then doodled around each word with a pen.  These words and this AJ page was totally inspired from a song called “Fireflies” by Owl City.  If you’re interested in listening to the song, check out the video below:

I learned that this song artist has insomnia and came up with this song during one of those times he had trouble sleeping.  I can relate and so it inspired my light page.


Next, I would like to share with you a card class event that I took part in called “Celebrations Delivered” provided by Scrapbook & Cards Today magazine.   It was a one day event with virtual live learning class videos and each instructor provided at least 3 different projects.  I have listed below each photo who the class instructor was.  

  • If you are on my website, just click on each photo to enlarge it and see the details about each one underneath the photo.  I have made 15 total cards from this:

Really had fun making these and using the products provided to us.  This also reminds me that I have more classes coming soon that I’ll be doing and that I’ve also forgotten to share some things that I had done last year, but hadn’t posted!  If anything else, you can hopefully enjoy or be inspired in some way as I post!  But more will come soon if my arms don’t fall off!😉

Thank you so much for stopping in today and I’m happy you’re here!  I will be dropping around to see what everyone is up to and I will be back on Saturday for our “Smash Your Stash” AJ inspiration!  Have a wonderful day!

Challenges:

  1. Art Journal Journey – LIGHT/KEEPING IT LIGHT 
  2. Simon Says Stamp Monday – NOT a card (art journal page at top)
  3. Try It On Tuesday – Spotlight It!  (Fireflies are spotlighted with yellow dots)  Hopefully this works for the challenge!

Hearts and Flowers for Sparkles Monthly Challenge

Hello friends!  I hope you’re having a great week so far and enjoyed a nice Valentine’s Day yesterday with some yummy sweets!  We enjoyed some treats of our own! 😉

Today I have a new challenge to share with you for the Sparkles Monthly Challenge blog and this month the lovely Dawn would like to see some “Hearts & Flowers” on your creations!  Although Valentine’s Day is over, I think hearts are great for adding any time of the year, so check out the inspiration from the design team and here’s what I’ve made:

I’ve made a mini slim card using the Taylored Expressions Hearts in Bloom Layering Stencils which are so great for mass producing several cards at once.  For this card and the other cards below, I decided I wanted to use the TE Hearts in Bloom Foil Panels which works with these stencils. I foiled them with gold foil.  I think the foiling adds such a pretty shine and glitter.  I also used the TE Love & Hugs Foil Panels for the sentiment and die cut it out with the coordinating die set.

So after foiling everything, I used the stencils to create the pretty bouquet of flowers with the hearts in it and then added a frame around the edge with a TE Diagonal Stitch Mini Slim die that doesn’t cut anything, but adds those slash marks.  I used some foam tape to pop up the foiled sentiment and just attached everything to a coordinating mini slim card base.

I couldn’t just make this one to show you, so here is the whole set of cards I’ve made together:

Those stencils create all of these patterns at one time.  I just lined the foil panels up at one time and then used each stencil for the colors.  If you didn’t want to use the foil panels, you could also just use the stencils on one sheet of cardstock and then cut them apart to make the card fronts.

I found these sets to become very addicting!  And just like that, two of them have been sent out!  

I’ve been really busy with creating behind the scenes and I will be sharing more soon!  I will be around to see what’s been going on with you all shortly!  I really appreciate your kindness and support…it really means so much!❤️  Thanks for stopping in!

Challenges:

  1. Try it On Tuesday – Hearts &/or Flowers
  2. Make My Monday – Love
  3. Allsorts – Anything Goes/Hearts
  4. Ally’s Angels – Anything Goes
  5. Little Red Wagon – Show Us Some Love/Valentine
  6. Crafty Gals Corner – Add a Heart
  7. Simon Says Stamp Wednesday– Fun with Foil

Art Journal Inspiration and Valentine’s Day Cards!

Good evening friends!  Tomorrow is about “LOVE” for Valentine’s Day!  I hope that whatever you’re doing that you spend it with those that you love or at least tell someone how much they mean to you!  I have a special post this evening that is dedicated or inspired by love. ❤️

First up is my art journal page with the prompt/theme of “LIGHT/KEEPING IT LIGHT” that I’m guest hosting this month for the Art Journal Journey Challenge.   It’s been so fun to see all of the wonderful art created so far!

This page was inspired by not just the “light” prompt for the challenge, but it was also inspired by the love of my life.  We have spent many moons together and have enjoyed our time in the moonlight as we both love nature and have spent some time traveling and seeing some beautiful things.  I’m so thankful to have had these special memories with him.

For the background:  I started with a 5.5″x8.5″ watercolor with pre-punched holes at the top with my Zutter machine.  I used my watercolor to create the blue sky background with an idea of where I was going to place the moon.  I left that area to watercolor in the yellow rather than the blue.  I then used some white opaque copic watered down and splattered over top for stars.  The “moon” was die cut in white with a heart shaped die and I added a moon stencil over top to make it look like a heart shaped moon and glued it in the center of the watercolor background.

The bottom portion was made with just ripping some cardstock and ink blending one with the greens and one with greys and black.  I die cut the trees in black and glued them in place and then added the ripped layers over top.

I stamped the Lavinia Stamps “Star Gazers” stamp in black in and fussy cut it out.  I colored the rocks they were sitting on as well as their wings and popped them up on the grey ripped border.  I also hand drew more rocks around them and used a white gel pen to highlight.  I added some glitter to the wings.  Lastly, I wrote over black cardstock with a white gel pen, cut them out and attached to the ripped green border.  I then used a black pen to doodle around the words.


Next up are a few Valentine cards that I’ve made.  I’m actually really bummed because I would’ve shared another two cards that I made, but I forgot to take photos of them before I sent them out!  I used a pizza theme and they were so fun! 

This first one is for my husband and I’ve used the Craft Roulette #201 parameters to create it:

We had to make an easel card, so I decided to make a heart shaped one.  I’ve used the cute skunk from Lawn Fawn with all of the “sweets”. (which was also one of the parameters)  My husband loves his sweets!  I also had to use “quiet” colors and some sort of bokeh, so I’ve made a bokeh background and used a solid heart stamp in white over the blended colors.  It reminds me of those conversation hearts.  This skunk makes me smile!

This is another fun card that I’ve made for a friend!  I couldn’t wait to use this fun mosaic heart from Taylored Expressions.  It came as a freebie for a limited time with a Valentine release.  I like that it comes with the solid heart backer which makes putting it together easier.   I ink blended a panel in two shades of pink and then die cut the heart with the pieces.  I used the frame cut in white and then popped in the ink blended pieces inside the frame.  

The embossed heart background was made after cutting out a piece of Bubblegum cardstock with the postage rectangle die.  I stamped and die cut the sentiment over top of the heart and added some gold rhinestones. 

And this card was done for the Inky Stamper FB challenge which was to create a square card.  I have made this one 4.25″ square and used the cute Snail stamp set along with some Doodlebug papers which you can also find in their store.

I just stamped, colored and cut out the images, added a border at the bottom and cut out a scallop square in white and stenciled some clouds at the top.  More pink papers onto a white square card base and called it done!  There’s nothing better than getting snail mail!

  • I hope you’ve enjoyed my heart-filled post today and you’ve been inspired in some way!  Thanks so much for stopping in and I’ll see you again on Thursday for a new challenge to try!  Happy Valentine’s Day!

Challenges:

  1.  Art Journal Journey – LIGHT/KEEPING IT LIGHT (art journal page only)
  2. Crafty Animals – #80 Anything Goes + animal (skunk card)
  3. Critter Crazy – #83 Anything Goes + critter (snail card)
  4. Pearly Sparkles Love/Have a Heart (skunk card)
  5. Creative Knockouts – #514 Love/Valentine’s Day (skunk card)
  6. A Place to Start – Monochrome (mosaic heart card – pink)
  7. Aud Sentiments – #310 Dies/Love/Wed/Anniversary + sentiment (skunk card)
  8. Creative Inspirations – For Someone You Love/Special Friend (mosaic heart card)
  9. The Male Room – Valentine/Use a Heart (skunk card)
  10. Crafty Catz – Anything Goes optional: Valentine/Love (snail card)

Art Journal Inspiration-Advice from the Sun

Hello friends!  Back to share more inspiration for this month’s Art Journal Journey challenge theme of “LIGHT/KEEPING IT LIGHT“.  I’m hosting this month’s theme and I’ve really enjoyed seeing everyone’s interpretations with it!  Looking forward to seeing even more!

For the last few days over my way, we actually got to enjoy a few walks outdoors as it has been unusually warm and with some sunshine…finally!  So of course I’m going to go out and enjoy it while it is around!  This inspired my page today:

Now, I’m not sure if the sun gives advice, but if so, I’m thinking there might be a few of these to consider!  It’s hard to read, but inside the circle, I handwrote “Keep it light – Rise to the Occasion – Look on the Bright side – Shine – Keep a Sunny Disposition – Be Brilliant – Set sights high – Renew energy”  I’ve also handwritten with a gold paint pen on the black under the sun ” Light a Path wherever you go“.

For the background:  Started with a 5.5″x8.5″ piece of heavyweight cardstock that was pre-punched at the top with my Zutter machine.  I took a baby wipe and covered the top half of the page with yellow paint.  I then used a “Light Ray” stencil and blended a few yellow and orange ink colors over the painted background.  I also took some gold metallic paint and splattered over the background with a fan brush.  A die cut a circle to place in the center.  The clouds and “SUN” letters were cut out with dies.  I used my printer for the lettering on the clouds and some gold mirror cardstock for the “SUN” letters.

The bottom half of the page is all papers.  I started with a black piece of cardstock sized to fit under the sun rays and then die cut several different green colored pattern papers to create hills layered on top of the black.  (Happy to use some more papers!)  I also found a book page strip and cut it for a “path” in the middle of the hills.  I sponged the edges with some black ink and that’s when the gold handwriting was done.

Thanks so much for stopping in today!  I’m glad you’re here and I hope this has inspired you in some way!  

  • I’ve had a few people that have sent me a message from my contact page on my blog.  If you have contacted me, I’ve replied, but not sure if they’ve been received.  Please check your spam folder to see if it’s there as I haven’t heard back from a couple of people.  Thank you!

Challenges:

  1. Art Journal Journey – Light/Keeping it Light
  2. Paperminutes – No cards
  3. Crafting From the Heart – Anything Goes
  4. Creative Artiste – Anything Goes Mixed Media

More Inspiration for AJJ-Be Like a Feather

Hello friends and happy weekend!  I have some more inspiration for you using the “LIGHT/KEEPING IT LIGHT” theme over at Art Journal Journey that I’m hosting this month!  There are so many options to play with as well as inspiration, so hope you can join in the fun!

Loved getting messy with a rainbow watercolor on this one!  I fell in love with these feathers from Taylored Expressions and knew the large images would be wonderful for an AJ page!

For the Background:  Started with my usual 5.5″x8.5″ Canson Watercolor 140# cold press paper that was pre-punched at the top with a Zutter machine.  I stamped each feather with a grey waterproof ink.  I then used my set of Kuretake Gansai Tambi watercolor and blended in the rainbow colors over the feathers.  After it dried, I splattered some of the gold watercolor over top.

I then used a large stamp with several words and stamped it second generation over the two opposite corners in the grey ink.  The words at the bottom and throughout the falling feathers were computer generated and cut out.  I inked around the edges and glued them to the page.  I did take a strip of gold mirror cardstock across the bottom and the “feather title” was made into a banner with a layer of grey cardstock behind it.  I added one gold rhinestone to each feather.

  • If I haven’t mentioned why I like to art journal, it’s simply something that gives me the freedom to create any style, any medium and no fear of trying something new as this is something personal for me only.  I don’t give away my art journal pages.  It’s something that I can release in art what comes from my heart and head…and that’s fine with me.  If you haven’t tried it, I encourage you to just have fun with it and let go.

I thank you kindly for stopping by and for your kind words…I truly appreciate any way that you interact with me and I’m glad you’re here!  See you next time!

Challenges:

  1. Art Journal Journey – LIGHT/KEEPING IT LIGHT
  2. Try it On Tuesday – Add Some Text
  3. Simon Says Stamp Wednesday – Anything Goes

Art Journal Journey Host for February

Hello friends!  I have some really exciting news to share today!🎉  I’m so honored to have been asked to host this month’s challenge for  ART JOURNAL JOURNEY!  The winter months can be not only very cold over my way, but dark days with less sunlight hours can really take a toll sometimes.  I’m always searching for something at this time of the year and so I thought it only appropriate to help with that for this month…

The theme that I have chosen for this month is “LIGHT“.  Light can have so many different meanings and so many different ways to interpret it.  Here are a few examples to get you thinking:
1. sun, moon, stars, candle. lantern, bulb, illuminate
2. colors (subtle or subdued tones or shades)
3. an idea (‘shedding some bright light on a subject’)
4. interpretations (light as a feather, light snowflakes, let your heart be light, let your light shine, etc)

* Please be sure to catch the rules to enter on the left sidebar of the challenge blog* 

Here is my starting inspiration for this month’s theme:

I’ve started my page with a 5.5″x8.5″ canvas paper with pre-punched holes at the top using a Zutter machine. 

For the background:  Pulling out a white, black, grey, yellow and light yellow acrylic paints, I found the center point where I wanted it and painted my yellow spot.  I worked with each color while it was still wet to help it blend together.  I worked outward with the light yellow, then white, then grey and finally the black.  Some of it needed to blended in with the next color, so I just worked it back and forth until I got the look I wanted. 

After the blends were dry, I used the detail brushes to create the light bulb and cord.  I drew/painted the lightbulb in the center of the yellow and worked around from there and lastly added my black cord hanging down.  It’s hard to tell in the photo, but I covered the bulb with a glitter brush pen application to give it sparkle.  (I have never done a page that was completely hand painted…so this was a challenge for sure!)

The Dumbledore quote was added with a white gel pen.  One of my favorite quotes.

  • I hope you enjoyed my approach to the “LIGHT” theme and you’ve been inspired to create something in your art journal today!  I can’t wait to see how everyone interprets it!
  • I will be posting several art journal pages throughout the month with this theme, so please be sure to stay tuned in to see more inspiration with it!

I’m sure you’re used to seeing only one monthly art journal page from me, but this month will be filled with several of them throughout and I hope it helps inspire you to bring some LIGHT to your creation in some way.  

Hope you have a brightly filled day!  Thanks for dropping by!

Challenges:

  1. Crafting from the Heart – Anything Goes
  2. We Love to Create – Anything Mixed Media/Paper Goes
  3. Creative Fingers – Anything Goes
  4. Penny’s Paper-Crafty- Anything Goes

January AJ Page-BRR!

Hello friends!  Hope you’re enjoying your day so far and staying warm!  We’ve just recently survived a very cold below freezing temps in my area, so going outdoors is not that pleasant even bundled up!  So with that, I stay inside and find crafting to be my happy space!  

I’m very excited to be joining with my crafty friend, Carol (from Crafty-Stamper) for another year of SMASHING OUR STASH!🎉  I love the inspiration that we bring each other as well as accountability for getting those piles of stash used up!  Thank you for joining me again and please be sure to check out the wonderful inspiration on her blog too! Here’s my AJ page with this month’s prompt of “COLD” (anything related to this word):

Of course when I think of cold, I think of my favorite animal…the penguin!!  I pulled out some Lawn Fawn stamps to use on my page today.  Lots of blues and silver and sparkle help with the feeling of cold too!  I have so many sparkly items, so it was great to use some up!

For the background:  I started with a piece of Canson Watercolor 140# coldpress 5.5″x8.5″ pre-punched holes at the top and covered it with blue colored acrylic paints using a baby wipe.  I also went around the edges with a darker blue and then used a number stencil with white paint which you can barely see as I’ve covered most of it up.  I then splattered with white paint using a fan brush for the snow.

  • I also found a cool icicle border and cut it out with my Cricut machine in silver glitter cardstock for the top of the page.  I then used my Zutter machine to punch the holes again and used a corner chomper to round the top edges.

For the bottom:  I used all Lawn Fawn border dies for the mountains and snow hills.  The blue ice water the penguin is standing on is just a straight piece of blue cardstock covered with a glitter brush pen.  I also used Stickles glitter to cover the snow cone that the penguin snowman is holding.

The lettering was done with a Lawn Fawn alphabet die that I ink blended in blues and covered with crystal effects.  I foiled over the “January” word with blue foil and cut it out with a die and placed a couple of silver rhinestones next to it.  This was popped up with foam underneath the “BRR” letters.

I hope you’ve enjoyed my AJ page today and have been inspired in some way!  Thanks so much for stopping in!

Challenges:

  1. Art Journal Journey – It’s On the Calendar (January is COLD!)
  2. Kreativ-Tanten – Snow
  3. Once Upon a TimeMr. Popper’s Penguin book cover
  4. Penny’s Paper-crafty– Anything Goes with Paper
  5. The Sisterhood of Crafters – Winter Blues

2024 Calendars Completed

Hello friends!  It’s that time of year when we turn over a new year and then realize that we need a calendar to keep track of our days…at least I do anyway!  I don’t feel ready for the year ahead until I’ve got my calendars up and ready to roll!  Usually, I’m ready to go by the end of the year, but I ran out of time with the Holidays, and I had planned on giving calendar gifts which I sent late, but I did get them done!  I still feel in Holiday mode because of this…Ugh!

So this month I’ve been working on several calendars and spending most of my time coloring them up.  It’s been very cold over my way, so I actually enjoyed doing them.  Here are a few sets that I sent out for gifts:

I think these Taylored Expressions Feisty Square Calendar Cards are my favorite!😆  I was laughing at each one as I was coloring them up!  The cards are already printed and makes it easy to get them colored up and attach them to the Desk Calendars.  All of the image cards are blank so that you can use them however.  I decided to just create my own background with each one using my markers in different ways while I was coloring them up.

I gave this set as a gift and wasn’t sure how they would choose to be displayed, so I added a magnet on the back of each one and also included a Walnut Wood Display, so they had a couple of options to use.

This next set was put together the same way I did the calendar above, expect these are the Taylored Expressions Scratch-Off cards.  (This one is not available in the store because I received the entire set with my Advent Calendar purchase.)  I thought these pups and cats were too cute and a perfect gift for someone that has both a dog and cat in their family.

After I colored them in, I added the Taylored Expressions Scratch Off Stickers to cover up the joke punch line.  I then used the TE Square Tear Off Calendar dies to create the design around the edges and a layer of cardstock to coordinate behind each one before placing on the calendar cards.  I also stamped “scratch off” under each card so that the person can scratch off the joke punch line for every month and see a new joke.

I also added a magnet on the back of each one as well as include a Walnut Wood Display so the recipient can choose how to display the calendar.

  • Click on the photos to enlarge on website!

Every year I always get the Inky Stamper Calendar kit that gets put together at the end of each year.  There is usually a number limit on how many are available each year, so if you are interested, you might want to click on the link to get one because I’m not sure how many more there are left.

These were also fun to put together and color.  I chose to stamp my own images and cut them out.  You still get the pattern papers and white sentiment strip with each month.

I absolutely love how this calendar turned out!  I’ve used the Taylored Expressions Friendly Square Calendar Cards and I thought they were so uplifting.  This time of the year positivity is something that is very important to me and can be hard to come by.  The days seem to be gloomy and short with little sunshine, so coloring all of these was great to fill my time with.

For this display, you may remember a calendar I had done a few years ago on THIS POST using the TE Snarky Calendar Cards.  I’ve decided to update that one and used the same display stand to create this one, which is why I prefer using this stand.  It’s nice and durable.

I have gold foiled each card and colored it.  I’ve made a new background display card with a layered stencil and I’ve layered everything with gold foil cardstock.  I’ve got a bag on the back to store my extra cards so that I can switch them out whenever I’d like.  All of the gold shine really catches my eye and is pleasant to view.

I hope you’ve enjoyed my post this afternoon and I REALLY appreciate you taking the time out of your day to leave me a comment.  It means very much to me as does your support!

Have a beautiful day and I’ll see you on Saturday for my first Art Journal Page of the year!

Challenges:

  1. Crafting From the Heart– Anything Goes
  2. Ally’s Angels – Anything Goes
  3. Love to Scrap – Anything Goes
  4. Love to Craft – Anything Goes
  5. A Perfect Time to Craft – Anything Goes
  6. Crafty Calendar – Anything Goes
  7. Lil Patch of Crafty Friends – Anything Goes

New Beginnings at Sparkles Monthly Challenge!

Hello friends!  With January comes a new year and every year people are thinking about everything “NEW” like resolutions, out with old, in with new sort of things.  It seems with cold and snow winter outside; I’ve been doing a majority of my time organizing and figuring out what to toss or keep!  I’m thinking I need a new “for sale page” here on my blog!  I will need to figure that out and update later!

Today brings a new challenge for the start of the year at the Sparkles Monthly Challenge Blog!  For the start of the year and this month’s challenge, we have the theme: NEW BEGINNINGS!  I received a Lawn Fawn gift last year and this is my first time using it for my card today:

Of course, a baby is a wonderful “new beginning”, and I was inspired to use this darling Lawn Fawn stamp set called Elephant Parade plus the Add-On.  I stamped, colored and die cut all of the images to arrange a scene over the arch opening of my card front made with the Lawn Fawn Secret Garden Window die set.

I wanted to keep the colors gender neutral, so I went with mint and yellow type colors.  I blended around the inside edge and white heat embossed the sentiment at the bottom.  I found a very old scrap of decorative paper and ran a stitched cloud background plate die over it.  (I think it’s been retired) This was the background for my window opening.  I added foam tape to the back of the mint card front and attached it to the decorative paper.  Some of the images were glued directly onto the background and some were popped up with foam tape. I’ve added this panel onto a top folding A2 white card base.

I finished out the design with some clear sparkling sequins filled with Stardust Stickles and a few white and black dots with gel pens.

I hope you’ve enjoyed my card today and have been inspired to come join us this month to enter your creation!  I look forward to seeing what you make!  Thanks so much for stopping by as I appreciate you taking the time!  Have a great day!

CHALLENGES:

  1. Simon Says Stamp – Cute Critters
  2. Critter Crazy – Anything Goes featuring a Critter
  3. Time Out – NEW
  4. CRAFT – NEW
  5. My Time to Craft – New in Your Stash (stamps/dies – first used for this card from gift given October 2023)