Hello friends and Happy New Year! We made it! Now it’s time to welcome 2026!
There are SO many things that happened this past year that I couldn’t even imagine, but they are all locked into memory now! It’s time to see what 2026 has in store for us next!
After sending out my Christmas cards, I always seem to forget to send one to someone, so I made a batch of New Year’s cards just in case and I ended up sending all of those out as well! I will have to make more if another one comes late! LOL
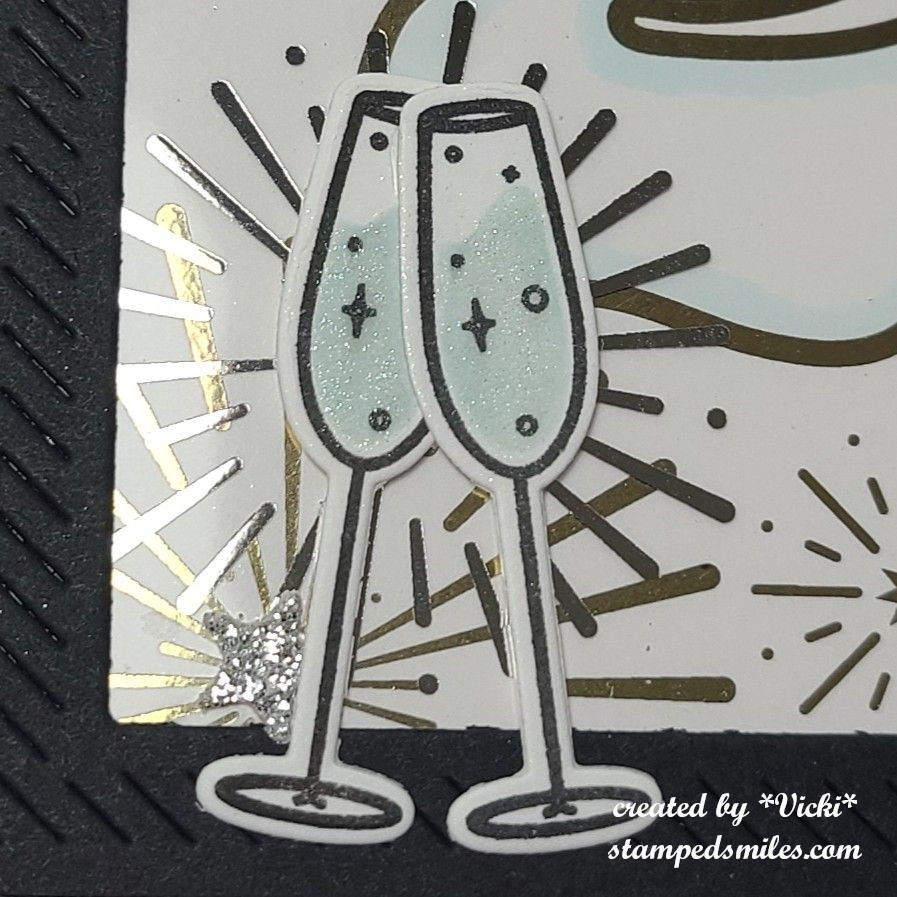
These were fun to put together using the Taylored Expressions New Year Bundle. I mainly used the Foil It – Shine On New Year and the Foil It – Acetate Framed Fireworks sheets. I foiled the numbers panel in gold and then the fireworks panel is clear acetate to layer over top of it that I foiled in silver. Fairly easy to do once you get them all foiled up and then just assemble together. I then cut out a Frame in Frame 3 in black cardstock to attach the acetate panel to and then layered it over the white foiled panel. I attached these onto a side folding A2 white card base.
To add a bit more sparkle with the shine, I die cut some different sized stars from the TE Little Bits-Stars dies in both silver and gold glitter cardstock. I added them randomly over the design.
Zooming in and looking at the background, you can better see all of the foil with the acetate and how it layers together along with the sparkly stars.
For a little more decoration, I took the TE 5 O’Clock Somewhere Stamp & Stencil Combo to stamp, add color to the champagne drink and then cut it out with the coordinating die. I only needed that one drink from the stamp, so I stamped several (I made a set of 6 cards) with needing two glasses for each card. I put one glass in front of the other and made it look like they were clinking together. I attached them at the bottom of the left side of card and then covered the liquid inside the glasses with a glitter brush pen.
I didn’t take a photo of the inside of the cards, but if you get a chance, check out these funny insiders panels from TE called Snarky New Year. I thought these were so fun and I foiled all of these in gold as well. Love using those Insiders so that I can quickly just attach something on the inside and not worry about stamping everything.
Thanks so much for dropping in today! Wishing you a happy and healthy New Year my friends!
Challenges:
Little Red Wagon – #839 “Use the Force” (pressure with Minc machine and die cut machine)
the Divas that cut…paper – Use NEW Crafty Item – All TE New Year products are brand new linked in post!
Hello friends! Hope you had a great Christmas and were able to make some wonderful memories! I can’t believe that we are ready to close out another year! The time just goes way too fast and there’s so much more to look forward to! I think the theme for my upcoming year is in this title post – KEEP DANCING!!!🕺
The last Saturday of the month (AND THE YEAR!) brings us to the monthly Art Journal Page collaboration with my crafty friend, Carol (from Crafty-Stamper)! We get creative trying to use up our never-ending stash piles along with a prompt for each month. I know she always has great inspiration to share, so please check out her blog too! Here’s my AJ page with the “SMASH OUR STASH” December prompt of “Previous Prompt”:
Since this is the time of the year that we have a “look back”, I thought it would be fun to take one of this year’s previous prompts and come up with a new AJ page. I chose April’s prompt of “SHINNY/SPARKLY”, and you can catch that page in the photos below or see my previous blog post HERE.
There’s nothing quite shinny or sparkly than New Year’s Eve! I always think of the ball dropping on Times Square in New York, but it also had me thinking of a disco ball that is very sparkly. Found this image online and printed it out. Cut it out with a circle die and then added a bit of colored shading with my markers in grey. I took a sponge to add glue to the entire ball and then covered it with chunky glitter. I added some sparkle images and filled them with silver glitter and then die cut the numbers and glued them over top of the ball.
For the background: It’s just a 6″x9″ black cardstock pre-punched at the top and then splattered with silver watercolor. I added some music notes and die cut stars. For the bottom, I used some woodgrain texture paper and cut strips to make a wood floor for the Riley the Moose disco dancer. A silver metallic paint pen was used for the ball string at the top and the wording around the top of the ball.
I stamped, colored and hand cut the moose and popped him up over a die cut shadow for under his feet. I typed a quote on the computer and printed it out over silver cardstock. While it was still wet, I sprinkled clear EP over top and cut rounded corners for the page. Lastly, I just popped up the glittered ball with foam tape and added some silver rhinestones at the bottom.
I thought it would be fun to do a review of all of the monthly pages that were created this year. I put the months in order below. (If you are on my website, just click on the photos to enlarge them.)
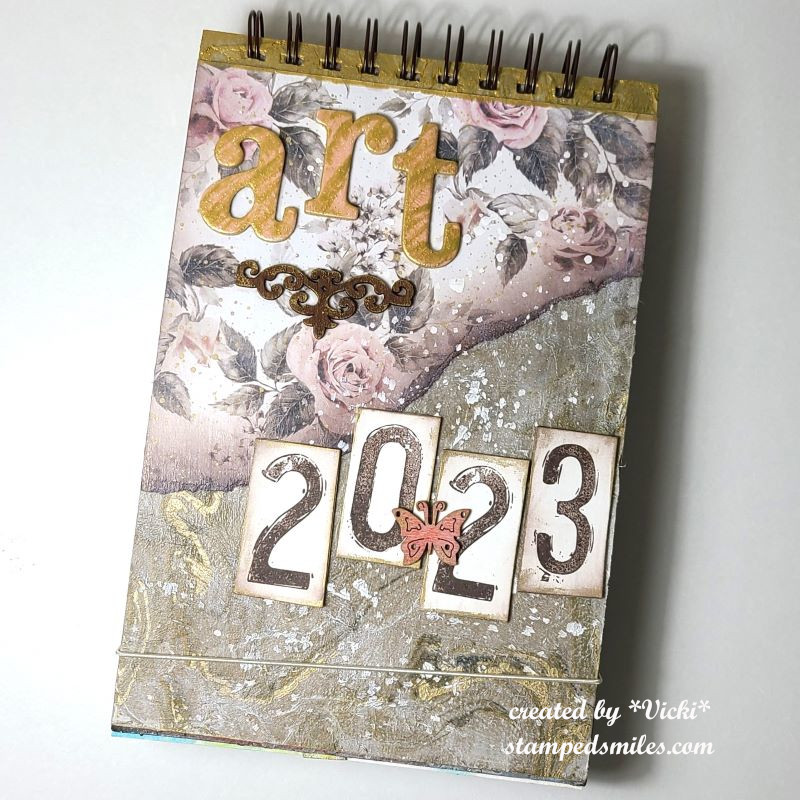
I pre-punch the holes at the short side of the pages each month and then at the end of the year, I use my machine to bind them together to make a book. I add covers and decorate them. There is a post with last year’s book HERE.
For this year, I went with the vertical look and added a stretch cord to keep them together better. I also tried out the napkin with the cover:
The napkin is at the bottom with the foil marble look. My husband got some napkins for New Year’s, and I thought I’d try it out. I added some chipboard, stamped and cut out numbers and added some wooden pieces. I used the rose papers for the covers on the inside as well as the back of the chipboard covers. It was put together with my Bind-It-All machine and coils.
I hope you’ve enjoyed seeing my Art Journal Journey throughout the year as I sure have enjoyed doing them! I get to pull from my stash to use, but there is also so much more to use! So this means that I will for sure be continuing with this journey and I hope you’ll join me too!
Thank you so much for stopping by to have a look back. Wishing you peace, love and health for the upcoming 2024 year! See you in the next year friends!!!🎉
Challenges:
Art Journal Journey – Above Us Only Sky (New Year’s Eve Ball Drop on Times Square with stars in the sky!!!)
Creative Artiste – Anything Mixed Media Goes with option of Christmas
Alphabet – ‘T’ is for Texture (texture on the top page with woodgrain floor, the chunky glitter disco ball. Texture on the book with chipboard, wood pieces and paste.)
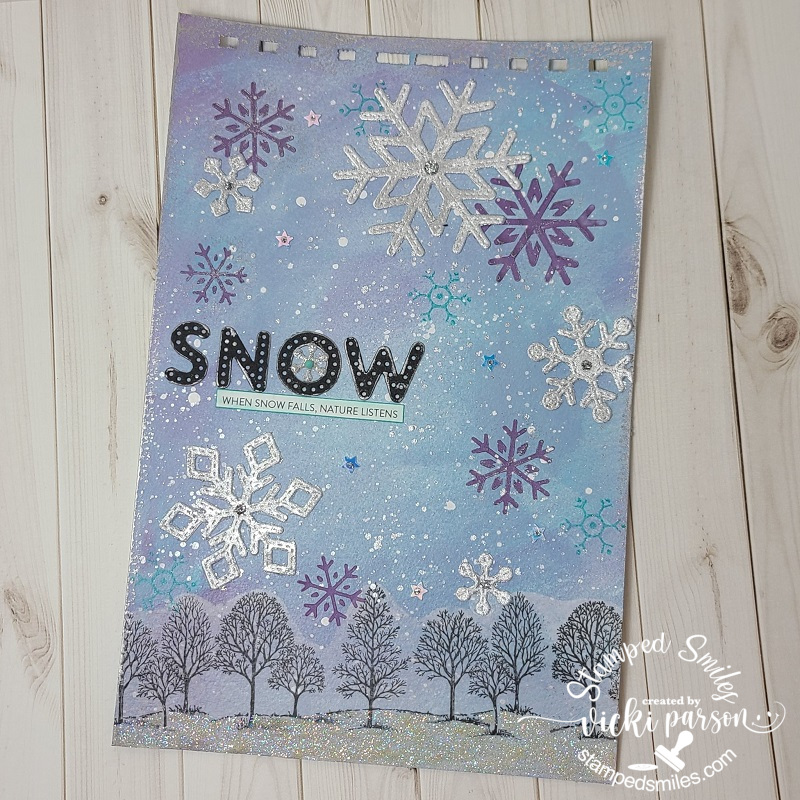
It is here! The end of 2022 has arrived weather you are ready for it or not! I know as I’ve gotten older the time seems to pass more and more quickly. Each year I usually go through all of the things that I didn’t have time to do. This year I’m going to look at all of things that I DID do instead! I look forward to a wonderful year ahead and I hope you are as well!
For this entire year, I’ve had such a wonderful time creating my AJ pages at the end of each month with my crafty friend, Carol (from Crafty-Stamper)! Thanks SO MUCH to her for the wonderful inspiration and joining in the venture with me! I know she’ll have something wonderful, so please check out her blog for an AJ page too! We’ve gotten creative by using up our never-ending stash piles! (I look forward to doing this for another year each month in 2023 and I’ll hope you’ll be here too!) Here’s my final Art Journal inspiration for 2022 with the “SMASH OUR STASH” December prompt of “Oldest Stash” :
It’s a bit challenging for me to FIND my “oldest stash” as I’ve been a bit of a collector over the years. So I’ve pulled out a very old, but favorite stamp set of mine from Stampin’ Up! called “Lovely as a Tree” from 2001. The container broke when I opened it up to take a stamp out! LOL I’ve also pulled out my Pearl Ex powders and some gilding flakes from my older media stash. It’s a good thing that powders don’t go bad otherwise I wouldn’t have been able to use them!🙄
For the Background – I’ve used some mix of paints and splattered some white paint over it for the snow. The trees at the bottom were stamped over vellum and then I cut it out and attached that to the bottom of the page so that they were a nice vibrant black as I didn’t think they would stamp over the paint very well. I did take a snowflake stamp (not too old) and stamped a few randomly over the background in teal ink. (water-proof)
For the Pearl Ex Powders – I mixed some Misty Lavender Pearl Ex with embossing paste and used a snowflake stencil to randomly add this to the background.
For the Gilding Flakes – I die cut some snowflakes with double sided adhesive sheets will make the front sticky. This made it so I could rub in the gilding flakes over them. They did turn out very pretty!
The “SNOW” letters were die cut and I found a neat winter clipping from my sentiment stash to add below it after I sponged some teal ink around it. I also die cut another tiny snowflake in the center of the ‘O’ with glitter cardstock and attached a tiny teal rhinestone in the center of it. I rubbed some silver wax around the letters and around the edges of the page. Lastly, I’ve added some star sequins and filled the centers of those and the gilded snowflakes with some silver Stickles. I covered the bottom of the page under the trees with glue and covered it with sparkly glitter.
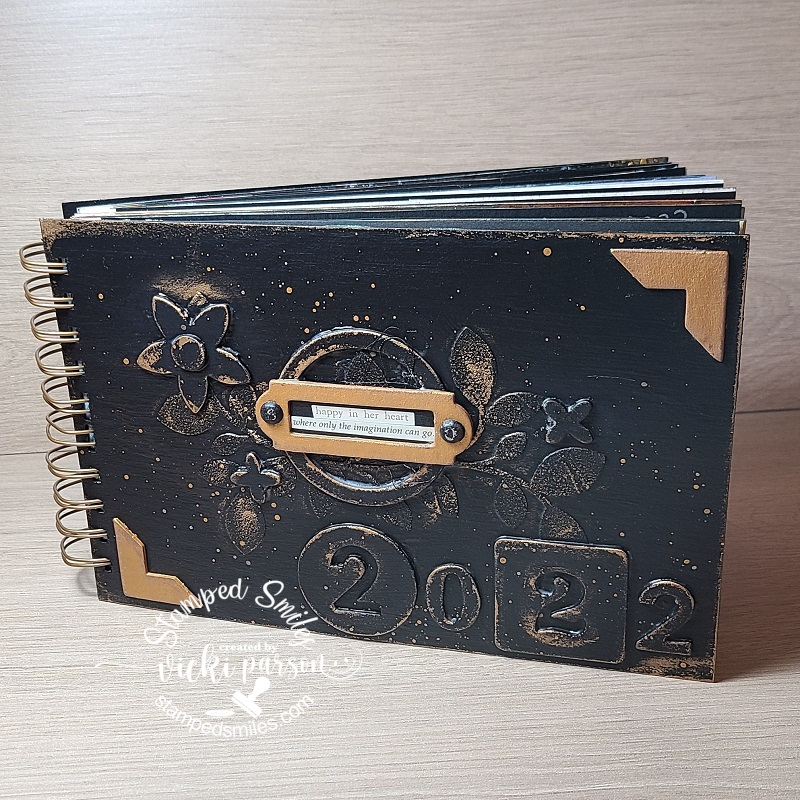
So I thought that since I’ve done an AJ page every month this year that not only did I need to close up the year, but I also needed to close the book to all the AJ pages I made from 2022 by finally finishing up a book to put them all in!
I made the covers with some chipboard along with some “old” chipboard pieces from my stash and did some painting with a bit of mixed media gold wax and stenciling. I wanted to be sure to add the year to the front and a little quote from my sticker book that says: “happy in her heart where only the imagination can go”
I fit all of the AJ pages completed this year along with a few extras that were created from before with unknown dates, added the front and back covers and used my Zutter Bind-it-All machine to add the spiral wire for a book. (This was the reason all of my pages had the pre-punched holes in them when I posted each month.)
That finishes up the 2022 year on my blog. I hope you’ve enjoyed my posts weather it’s for inspiration or just a smile. Either way, I’m so thankful that you have joined me this past year and your friendships. I look forward to a productive and crafty year ahead in 2023!
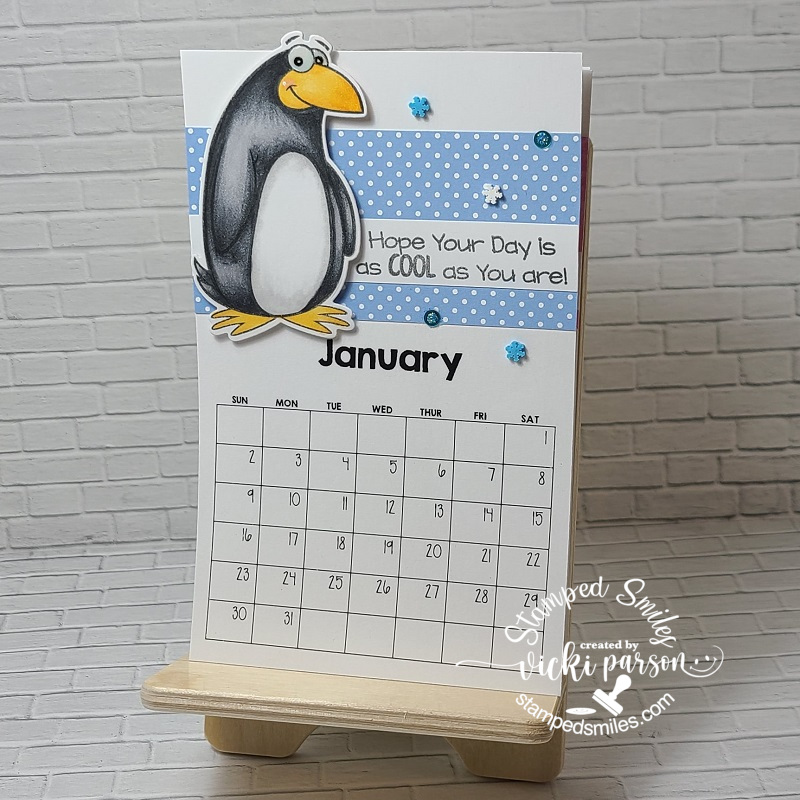
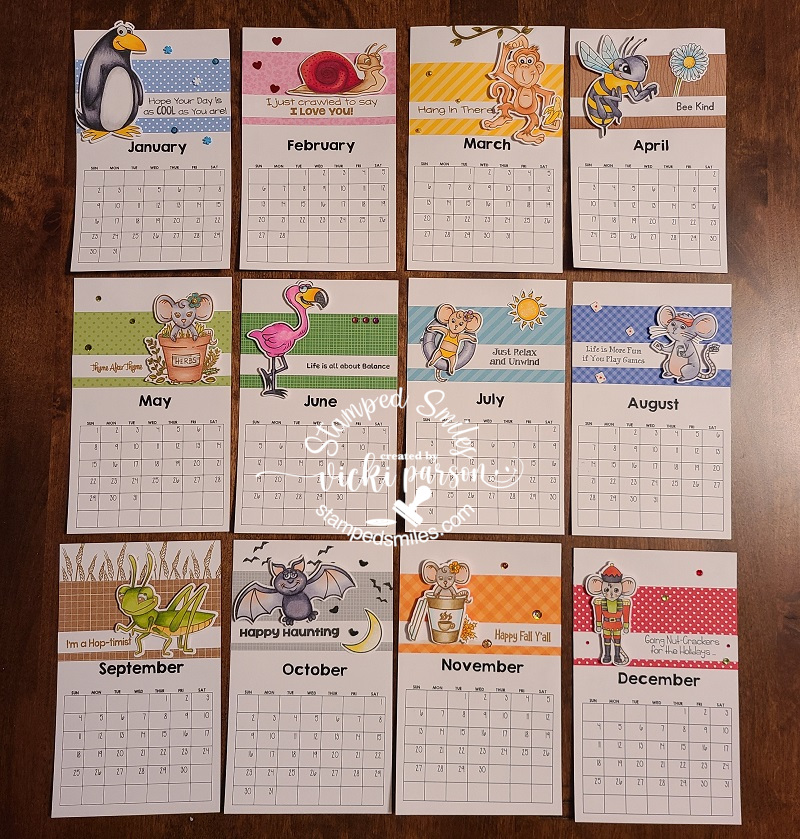
Hello friends! How are you dealing with the 2022 year so far? I hope that you have a fantastic start and look forward to a brilliant and crafty future ahead of you! Speaking of starting a New Year, I realized that I needed to start my crafty calendars…which really should’ve been started sooner!🙄 I actually enjoy putting them together, especially the coloring as it’s very relaxing for me.
I’ve had this set of calendar cards along with this stand since this last Spring from Taylored Expressions and of course I’ve waited until recently to get them finished up! I’m glad I did though as I think these will be so fun to look at and chuckle to change out each month:
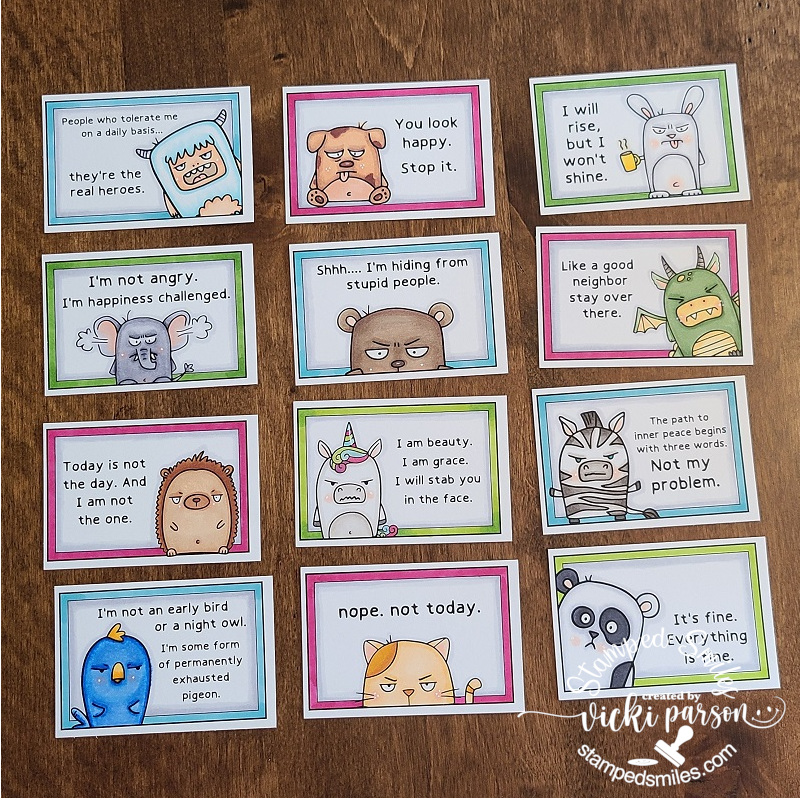
Tee hee! What got me interested in Taylored Expressions from the start were these adorable and funny Grumpy characters that she has in one of her product lines! (You may have seen a “Grumpy” calendar I’ve made in the past on THIS POST.) She has LOTS of different types of calendars and accessories to choose from, but this is a set that had come out this past year. I thought this would be a fun way to help motivate me this year for creative inspiration!😁
I’ve taken a white piece of cardstock cut to size my calendar stand that would accommodate the tear-off calendar pad and hold the “snarky cards” in place with the gold clip. I’ve used some TE inks and blender brushes to blend over top of the white piece. I then used the TE Striped Squares stencil to go over it using the same colors and then mounted this piece over a black cardstock layer. (This piece and the changeable cards are held to the stand with the gold clip.)
Here are all of the completed cards in the set that I can change out each month or whenever I want. I’ve used the TE Clipboard Calendar Cards-Snarky for my own personal calendar that I’ve colored up with Copic markers. The frames were colored with coordinating colors that matched up with the rainbow stenciled background for my calendar front. Really enjoyed coloring and giggling while making this set!
I also wanted to show you the back side of this TE Walnut Wood Clipboard Stand so that you can see how I store all of the extra cards on my calendar when I need to change one out. You can choose to add a package of the TE Calendar Storage Sleeves with the stand if you get one, but I thought this whole system was a nice and sturdy option of creating a calendar that you can personalize for yourself or for a gift. I ended up creating a calendar last year for Mother’s Day and gave it as a gift. I used the TE Clipboard Calendar Cards-Sweet for that one and did some foiling on them. (Just don’t forget to purchase the next year’s tear-off calendars to replenish the recipient for next year!)
And I also wanted another calendar for my computer area which also brings a smile to me each month! I bought a calendar set last year from Inky Stamper and really enjoyed flipping the cute characters each month as the year went on. Happily, she came out with another new calendar set for this year and I happily purchased it BEFORE it ran out! (So sadly, it sold out quickly!)
With these calendar kits, the stand, the monthly calendar cards as well as all of the pattern paper strips, stamped and die cut characters and sentiment strips ALL come with this kit! I think it’s a pretty good bargain for all that was included with it. Of course, you have to color and put together each card…but THAT’S what the fun is about!
And here’s a look at the entire set of calendar cards that I colored and put together. There were instructions for each card along with the Copic markers used in the examples. For some of the cards, I already owned the stamp set, so I added a few extra details to some of them and I also added a few of my Inky Stamper Gems and Sequins mixes to some of them. Square dots and a strip of gold enamel dots were also included to decorate with.
So, I had an awesome time putting this one together as well! I look forward to seeing every single month throughout the entire year!
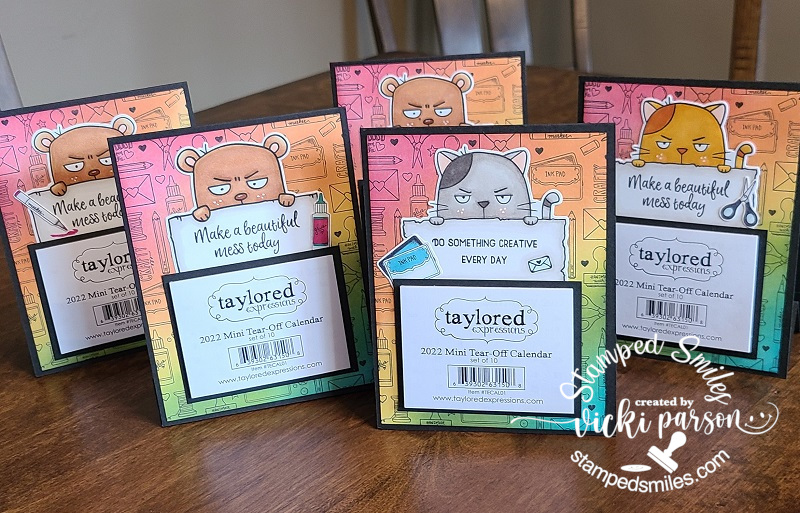
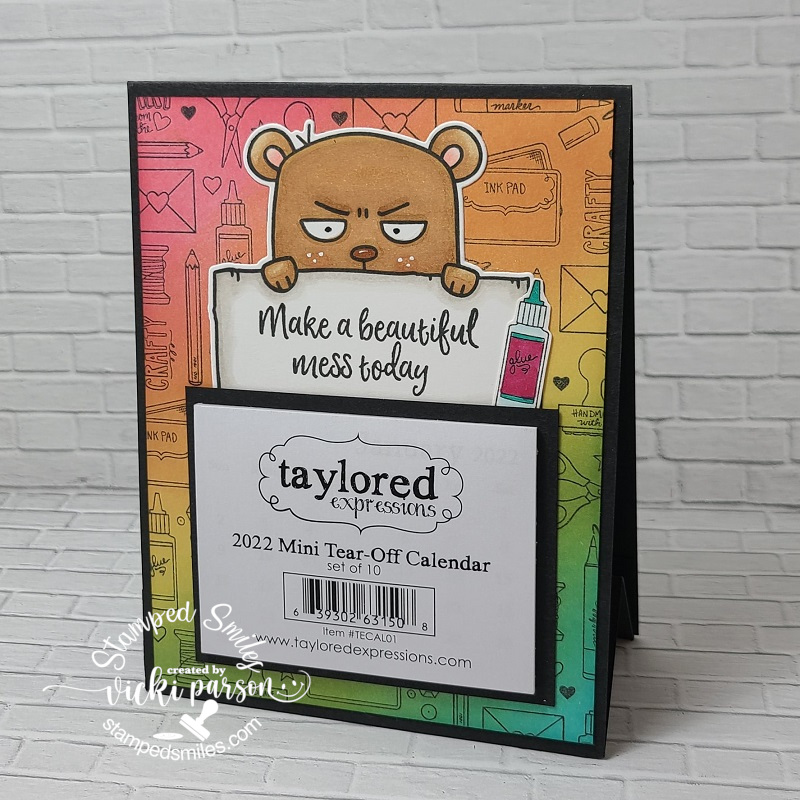
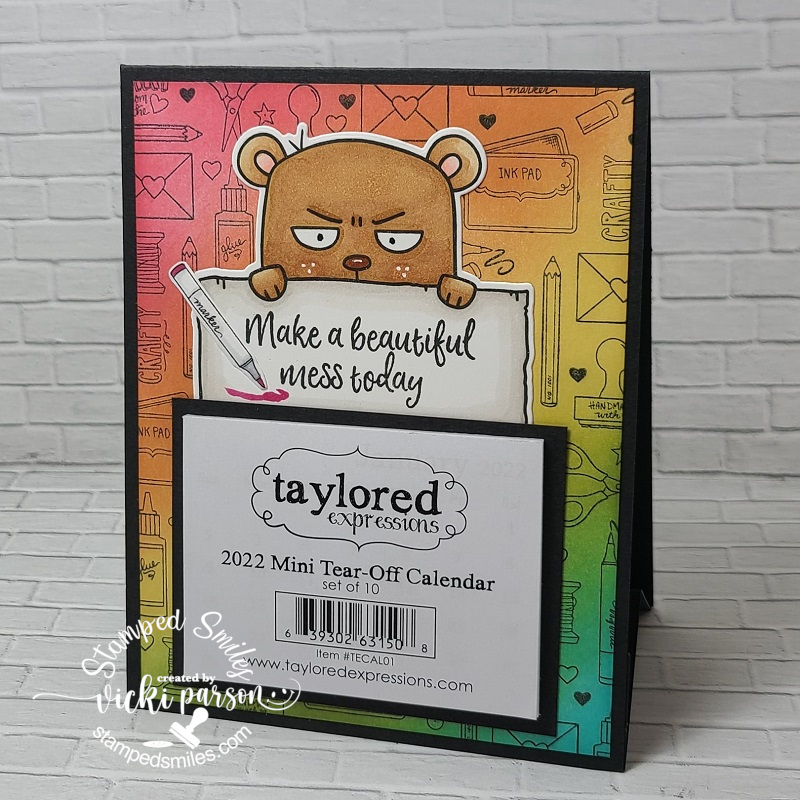
Since I had a couple of left over Taylored Expressions 2022 Tear-Off calendars, I thought it would be fun to just create a “calendar card stand” for crafters and give them out to whoever wants one!
EDITED UPDATE: All of the calendars have been claimed! Sorry if you’re looking to get one as I have no more left. Hope everyone enjoys their calendar all crafty year!
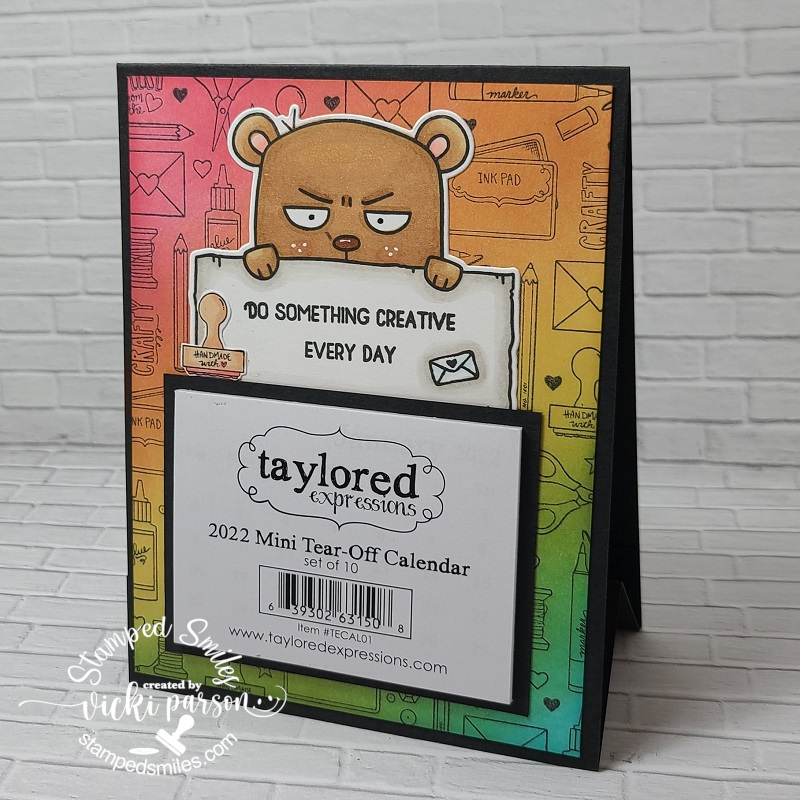
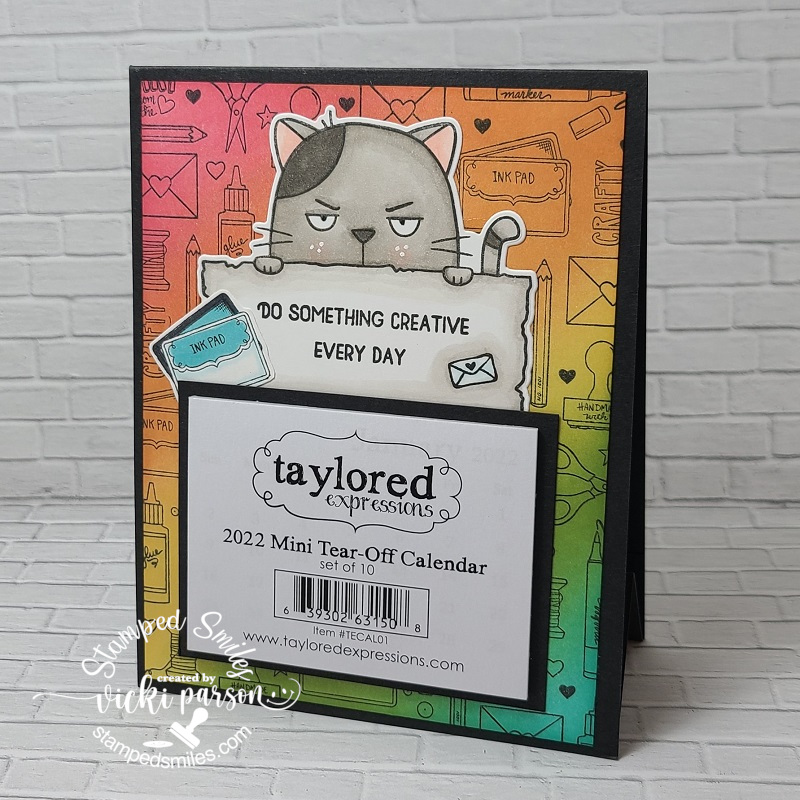
So, I had 5 of these calendars left over and I knew I wasn’t going to use them, but of course I didn’t want to just throw them out either! So, I took the TE Big Grumpy Bear and the TE Big Grumpy Cat sets to help motivate a fellow craft friend throughout the year! TEE HEE! I’ve made a rainbow-colored background for these by taking the TE Art From the Heart background stamp and stamping it with black over a white piece of cardstock. I used some TE ink and blender brushes to blend in the rainbow colors. I stamped an extra background image to color in some of the images and fussy cut them out for accents.
I attached the “Grumpies” over the background and layered the calendar with a black layered piece behind it to go over top of the “Grumpies” with their “feet” underneath so you can see them. I then added the fussy cut out images that I colored in a corner of each one.
I made a “stand” for this by creating a valley fold piece to attach in between the top folding A2 black card base. This will make for a permanent stand to display your calendar through the year! (And hopefully motivate someone’s crafty process throughout the year) I receive so much inspiration from many of you crafty friends, so it would be nice if I could possibly reciprocate that in some way!
Check out each one of these calendars I’ve made below in detail! Just click on the photos to enlarge them if you’re on my website:
Grumpy Bear with glue bottleGrumpy Bear with markerGrumpy Bear with stampGray Cat with ink padOrange Cat with scissors
So now that we’ve got the year started and in place, let’s hope for a really creative and productive one ahead!
I have some more craft projects that I’ve been working on as well as a really BIG craft project that I’m taking on for the love and excitement of it all! I look forward to sharing with you soon!
Thanks for stopping in and I wish you a happy, healthy and productive rest of your week!
Challenges:
Sweet Stampin’ – NEW (stamped New Year calendars with new products!)
Hello friends! Happy Monday! Hope that you’ve had a wonderful weekend and are ready for Christmas to come! This Friday will be Christmas Day and I’m happy to have everything finished and ready to deliver the cookies and presents to family and enjoy the time with my husband. Hoping that next year will be looking much different too! Are you ready for Christmas or just ready for the year to be finished? 😉
Today is the start of a new challenge over at {Cupcake Inspirations} with the theme of “SNOWFLAKES“! The only difference for this challenge is that it is only lasting for ONE week instead of the noraml 2 weeks. Also, this will be my final post as a design team member for them as well. I have really enjoyed being apart of this team as what’s better with crafting than with a cupcake inspired theme, right?!🧁😋 So I’m sure I’ll be inspired to play along with the challenges in the future as I have been! Hope you’ve enjoyed my creations for this challenge. Here is my “snowflake” cupcake inspired project for today:
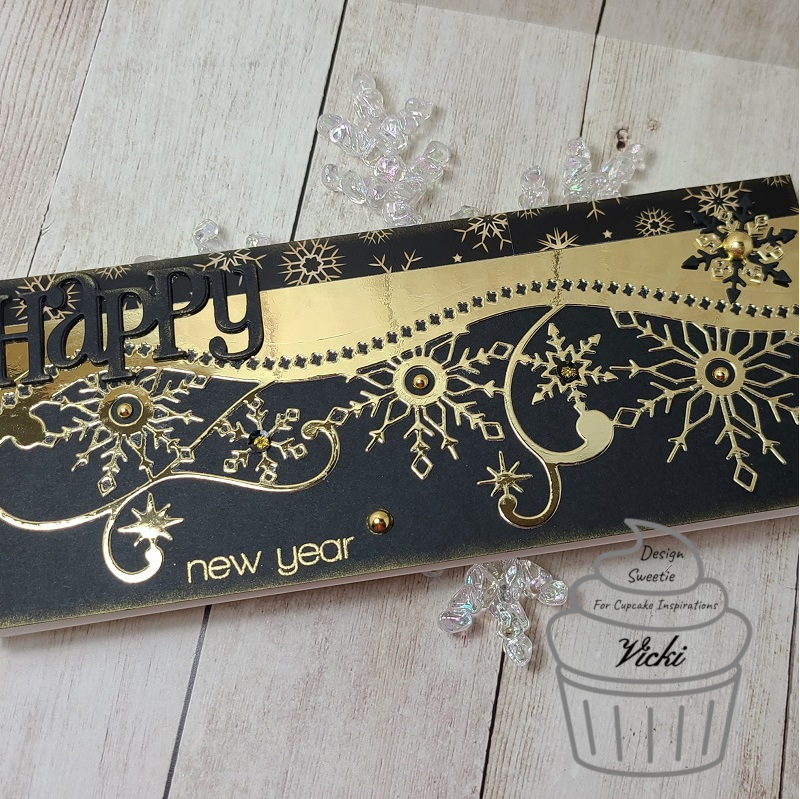
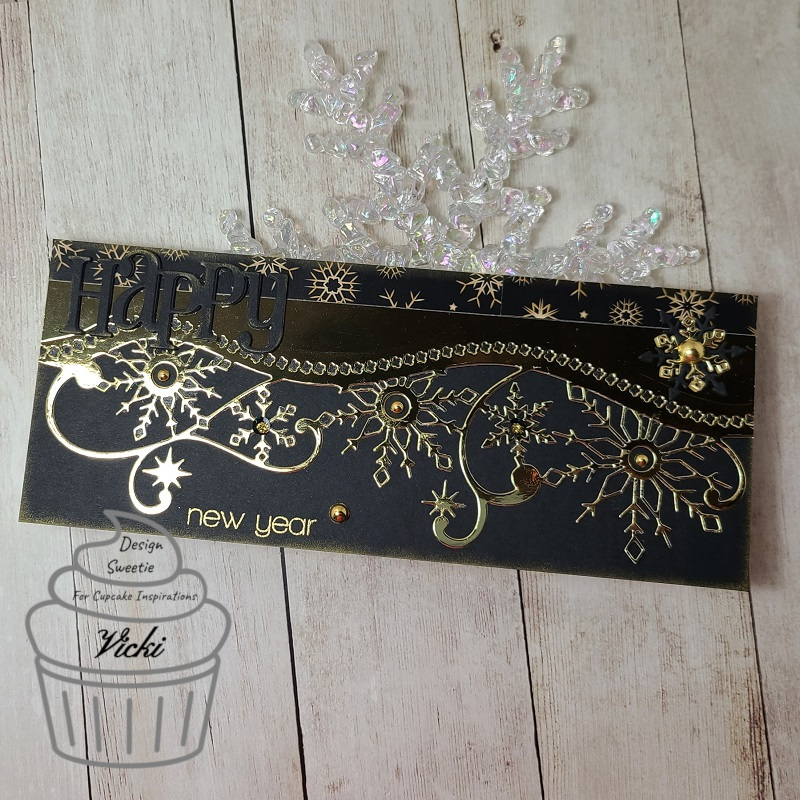
I thought it would be appropriate to create a New Year’s themed card for this challenge as I don’t really need to make any more Christmas cards, but sometimes I forget to send out a Christmas card to someone and don’t realize it until later, so that’s when a New Year’s card can come in handy! LOL!
I absolutely LOVE the fabulous slimline dies that Whimsy Stamps has! Such a huge selection of them and I spotted this gorgeous Elegant Snowflakes and Border die and thought it would make some really incredible slimline style cards no matter what color scheme you have in mind! I knew that I first wanted to try it out with some metallic mirror cardstock, and I was also inspired by these gorgeous Gilded Holiday papers from Whimsy Stamps with the snowflakes in gold and black colors. It looked elegant like the die, so I pulled out a strip to fit across the top, but because it’s 6 x 6, it didn’t fit, but I decided to piece the strip together anyway and I don’t really think you can tell that much until you look up closely to know that it’s there.
So, I then layered the gold metallic die cut piece right underneath the strip that was attached to a 3.5 x 8.5 black cardstock layer. There are also a couple of extra snowflake dies included with that border die, so I used them layered together (one in gold and another in black cardstock) on the right side of the slimline design.
To create the sentiment on the card, I used the Whimsy Stamps Happy Sayings Clear Stamp Set and gold heat embossed it along the bottom of the black card panel. I also took the Whimsy Stamps Happy Large Word die and die cut it out in black cardstock several times to layer together for thickness. Before attaching it to the card, I used a gold ink pad and brushed around the edges with it as well as the entire black card front panel before attaching all together. I then layered it over a white top folding slimline card base.
Here’s a closer view of the gold metallic die along with the gold heat embossed sentiment as well as the gold inked edges around the design. I’ve also decided to add some gold Drip Drops from Taylored Expressions in the center of some of the snowflakes as well as a couple of black sequins that I filled the centers with some gold Stickles with.
Of course I think it looks so much more elegant, shinny and sparkly in person as it’s hard to photograph and be able to capture all of the lighting that you see when you’re holding it in your hands!
Hopefully by sharing a few different angled photos, you’re able to see some of these details in this card design.
Please be sure to stop by the {Cupake Inspirations} Challenge blog and come join us with your “snowflake” creations this week and check out the inspiration from the design team whle you’re there! REMEMBER: You have only ONE WEEK to enter! Can’t wait to see what you come up with!
Thanks for stopping by today and I’ll be seeing you soon with another post soon!
Hello friends and happy Thursday! We are getting ready to start the weekend and I’m ready to have some time to catch up on a few things! How about you? Do you have any plans for the weekend?
Today starts a new challenge over at Cute Card Thursday! Yay! The challenge for this week is probably a favorite of mine which is “critters“! Looking forward to seeing all those critters in the gallery this week! 🙂
My project for today is another one of those that I had actually wanted to start last year, but of course it gets pushed aside for another day, so here’s the day I start! When I went to a stamp convention this last Summer, I really enjoyed the vendor booth for Taylored Expressions and just fell in love with these grumpy critters:
LOL! I plan on making myself this fun little calendar for my stamp room. I also thought about making a couple more of them for some gifts too! So here’s my start with them. Really simple and fun little calendar cards to make up! I have a die coming that will help to display all of the months which I will share later on. So stayed tuned for up-coming Calendar months made with the Taylored Expressions Calendar Grumplings stamp set!
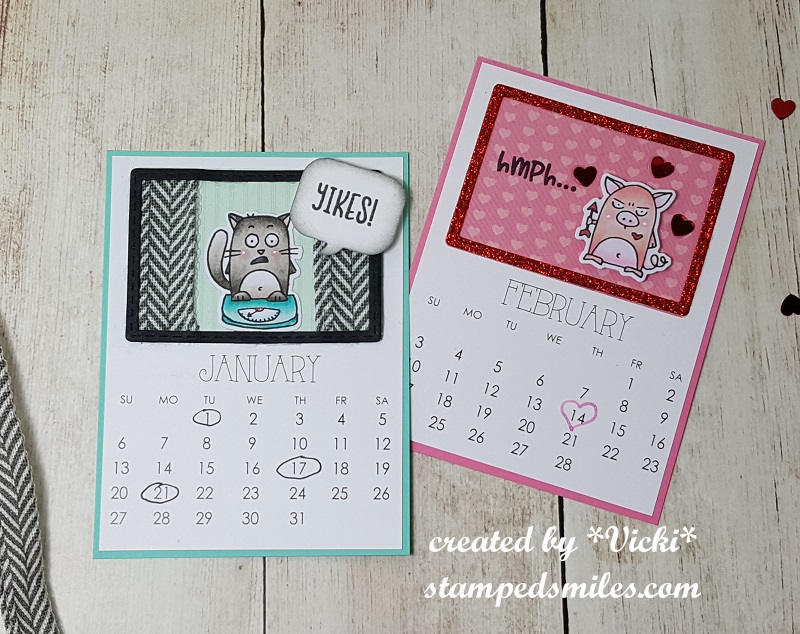
So is this how we all feel when January rolls around? LOL!
When I went to the stamp convention, I picked up this package of the 2019 3×4 calendar cardsthat were pre-printed with a special little rectangle on top with a decorative background print on it. This is where I’m using the spot to create my “calendar scenes”. There are dies that you can get that fit these to help you create your designs.
So I took the unhappy/surprised kitty and colored him in with Copics and cut him out with the coordinating die. I took the frame from the calendar scene die set to cut out a frame with black cardstock and then placed some ribbon behind it to make it appear like curtains. and then I had a speech bubble punch which I punched from white cardstock and stamped the sentiment over it and sponged around the edges with some gray ink. I took some foam tape and popped the speech bubble up over the scene. I mounted this card onto some coordinating colored cardstock. I wanted to keep these smaller, but I could see this work for some really cute cards too!
And here’s the February Calendar Critter with the grumpy love pig!! LOL!
I stamped, colored him in with Copics and a red gel pen for accents and cut him out with the coordinating die set. I also took the frame die from the calendar scene die set and cut it out from some red glitter cardstock and attached it over the pink heart background.
I then popped him up with foam tape and stamped the sentiment right next to him. I took the heart sequins and glued them around the pig. I used a gel pen to draw a heart around Valentine’s Day. Lastly, I layered this calendar onto a piece of coordinating pink cardstock.
Hope you’ve enjoyed my “Grumpy Calendar Critters” today and please be sure to stay tuned in for more months in the future! Thanks so much for stopping in!
Happy New Year friends!! Here’s wishing for a very HAPPY, HEALTHY and CRAFTY2019 to you all!!
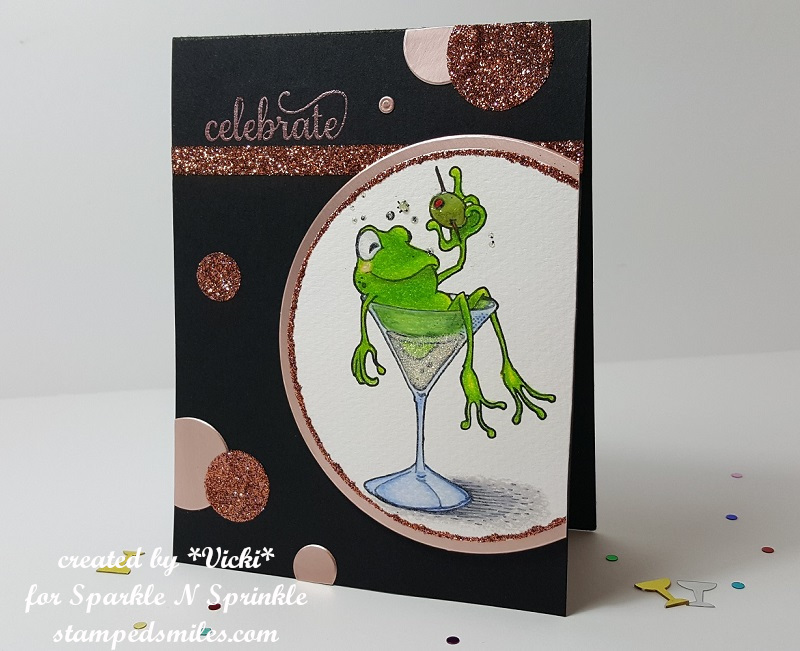
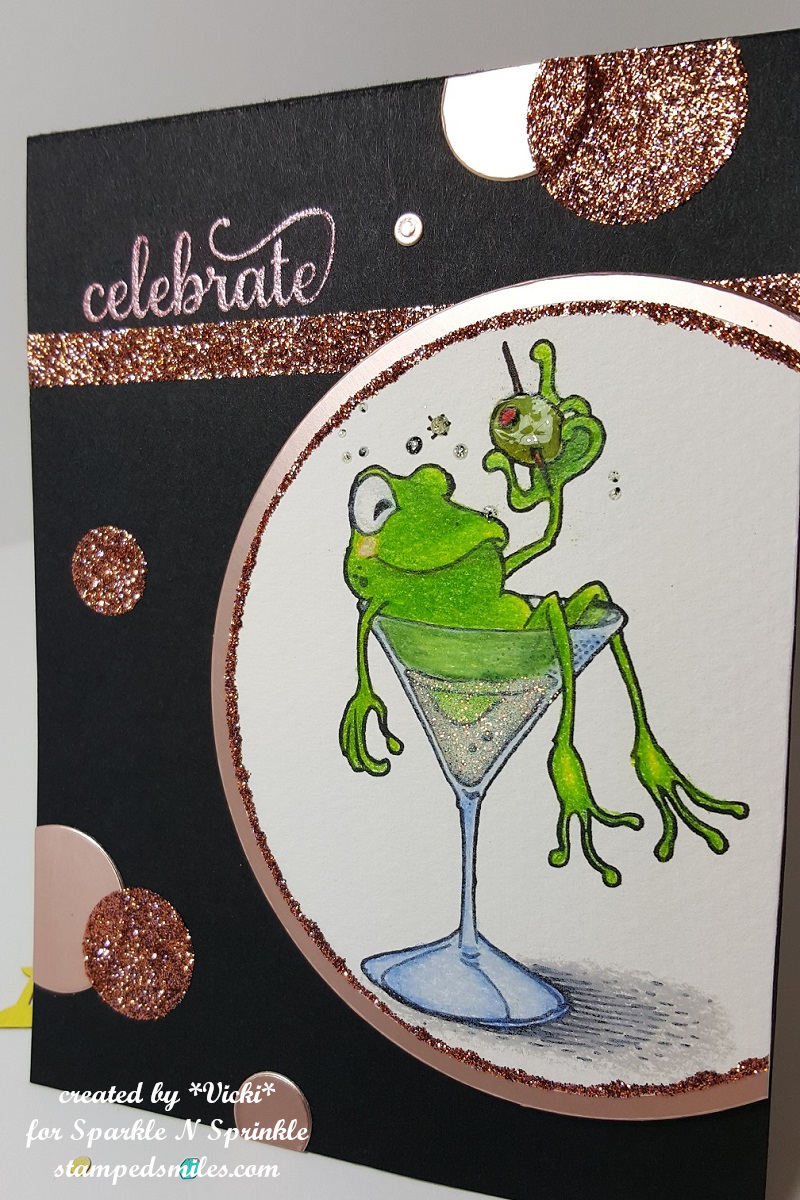
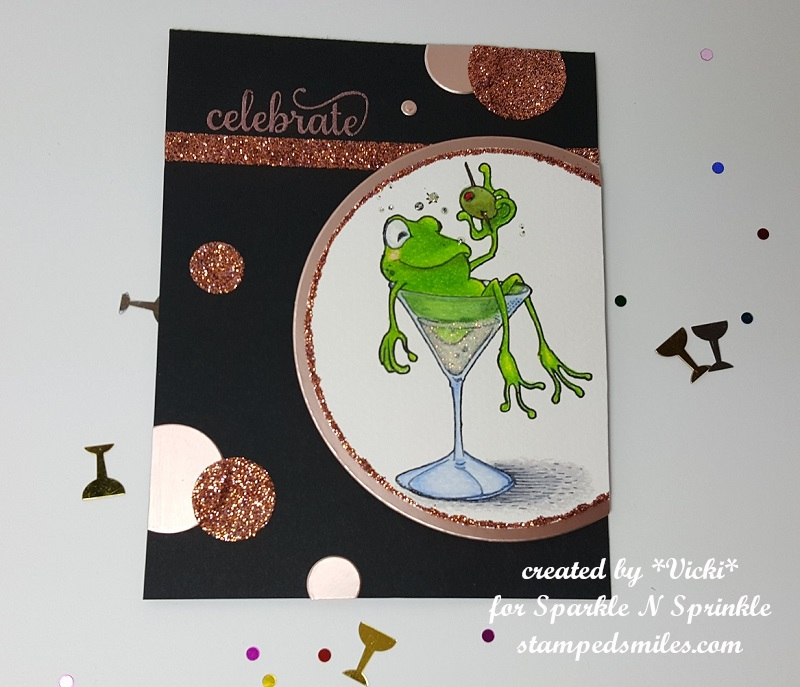
So… to be festive and join in on the celebration everywhere, I’ve decided to make a special card just for the occasion! 🙂
I’ve used this really fun digital stamp called Max andI have used my Prisma Color pencils to color him in with over some Canson Mi-Teintes Pastel paper. I cut him out with a circle die and then ran some glue around the edges with a Nuvo Medium Tip Glue Pen and sprinkled some Copper Jewel Glitter over it. I mounted another circle behind it that I’ve cut out with some Tonic Burnished Rose Mirror Cardstock.
For the background of my card, I’ve used some Adhesive Sheets that I’ve cut out in different sized circles and then added some of the same glitter that I’ve used for around the frog image panel. I cut a few more circles out with the same mirror cardstock as well.
Before attaching the circles, I’ve heat embossed the sentiment over the A2 sized top folding black card base with some bronze Rose embossing powder, which I think matches up beautifully with that mirror cardstock! Right underneath the embossed sentiment, I added some 1/4″ Tear Tape and sprinkled on some more of that pretty glitter that I’ve used all over this card. Then I added all the circles in the background including the frog image panel and cut off the circle part sticking over the edge on the right side.
Taking a closer look at the “party Max frog”, you can see better how he’s colored in and a few other details that I’ve added to him. For the olive shine, I’ve used some Nuvo Morning Dew Crystals Drops and for the “liquid” glass he’s sitting in, I’ve taken the Nuvo Medium Tip Glue Pen and sprinkled some Waterscape glitter over it. I’ve also used the Nuvo Gold Coast Glitter Drops to add a bit of sparkle around Max’s head. (I’m assuming that it’s a bit of “champagne pops” from the glass! Tee Hee!)
Just like Max here, I’m just as happy to dive right into the New Year in 2019!
Thanks so much for dropping in!! Enjoy your first day in 2019!
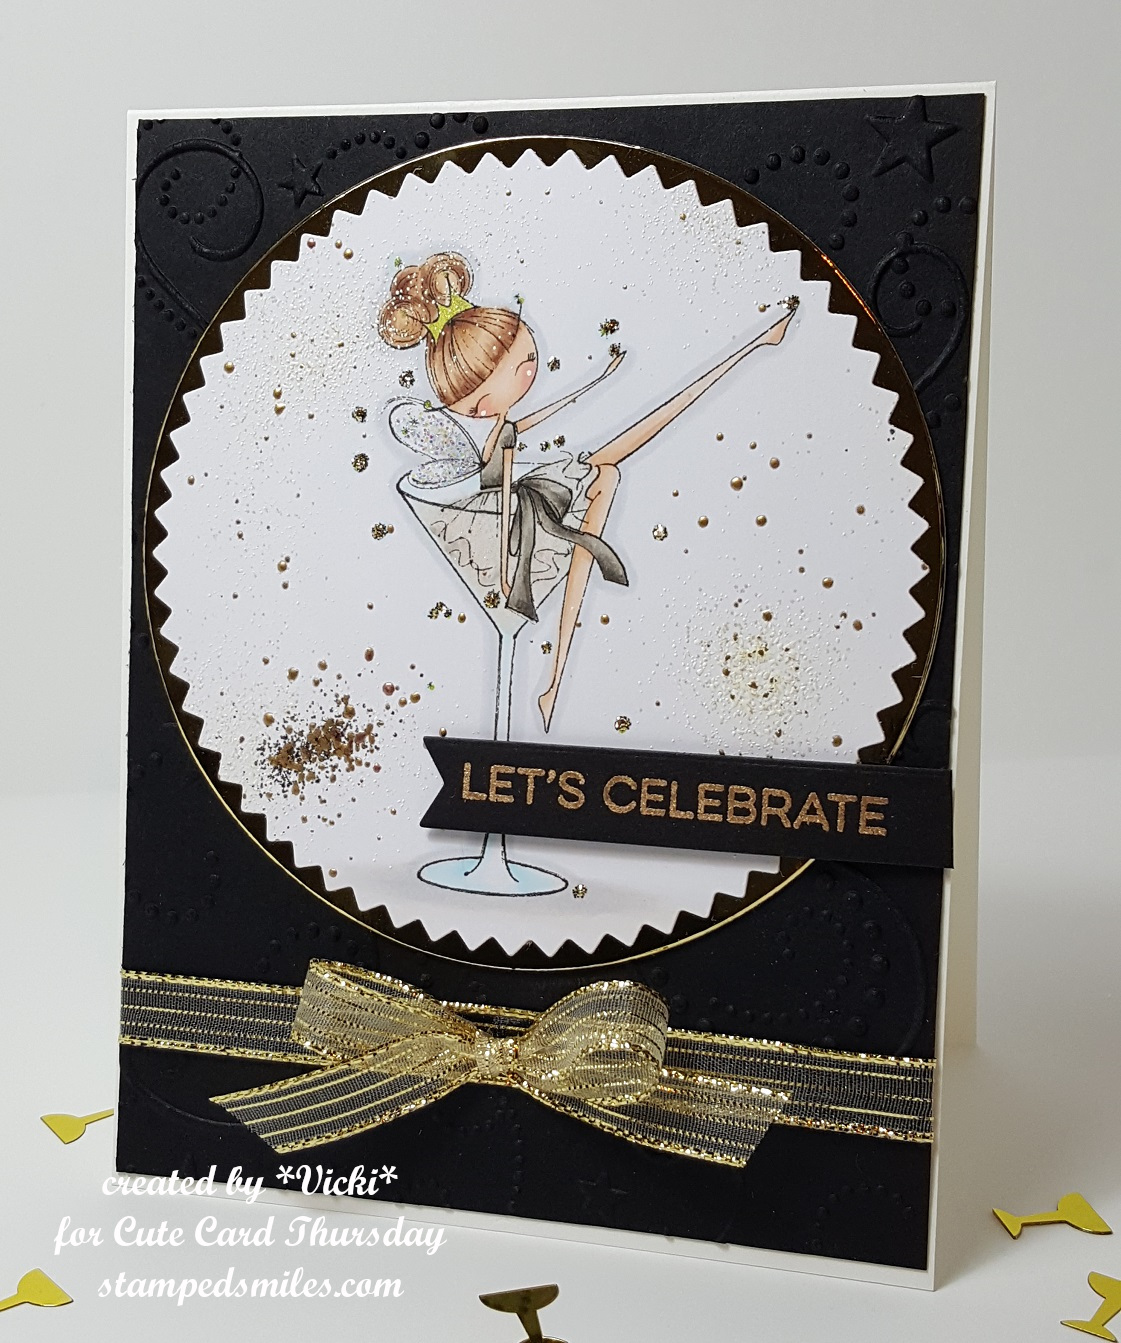
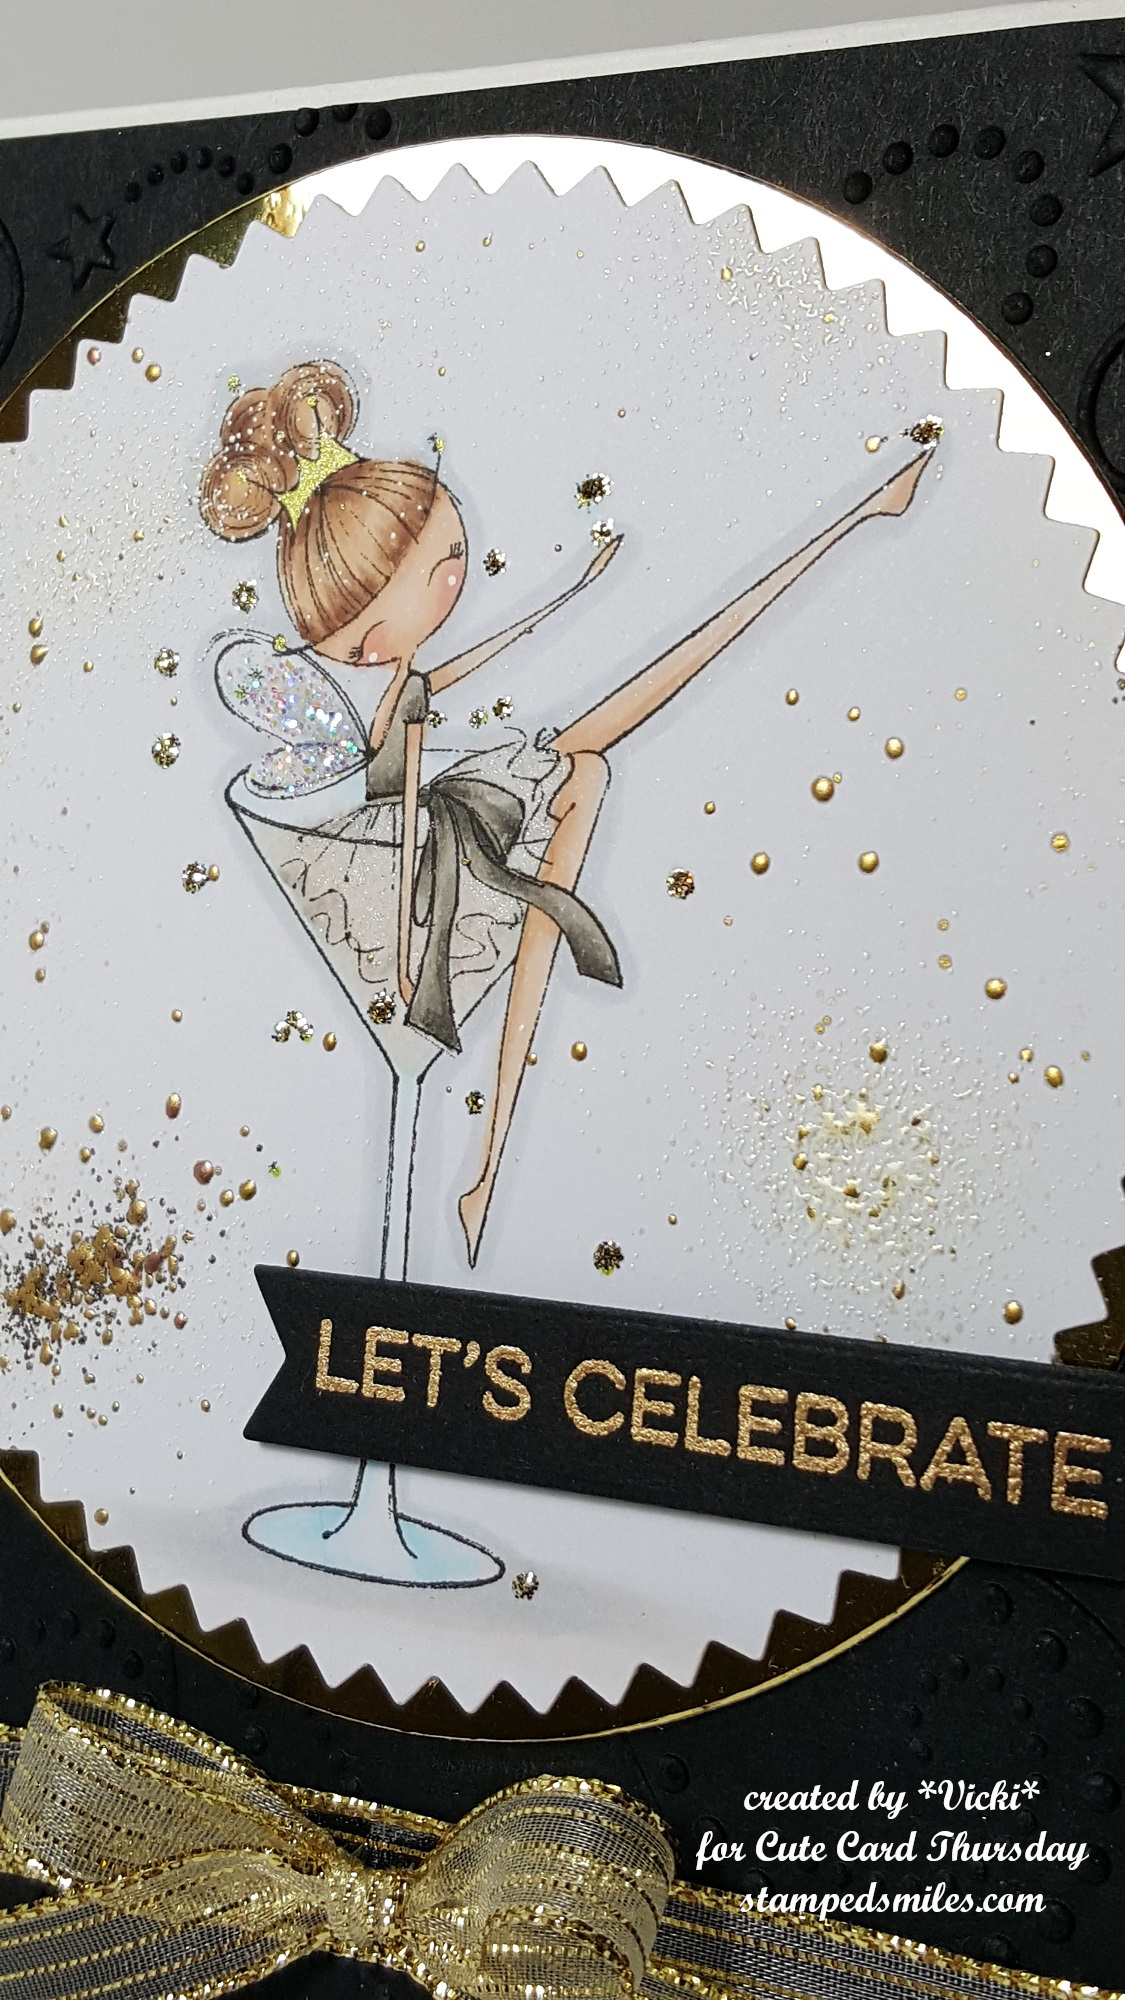
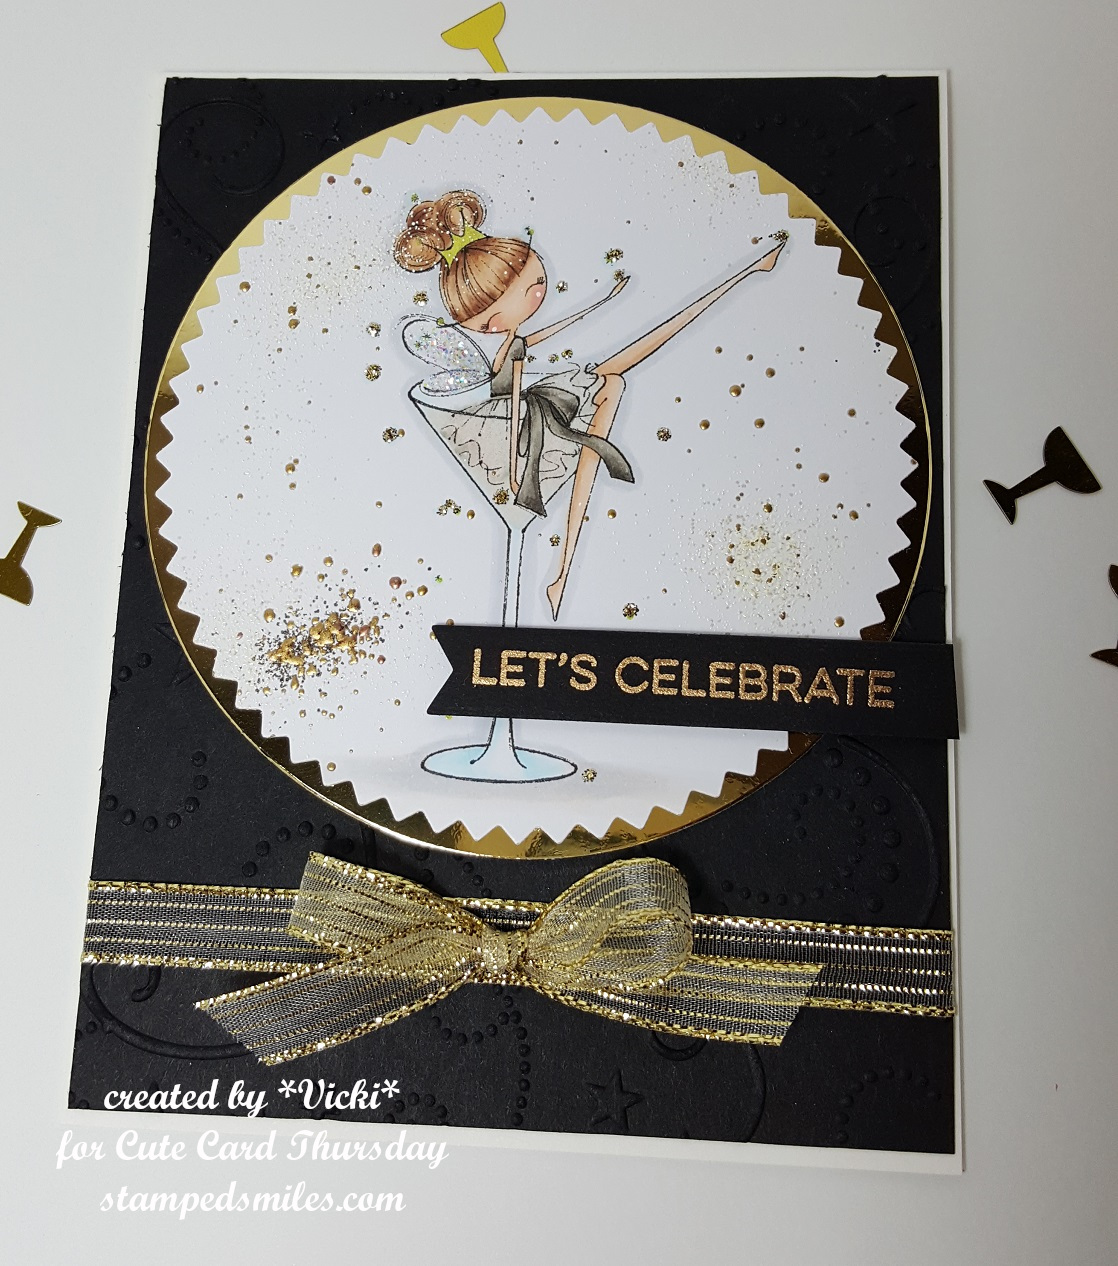
Hello friends! It’s time for another Cute Card Thursday challenge this week! We would like to see some “embossing” on your creations this week! You can make it heat embossed, dry embossed or I would say embossing paste would work too! Or you could challenge yourself and try to combine more than one kind! 🙂
We are sponsored this week by All Dressed Up Stamps, so be sure to enter the gallery for your chance to win a prize!! Here’s what I’ve created for this week’s challenge:
This is such a cute and fun image! I thought it would make a really fun “New Year’s” type of card, so I created with that in mind. This image from All Dressed Up is called Season to Sparkle. I colored her up with Copic markers and then used a gold gel pen to color in her crown. I’ve also taken the Spectrum Noir clear glitter brush pen and colored her dress with it. The sparkle on her wings are liquid glue and loose glitter.
I’ve cut the image out with a Zig Zag circle die and then layered a piece of gold mirror cardstock cut with a circle behind it. I attached the circle image panel over a dry embossed black card front panel that I’ve also wrapped some gold ribbon around and attached the bow to the front.
I also heat embossed the sentiment with some gold EP and cut out a banner strip to pop up over the circle image panel. I cut the tail end to match the card front. This card front panel was layered onto an A2 sized white top folding card base.
Here I wanted to show you a closer look at the image panel and the close-up details of the frantage embossing powder over it. (This is such a fun embossing powder to play with! You have to heat it up from underneath.) You can also see the gold embossed sentiment too. I did take some gold tinsel Stickles and added a few drops around the image for more sparkle.
I hope you’ve enjoyed my card today and thanks so much for stopping by and I’ll see you soon!


 We’ve gotten creative by using up our never-ending stash piles! (I look forward to doing this for another year each month in 2023 and I’ll hope you’ll be here too!) Here’s my final Art Journal inspiration for 2022 with the “SMASH OUR STASH” December prompt of “Oldest Stash” :