April AJ Page-One Cup at a Time

Hello friends!  I hope you’ve been enjoying your month so far!  We’ve had a few really nice days this month, but it’s still a tad bit chilly and hopefully it will warm up more next month!  It’s hard to believe we are already headed into May for this year!

That means it’s time for the monthly Art Journal Page collaboration with my crafty friend, Carol (from Crafty-Stamper)! We get creative trying to use up our never-ending stash piles along with a prompt for each month.  I know she always has great inspiration to share, so please check out her blog too! Here’s my AJ page with the “SMASH OUR STASH” April prompt of “HALF” -(e.g. 2 halves to create whole item/half of something):

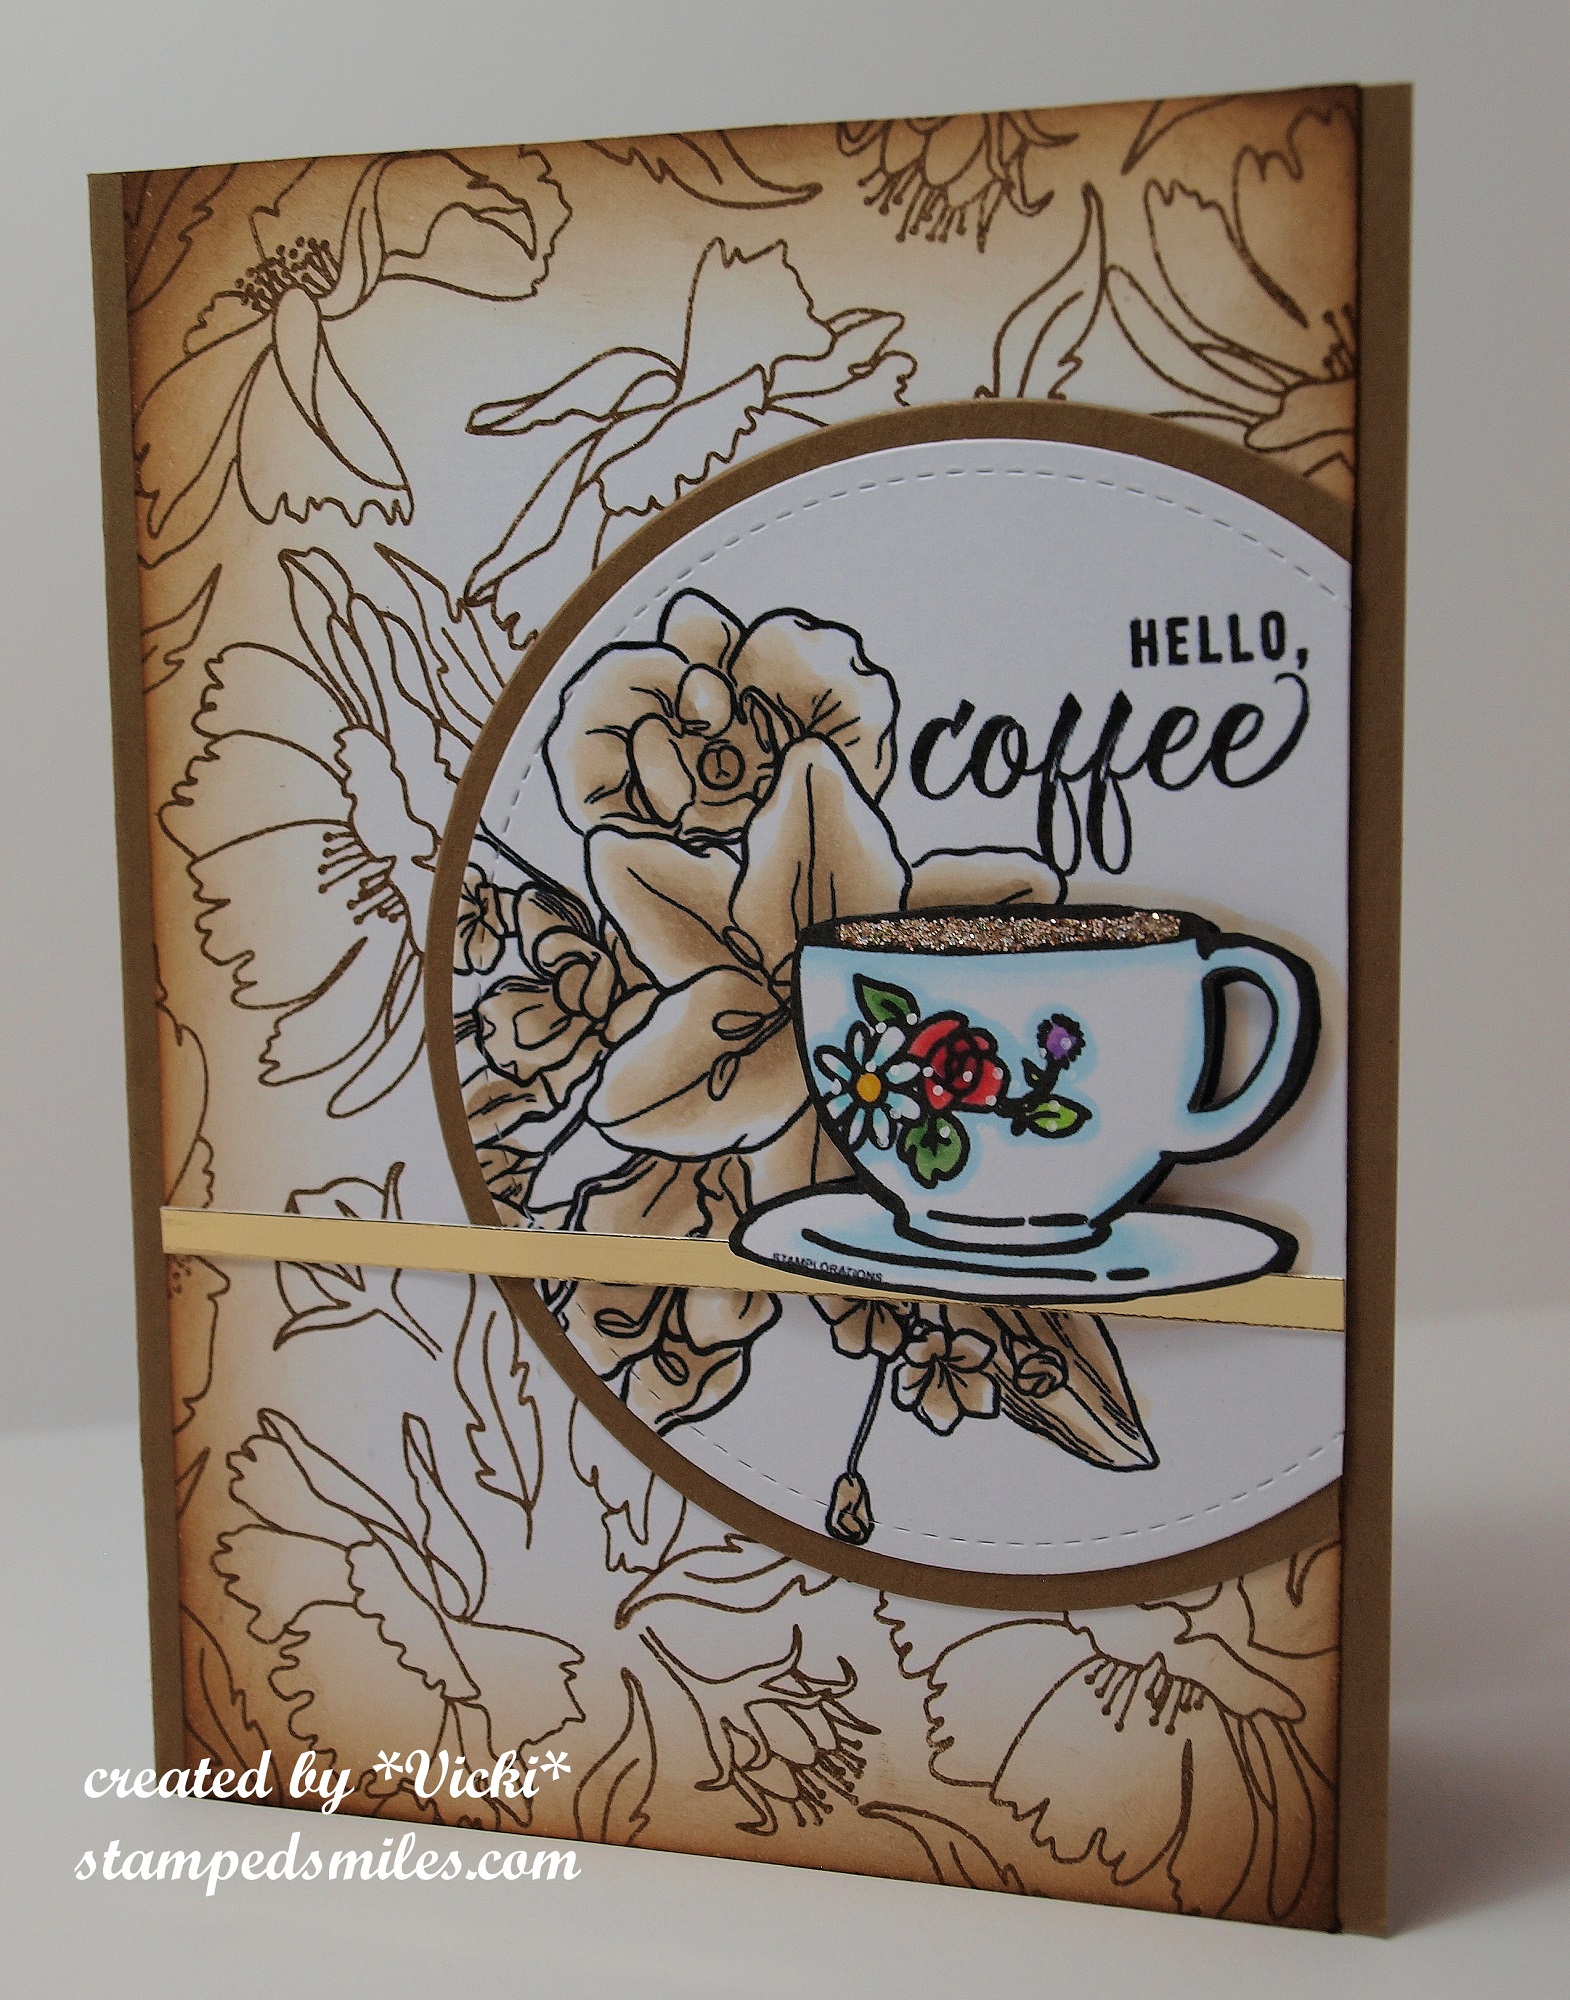
Yes, coffee please!  I’m a coffee lover and so is my husband!  I don’t think we’d be able to start a day without it!  I know there are lots of people who don’t like coffee and that’s OK…as long as there will be some somewhere for me, I’m good! 😉☕

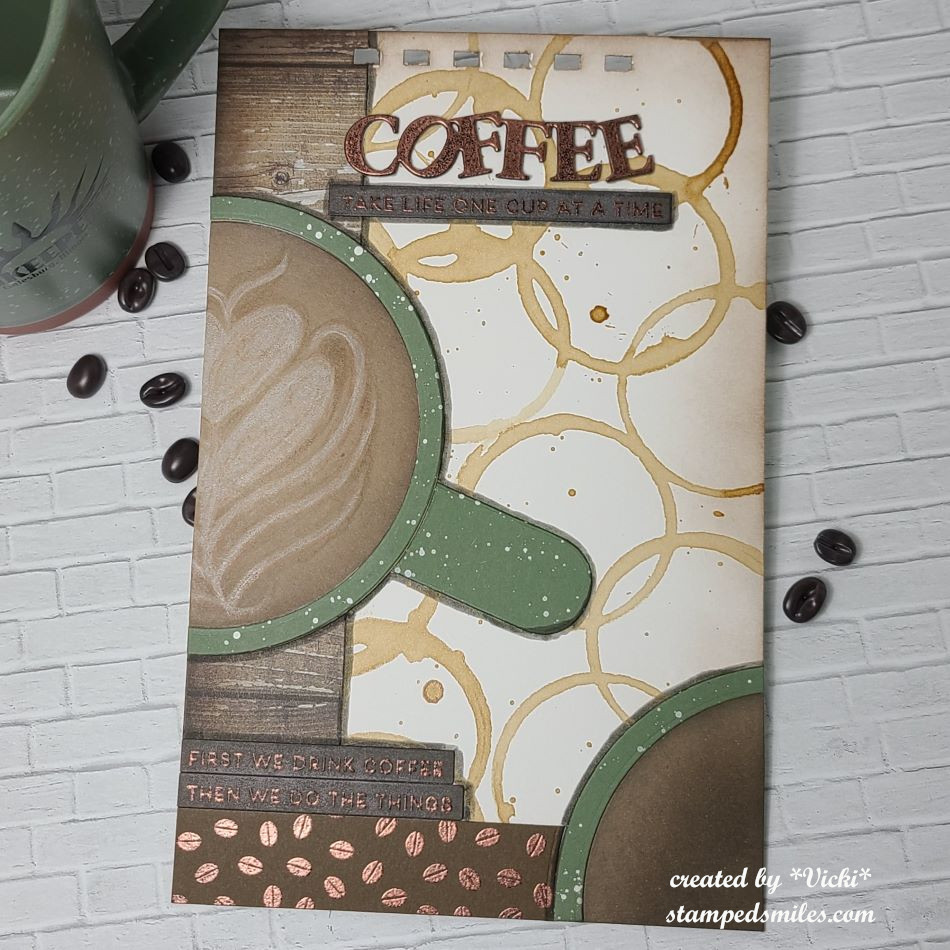
It was my husband that inspired this page for me when I asked him what his favorite shape was, and he answered with a circle.  Looking down at my coffee cup was the circle I saw and decided to take more inspiration from a coffee cup we purchased at one of our favorite local coffee cafes you can see in the top corner of the photo.  To achieve the look, I took a cardstock color matching the cup and splattered white paint over it.  The “HALF” is obviously the coffee cup that was cut out with circle dies.  I cut another piece of the handle which makes it look like the view you would see from the top of the cup.  The other “HALF” of the cup was placed in the corner area at the bottom and this coffee is more of my husband who likes plain black coffee.  But this is certainly how we start our day together which is great since he’s retired now.  The other “HALF” cup has the latte art, and I did that one with light sponging around the edge and then took my colored pencils to free hand the design.  Not sure if that’s exactly what it looks like, but I gave it a try.

  • For the background:  I’ve used a strip of wood plank pattern paper from my stash, and I’ve also heat embossed a coffee bean background stamp with, of course, coffee embossing powder that I’ve had for a very long time, and it was a great time to use it!  I’ve also heat embossed the “coffee” sentiment and quotes with it. Below the embossed coffee is a sentiment that says:  “Take life one cup at a time” and the other two at the bottom say: “First we drink coffee, then we do the things”😂 
  • The coffee cup-stained background, I’ll share more about below.

I also took a big brush marker to go around the edges of the cups and the sentiment strips.  I wanted the heat embossing to stand out a bit more over the brown cardstock, so I took a white Tim Holtz crayon and rubbed over top of it to brighten it up.

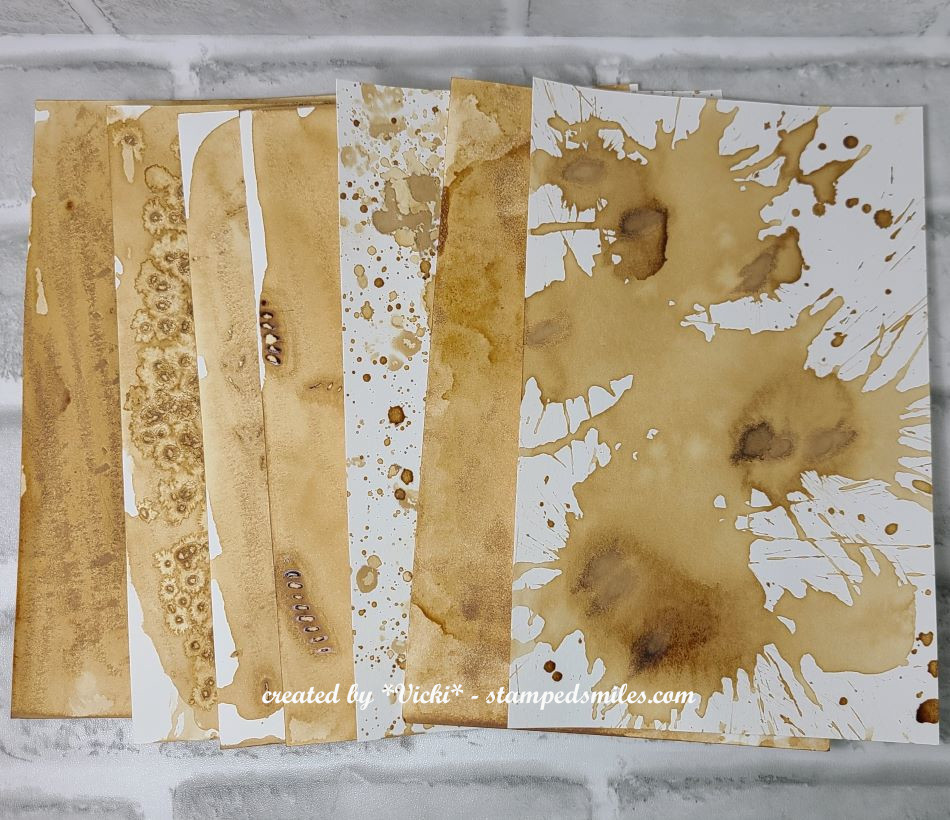
Have you ever made backgrounds with coffee?  I had such a fun time playing with it and decided to make several different backgrounds that I could use for later!

I don’t drink instant coffee, but I have some in my cupboard because I like to make a chocolate cake that has instant coffee in it…so good!  I took some of this instant coffee and made the coffee cup-stained background for my page to create more circles that went with my circle coffee cups.

I also decided that since I had a cup of it, that I would go ahead and make more backgrounds with it and just play around with different things.  I splattered, I smooshed, I’ve added salt along with a few other things and let dry and make patterns with.  Once dry, I cleaned them off and here are the results of my play.  I wish I had done another cup circle background though.

I hope you’ve enjoyed my art journal page and been inspired in some way!  Thanks so much for dropping in!  Have a great weekend!  Mine will be busy!

Challenges:

  1. Art Journal Journey – Geometric Forms
  2. Creative Artiste – Anything Goes Mixed Media
  3. Creative Fingers – Anything Goes
  4. Try it On Tuesday – Inspired by a Song (Can’t think of coffee with the “Coffee Song” by Frank Sinatra!)
  5. Lil’ Patch of Crafty Friends – Anything Goes
  6. Penny’s Paper-Crafty – Anything Goes using paper

{Cupcake Inspirations} Birthday Celebration Day 2

Hello friends!  The celebration continues over at {Cupcake Inspirations} with our feature of sponsors for our 500th “birthday celebration” challenge!!  Woot!!

Today, we are highlighting STAMPlorations & Rachelle Anne Miller Creative Studios – check out the challenge blog for more details about these sponsors.

The DT was provided with an image from STAMPlorations to use:

Vicki-CIC500-Day2-Stamplorations

What could be more fun and happy for a celebration than rainbow colors?!

I was provided with this lovely Framed Tea Cups stamp to use for my card which I’ve colored up with Copic markers using the traditional ROYGBV rainbow colors for the cups.

I also decided to mask off the image and using the ARTplorations Weaving Stencil, I inked over with some Pumice Stone Distress Ink and then cut out the panel with the CUTplorations Crazy Double Running Stitch Rectangle die that was barely trimmed along the edges so that I could layer it over a black A2 sized top folding card base.  I also took one of the images from the Scribbly Splattery Grunge stamp set and randomly stamped it a few times with black ink before attaching the panel to the card base.

Lastly, I used the CUTplorations Celebrate Word die to cut out the sentiment with silver foil cardstock and attached it to the bottom of the card and then I added some silver sequins to the design.

Thank you for stopping in today friends!  See you tomorrow!

Challenges:

  1.  STAMPlorations Never-Ending Challenge – Anything Goes + STAMPlorations product
  2. Crafty Friends – #142 Anything Goes
  3. Creativ Fusion Arts & Crafts – #20 Anything Goes
  4. Cute Card Thursday – Bright Colors
  5. Seize the Birthday– Rainbow Colors or Anything Birthday

Merry Christmas Friends!

Merry Christmas to all of my friends here and I’m honored to be a little part of your life with you in some way…I hope you know that!

**This is a pre-scheduled post to wish you all a special happy day.  I’m away spending time with my family right now, so sit back with your favorite beverage for a time out and I hope you enjoy today’s long post.**

Just wanted to share BATCHES of the cards and creations that I’ve made for the Holidays this year.  I know that I make lots of creations, but for the purposes of mailing cards, I try to keep these particular cards as “mail friendly” as possible, so these are more simple in style for me, but really enjoyed making them and just had fun:

Vicki-GlitterSnowSceneSet

I tend to do bulk cards in a set of 4-6 so that I don’t get “bored” with it or run out of a certain supply or something! LOL!  So this first set of 6 cards is using the gorgeous Stampin’ Up! stamp set “Winter Woods”.  I stamped up the scene background and then covered the entire panel with double stick adhesive and then covered it with dazzling diamonds glitter.  (The deer I added is from a favorite Newton’s Nook stamp set called Serene Silhouettes.)  The white heat embossed greeting is from the Stampin’ Up! stamp set “Itty Bitty Christmas”.  (I think this set was probably my favorite to do!)

Vicki-PenguinChristmasSet

I just *had* to get these penguins in there somewhere! LOL!  These set of cards are actually all just a bit different, but I colored up the penguins from the “Pablo the Penguin” free stamp set included with the Making Cards Magazine for December and cut them out in different ways and then mounted them onto cards.  Some of them use some of the free papers that were also included with the issue.  So this is another set of 6 cards that were mailed out.  Love those cute penguins with the different hats! LOL!

Vicki-ReindeerChristmasSet

Here’s another set of cards that I’ve made to send out, but because these were even more simple than the ones above with very little stamping involved, I made 8 of these.  (So if you’re counting, I’ve made 20 total so far…not including some other special cards I’ve mailed out to people along the way.)  – I absolutely fell in love with this die set from STAMPlorations called “Two Reindeer” and was so excited to see that I had won a gift certificate from their blog and this was something that I knew I would be getting right away!  This was cut from gold cardstock and mounted over a piece of various different Stampin’ Up! pattern paper from my stash…it’s always nice to be able to use up more of my hoarded paper stash!  The sentiment is again from the Stampin’ Up! “Itty Bitty Christmas” stamp set.

Vicki-GnomeXmasWobbler

Now I didn’t want to leave out a couple of cards that I made especially for my boys.  They know their mom likes to stamp, but they know I have to add in a bit of my goofy humor with them as well! 🙂  So of course I had to pull out this fun Simon Says Stamp “Gnome for the Holidays” card kit (sold out) to make them!  I think I ended up using ALL of the wobblers in the kit too!  I told my son that this is me wobbling with the presents about to drop everything and my hubby is trying to save everything! LOL!

Here’s a little wobbler action for you too…

And of course I had to make another card for my other son too…

Vicki-GnomeXmasWobbler2

I absolutely feel in love with all of those cute gnomes that came out everywhere this year for crafting…so I still have more that I didn’t get a chance to use, but thought this would be perfect for my son with this trendy style design…of course using a wobbler too!  And I do love him GNOME matter what! 🙂

For some reason, I thought the wobbler action on this one was more fun! LOL!  Not sure if it’s because of the weight/size or what…but cool to see the difference.

And whilst in the middle of making up all of these cards to mail out, I also had fun playing with the Christmas Advent Calendar that I had purchased a while back.  Because it’s an “Advent Calendar” you start with December 1st and open each day.  So each day to open was pretty cool because there was a new surprise stamp inside!  So I took each day’s stamp and made a tag for each one clear up until today’s last window to open: (obviously previously opened and made to finish! LOL!)

Vicki-BMAdvent-Week1

I will show by the week.  So this is week 1 with the first 5 days opened.  The stamp that I received for each day is noticeably featured in each tag.

Vicki-BMAdvent-Week2

And these are the tags made for week 2.  The angel tag was made with Deco Foil in the background.

Vicki-BMAdvent-Week3

These are week 3 tags made.  The purple colored tag on the left bottom is actually a shaker.  The window sheet was glaring in the camera.

Vicki-BMAdvent-Week4

This is week 4 of the tags.  Hubby picked out the candy canes as his favorite of all of them.  Mine was the stockings tag.

Vicki-BMAdventTags-Week5

And here is the final last week of the tags from the Advent Calendar.  Really cool to have all of these tags on hand for gifts!  I needed them! 🙂

And of course I wasn’t done with the Advent Calendar box itself because I thought I could “recycle” the little window flaps on the box because they had some cute images on them for each day…so I cut them off with my scissors after I opened that day and kept them:

Vicki-BMAdventTags-windowflaps

So I thought it would be fun to use them to create a card!  They had numbers on them, but I have covered them up in certain ways so that they’re not showing.  The cover die was cut out from the same colored cardstock for the background too.

Whew!  Now to get finished up with my wrapping and “merry making” before the big day!  I hope you are or have enjoyed yourself a wonderfully HAPPY Christmas day no matter how you’re celebrating it!  Thank you for spending some of your time here on my blog today!

I’ll be seeing you soon my friends!

Brewed Two Ways

Wow!  Thank you so VERY much for the warm welcome here!  I’m blown away by your support and deeply touched!  Please, please bare with me as I try to find my way back to getting “in the groove” with things, but I’m sure it won’t take too long to find it!  I’m excited about creating and sharing what I love to do with you and think this is the best way to do just that!  So let’s continue, shall we?

As I had mentioned in my post yesterday, I saw that the Coffee Lover’s Spring/Summer Blog Hop has begun!  Yay!  I can never pass up a yummy cup of Joe for sure! 🙂

Since it started yesterday, I thought that maybe I should make two cards!  So of course I’m starting with something that I have “brewed up” in two different ways:

OLYMPUS DIGITAL CAMERA

I have used this gorgeous digital stamp kindly provided by one of the super sponsers for the blog hop.  You can find this image here on the Stamplorations blog.  I sized the image and then used a stitched circle die to cut it out.  I’ve also printed it out a second time and cut out just the cup and popped it up over the design.  I thought it would be fun to create a sepia colored design except for the cup of coffee.  So I’ve used Copic sepia color tones to color in the flowers.  For the background, I’ve used the STAMPlorations Blooming Buds set and stamped the images.  I blended some sepia color inks along the edges to go with the theme.  I took a strip of gold foil card stock to place the popped up coffee cup and I filled the coffee cup with some yummy vintage gold glitter by Ranger.

I’ve taken the same coffee digital stamp and brewed it up in another way…

OLYMPUS DIGITAL CAMERA

For this one, you can see that I have really enlarged the entire image and pretty much have used it for the front of my card design.  I thought the flowers in this image were so pretty and wanted to color them to take up the whole card.  I’ve colored everything with my Copics and glitter gel pens.  For the sentiment I pulled out the image from STAMPlorations A Full Heart and embossed it in white over a strip of black card stock.  I used my scissors to cut a banner with it and stuck it right under the coffee.  Lastly, I just attached some gold sequins and filled the centers with some gold stickles.

I had fun with this pretty image and I thank Shery from STAMPlorations for providing it!  I hope to play some more during the Coffee Lover’s Hop, so stayed tuned in for that!

I have also been getting ready still for the up-coming ICAD challenge as well!  There have been some more warm-ups assigned, so I wanted to keep up with doing that.  I am really loving the creative process with this because it’s all about just “playing around” which is always fun to do with your stash! 🙂  So one of the warm-ups is to make a map of some sort.  I decided to make a “mental map” to remember things that I need as I go along with this creative process.  The next warm-up was to make a card with 3 colors and 3 words.  I hardly use these colors, so I put them on purpose.  The third challenge was to create a cover card for the front of your ICAD creations to place in front of wherever they’re being stored.  Here’s a photo of the results with that:

OLYMPUS DIGITAL CAMERA

Hope you’ve enjoyed my post today!  I have been creating and having so much fun!  Be sure to stay tuned into my blog each week as I report the week’s ICAD challenges that I’ve completed.  Making sure I post it on my blog will help keep me accountable as well!   Don’t forget to check out the badge on the sidebar of my blog if you’d like more information about it!

I would like to enter my coffee cards above into the following challenges:

  1.  Coffee Lovers Blog Hop Spring + Summer
  2. STAMPlorations – Never Ending Challenge – must use their images
  3. Dare 2B Artzy – Dreaming of Flowers
  4. Pink and Main Challenge – #30 Anything Goes

Sorry Connie, I missed that challenge…I’ll get the next one!

Wishing you all a fabulous weekend and thanks again for stopping in, I truly love that you are here and found me!  Lots more coming!  -Don’t forget to share some smiles today! 🙂