Hello friends and happy weekend to you! As we inch closer and closer to Thanksgiving at the end of this month, I think this is a perfect time to create a few thank you style cards to use throughout the year!
This brings us to a new monthly challenge over at Sparkles Monthly and we have the theme of “Thank you Card” this month. I look forward to seeing all of the projects in the gallery for this one. Here’s what I came up with:
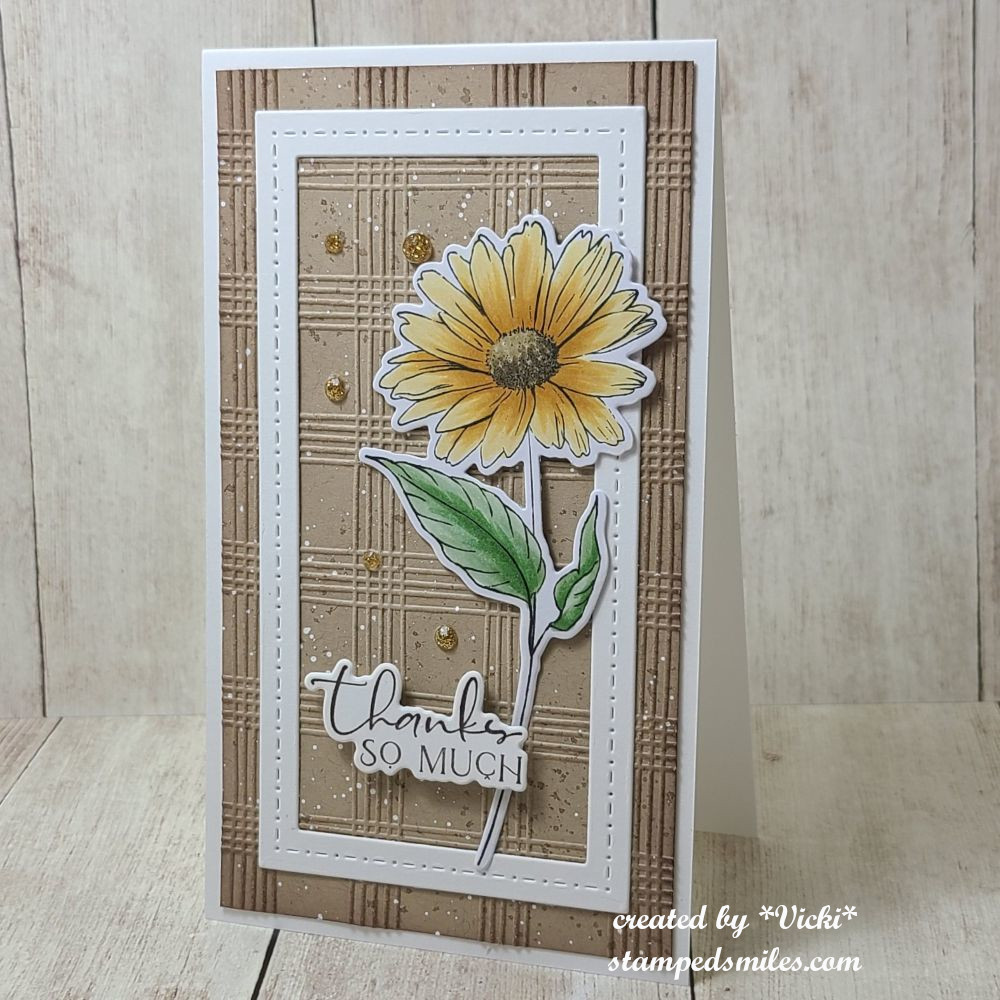
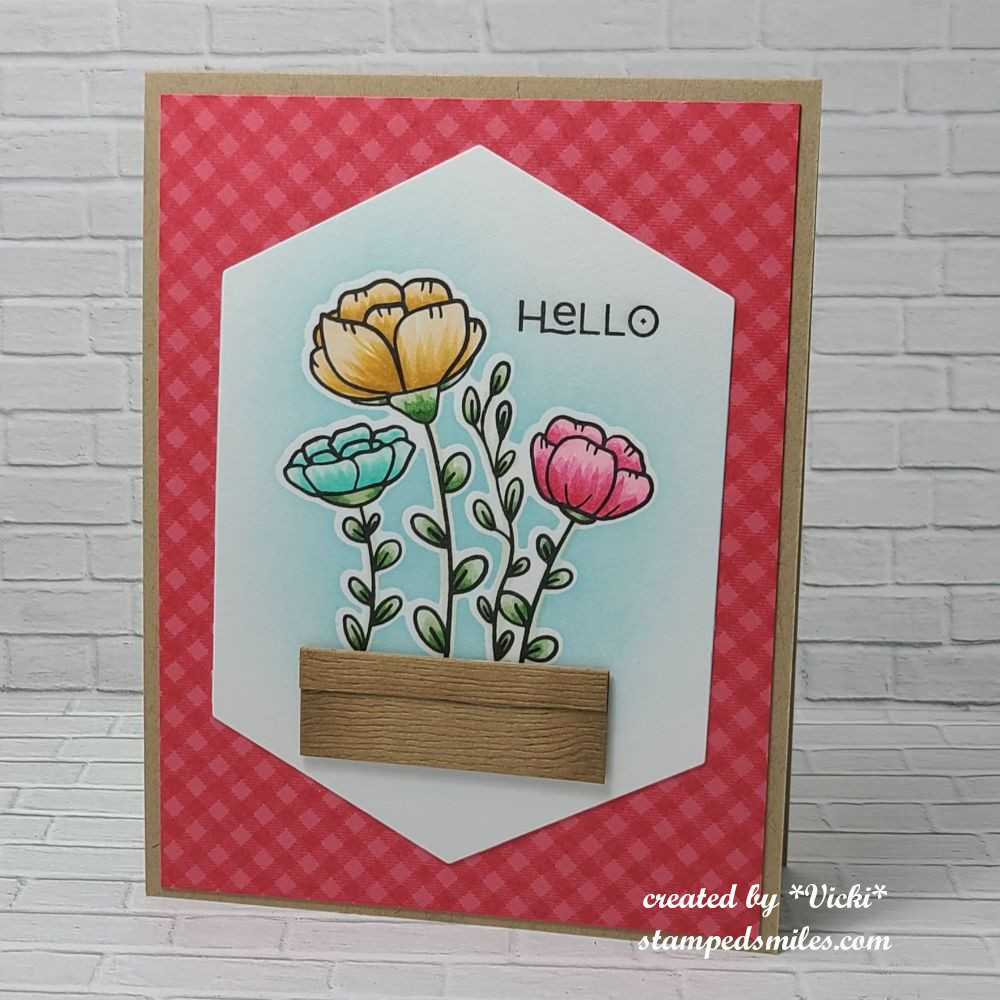
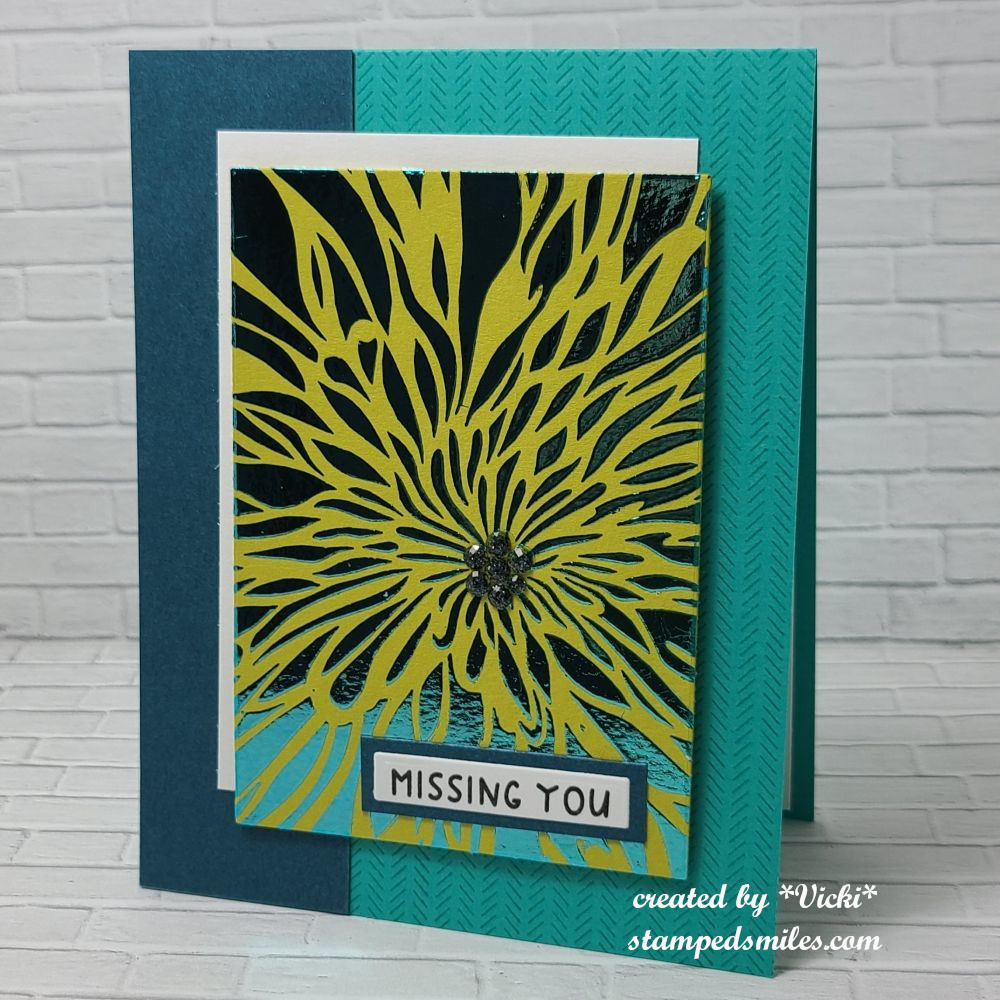
I thought I’d try out a mini slim sized card for this one and the tall larger flower was a great fit for it! I used the Taylored ExpressionsNatures Canvas Card kit (no longer available).
For the background panel, I embossed a kraft cardstock piece with the TE Sketched Plaid embossing folder and the went around the edges with the same color ink and then added some brown and white splatters before attaching it to a mini slim top folding card base. I also die cut a frame from the TE Mini Slim Frame in Frame dies out of white cardstock to place over the embossed layer.
I stamped, hand colored and die cut the flower. I used one of the greeting panels (from card kit) to gold foil and cut out the coordinating sentiment with it to pop up with foam tape over the flower stem. It was then finished off with some gold gem/rhinestones.
I hope you’ve been inspired by my thank you card and will join in the fun with us this month for the challenge! **NOTE** This will be my final project for the Sparkles Monthly Challenge as a design team member. I have enjoyed my time and wish Caz all of the best for the challenge blog in the coming year as well. Thank you!
Hello friends! I hope that your month of November has been a good one for you so far! It’s getting cooler by the week, but I try to get out to enjoy the warmer days as much as I can before the winter gets here!
Today is a new challenge over at the Alphabet Challenge Blog! Our next letter is “P”, and our hostess, Deborah, has chosen “Pumpkin(s)” I hope you will join in the fun with us! *Please remember that this is a bi-weekly challenge, so you have two weeks to enter.* Here’s the project I’ve made for this challenge:
When I saw this challenge, I remembered that I had gotten a stitched pumpkin die setfrom Lawn Fawn a few years back and haven’t used them yet, so I pulled them out to use for this challenge! (I had to clip the metal dies apart, so I knew I hadn’t used it yet!)
I decided to cut them out in different colors of cardstock and then ink blended the bottoms of each in a darker shade including the stem on the top pumpkin. I also took them and splattered some gold, brown and white over all three pumpkins before assembling them in stacking order.
For the card front, I took a stitched white panel and stenciled some leaves (Pink & Main-not in store) in light tan ink. I made my scene for the pumpkin stack by using some Fall Plaid papers (not in store anymore) by Lawn Fawn for the background and die cutting a hill for the pumpkins to set on. I placed the plaid paper and ground over a darker brown cardstock layer and popped it up with foam tape over the stenciled leaves card front. I attached all of these layers onto a white top folding A2 card base.
For the sentiment, I white heat embossed the sentiment (not sure what Lawn Fawn set I used this for it) over dark brown cardstock and cut out a banner to pop up above the pumpkin stack with thin foam squares. I added a few gold rhinestones for sparkle.
Hope you’ve been inspired by my card today and stop on over at the challenge blog to join in the fun with us! I look forward to seeing what you come up with!
Thanks so much for stopping by and I’ll be back tomorrow with another challenge project!
Happy September friends! Can you believe we’re getting ready to get into the Autumn season already?! It seems like the summer flew by, but I have to say that I’m so very ready for the falling leaves and all things Autumn to start up now…especially cooler temps!
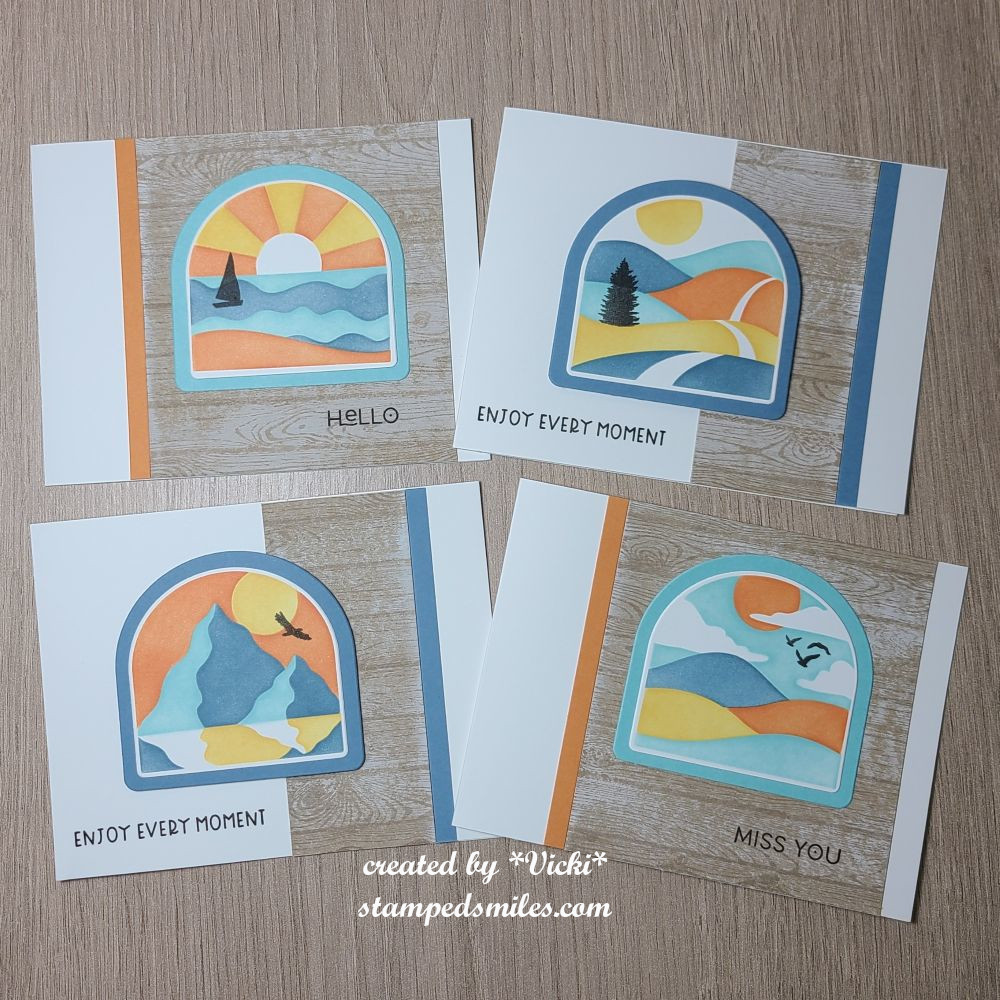
Today also brings us to a new challenge over at the Mix It Up Challenge Blog. The challenges always run for 6 weeks so there is plenty of time to enter. The theme given for us this time is: Fancy Folds or you can always do the ‘Anything Goes” too. Here’s the card that I came up with for the challenge using the theme:
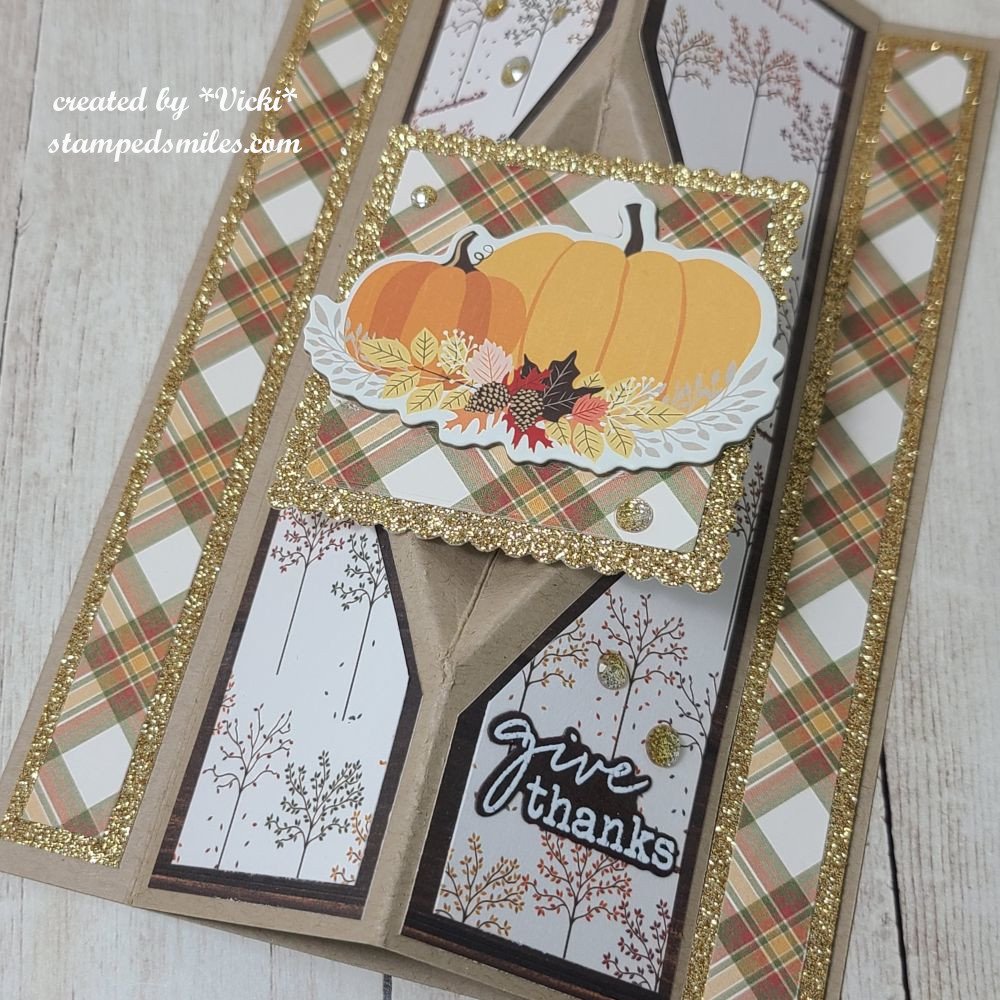
This is a something I came across a while back and saved the tutorial for later to give it a go. This is called a “Faceted Vertical Easel Card” and this is a 5″x7″ size. I would give you a link to the tutorial, but when I started creating half-way through to come upon the layers, I noticed the measurements were not quite right, so I had to figure out an adjustment to make it work correctly. I do love the look of it with its unique faceted design. It’s basically just an easel style card with a bit of a design in the center fold area and going vertical instead of horizontal. (If I make another again, I’ve decided another easier way to work it.
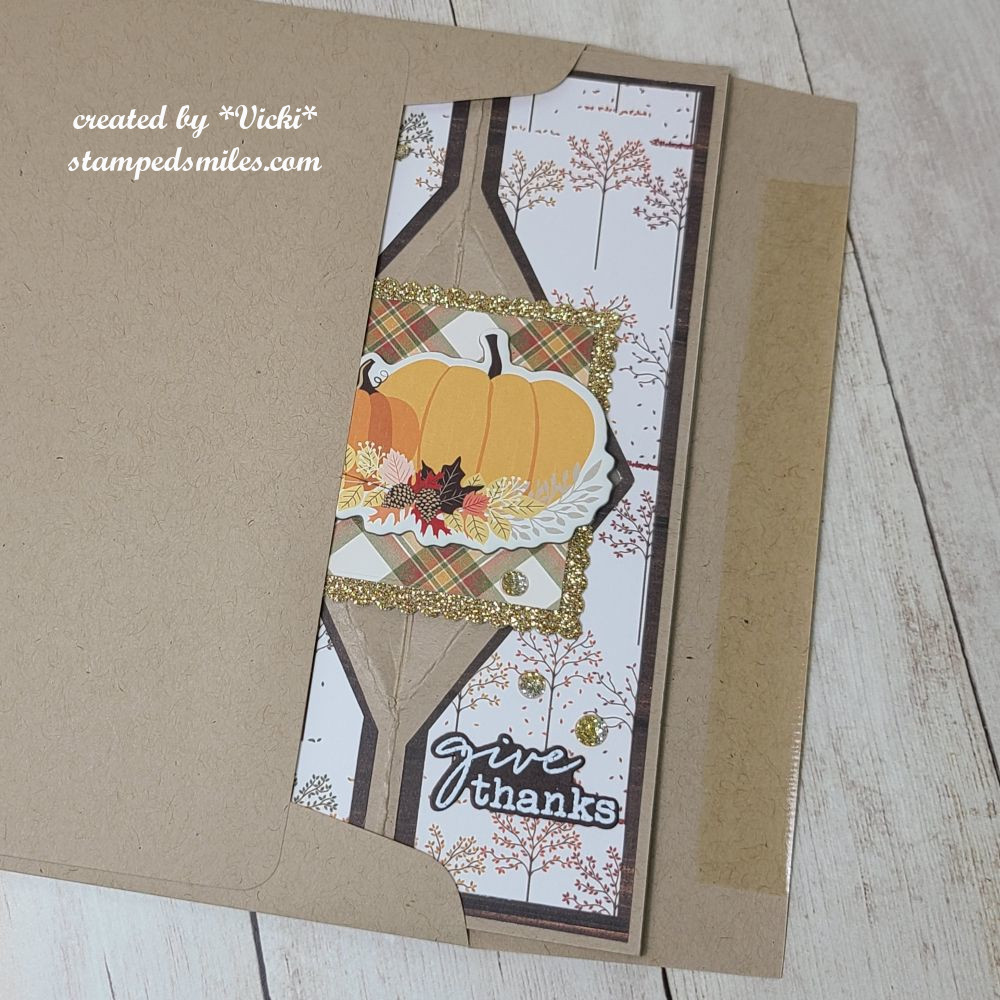
Since I was in the mood for the Autumn season, I decided to make my design with that in mind. I started with a kraft cardstock base measuring 10″x7″ with all of the different scores/cuts for this design as well. For decorating it, I’ve pulled out some Autumn papers by Photoplay in my stash and added a layer of glitter gold cardstock. To make square aperture with the pumpkins, I pull a cardboard cutout from the paper pack to use with it, and then white heat embossed a sentiment and die cut to place on the bottom right of card. Lastly, I’ve added some gold gems to both panels as well as the square panel in the center of the card.
I think what I like most about this is that it folds completely flat for mailing in an envelope. Once the recipient receives it, you can slide it open to catch the strip on the right side of the card and it will stand up like the first photo in this post.
I hope you’ve enjoyed my fancy fold card today and you’ll hop on over to the challenge blog to see what the rest of the team has come up with. I look forward to seeing the gallery and what fancy folds will be in there!
Thanks so much for stopping in today! Have a great day!
Hello friends! I hope you’ve had a wonderful week and looking forward to a great weekend coming up! We are having a heat advisory for the next several days over my way, so I thought it would be a great idea to stay indoors and craft! I also thought this would be a great time to catch up with some posts sharing some things that I’ve worked on the first part of this year that I hadn’t gotten a chance to share with you.
LONG POST – pull up your chair with your favorite beverage and enjoy!
I thought I’d share the Taylored Expressions Virtual Stamp Joy that I did back in March. I actually spent the weekend attending the classes and creating as I followed along. I managed to get all of the projects done the day after the event was over, but failed to post all of what I had made due to the fact that I was busy helping two different people move…and then life just got really busy after that as well! LOL
*I also have added an additional event from Taylored Expressions this last weekend called “Summer School” which concentrated on foiling techniques. Although I’ve done foiling before, I sure enjoyed seeing new products and learning a few new techniques too! (These four cards are at the end of the gallery photos below)*
If you’re on my website, just click on the images below to enlarge the photos and view any details underneath each one. ENJOY!
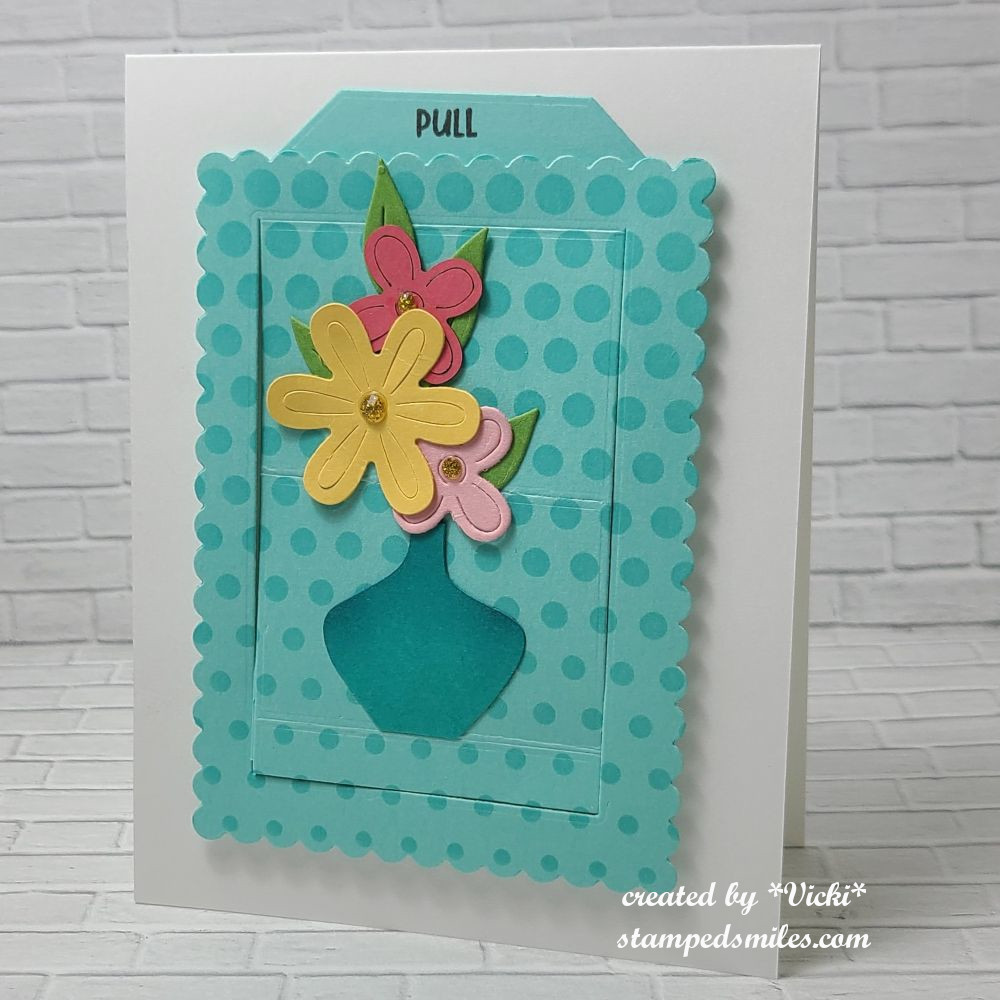
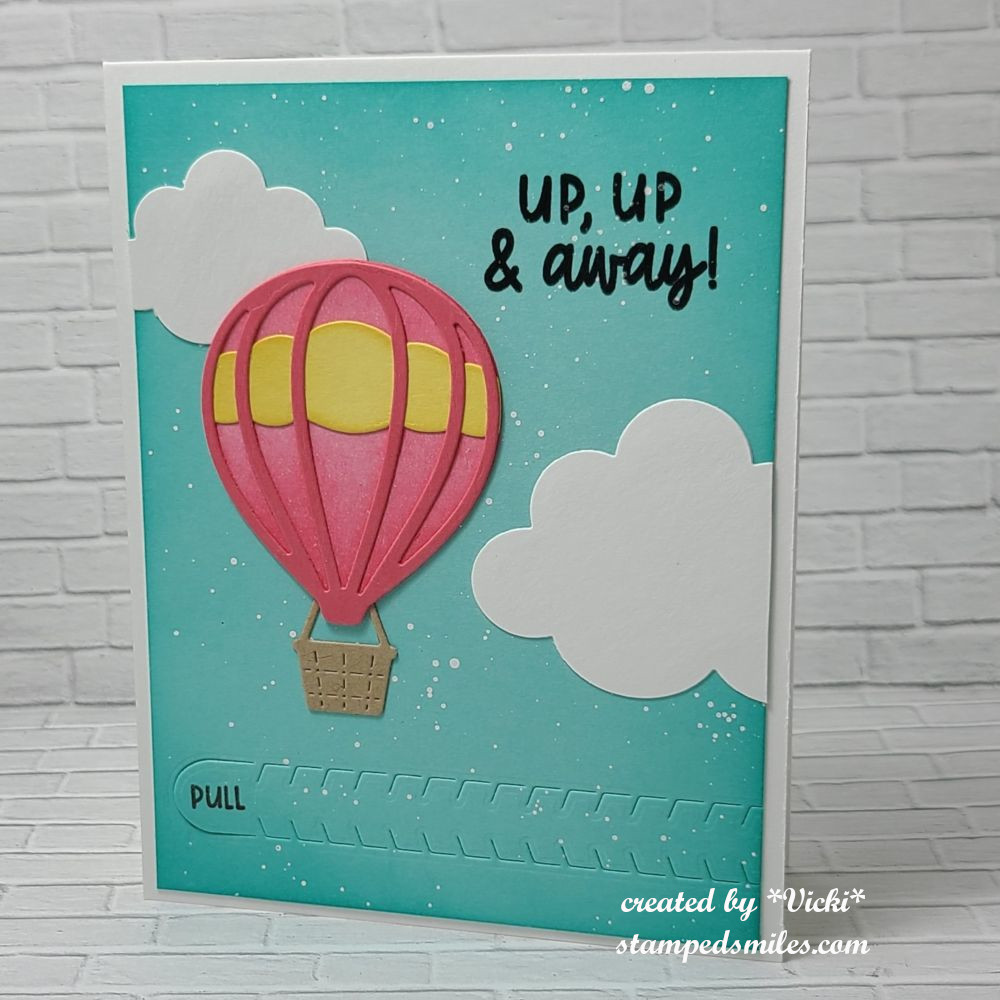
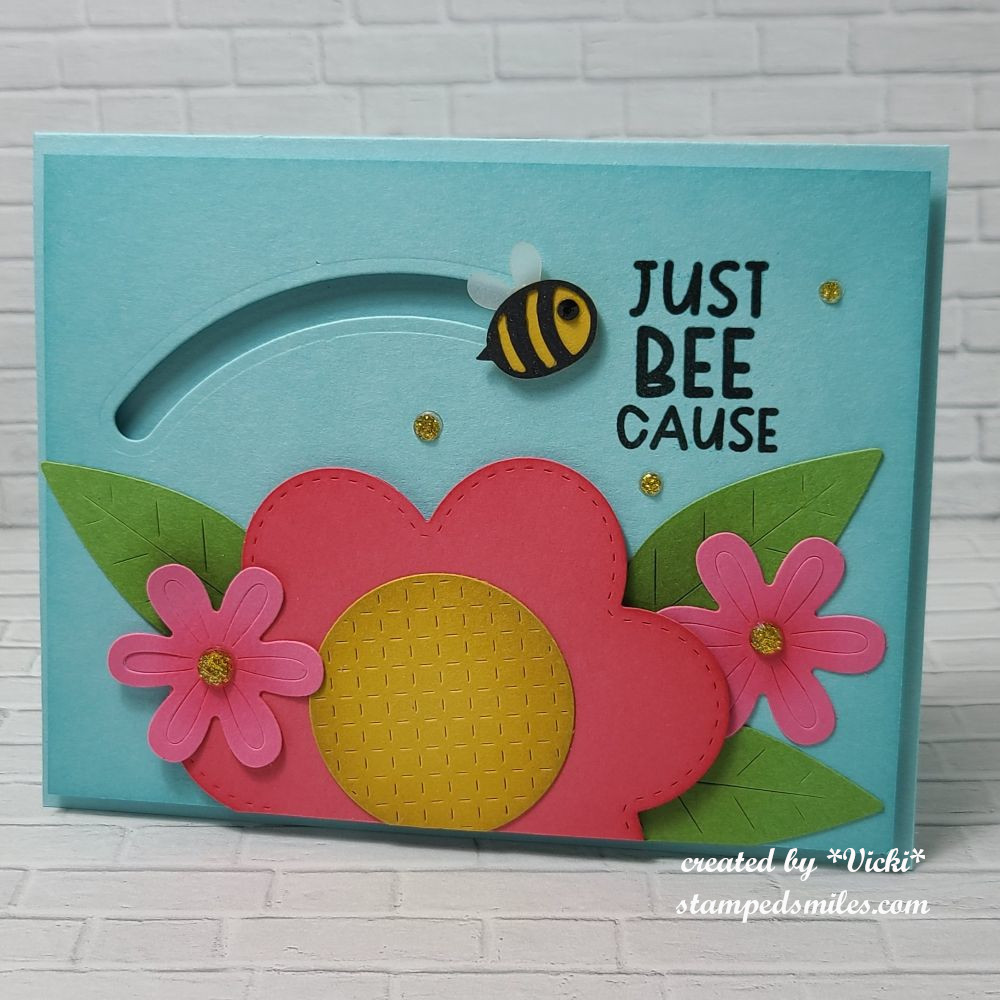
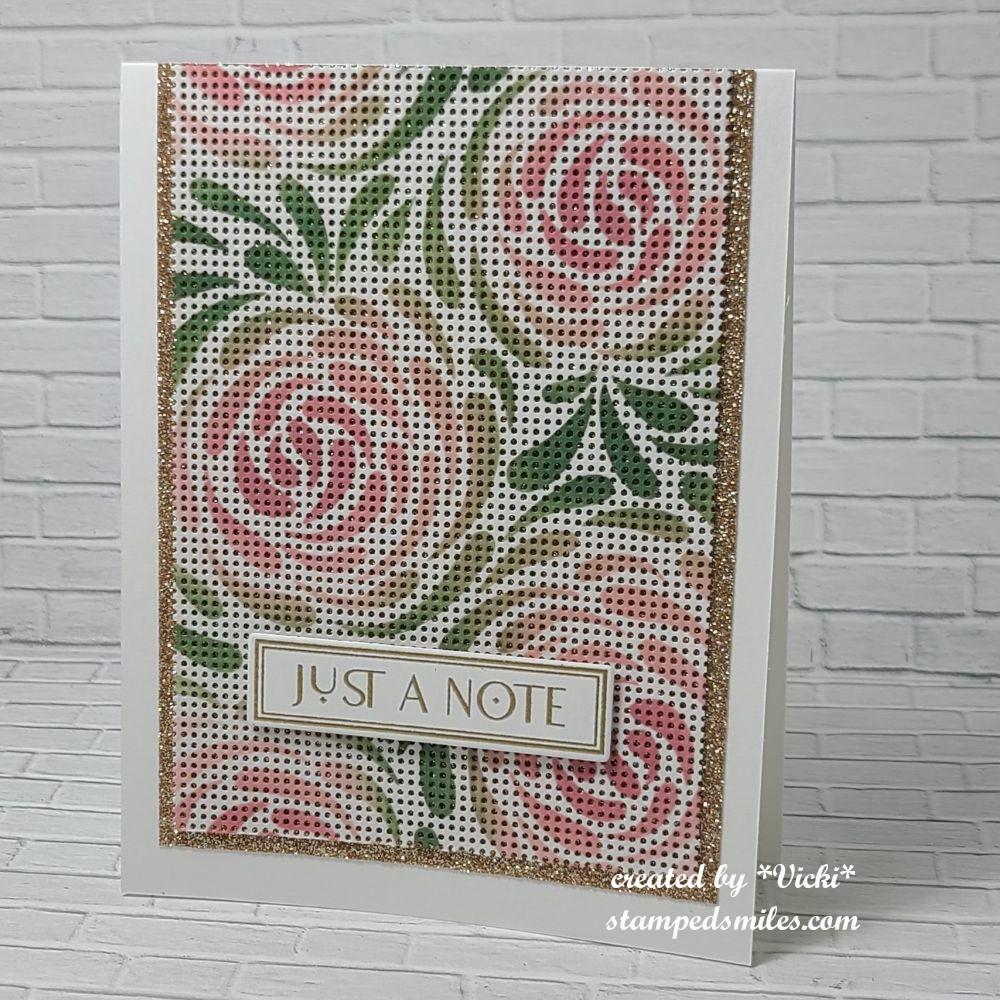
Dimension Class-ink blending and splattering die cutsDimension Class-markers over die cutsDimension Class-stacked die cuts for layersDimension Class-liquid watercolor smooshing with die cutsInteractive Class-Light Up CardInteractive Class-Light Up Card pushing button to activate itInteractive Class-Pop Up CardInteractive Class-Pop Up Card when you pull up on the tab to reveal message and flowers pop upInteractive Class-Rip Strip Card – when the recipient pulls on strip, it reveals messageInteractive Class- Spinner Card – bee spins and moves along curved trackSession 1 -stenciling on perforated papersession 2 – watercolor panels using Karin Brush markerssession 3 – stamp a stack using quad stencils to make four cardssession 4 – marker coloringsession 5-ink blending on stamp and embossing over imagesession 6-calendar easel card with message padsession 7 – ink blending over glitter cardstockSummer School-double foil technique and using markerSummer School – clear foilSummer School – foil paste and sprayed foil techniquesSummer School – Foil paste over color cardstock
I always love to learn new things with stamping/crafting along with all of the fun new products that come out too! I know I REALLY don’t need to purchase more things, but when cool stuff comes out, it’s really hard to pass it by! I think doing these classes and joining in on different challenges help me to use these fun things up!
So I hope you’ve enjoyed my post sharing all of the things that I’ve been doing! I will have another post sharing more things that I haven’t shared yet too! In the meantime, I’ve also been working on a scrapbook which has been fun and something that I haven’t done in a really long time! A baby can do that to you! LOL
Thanks so much for stopping in today my friends! I’ll be seeing you soon! Have a great weekend!😊
Hello and happy Friday my friends! After things got heated up the last couple of days, I think I’m ready for a couple of days of cooler weather! I don’t want to skip Spring by going straight into a hot Summer! Hope you have some great things planned this weekend!
Today starts a new challenge over at the Alphabet Challenge Blog! We are now onto the letter “C” and the hostess has chosen “C” is for Circles *Remember that this is a bi-weekly challenge, so you have two weeks to enter* I hope you will find some time to play along! Here’s what I’ve created:
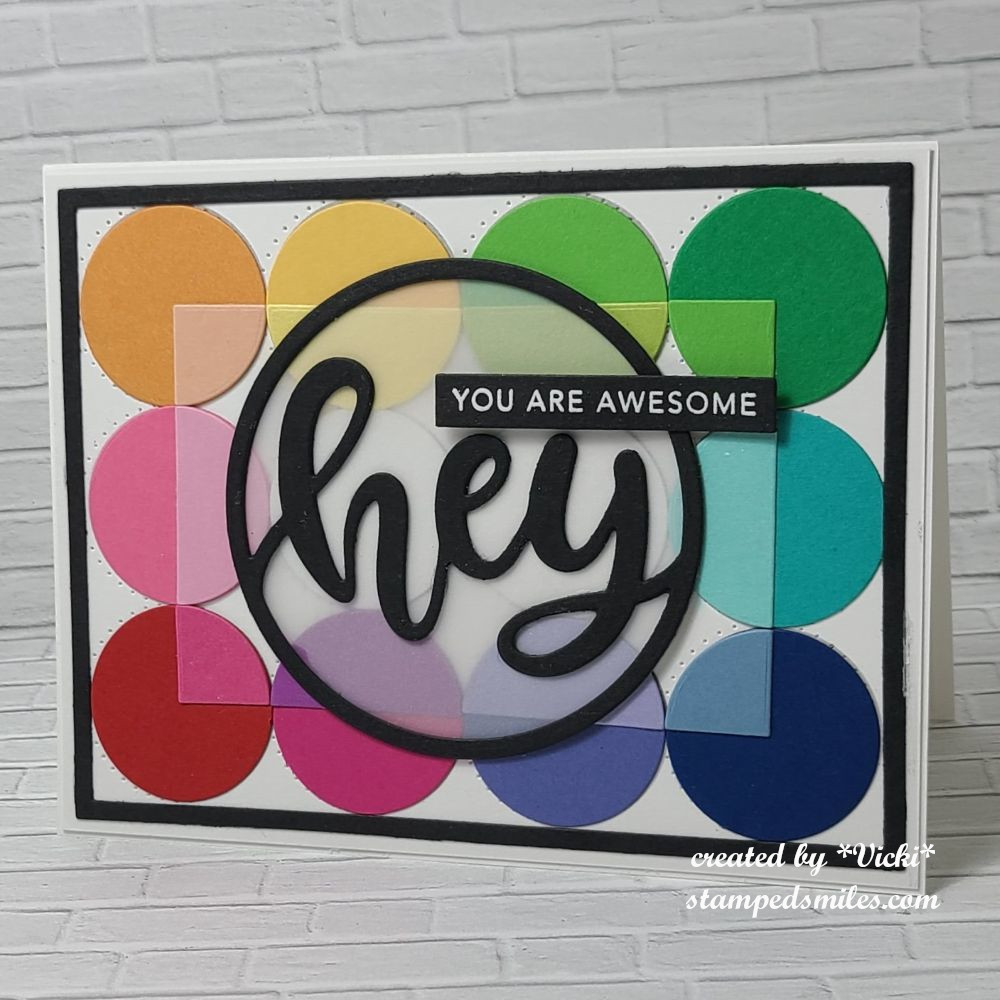
I do love me some circles and I thought I would just use them all over the place for this challenge! I pulled out my Taylored Expressions “Talking in Circles card kit” that came out earlier in the year and no longer available. However, the panel that I’ve used to create this design are still available in the store called “Talking in Circles A2 Sugar Cube Maps“. They make it easy to follow where placements need to be and lined up.
I used the TE A2 Thin Frame Cutting Plate for the black frame around the circles. I thought I would try and use another cutting plate, but the design pretty much covered it up. I layered this whole panel over a top folding A2 white card base.
For the sentiment in the center, I used another circle die from the TE, but I don’t think it’s in the store any longer. I cut the “HEY” circle out from black cardstock and layered some vellum behind it. I white heat embossed the “You are awesome” sentiment over black and cut that out with a Simply Strip die. This was popped up with a foam strip over the design.
Thanks so much for stopping over today! I hope you’ve enjoyed my card and you will take a hop on over to the challenge blog to see what the rest of the team has come up with.
See you soon! In case you need to know…you are awesome!
**DON’T FORGET TO ENTER THE GIVEAWAY I’M OFFERING IN THIS POST – THERE’S STILL A FEW DAYS LEFT TO ENTER!**
Hello friends and welcome to the New Year of 2025! Hope that you’ve had a wonderful and healthy Holiday Season and ready to start the crafty year! I look back and can’t believe that I’ve been blogging since 2006…next year will be 20 years of blogging! Holy cow! Should I have some sort of celebration?
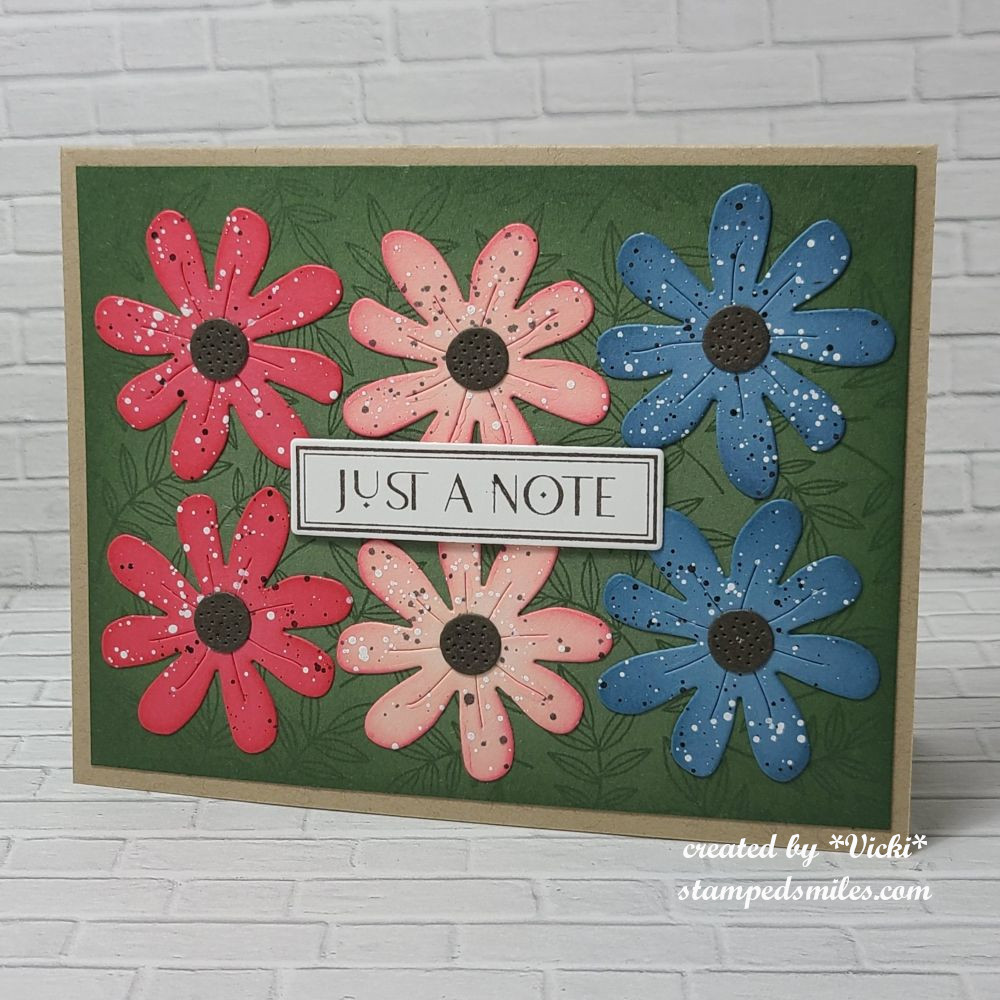
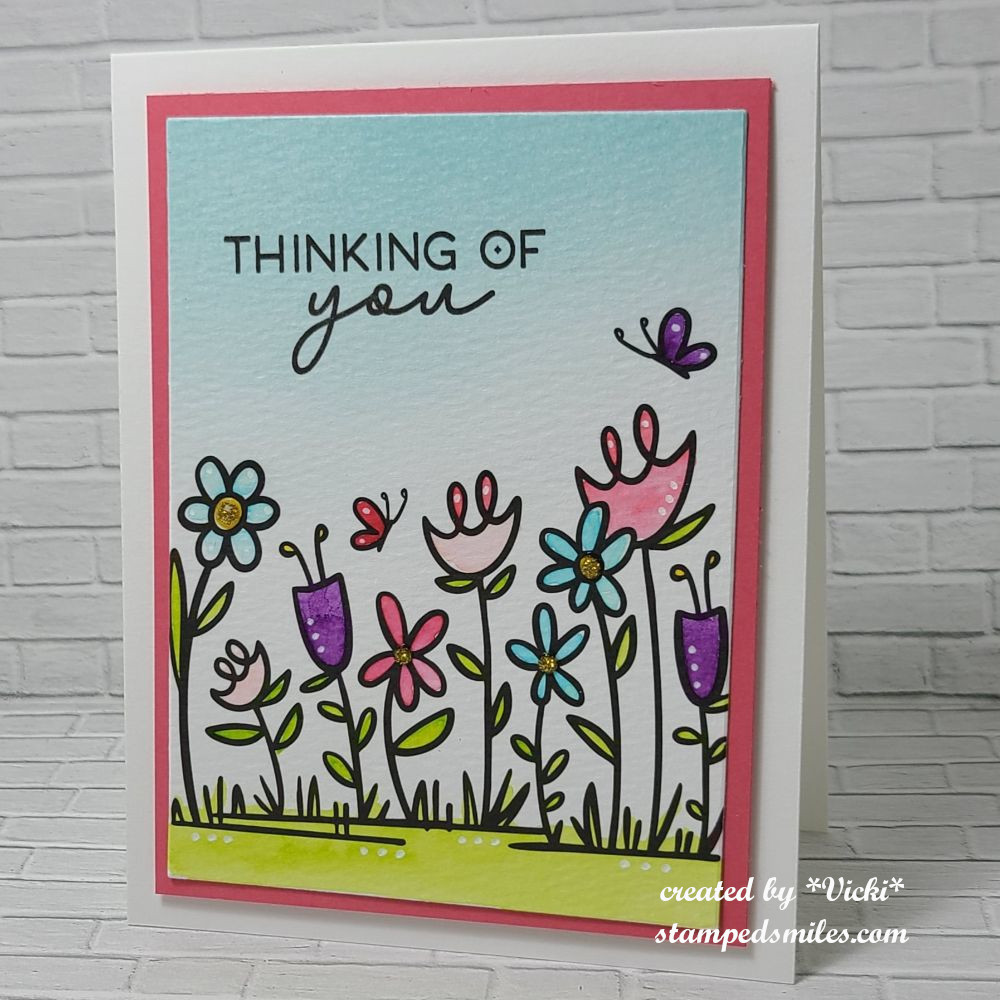
Today not only starts a brand new year, but it’s also the start of a new challenge over at the Mix It Up Challenge Blog. ( NOTE:The challenge blog has recently been taken over by Tina, but it’s running the same way that Leslie had been running it…so hope you can join along as you always have or if you haven’t yet, sure hope to see your creations over there!) The challenge will run for 6 weeks so there is plenty of time to enter. The theme given this time around is: Monochromatic (meaning shades of the same color) or you can do the ‘Anything Goes” too. Here’s the card that I came up with for the challenge using the theme:
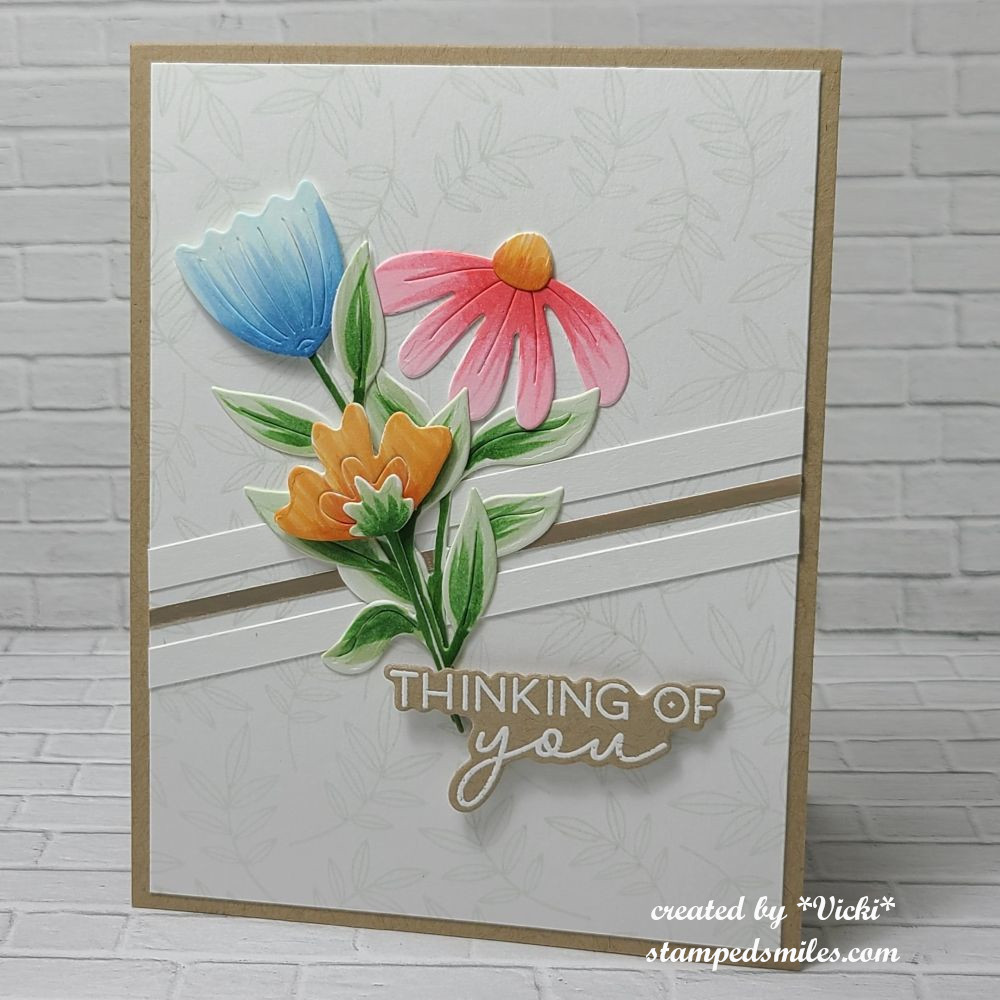
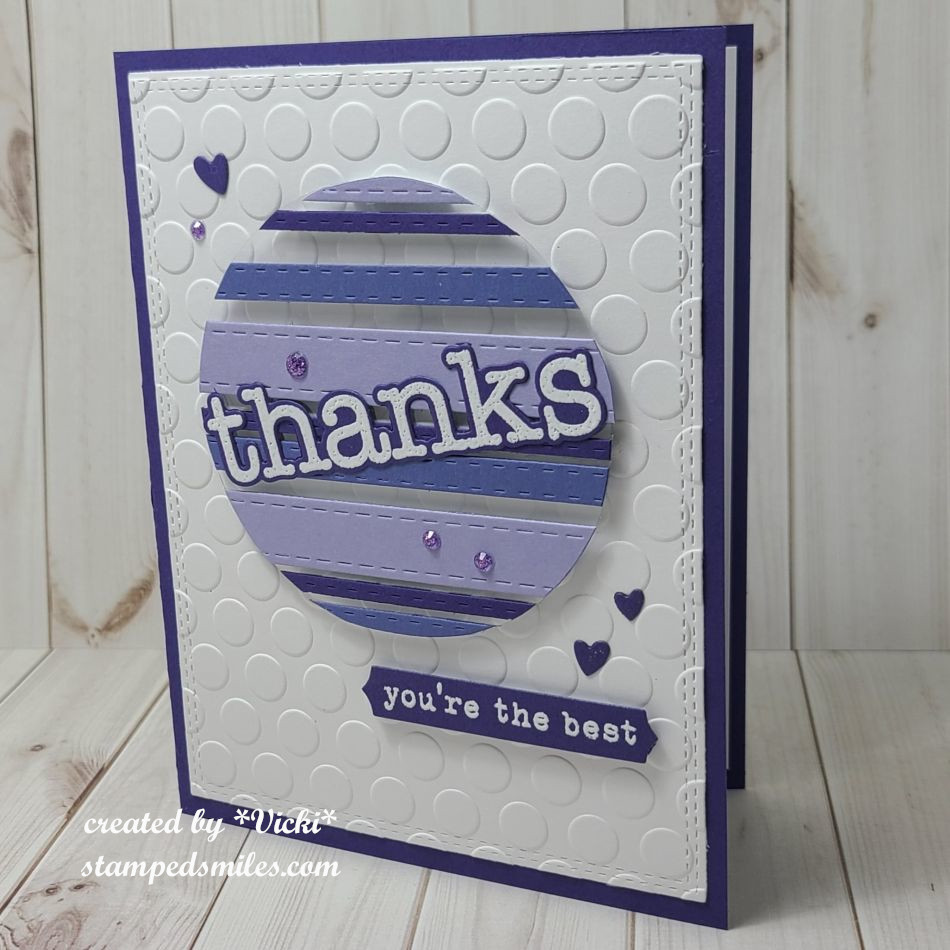
Of course I chose shades of purple for my design in the Taylored Expressions colors: Eggplant, Dried Fig and Macaron. I also used the floating technique with the circle of acetate and the different strips attached and popped up with foam tape strips. Very easy and fun to do!
The “thanks” sentiment and strips were white heat embossed over the Eggplant color and cut out with the coordinating dies. The little hearts were also apart of the die cut. I then added some purple color rhinestones to finish it off.
I’ve used a VERY old embossing folder by Cuttlebug…do you remember that thing? I attached the embossed piece to a side folding A2 Eggplant card base and added a white panel with a sentiment on the inside.
I hope you’ve enjoyed my first card of the New Year or have been inspired to create a monochromatic card as well to enter in the challenge with us!
Thanks so much for stopping in today and I look forward to seeing all of your crafty inspiration throughout the year! See you soon!
Challenges:
Creative Inspirations – Something Old/Something New (I’ve used a VERY old embossing folder!)
Hey friends! Just poppin’ in with another card I made and wanted to get it in before the deadline ends…which I normally don’t always do!😁
I have been playing along (with the exception of the last few years) with the Coffee Loving Papercrafters “Coffee Lovers Blog Hop” which has been going on since 2014! It’s hard to believe it’s been around that long, but looking back at the posts that were shared recently for “a look back”, I had a different blog platform and there I was playing along 10 years ago! Really appreciate all of the fun that Amy has provided to us through the years as well as the many sponsors that have been apart of it.
I’ve pulled out some stamp sets from one of the sponsors (Newton’s Nook) new and older from my stash in honor of this occasion:
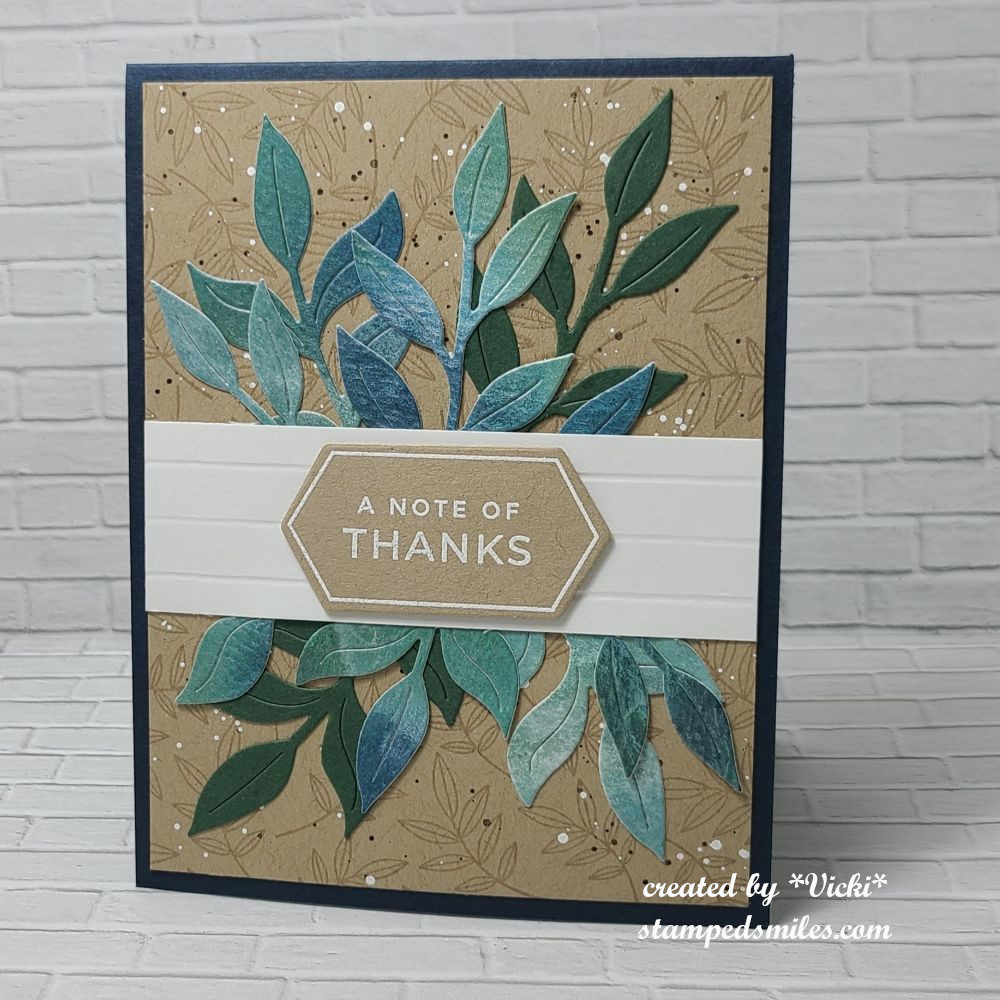
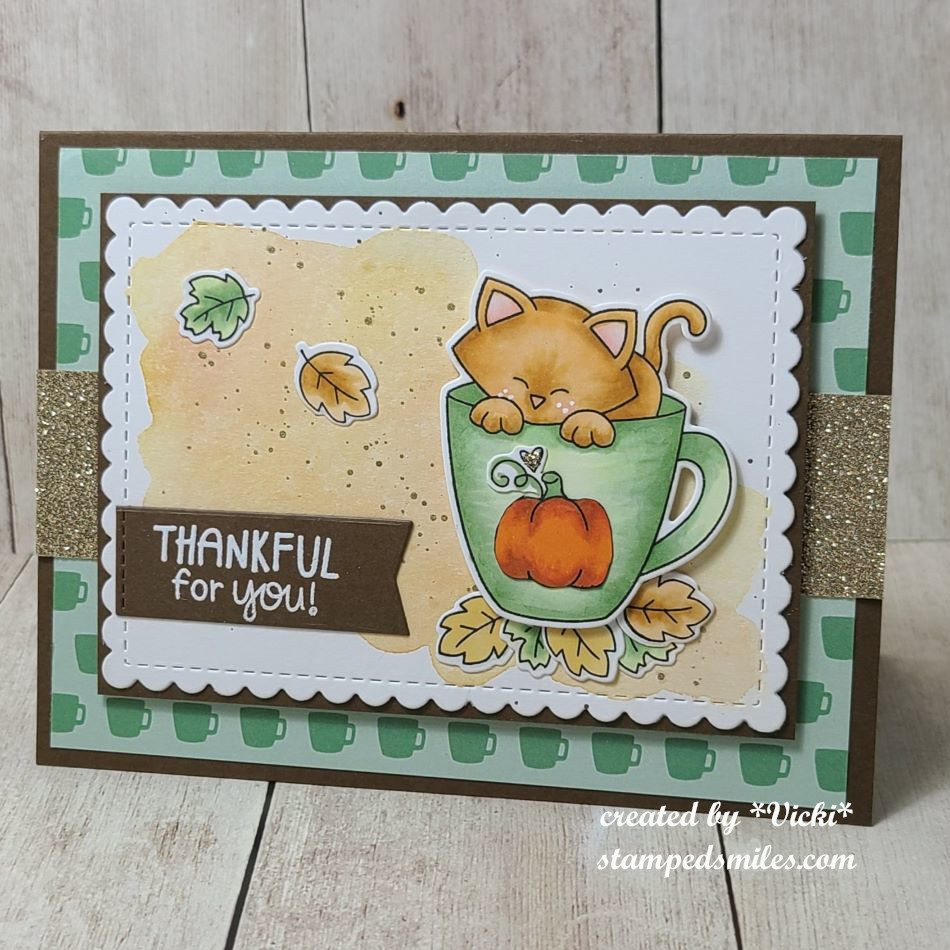
That is the cutest cup of Pumpkin Spice Latte that I’ve ever seen! I’ve used the NN Newton’s Mug stamp set with coordinating die to stamp, color and cut him out. He was popped up with foam tape over the background. For the pumpkin image on top of the mug, I’ve used an older NN stamp set called “Love a La Carte” (No longer available). I just stamped, colored and fussy cut the image to place over the mug. I also added some gold glitter on the heart above it.
For the background: I cut a piece of paper with the NN Frameworks die set and pulled out some watercolors for the background and then splattered some gold after the background was dry. I layered this over the brown cardstock. I also used a piece of that brown cardstock to white heat emboss the sentiment which came from an older STAMPtember collaboration set with NN called “Talk Turkey“. I cut it out with a banner die and attached it to the side of the scallop panel. The leaves under the mug and over the watercolor panel were from the NN Autumn Mice stamp set and coordinating dies.
I was trying to also follow along with a fun sketch from the Inky Paws Challenge (see below) and so I’ve pulled out some more papers from the NN Coffee House Stories paper pad that I thought went with the coloring on my cup and attached it to an A2 top folding brown card base. I also added a strip of gold glitter paper to bring out the touch of glitter on the tiny heart above the pumpkin.
That’s it for today! I hope you’ve enjoyed my coffee card or have been inspired to create something fun too! I’m off to check out all the other entries for more inspiration! Have a wonderful weekend ahead!
Challenges:
Coffee Loving Papercrafters – #fallwinter2024clh 2024 Fall/Winter Coffee Lovers Hop using coffee, tea, cocoa, and/or apple cider
Hello friends! I hope that your October has been a good for you! We have just started seeing some cooler weather and even a bit of frost coming tomorrow night! I also wanted to say thank you for your comments about my last post. After having such a break, getting my crafting back on has been touchy. I’m trying to get organized!😁
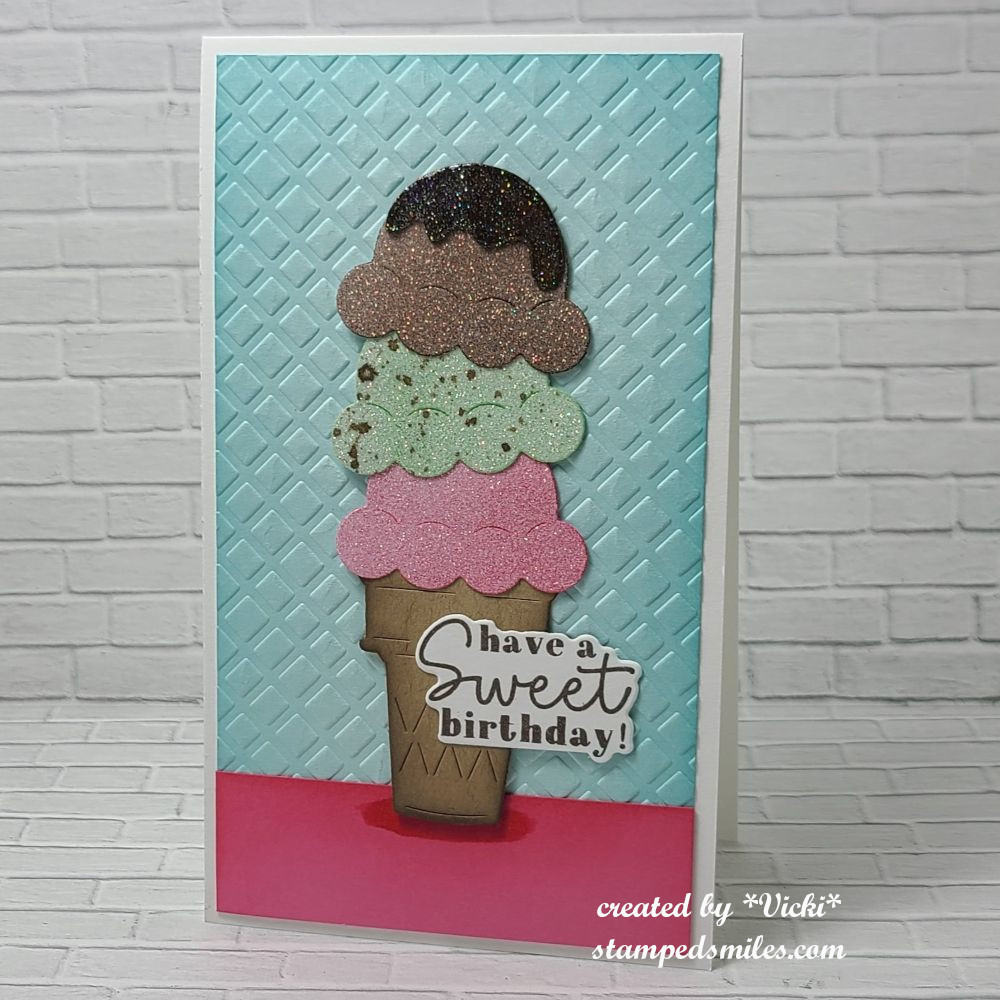
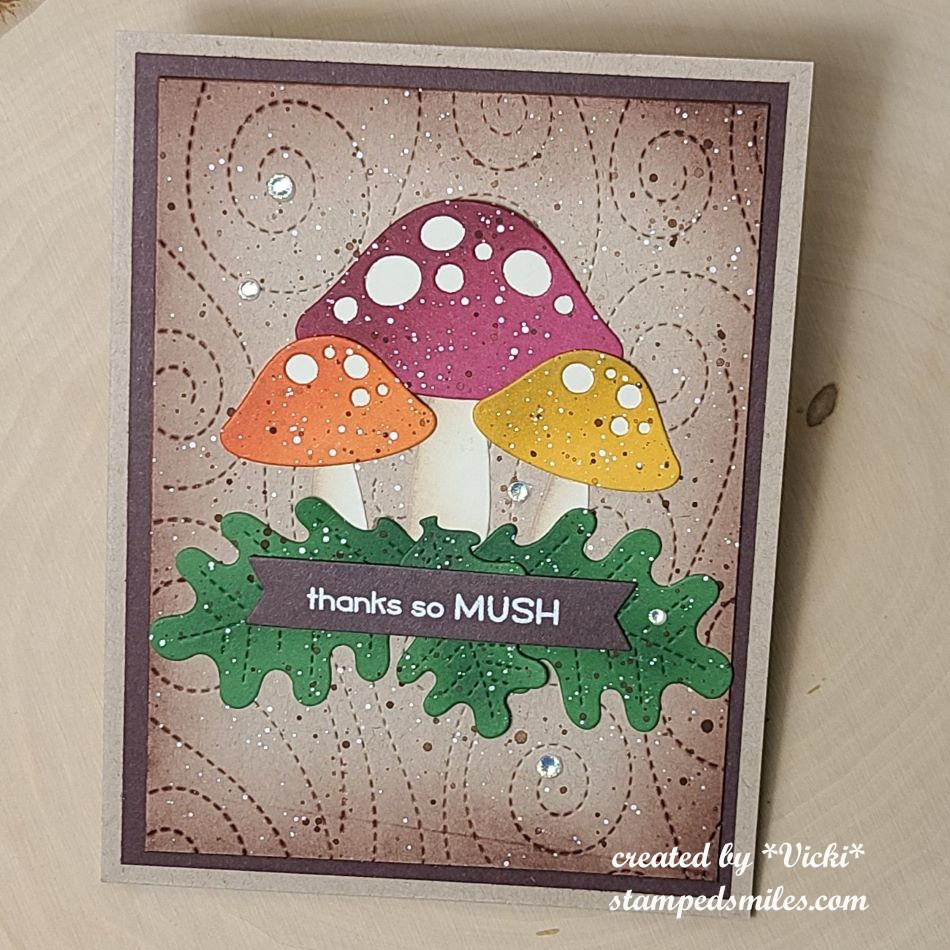
Today starts the October challenge over at Sparkles Monthlyand for this month, our hostess is asking to see a mushroom(s) on your project. Be sure to stop by the blog to see what the rest of the team has created for you. Here’s my project for this challenge:
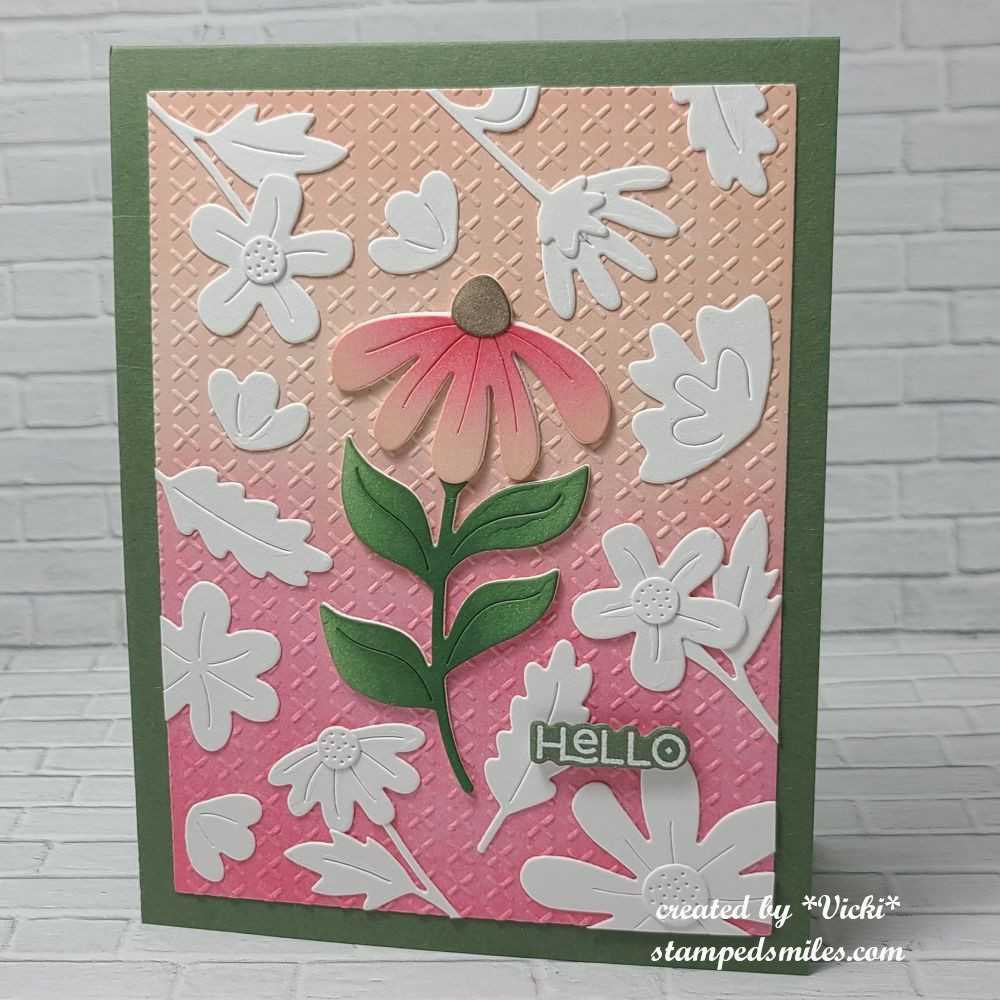
I really like how this one turned out! I was trying to keep it in an Autumn feel with using these colors and adding leaves. Everything I’ve used came from Lawn Fawn.
I started by cutting out the background panel, the leaves and the mushrooms in different colors of cardstock. I sponged over the each of the pieces for dimension and shading and then splattered over top of them with brown and white paint.
I just attached all of the layers together that I thought was pleasing to my eye and then I white heat embossed the sentiment over the brown cardstock and cut out the banner and popped it up over the leaves with foam tape. Lastly, I just added a few white gems for sparkle.
I hope you like my card today and has inspired you in some way to play along with us for the challenge this month! I would to see your mushroom creations in the gallery! I appreciate you stopping today!
Hello friends! I have a mix of projects that I’ve recently been working on and wanted to share my latest since I’ve gotten all caught up with the projects that I hadn’t posted.
I had a few birthdays come up and of course I forgot to take photos of a few of them before I sent them out the door and now they’re long gone! (DOH!) But I did remember to take photos of these:
I fell in love with the stack of party pups from Newton’s Nookand I always wanted to try out one of those cool card layout dies! The person that I’m sending this to loves his dog and I know the dog also has some “friends” she visits with, so why not a “PAW-ty” of them together!
I’ve used the NN Birthday Barks stamps & diesand colored it out with Copic markers. I stamped and heat embossed the sentiment in the top right square and added a stamped paw print from the stamp set. All the images were popped up with foam squares.
For the background, I took the NN A2 Card Layout 2 die and cut the frame with all of the stitched pieces using the NN Birthday Woofs Paper Pad. These dies make for some quick and easy cards without much thinking involved which is great when you’re in a hurry!
Next card was made as a thank you for a pizza night using one of those Ooni Pizza outdoor grills. I’ve never had one and so of course being the pizza lovers that hubby and I are, we gladly excepted! Very good pizza it was! I wanted to thank them for having us and made this card:
I’ve used this really cute pizza set from My Favorite Things and I was happy to pull some papers I had for years and years to help pull it together.
I’ve used the MFT A2 Stitched Rectangle dies to cut the checkered pattern paper as well as the light blue panel. I’ve used the MFT Stitched Mini Scallop Rectangle dies to cut the white piece behind the blue panel. (The red and white checkered paper is so old…got it at a stamp event so many years ago and hoarded it of course!)
Decorating the pizza was so much fun and I used the same ingredients we received on our Ooni pizza which was a handmade crust, tomatoes, pepperoni, Canadian bacon, cheese and sprinkled with basil leaves. All of the cut pieces to make the pizza came from the MFT Pizza Maker dies and the sentiment came from the MFT Pizza My Heart sentiment set (I don’t see it on the website, so I’m not sure if it’s available any longer?) I stamped it with black pigment ink and heat embossed with clear embossing powder. I’ve also used the same size stitched rectangle die as the blue panel to cut off a portion of the pizza to make it fit into design.
Lastly, this is a card made hot off the press tonight using the current Craft Roulette parameters! So if you missed it, go catch tonight’s latest episode #228 and play along! This is the card that I’ve made with tonight’s parameters:
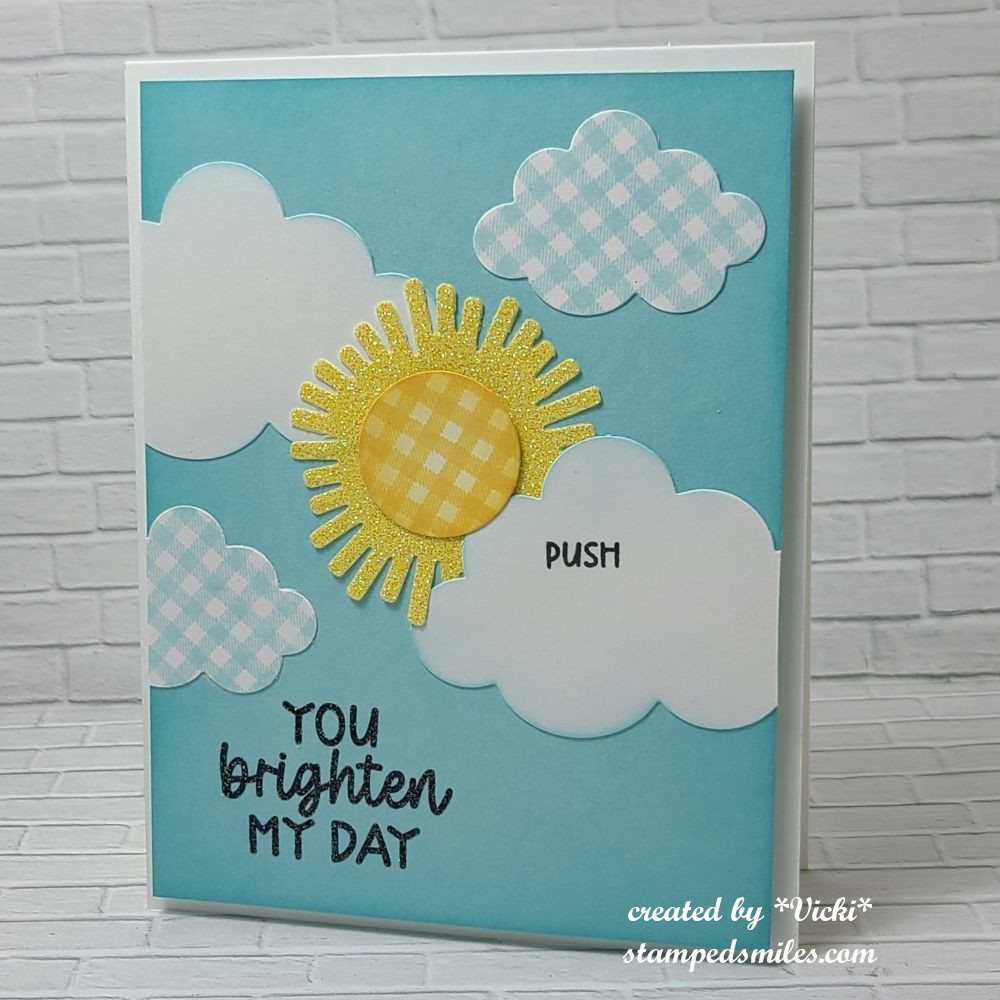
I decided I wanted to also use the image from Beccy’s Place August Freebie challenge and add myself another challenge on top of the 4 parameters! I loved the image as it looked so refreshing! I played around with the image on my computer and added an extra one next to it, but flipped it around and placed it behind the other one. I also typed up my own sentiment underneath to go with the “Monday” parameter with Craft Roulette.
Project: I used a Geometric Square stencil for the background with yellow ink and to fit Beccy’s extra twist challenge which was to use something old from your stash, I did dust off those square sequins and brads that I’ve had for years and years to add on the front of the cups. (Now the image reminds me of those Recesses Peanut Butter shakes! YUM!)
Colors: Bee Garden colors are obviously the black and yellow and I had to add in some orange for the guest Irene who is a #teamorange color person.
Element: Monday was typed up within the sentiment.
Random: Use A Marker(s) which the image was colored in with Copic markers.
Ok…so that’s it for me this weekend! I needed to get this posted this evening because I would be missing out on a challenge that I wanted to be sure to play in before time runs out and that will be in like a couple of hours!
Thanks for dropping by today friends! I hope you have an amazing weekend!!
Hello friends! I hope that you’re enjoying your August so far! Recently, we’ve been experiencing much cooler temperatures than we normally have this time of year, so it’s been great to go out for a few walks.
I’m ALMOST caught up with things that I haven’t posted, with the exception of a few birthday cards that I’ll share later. For today, I’d like to share some projects that I’ve made at an event I attended back in April along with a class from Inky Stamper.
But first, here are a few projects I’ve made for their recent challenges:
This is a tag I’ve made for the Inky Stamper Inkspiration FB Group July challenge. The challenge was to make a tag and I thought I’d try out a fun idea of making a pocket for my tag that held another tag inside so that you could put a message and a gift card.
I’ve used some Limeade Dots/Stripe 12×12 Doodlebug paper to cut it out with and used a border die to help with the pocket decoration. I cut another tag to place inside the pocket for a special message and to include a gift card. At the top of the inside tag, I’ve made little “charms” with images from the Inky Stamper Margarita stamp set. I’ve also stamped the background of the inside tag. I don’t usually color with pencils, but this time I decided to pull them out.
To get the sentiment to fit around the pocket border, I had to curve the stamp a bit to make it work with the tag.
So the Inky Stamper Inkspiration FB Group challenge for August was to use a white pencil. This happens to be a favorite to use for Chelsea with her images and it does make for a nice quick highlight. So the images were just stamped on colored cardstock and I used the white pencil to highlight them with.
I decided to combine this with last week’s Craft Roulette Episode #226 with the parameters of – Project: “See-through” (I made a see-through shaker card) Colors: “Jungle” (I used greens and browns for my jungle) Element: “Teacher(s)” (The sentiment says it all!) Random: “Tangle” (There are a tangle of leaves inside shaker element.)
Back in April there was an Inky Stamper Inky Escape event that I attended and here are some projects that I made from the Make-n-Takes that were provided as well as some of the projects that I was working on using the new release that came out during the event:
(If you are on my website, click each photo to enlarge it and read the captions)
The tag was made my Chelsea that was attached to my “swag bag” and the box was a make-n-take project. There was a moon pie included with project, but when I came home, I added 4 Ghirardelli chocolate squares to show how many fit inside.This card uses the same stamp set as the tag above. The background is a scratch ‘N’ sniff made with Kool-Aid.This was a light up card using the Pear Blossom EZ Light.Cute make ‘N” take with a magnet on the back of the baby roo that fits inside the mama pouch slit!This was an extra make ‘N’ take using some ALL & Create Washi Tape! Cool!
There is actually another Inky Escape coming up in October that I’m attending and I’m sure it will be fun with Halloween and Christmas theme combined!
While I was there, I worked on some more of my own projects using some of the new sets:
I decided to take and use one 6×6 paper pack from my stash and it seemed to go really well with the outer space theme and I love the purple colors from this set. I’ve used the following Inky Stamper stamps sets: Astronaut, Big Words, & Alien.
Click on the photos below to see a close up look at each card:
Before the Inky Escape Event, there was also an on-line class from Inky Stamper that I took part in and that’s because I thought the projects were super cute! Here are the projects that were completed for this class:
These were both created with the Inky Stamper Hedgehog stamp set. The Journal Book , the Doodlebug DIY Snow globe and Doodlebug dimensional stickers/shaker balls were all provided with the class. I decided to add a few extra elements with mine. The tiny hedgehog on top of the snow globe was included in our box, but not apart of the projects…but I thought it would be fun to add it!
Speaking of Doodlebug, while I was at the Inky Escape Event, Chelsea had a few things on sale and I snagged a kit and special ordered the Doodlebug Frame with it. So when I got back home and the frame came in, I wanted to do my project right away:
I have this displayed in my stamp room and I love the rainbow of colors in it with the different crafty tools in smile faces! The size is 8in. x 8in. with a glass on the front. Although it’s not really that visible in the photo, it is actually quite dimensional.
I think it goes well with the black frame that matches my black frame with the crafty squares swap group I was in. (You can see that post here.)
Whew!😳 I’ve been really busy this year, but I don’t think you would’ve known this without my posting about it! I’m glad that I’ve gotten caught up with things that I’ve done and hopefully I won’t be doing posts like this in the future! It just seems like so much all at once!
Anyway, there we go and now I need to finish and send out a few birthday cards coming up, so I will catch up with that later as well! For now, thanks so much for stopping in and keeping tracks of my sporadic postings! I will be back to share a DT post for a challenge coming!