Hello crafty friends! Happy Friday to you! Hope that you’re having a great Summer and a great start to your July month. We’ve been busy doing lots of things and I got to visit my new grandson again which of course was wonderful!
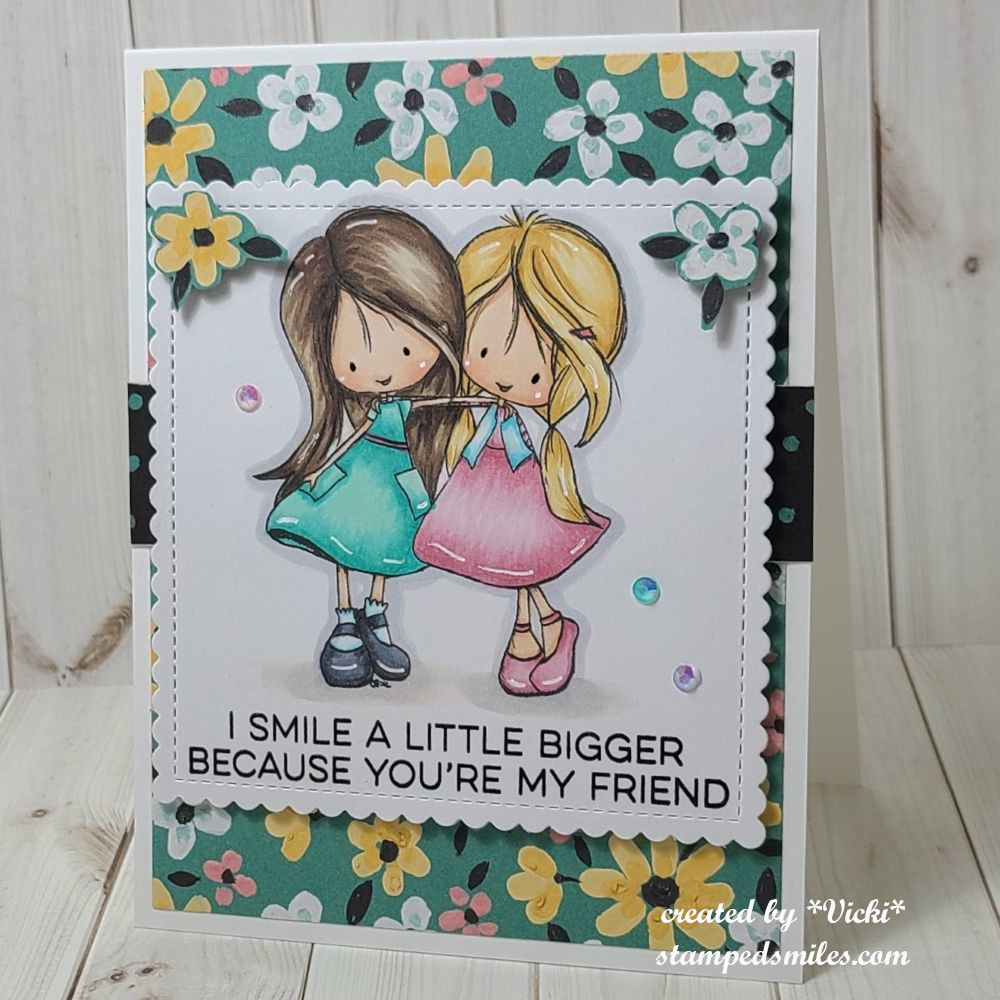
I’m swinging in today to share a new challenge over at the Alphabet Challenge Blog! Our next letter is ‘G‘ and the hostess has chosen “G” is for GIRLFRIEND *Remember that this is a bi-weekly challenge, so you have two weeks to enter* I hope you will find some time to play along! Here’s what I’ve created:
Isn’t this the cutest image! I found this adorable image called “Emmy and Wryn-BFF” from the Tiddlyinks store on Etsy. I have always loved this artist’s images and I hope to be coloring up more of them soon!
I colored the image with Copics and then black heat embossed the sentiment at the bottom and cut out the entire panel with a stitched scallop square die. (P.S. Have you heard that “My Favorite Things” has closed?) Both the sentiment and die came from MFT.
I had a package of these pretty papers from another crafty friend laying around, so I pulled them out to use for this card. I loved the flowers, so I cut a few of them out and popped them up in the corners with foam squares. I added another strip of the papers in the center of the design behind the image panel that was also popped up with foam tape.
I finished with details on the images using a black gel pen for their eyes and a white gel pen for highlights. I added some colored gems over top.
I hope you’ve enjoyed my card today and that you’ll stop on over to the challenge blog to see what the rest of the team has come up with. Thanks so much for dropping in!
Hello friends! I hope you’ve had a wonderful week and looking forward to a great weekend coming up! We are having a heat advisory for the next several days over my way, so I thought it would be a great idea to stay indoors and craft! I also thought this would be a great time to catch up with some posts sharing some things that I’ve worked on the first part of this year that I hadn’t gotten a chance to share with you.
LONG POST – pull up your chair with your favorite beverage and enjoy!
I thought I’d share the Taylored Expressions Virtual Stamp Joy that I did back in March. I actually spent the weekend attending the classes and creating as I followed along. I managed to get all of the projects done the day after the event was over, but failed to post all of what I had made due to the fact that I was busy helping two different people move…and then life just got really busy after that as well! LOL
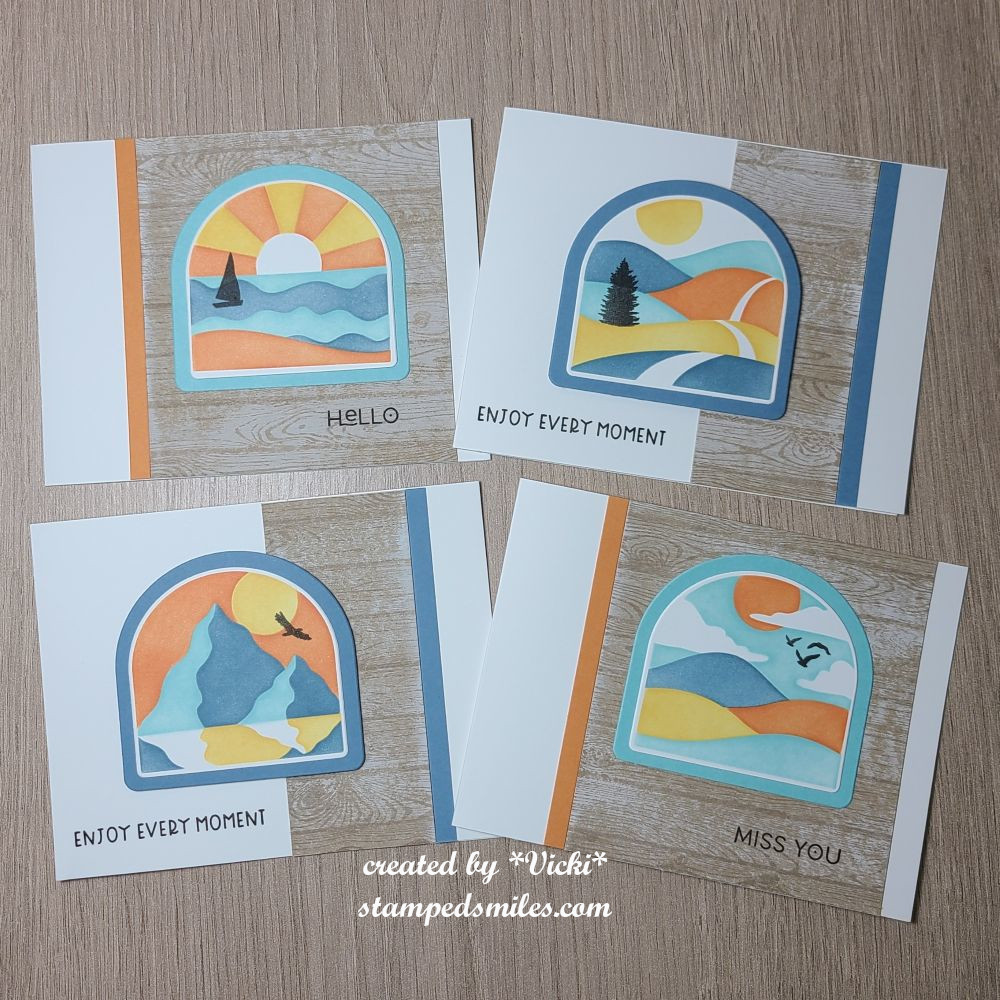
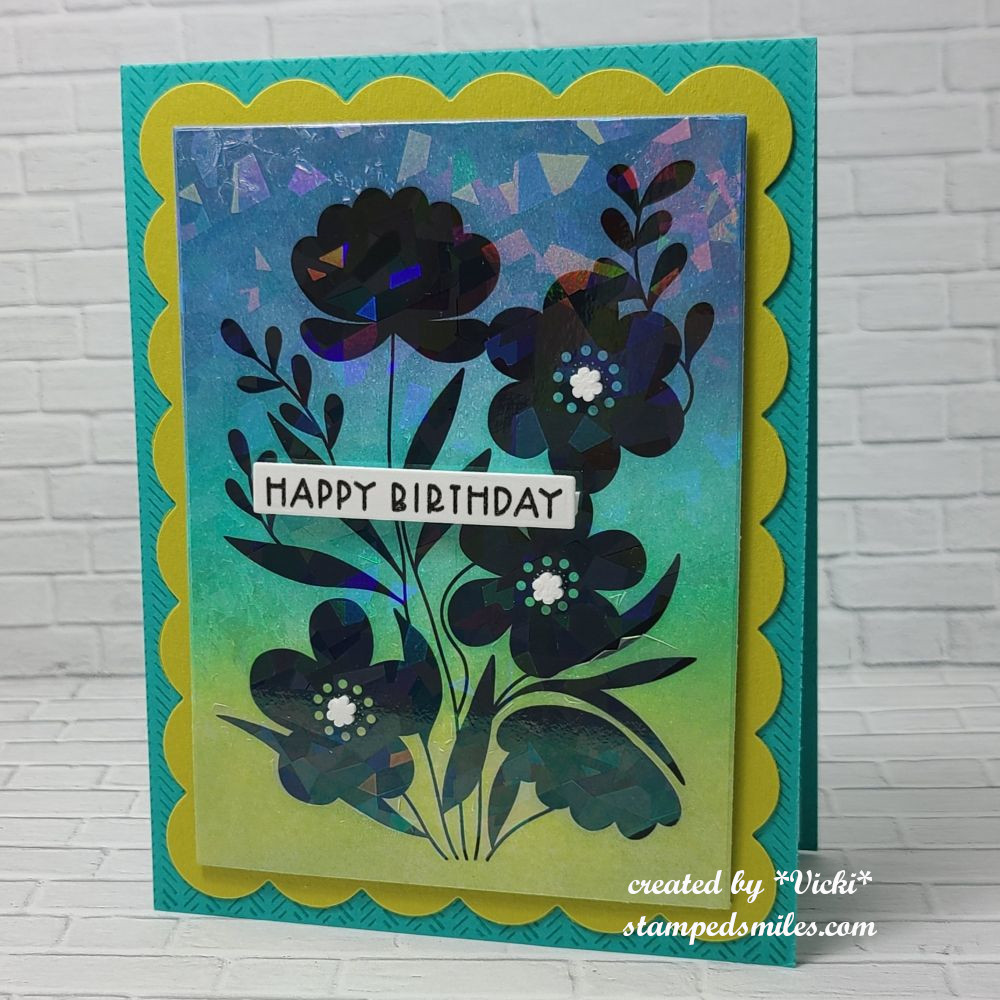
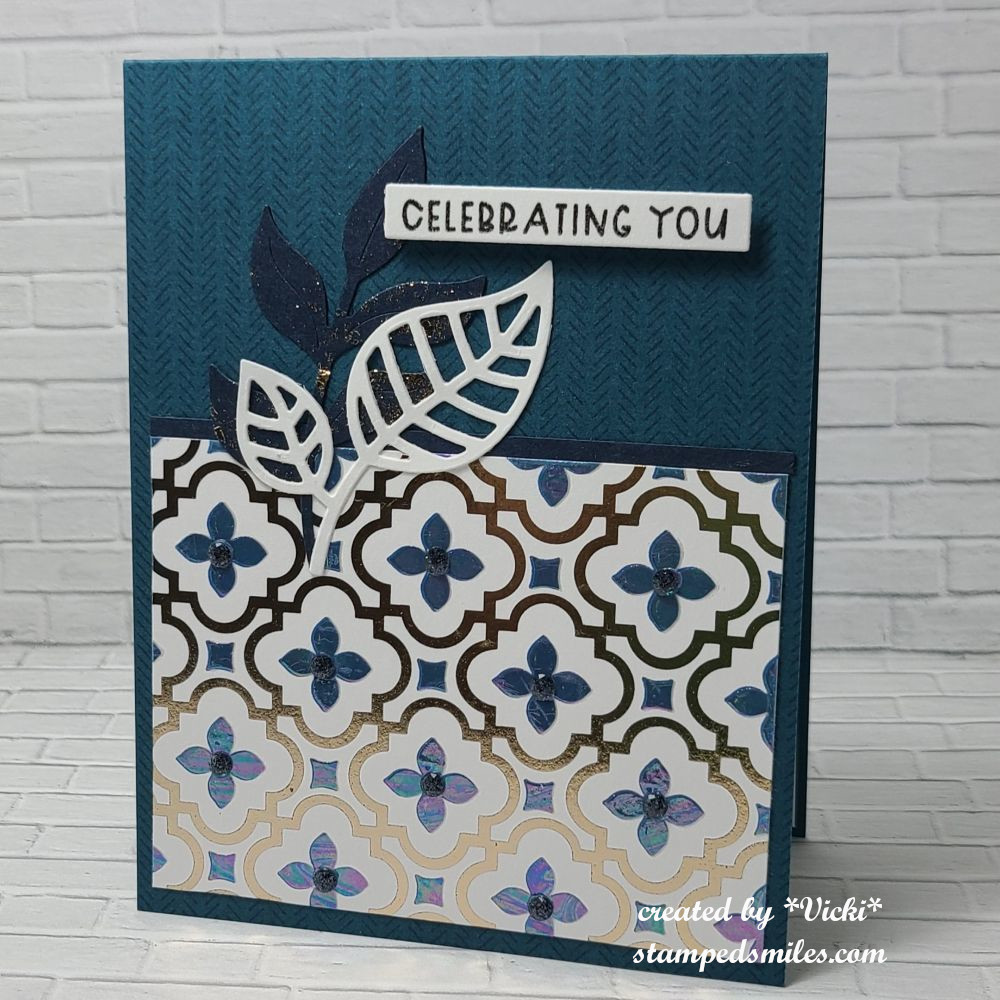
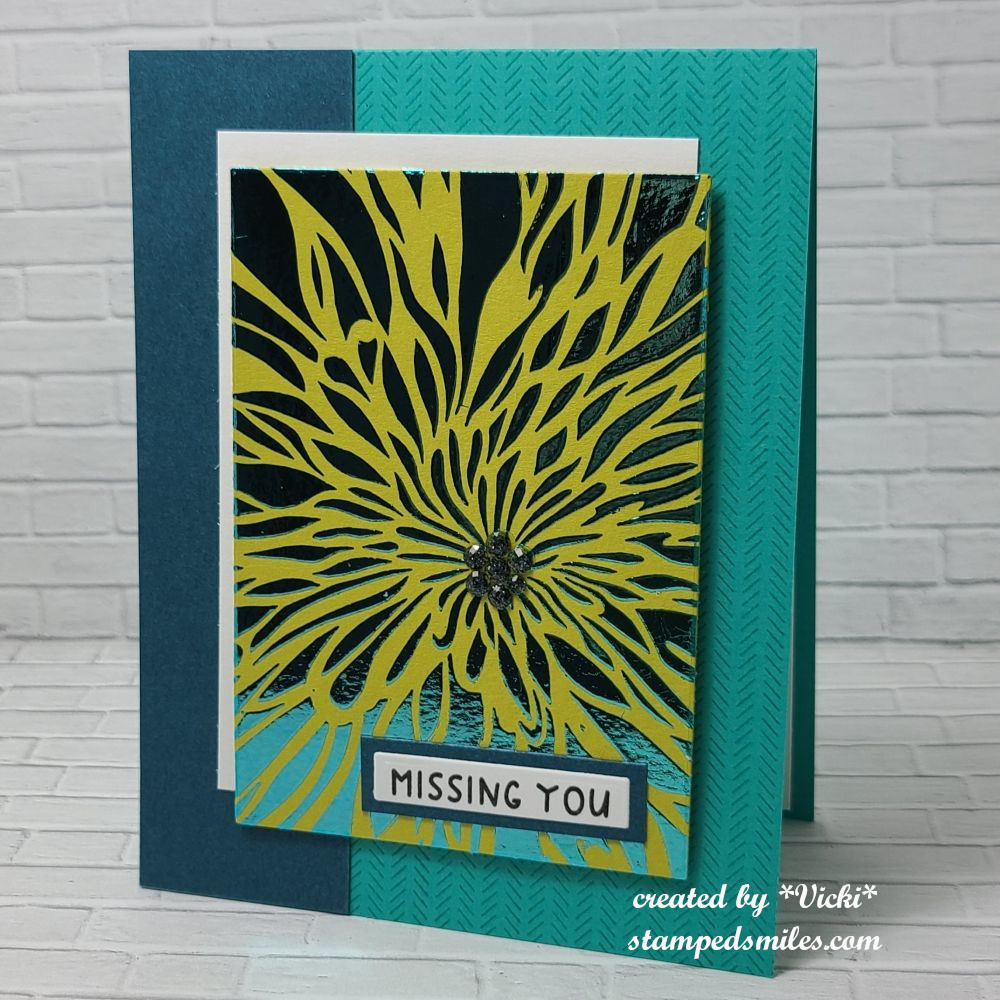
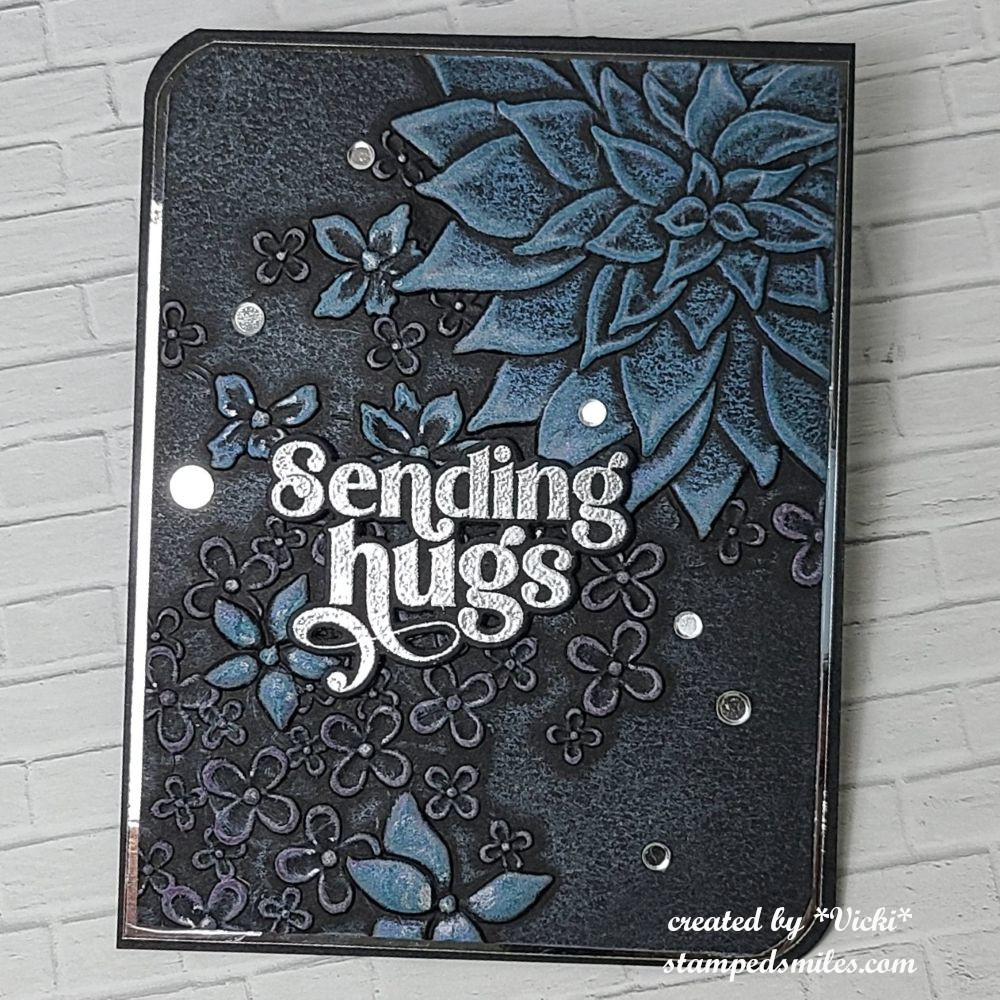
*I also have added an additional event from Taylored Expressions this last weekend called “Summer School” which concentrated on foiling techniques. Although I’ve done foiling before, I sure enjoyed seeing new products and learning a few new techniques too! (These four cards are at the end of the gallery photos below)*
If you’re on my website, just click on the images below to enlarge the photos and view any details underneath each one. ENJOY!
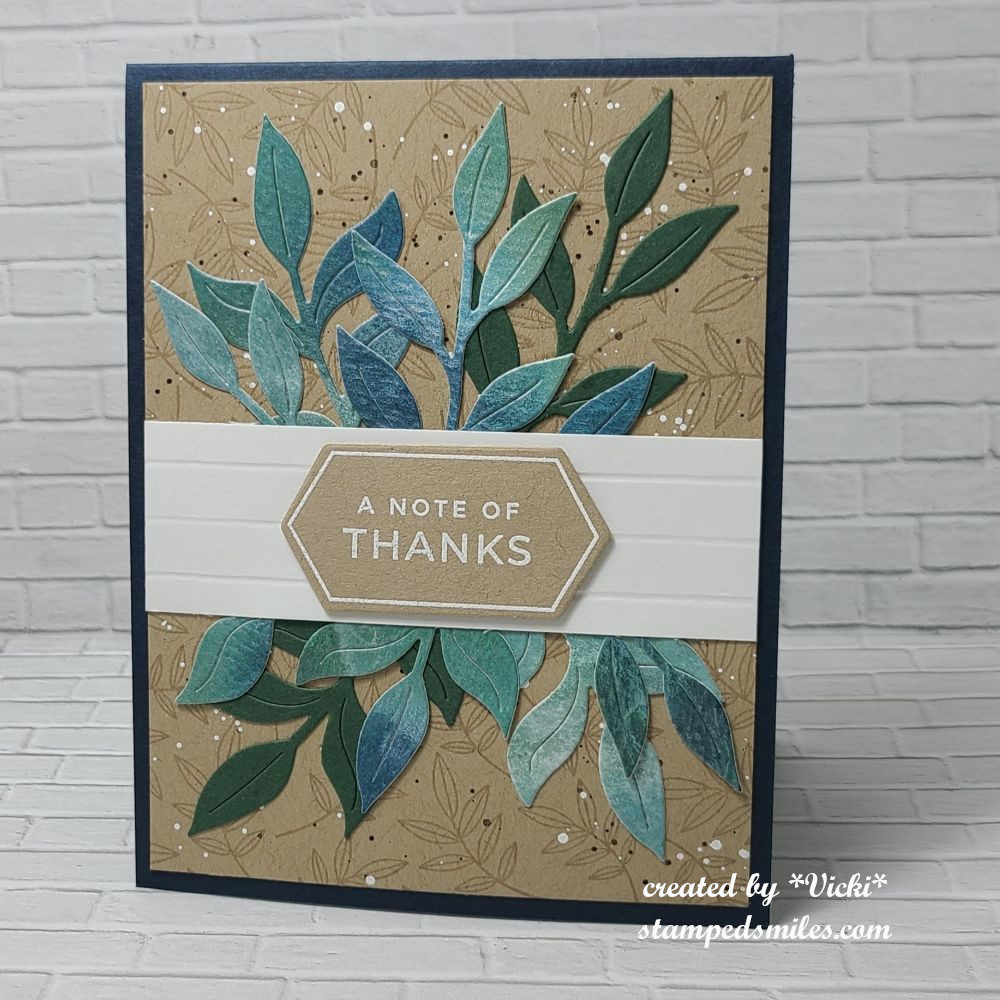
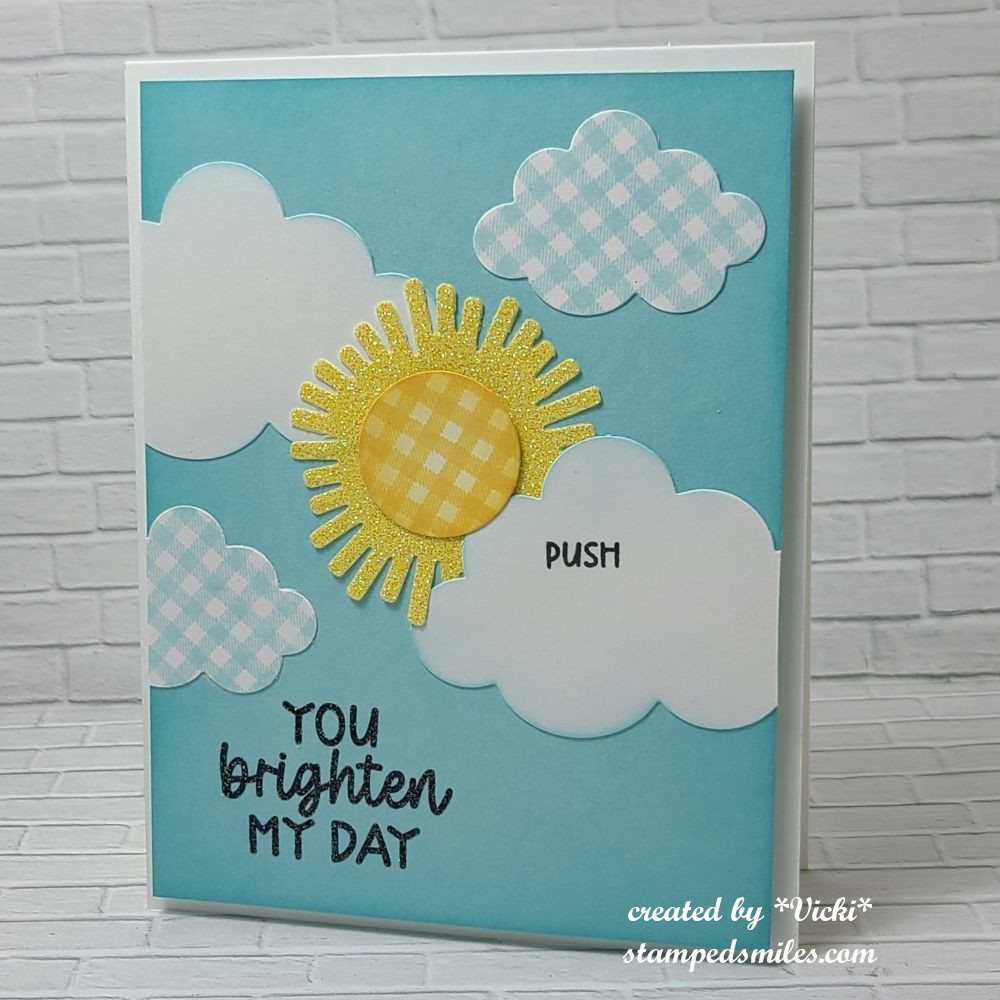
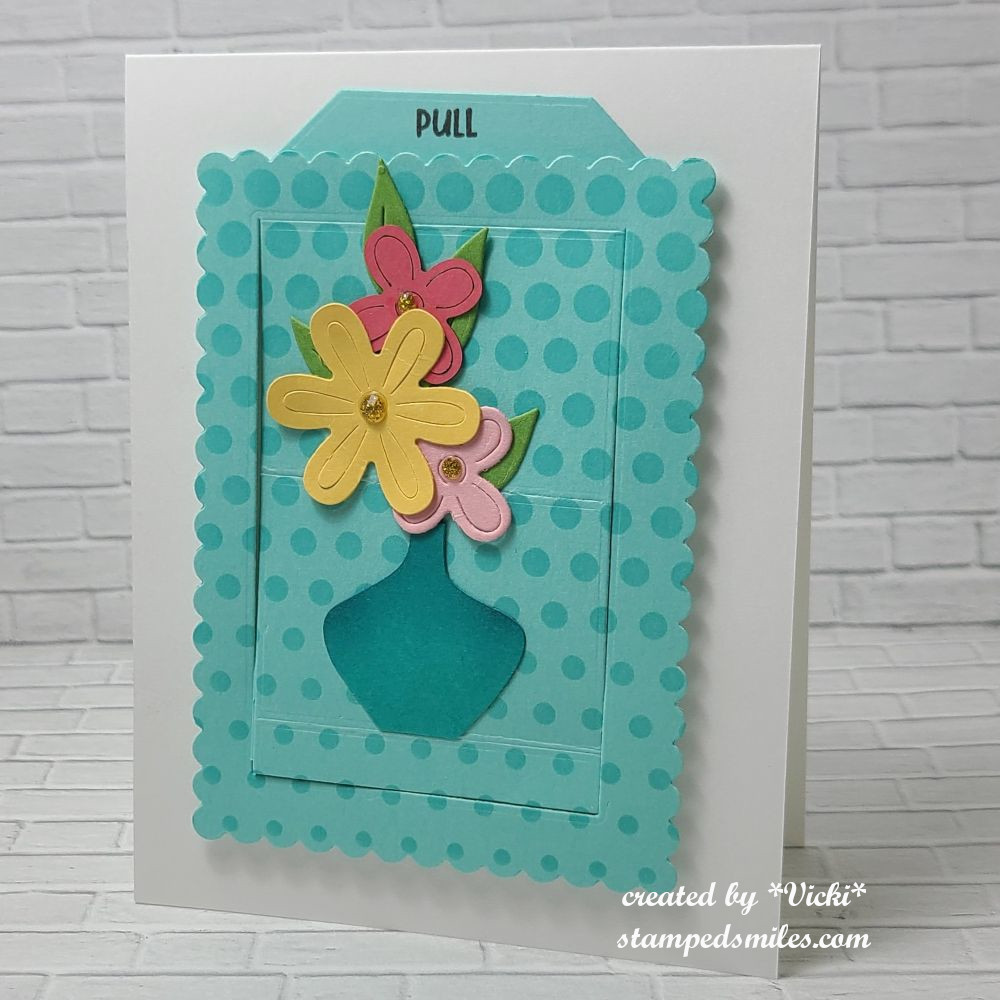
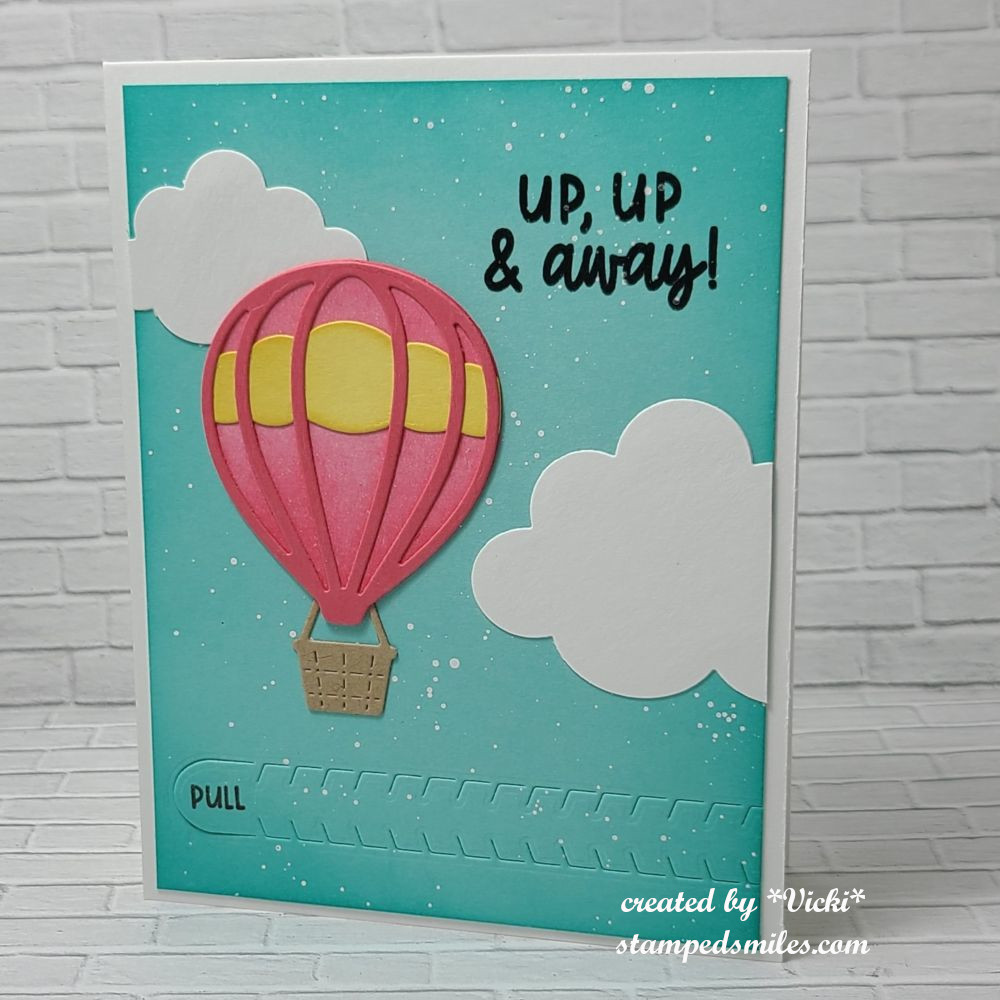
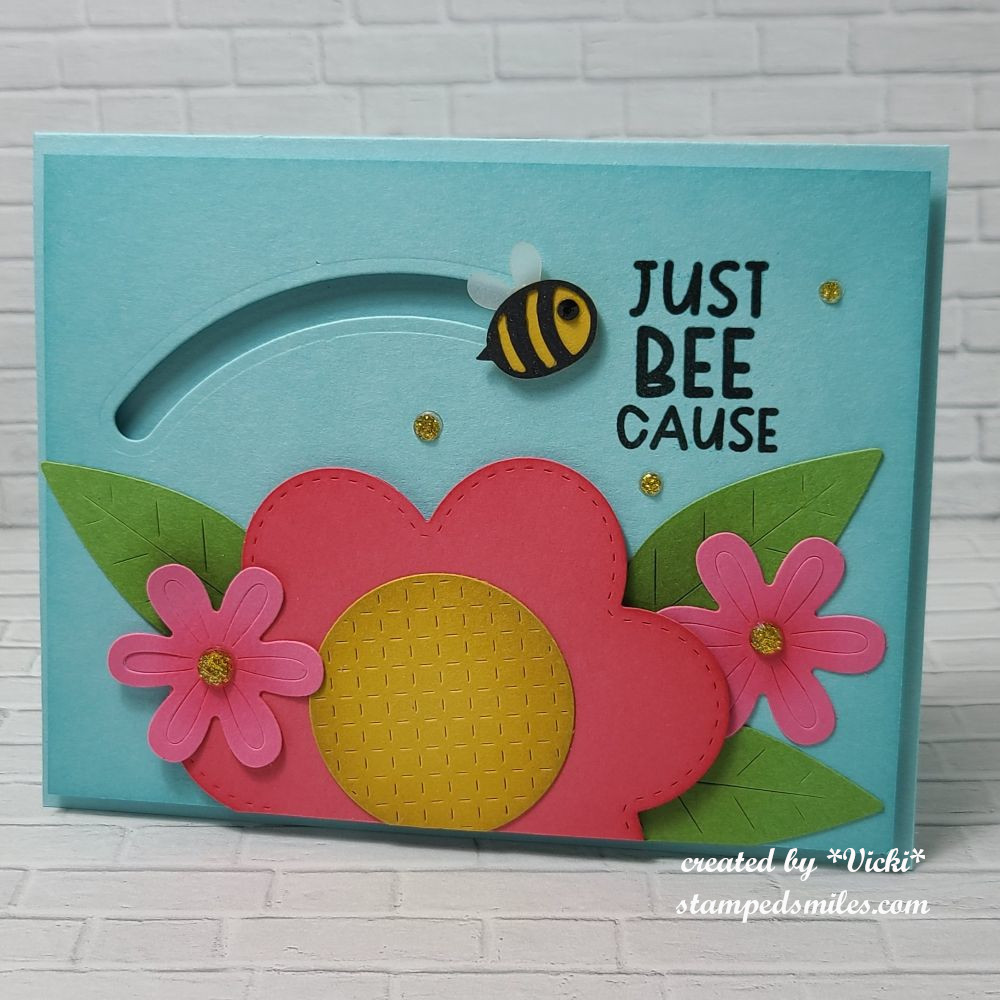
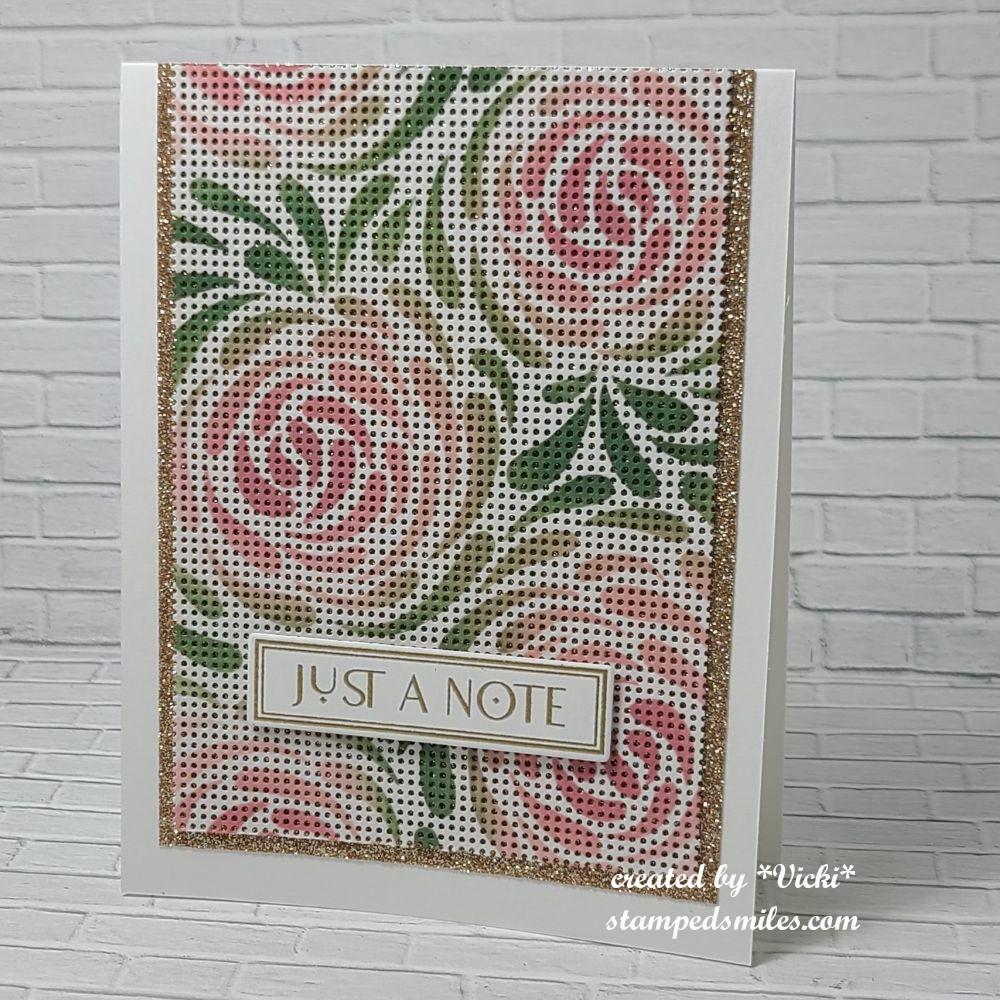
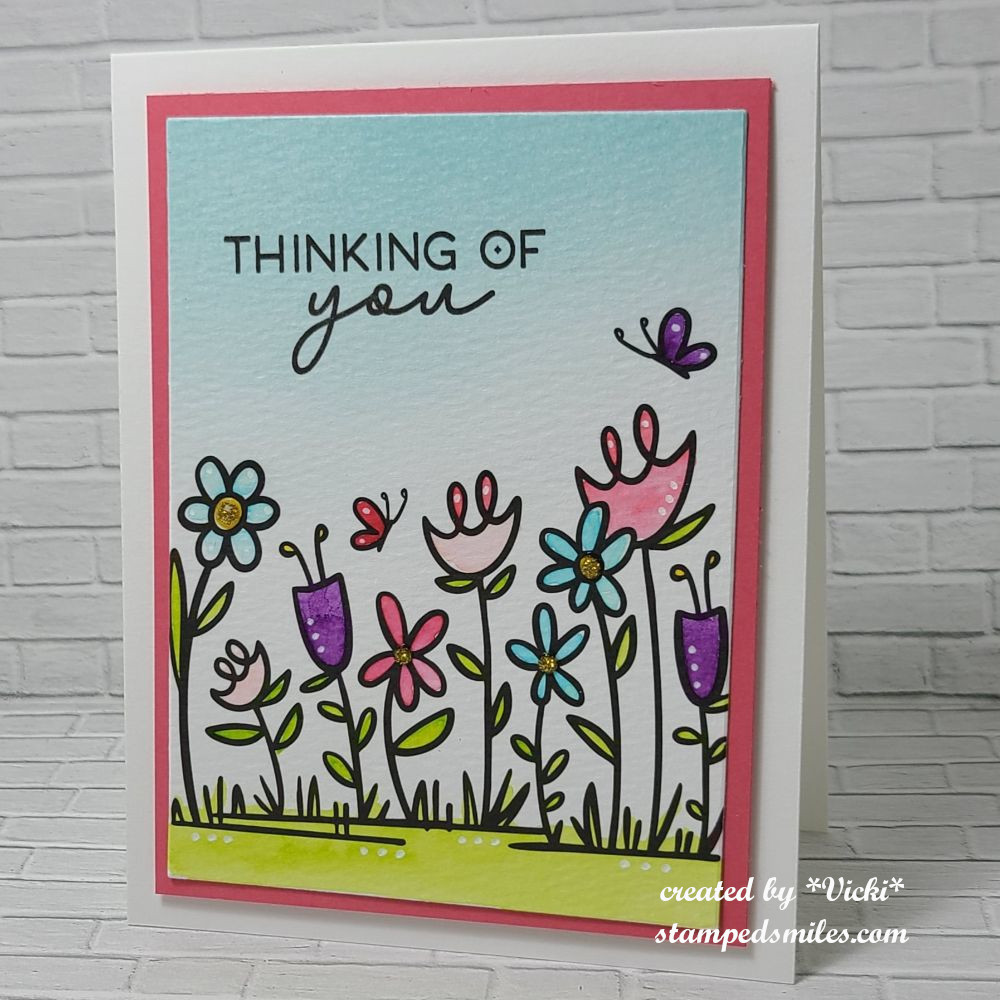
Dimension Class-ink blending and splattering die cutsDimension Class-markers over die cutsDimension Class-stacked die cuts for layersDimension Class-liquid watercolor smooshing with die cutsInteractive Class-Light Up CardInteractive Class-Light Up Card pushing button to activate itInteractive Class-Pop Up CardInteractive Class-Pop Up Card when you pull up on the tab to reveal message and flowers pop upInteractive Class-Rip Strip Card – when the recipient pulls on strip, it reveals messageInteractive Class- Spinner Card – bee spins and moves along curved trackSession 1 -stenciling on perforated papersession 2 – watercolor panels using Karin Brush markerssession 3 – stamp a stack using quad stencils to make four cardssession 4 – marker coloringsession 5-ink blending on stamp and embossing over imagesession 6-calendar easel card with message padsession 7 – ink blending over glitter cardstockSummer School-double foil technique and using markerSummer School – clear foilSummer School – foil paste and sprayed foil techniquesSummer School – Foil paste over color cardstock
I always love to learn new things with stamping/crafting along with all of the fun new products that come out too! I know I REALLY don’t need to purchase more things, but when cool stuff comes out, it’s really hard to pass it by! I think doing these classes and joining in on different challenges help me to use these fun things up!
So I hope you’ve enjoyed my post sharing all of the things that I’ve been doing! I will have another post sharing more things that I haven’t shared yet too! In the meantime, I’ve also been working on a scrapbook which has been fun and something that I haven’t done in a really long time! A baby can do that to you! LOL
Thanks so much for stopping in today my friends! I’ll be seeing you soon! Have a great weekend!😊
Hello and happy Friday! Thank you so much for the congrats from my last post about the baby! I look forward to meeting our new family member soon! It’s starting to get really warm over my way, so it’s a great time to be indoors with the cool air and craft.
Today starts a new challenge over at the Alphabet Challenge Blog! Our next letter is E and the hostess has chosen “E” is for Embossing (heat or dry) *Remember that this is a bi-weekly challenge, so you have two weeks to enter* I hope you will find some time to play along! Here’s what I’ve created:
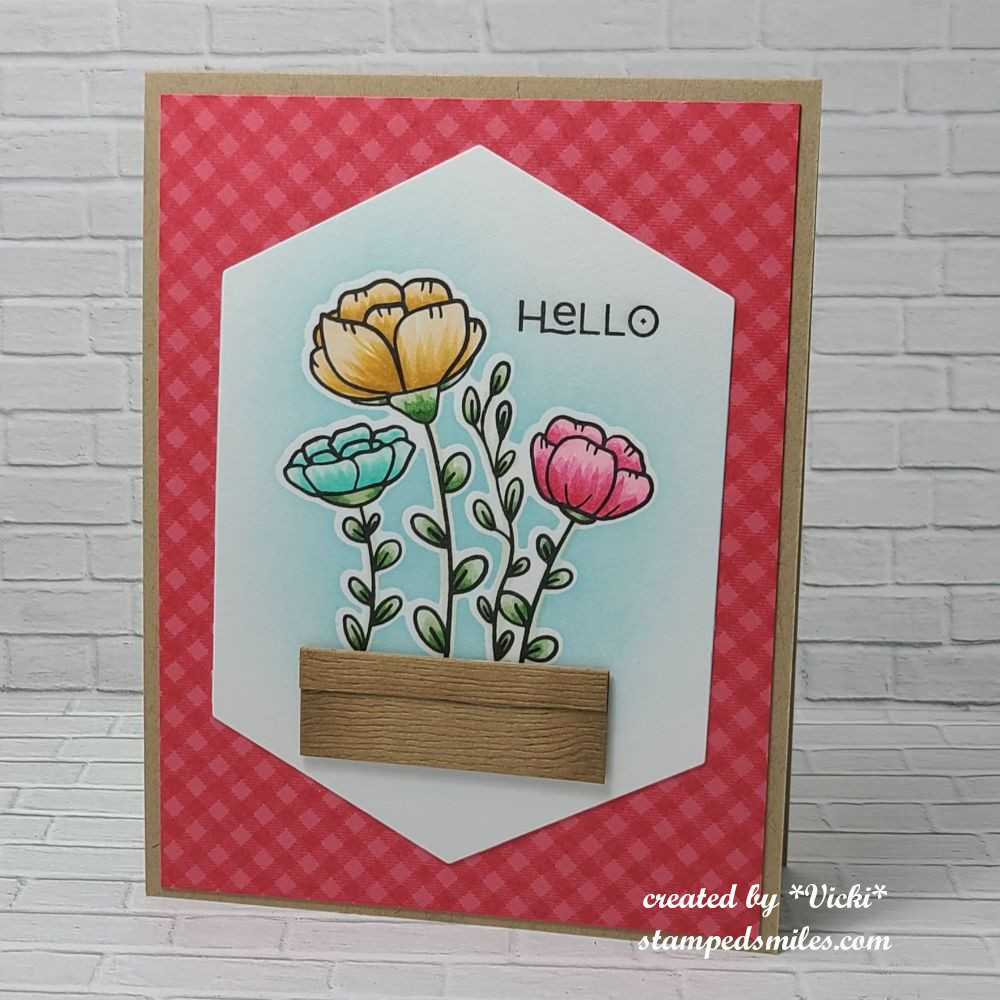
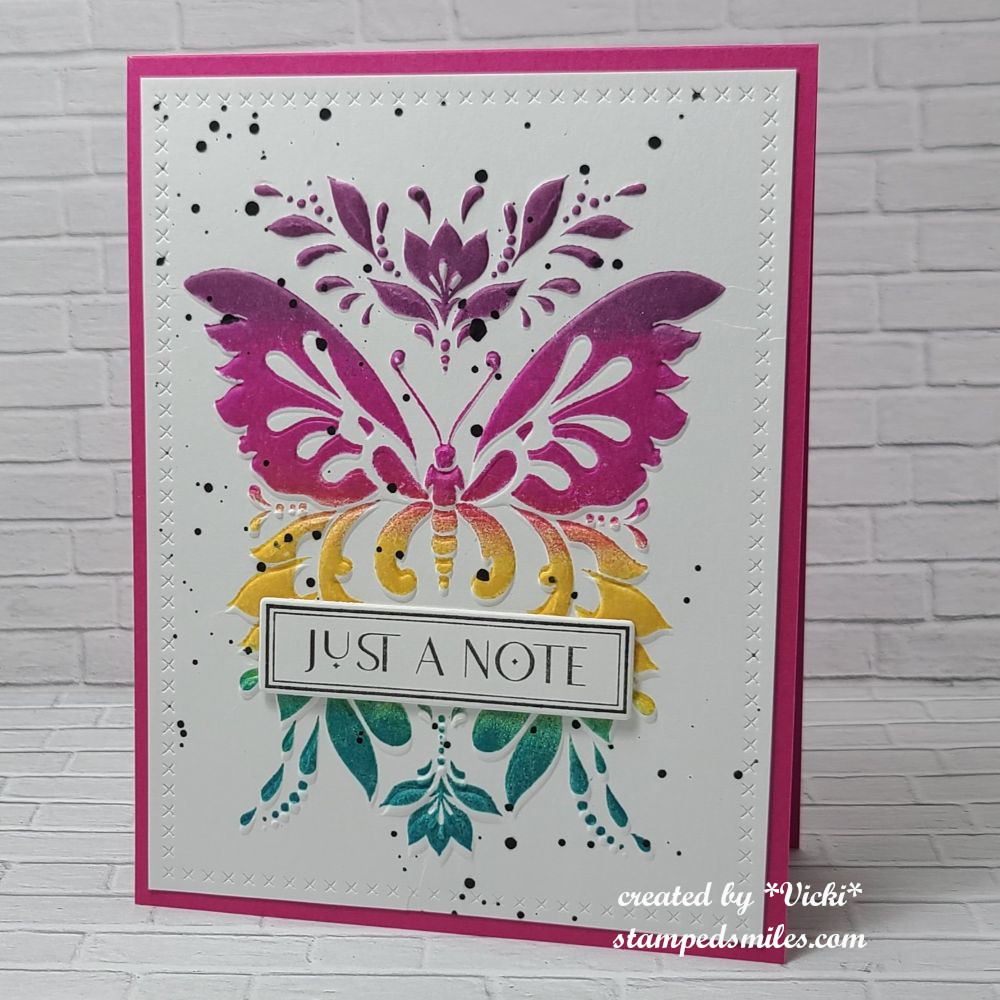
I absolutely love to emboss! I first fell in love with stamping because of the magic of heat embossing and then fell in love again when those embossing folders came out! So I’ve decided to do both versions for my card.
I haven’t had a chance to use this Drifting Flowers embossing folder from Simon Says Stamp. I thought it was so pretty! I wanted to emboss in black and try out my Lisa Horton Interference Inks with it, so after I embossed it, I used my finger to rub white ink over the raised areas. I then used the LH Interference Inks over that once it dried. (I can’t remember exactly what colors I used, but it basically started as an experiment and I had several pads open!) I also used a silver ink pad to rub the centers of each flower minus the large one.
I should also mention that some of the white ink was very slightly rubbed over the open areas as well because I got a white streak on it…so I just continued to rub all over those areas until blended in. I didn’t mind the look.
While the inks were drying, I silver heat embossed the sentiment and cut out it with the coordinating die. I additionally cut out two more for added thickness and attached to the panel. I layered this embossed panel onto a mirror silver layer with both of these layers getting rounded on two ends with my corner chomper. I added these onto a chomped top folding A2 black card base. Lastly, I added some silver sequins.
Please be sure to stop by the challenge blog to see the inspiration from team as well! I look forward to seeing your embossed projects in the gallery. Thanks so much for stopping by today and I hope you like my card. See you soon!
As You Like It – Favorite: to add a sentiment or not and why? (I most always have sentiments on my cards because I feel it’s important when sending a greeting card to someone and it’s hard for me to leave it blank.)
Hello there friends and welcome to April already! I do not know if this year seems to be flying by because I’ve been busy with life or it’s just flying by anyway! Speaking of things flying by…
Today starts up a new challenge over at the Alphabet Challenge Blog! We are on the last letter of the alphabet this time and the hostess has chosen “Z” is for ZOOM(anything that goes fast) for the theme. *Remember that this is a bi-weekly challenge, so you have two weeks to enter* I hope you will find some time to join us in the gallery! Here’s what I’ve created:
How cute is that pup standing on the bike seat to look over his bird friend perched on the basket! The name of these adorable animal friends are called “Gus & Gertie” which are a set of characters designed by Taylored Expressions. (If you click on the link, you can see the full line of them.) The set I’ve chosen is called Gus & Gertie Best Buds. I like these animals because they’re very easy to color!
I could’ve chosen the airplane from the set, but I kept thinking of those electric bikes & scooters you can rent from cities and they seem to go really fast when I see kids whizzing by on them! LOL
I kept my scene in a circle and added some clouds in the background that I stenciled in and then layered some hills/slopes and a grass border on the front. I just popped the “ride or die” sentiment at the top and attached the die cut image with foam tape. I layered the scene onto a black circle base that was attached to a red brick embossed background. All was attached to a top folding A2 white card base.
That’s all for me today! Thanks so much for checking in with me as I enjoy reading what you have to say! Enjoy your weekend and I’ll see you soon!
Challenges:
Critter Crazy – #97 Anything Goes with a Featured Creature
Hello friends! I hope that you’re enjoying your August so far! Recently, we’ve been experiencing much cooler temperatures than we normally have this time of year, so it’s been great to go out for a few walks.
I’m ALMOST caught up with things that I haven’t posted, with the exception of a few birthday cards that I’ll share later. For today, I’d like to share some projects that I’ve made at an event I attended back in April along with a class from Inky Stamper.
But first, here are a few projects I’ve made for their recent challenges:
This is a tag I’ve made for the Inky Stamper Inkspiration FB Group July challenge. The challenge was to make a tag and I thought I’d try out a fun idea of making a pocket for my tag that held another tag inside so that you could put a message and a gift card.
I’ve used some Limeade Dots/Stripe 12×12 Doodlebug paper to cut it out with and used a border die to help with the pocket decoration. I cut another tag to place inside the pocket for a special message and to include a gift card. At the top of the inside tag, I’ve made little “charms” with images from the Inky Stamper Margarita stamp set. I’ve also stamped the background of the inside tag. I don’t usually color with pencils, but this time I decided to pull them out.
To get the sentiment to fit around the pocket border, I had to curve the stamp a bit to make it work with the tag.
So the Inky Stamper Inkspiration FB Group challenge for August was to use a white pencil. This happens to be a favorite to use for Chelsea with her images and it does make for a nice quick highlight. So the images were just stamped on colored cardstock and I used the white pencil to highlight them with.
I decided to combine this with last week’s Craft Roulette Episode #226 with the parameters of – Project: “See-through” (I made a see-through shaker card) Colors: “Jungle” (I used greens and browns for my jungle) Element: “Teacher(s)” (The sentiment says it all!) Random: “Tangle” (There are a tangle of leaves inside shaker element.)
Back in April there was an Inky Stamper Inky Escape event that I attended and here are some projects that I made from the Make-n-Takes that were provided as well as some of the projects that I was working on using the new release that came out during the event:
(If you are on my website, click each photo to enlarge it and read the captions)
The tag was made my Chelsea that was attached to my “swag bag” and the box was a make-n-take project. There was a moon pie included with project, but when I came home, I added 4 Ghirardelli chocolate squares to show how many fit inside.This card uses the same stamp set as the tag above. The background is a scratch ‘N’ sniff made with Kool-Aid.This was a light up card using the Pear Blossom EZ Light.Cute make ‘N” take with a magnet on the back of the baby roo that fits inside the mama pouch slit!This was an extra make ‘N’ take using some ALL & Create Washi Tape! Cool!
There is actually another Inky Escape coming up in October that I’m attending and I’m sure it will be fun with Halloween and Christmas theme combined!
While I was there, I worked on some more of my own projects using some of the new sets:
I decided to take and use one 6×6 paper pack from my stash and it seemed to go really well with the outer space theme and I love the purple colors from this set. I’ve used the following Inky Stamper stamps sets: Astronaut, Big Words, & Alien.
Click on the photos below to see a close up look at each card:
Before the Inky Escape Event, there was also an on-line class from Inky Stamper that I took part in and that’s because I thought the projects were super cute! Here are the projects that were completed for this class:
These were both created with the Inky Stamper Hedgehog stamp set. The Journal Book , the Doodlebug DIY Snow globe and Doodlebug dimensional stickers/shaker balls were all provided with the class. I decided to add a few extra elements with mine. The tiny hedgehog on top of the snow globe was included in our box, but not apart of the projects…but I thought it would be fun to add it!
Speaking of Doodlebug, while I was at the Inky Escape Event, Chelsea had a few things on sale and I snagged a kit and special ordered the Doodlebug Frame with it. So when I got back home and the frame came in, I wanted to do my project right away:
I have this displayed in my stamp room and I love the rainbow of colors in it with the different crafty tools in smile faces! The size is 8in. x 8in. with a glass on the front. Although it’s not really that visible in the photo, it is actually quite dimensional.
I think it goes well with the black frame that matches my black frame with the crafty squares swap group I was in. (You can see that post here.)
Whew!😳 I’ve been really busy this year, but I don’t think you would’ve known this without my posting about it! I’m glad that I’ve gotten caught up with things that I’ve done and hopefully I won’t be doing posts like this in the future! It just seems like so much all at once!
Anyway, there we go and now I need to finish and send out a few birthday cards coming up, so I will catch up with that later as well! For now, thanks so much for stopping in and keeping tracks of my sporadic postings! I will be back to share a DT post for a challenge coming!
Hello friends! Easter is coming for us for very soon and I’ve been enjoying all of the Spring that’s starting to come up outside with flowers and buds on the trees! It’s still a little cool, but hopefully the weather will even out and stay warmer!
Since I’ve been trying to get motivated for Easter, I’ve pulled out some papers from my stash and have been inspired to CASE (copy & share everything) a friend that really inspires me to use things I have! First, I’d like to share a fun Easter card that I’ve made for a sketch challenge that I was inspired by as well:
That sitting bunny is so cute! (Thank you Carol…more on that later in post!) If you check out the sketch from the Sketch Saturday challenge blog (see in challenge list below), you will see all of the fun angle strips in the sketch. I thought it would be fun to pull out some Easter papers from my stash. I wasn’t sure how to do the background until I saw that this sitting bunny worked perfect for a part of the paper pad that had this wheelbarrow image in it! I cut it out from the paper and placed the bunny on it.
For the background of the card, I thought it would be fun to use my stencils to create a scene with grass and clouds. The wheelbarrow bunny fit in the open area and then I used the angles from the sketch to cut pieces with the same Easter paper pad. I just eyeballed everything by marking notches and lining those notches in my paper trimmer to get a straight cut. Even the solid paper on the base layer came from the paper pad. I just cut it A2 size to fit over an A2 top folding white card base.
The sentiment was stamped and cut out with the coordinating die. I added some shadow under wheelbarrow with a green marker (not really the color I wanted, but it worked), and colored a bit of pink on the bunny too. I added teal rhinestones next to the sentiment and done.
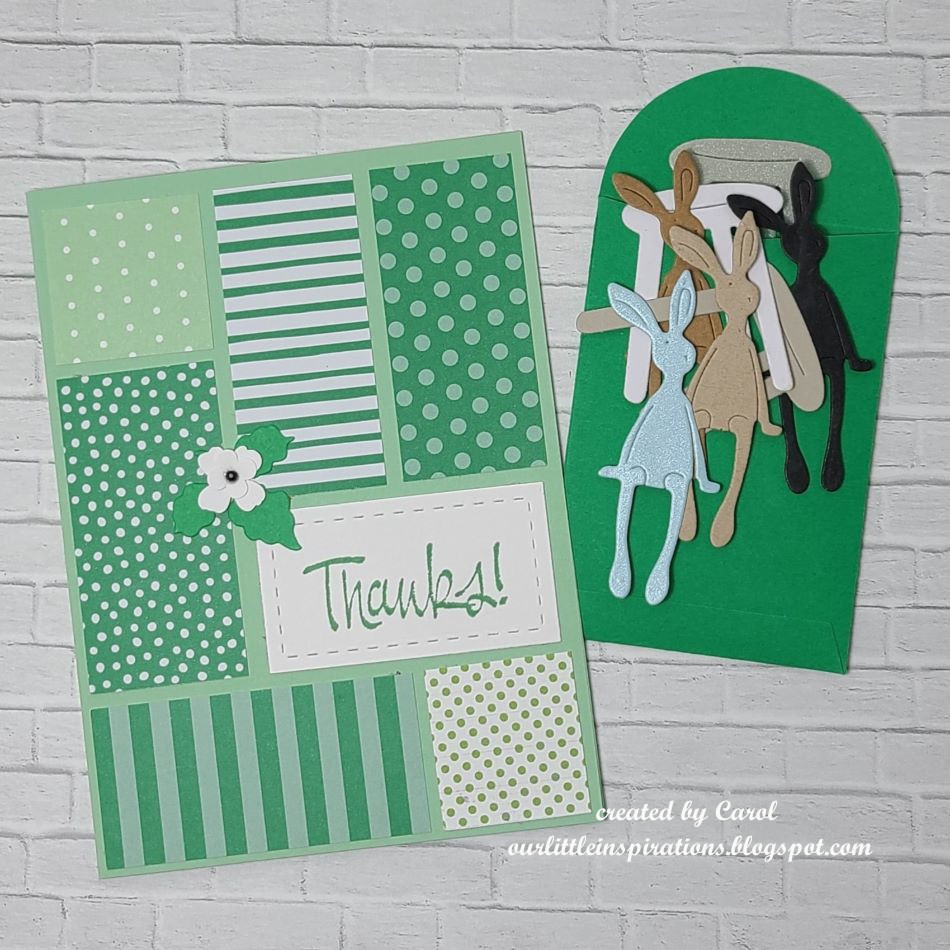
Next, I wanted to share something else that I was inspired by from my friend Carol at https://ourlittleinspirations.blogspot.com who sent me a very cool card and kind gift:
She always inspires me with her “snippet” creations and coming up with cards like this one to utilize those pattern papers we hoard so much! The pattern is very pleasing to the eye and so I wanted to create one myself! With all of the papers I have, I’m sure I could make a zillion cards! 😆 I also love how she used a monochromatic green theme with it…which I will need to try another one with this idea! You should go check her blog out and be inspired too!
Also, she was very kind in sending me these die cut sitting bunnies & stools! I do not know exactly where this bunny is from, but I’ve seen it around the craft world. So cute! Thank you so much for your kindness and inspiration my friend!
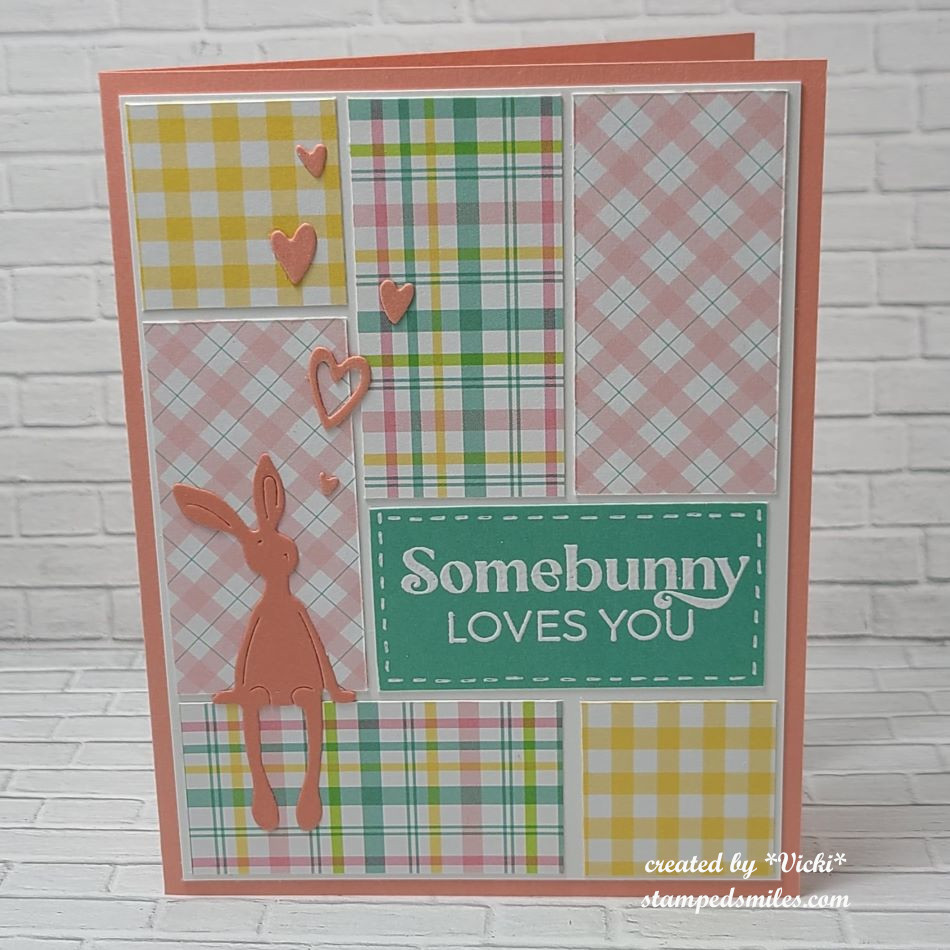
So here’s the card that I created inspired by Carol. I really love plaids and I thought it would be fun to re-create her design which I measured out her pieces and cut based on what I thought they were. It was really fun and not as hard as it looks like it might be. I wrote the measurements and cut from the same Easter paper pad as I used on the card above. I started with a white base…that way if I messed up, it wouldn’t matter too much. The sentiment piece was also from the same paper pad. I just white heat embossed the sentiment and added some stitch details with a white gel pen.
I used one of the sitting bunnies that Carol provided me with, and tried to match up what I had from my stash the best I could to die cut some hearts along with the A2 side folding card base.
I brushed the hearts with a glitter brush pen and called it done.
I had so much fun playing with these paper blocks and bunnies! I hope you’ve enjoyed my creations and inspiration today as well! Thanks so much for stopping by! C U SOON!
Hello friends! I hope that whatever state you’re finding yourself right now, that you’re able to find a bright spot in your day somewhere. In watching the news, there are so many variable patterns in the weather and my heart goes to those in Hawaii dealing with the wildfire disaster. My card today is not only for the DT challenge, but also a tribute to our tropical friends in Hawaii.
There’s a new challenge today over at the Sparkles Monthly Challenge with the theme of: TROPICAL and/or BEACH
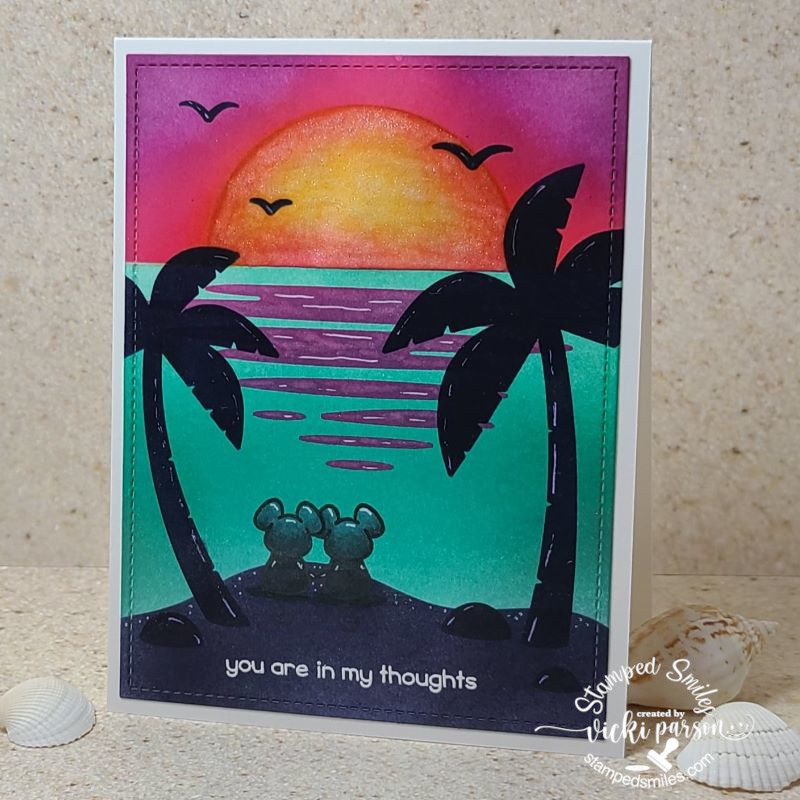
Since I live in the Midwest area, I don’t get a chance to see too many scenes like this, but maybe someday hubby and I will get a chance soon! The inspiration for my card came from my computer background photo and I loved the look of the water with the setting sun. Everything I’ve used on my card today came from Lawn Fawn.
The entire background was done with stenciling using the LF Beach Sunset Stencils and inks. I added that mice couple from a freebie stamp set that came with one of my orders. I colored them pretty dark with cool grey tones so that they blended into the beach and looked like a silhouette. The sentiment at the bottom was white heat embossed from the LF Butterfly Kisses set. I’ve used a glitter brush pen over the sun and purple reflective water. I think I got a little carried away with the white gel pen, but I was trying to make it look like the dark areas were highlighted with some of that setting sun over it and there’s just no removing any lines! (If you’ve done this, then you know what I’m saying!)
I hope that you’ve enjoyed my Tropical themed card today or found some inspiration with it. Thanks so much for dropping in and please check out the challenge details with inspiration from the DT and play along!
Hello friends! It’s been a bit since my last posting! I’m still crafting, but I’m also enjoying the outdoors lately too! I’m just not making the time I need to post on my blog here! However, being on a design team helps to keep me focused on posting and hopefully it’s something that will bring motivation because I need it! So I will try and get some more posts in!
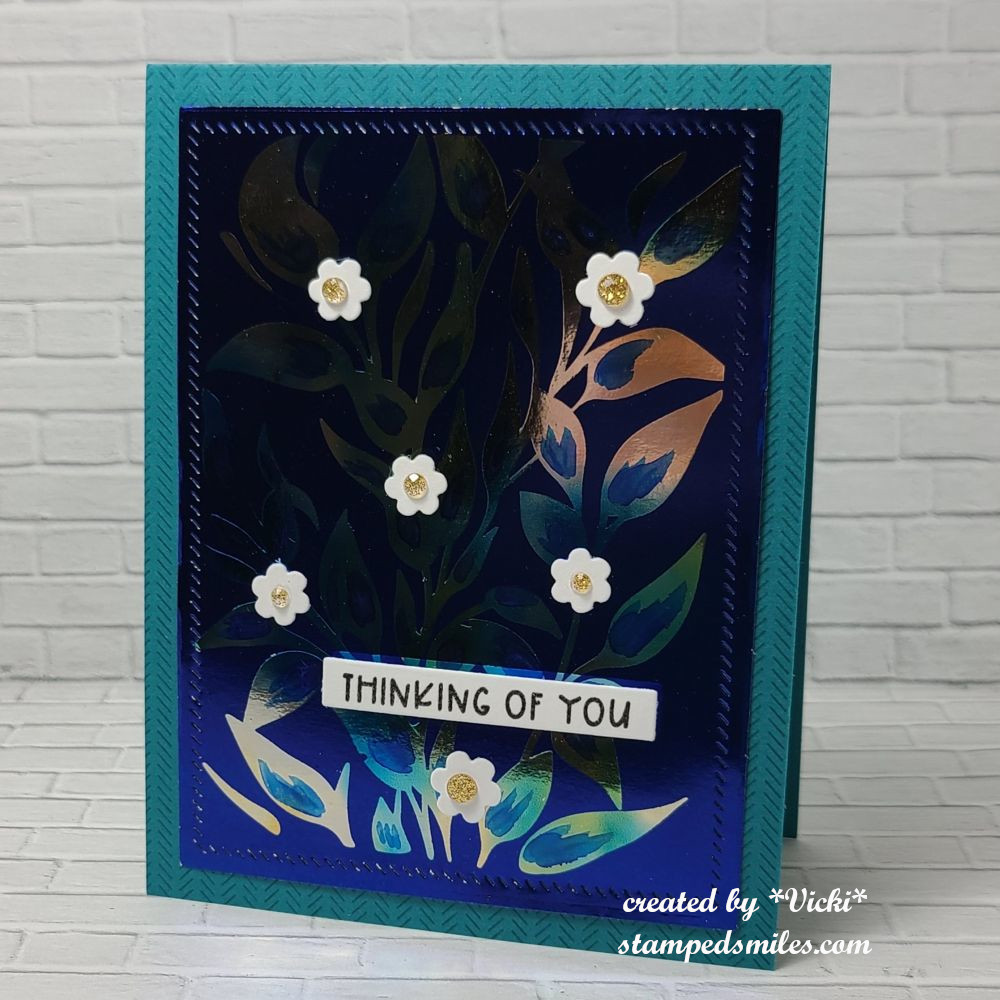
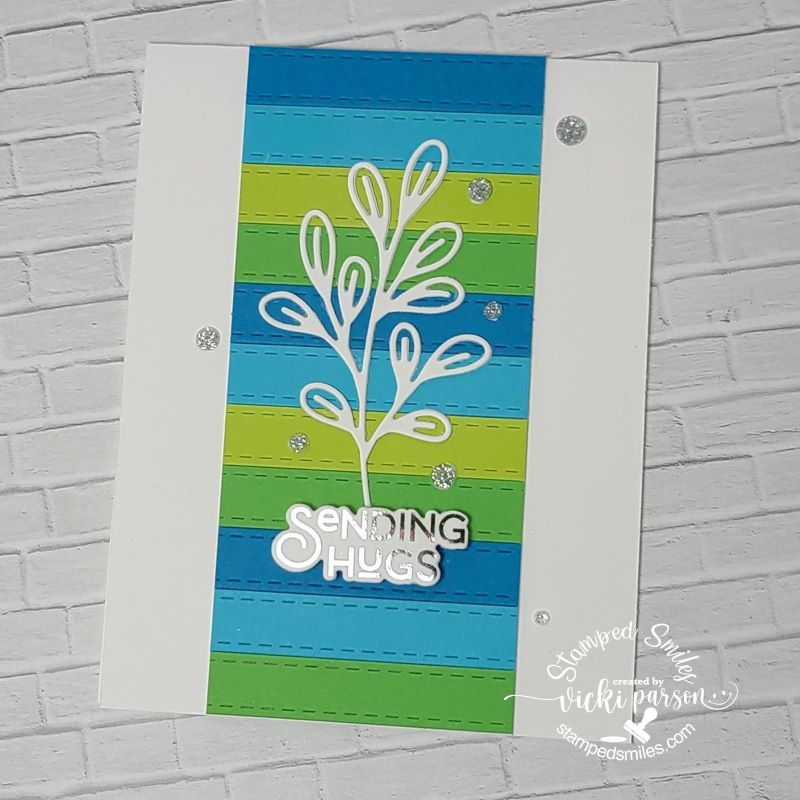
Today starts a new challenge over at the Sparkles Monthly Challenge and the theme is “No Stamping Allowed!” This may seem a bit challenging, but I look forward to seeing what people come up with for it! Be sure to check out the blog to see what the design team has come up with for inspiration! Here’s what I’ve made for the challenge this month:
I was trying to channel something that would work and realized that I had these fun strip dies from Taylored Expressions and I wanted to play with some new colors, so I ran with that on the middle of my card front by alternating the strip colors.
I also die cut a frond three times and glued them together for thickness and sturdiness. I attached it over the colored strip panel and then added a sentiment that was already toner printed so that I could foil over it with silver Deco Foil. I also had a die that cut it out which was popped up with foam strips and added to the bottom of the die cut frond. Lastly, I’ve just added some silver glitter drops randomly over the card front.
Hope you’ve enjoyed my non-stamped card today and will think about joining in the challenge with us this month! Thanks so much for stopping in! Have a great week!
Hello friends! Hope your week is getting off to a great start. I can’t believe that January is over and we’re starting a new winter month already, but at the same time I’m already feeling like this cold weather can move along faster to Spring!
Today I have a couple of creations that I’ve made using those Inky Stamper products and playing a little “Craft Roulette” too! Chelsea was on Craft Roulette and if you’ve never seen it play out in action, take a look at the You Tube channel to see what it’s about! She was on episode #146 and here’s my card that I’ve made with her perimeters:
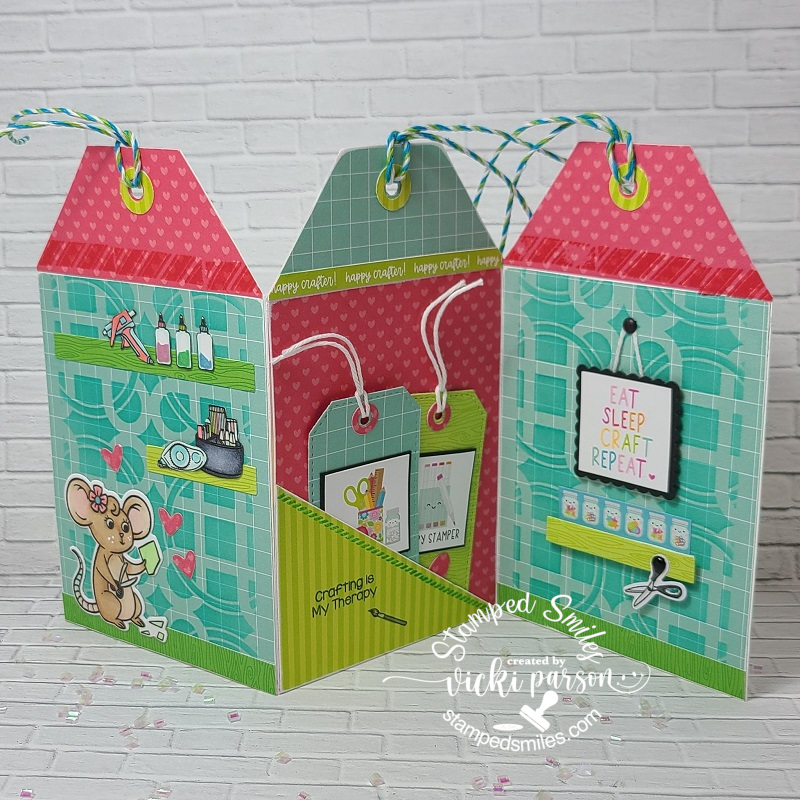
I had so much fun with this and I’ve never made a tag shaped accordion card before, but it was stuck in my head to give it a try and pull out the Inky Stamper Craft Room set to create it. The “Roulette Wheel” spun on: Double Tags, shelf/shelves, 2 shades of green and something in the background.
The two shades of green were easy with using the Doodlebug Paper Packs and adding in a few other greens to the coloring. I’ve also made two tags and placed them inside the pocket area in the middle of the accordion design. I used a stencil in the background of the other two panels and of course I added some crafty goodies to the shelves in Rosie’s craft room! The accordion card was easier than I had anticipated and just made a mini slim line size design by cutting off the edges to create the tag shape. The hole and reinforcers were made using punches and dies. You can see that I’ve colored up, cut out “Rosie” in her craft room where she is cutting her design going through her creative head!
When it’s all folded up and closed, this is what the card looks like. I could always add a sentiment on the back, but I thought this would be fun to send to a fellow crafter for sure! I just wish my shelves looked this organized! And I always try to use another thing from my stash as I pulled out lots of twine that gets thrown in a bin, so it was nice to use for the tops of each tag area. (Maybe on the back of the card, the crafter can add items to use up on their next project and display it! LOL)
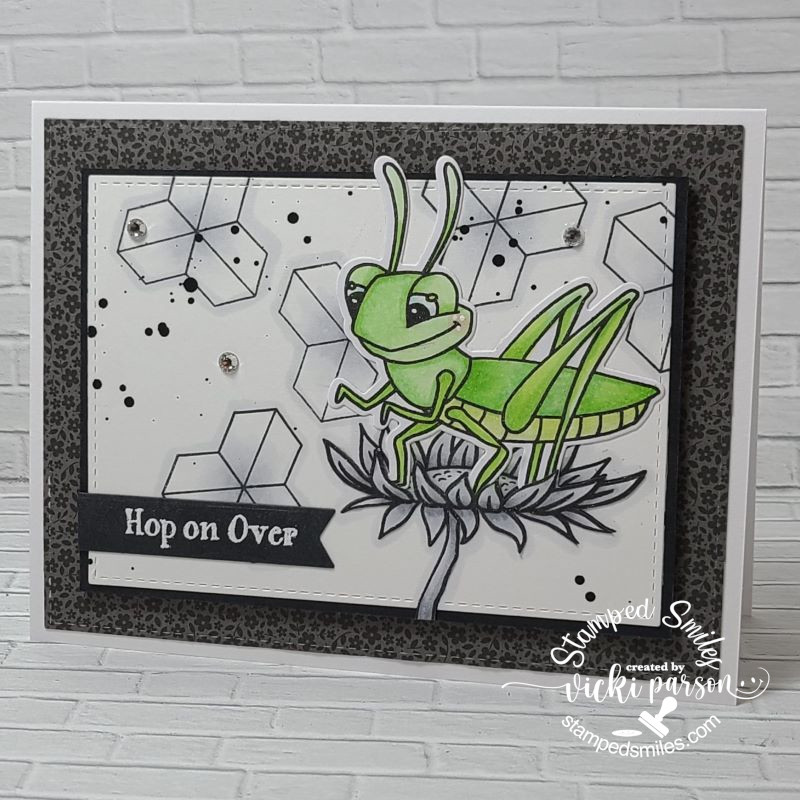
And here’s another card that I’ve done for the January challenge on the Inky Stamper Inkspiration FB Group which was to use: Black, white plus one other color:
I decided to pull out the Grasshopper set and make everything in the background black and white, but just color the grasshopper in green. All of the elements including the sentiment came from the same stamp set. I splattered some black paint over the background and the images were colored with some cool gray Copic markers. I white heat embossed the sentiment over black and cut it out with a banner die.
Behind the white panel, I took a piece of the black floral paper from the Doodlebug Floral & Graph Paper Pad and attached that to a white top folding A2 card base. It was a fun and easy card to put together!
Thanks so much for “hopping” over here today! Hope you’ve been inspired or smiled!😊
Autumn is always a favorite time of the year with the changing of the Season: cooler temps, pretty colors and being able to go out enjoy all of nature with its bounty and beauty. There’s also nothing better than freshly picked apples from the orchid too! It’s something that I love to do with my husband every year at our local orchid.
So, when Lawn Fawncame out with this adorable set along with a free craft-a-long class, I knew I wanted to participate!
This is the first card we created using the LF Apple-solutely Awesome stamp set and dies. For the class, we actually stamped, colored and cut out all of the images that we would be using for both of these cards. I think the fun thing about this set is arranging the images to figure out where you want to place them for your scene. Since it was a class and I didn’t have to think too much, I decided to just follow along with what I had and just enjoy the process.
I didn’t have the stencil set that they used for the class, so I had this Pink & Main Leafy Stencil that I thought would work out fine and I just blended different colors with some Oxide inks. The white panel was cut with the LF Small Stitched Rectangle dies, popped up over the stenciled leaf panel and the sentiment was stamped at the bottom before attaching the images.
I’ve already sent this card to someone that gifted us some homemade applesauce…YUM! (Already gone!)
And here’s the second card we created for the class using the same stamp set and stitched rectangle dies. I had fun with that “cider jug” and adding a bit of sparkle to the contents inside with my glitter brush pen.
For the sentiment, I die cut it out with some LF Woodgrain Cardstock and ink blended some brown Oxide ink at the bottom of the die cut. I used some foam strips to pop it up over the panel. The white panel was done the same as the above card. I used the same stencil as the above card as well but only kept the yellow tones for this one as it seemed too busy with all that was going on with the card.
So, although this was a class that I mainly followed along with except for a few minor changes, I had fun making these while getting into the Fall spirit! I hope you’ve enjoyed them as well! Thanks for stopping in!