Hello and happy Spring! Hope you’re having a great March so far. We just received about an inch of snow on Spring day, so I hope it starts getting warmed up from here! I’m ready for warmer weather so I can cook out on the grill….YUM! Speaking of that….
Today starts a new letter over at the Alphabet Challenge Blog and our lovely hostess would like to use “Y” is for YUMMY as the theme this time. How fun is that! Remember you have two weeks to join in the gallery to play with us. Here’s my creation for this challenge:
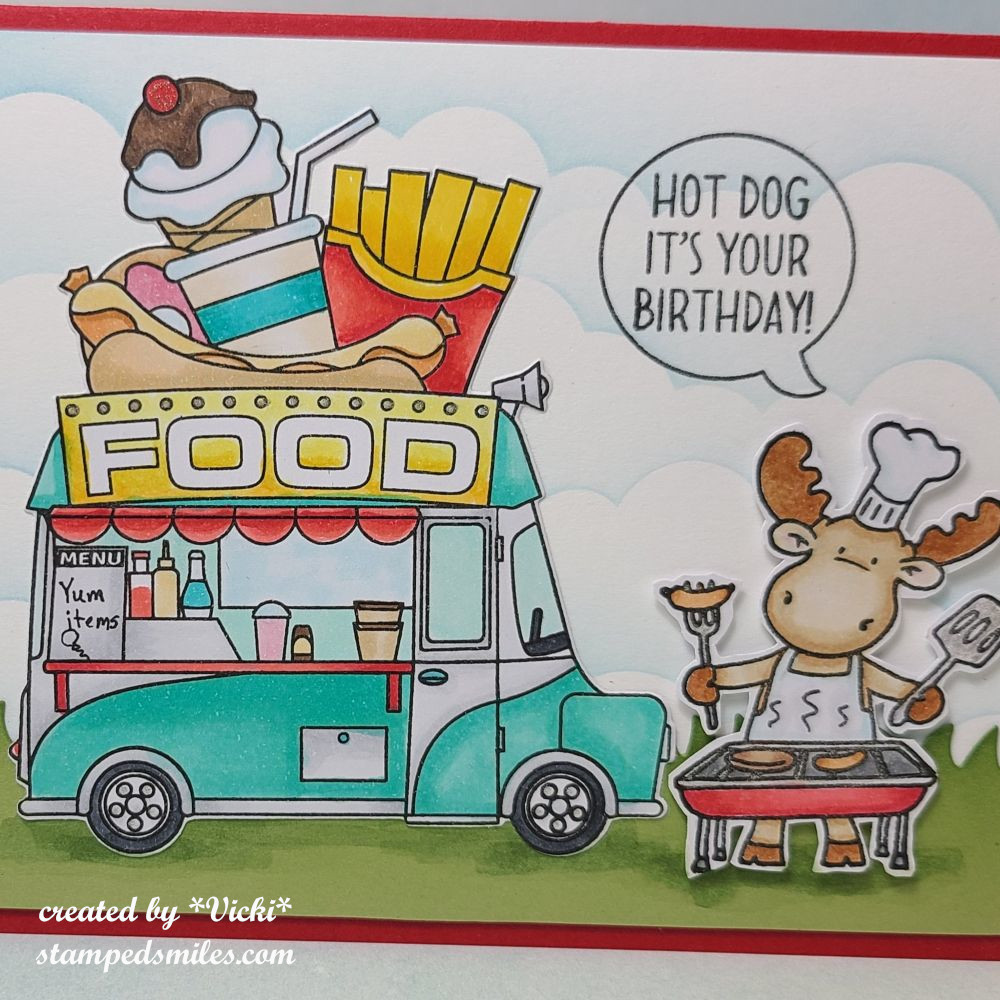
I couldn’t resist getting out this fun “Food Truck” set from Riley and Company to color up! I also paired it with the BBQ Rileyto complete the scene full of yummy goodies! The images were both stamped and colored up with Copics. I used the coordinating die to cut out the Food Truck and I just fussy cut with scissors for the BBQ Riley.
Before attaching the images, I used a cloud stencil and blended the background and then took a piece of green cardstock to cut out a grass border for the bottom. I ink blended the edges of the blades and then used a green Copic marker to add some shadowing for the stamped images before placing them down on the scene. BBQ Riley was popped up with foam tape.
Here’s a closer view of the images. I used a liner pen to draw “yum items” under the menu board on the truck with a drawing of a balloon. I also used a silver gel pen to color in parts of the truck, the lights above the “food” word along with the utensils on BBQ Riley and parts of the grill.
I found a speech bubble and sentiment from my stash that I thought would be perfect for this card and stamped it above Riley’s head as he’s holding up a hot dog.
Do you like to stop and eat at food trucks? What’s your favorite? Last summer we went to a small town festival and they served some lemon shake ups at one place along with some BBQ shredded pork and it was so yummy! We also like to grab some kettle corn to take home too.
Did I make you hungry now?! Hope you’ve enjoyed my card today and I hope you’ll stop by the Alphabet Challenge Blog to come play along too! We’d love to see your yummy creations! Thanks so much for taking the time to stop by! I enjoy reading your thoughts! Have a great weekend!
Hey friends! Wow, how in the world did Christmas get here so darn fast?! I feel like we just got through Thanksgiving and then things were a blur after that!😳 So, I’m also now realizing that it’s been a whole month since I’ve posted! YIKES!
Since it IS December…and the middle of it…that means today starts the December challenge over at Sparkles Monthlyand for this month, our hostess is asking to see Christmas Transport on your project. Be sure to stop by the blog to see what the rest of the team has created for you. Here’s my project for this challenge:
For me, Christmas transport is not planes, trains or anything busy or noisy, but something a little more outdoors around the countryside. There’s nothing better than a good road trip with snow falling and the smell of fresh pine in the air! I live in an area where there are lots of tree farms to pick out your perfect tree. (Do I pick out a real tree? Nope…but I do love them and the smell. Just not the mess. LOL) I prefer to visit the trees and not chop one down.
I’ve used the adorable Inky Stamper set called Vintage Truck and I’ve decided to add the tree image to the back of his truck as he’s taking it home to decorate for Christmas! I’ve fussy cut the image out after coloring and even added a snowflake stamp to the truck door from the Inky Stamper Toboggan stamp set. I’ve also stamped a few more along with the larger snowflake and cut out to add to the background of the card.
For the background, I’ve used some paper from the Lisa Horton A Festive Tapestry pack as it was perfect for a landscape of trees. At the bottom, I’ve used the road die from Lawn Fawn and then placed it over my tree landscape and added the truck over it by popping up with foam tape so it looks like he’s on the road.
So while making this card, I had the song stuck in my head and so I found a perfect sentiment to go with it from the Inky Stamper Tree stamp set. I white heat embossed over a green piece and cut out a banner to add to the top left of the card. Everything was placed over a white A2 top folding card base and I lastly added some Iridescent Clear Drops in the center of the snowflakes.
Hope you’ve enjoyed my card for you today and I hope that you’ll hop on over to the challenge blog and play along! I’d love to see what you come up with!
Hello friends and happy Wednesday! Today starts a new challenge over at the Sparkles Monthly Challenge Blog and this time we would like to see your CAS (or “clean and simple”) creations! I hope you will hop on over to see the inspiration from the team and consider joining in the fun with us!
Here’s the DT creation that I’ve made for it:
Sometimes I feel that CAS can actually be even more difficult than regular cards and I struggle with thinking I’ve added too much, or it doesn’t look right. I think it’s more of me over-thinking something, though!
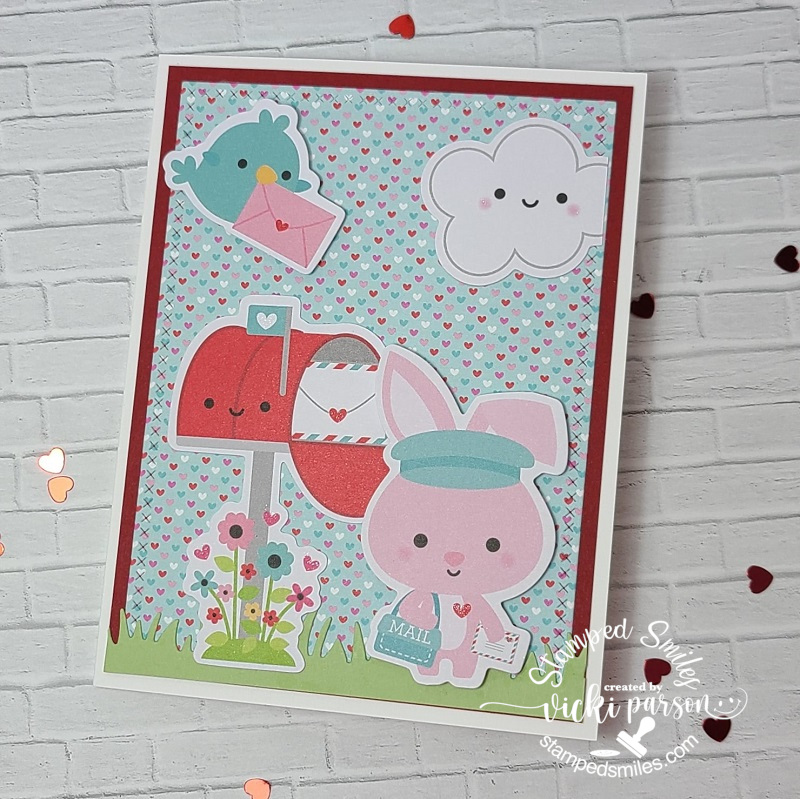
It was my son’s birthday yesterday and I thought this would be a great opportunity to make a card for him. He’s a postal carrier, so I thought this cute owl from the Lawn Fawn Special Delivery would work great for this. I started with the LF Stitched Cloud Backdrop and the LF Stitched Rectangle Frames dies to create the main focal panel. I lightly blended some blue ink in a circle before adding the Copic colored postal owl popped up with foam.
Over some red cardstock, I white heat embossed the sentiment. (I don’t remember which LF stamp set it came from) I die cut it with a banner die and popped it up over the cloud panel. I also had an extra die cut heart lying on my table, so I thought it would be great to add with the owl.
Thanks so much for stopping in today! Hope you’ve enjoyed my CAS card and have been inspired to join us this month with your take on the challenge too!
Hello friends! Hope that you’ve had a wonderful Valentine’s Day and a great start to this new week in February!
I’m really excited to share that I’ve just been invited as a new design team member over at the Sparkles Monthly Challenge Blog! I really like the fact that it has fun monthly themes to get you thinking and also that I can use up my never-ending piles of my own craft stash! This fits perfectly well with me and something I can handle!😉 So I hope you’ll stop by and follow along to play with us each month! You can find a new one on the 15th of each month.
Today starts a new monthly challenge theme which is #161 “Men Only“…so anything masculine will do! With having sons in my family, I’m always in need of masculine style cards for sure! Here’s my card for this month’s challenge:
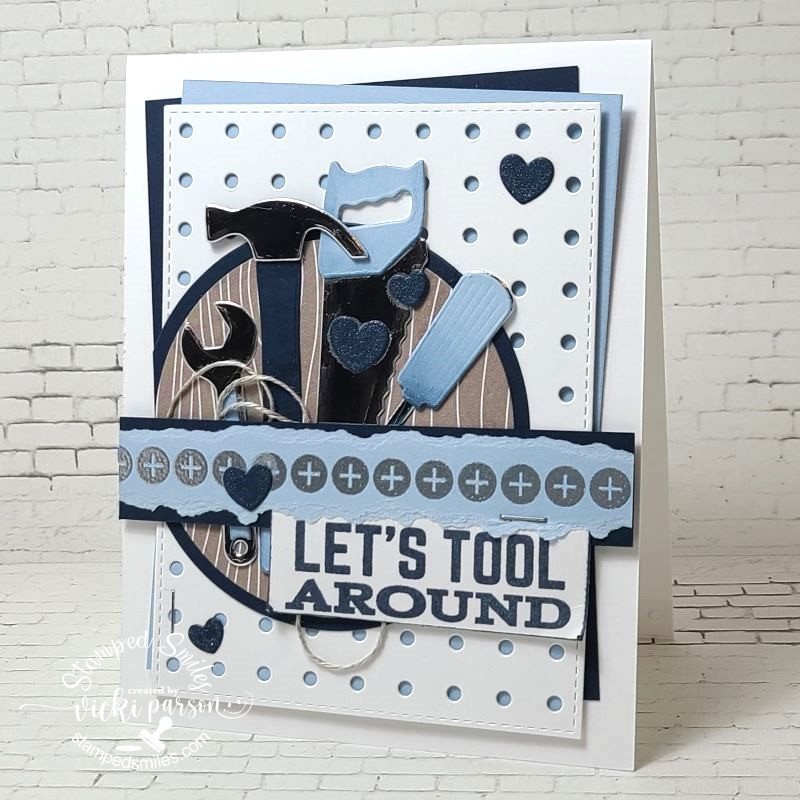
Oh yes…tools! This always seems to be a favorite in my craft supply when creating a masculine card for sure! I made this one for my husband who’s a very handy guy, and he likes the color blue. I always like to add lots of textures, distressing and layers when making a masculine card. This also helps for using more of those craft supplies!
I’ve had these stamps and dies from My Favorite Things for quite a while now and only used them a couple of times. I die cut the background panel in the pegboard cover die and stitched rectangle dies, plus, layered with a couple of different blue panels that were stapled together. A die cut circle in woodgrain and blue papers were attached and cut off at the edge before attaching to the top folding white A2 card base.
I’ve added the die cut tool elements over top of the circle using some silver mirror and blue colored cardstocks to cut them out. I added some sponged ink over some places and topped it with a ripped strip of silver embossed screw heads, a strip of dark blue and the stamped sentiment stapled together and placed it over top with a piece of “messy” thread. Lastly, I added the dark blue die cut hearts and covered them with a glitter brush pen.
I hope that you will stop by the Sparkles Monthly Challenge Blog to check out the challenge and inspiration from the creative design team! I look forward to seeing what everyone creates!
Thanks so much for stopping in and I’ll see you soon!
Happy Valentine’s Day friends! Today is the day all about hearts and love! Although I’ve already sent out my Valentine cards, I have a couple of lovely individuals who take a peek at my blog from time to time…so I have to wait until they’ve received their cards before I share them here!😉 It’s somewhat hard to “hide” my crafting since hubby’s now retired! LOL So here’s the cards I made:
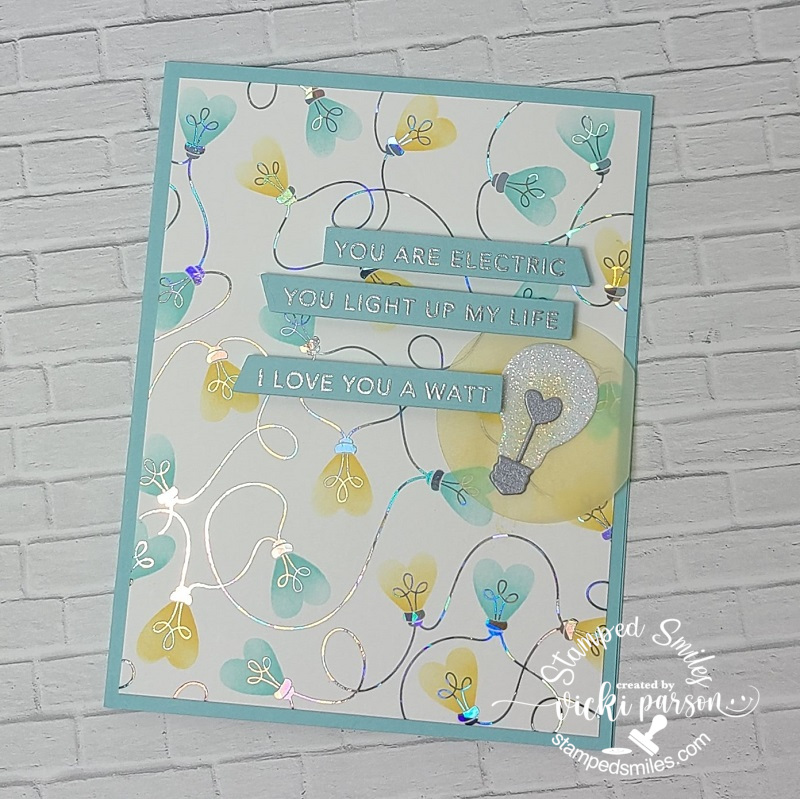
I just KNEW the minute I saw this Taylored Expressions Love Lights Stamps & Stencil Combo set that it was something perfect for making cards for my retired electrician hubby! This set also coordinates with other products and so I started by foiling the TE Foil It-Love Lights panel and then ink blending with the stencil set. I had to use blue as this is hubby’s favorite color. So, I’ve used the TE Sprinkles and Potato Chip inks. The cardstock is TE Sprinkles. (I used softer tones for the Valentine feel.) I also used the coordinating TE Mini Strips-Watt’s Up sentiment set that was silver heat embossed over the TE Sprinkles cardstock and cut out with the TE Mini Strips-Asymmetrical Die. I just love the punny sentiments that go with this set!
The tiny light bulb for the accent I used actually came from a TE ‘freebie’ with one of my orders, so I die cut the light bulb with white glitter cardstock and lightly sponged some yellow ink in the center. I die cut the center and bottom of the bulb with silver brushed cardstock and glued it onto the light bulb. I die cut a circle from some vellum and also sponged this with yellow ink and glued the light bulb on top of it and attached it to the side of the card nestled with the sentiment strips that were popped up with foam tape. He will have gotten this one this morning.
And here’s another card that I sent to someone very special! It’s a simple card, but wow it was so much fun to create with using the Simon Says Stamp Limited Edition Happy Mail Love card kit! (Looks like it’s still available at the time I’m writing up this post, but not sure how long it will stay available.) I so love those CUTE Doodlebug products and there are so many of them including the stamp set that goes together in this kit! I wanted to play some more with it, but I have so many other things to focus on, so I’ll have to come back to it later! LOL
I’ve used the Doodlebug background papers from the kit and cut it out with a Lawn Fawn Cross-Stitch die and also cut a strip of ‘grass’ with green cardstock at the bottom using the Lawn Fawn Grassy Border die. The heart papers were attached over a red piece of cardstock from the kit and layered onto a top folding A2 white card base. The grass border was attached over the red cardstock and heart background papers. This gave me the room to take the CUTE Doodlebug LOTS OF LOVE Odds and Ends Ephemera die cut shapes to create my scene with! This pack came in the kit and there are SO many pieces! I’m sure you could go on and on making cards! The bird and bunny die cuts were popped up with foam tape. It’s hard to see in the photo, but I’ve taken my glitter brush pen to all of the hearts on the images and the cheeks on the cloud.
I think these cards did what was intended which was to create smiles during this cold winter season! I sure hope that it has done the same for you as well! 😉 Wishing you a happy Valentine’s Day with all of my heart! ❤ Thanks for stopping in and I’ll be seeing you soon!
Hello friends! I hope you are all doing well and looking forward to a promising year this go around! I sure am! I know it’s been a while since I’ve posted, but I was having a bit of a hard time with having lost my “MOJO” for a period, feeling really down and not myself at all. Christmas came and then on top of it, I’ve gotten sick. I am starting to feel a bit better now, so I decided that the only way to get through all of this is by doing what I’ve always felt to be therapeutic, which is to keep on creating! I just need to get back into the mindset of it again is all, but I do enjoy it when I’m creating as I’m sure my fellow crafty friends can relate to!😉 Appreciate your kindness to me always.
Since I really haven’t created much lately other than Christmas cards (as you can see from my previous post below), I’m going to share some projects that I had done at the end of last year including some commissioned cards I was asked to do:
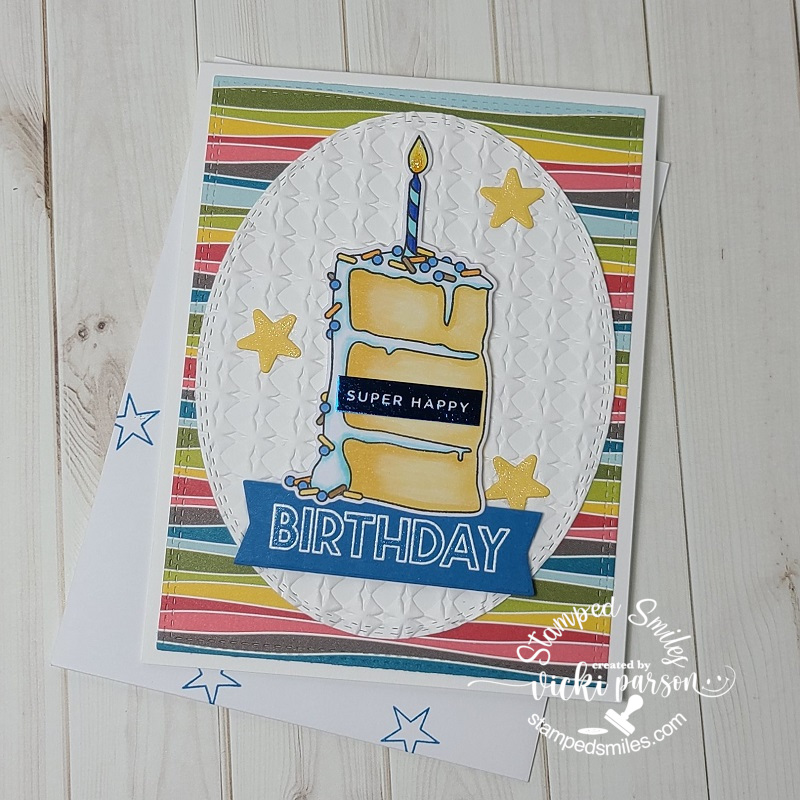
Last month was a birthday card for my dad, so I’ve pulled out a special birthday kit that came out sometime last year from Simon Says Stamp. Everything I’ve used on the card including the embossing folder, stamps, sentiment strips and paper all came from the kit. It may be hard to see in the photo, but I’ve foiled over the “super happy” sentiment strip that was included with the kit and glued it over top of the cake slice.
I’ve added some glitter over the candle flame, the yellow stars and the inside of the white embossed “birthday” strip under the cake slice. I pulled out the blue colors from the striped paper to color the image with using Copic markers and die cut it out to glue over top of the sentiment strip and embossed oval layer.
And speaking of birthdays, I was commissioned to do a 50th birthday card for a guy that is a professional painter and enjoys grilling outdoors. The first image that came to my mind was this really cute LOTV image. I printed him out and thought it would be fun to incorporate the birthday number above “the painter” to make it look like he’s in the process of doing it while the paint is dripping everywhere. So while the boy painter was printed out, I stamped and embossed the numbers above him.
My husband had the idea of the little grill along the edge going “up in smoke”. So I created a “ground” area for the ladder and the grill to be on. I stamped the grill image, colored it in and then a liner pen to draw the line to establish the separation. I then ripped the corner above the grill and sponged some Black Soot distress ink around the grill and corner edging. I didn’t want the background to be white or black, so I dug out some brick style pattern paper to place behind that corner area before attaching it to the card base. Hopefully there were some chuckles from it!
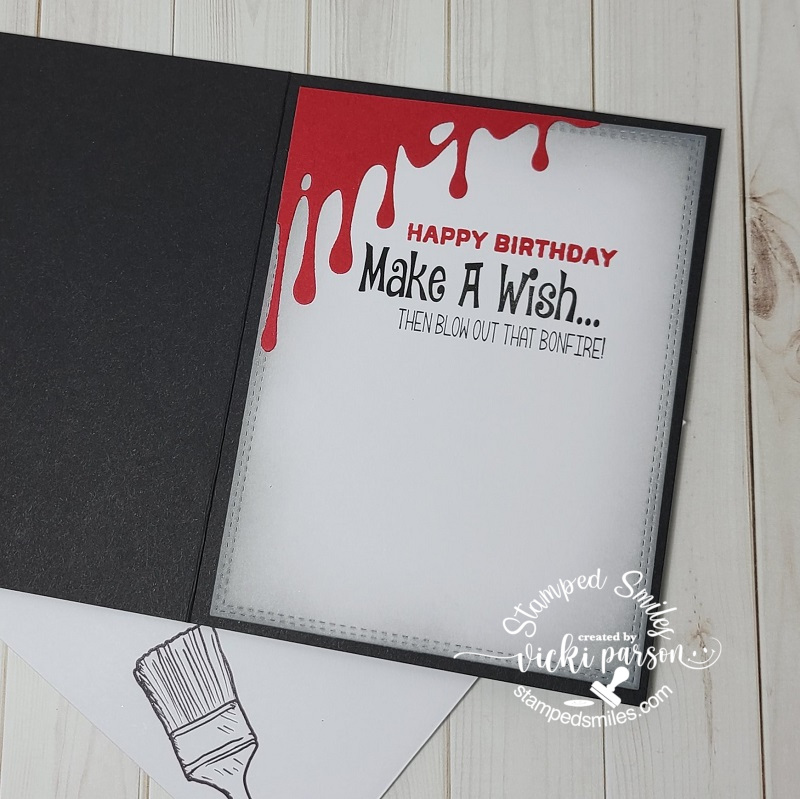
So for the inside of the card, I thought it would be fun to take this corner border die that I received from a Halloween class and make it look like the red paint drip continued on the inside. Then I found this really funny sentiment to go along with the grilling bit too! I also sponged some more of that Black Soot distress ink around the edges.
These were really fun cards to do and I enjoyed the coloring process so much! I find that coloring images really helps me get through some creative blocks…even if it’s a simple image or something that I don’t use, so I’m thankful to at least to be able to do that. Hopefully I can get back into what I enjoy doing here.
I know people sometimes struggle with masculine style cards, so here are a few examples of cards that I came up with for men. Hope it helped with some ideas for you too! Thanks for stopping by today and I’m glad you did!
Hey there friends! Wow, so my last post was Thanksgiving and I pretty much missed the entire month of December it seems like, right?! It has been a very crazy month with lots of different things (including personal) going on so pardon me for going MIA!
I HAVE been working on some projects here and there and I would be happy to share those, but for right now, let’s focus on the Christmas projects that I’ve been working on getting ready for the up-coming Holiday next week!
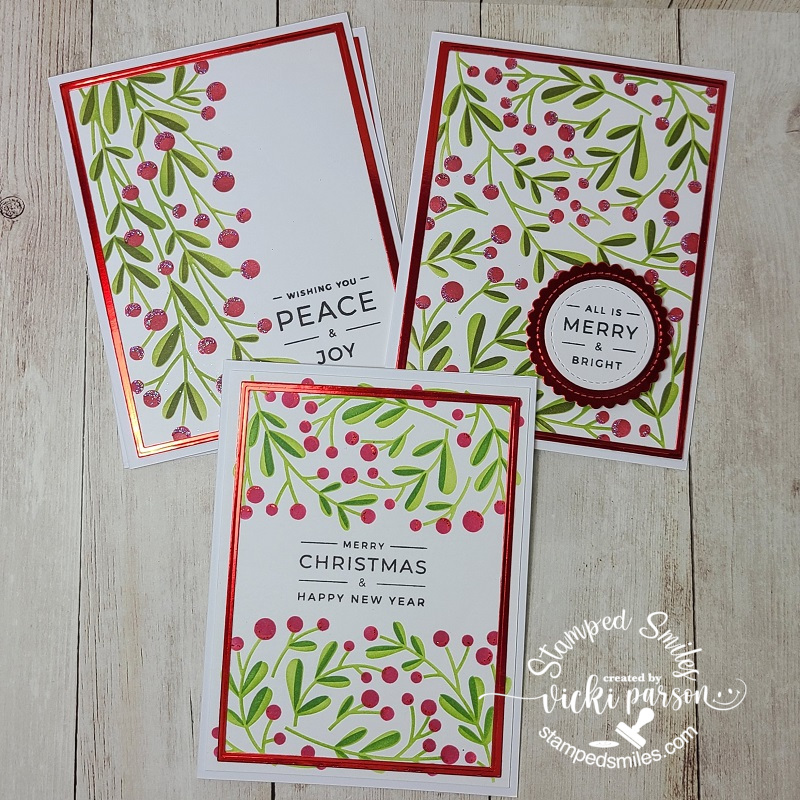
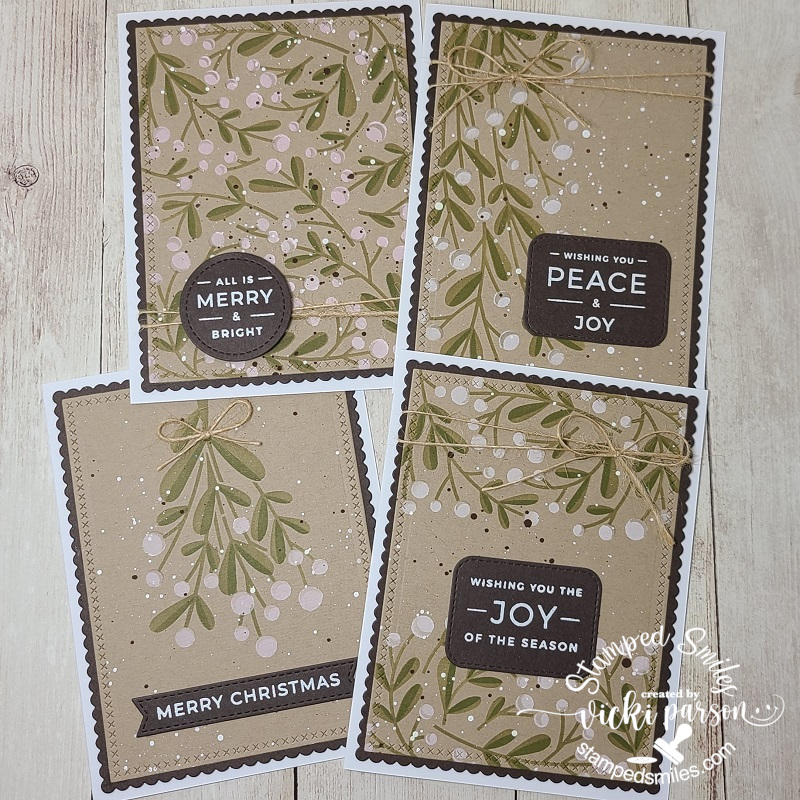
I have already sent out my Christmas cards, thank goodness, as I wasn’t even sure that was going to happen either! I was very impressed with the new Taylored Expressions Create-in-Quads Mistletoe Layering Stencil and how quickly I was able to knock out 4 card panels at a time, which was a huge time saver to get my Christmas cards finished up! There is actually a set of 4 designs here (like shown below), but I was in the middle of addressing the cards and forgot to photograph some before shoving into envelopes! LOL This set was using the white cardstock with the green and red colors which turned out very pretty. I also used the red glitter paste for the highlights on the berries.
And here is the other set of four cards that I made using the Toffee colored cardstock with green and white inks for the stenciling. I’ve also splattered these with brown and white paint. The sentiments were white heat embossed over some TE Chocolate Truffle cardstock and cut out with some MFT dies. Before attaching to the pre-made white A2 card bases, I also wrapped some twine around some of the panels or added a bow with it. (I love the homespun look of the white mistletoe!)
These all turned out great because they were pretty much flat and fairly easy to mail off. I think I was short just a few which is where I’m glad that I still have a few extra cards that I had made throughout this year and I have previously given out some “extra special” Christmas cards earlier in the year as well. I think you may have already seen them from a previous post…I will have to take a look and see under my “Christmas” section!
If you’re looking for a last-minute Christmas gift/tag, these wood slice things are so quick easy and fun to create! I’ve had a huge box of these wood slices for a long time, so I pulled one out to make a project for the Inky Stamper December challenge on FB. I had hubby drill out a hole for me at the top before decorating so as I knew where to put everything.
I’ve used the Inky Stamper Christmas Bauble stamp set for the stamping on the wood and colored in with pencils and gamsol. I’ve added details with a glitter brush pen on the ornament and added some snowflakes with Nuvo White Crystal Drops. I had to mask the frog to stamp the Santa hat on him. I’ve used some silver twine for the hanging portion and then I glued a silver bow with some silver ribbon from my stash under the hole.
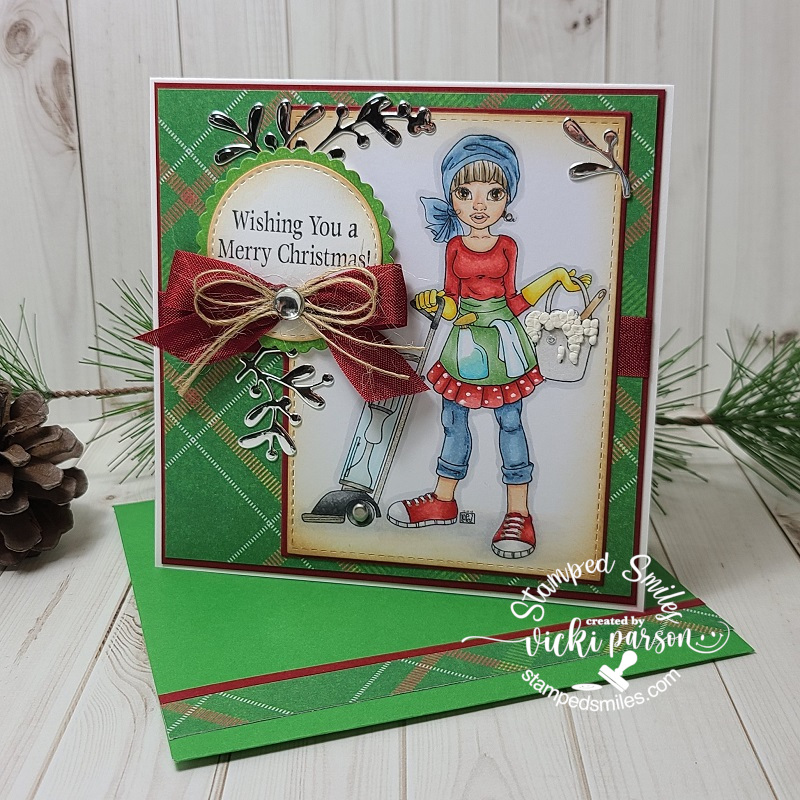
And lastly, I’ve also been working on some commissioned cards as well! Last year, I had a request from someone to create a special Christmas card for his cleaning lady. I had him pick out an image and asked about the colors…you may remember it as I had posted it last year.
a few months back, someone had asked me to re-create the same design for them with pretty much the exact design with the exception of the sentiment which I changed out for this person. This one went to another country and I was concerned about the shipping costs, but it was not a problem. The package had taken an unexpected journey because of the crazy mailing system going on at this time, but it arrived eventually and was in “perfect condition” as reported to me, so I was so thrilled with that and they seemed very pleased with it.
With the square size of the design (5″ x 5″), I’ve handmade the envelope for this one as well. I found the exact papers used in the designs for these cards, but I don’t think I have any more left after completing this one.
Here’s how I’ve decorated the inside of the card and left blank as requested for their own personal use.
So now, I just want to take this time to say THANKS SO MUCH for hanging in there and stopping in today! I don’t have too much time on my hands right now as I’m getting ready to make some Christmas treats and the Holidays will soon be over. I hope you are all doing well and I wish each and every one of you a very safe, happy and healthy Holiday Season!
Hello friends! Hope that you’re having a great week so far! Hubby and I are trying to figure out how this “retirement thing” goes together! LOL! I think we’ll be having so much fun and we’re just really excited about the future and what we’ll be doing.
Speaking of which, this past Sunday he also celebrated a birthday and of course I had to make him a card that was suited for an electrician. I had to add a bit of humor about his age on the inside, but this is what I came up with:
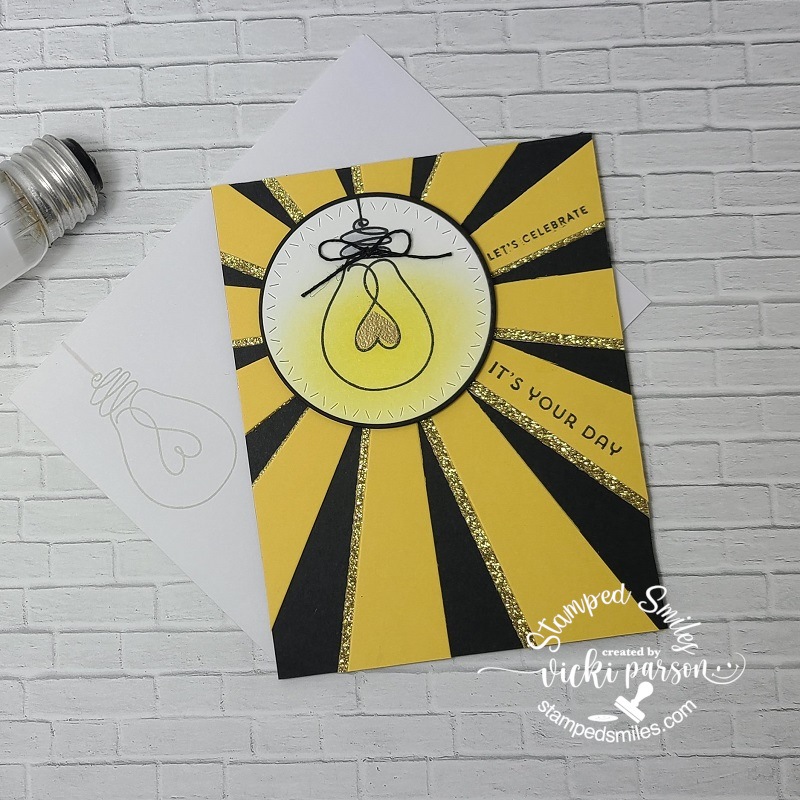
I’ve had this Stampin’ Up! Sunburst die and stamp set and haven’t used it that much since I bought it. (Quite a while ago! Not quite sure how old. LOL) I thought it would make a great light beam for my VERY old Simon Says Stamp ‘Watts Up’ stamp set that was from a past card kit. (circa 2014/2015) …yep, all old!
I die cut the sunburst from some yellow and gold glitter stock that I glued together slightly off-set and then attached it over a side folding A2 sized black card base. I stamped the sentiments over a couple of the yellow strips with black ink taking care to make room for the circle panel.
I then stamped the lightbulb over a white piece of cardstock and colored the base with Copics and used a marker draw a line above it for the string. I took a solid heart from the stamp set and heat embossed it with some Gold Metallic Gilded EP and then sponged some yellow ink over the bulb for some glow. I die cut it out with a circle die and then layered over another die cut circle black piece and popped it up over the sunburst layers with foam tape.
I tied a bow with some black twine and glued it to the light bulb base. I also stamped the bulb in a lighter gray ink over the envelope and added a string to that as well with a gray marker. (The inside of the card said: “Old is the new black.” 😆)
———————————————————————————————————–
And I also wanted to share that I’m still plugging away on the several kits that I received from the Whimsy Stamps Virtual Retreat last month! These are really amazing projects and I’m having lots of fun putting them together still! (Christmas will be coming next. So, stay tuned for those!):
This is a fun interactive card with a pull tab at the top where this cut little dragon slides upwards towards the sky! This kit 9 came with an A2 sized envelope, but I had to make my own envelope slightly larger to accommodate for the pull tab sticking above the card. I’ve added doodle lines around the edges and shadow stamped a sentiment at the bottom for my own added details.
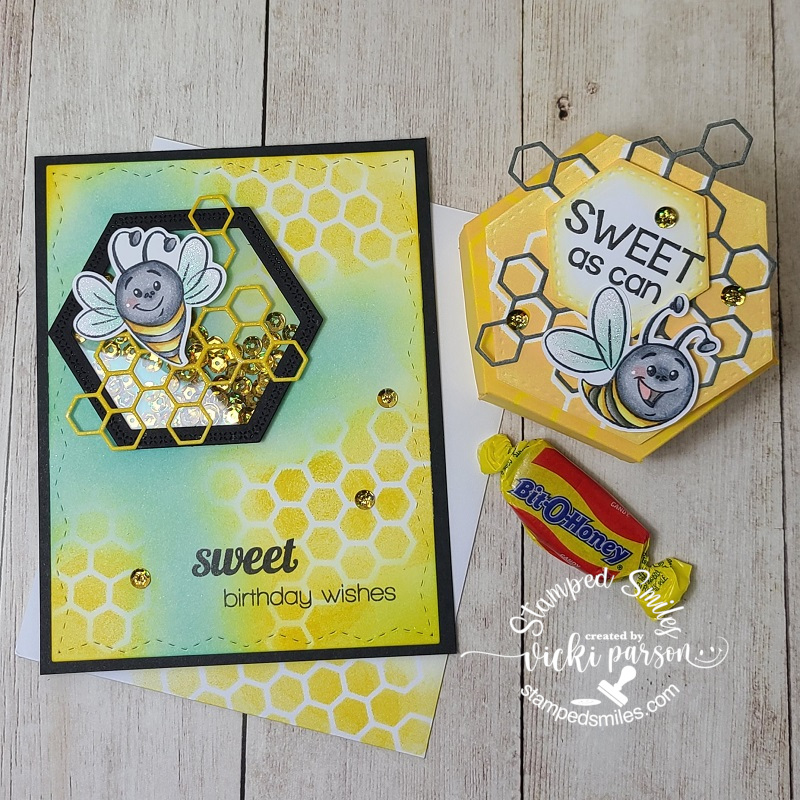
This set was from kit 14. The hexagon shaped box was super fun and even came with the candy! There was also an extra stamped and cut out bee, so I used it to make another card… shaker style! I used the left over honeycomb die cut piece as a stencil on the card as well. I used the envelope that was provided in the kit above and decorated it for this A2 sized card instead. (I know someone that loves these candies…so they might get a surprise at some point! 😉)
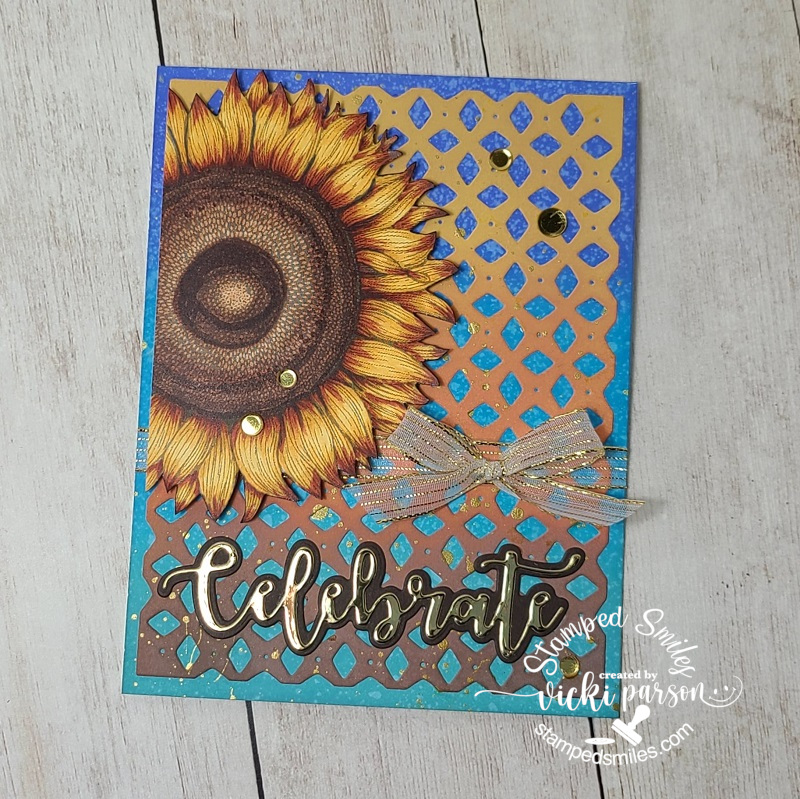
And lastly, this was from kit 15 and TOTALLY different than what was photographed in the booklet! First of all, I received a plant image with a die cut speech bubble sentiments and thought it might be cool for a Halloween card on another project, so I saved those to use later. I received an EXTRA stamped sunflower image from kit 22 that I had posted earlier and decided to use it for this card here. I colored it similar to that one and cut it out, but cut off a portion of it on this design. I also changed up the background ink blended colors and splattered some gold paint on this one. Love how it turned out. This will be for an Autumn anniversary card for someone coming soon.
Hope you’ve enjoyed all of my projects today! Thanks so much for stopping by and I’ll be seeing you soon!
Challenges (For the Birthday Lightbulb card ONLY):
Retro Rubber – Anything Goes + stamps older than one year
Hello friends! I hope that your week is finding you in a good place right now. Sometimes I feel a bit overwhelmed with things that are going on in the world, but I am so thankful that I have the crafty time to keep my mind creative and music to help alongside to keep on keeping on. This is one way that I know I can express myself in a postitive way and hopefully inspire someone too.
In my previous post, I had made several healthcare worker cards and I had made one for my son who is a mail carrier, but I was having a hard time finding an image for a food service worker. (check out that post HERE.) I asked if anyone knew of any images. Someone had reached out to me and shared a few images that were just too adorable and I couldn’t pass up on nabbing one for my other essential worker son:
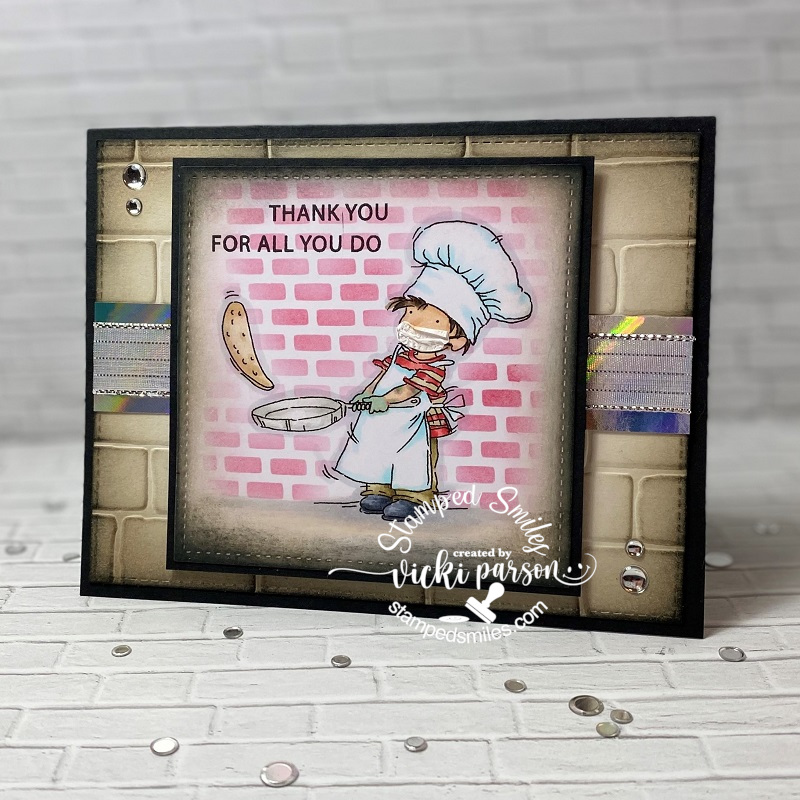
Isn’t he just as cute as can be?! I’ve used the LOTV Pancake Day digi stamp for my card. It actually reminds me of my son making crepes for a restaurant that he used to work for. I was treated with a delicious pumpkin pecan cream crepe by him a few years back on my birthday! It was yummy!
As you can see, I’ve altered the image a bit to fit with the current covid-19 restrictions by giving him a make-shift face mask as well as coloring some plastic-style gloves on his hands. To make it even more personal, I decided to give him a couple of colored tattoos on his arms as my son has tattoos on his arms and dark brown hair.😁
For the card, I’ve used some Sidewalk cardstock from Brutus Monroe and used a Stampin’ Up! brick embossing folder over it and then sponged some distress ink around the edges. It was cut out with a stitched rectangle die. I added a strip of Prism paper and some silver metallic ribbon over it before attaching it to a top folding A2 sized black card base. I finished it off with some silver Glossy Dots from Pink and Main.
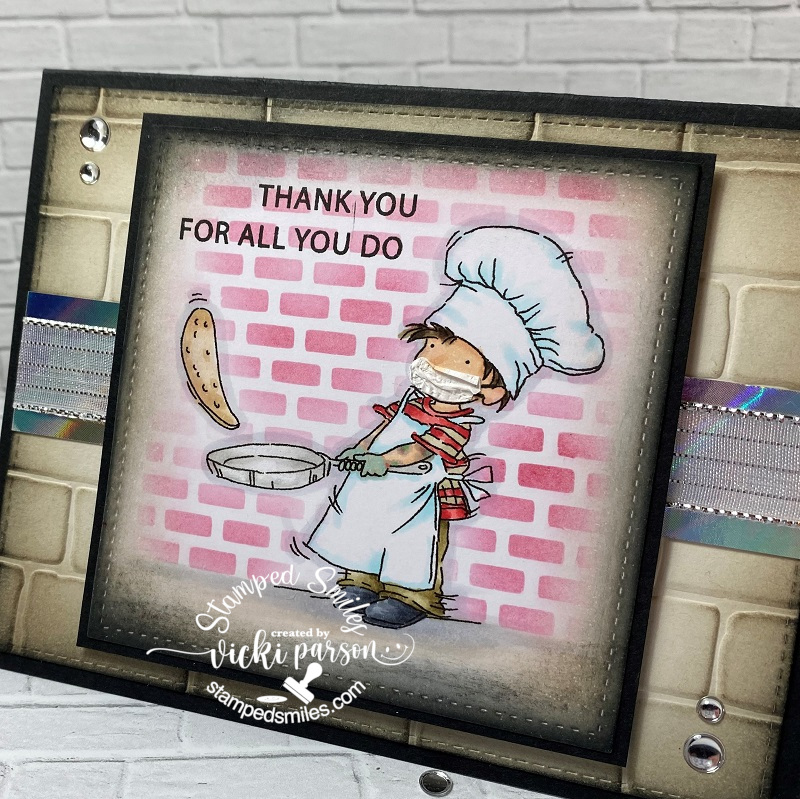
I colored the image with Copic markers and as mentioned above added the special coloring for the tattos and gloves for his hands. I’ve also covered the pan with a glitter brush pen.
To make the face mask, I took a Copic liner to draw in the lines for the cord around his ear and then I took a tiny piece of thin tissue style paper that was used between the packages of acetate sheets you buy. I wanted it because it was thin and I was able to create tiny folds and wrinkles in it…I just glued it over the area on his face and manipulated it before it completely dried.
I stamped the sentiment from a Lawn Fawn stamp set with black ink next to the image and then I used a stencil that was cut out by my mom, thanks mom, on her Cricut machine and inked it up with some red ink using a foam brush tool. I wasn’t very accurate with not covering the image, but thankfully the sand eraser helped out! I finished coloring up the “ground” area and sponged around the stitched square cut out of the image. I layered it onto another piece of black cardstock and popped it up over the card with craft foam.
I think this card turned out so cute and it’s on the way to him now! I think he’ll get a kick out of it and he’ll probably notice the extra personalized details I’ve added to it too!😂
I hope you have enjoyed my special essential worker card today and brought you a smile! Thank you so kindly for stopping in and I’ll see you again soon!✌
Hello friends! I haven’t really mentioned too much about what’s going on in the world right now, and I know it has tremendously affected many people around me. In the crafting community I sense changes as well in different ways. I do hope that crafting can help either take your mind off the situation or at least help with making you ‘feel’ that creating from the heart, as we stay at home, is a fantastic way to contribute and help bring about smiles in many ways.
I would like to ask you if you want to respond about it:Has crafting helped you during this time or has it made it difficult to concentrate? I have found that taking TONS of classes have actually been my savior right now especially as I was taking that break I had. (Helps me to concentrate on something like a technique.) I found MANY having classes (free or having group parties going on with crafters teaching and sharing). Due to this pandemic, I know many people/companies in the crafting community have revved up their classes and challenges as well… along with giving out free digital images!
This brings us to my post for today….
I have made several stacks of “thank you” cards geared towards our healthcare workers and it has been very rewarding for me to be able to color in all these images in my post today as a salute and honor to those that have been “on the front line” dealing day to day since the beginning of this pandemic. My heart goes out to all in this uncertain time and although there are many horrible stories related to this, there are also some good ones too. Let’s rise up.
Taylored Expressions put on a card drive to send cards to the healthcare workers and it ended today, so these cards have already been sent.
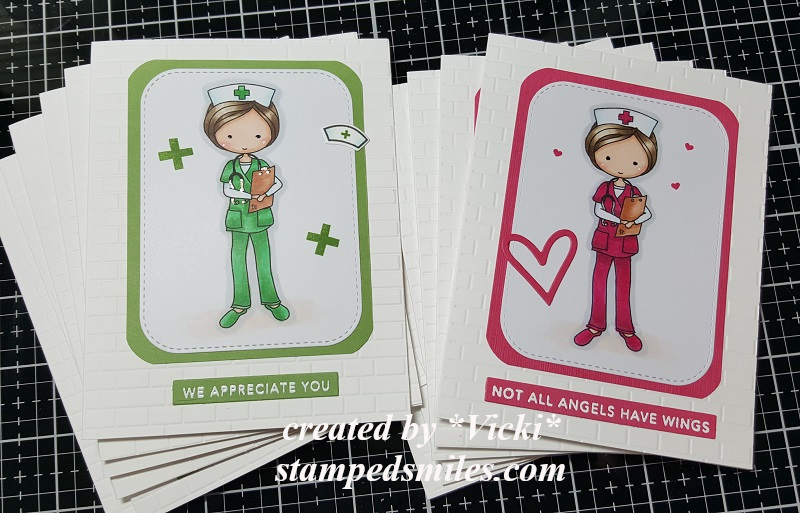
For this particular stack of cards, I’ve made 6 of the pink and 6 of the green using this adorable MOKA Melissa Nurse free download from Taylored Expressions. I’ve also used the Subway Tiles embossing folder for the background as well as white heat embossed the sentiments from the Life Saver Mini Strips stamp set and die cut them out with the clever Mini Strips Die. I’ve used a heart die that came with an order I had and then I took some tiny images from other sets for the accents.
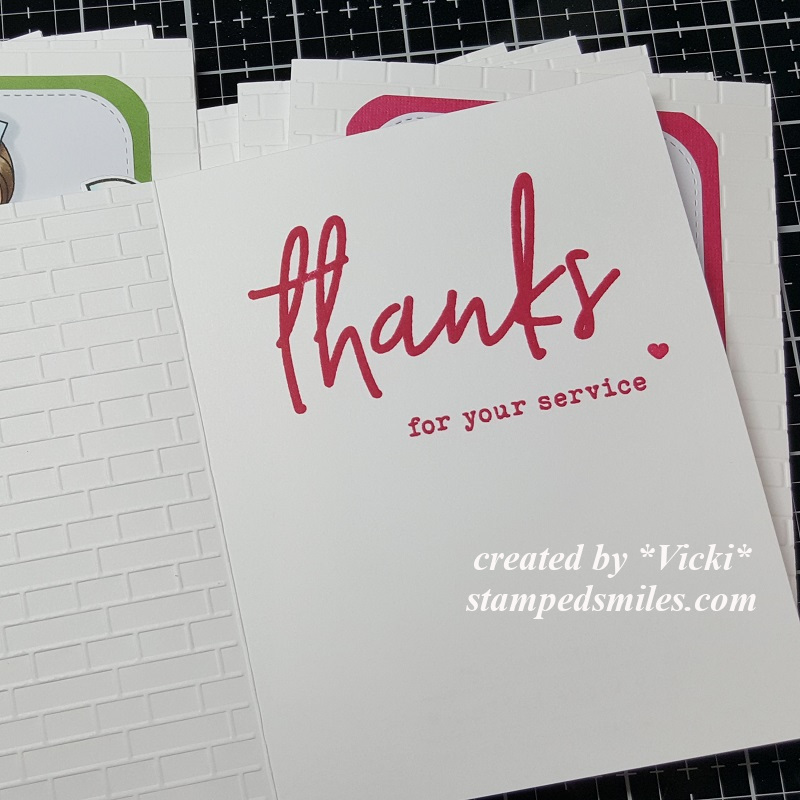
I stamped a message on the inside of all of the cards from TE Big Thanks stamp set too. (This set came for free with an order I placed.)
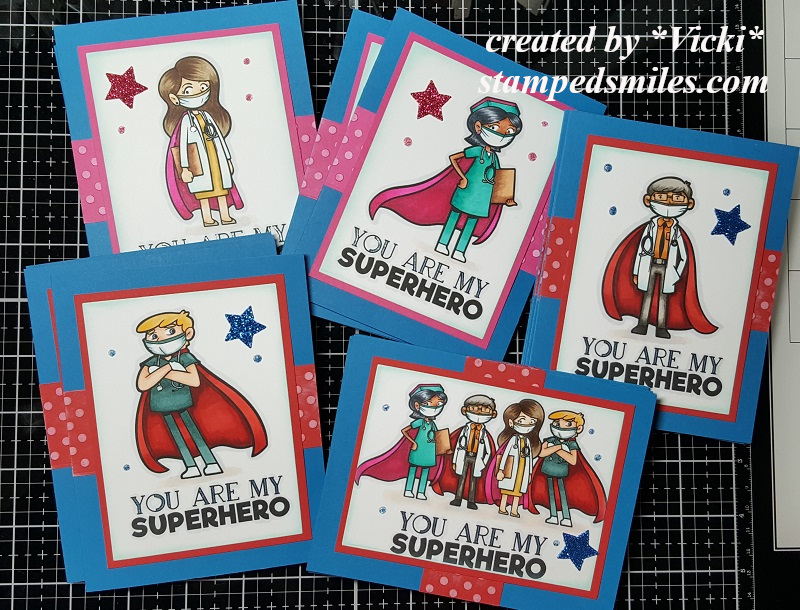
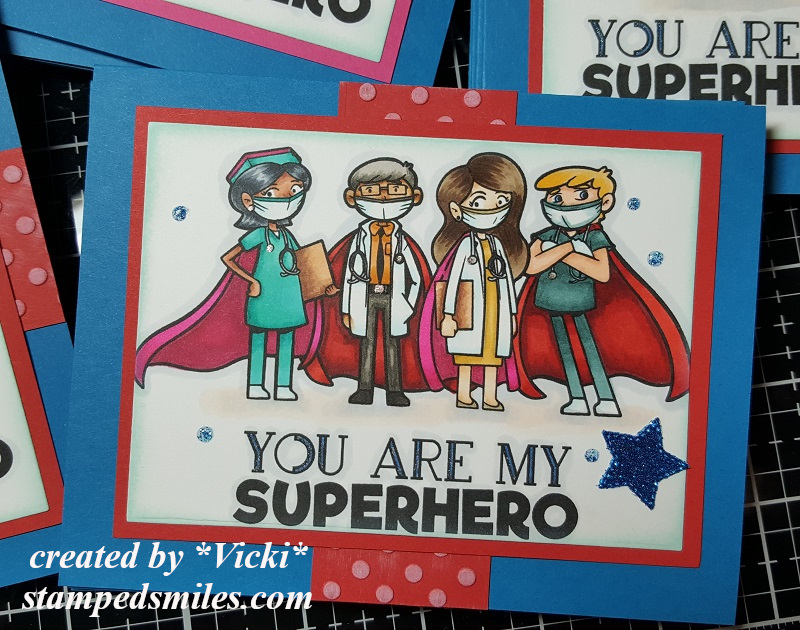
Here’s another set of 20 cards I made for healthcare workers using the Freebie Healthcare Super Hero Coloring Pages. (To print these out to fit over an A2 sized card base, I used my printer settings to print out 4 pages on one sheet.)
I layered them over some pink and red cardstock and then the base of the card is some A2 sized side folding blue cardstock. The left over pieces from the pink and red cardstock strips were ran through and embossing folder and white white Ink was ran over it.
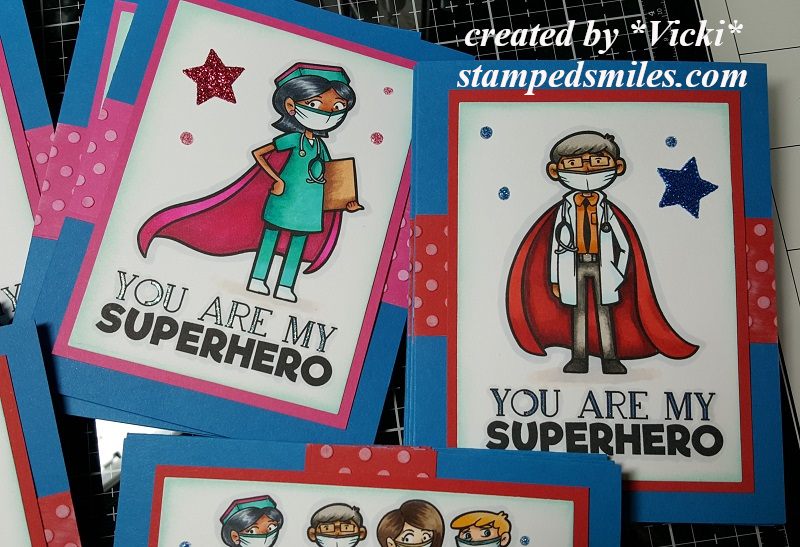
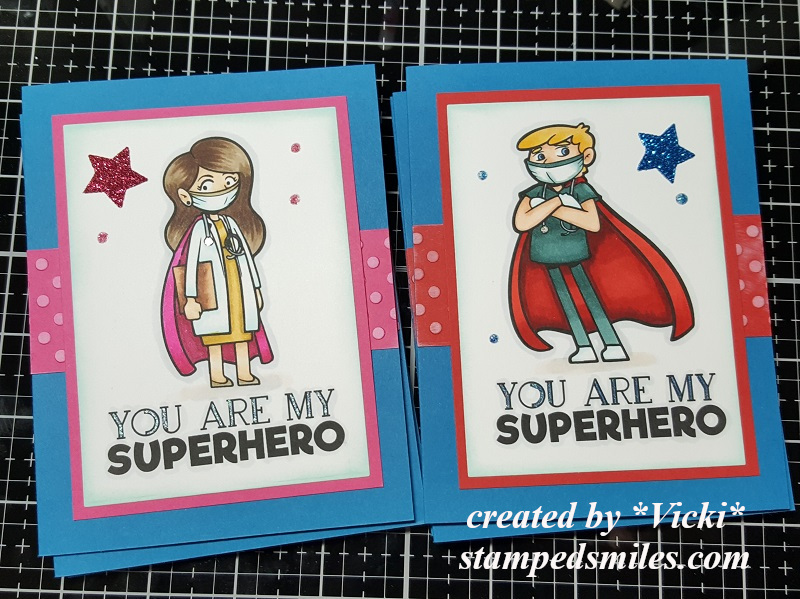
Here’s a closer look at the individual sets. I used a star die to cut out some stars with Glitter paper. I also took some blue and pink glitter glue to create extra “dots” around them. This was good practice for me to experiment with different skin tones too.
I’ve used Copic markers to color all of these in with and then I took some gel pens to color in parts of the image as well as the outline in the sentiment too.
I thought this was a fun one with all of them together and I like that they’re all wearing capes and masks too. I had these finished up at the end of April, but just now getting all of these out where I wanted them to go. I’m sending some masks along with the cards to our local hospitals.
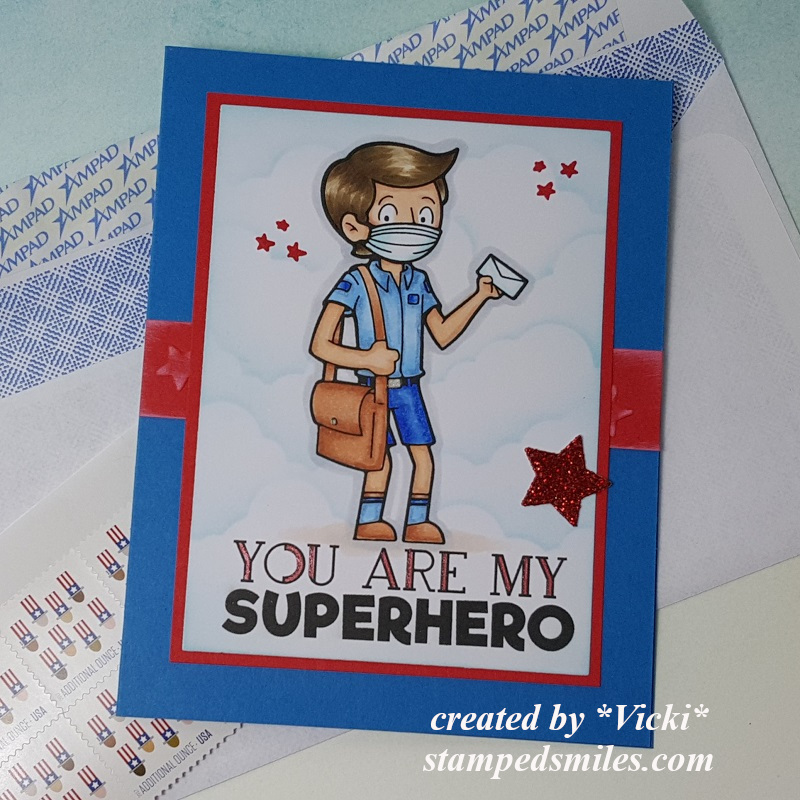
One last and important card I made was specifically for my son who’s a postal carrier. Of course I tried coloring it in with the same hair color he has too. LOL! After I made the batch of cards above, they came out with more superhero freebie downloads, so I grabbed the Mail Carrier Superhero Coloring Pages to make one for him too. And this one is already on it’s way as well. For the background, I used the Scene stencil for the clouds with blue distress ink.
I finished this one similar to the ones above.
The ONLY superhero I’m missing is one for my other son who’s a food service worker and I haven’t seen any of those images out yet. Does anyone know where to find one? I would love to make a “thank you” card for him as well. I may just come up with my own version with what I already have…but have to think about how first. LOL!
This particular song came to my mind and was something that I listened to while coloring….
It was somewhat catchy and upbeat I thought. I always like to try and think of the positive ways that cards I make give a positive impact or inspiration somehow. Could be wishful thinking, but it’s my hope anyway.
Thank you so much for taking the time to stop by today to read my post! I hope that you’ve been inspired in some way! Have a beautiful weekend my friends!