Hello friends! I hope that all of U.S. friends celebrated a wonderful Thanksgiving! I have a couple of scheduled posts while I’m away for today and tomorrow. It’s a busy time of the year and I’ll try to keep up with my “blog duties” the best I can.
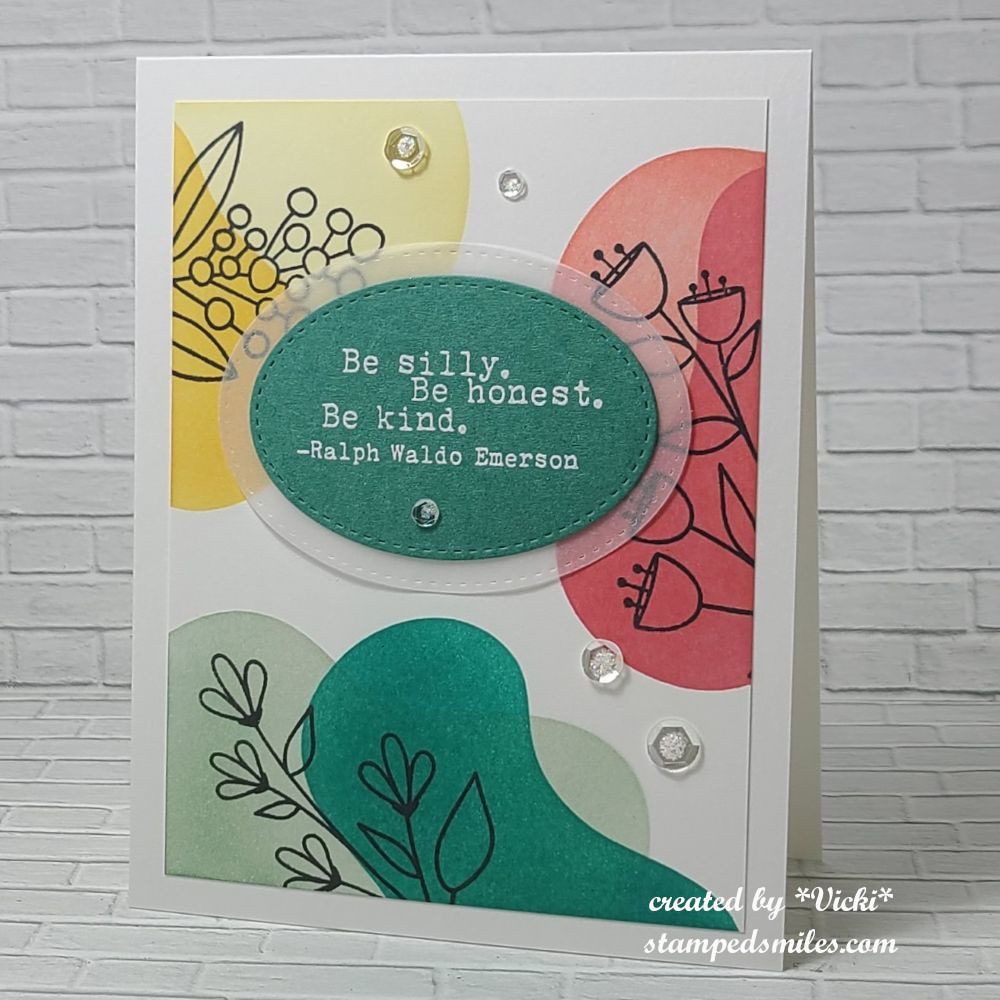
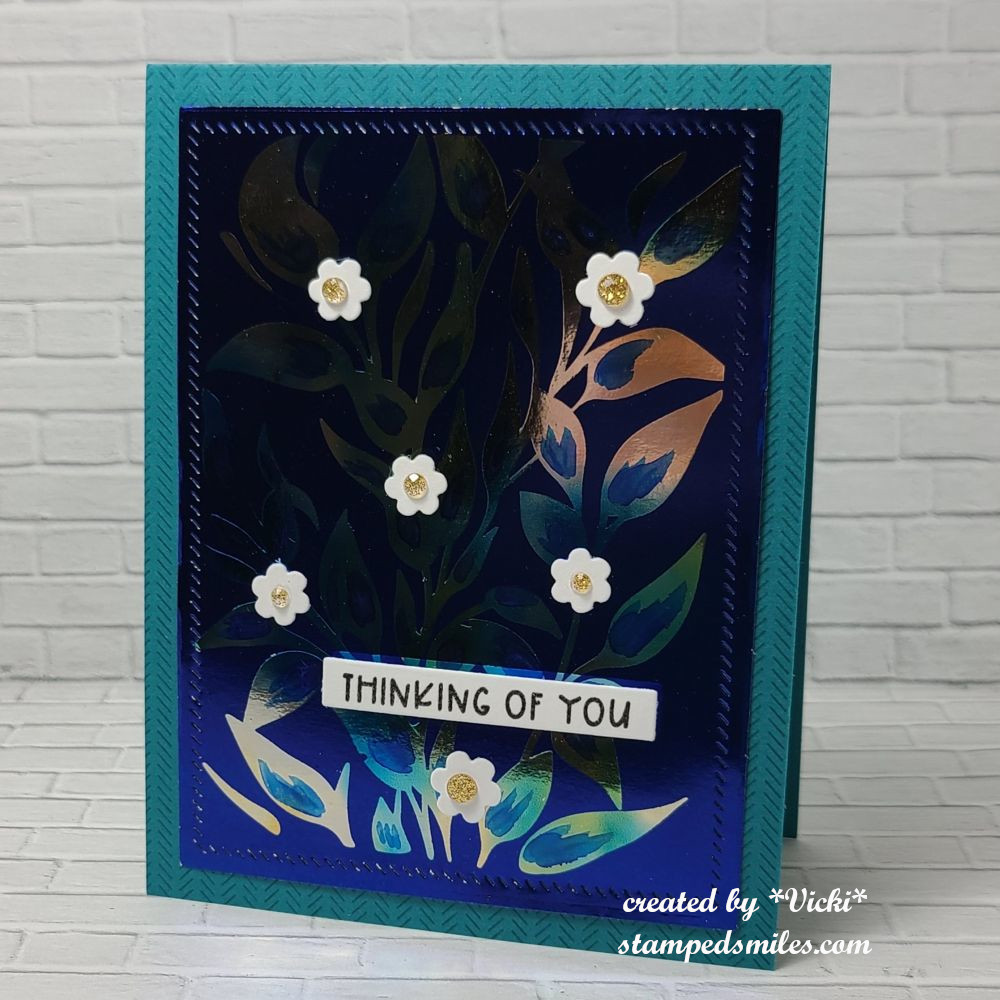
Today is a new challenge over at the Alphabet Challenge Blog! Our next letter is “Q”, and this time it was my turn to pick a theme with this letter and I’ve chosen “Quote” I hope you will join in the fun with us! *Please remember that this is a bi-weekly challenge, so you have two weeks to enter.* Here’s the project I’ve made for this challenge:
I’ve always loved using quotes for things and you can catch me with my kids saying quotes from movies all of the time. We can say a quote and know exactly where it came from. Some people don’t understand what we’re talking about which makes it even funnier!😉
I’ve pulled out a Catherine Pooler stamp set called “Notable & Quotable” that I don’t remember where I purchased it from, but I fell in love with the quotes in it. It also came with the flower images in the set too.
For the background, I used a My Favorite Things “abstract” stencil and blended over it with several different colors. I then took a couple of the floral images from the stamp set and stamped over the stenciled “blobs”. I then white heat embossed one of the quotes from the stamp set and cut it out with a stitched oval die and then layered another stitched oval vellum layer behind it. I popped it up with foam tape over the center of the background and then attached the entire layer over a white top folding A2 card base. Lastly, I added some clear sequins with Stickles in the center of each one.
Thanks so much for stopping in today! I hope you like my card and will come join in the fun with us! I’ll be back again tomorrow with my monthly Art Journal Page!
Hello friends! Welcome to the start of a new week for mid-September! I think Summer actually DID come back to us as we’ve set record high heats for this time of the year! I think I’m ready for those cooler temps to come back! Ugh! I know it won’t be long now and we can start enjoying trips outdoors as we look forward to picking apples and all Autumn festivities that we do!
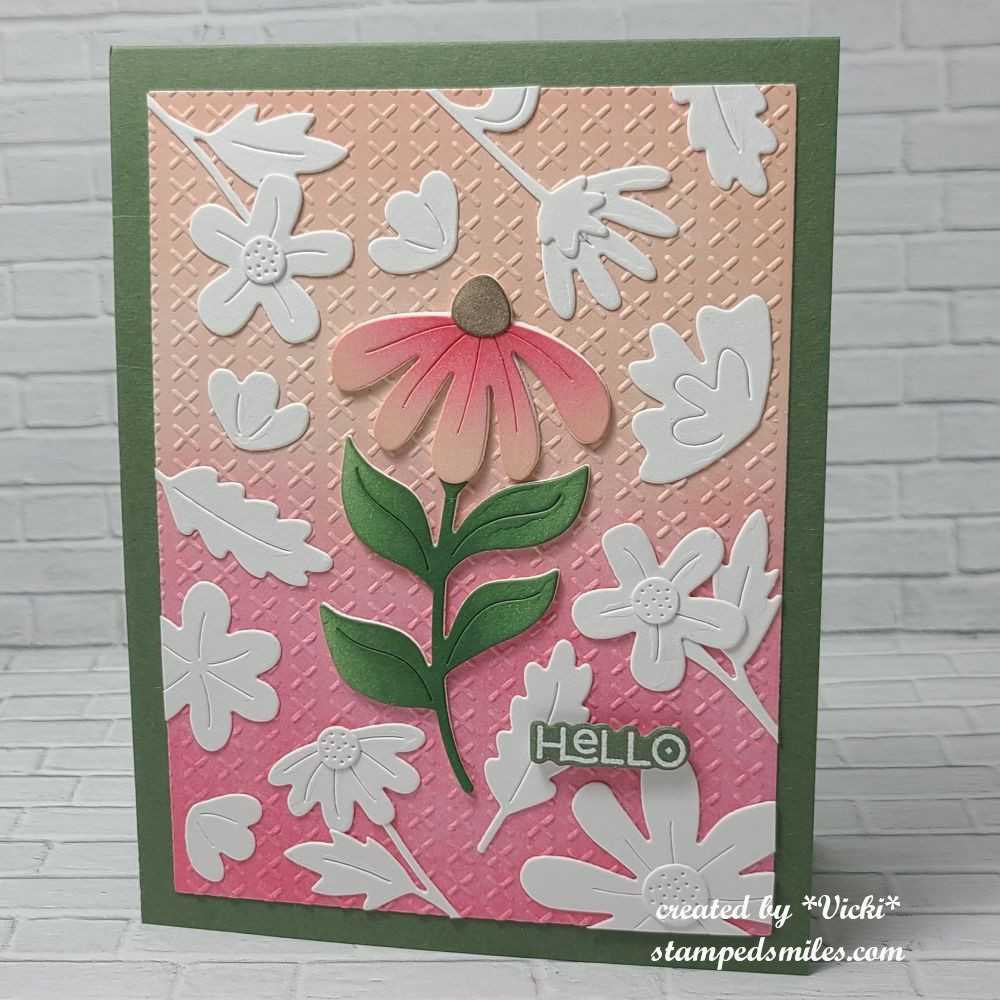
Today is time to share a new challenge over at Sparkles Monthly and we have the theme of “USE A SNGLE FLOWER (floral image)” this month. Flowers seem to be everyone’s favorite. Here’s what I came up with:
Mine is a single sunflower image. My husband planting them in our backyard this year and they were so pretty! Of course, I forgot to take a photo of one before they died off.
The items I’ve used came from an older card kit from Simon Says Stamp including the stamp set called Sunflower Fields. There is a single sunflower image that I thought would be perfect for this challenge, plus I can use more items from my stash!
For the size of the flower image, I wanted it to stand out, so I used a tag and twine from the kit and decided to make this a mini slim card size.
For the background: I used a piece of watercolor cardstock and gold heat embossed the “Romantic Script” background stamp (retired) from My Favorite Things and then used some oxide inks swiped on glass with spritzed water to make a “smooshed” background. I also used these same colors to watercolor my flower with. (except the green, I only used that for the flower) I also used some gold watercolor to splatter over the tag. I only splattered the tag because I didn’t think it would show very much over the card background.
I cut the smooshed watercolor panel to fit over a kraft side folding mini slimline card base. I die cut the flower and the sentiment to attach over the tag, added some twine and then used foam tape to pop it up over the ink smooshed background. Lastly, I’ve added some yellow sequins to finish it off.
I hope you will take some time to pull out a single flower and join us in the challenge this month! Looking forward to seeing your creations! Thanks so much for dropping by!
Happy Friday friends! 🎉 I see that we are nearing the end of August and that it’s time for kids to get back to school, which means, Autumn is heading our way! I think I’m ready for cooler weather right now! I just love all things Fall as it’s my favorite time of the year! What is your favorite season?
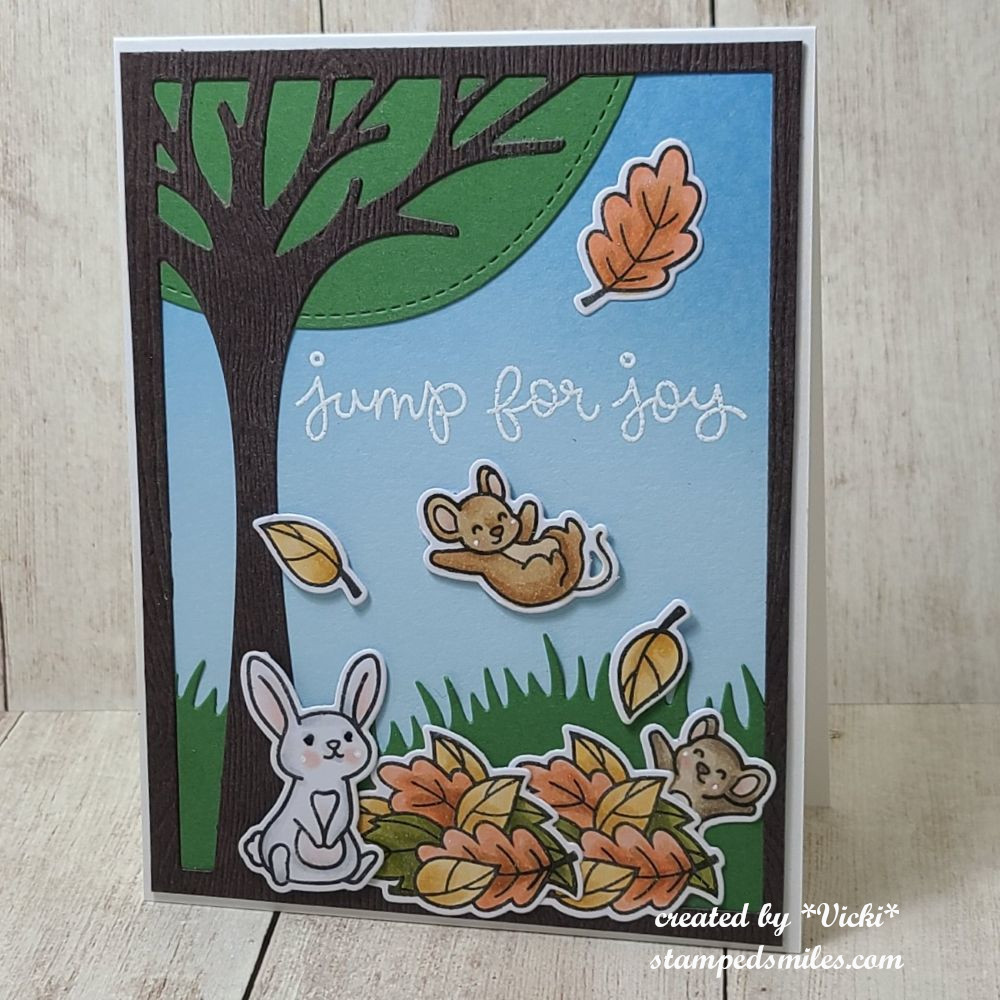
Today starts up a new challenge over at the Alphabet Challenge Blog! Our next letter is “J”, and the hostess has chosen “J is for JUMP” (this can be anything that jumps!)*Please remember that this is a bi-weekly challenge, so you have two weeks to enter.* I hope you’ll join in the fun with us. Here’s the project I’ve made for this challenge:
I knew when I saw the theme for this challenge that I had to use a pile of leaves for “jump“! I also think the best critters for that would come from Lawn Fawn of course! Can you see the little “wee” mouse jumping out from the pile?!
I started with a white card front by blending some blue inks in the background for the sky. I also used the Lawn Fawn Leafy Tree Backdrop: Portrait die to go over my ink blended sky background. The frame and tree were cut out from dark brown woodgrain texture cardstock. I used some green cardstock to cut the circle from the die set to place behind the tree as well as the LF Grassy Hillside Border die behind the tree and frame as well.
For the Autumn leaves pile and sentiment, I used the LF Jump for Joy stamp set/dies. All images were colored with Copics and I white heat embossed the sentiment over the ink blended sky. For the mice critters, I used the LF You Autumn Know stamp set/dies. For the little bunny, I used the LF Butterfly Kisses stamp set/dies. Some of the die cut images were just attached and others were popped up with foam tape for dimension. I actually wanted my pile of leaves to be larger, so I stamped, colored and die cut two of them. (I needed that little mouse on the right to be jumping out from the pile too!)
This was a fun one to make because I kept pulling out different sets to figure out which critters I wanted to use, but these cute mice get me every time. It makes me look forward to seeing the colors, sights, smells and sounds of Autumn coming. I hope you’ve enjoyed it too and I look forward to seeing all of the “jumping” that will appear in the gallery!
Thanks so much for stopping in today! Have a great weekend!
Hello friends! I hope you’ve had a wonderful week and looking forward to a great weekend coming up! We are having a heat advisory for the next several days over my way, so I thought it would be a great idea to stay indoors and craft! I also thought this would be a great time to catch up with some posts sharing some things that I’ve worked on the first part of this year that I hadn’t gotten a chance to share with you.
LONG POST – pull up your chair with your favorite beverage and enjoy!
I thought I’d share the Taylored Expressions Virtual Stamp Joy that I did back in March. I actually spent the weekend attending the classes and creating as I followed along. I managed to get all of the projects done the day after the event was over, but failed to post all of what I had made due to the fact that I was busy helping two different people move…and then life just got really busy after that as well! LOL
*I also have added an additional event from Taylored Expressions this last weekend called “Summer School” which concentrated on foiling techniques. Although I’ve done foiling before, I sure enjoyed seeing new products and learning a few new techniques too! (These four cards are at the end of the gallery photos below)*
If you’re on my website, just click on the images below to enlarge the photos and view any details underneath each one. ENJOY!
Dimension Class-ink blending and splattering die cutsDimension Class-markers over die cutsDimension Class-stacked die cuts for layersDimension Class-liquid watercolor smooshing with die cutsInteractive Class-Light Up CardInteractive Class-Light Up Card pushing button to activate itInteractive Class-Pop Up CardInteractive Class-Pop Up Card when you pull up on the tab to reveal message and flowers pop upInteractive Class-Rip Strip Card – when the recipient pulls on strip, it reveals messageInteractive Class- Spinner Card – bee spins and moves along curved trackSession 1 -stenciling on perforated papersession 2 – watercolor panels using Karin Brush markerssession 3 – stamp a stack using quad stencils to make four cardssession 4 – marker coloringsession 5-ink blending on stamp and embossing over imagesession 6-calendar easel card with message padsession 7 – ink blending over glitter cardstockSummer School-double foil technique and using markerSummer School – clear foilSummer School – foil paste and sprayed foil techniquesSummer School – Foil paste over color cardstock
I always love to learn new things with stamping/crafting along with all of the fun new products that come out too! I know I REALLY don’t need to purchase more things, but when cool stuff comes out, it’s really hard to pass it by! I think doing these classes and joining in on different challenges help me to use these fun things up!
So I hope you’ve enjoyed my post sharing all of the things that I’ve been doing! I will have another post sharing more things that I haven’t shared yet too! In the meantime, I’ve also been working on a scrapbook which has been fun and something that I haven’t done in a really long time! A baby can do that to you! LOL
Thanks so much for stopping in today my friends! I’ll be seeing you soon! Have a great weekend!😊
Hello friends and Happy Father’s Day to all of those in the U.S. that celebrate this day! Our usual is to cook out on the grill and spend time together. So I hope whatever your plans are, you have a great day! (I made a card for hubby, but forgot to take a photo…so I’ll share later.)
I’m stopping by today to share that we have a new challenge over at Sparkles Monthly and we have the theme of “Fairytale/Storybook” this month. Would love to see your take with this theme on your projects, so I hope you’ll join us. Here’s what I came up with:
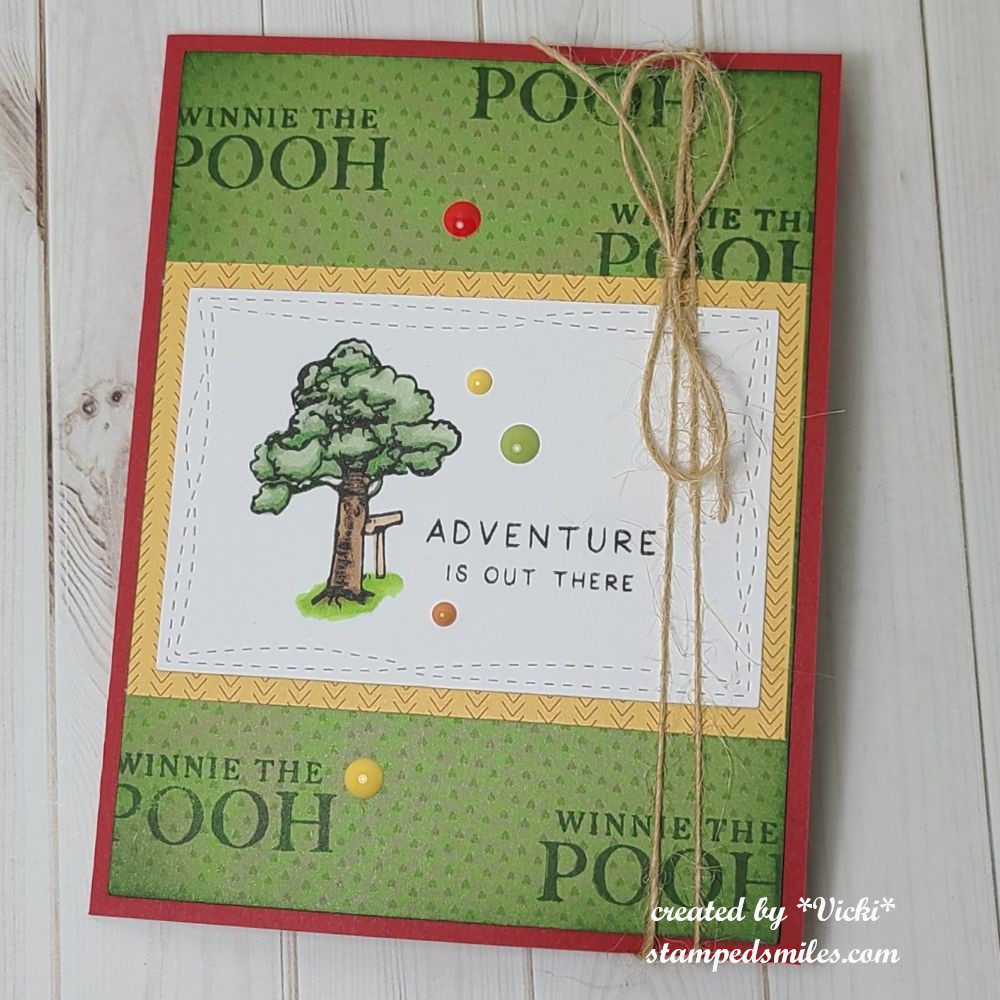
Since, I had lots of “Winnie the Pooh” on my mind with the baby shower, I thought it would be appropriate to create something using the stash that I already had out and was thinking of when this challenge theme came time to do! I think most of us grew up with this storybook and know who this is! And I had purchased some of these items from Echo Park several months ago, so it was great to be using more of it up!
FRONT of CARD: It doesn’t really look to appealing on the front, but I thought I’d share what I did anyway. I used a stamp set from Echo Park and stamped the tree (and colored it) with the sentiment on the white panel and die cut it out. I also used some of the Winnie the Pooh papers and layered behind it. The green paper was stamped with the sentiment from the stamp set. I added some matching enamel dots all over it.
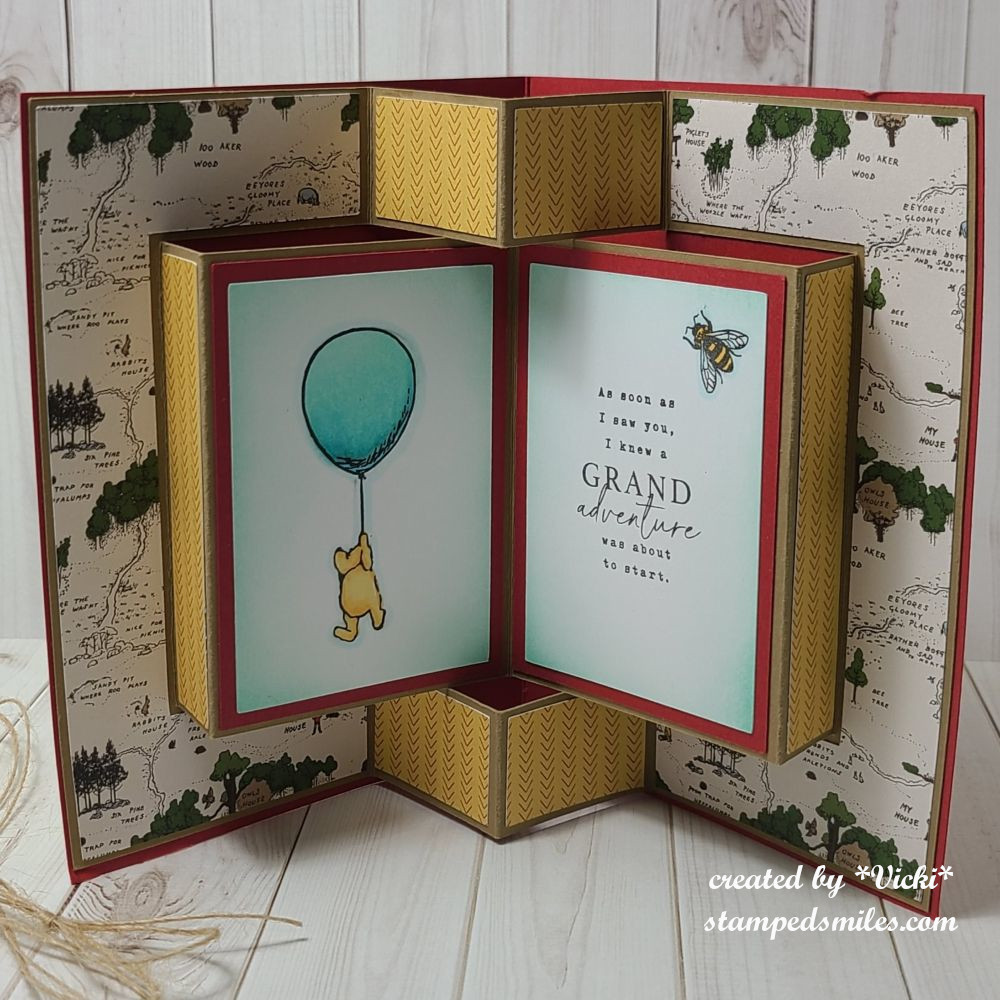
Since this is a special Fun Fold design, I needed to help it stay closed, so I tied some twine around the right side of the card.
When you open the card, this is what the inside looks like! You see the center fold pops out like a book! So this is called a “Fun Fold Book Card” and the design was cut out with my Cricut machine using the papers and stamps from Echo Park Designs. This way I knew it would all match up on the design. I did stamp the Pooh with balloon and the other side with the sentiment and bee were also stamped. I blended some blue ink around the edges.
I thought this would be such a cute card for a kid!
Thank you so much for stopping in today and I hope you like my fun fold card! Please stop by the challenge blog to see more inspiration and join in to play! See you soon!
Hello and happy Friday! Thank you so much for the congrats from my last post about the baby! I look forward to meeting our new family member soon! It’s starting to get really warm over my way, so it’s a great time to be indoors with the cool air and craft.
Today starts a new challenge over at the Alphabet Challenge Blog! Our next letter is E and the hostess has chosen “E” is for Embossing (heat or dry) *Remember that this is a bi-weekly challenge, so you have two weeks to enter* I hope you will find some time to play along! Here’s what I’ve created:
I absolutely love to emboss! I first fell in love with stamping because of the magic of heat embossing and then fell in love again when those embossing folders came out! So I’ve decided to do both versions for my card.
I haven’t had a chance to use this Drifting Flowers embossing folder from Simon Says Stamp. I thought it was so pretty! I wanted to emboss in black and try out my Lisa Horton Interference Inks with it, so after I embossed it, I used my finger to rub white ink over the raised areas. I then used the LH Interference Inks over that once it dried. (I can’t remember exactly what colors I used, but it basically started as an experiment and I had several pads open!) I also used a silver ink pad to rub the centers of each flower minus the large one.
I should also mention that some of the white ink was very slightly rubbed over the open areas as well because I got a white streak on it…so I just continued to rub all over those areas until blended in. I didn’t mind the look.
While the inks were drying, I silver heat embossed the sentiment and cut out it with the coordinating die. I additionally cut out two more for added thickness and attached to the panel. I layered this embossed panel onto a mirror silver layer with both of these layers getting rounded on two ends with my corner chomper. I added these onto a chomped top folding A2 black card base. Lastly, I added some silver sequins.
Please be sure to stop by the challenge blog to see the inspiration from team as well! I look forward to seeing your embossed projects in the gallery. Thanks so much for stopping by today and I hope you like my card. See you soon!
As You Like It – Favorite: to add a sentiment or not and why? (I most always have sentiments on my cards because I feel it’s important when sending a greeting card to someone and it’s hard for me to leave it blank.)
Hello and happy Friday my friends! After things got heated up the last couple of days, I think I’m ready for a couple of days of cooler weather! I don’t want to skip Spring by going straight into a hot Summer! Hope you have some great things planned this weekend!
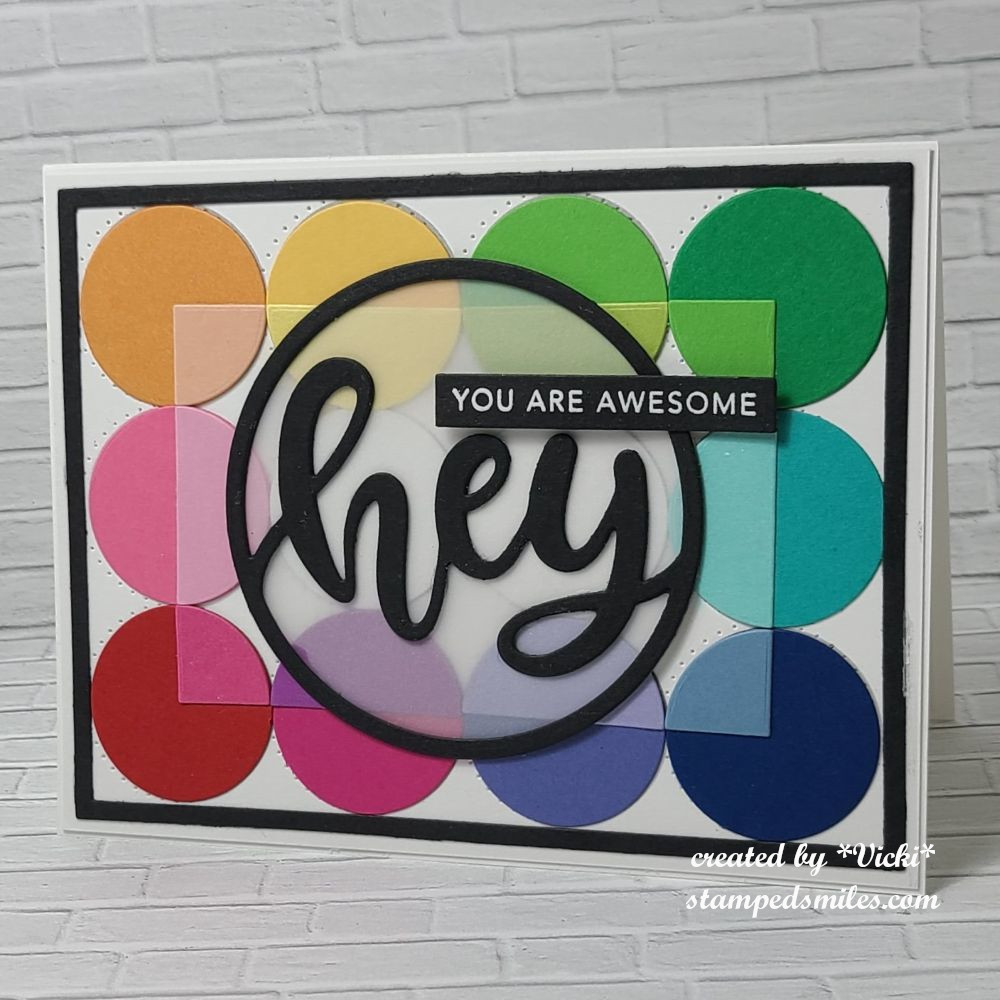
Today starts a new challenge over at the Alphabet Challenge Blog! We are now onto the letter “C” and the hostess has chosen “C” is for Circles *Remember that this is a bi-weekly challenge, so you have two weeks to enter* I hope you will find some time to play along! Here’s what I’ve created:
I do love me some circles and I thought I would just use them all over the place for this challenge! I pulled out my Taylored Expressions “Talking in Circles card kit” that came out earlier in the year and no longer available. However, the panel that I’ve used to create this design are still available in the store called “Talking in Circles A2 Sugar Cube Maps“. They make it easy to follow where placements need to be and lined up.
I used the TE A2 Thin Frame Cutting Plate for the black frame around the circles. I thought I would try and use another cutting plate, but the design pretty much covered it up. I layered this whole panel over a top folding A2 white card base.
For the sentiment in the center, I used another circle die from the TE, but I don’t think it’s in the store any longer. I cut the “HEY” circle out from black cardstock and layered some vellum behind it. I white heat embossed the “You are awesome” sentiment over black and cut that out with a Simply Strip die. This was popped up with a foam strip over the design.
Thanks so much for stopping over today! I hope you’ve enjoyed my card and you will take a hop on over to the challenge blog to see what the rest of the team has come up with.
See you soon! In case you need to know…you are awesome!
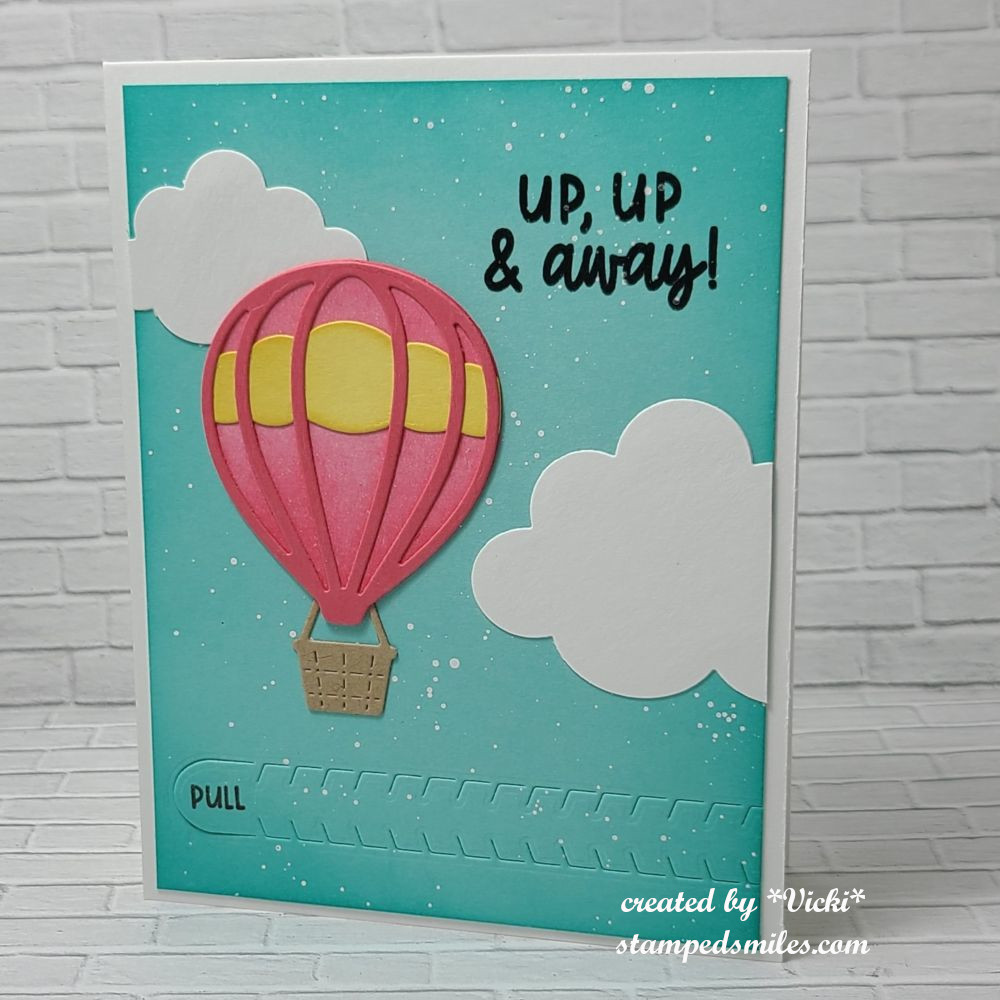
Hello friends! When I read about the weather from other areas, it always amazes me how different and even to extremes the weather gets especially during this time of the year! I hear everything from rain, sun, snow, tornadoes, flooding, cold, warm, hot, etc. So where do you find your own weather to be at right now? In my area, we have reached past the snow, but it’s still pretty cool at night…so I know that Spring and the rain is here for us with a bright spot of flowers/sprouts starting to come out in the Midwest U.S.
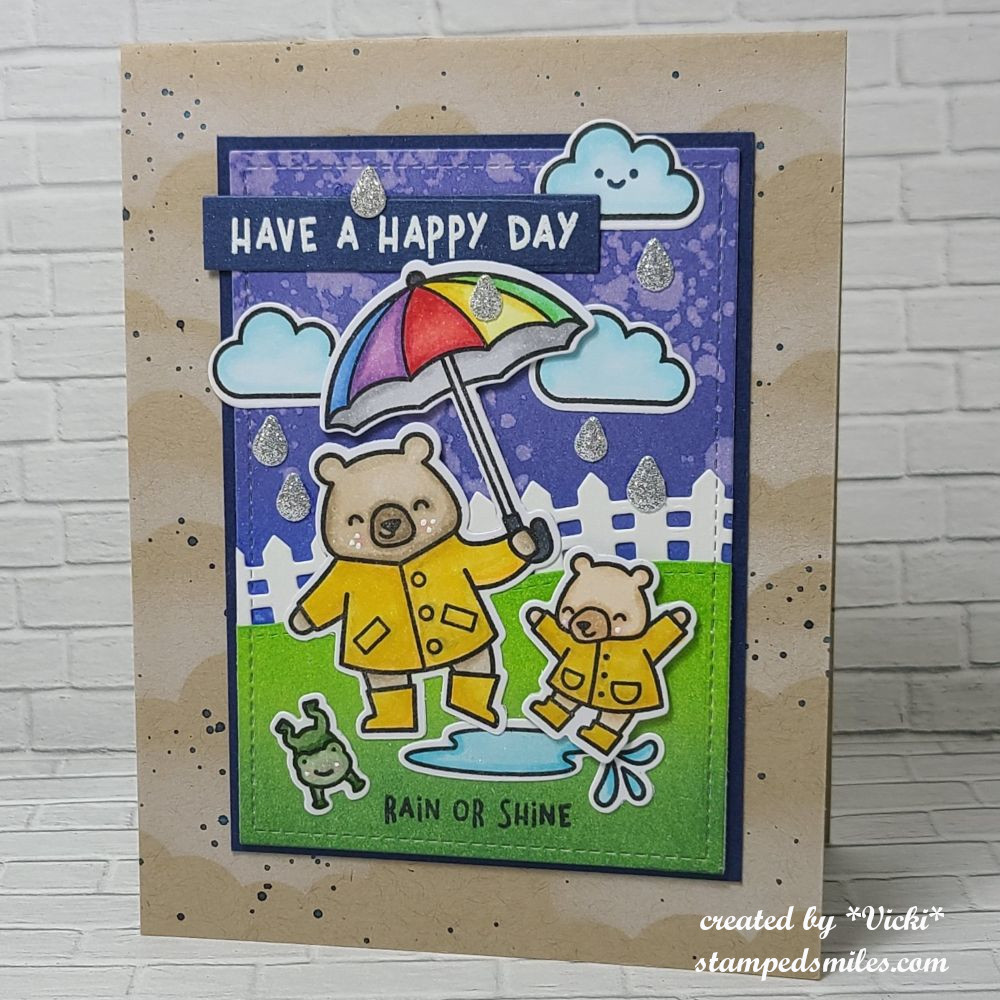
With this in mind, we have a new challenge over at Sparkles Monthly and we have a very fitting theme of “Weather Related” (rain, wind, sun, etc.) this month. Would love to see lots of different varieties of weather related projects, so I hope you’ll join us. Here’s what I came up with:
I was so happy to finally get a chance to use this adorable set by Lawn Fawn called Beary Rainy Day as I’ve had it for a while, but never used it until now.
I started with a kraft A2 sized top folding card base and stenciled some white clouds over it. I then splattered some navy watercolor paint over it.
While that was drying, I worked on my scene. For the background, I took some blue oxide inks in Blueprint Sketch and Salty Ocean and ink blended them on the stitched die cut panel. I used some water to spritz over it for a watermark look. While that was drying, I took another stitched panel and ink blended some Mowed Lawn and Rustic Wilderness Oxide inks for the grass area and die cut a hill to place at the bottom. Before I attached it, I also die cut a white picket fence to go behind it. I placed this scene onto a piece of navy cardstock and attached to the card base.
To complete the scene, I’ve stamped, colored with Copics and die cut the critters, rain puddles and clouds. I used the coordinating raindrop die with the set and just die cut a few raindrops in silver glitter paper to add to the scene. Lastly, I white heat embossed part of the sentiment on navy cardstock, cut out with a banner die and then just stamped the sentiment at the bottom in navy ink. Also hard to see in the photo, but I’ve added some shimmer to the puddles with a glitter brush pen.
That’s all from me today! Hope you’ll stop by the Sparkles Monthly blog is see what the team has come up with using this theme and join us in the challenge! Thanks so much for stopping in as I love to read your comments!
Time Out – #286 Pick 2 from list: I picked Stencil & Water + Spots ( I was inspired to stencil some clouds and add some spots (splatter) to go with the colors/clouds of my scene and I was inspired by the water with the rain, puddles and watermark for ink blending)
Thank you to all the challenge blogs for keeping us all inspired to create and play along with our supplies! I try to play along as much as I can.
Hello friends! November has come with the pretty leaves on the trees and the coolness in the winds. I always turn to comforting “things” this time of the year and it always gives me a sense of peace before the year comes to an end. A warm fuzzy blanket, socks/slippers, sweaters, etc. is what I usually turn to. What is your comfort “thing”?
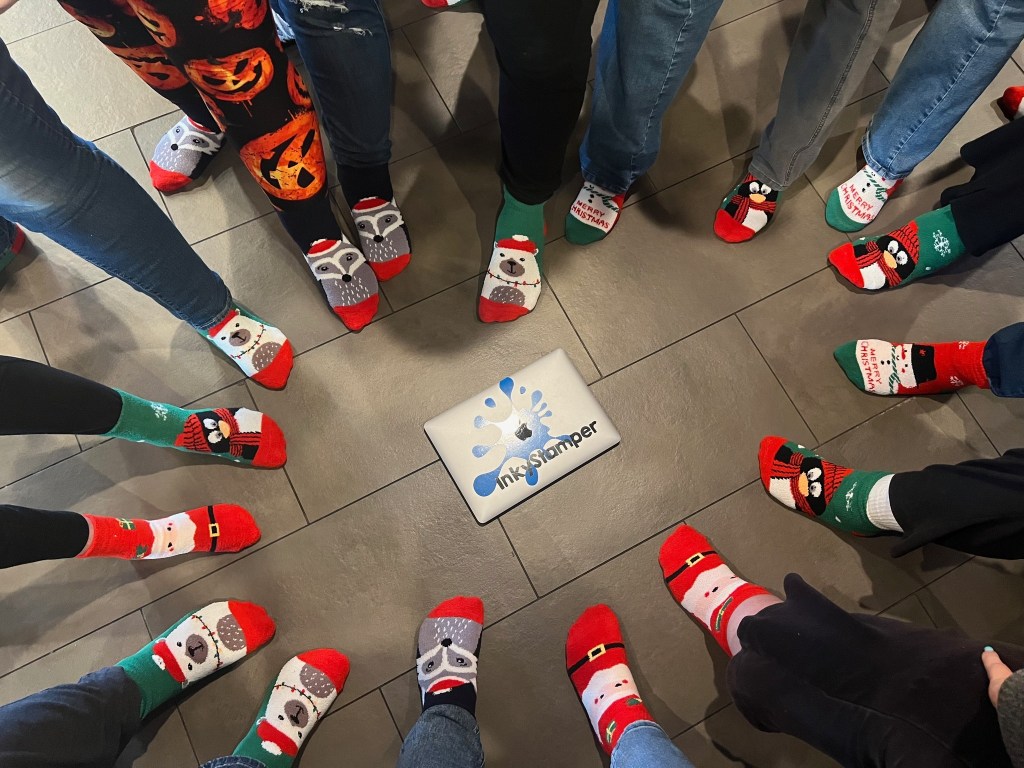
I promised to share with you the fun things we did over at the “Inky Escape” event that I recently attended and it was wonderful to see all of my crafty friends again for laughs and fun together. I think I miss them already!
I lifted this fun photo from the Inky Stamper FB page as I don’t have any photos other than seeing what others took. There were a total of 18 of us this time:
Everyone received a “swag bag”…but the case this time was a Christmas stocking full of fun goodies and one of them was that everyone received cute fluffy socks. I’m not exactly sure which one is me in that photo, but I did have a polar bear sock! LOL We each placed one foot in the circle and Chelsea took the photo.
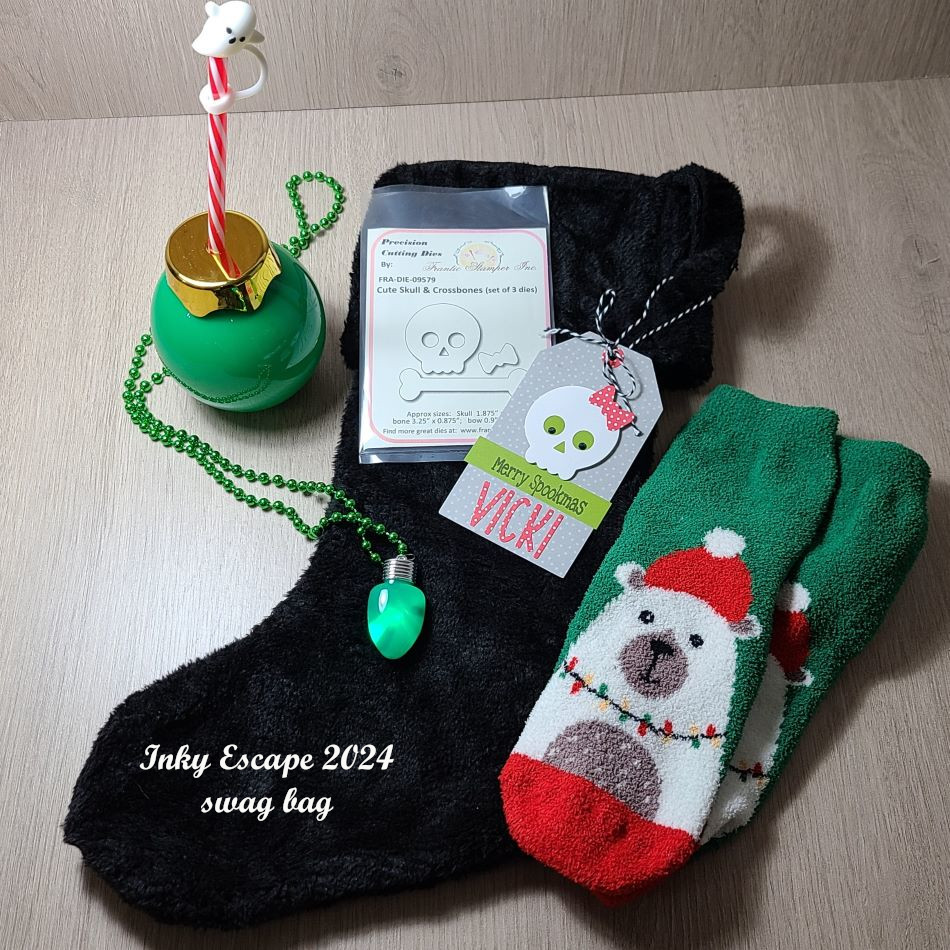
And speaking of the “swag bag”/Christmas stocking…here’s what we each received:
When I got to the event, there was this black stocking on my table with the cute tag attached to it with my name. Each person received a personalized tag on the swag bag, plus the “skull” dies that were used to create the tag which was inside the stocking! There are my polar bear fuzzy socks (I’ve already washed them up by hand so the colors wouldn’t bleed in the wash…and they’re so warm and fuzzy!) I also received the cute “Christmas bulb” drink holder with a candy cane straw and a little ghost stopper for the top! We used these containers to hold the “Jingle Juice” that we drank at some point! And then I received a light up Christmas bulb necklace that has different settings when you push the button the back. The theme for this event was called “Merry Spookmas” which you can see the greeting for that on my personalized tag. So fun!
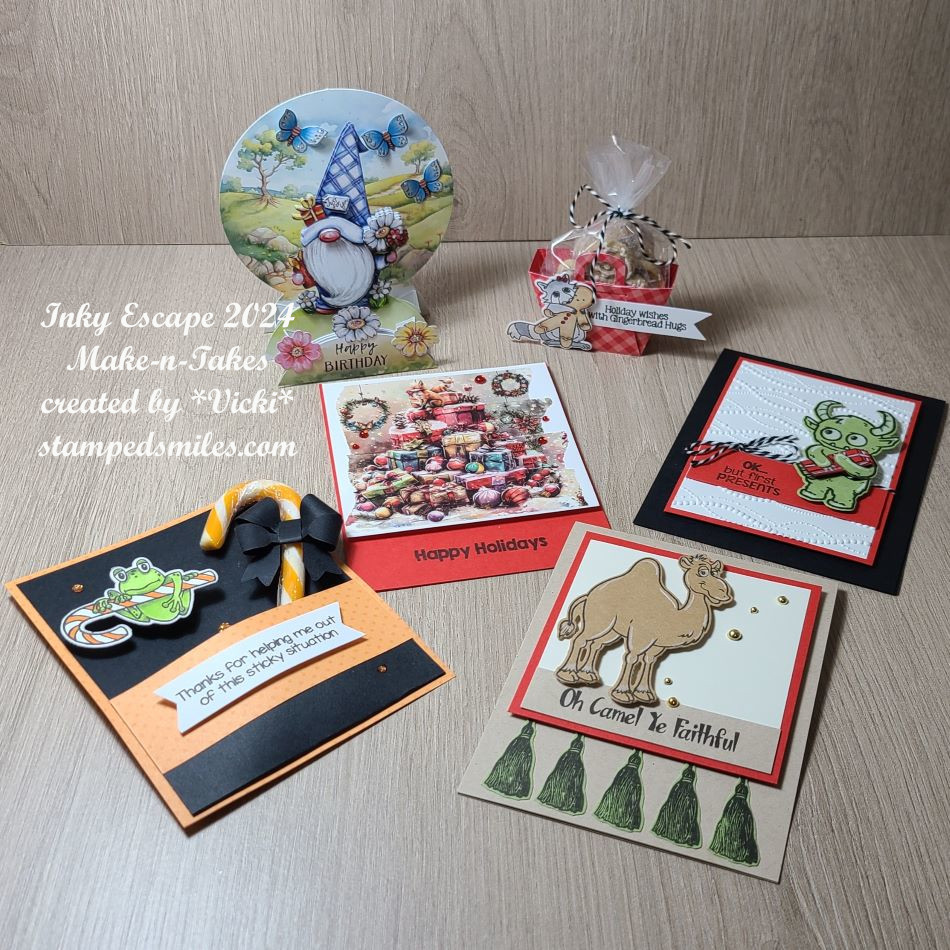
And speaking of fun…here are all of the Make-n-Takes that we created during the event. We sat and made 4 projects and then two of those projects were “bonus” makes using some other special items. (There is a “story” about one of them, but you can check out each project up close in the gallery below.)
*If you are on my website, just click on each photo to enlarge and scroll downward to see more information about each photo while it’s enlarged.*
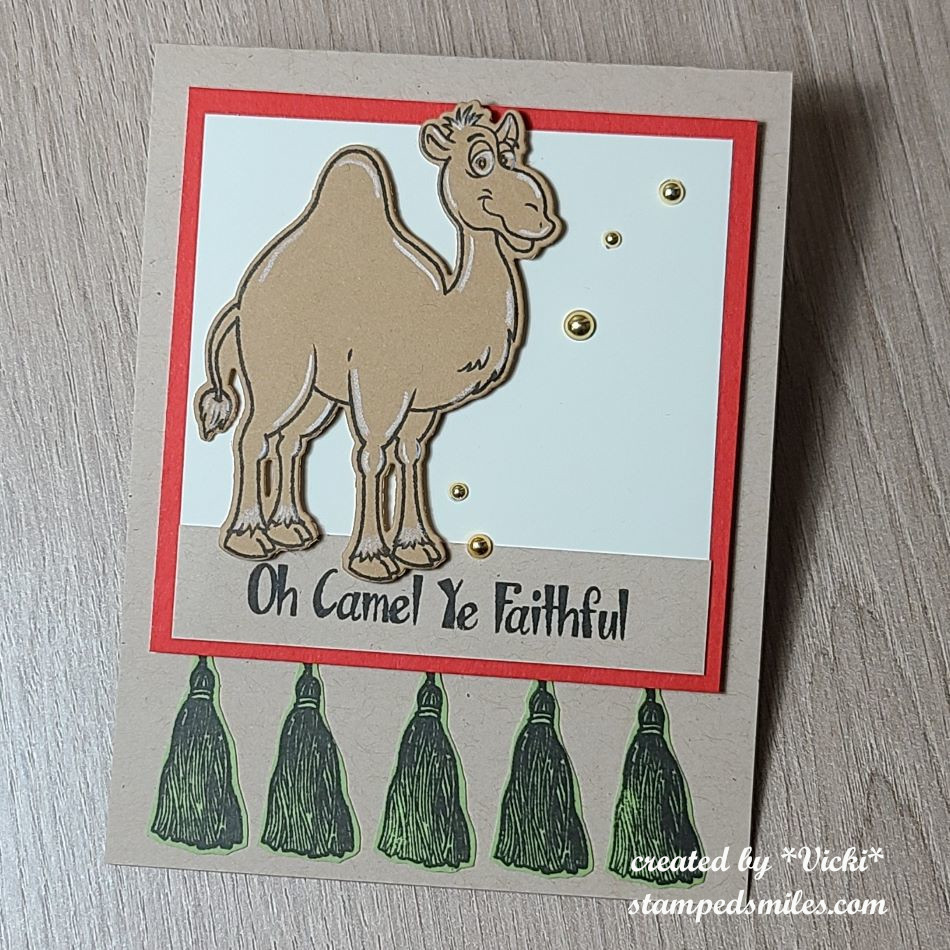
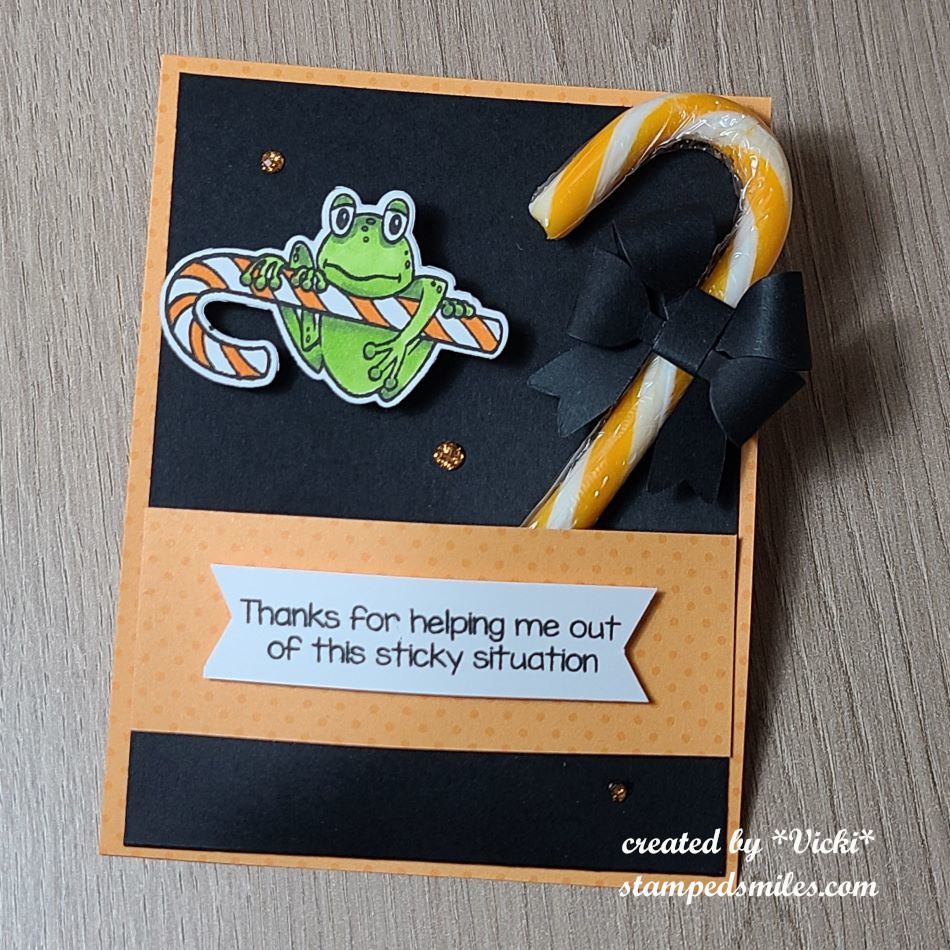
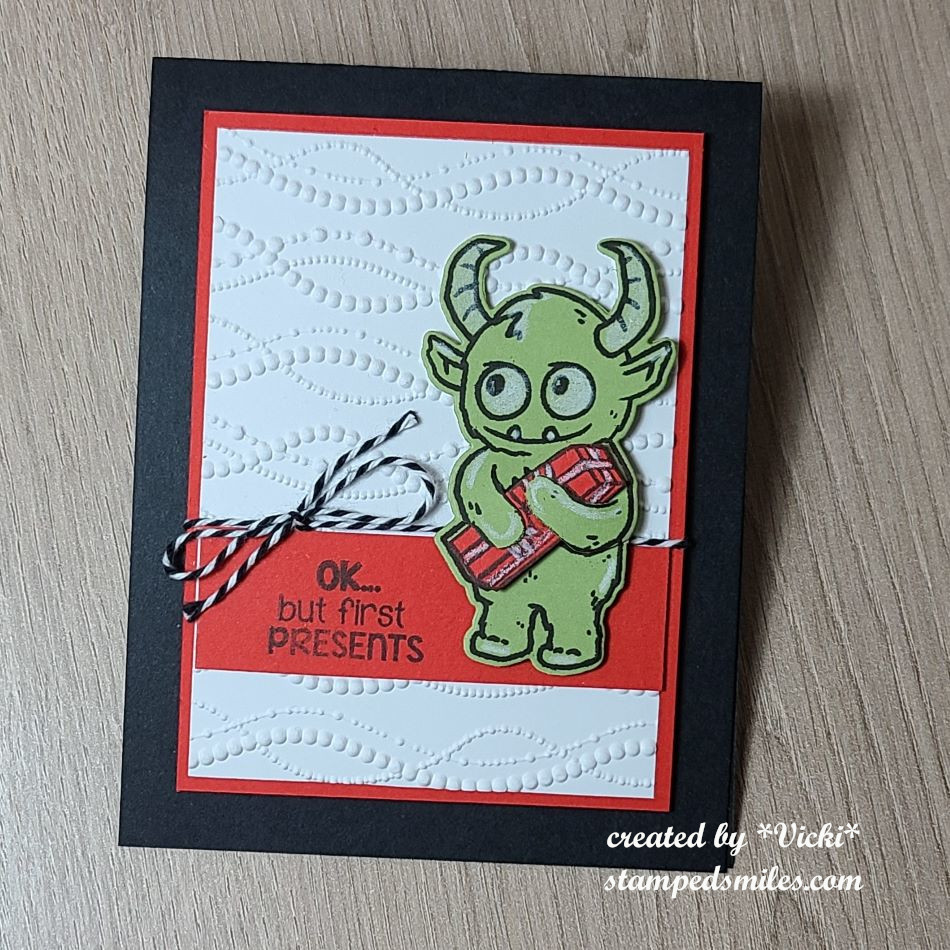
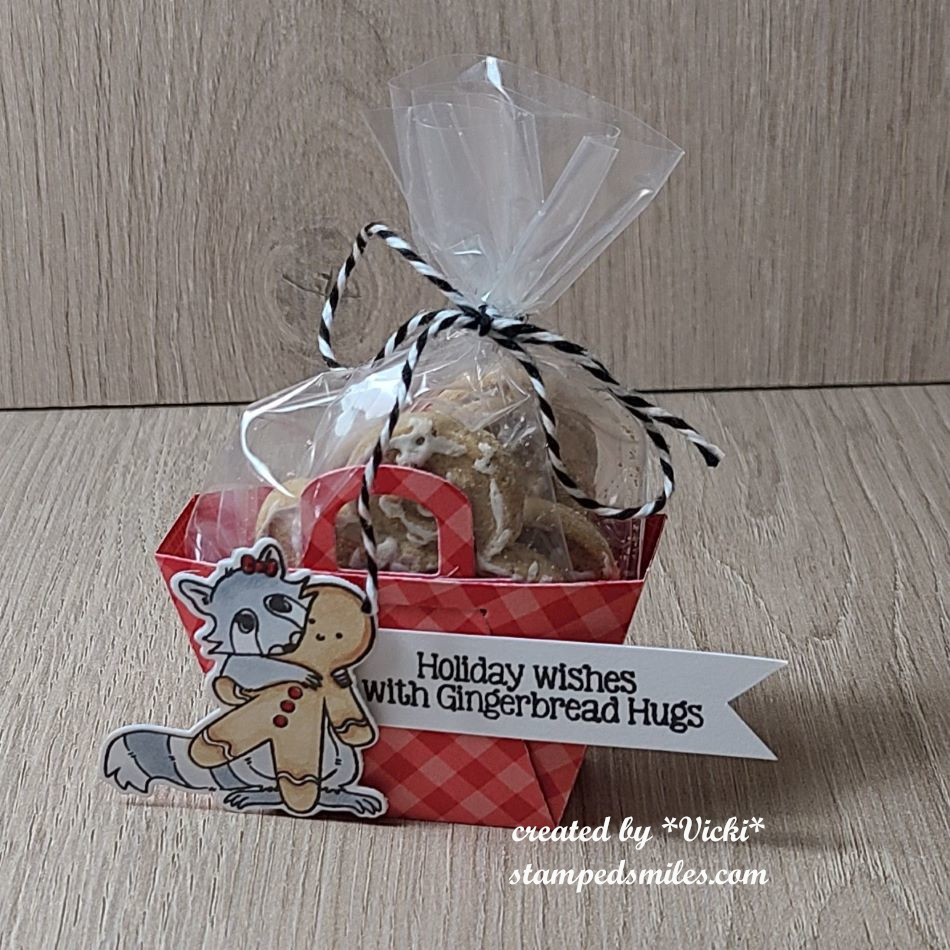
Camel stamp set used. Images were stamped on colored cardstock and cut out.I TOADally FROGgot to run the black cardstock through an embossing folder! Doh! Orange Cream candy cane inside pocket with paper bow and frog on wobbler.My favorite stamp set of this release is the Gifter set. He was stamped on cardstock and cut out. Present was paper pieced inside his arms.Cute gingerbread treat container came complete with gingerbread cookies wrapped with twine!Bonus make-n-take was easy peasy with some very cool Aall & Create washi tape that made this image!We chose the “winter” gnome that we wanted, but mine was so messed up I had to ditch it! I came home and made a birthday one that similar from my own card kit stash! LOL
The first four make-n-takes were made using the brand new Inky Stamper release that came out during this event! You should go check them out now on the website! (They’re all shown on the home page under “Featured Products”.) My favorite is that darling “Gifter” stamp set! I’m sure you’ll be seeing something from that set soon from me! *wink*
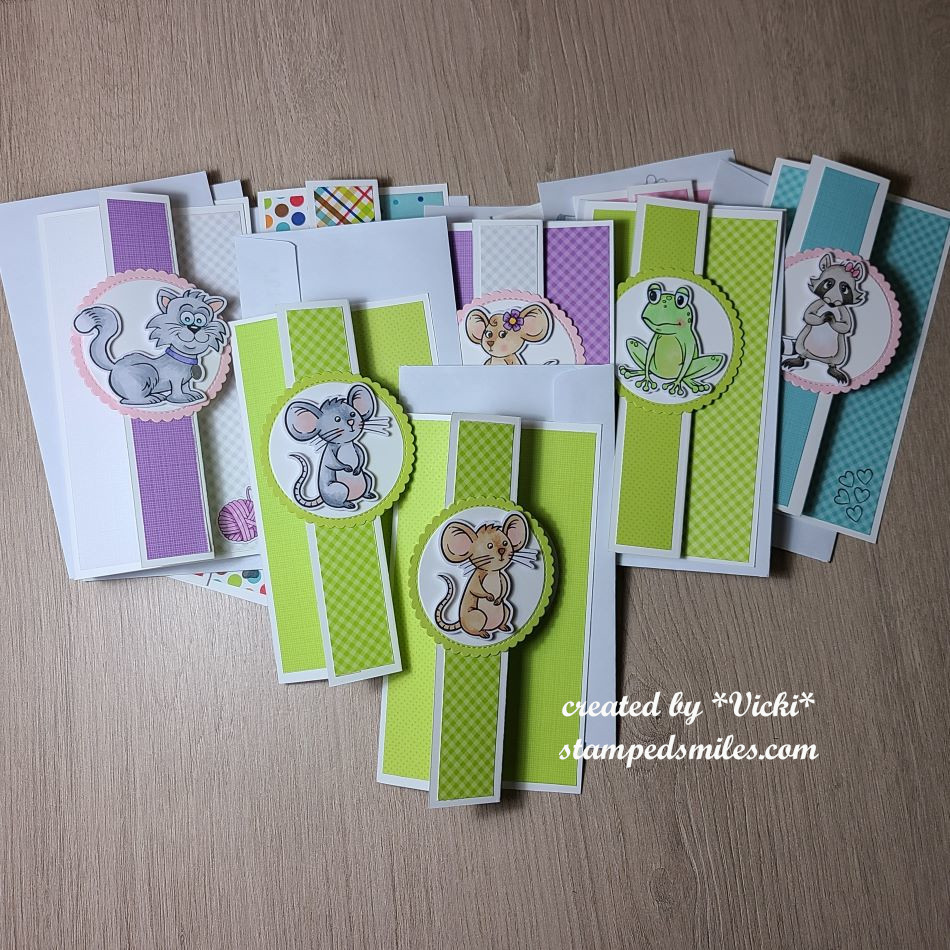
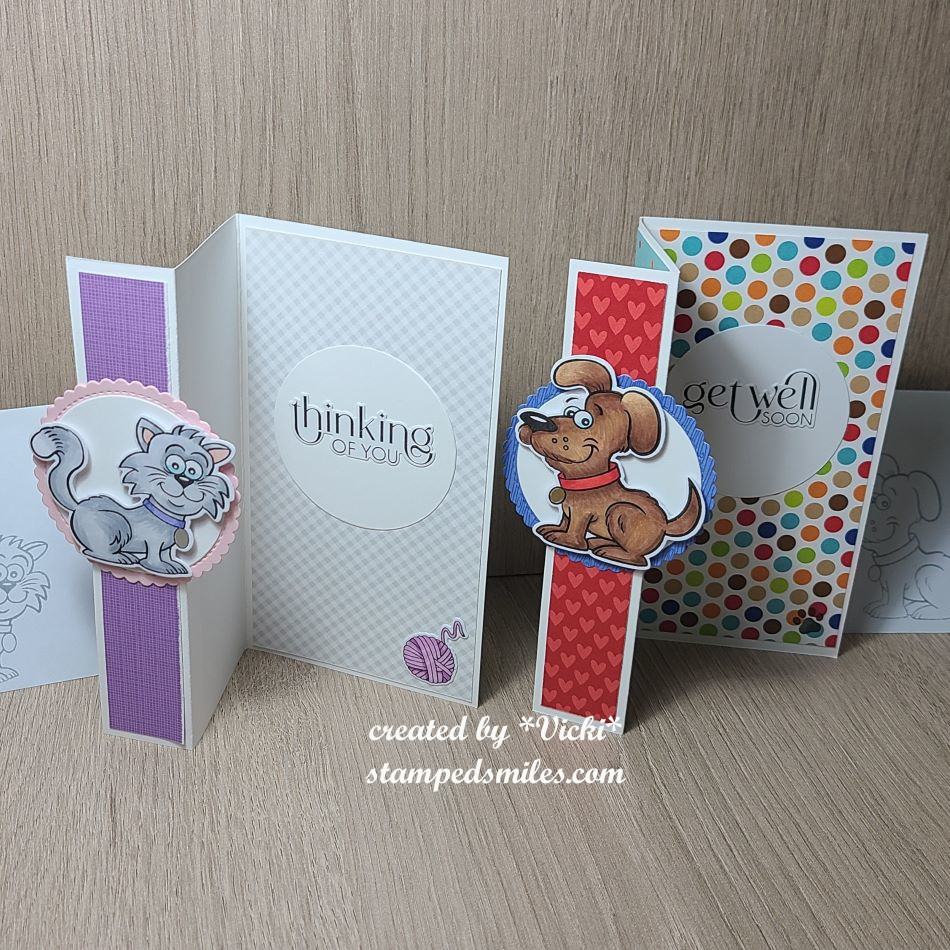
And since I was there to “crop” (as they say), I brought some things to work on that I really wanted to get done. So I decided to pull out some more Inky Stamper images to color and make a “Sheetload of Cards” using the September Sheetload of Cards Template by Crafty Al. If you’re not familiar with her, check out her You Tube Channel and look for all of her “Sheetload of Cards” videos to see how you can find instructions for each month. #SUYSSep2024 #ShowUsYourSheetLoad
I utilized her template to create the full 12 cards as demonstrated. The dimensions of the finished card design is 3.5″ x 6.25″ which I really liked as it helped to use up the full 6″x6″ size of those paper pads! Also, you don’t have to create envelopes for these as they fit perfectly inside those #6 envelopes (3-5/8″ x 6.5″) that you can find at any office supply area of a store.
As you can see, I used a variety of images that I stamped, colored and cut out for each design. I matched up my design papers to coordinate with the images. All of the images I used are from Inky Stamper. All papers come from a variety of Doodlebug Design papers.
Here’s a closer look at two of the cards I made from the set so that you can see how the card opens up and the greetings on the inside of each card. (Sentiments come from Taylored Expressions.) You can also see the coordinating envelopes next to them with the matching critter stamped in grey ink.
These cards are on the way for a special charity for ill children patients to help lift spirts and I hope each one will!
I know there were so many things going on during the event that I was even surprised that I got all of these finished. They were mostly finished with the exception of the greeting which I added when I got home. I had plenty to do while I was there and also enjoyed all the activities too!
I hope you’ve enjoyed my post today as well! I thank you so much for stopping in!
Hello friends! I hope you’ve had a good week and looking forward to a great weekend ahead! The weather has been unseasonably cool for this time of the year and I’m able to get my windows open the last few days and enjoying it! Unfortunately, it’s going to warm up again, so I know that the air will come back on.
Today I’m sharing something that is a bit different and new to me, but I think it will come in very handy for the future as my “goal for next year” is to use up those old card kits that have been stored in my stash for WAY too long! I’m hoping to start this on my blog next year each month and focus on a card kit each month so I can clear things out from my stash! Stay tuned!
I found a fellow crafter Call Me Crafty Al and I decided to give her “Sheetload of Cards“ a try for this month and see how it goes! It would probably have been much easier to do it the way she did, but I challenged myself to use my card kit items instead:
Here’s the set of all eight cards using the same sketch from Crafty Al’s Sheetloadfor this month. You may not recognize the card kit that I’ve used as it’s an old one from Simon Says Stamp. The box had November 2015 written on it, and the paper inside had “Here’s Looking at You” card kit on it. I know that I have pulled it out and used a few things out of it, but there was still plenty to use!
I was looking to make some uplifting/inspirational cards so this all worked out great.
Click on the photos above if you’re on my website so you can get a closer view of them.
I’ve used all of the cardstock except one sheet of kraft, all of the 6×6 papers were used except two sheets and I’ve also used up some of the journaling cards that were included as well as the stamp set and thread. The reason why some of the edges are rounded is because the journaling card inside the kit had rounded edges. I just decided to incorporate that into the design and I think it worked out okay.
Honestly, I don’t know weather to be proud of myself for using up my extremely old card kit or feel embarrassed for having such an old card kit still in my stash!😂
Regardless, I hope you’ve enjoyed my play with the “Sheetload of Cards” for August 2024 utilizing a very old card kit! How about you? Do you still have some card kits or stashes of something from 2015…er older? Would you like to use them up too? Follow along with me next year each month as I attempt to use up those old old old stash items and have a session of “Crafting to the Oldies“! This is me holding myself accountable! Let’s do this!
Thanks so much for dropping in today and have a great weekend!❤️