Hello friends and happy weekend! Monday will be the first of December already! Wow, time seems to be going so fast especially at the end of year! This is exactly what my page was inspired by in this post!
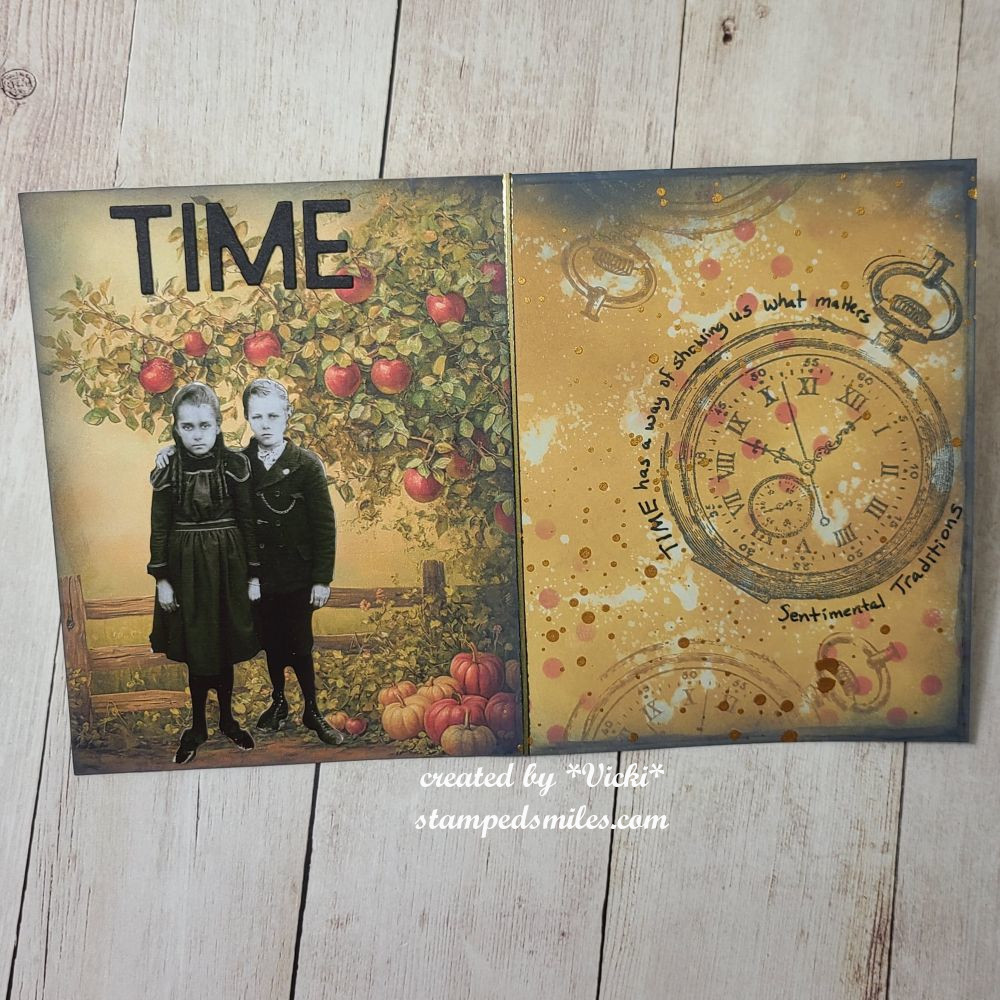
Last Saturday of November brings us to the monthly “SMASH OUR STASH” Art Journaling. I’ve collaborated with my crafty friend Carol (from Crafty-Stamper) to join in. Here’s my AJ page with the NOVEMBER prompt of “TRADITIONS”:
This is a little different type of style, but most of the time I just come up with whatever happens to pop into my head and hopefully with older items I have from my stash!
This may not seem like I’ve used the “traditions” prompt for this month, but if you look at the wording at the bottom of the pocket watch, It says “Sentimental Traditions”. I was thinking of “old timey” type of things and the story about traditions on my page comes from my family going to our favorite place every fall for picking apples and now my children go every year as well, so it’s fun to know they’re still enjoying the same tradition we had with them.
For the background: (size of Mixed Media paper is 5.5″ x 8.5″) I ink blended with brushed corduroy oxide ink and spritzed with water to create the watermarks. I stenciled the dots with fired brick oxide and went around the edges with black soot oxide. I added some background paper to the other side that has the apple tree and then I added the paper doll couple over top and then added the “TIME” lettering that was die cut with black cardstock above them. I also sponged around the edges of the apple tree paper with black soot oxide. I added a gold metallic sticker line in the center between the paper and ink background.
I took a really old Whimsy Stamp stamp set with the pocket watch stamp and stamped it with black ink and then used a pen to write the words: “TIME has a way of showing us what matters.” I then stamped a couple more of the pocket watch image in brushed corduroy oxide and then splattered some gold watercolor over right side of the page.
- Thanks so much for stopping in today! Hope you’ve enjoyed my art journal page!
Challenges:
- Art Journal Journey – A Moment In Time
- Anything Goes in a Card Free Zone – No cards
- Creative Artiste – #121 Anything Goes Mixed Media