Hey friends! Wow, how in the world did Christmas get here so darn fast?! I feel like we just got through Thanksgiving and then things were a blur after that!😳 So, I’m also now realizing that it’s been a whole month since I’ve posted! YIKES!
Since it IS December…and the middle of it…that means today starts the December challenge over at Sparkles Monthlyand for this month, our hostess is asking to see Christmas Transport on your project. Be sure to stop by the blog to see what the rest of the team has created for you. Here’s my project for this challenge:
For me, Christmas transport is not planes, trains or anything busy or noisy, but something a little more outdoors around the countryside. There’s nothing better than a good road trip with snow falling and the smell of fresh pine in the air! I live in an area where there are lots of tree farms to pick out your perfect tree. (Do I pick out a real tree? Nope…but I do love them and the smell. Just not the mess. LOL) I prefer to visit the trees and not chop one down.
I’ve used the adorable Inky Stamper set called Vintage Truck and I’ve decided to add the tree image to the back of his truck as he’s taking it home to decorate for Christmas! I’ve fussy cut the image out after coloring and even added a snowflake stamp to the truck door from the Inky Stamper Toboggan stamp set. I’ve also stamped a few more along with the larger snowflake and cut out to add to the background of the card.
For the background, I’ve used some paper from the Lisa Horton A Festive Tapestry pack as it was perfect for a landscape of trees. At the bottom, I’ve used the road die from Lawn Fawn and then placed it over my tree landscape and added the truck over it by popping up with foam tape so it looks like he’s on the road.
So while making this card, I had the song stuck in my head and so I found a perfect sentiment to go with it from the Inky Stamper Tree stamp set. I white heat embossed over a green piece and cut out a banner to add to the top left of the card. Everything was placed over a white A2 top folding card base and I lastly added some Iridescent Clear Drops in the center of the snowflakes.
Hope you’ve enjoyed my card for you today and I hope that you’ll hop on over to the challenge blog and play along! I’d love to see what you come up with!
Hello friends! November has come with the pretty leaves on the trees and the coolness in the winds. I always turn to comforting “things” this time of the year and it always gives me a sense of peace before the year comes to an end. A warm fuzzy blanket, socks/slippers, sweaters, etc. is what I usually turn to. What is your comfort “thing”?
I promised to share with you the fun things we did over at the “Inky Escape” event that I recently attended and it was wonderful to see all of my crafty friends again for laughs and fun together. I think I miss them already!
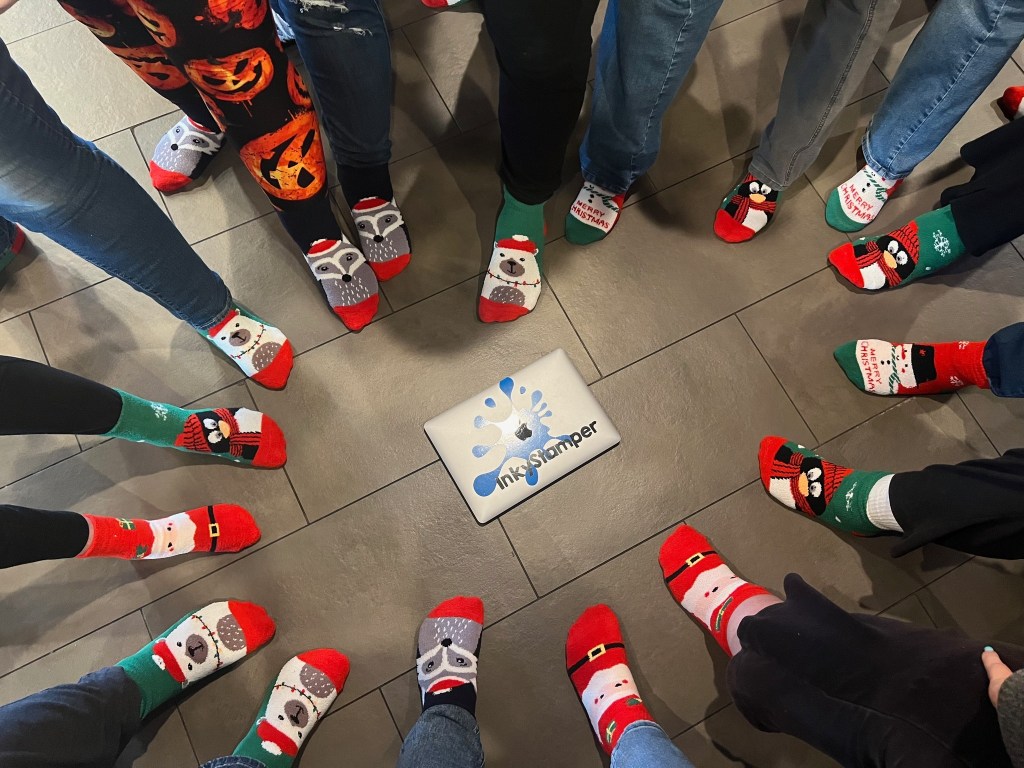
I lifted this fun photo from the Inky Stamper FB page as I don’t have any photos other than seeing what others took. There were a total of 18 of us this time:
Everyone received a “swag bag”…but the case this time was a Christmas stocking full of fun goodies and one of them was that everyone received cute fluffy socks. I’m not exactly sure which one is me in that photo, but I did have a polar bear sock! LOL We each placed one foot in the circle and Chelsea took the photo.
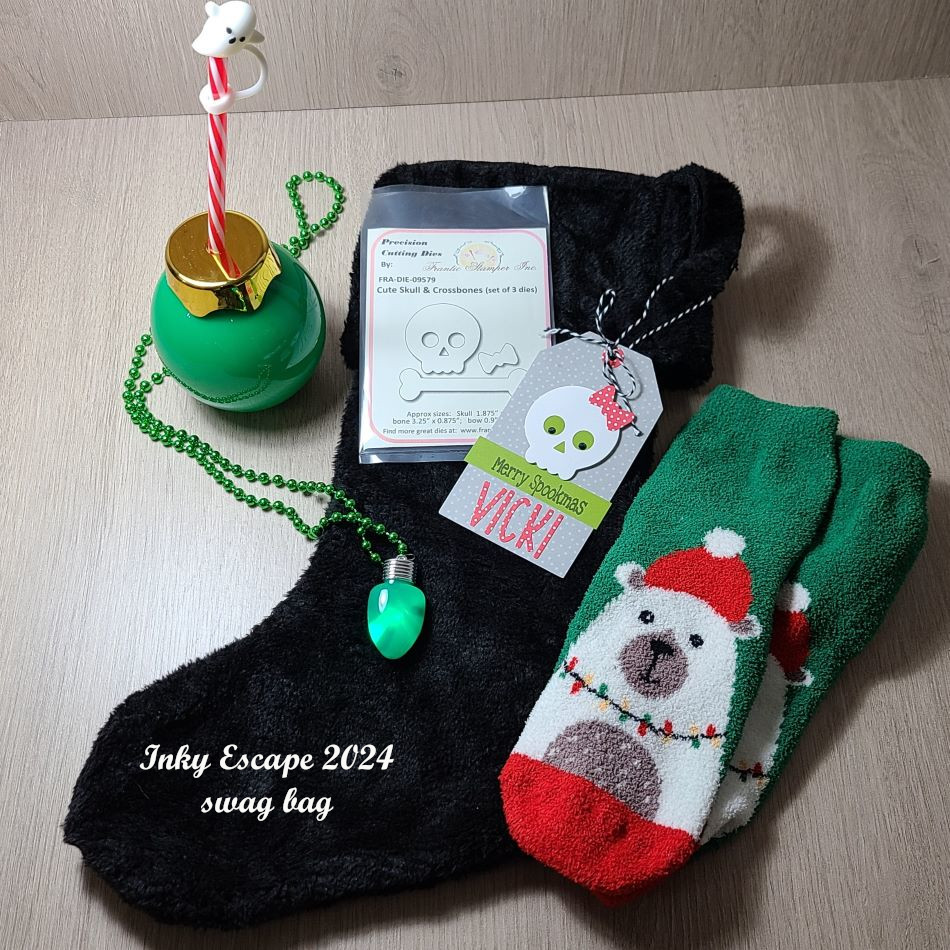
And speaking of the “swag bag”/Christmas stocking…here’s what we each received:
When I got to the event, there was this black stocking on my table with the cute tag attached to it with my name. Each person received a personalized tag on the swag bag, plus the “skull” dies that were used to create the tag which was inside the stocking! There are my polar bear fuzzy socks (I’ve already washed them up by hand so the colors wouldn’t bleed in the wash…and they’re so warm and fuzzy!) I also received the cute “Christmas bulb” drink holder with a candy cane straw and a little ghost stopper for the top! We used these containers to hold the “Jingle Juice” that we drank at some point! And then I received a light up Christmas bulb necklace that has different settings when you push the button the back. The theme for this event was called “Merry Spookmas” which you can see the greeting for that on my personalized tag. So fun!
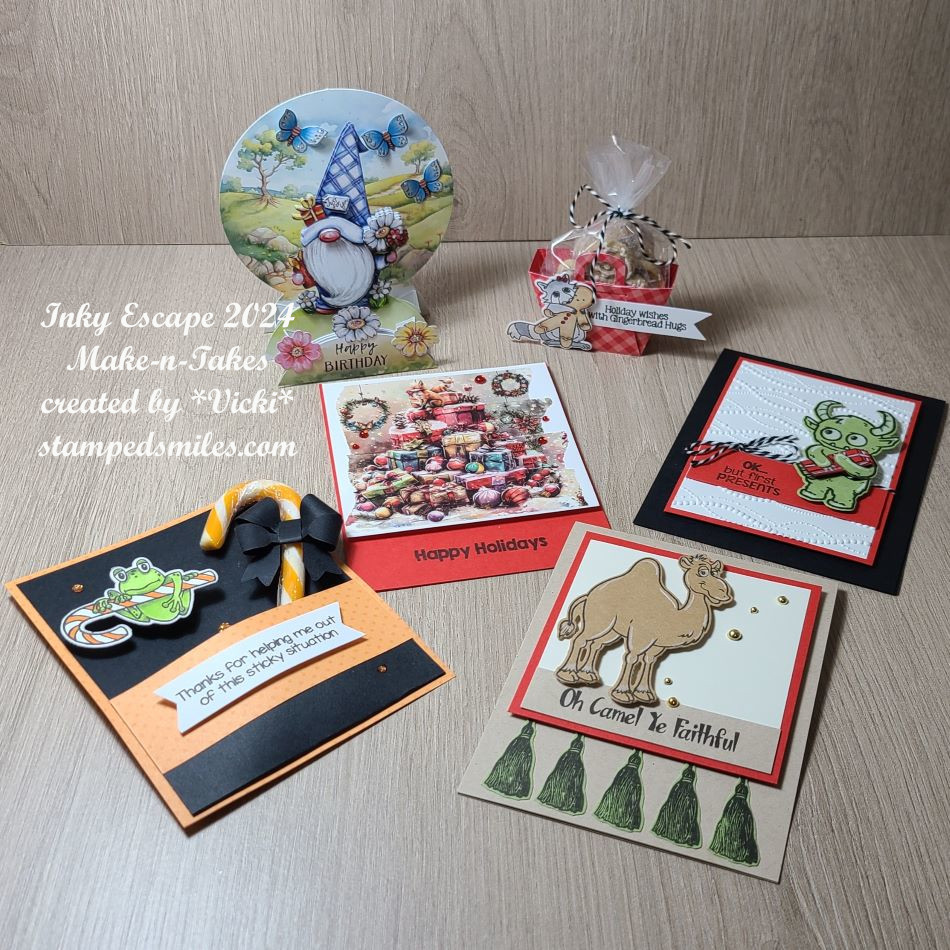
And speaking of fun…here are all of the Make-n-Takes that we created during the event. We sat and made 4 projects and then two of those projects were “bonus” makes using some other special items. (There is a “story” about one of them, but you can check out each project up close in the gallery below.)
*If you are on my website, just click on each photo to enlarge and scroll downward to see more information about each photo while it’s enlarged.*
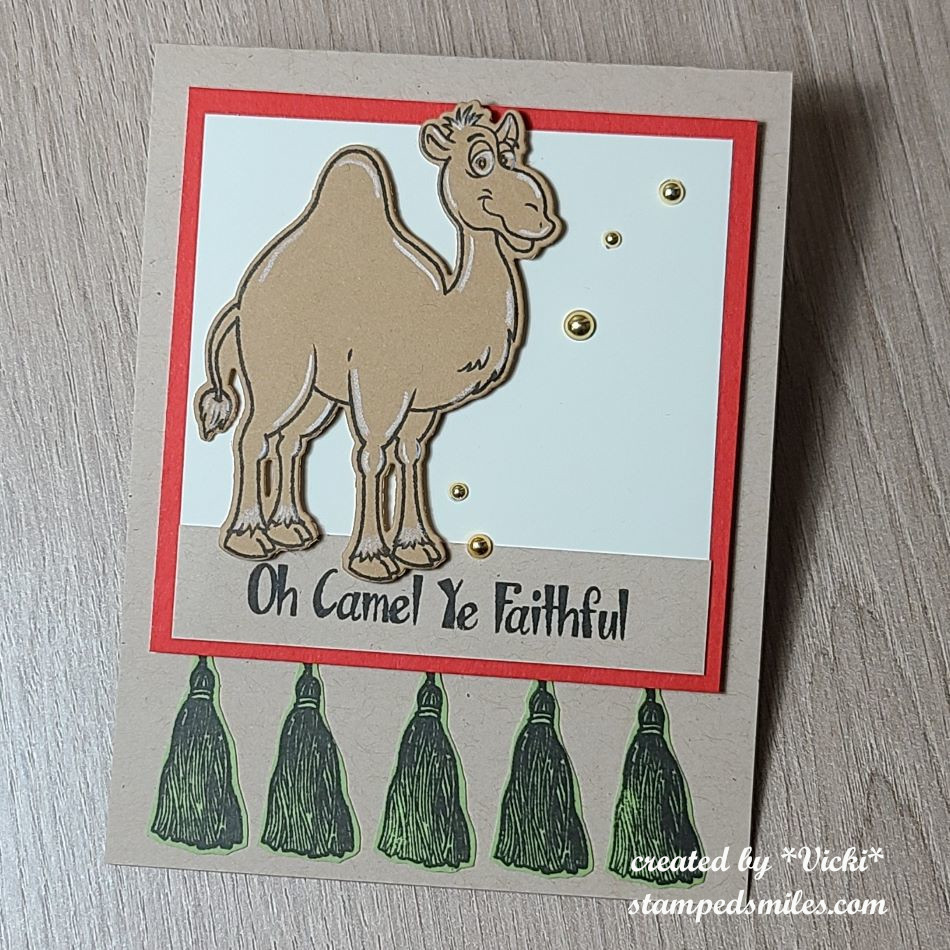
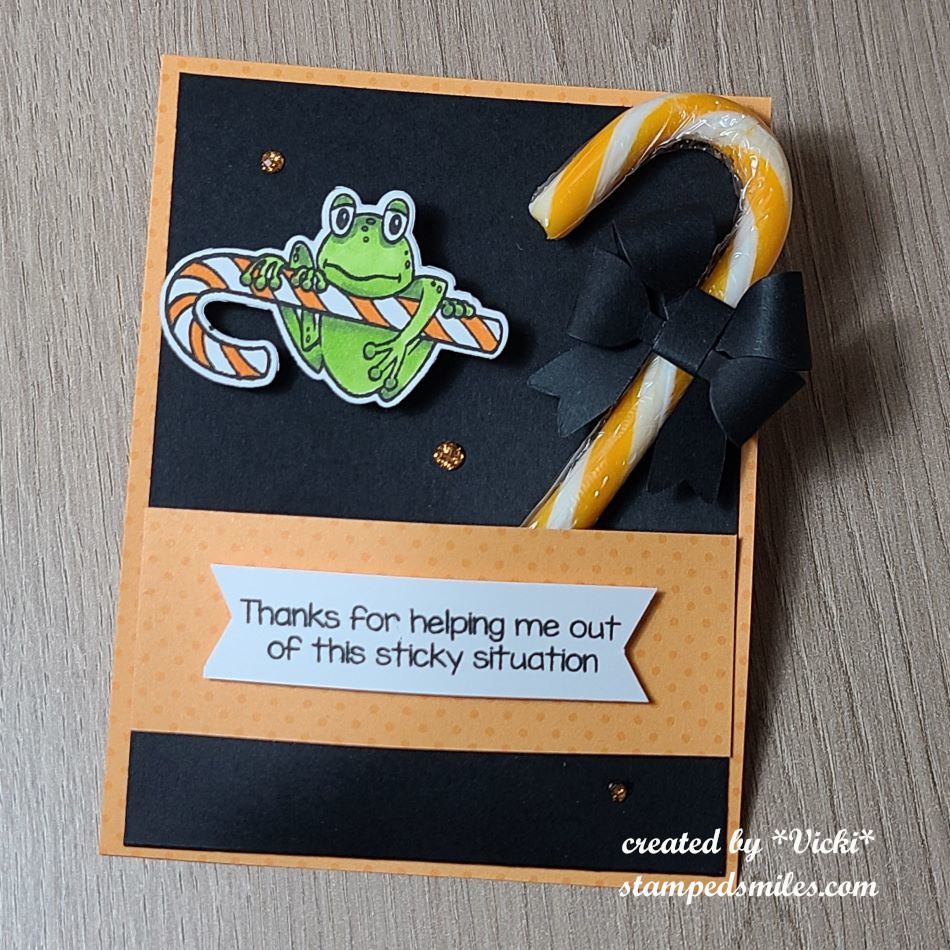
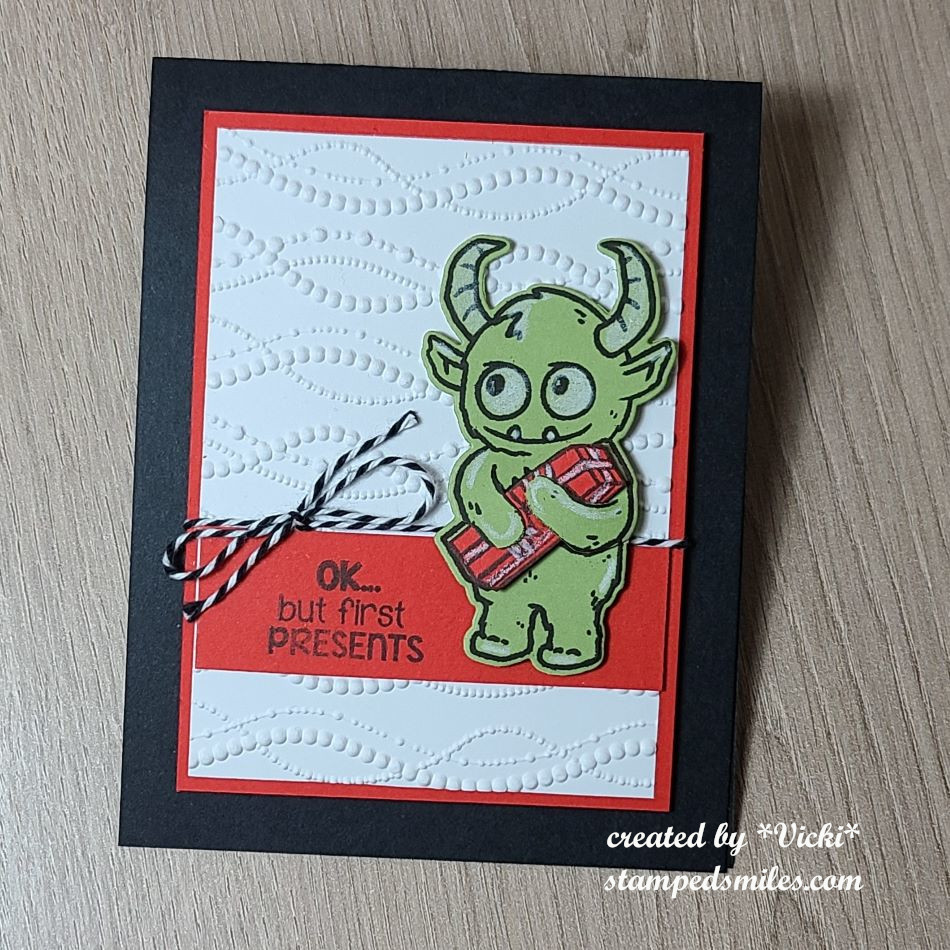
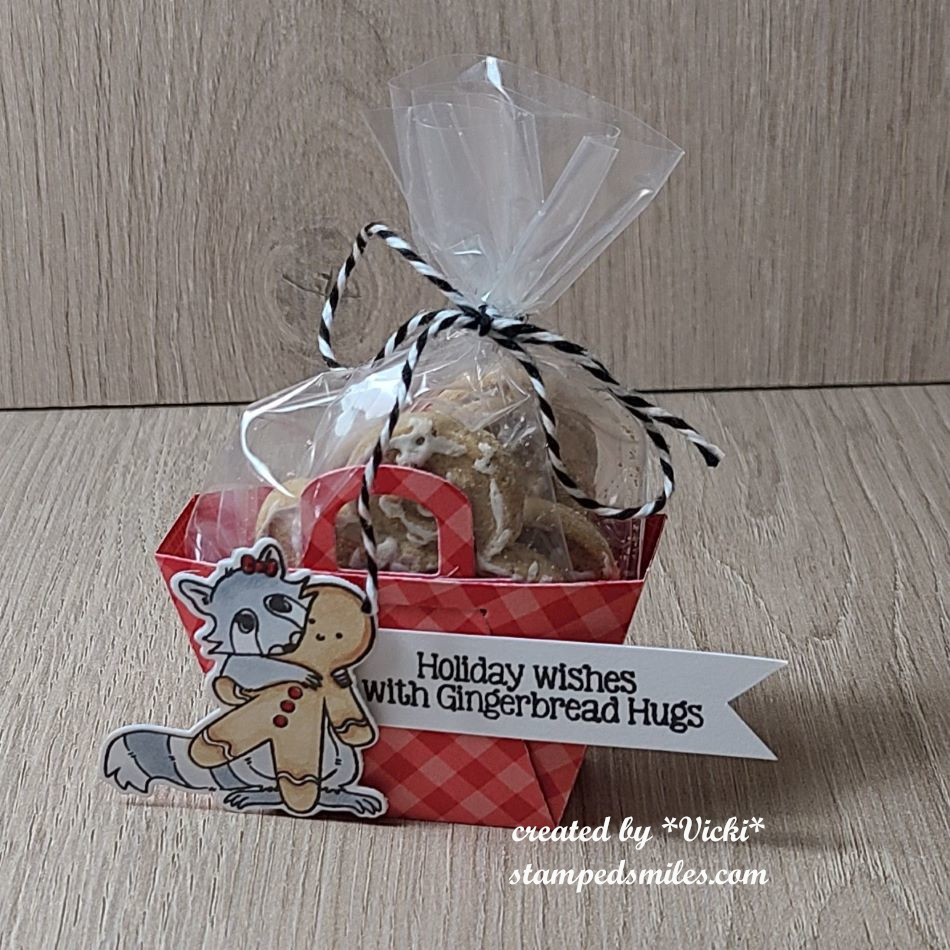
Camel stamp set used. Images were stamped on colored cardstock and cut out.I TOADally FROGgot to run the black cardstock through an embossing folder! Doh! Orange Cream candy cane inside pocket with paper bow and frog on wobbler.My favorite stamp set of this release is the Gifter set. He was stamped on cardstock and cut out. Present was paper pieced inside his arms.Cute gingerbread treat container came complete with gingerbread cookies wrapped with twine!Bonus make-n-take was easy peasy with some very cool Aall & Create washi tape that made this image!We chose the “winter” gnome that we wanted, but mine was so messed up I had to ditch it! I came home and made a birthday one that similar from my own card kit stash! LOL
The first four make-n-takes were made using the brand new Inky Stamper release that came out during this event! You should go check them out now on the website! (They’re all shown on the home page under “Featured Products”.) My favorite is that darling “Gifter” stamp set! I’m sure you’ll be seeing something from that set soon from me! *wink*
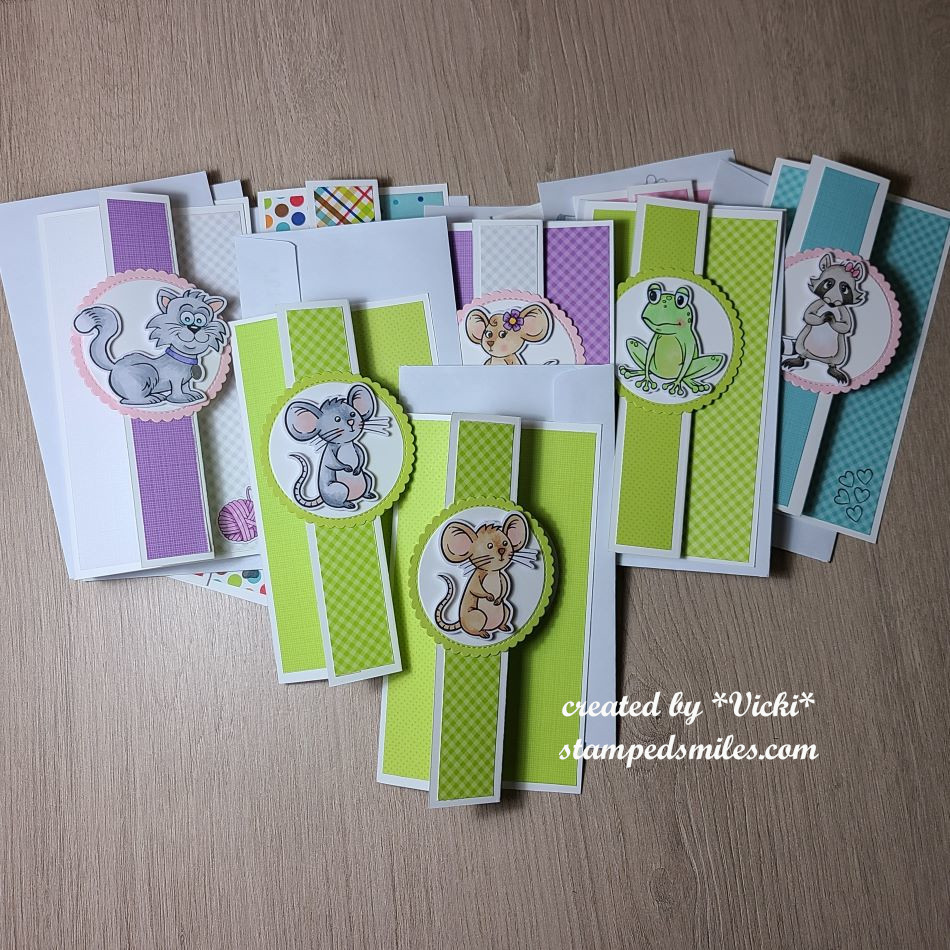
And since I was there to “crop” (as they say), I brought some things to work on that I really wanted to get done. So I decided to pull out some more Inky Stamper images to color and make a “Sheetload of Cards” using the September Sheetload of Cards Template by Crafty Al. If you’re not familiar with her, check out her You Tube Channel and look for all of her “Sheetload of Cards” videos to see how you can find instructions for each month. #SUYSSep2024 #ShowUsYourSheetLoad
I utilized her template to create the full 12 cards as demonstrated. The dimensions of the finished card design is 3.5″ x 6.25″ which I really liked as it helped to use up the full 6″x6″ size of those paper pads! Also, you don’t have to create envelopes for these as they fit perfectly inside those #6 envelopes (3-5/8″ x 6.5″) that you can find at any office supply area of a store.
As you can see, I used a variety of images that I stamped, colored and cut out for each design. I matched up my design papers to coordinate with the images. All of the images I used are from Inky Stamper. All papers come from a variety of Doodlebug Design papers.
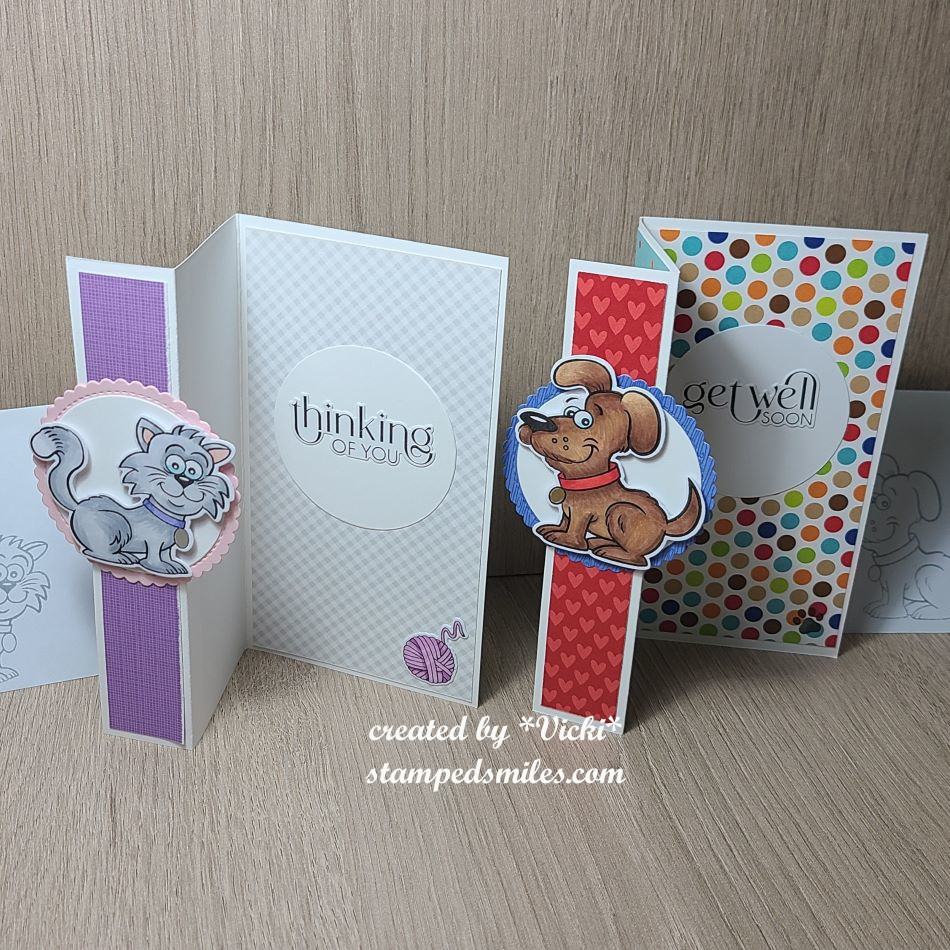
Here’s a closer look at two of the cards I made from the set so that you can see how the card opens up and the greetings on the inside of each card. (Sentiments come from Taylored Expressions.) You can also see the coordinating envelopes next to them with the matching critter stamped in grey ink.
These cards are on the way for a special charity for ill children patients to help lift spirts and I hope each one will!
I know there were so many things going on during the event that I was even surprised that I got all of these finished. They were mostly finished with the exception of the greeting which I added when I got home. I had plenty to do while I was there and also enjoyed all the activities too!
I hope you’ve enjoyed my post today as well! I thank you so much for stopping in!
Hello friends! It seems like this month has really flown by as I now realize that Halloween will be here next week and I wanted to get some cards sent out that I’ve made!
So here are my Halloween cards for this year….I had so much fun!
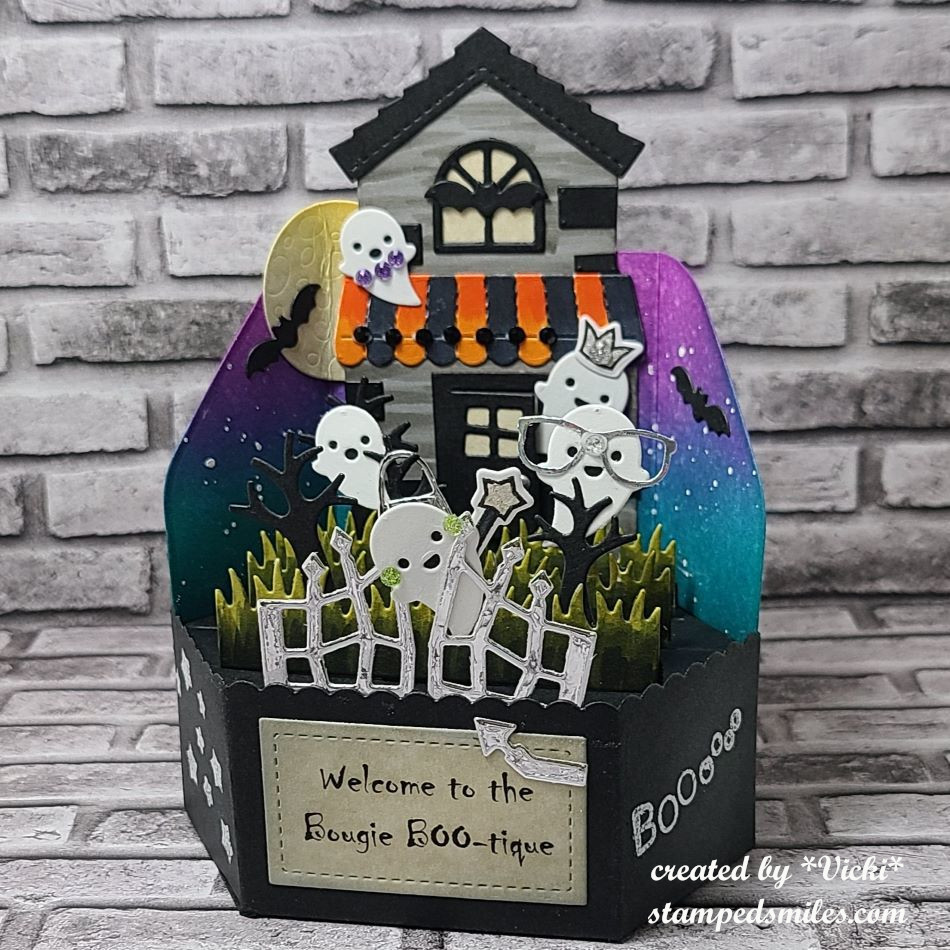
This one was so much fun putting together and it wouldn’t have been put together if it weren’t for the parameters on Craft Roulette #237 this week! The four parameters consisted of these – 1. Project: Pop Up Card, 2. Colors: Trick-or-Treat, 3. Element: Boutique and 4. Random: jewelry
I used the Lawn Fawn Platform pop-up dieand the build a house die with the Halloween add on plus a few other dies and stamp sets all from Lawn Fawn. The front “welcome” sentiment was printed out from my computer and I made up the “Bougie BOO-tique” language to fit with the parameters of the challenge.😆 These ghosts are all blinged up and hanging out around their favorite “BOO-tique” to catch up on all of the latest trends in style! One is wearing a necklace, another a tierra, another carrying a purse, another styling glasses with bling and the front ghost has earrings and a sparkle wand.
The background was done with the Lawn Fawn Platform Pop Up Add On around the back of the pop up. I ink blended and then splattered with white Copic Opaque White mixed with water to get the starry night background. This card went to my husband because he really enjoyed it and said that it wasn’t going anywhere, but it does lay flat for mailing.
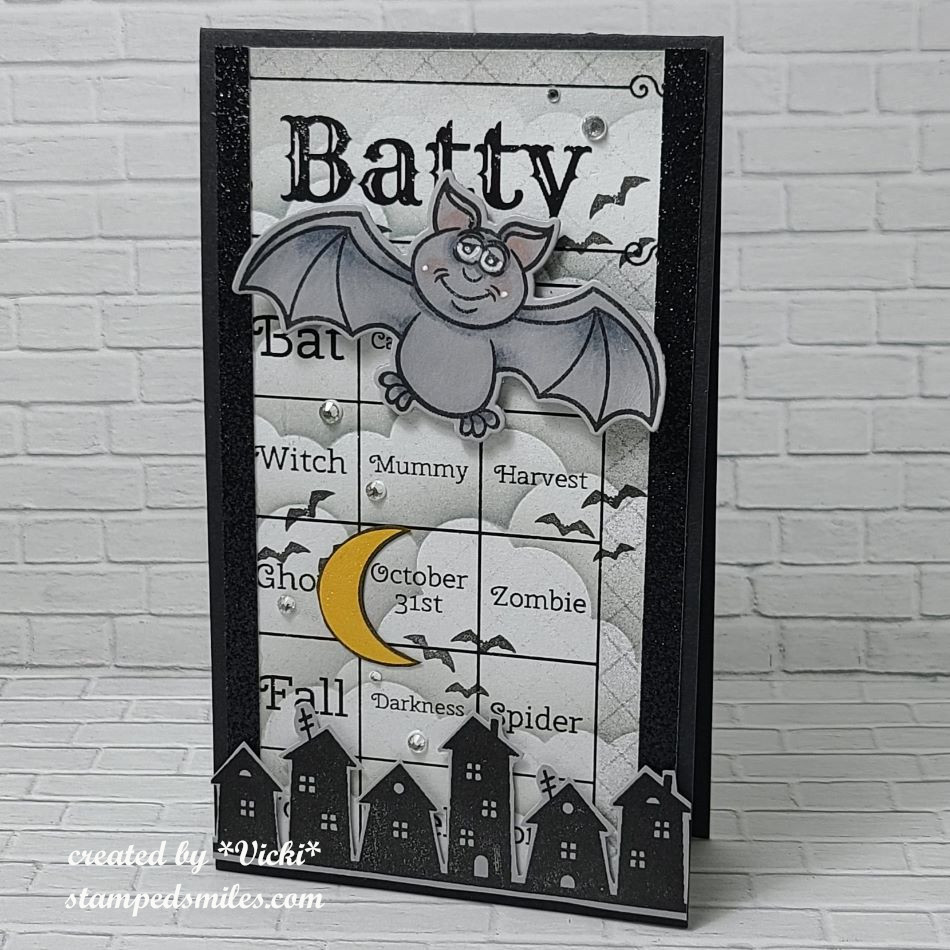
This card was done for an Inky Inkspiration Challenge over on FB for September and they were asking for a slimline card. I’m more into making the mini slimline size rather than a full size, so that’s what I went with! I’ve used the cute Bat stamp set for all of the images, except for the background panel, which you’ll notice it looks like a BINGO card and it is! It was the game that we played in a Zoom class that I took with Inky Stamper and we actually used this Bat stamp set for the projects we made and the BINGO card was included. I decided instead of throwing it away, that I would use it as background paper for my card. I just stenciled in some gray clouds over top and stamped some bats from the set with it. The rest were just cut out and placed on the card with the bat being popped out with foam tape.
(I would’ve showed photos from the class, but I forgot to take photos of them!)
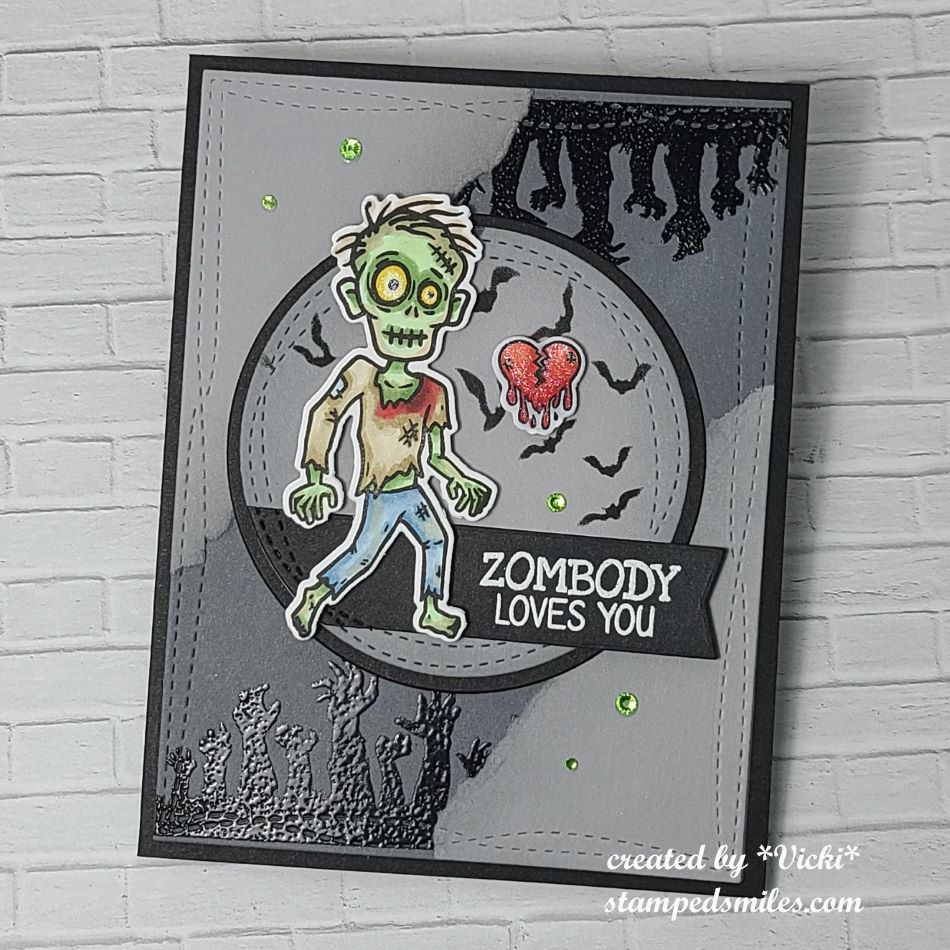
And here’s another card I made for World Card Making Day using the fun sketch from the Inky Stamper Inkspiration Group on FB. I’ve used this really CUTE Zombie stamp set from Inky Stamperfor this card. I had so much fun coloring him up!
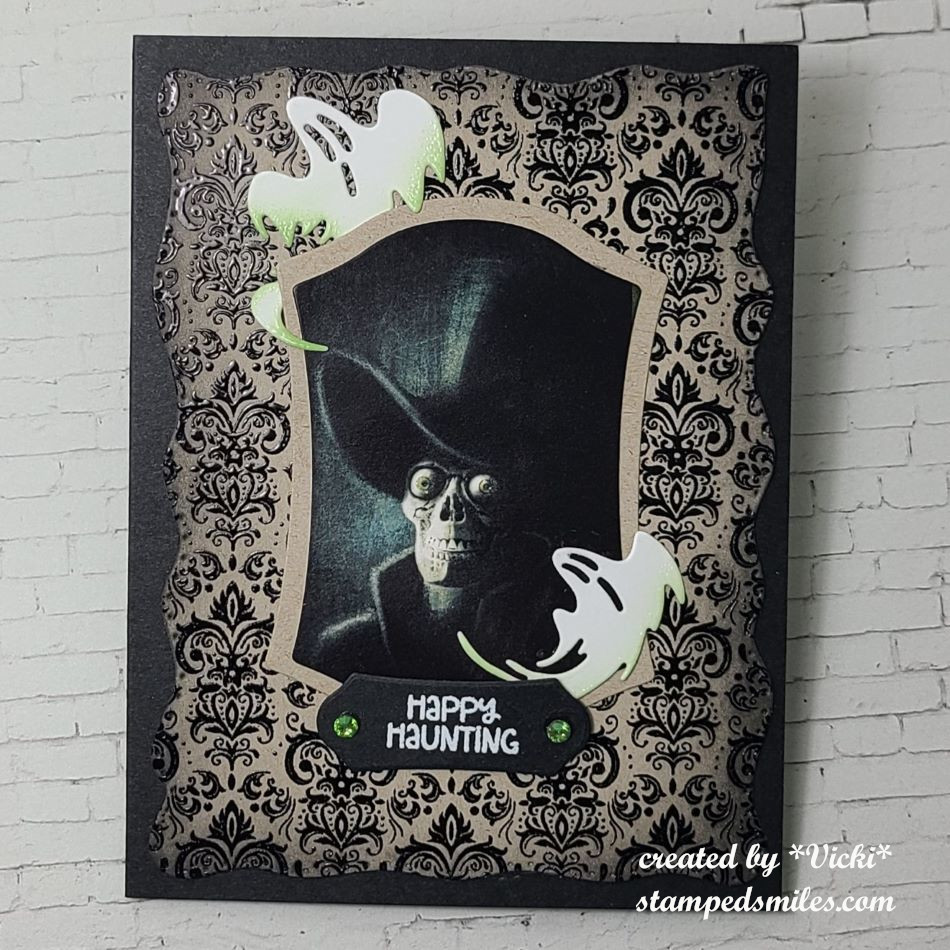
And this last card I made for someone who loves the spookiness of the season almost as much as I do! I pulled this really cool image from an older paper pack by Whimsy Stamps. In fact, all of the images on this card came from this store.
I die cut the image out with the WS ATC Antique Frames including the sentiment that was white heat embossed. The background was black heat embossed with the WS Vintage Wallpaper stamp over kraft cardstock. I sponged some black ink around the edges which was also cut out with the WS Wavy Pieced Rectangle dies. I cut out a few ghosts from white cardstock using the WS Boo die set and sponged some green ink at the very bottom edges.
I thought it would be fun to make the eyeballs of the skeleton and the edges of the ghosts glow in the dark, so I used some glow-in-the-dark embossing powder over them and finished off the sentiment panel with green gems. (It’s too hard to take a photo of the glow-in-the-dark!)
Well that’s it for me today with all of the Halloween cards! I hope you’ve enjoyed them or have been inspired in some way! Thanks so much for stopping in and I’ll see you again on Saturday with another Art Journal Page for the month!
Hello friends! I hope that you’re enjoying your August so far! Recently, we’ve been experiencing much cooler temperatures than we normally have this time of year, so it’s been great to go out for a few walks.
I’m ALMOST caught up with things that I haven’t posted, with the exception of a few birthday cards that I’ll share later. For today, I’d like to share some projects that I’ve made at an event I attended back in April along with a class from Inky Stamper.
But first, here are a few projects I’ve made for their recent challenges:
This is a tag I’ve made for the Inky Stamper Inkspiration FB Group July challenge. The challenge was to make a tag and I thought I’d try out a fun idea of making a pocket for my tag that held another tag inside so that you could put a message and a gift card.
I’ve used some Limeade Dots/Stripe 12×12 Doodlebug paper to cut it out with and used a border die to help with the pocket decoration. I cut another tag to place inside the pocket for a special message and to include a gift card. At the top of the inside tag, I’ve made little “charms” with images from the Inky Stamper Margarita stamp set. I’ve also stamped the background of the inside tag. I don’t usually color with pencils, but this time I decided to pull them out.
To get the sentiment to fit around the pocket border, I had to curve the stamp a bit to make it work with the tag.
So the Inky Stamper Inkspiration FB Group challenge for August was to use a white pencil. This happens to be a favorite to use for Chelsea with her images and it does make for a nice quick highlight. So the images were just stamped on colored cardstock and I used the white pencil to highlight them with.
I decided to combine this with last week’s Craft Roulette Episode #226 with the parameters of – Project: “See-through” (I made a see-through shaker card) Colors: “Jungle” (I used greens and browns for my jungle) Element: “Teacher(s)” (The sentiment says it all!) Random: “Tangle” (There are a tangle of leaves inside shaker element.)
Back in April there was an Inky Stamper Inky Escape event that I attended and here are some projects that I made from the Make-n-Takes that were provided as well as some of the projects that I was working on using the new release that came out during the event:
(If you are on my website, click each photo to enlarge it and read the captions)
The tag was made my Chelsea that was attached to my “swag bag” and the box was a make-n-take project. There was a moon pie included with project, but when I came home, I added 4 Ghirardelli chocolate squares to show how many fit inside.This card uses the same stamp set as the tag above. The background is a scratch ‘N’ sniff made with Kool-Aid.This was a light up card using the Pear Blossom EZ Light.Cute make ‘N” take with a magnet on the back of the baby roo that fits inside the mama pouch slit!This was an extra make ‘N’ take using some ALL & Create Washi Tape! Cool!
There is actually another Inky Escape coming up in October that I’m attending and I’m sure it will be fun with Halloween and Christmas theme combined!
While I was there, I worked on some more of my own projects using some of the new sets:
I decided to take and use one 6×6 paper pack from my stash and it seemed to go really well with the outer space theme and I love the purple colors from this set. I’ve used the following Inky Stamper stamps sets: Astronaut, Big Words, & Alien.
Click on the photos below to see a close up look at each card:
Before the Inky Escape Event, there was also an on-line class from Inky Stamper that I took part in and that’s because I thought the projects were super cute! Here are the projects that were completed for this class:
These were both created with the Inky Stamper Hedgehog stamp set. The Journal Book , the Doodlebug DIY Snow globe and Doodlebug dimensional stickers/shaker balls were all provided with the class. I decided to add a few extra elements with mine. The tiny hedgehog on top of the snow globe was included in our box, but not apart of the projects…but I thought it would be fun to add it!
Speaking of Doodlebug, while I was at the Inky Escape Event, Chelsea had a few things on sale and I snagged a kit and special ordered the Doodlebug Frame with it. So when I got back home and the frame came in, I wanted to do my project right away:
I have this displayed in my stamp room and I love the rainbow of colors in it with the different crafty tools in smile faces! The size is 8in. x 8in. with a glass on the front. Although it’s not really that visible in the photo, it is actually quite dimensional.
I think it goes well with the black frame that matches my black frame with the crafty squares swap group I was in. (You can see that post here.)
Whew!😳 I’ve been really busy this year, but I don’t think you would’ve known this without my posting about it! I’m glad that I’ve gotten caught up with things that I’ve done and hopefully I won’t be doing posts like this in the future! It just seems like so much all at once!
Anyway, there we go and now I need to finish and send out a few birthday cards coming up, so I will catch up with that later as well! For now, thanks so much for stopping in and keeping tracks of my sporadic postings! I will be back to share a DT post for a challenge coming!
Hello friends! For those that celebrate the July 4th holiday, I hope you had/ having a great weekend! We usually do a cookout and later watch fireworks. It was a bit hot and humid so we didn’t stay outdoors very long and watched a movie instead.
WARNING: PHOTO HEAVY POST!!!!
I think I may have posted about this before, but last year I was introduced to Craft Roulette (a papercraft game show on You Tube) by Chelsea from Inky Stamperwhen she was a guest on there last year. I quickly became addicted to it and have been playing quite regularly. In fact, this is Chelsea’s third time as a guest on there and I wanted to share what I’ve made for episode #222 that aired on You Tube Friday July 5th, 2024.
The parameters this week are…
PROJECT – Dutch Door (create a card/project with dutch door)
COLORS – Gnomes (whatever inspires those colors to you)
ELEMENT – Movie
RANDOM – Building Blocks
If you’re interested in playing along, check out the Craft Roulette website on how to enter and watch the episode! You can watch/play along on You Tube with them every Friday evening. (Check what time zone you’re in compared to the Central US time zone used for Craft Roulette live shows.) You have until Sunday evening to play. If you enter the Craft Roulette #222 episode by then, you can also enter your card over at Inky Stamper Inkspiration Group on FB for a chance to win a prize from her as well. So check it out!
I think this one turned out cool using the Inky Stamper Alien stamp set! I have my alien (which is my “movie” element parameter) colored up with pencils and cut out with the die. I stamped the molecule (which is my “building blocks” random parameter in red ink over a piece of Doodlebug graph paper. I sponged the edges of this piece with some grey ink before attaching it to the bottom portion of the card. The sentiment also came from the same stamp set that was white heat embossed over black and cut out with a banner die and popped up with foam squares.
To create the “Dutch Door” card for the project parameter, I just used a black A2 card base and cut the front in half so that only the bottom portion of the card opens up. For the torn hole behind the alien, I used the Lisa Horton Torn Aperture 3D embossing folder and die. I used some silver mirror for the outer edges and black for the back along with a piece of white for the background details. I finished it off with some Pinkfresh Studio Ice clear drops.
Here’s the inside of my Dutch door card. I took a white piece of cardstock for the inside of the card along with the white piece from behind the torn aperture on the front and ink blended a galaxy background with reds, blues, greens, yellows and black which works with the “gnomes colors” for the colors parameter. I sprayed the background with water, let it dry and then I white heat embossed the sentiment from the alien stamp set and then I used silver watercolor to splatter over top of both pieces.
I attached the insert for the aperture back in with the silver frame and attached it to the front bottom portion with half of it sticking up above it. (As you can see in the photo above.) The alien was attached over the aperture with foam squares.
Had a lot of fun making this one and playing along using the parameters!
Obviously, I don’t post the cards I make every week for Craft Roulette on my blog, but I thought I’d share all the creations that I made last year since my very first contribution that I’ve done. I thought I’d save the cards for posting at the end of each year to look back on them. I started in January of last year and only skipped a couple of them. This card today will be my 72nd contribution!
So here’s a gallery of cards that I’ve contributed since I first discovered Craft Roulette in January of 2023 up to December 2023: (I will post the cards for this year in December!)
If you’re on my website, click on the photos to see enlarged
Wow! That was ALOT of cards! I placed the episode #s on each one for reference on what the parameters would’ve been. So this is what happens when I don’t post!
I have fun trying out the parameters each week and entering. I did win a prize one week from The Paper Insider which was a box of gorgeous papers. They’re all so gorgeous that I seem to be hoarding them and not used any of it!🙄 That will be a goal for one of these weeks for sure!
Hope you’ve been inspired with my post today and maybe I’ll see you over at Craft Roulette sometime! Thanks so much for stopping in today!
Good evening friends! Tomorrow is about “LOVE” for Valentine’s Day! I hope that whatever you’re doing that you spend it with those that you love or at least tell someone how much they mean to you! I have a special post this evening that is dedicated or inspired by love. ❤️
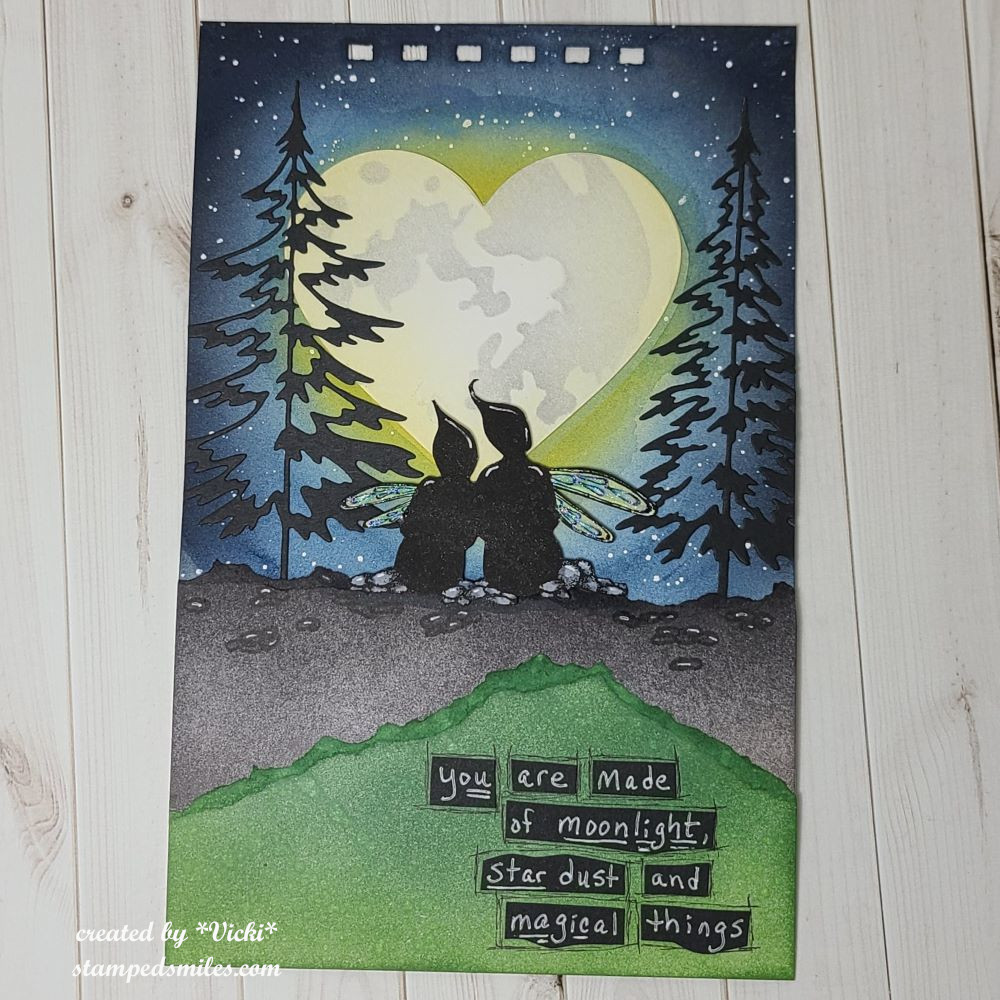
First up is my art journal page with the prompt/theme of “LIGHT/KEEPING IT LIGHT” that I’m guest hosting this month for the Art Journal Journey Challenge. It’s been so fun to see all of the wonderful art created so far!
This page was inspired by not just the “light” prompt for the challenge, but it was also inspired by the love of my life. We have spent many moons together and have enjoyed our time in the moonlight as we both love nature and have spent some time traveling and seeing some beautiful things. I’m so thankful to have had these special memories with him.
For the background: I started with a 5.5″x8.5″ watercolor with pre-punched holes at the top with my Zutter machine. I used my watercolor to create the blue sky background with an idea of where I was going to place the moon. I left that area to watercolor in the yellow rather than the blue. I then used some white opaque copic watered down and splattered over top for stars. The “moon” was die cut in white with a heart shaped die and I added a moon stencil over top to make it look like a heart shaped moon and glued it in the center of the watercolor background.
The bottom portion was made with just ripping some cardstock and ink blending one with the greens and one with greys and black. I die cut the trees in black and glued them in place and then added the ripped layers over top.
I stamped the Lavinia Stamps “Star Gazers” stamp in black in and fussy cut it out. I colored the rocks they were sitting on as well as their wings and popped them up on the grey ripped border. I also hand drew more rocks around them and used a white gel pen to highlight. I added some glitter to the wings. Lastly, I wrote over black cardstock with a white gel pen, cut them out and attached to the ripped green border. I then used a black pen to doodle around the words.
Next up are a few Valentine cards that I’ve made. I’m actually really bummed because I would’ve shared another two cards that I made, but I forgot to take photos of them before I sent them out! I used a pizza theme and they were so fun!
This first one is for my husband and I’ve used the Craft Roulette #201 parameters to create it:
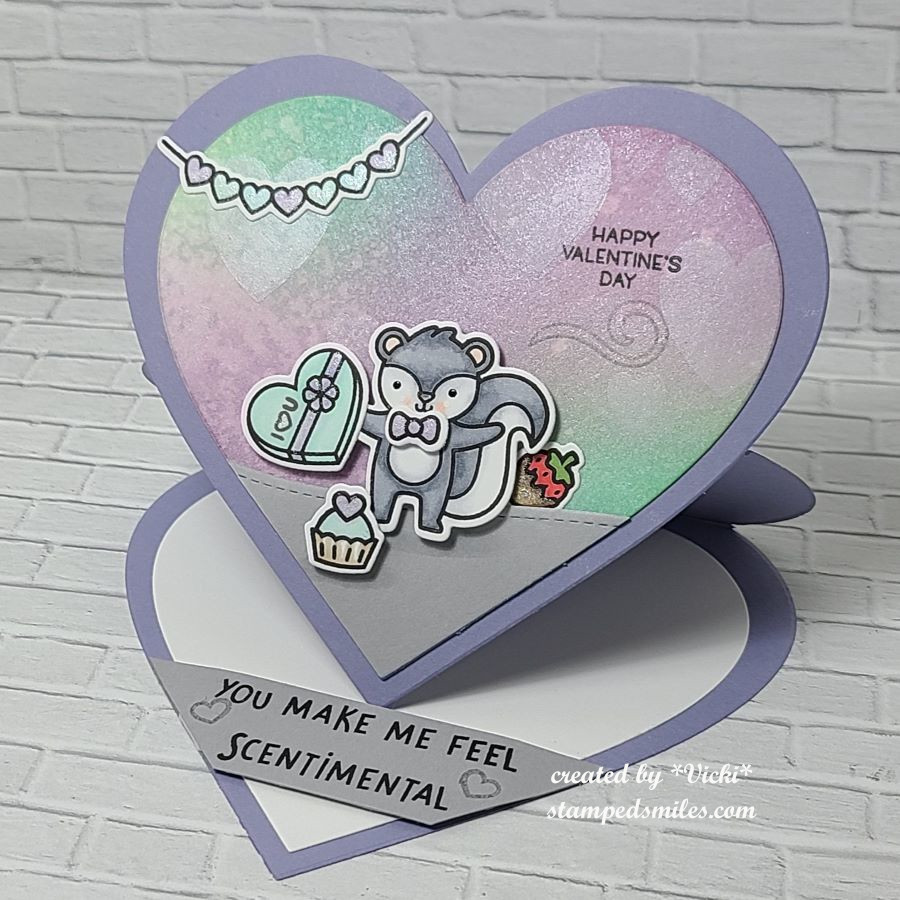
We had to make an easel card, so I decided to make a heart shaped one. I’ve used the cute skunk from Lawn Fawn with all of the “sweets”. (which was also one of the parameters) My husband loves his sweets! I also had to use “quiet” colors and some sort of bokeh, so I’ve made a bokeh background and used a solid heart stamp in white over the blended colors. It reminds me of those conversation hearts. This skunk makes me smile!
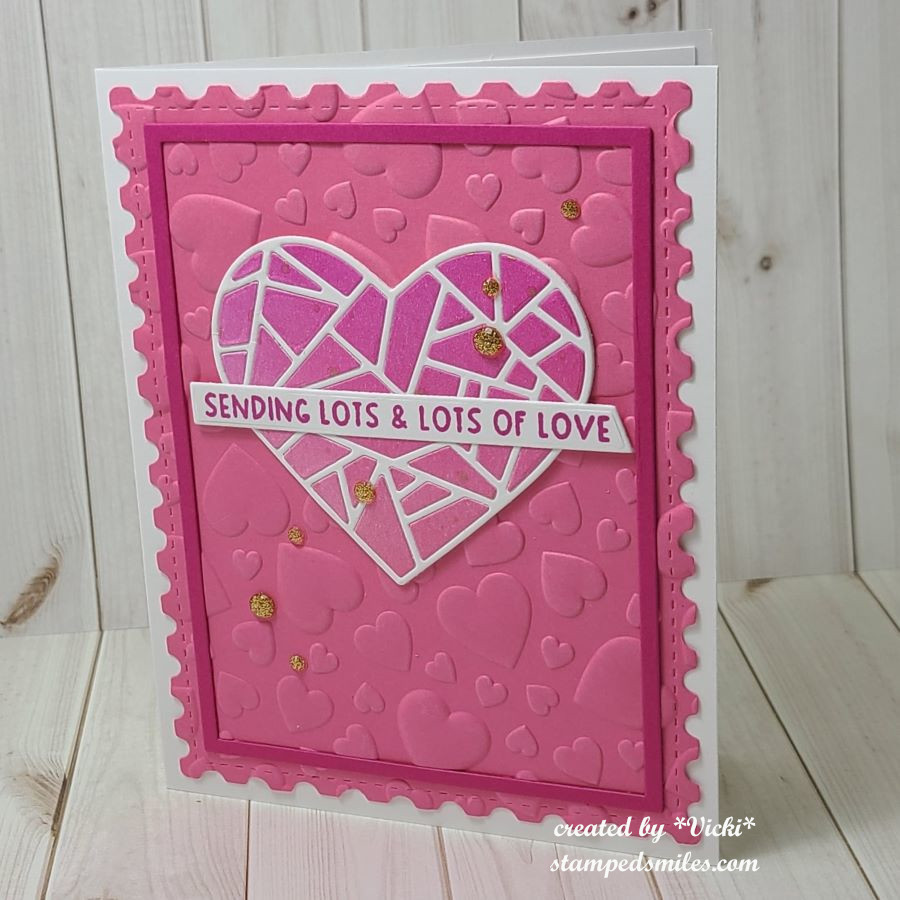
This is another fun card that I’ve made for a friend! I couldn’t wait to use this fun mosaic heart from Taylored Expressions. It came as a freebie for a limited time with a Valentine release. I like that it comes with the solid heart backer which makes putting it together easier. I ink blended a panel in two shades of pink and then die cut the heart with the pieces. I used the frame cut in white and then popped in the ink blended pieces inside the frame.
The embossed heart background was made after cutting out a piece of Bubblegum cardstock with the postage rectangle die. I stamped and die cut the sentiment over top of the heart and added some gold rhinestones.
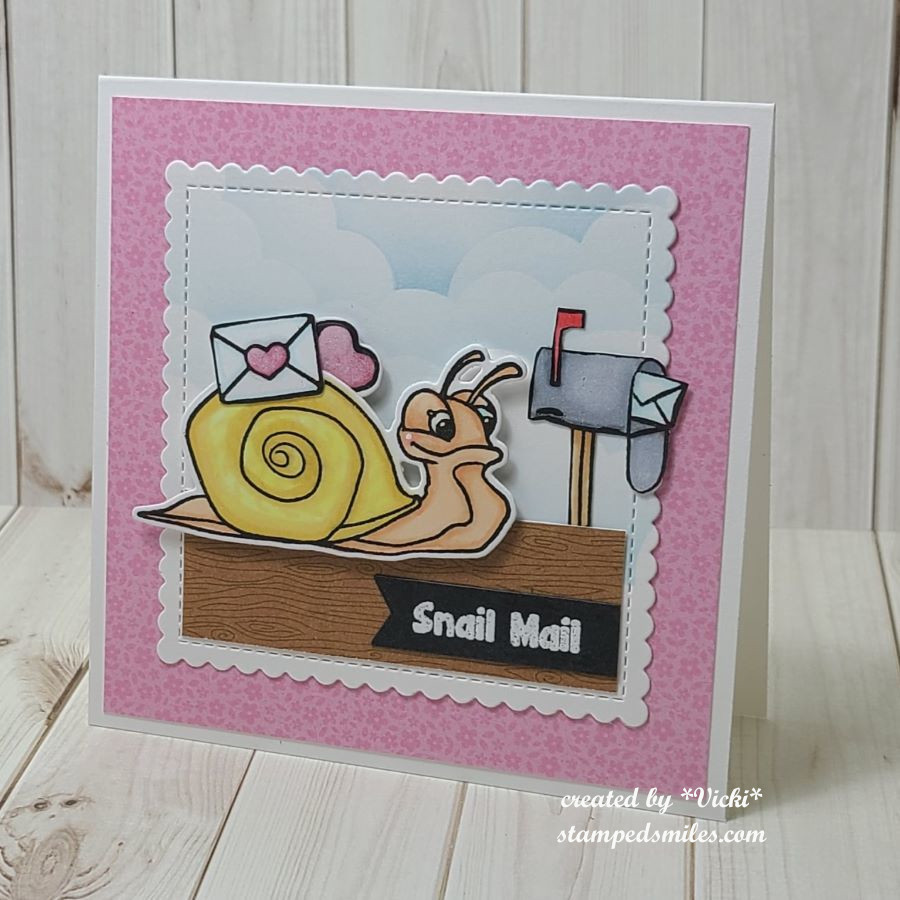
And this card was done for the Inky Stamper FB challenge which was to create a square card. I have made this one 4.25″ square and used the cute Snail stamp set along with some Doodlebug papers which you can also find in their store.
I just stamped, colored and cut out the images, added a border at the bottom and cut out a scallop square in white and stenciled some clouds at the top. More pink papers onto a white square card base and called it done! There’s nothing better than getting snail mail!
I hope you’ve enjoyed my heart-filled post today and you’ve been inspired in some way! Thanks so much for stopping in and I’ll see you again on Thursday for a new challenge to try! Happy Valentine’s Day!
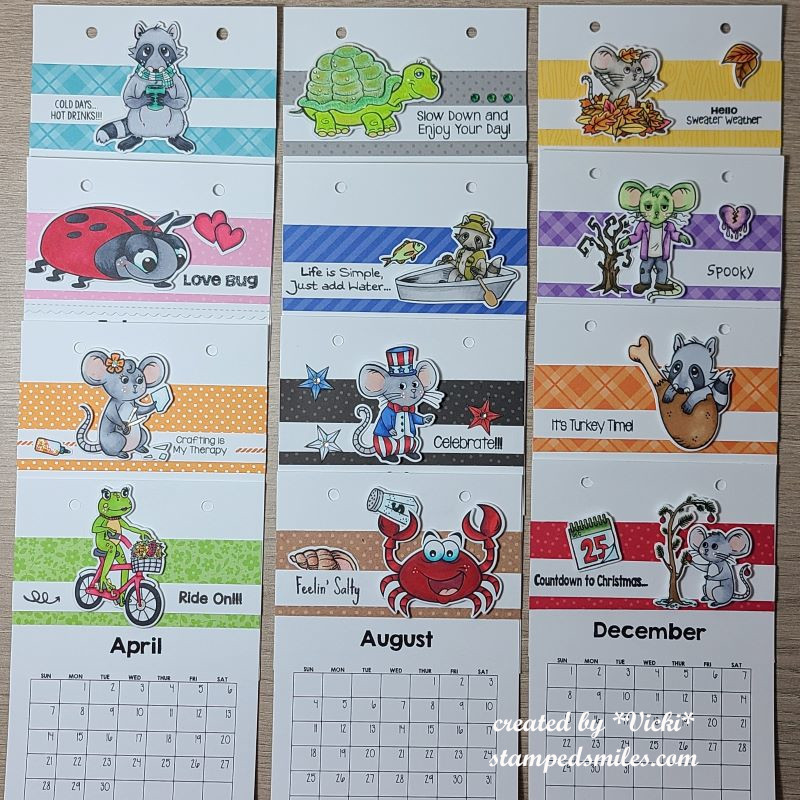
Hello friends! It’s that time of year when we turn over a new year and then realize that we need a calendar to keep track of our days…at least I do anyway! I don’t feel ready for the year ahead until I’ve got my calendars up and ready to roll! Usually, I’m ready to go by the end of the year, but I ran out of time with the Holidays, and I had planned on giving calendar gifts which I sent late, but I did get them done! I still feel in Holiday mode because of this…Ugh!
So this month I’ve been working on several calendars and spending most of my time coloring them up. It’s been very cold over my way, so I actually enjoyed doing them. Here are a few sets that I sent out for gifts:
I think these Taylored Expressions Feisty Square Calendar Cards are my favorite!😆 I was laughing at each one as I was coloring them up! The cards are already printed and makes it easy to get them colored up and attach them to the Desk Calendars. All of the image cards are blank so that you can use them however. I decided to just create my own background with each one using my markers in different ways while I was coloring them up.
I gave this set as a gift and wasn’t sure how they would choose to be displayed, so I added a magnet on the back of each one and also included a Walnut Wood Display, so they had a couple of options to use.
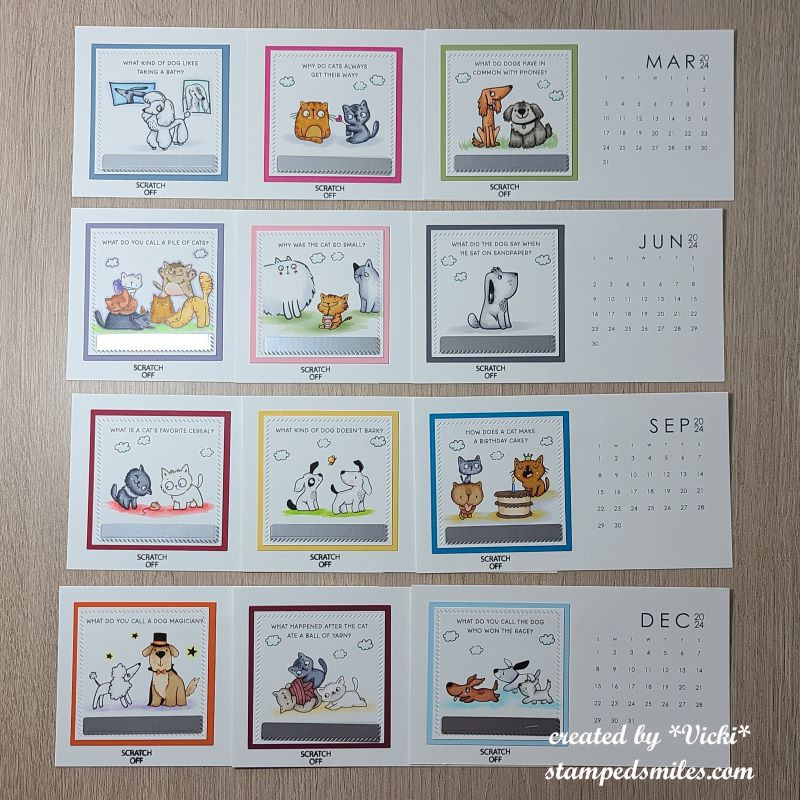
This next set was put together the same way I did the calendar above, expect these are the Taylored Expressions Scratch-Off cards. (This one is not available in the store because I received the entire set with my Advent Calendar purchase.) I thought these pups and cats were too cute and a perfect gift for someone that has both a dog and cat in their family.
After I colored them in, I added the Taylored Expressions Scratch Off Stickers to cover up the joke punch line. I then used the TE Square Tear Off Calendar dies to create the design around the edges and a layer of cardstock to coordinate behind each one before placing on the calendar cards. I also stamped “scratch off” under each card so that the person can scratch off the joke punch line for every month and see a new joke.
I also added a magnet on the back of each one as well as include a Walnut Wood Display so the recipient can choose how to display the calendar.
Click on the photos to enlarge on website!
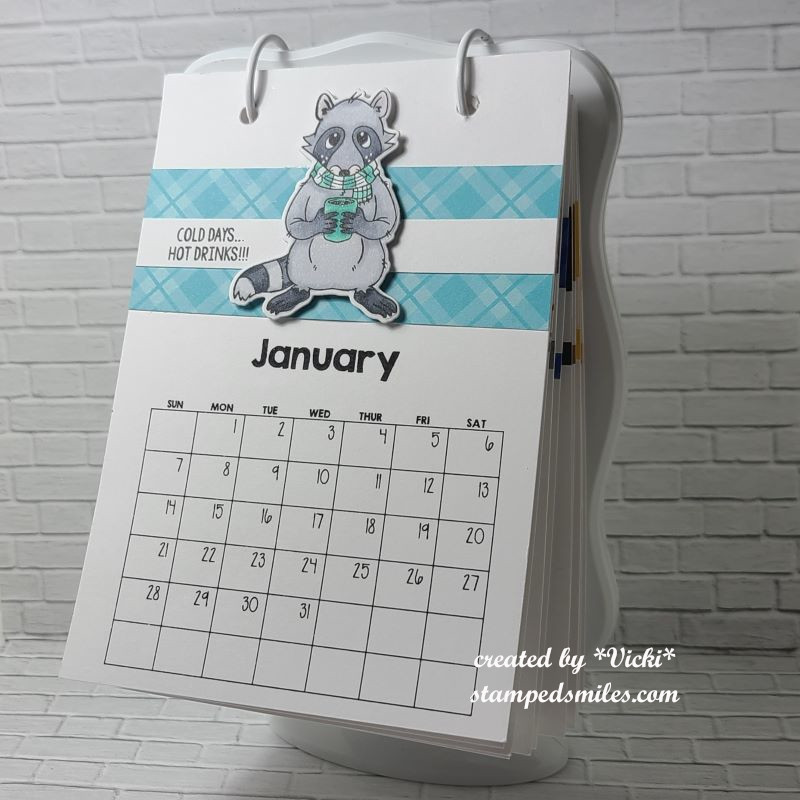
Every year I always get the Inky Stamper Calendar kit that gets put together at the end of each year. There is usually a number limit on how many are available each year, so if you are interested, you might want to click on the link to get one because I’m not sure how many more there are left.
These were also fun to put together and color. I chose to stamp my own images and cut them out. You still get the pattern papers and white sentiment strip with each month.
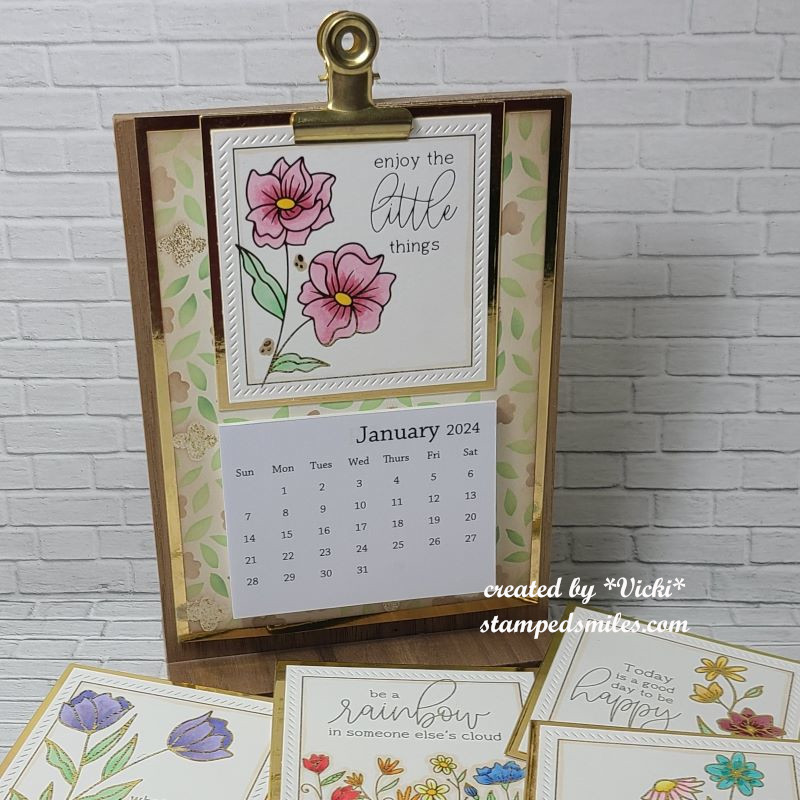
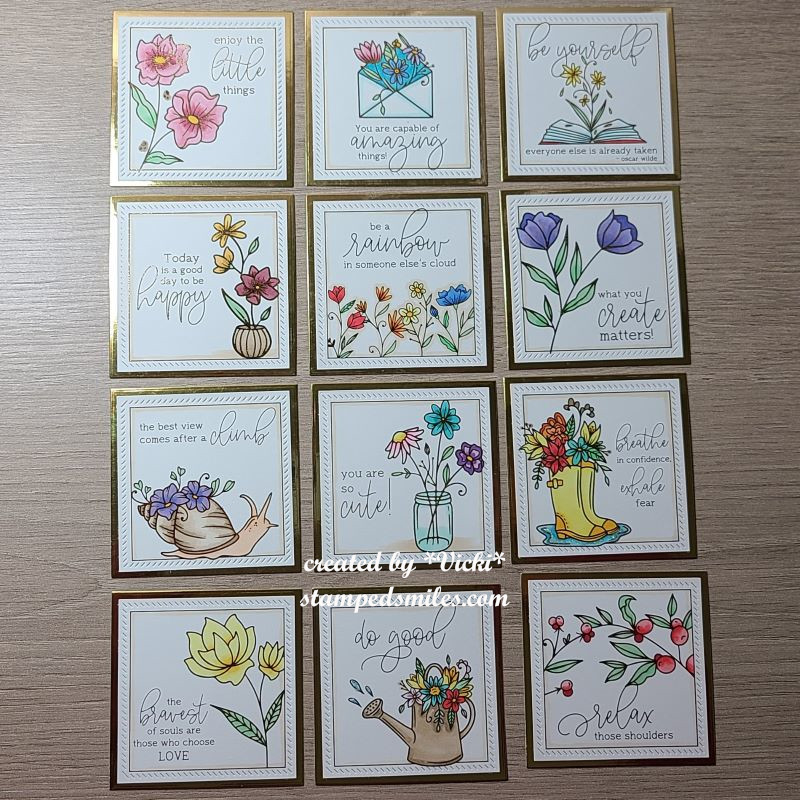
I absolutely love how this calendar turned out! I’ve used the Taylored Expressions Friendly Square Calendar Cards and I thought they were so uplifting. This time of the year positivity is something that is very important to me and can be hard to come by. The days seem to be gloomy and short with little sunshine, so coloring all of these was great to fill my time with.
For this display, you may remember a calendar I had done a few years ago on THIS POST using the TE Snarky Calendar Cards. I’ve decided to update that one and used the same display stand to create this one, which is why I prefer using this stand. It’s nice and durable.
I have gold foiled each card and colored it. I’ve made a new background display card with a layered stencil and I’ve layered everything with gold foil cardstock. I’ve got a bag on the back to store my extra cards so that I can switch them out whenever I’d like. All of the gold shine really catches my eye and is pleasant to view.
I hope you’ve enjoyed my post this afternoon and I REALLY appreciate you taking the time out of your day to leave me a comment. It means very much to me as does your support!
Have a beautiful day and I’ll see you on Saturday for my first Art Journal Page of the year!
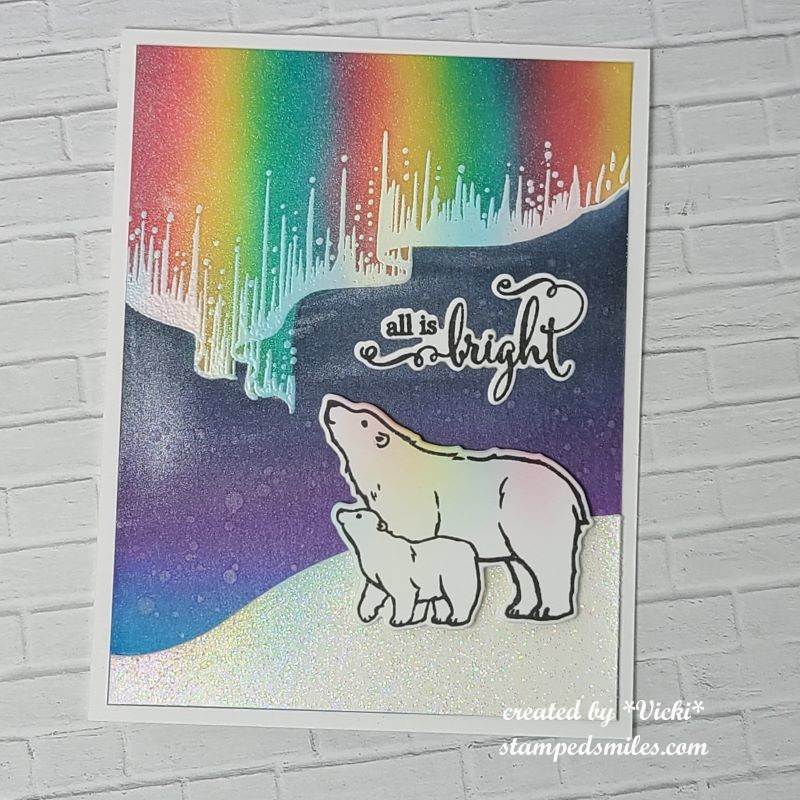
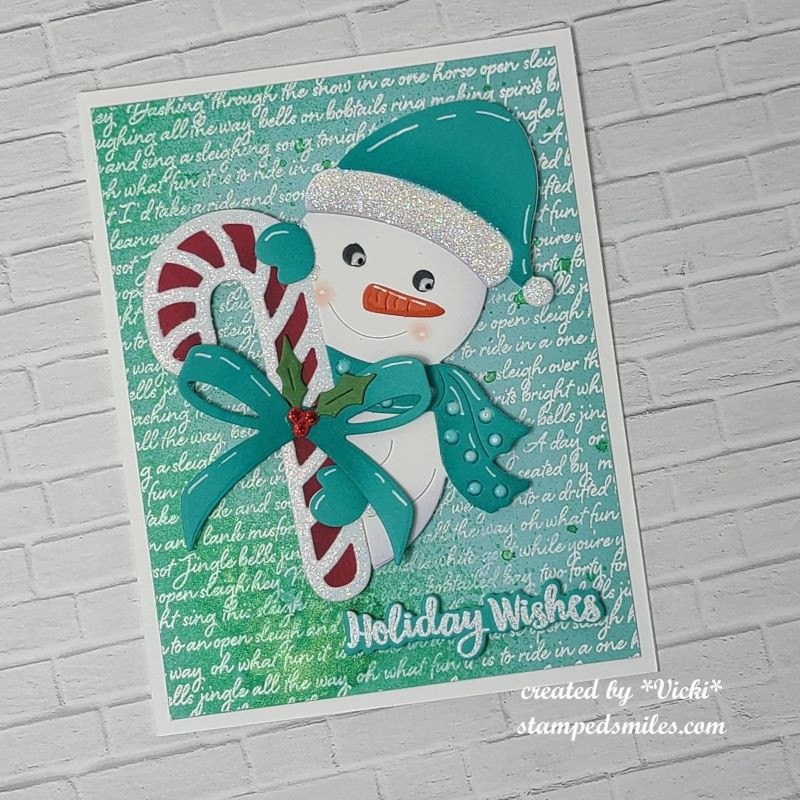
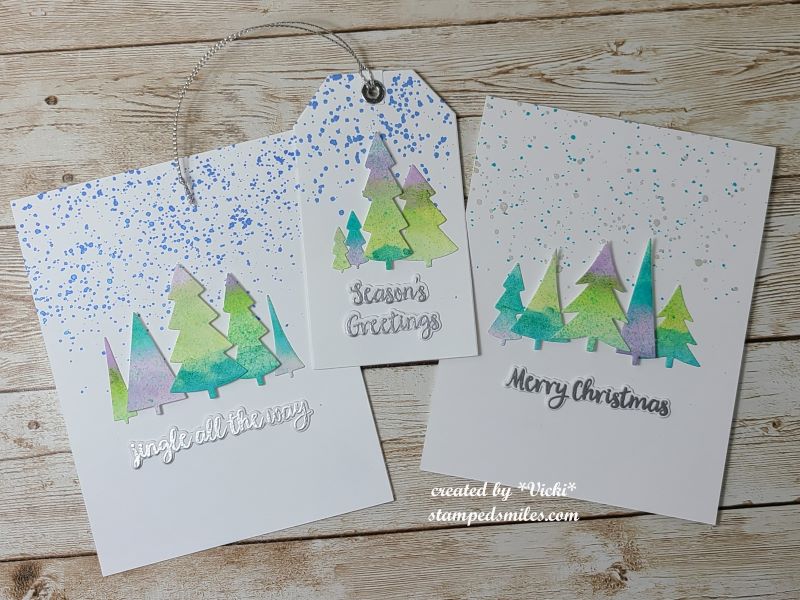
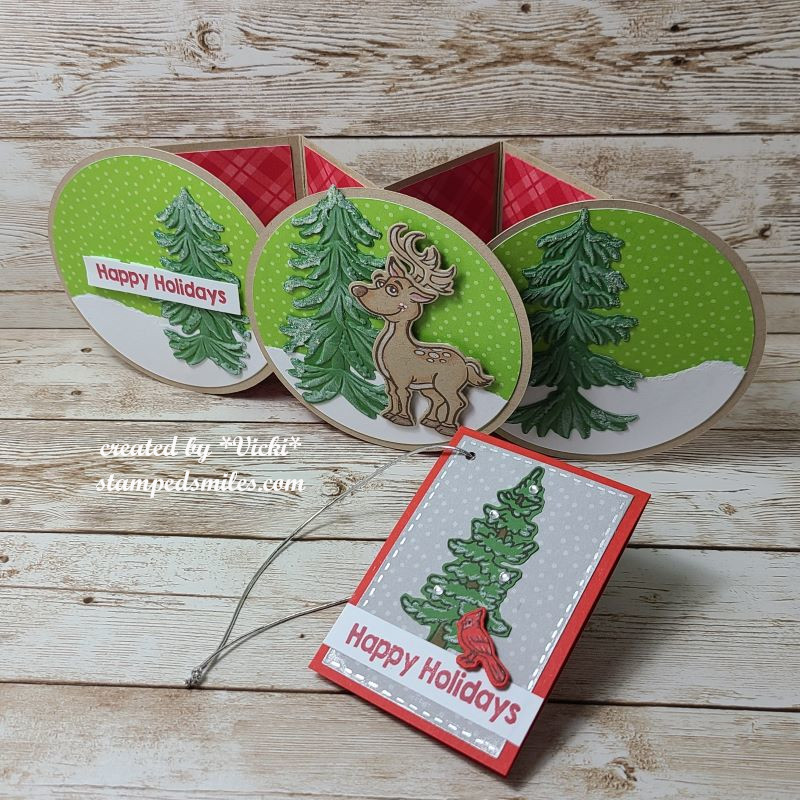
Hello friends! I hope that you’re having a great start to your week! We’re almost there as Christmas approaches us quickly! I’ve been enjoying the Season and having fun keeping busy. Currently baking cookies and decided to take a break from that to sit and make a post about all of things that I’ve been doing besides posting!😆
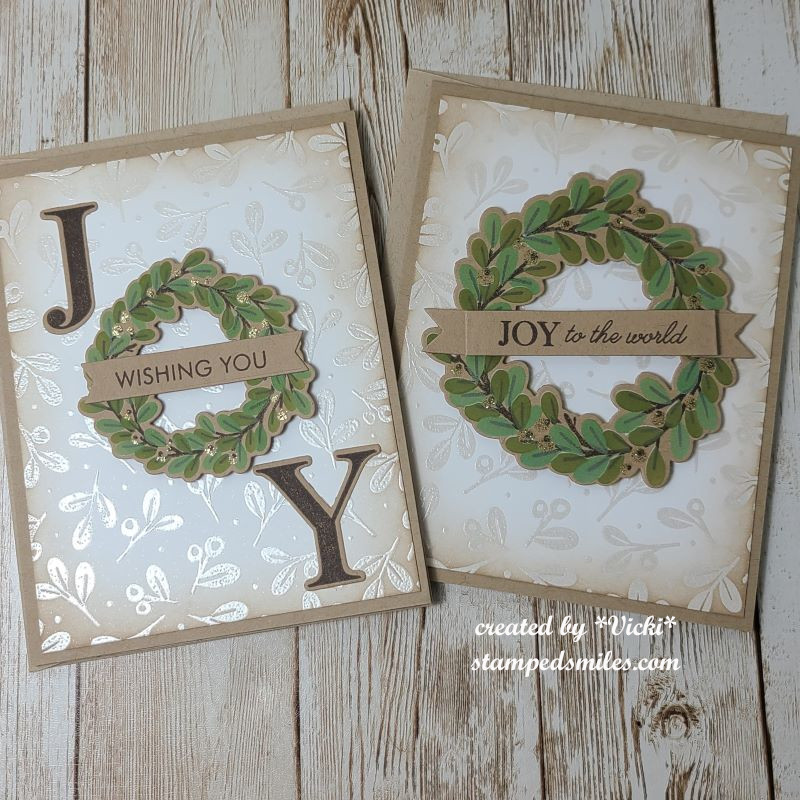
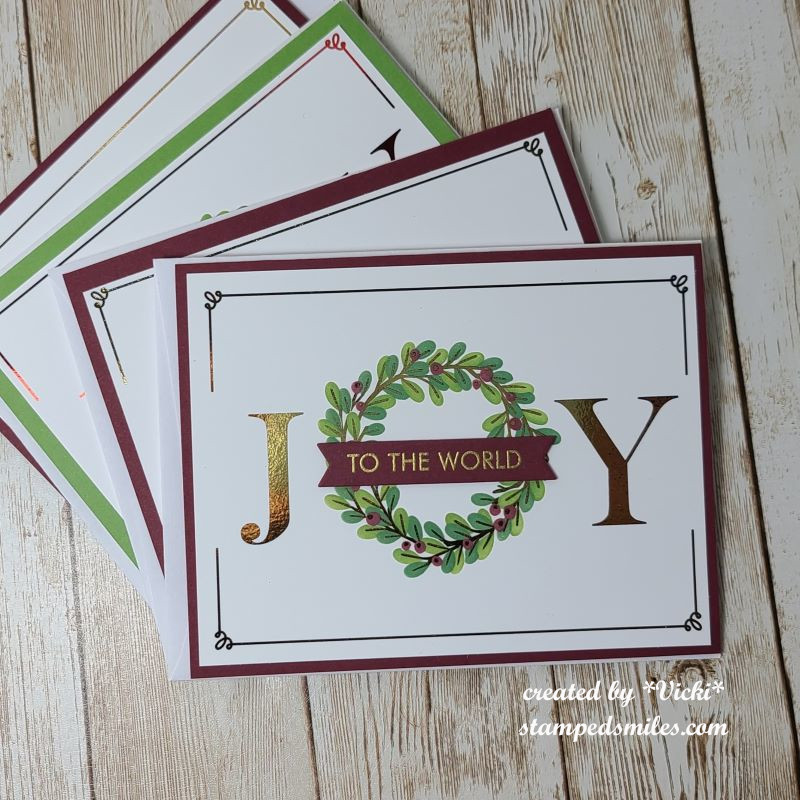
This is just one of the several similar cards that I created for my Christmas cards this year. It came from a Christmas in July card kit from Taylored Expressions. It mainly used the Wreathed in Joy Stamp & Stencil Combo set. There are dies you can cut them out with as well as foilable panels which is shown on this one.
I do not like to make several of the “same thing”, so I’ve changed them up to different colors, layouts, etc. So you can see the different versions I’ve done below. (If you are visiting my web page, just click on each photo to see it enlarged.)
*Apologies for the messy stack for photo taking…it was a lot to do all at once!
Most of these are blue and silver which is my favorite color combination for Christmas colors, so I did about 6 of these.
I think these look the most vintage with the soft tones. Only 2 of these.These are more traditional looking with the red and greens, plus some were foiled and some heat embossed. There are 4 of these.These are all pretty similar with the larger wreath used. I changed up the green colors a couple of times. There are 6 of this kind.
I thought these would be enough for all of the Christmas cards to send out, but I realized going back through my list that I wasn’t going to quite have enough.
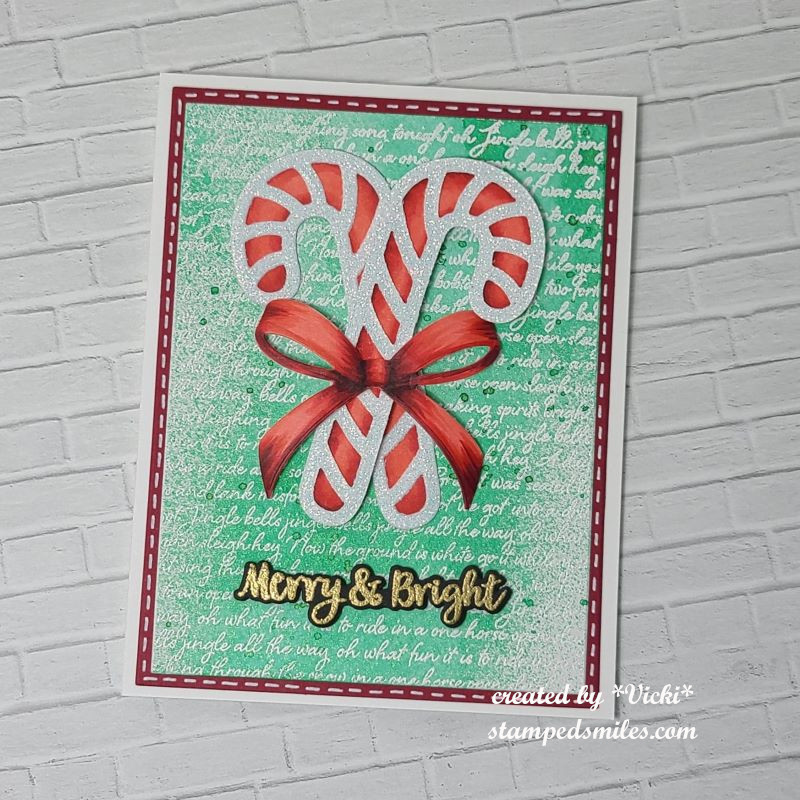
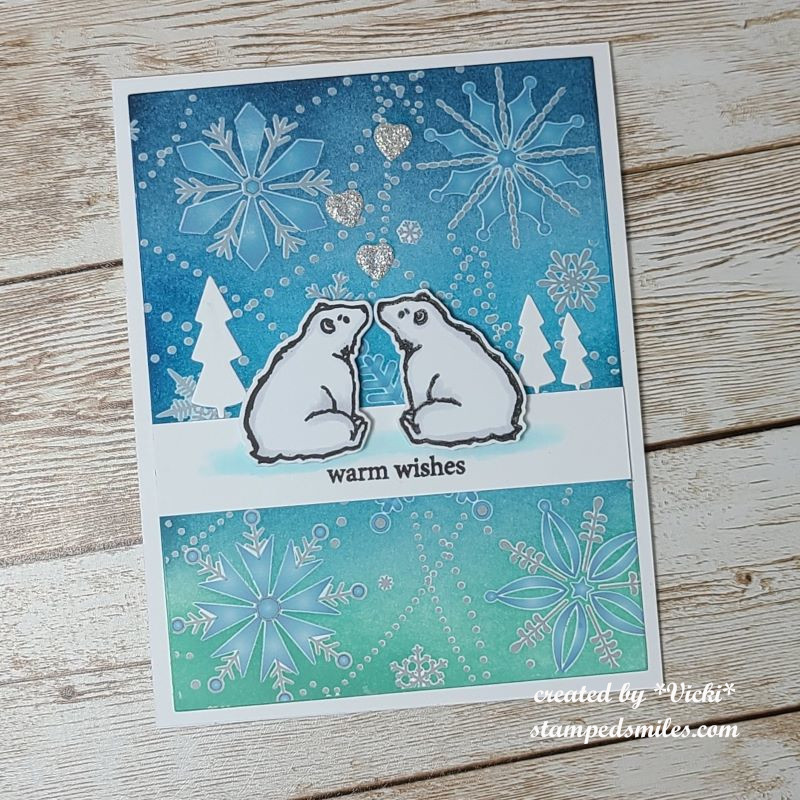
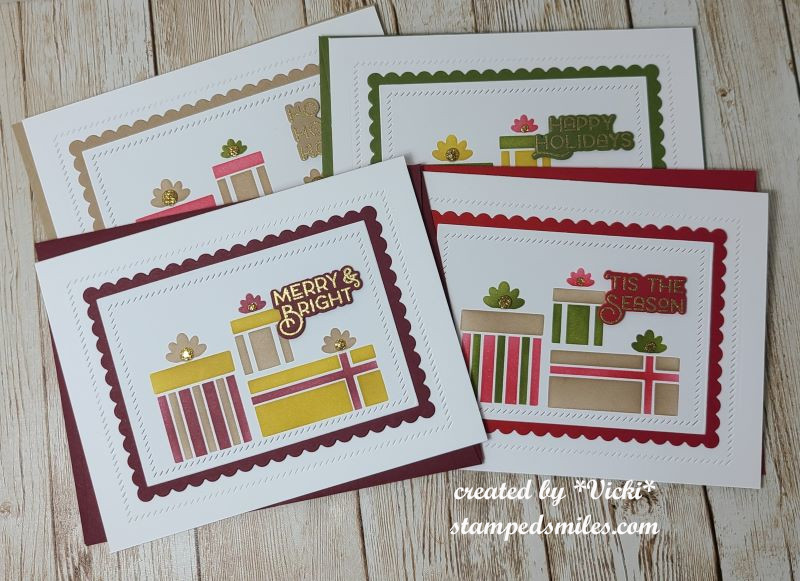
So I’m glad that at the beginning of this month I took a Hero Arts Stamp-a-Longand made several different types of Christmas cards. Here are the results of these below: (Again, if you’re looking on my web page, just click on the photos to enlarge them.)
background using sprays and coloring die cutssimple CAS cardnorthern light mixed media techniqueemboss resist background and dimension die cuttinggift tag card with a pocket inside for holding a gift cardreverse die cutting on gatefold cardlayering tree stamp and gatefold cardusing die cut plate for stencilingWatercolor CAS projectsusing a die cut plate for embossing and masking
mirror stamping technique and rub-on background
So some of these were also taken and used for sending out more Christmas cards. I’m glad that I did the projects for this class or I probably would not have had enough cards.
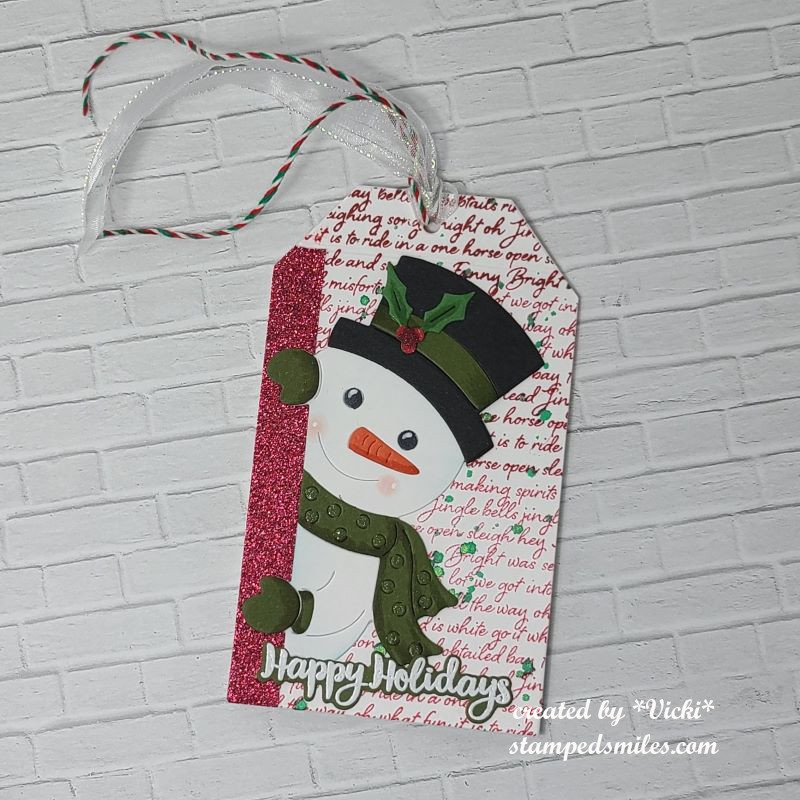
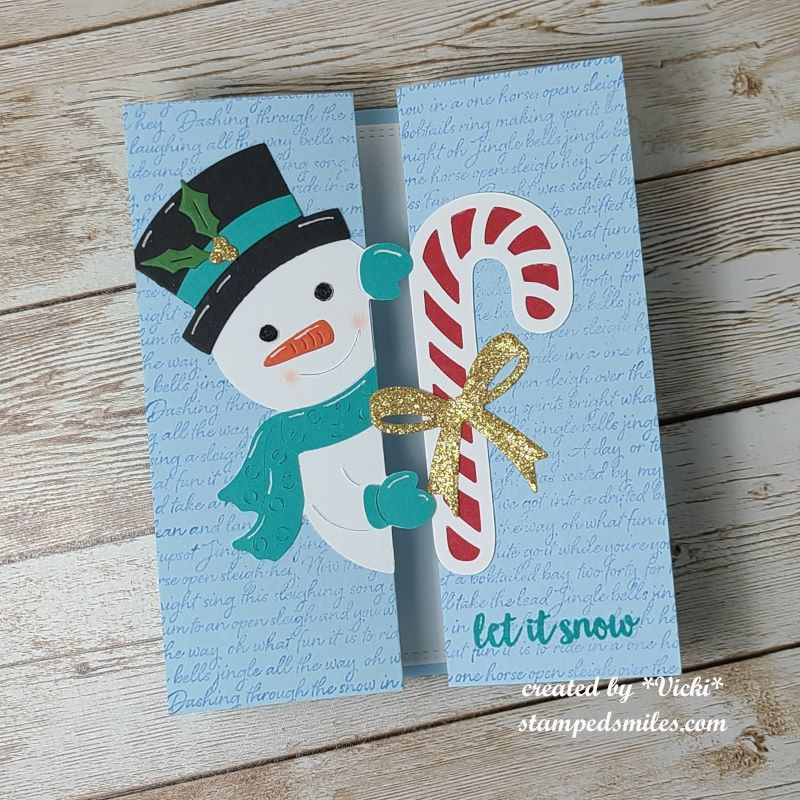
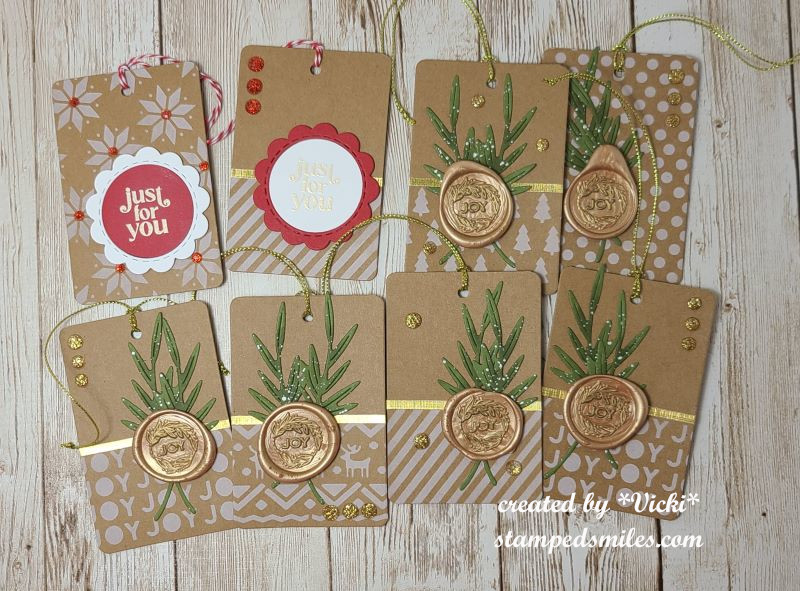
BUT WAIT! That’s not all! I’ve also made a few other Christmas items that I’ve also sent out. I’m also sharing some gifts and gift tags that I’ve made from a Taylored Expressions Advent Calendar that I got this year. I made some more cards and tags. (I tried out wax melting which is something I’ve never done…it was fun) Others are from classes I took or participated in Craft Roulette for.
If you’re on my web page, just click on the photos below to enlarge each one.
a craft roulette challengeanother craft roulette challengeInky Stamper OOAK classcraft roulette challengestencil from my advent calendarmelted wax, tags, pine sprig die and stamp set from advent calendar
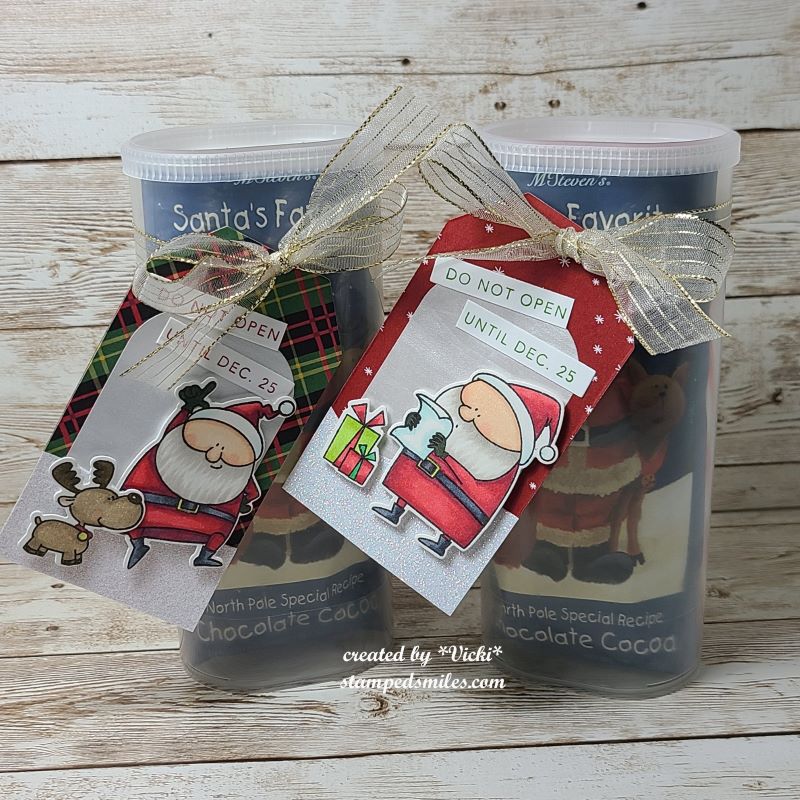
I usually make these every year along with a poem on the back for the hot cocoa ingredients. This one is called “Santa’s Soup”. I might add a few other fun items in there as well! The people that get one of these knows to look inside right away!
Wow, so that was a lot! I know that my blog has been pretty sparse with posts lately and I am finally getting around to posting the things that I’ve been working on, so I hope you’ll get that and you’re able to take some time for yourself this season and enjoy the peaceful quiet moments!
I will be sure to take a moment and catch up with everyone before Christmas arrives. In the meantime, it’s back to cookie making! Thanks so much for stopping in today!❤️
Hello friends! I hope you’re having a good week so far and staying safe wherever you are in the world. Sending hugs to all experiencing a troubled time. I hope that my post can bring a smile to you today.
I needed to create some get well type of cards and so I thought I’d try to incorporate some challenges while working on them which helps me to concentrate more in what I’m doing and maybe think outside the box a bit.
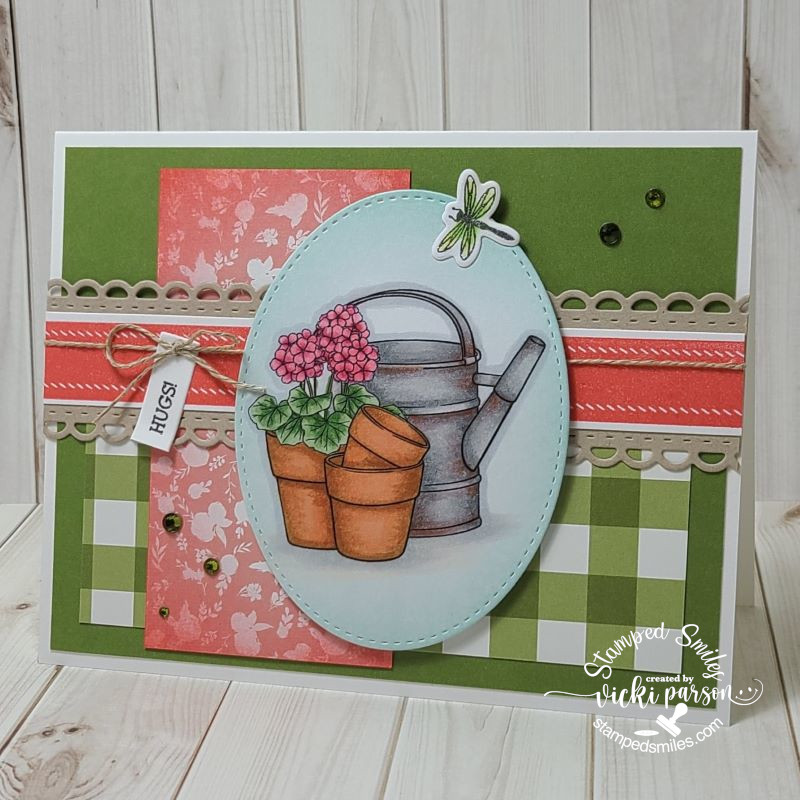
My first card is made with the Beccy’s Place Challenge freebie this month and she also challenged us with a sketch which I’ve decided to use for my card. (see sketch below) I was really happy to use up some more pattern papers with it and I also decided to add a tiny dragonfly at the top to enter another challenge and to adhere to my “bug” theme today!
I printed the image in black and white and colored with Copics. The dragonfly and the center pink strip were stamps that I cut out and added to the design. The rest is pattern paper from my stash except the scalloped kraft border in the center that I cut out with a die. I stamped the sentiment and cut it out to go with my twine around it. *You will notice in ALL of these cards that I’ve used some sparkly gems. I wasn’t aware until posting them! I must be on a kick of wanting to use them!*
And for this next card, I’ve played with a large bug:
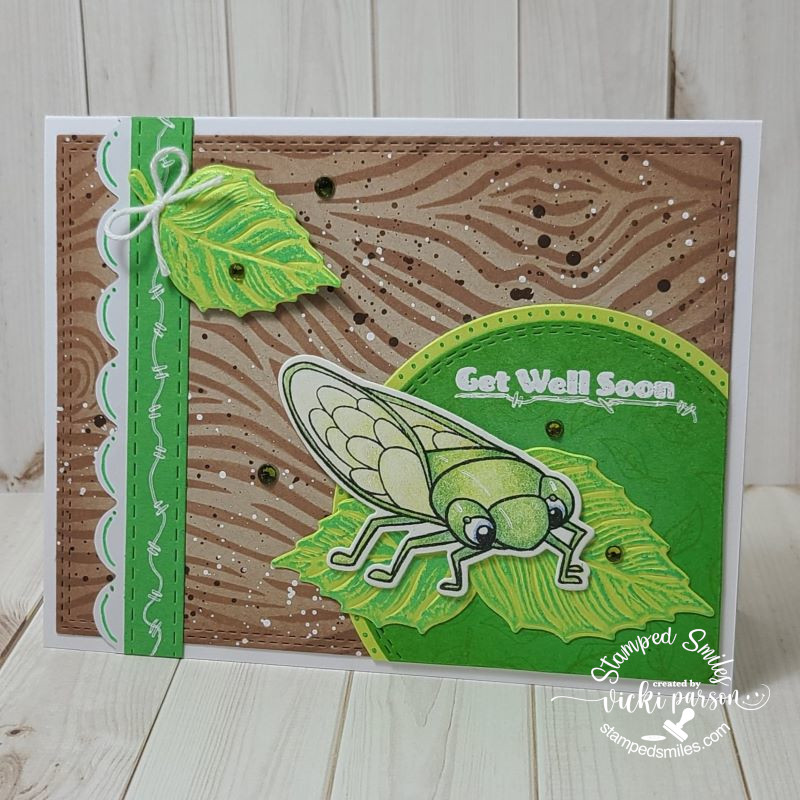
Around my area this time of year, you can hear the sound of these cicada bugs with their distinct noise throughout the trees. My husband likes the sound when a bird catches one! EEW! This bug is a cute one from Inky Stamper called Cicada and I’ve colored it up with pencils this time. Hard to see, but I’ve also added some shimmer with a glitter pen on his wings.
I’ve used the Picket Fence Tree Bark stencil over kraft on the background and then splattered it with brown and white paint. The leaves under the bug and the accent came from the Lisa Horton Variegated Leaf EF+die that I cut over light green cardstock. I used some metallic green wax to go over the details in them. I also used some gel pens to make some doodles around the strip, the circle and under the sentiment along with following a sketch. (details below) You will also notice more sparkly gems! I’m also entering this in the Inky Stamper FB challenge this month which is using an IS bug image.
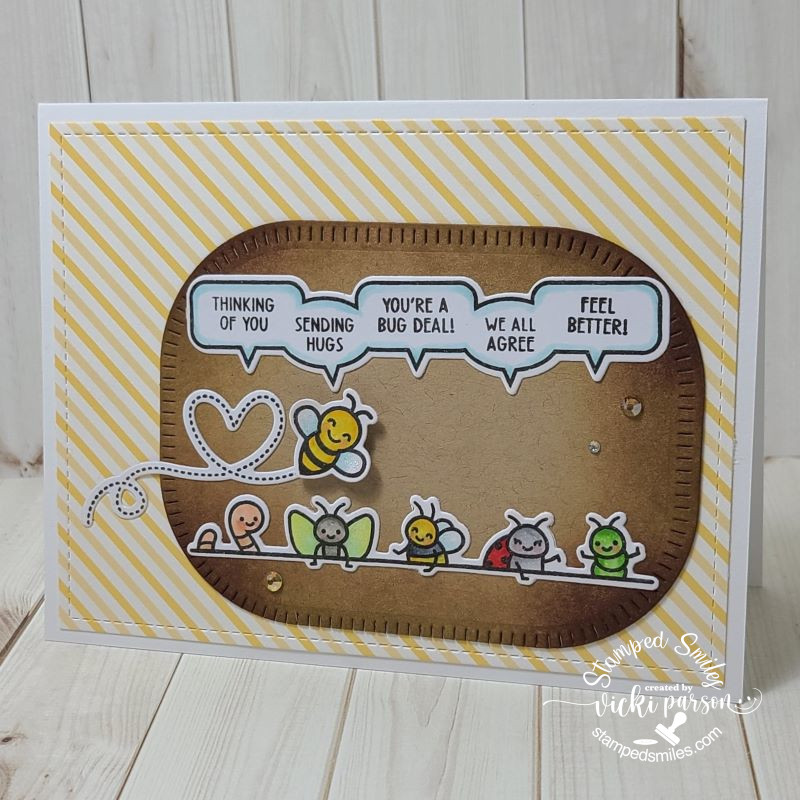
For my last card I decided to keep this one simple’ish’:
So, I know these aren’t real bugs because I’m not squealing, but these guys are too cute! They’re popping up out of the dirt for a special greeting! I mixed in both a new and older stamp set from Lawn Fawn on this one. I’ve used another sketch for this one and decided to keep it very simple. The hardest part of this was the coloring which honestly wasn’t all that difficult either because they’re small images. I’ve also added some shimmer with a glitter pen on the wings and of course, there’s those sparkly gems again!
Hello friends! I had a day of some crafty fun and wanted to share things I’ve made for some challenges. I absolutely love the red, white and blue colors. Most of the time it’s associated with patriotic colors and July 4th Holiday, but I’ve decided to take not just the colors, but the theme using one stamp set and a sheet of paper to create different looks with it.
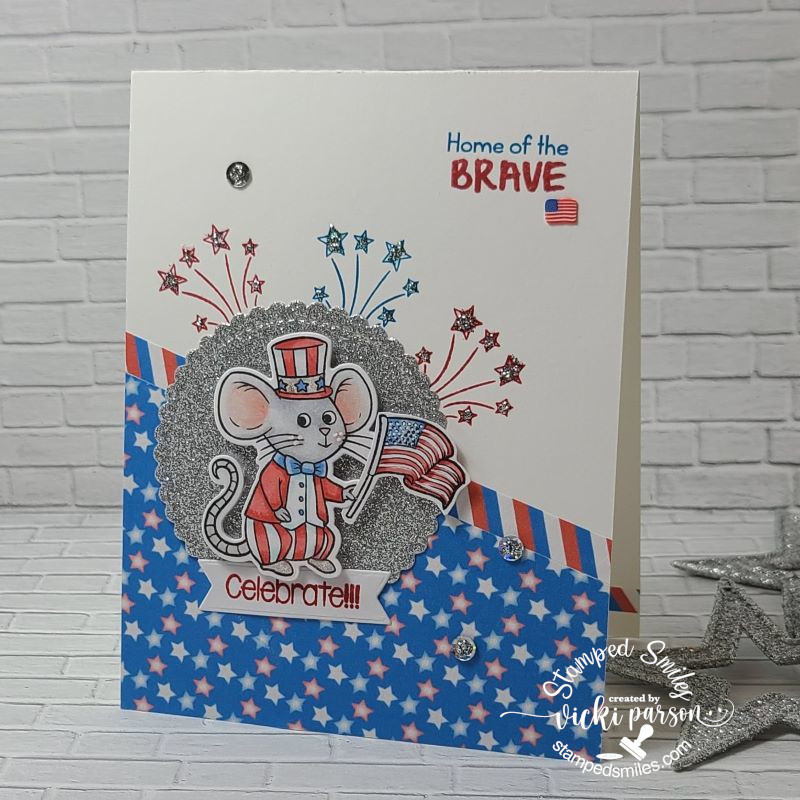
First up is this really cute mouse waving his flag with a fun patriotic theme…which is what this new stamp set from Inky Stamper (called Americana) was intended for. I printed out some freebie papers and used them on all of my cards here today. I colored Ralph up with Copics and popped him up on a scallop circle silver glitter cardstock and stamped the sentiments and stars with red and blue inks. I also added some sequins from the Stars & Stripes sequins mix at Inky Stamper and added some silver Stickles in the centers of those as well as the stars. I also added one of the flags from the sequins mix next to the sentiment at the top. (I’ve used these on all of these cards too.)
I’ve made this card for SCS Teapotter Tuseday challenge as a Patriotic Congrats card for someone in the military whose been promoted to Colonel, so this worked out really well for sending this one out.
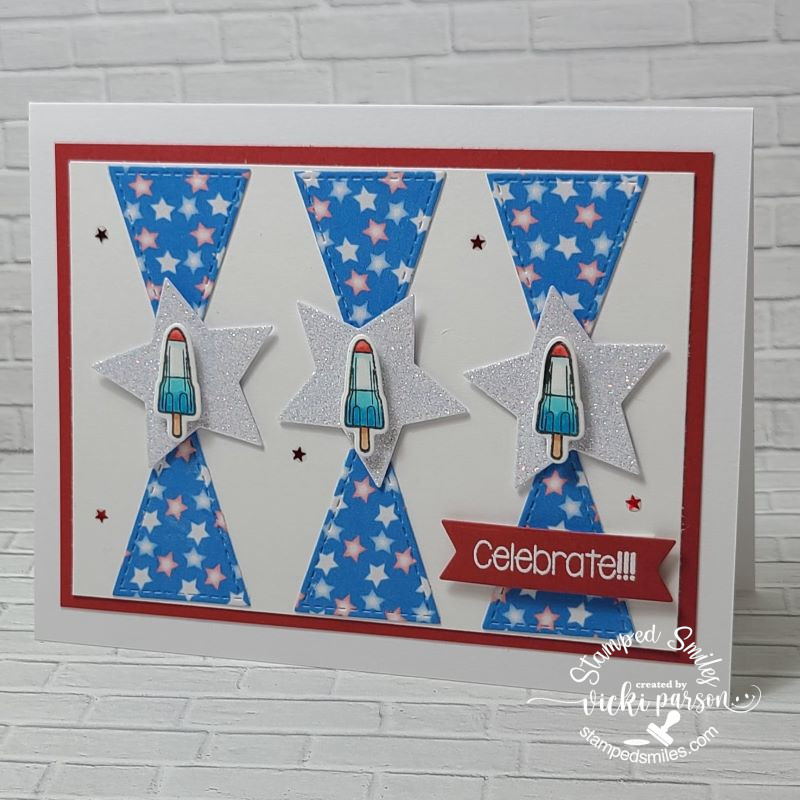
For this card, I wanted to share that a teeny tiny image from a stamp set can be fun to use in a different way as well. I took the “bomb popsicle” image that was stamped and colored and popped them up with foam tape over die cut stars from white glitter cardstock. I’ve used some more of the freebie papers and added a sentiment that was white heat embossed over red cardstock and cut out with a banner die. The tiny red stars came from that sequins mix I mentioned above.
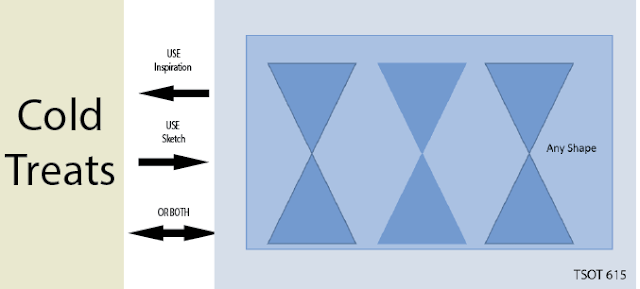
I made this card based on a sketch for a challenge that I wanted to enter before it ended too. (Check it out in the challenges listed below.)
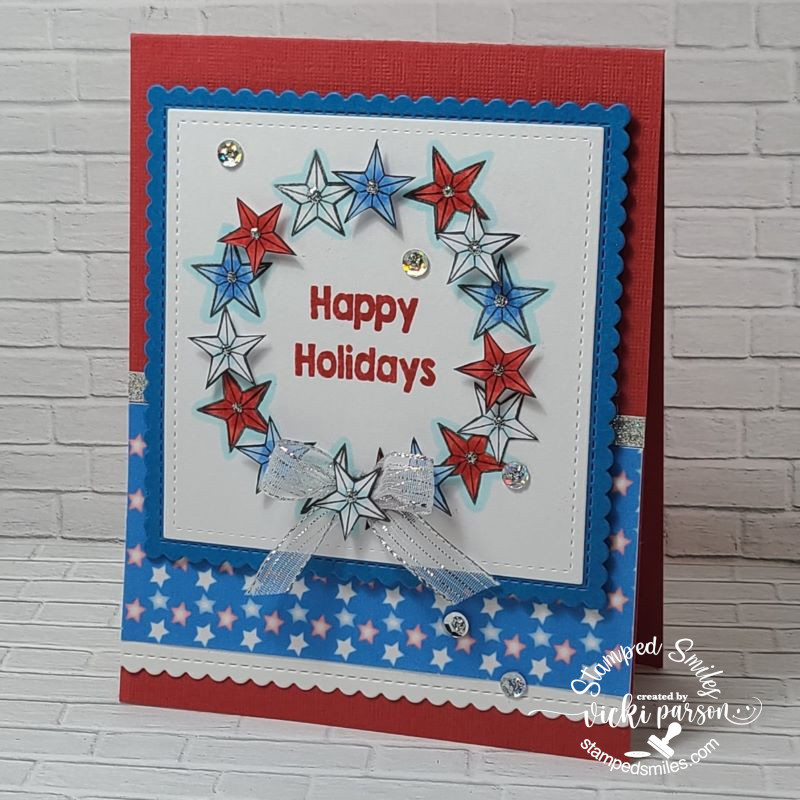
And lastly using this same stamp set, freebie papers, sequins mix and color theme, I made a Christmas card with it. I took the little star image from this stamp set and stamped it several times, colored it in and fussy cut several of them out. It’s not that bad when you’re cutting and watching videos while you do it!
I took a circle die and traced a circle with a pencil so that I would have a guide as to where to create my wreath. I stamped a few stars directly on the circle area and then erased the line before I colored them. the other stars that I fussy cut, I glued some on and popped some up with foam squares. I also added an extra star in the center of the silver bow on the wreath.
I added some silver sequins from the same sequins mix mentioned above and then placed some silver Stickles in the centers of them as well as in the center of the stars.
These were so much fun to make with all of the same products and color theme to challenge myself with. I hope you’ve enjoyed them too or been inspired in some way. Thanks for dropping by!