Hello friends! Last month was a very busy month for me and I know that I had mentioned a couple of times that I had some things that I was working on “behind the scenes”, so I thought I’d share what I’ve been doing.
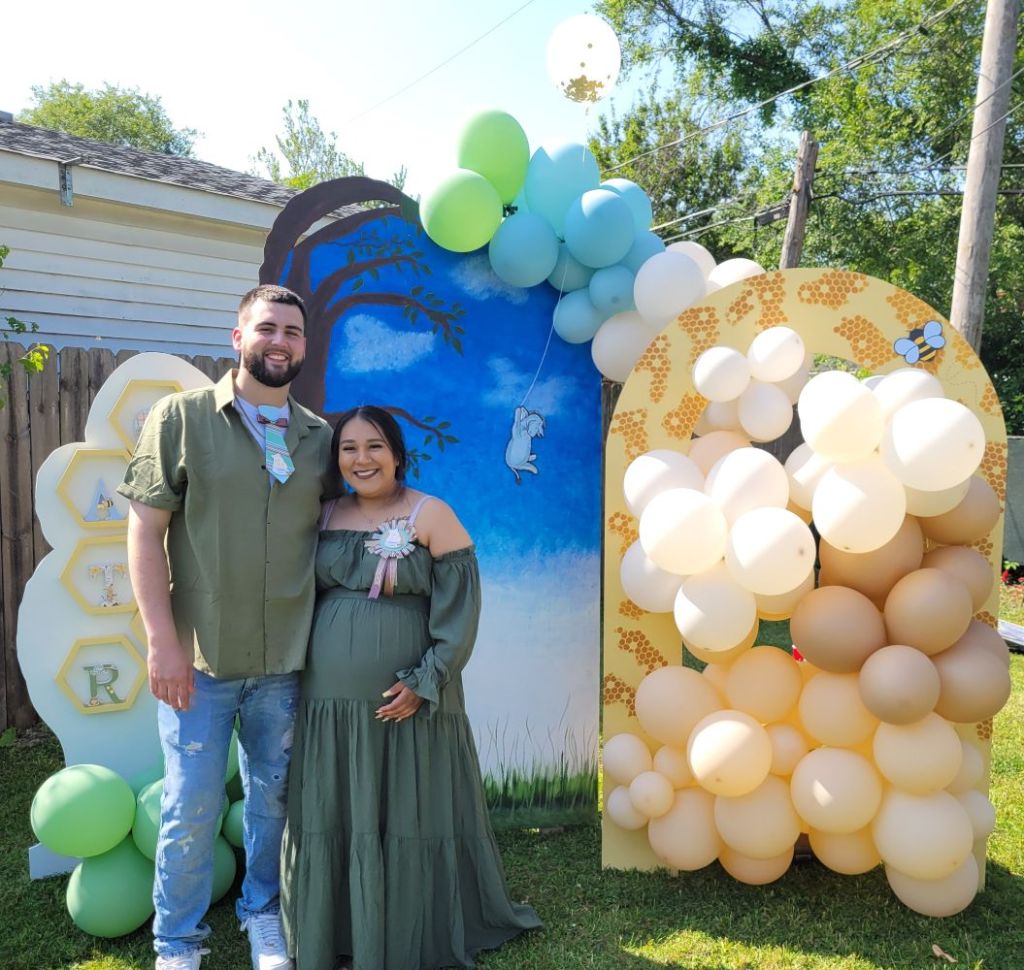
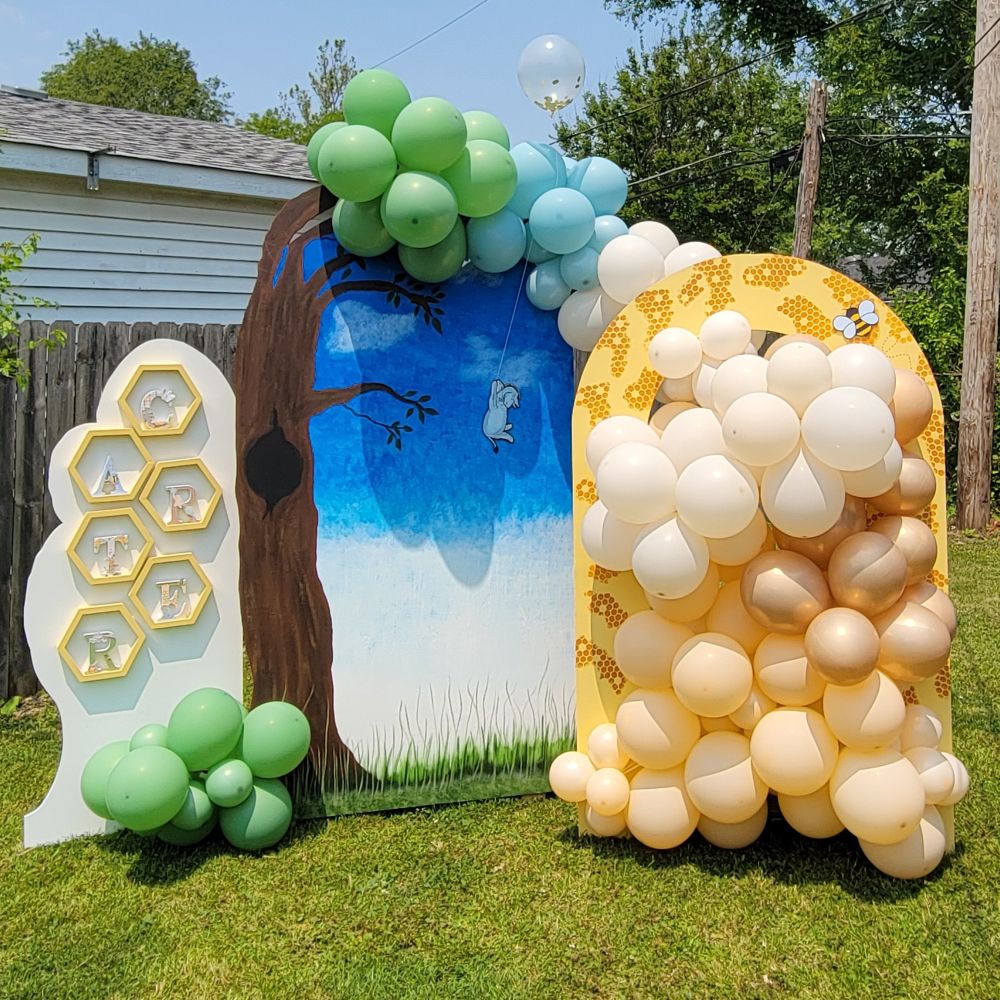
At the end of last year, my son surprised us with the news of a new grandchild coming! A few months ago, I was asked to help with some decorations for their baby shower and of course I wanted to help! Here’s a photo of the soon-to-be parents in front of a back drop that my husband cut out and I hand painted. My husband and I also put together the balloons around it:
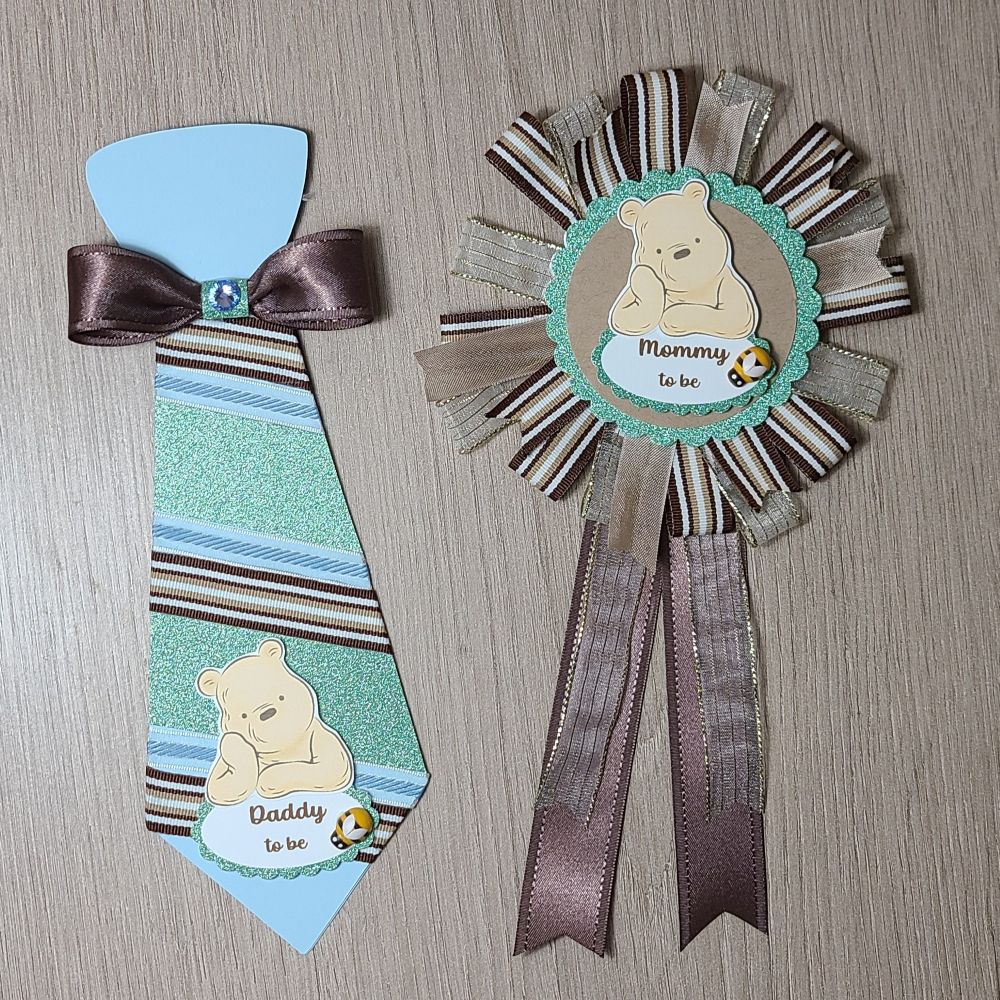
You may also notice, on the couple, they’re wearing a corsage that I made for each of them to wear. My son wasn’t too thrilled about wearing it, but he humored his mom. LOL
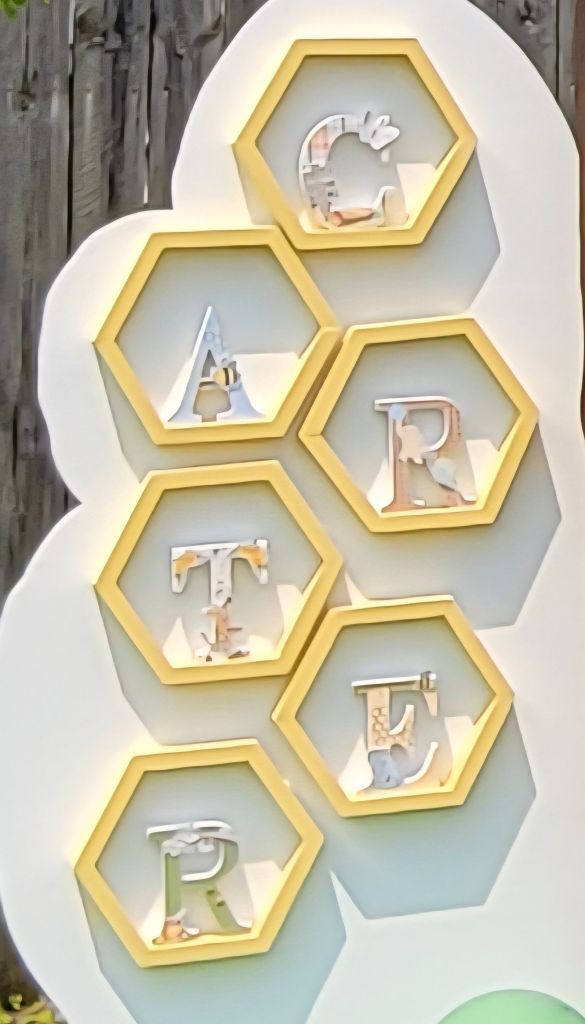
On the left white panel, There are hexagon shelves that my husband put together and there are wooden letters of the baby’s name. I decorated each of the letters with Winnie the Pooh papers and characters. I wish I had taken a better photo of them, but I tried to zoom in a photo with the gallery below.
You can see how tall each of the panels are. My son is over 6 foot tall. I don’t paint much, so painting something this large was a big undertaking, but I enjoyed the labor of love doing all of these things for them.
Below you can see all of things that I’ve made for the baby shower and there is a brief description with each photo explaining what it is. If you are on my website, please click on each photo to enlarge it and scroll just beneath it to read the description:
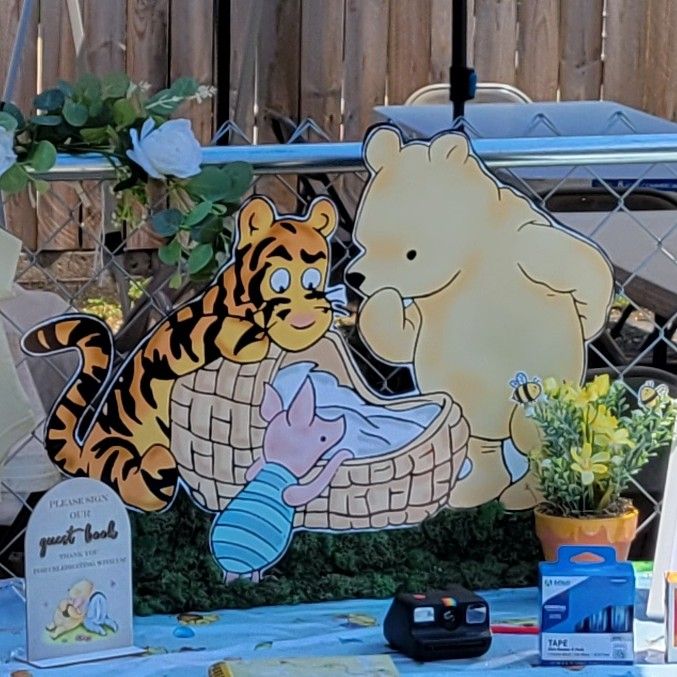
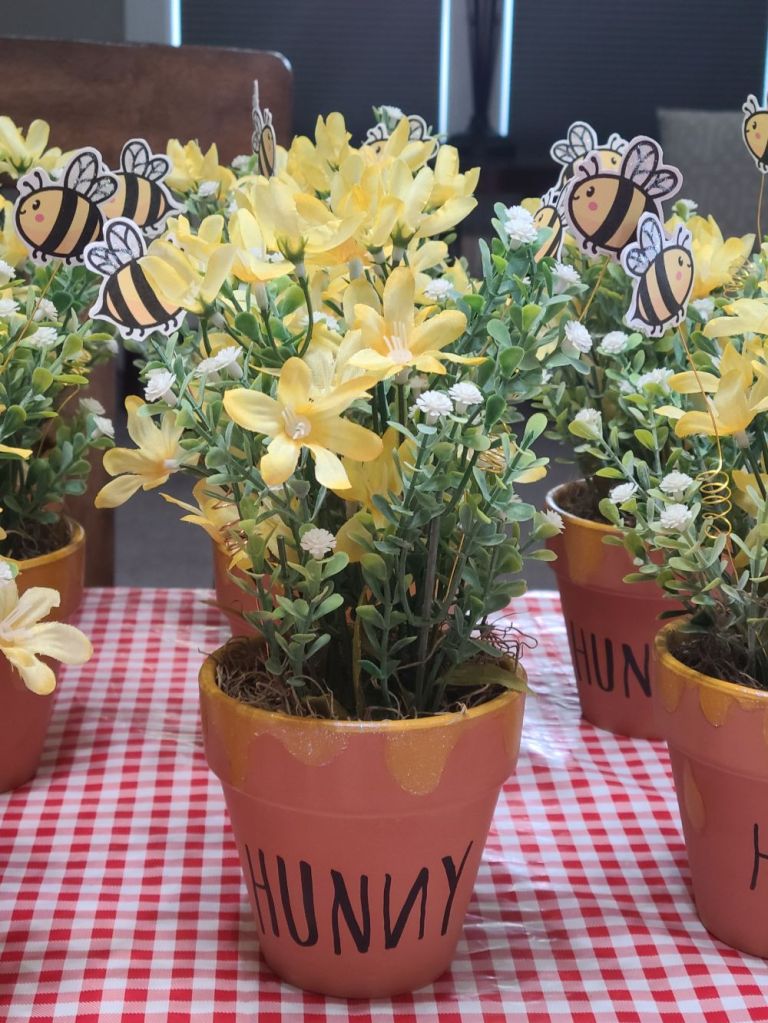
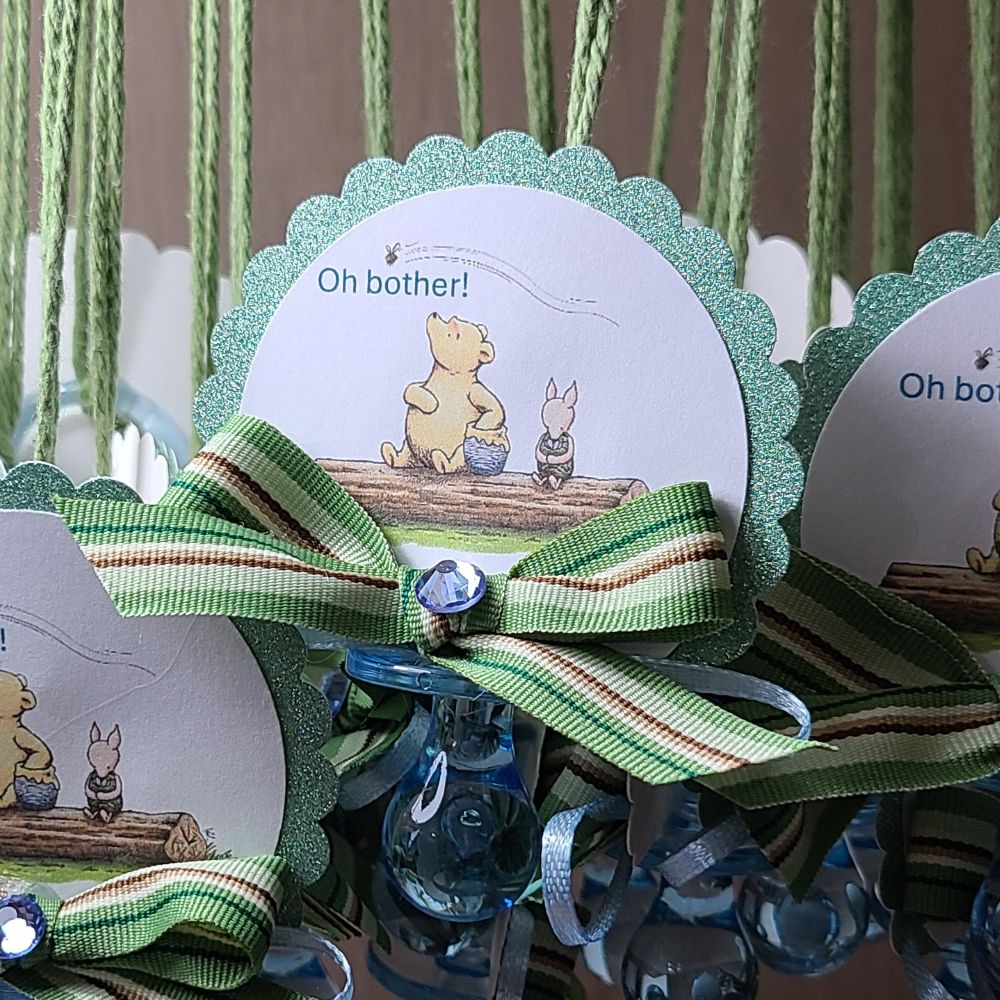
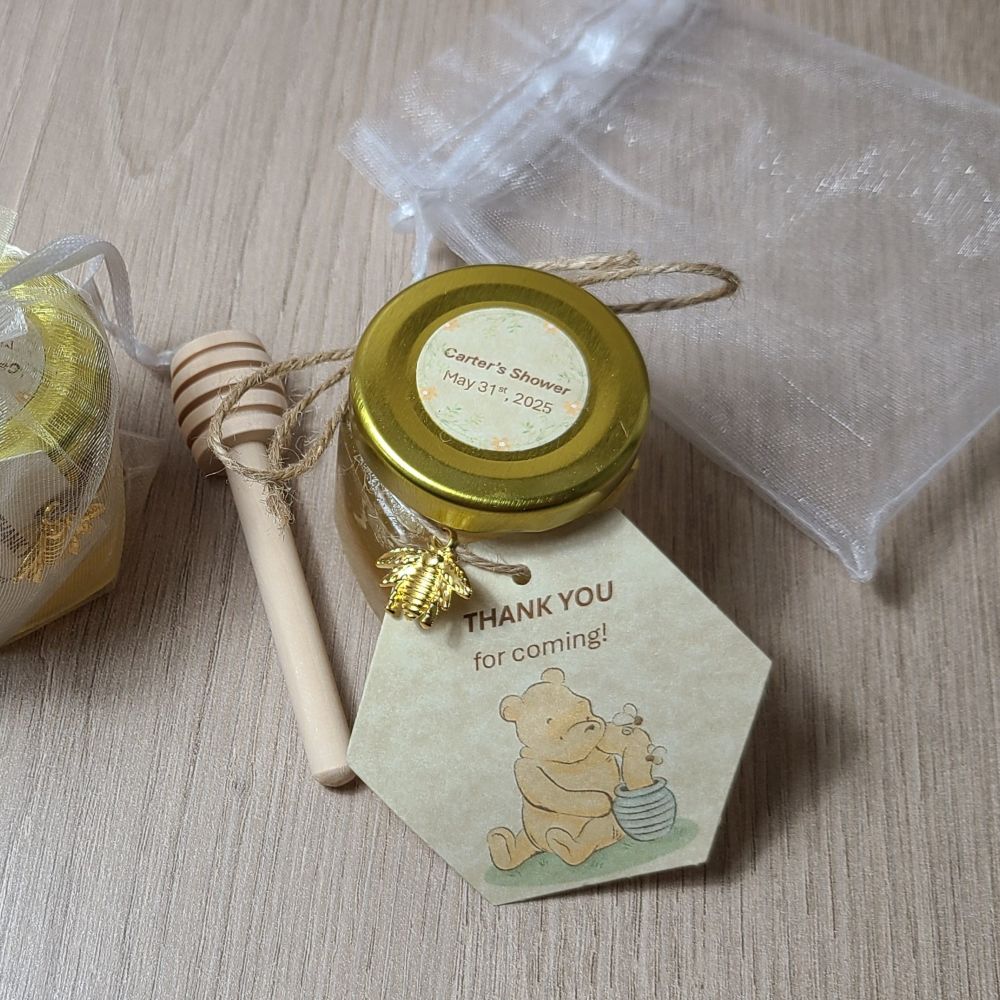
The full backdrop when finished with 3 large wooden panels cut out by my husband and hand painted by me. I added a hexagon stencil pattern with paint on the yellow arch panel. Eeyore and the bee were cut out from computer print and attached to a foam cut out by hand.Left back drop panel with hexagon shelves. Each hexagon has the wooden letters of baby’s name that I decorated with Winnie the Pooh characters and papers. This photo is really blown up because I didn’t capture a good photo of the letters.We made a large “hundred acre wood” sign that my husband cut out and placed in a clay pot. I used paper covered chipboard for the “welcome” and stenciled with black paint on the rest. The Winnie the Pooh character with all of the balloons was cut out from a computer print and flipped with each side on a cut out black foam piece. We staked it in the ground and attached the balloons around it. We made 5 different characters to line the drive.This is one of three different prints that we had done on poster size that was hand cut out and placed on a foam board. To make the characters stand up, my husband made a wooden stand with slots wide enough to fit the cut outs with the foam board. Since the front of the wood showed when the characters were upright, I covered the wood with moss by gluing it to the wood that showed. This character is on a table about 16″ x 20″ large. (I didn’t get good photos of these either!)I made 15 center pieces by painting the yellow honey drip over a clay pot. I also added some glitter paint over it and added the “hunny” letters. I printed and cut out the bees and attached them with wire to stick inside the pots with the fake flowers. I added some moss at the bottom to cover up the foam used inside to stick the flowers in. I covered the bee’s wings with glitter too.For each of the center pieces, we added a charger plate underneath each one so the couple could add candies for each of the tables.These are the corsages that I made for the mommy and daddy to be. I used the Cricut to cut the tie pattern from cardstock and then added some glitter papers, ribbon and cut out a cute Winnie the Pooh to go above the lettering. I had some wooden bee embellishments and added a pin on the back to attach the clothing with.I made 50 of these pacifier necklaces for the party. I cut out the image with a circle punch, added the glitter scallop punch layer behind it. I used some green yarn to tie around the blue acrylic pacifier decoration and attached the image over it with hot glue. I also attached a ribbon bow as well as a blue gem in the center. The rule of the game was if anyone was crossing their legs, arms, hands, etc. they collected a necklace from someone else. Whoever collected the most necklaces won the game. (It was funny to watch everyone playing the game! I lost mine really fast!)I made 50 of these hexagon tags and personalized sticker on top with the name and date for a party gift. Inside the jar was real honey combs from a local area.
They put in so much work having this baby shower with lots of food, yummy desserts and drinks. I know with all of the set up and cleaning up they were wore out! We were also wore out when it was finished up. LOL Now it’s just the waiting to meet the newest member of the family by the end of this month. We are certainly looking forward to it!
Hope you’ve enjoyed my post today…and now you can see why I’ve had “BEEs” on my mind lately! LOL Thanks so much for stopping by!
Hello friends! November has come with the pretty leaves on the trees and the coolness in the winds. I always turn to comforting “things” this time of the year and it always gives me a sense of peace before the year comes to an end. A warm fuzzy blanket, socks/slippers, sweaters, etc. is what I usually turn to. What is your comfort “thing”?
I promised to share with you the fun things we did over at the “Inky Escape” event that I recently attended and it was wonderful to see all of my crafty friends again for laughs and fun together. I think I miss them already!
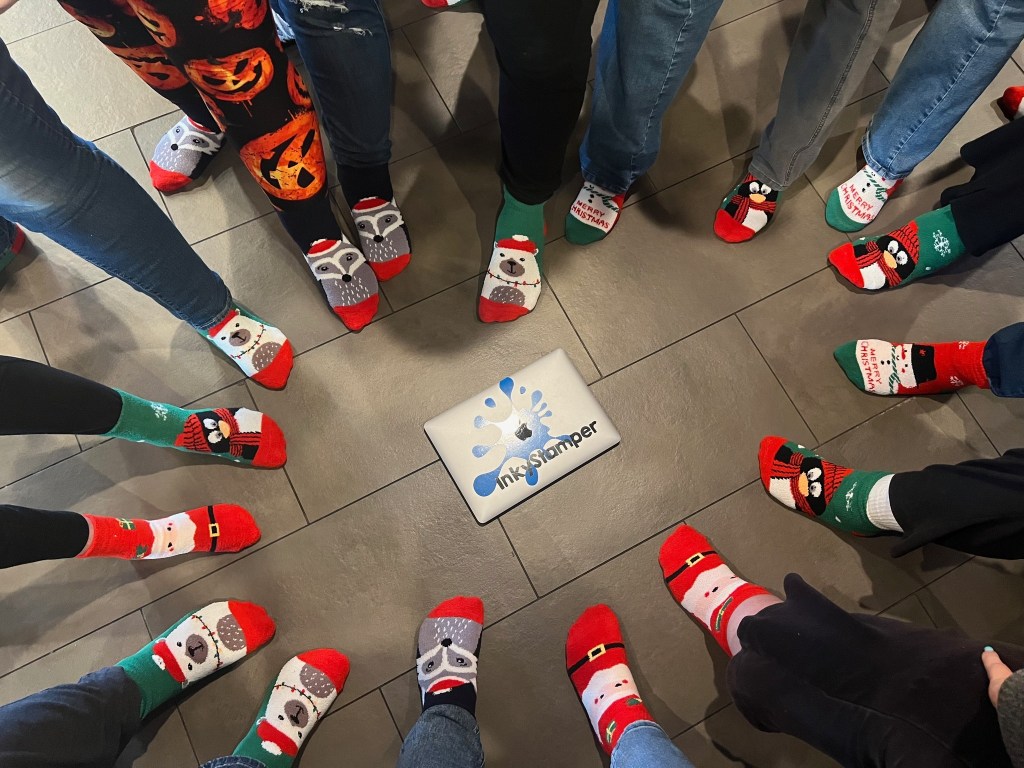
I lifted this fun photo from the Inky Stamper FB page as I don’t have any photos other than seeing what others took. There were a total of 18 of us this time:
Everyone received a “swag bag”…but the case this time was a Christmas stocking full of fun goodies and one of them was that everyone received cute fluffy socks. I’m not exactly sure which one is me in that photo, but I did have a polar bear sock! LOL We each placed one foot in the circle and Chelsea took the photo.
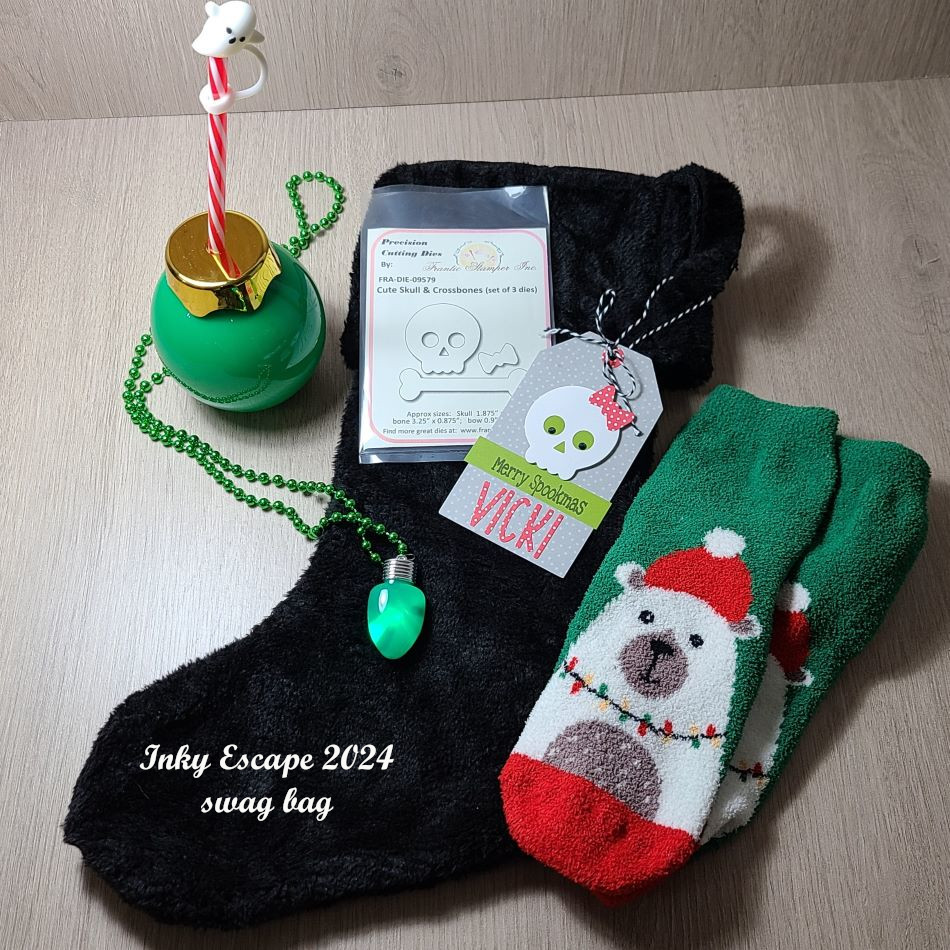
And speaking of the “swag bag”/Christmas stocking…here’s what we each received:
When I got to the event, there was this black stocking on my table with the cute tag attached to it with my name. Each person received a personalized tag on the swag bag, plus the “skull” dies that were used to create the tag which was inside the stocking! There are my polar bear fuzzy socks (I’ve already washed them up by hand so the colors wouldn’t bleed in the wash…and they’re so warm and fuzzy!) I also received the cute “Christmas bulb” drink holder with a candy cane straw and a little ghost stopper for the top! We used these containers to hold the “Jingle Juice” that we drank at some point! And then I received a light up Christmas bulb necklace that has different settings when you push the button the back. The theme for this event was called “Merry Spookmas” which you can see the greeting for that on my personalized tag. So fun!
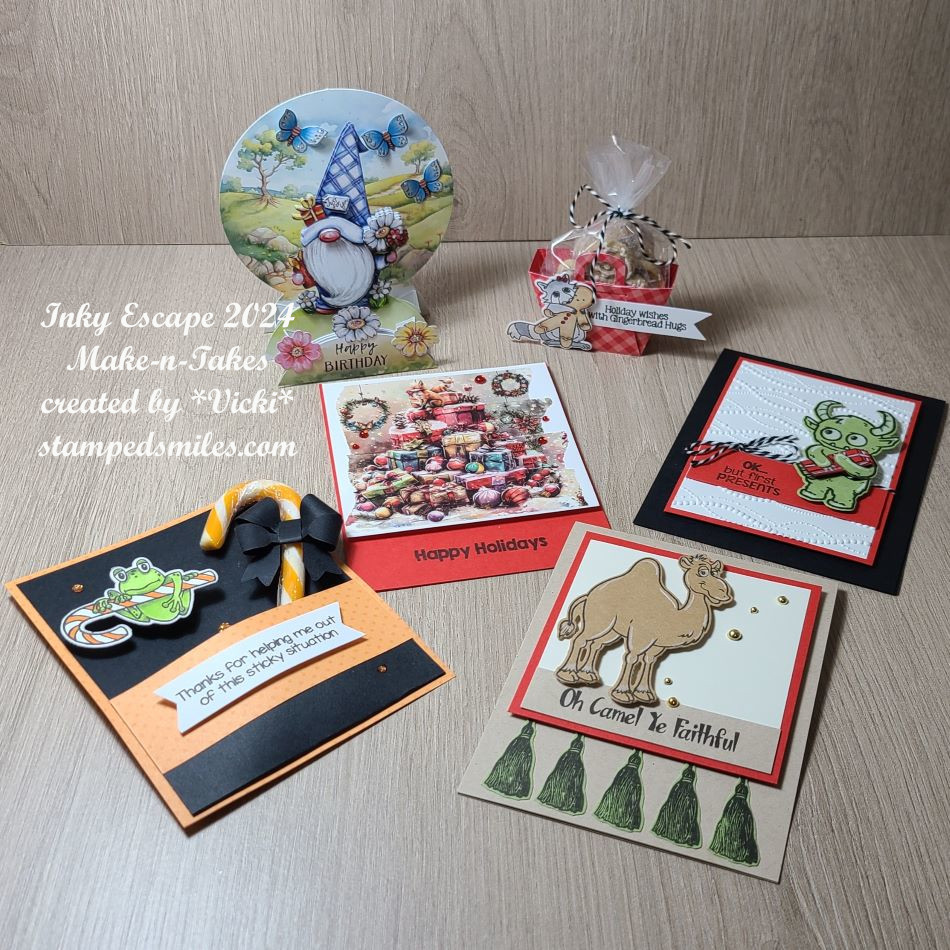
And speaking of fun…here are all of the Make-n-Takes that we created during the event. We sat and made 4 projects and then two of those projects were “bonus” makes using some other special items. (There is a “story” about one of them, but you can check out each project up close in the gallery below.)
*If you are on my website, just click on each photo to enlarge and scroll downward to see more information about each photo while it’s enlarged.*
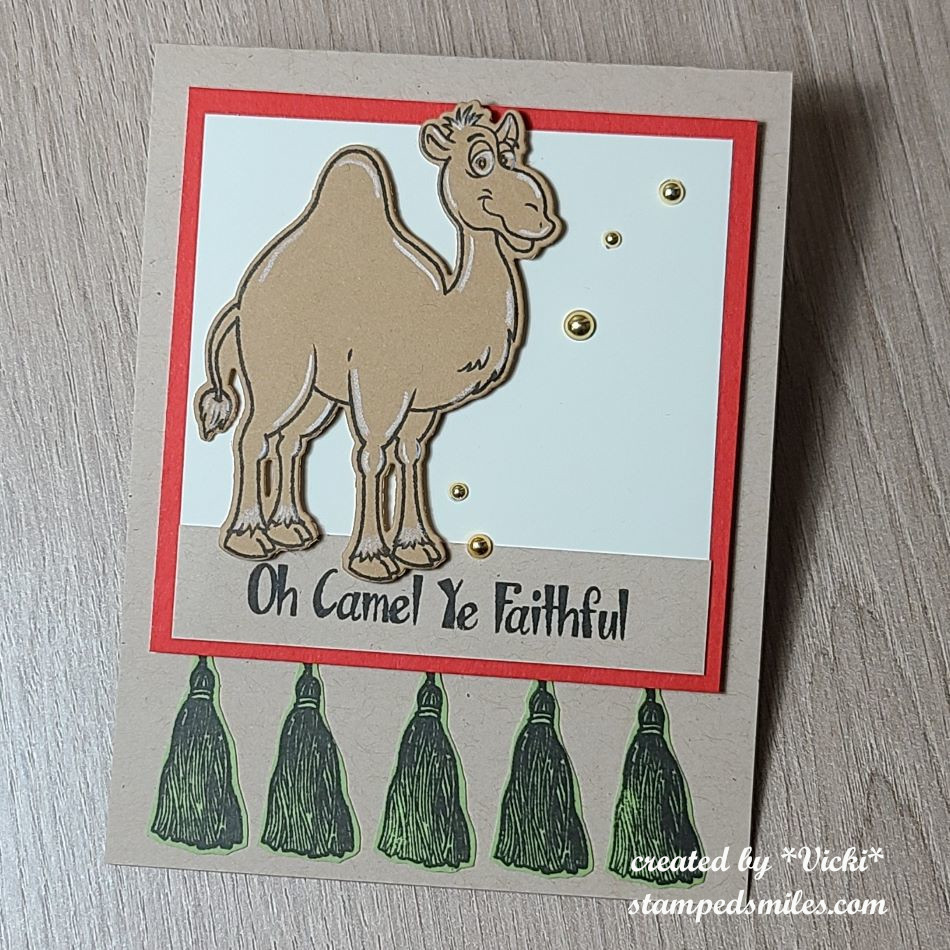
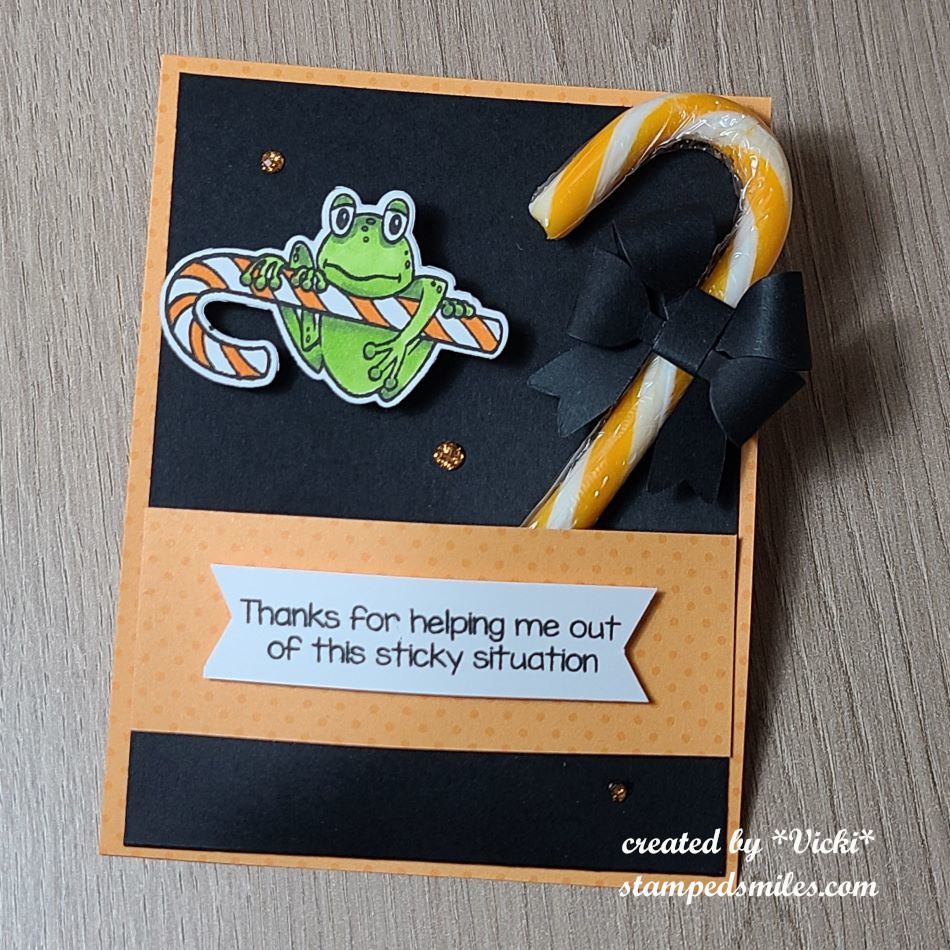
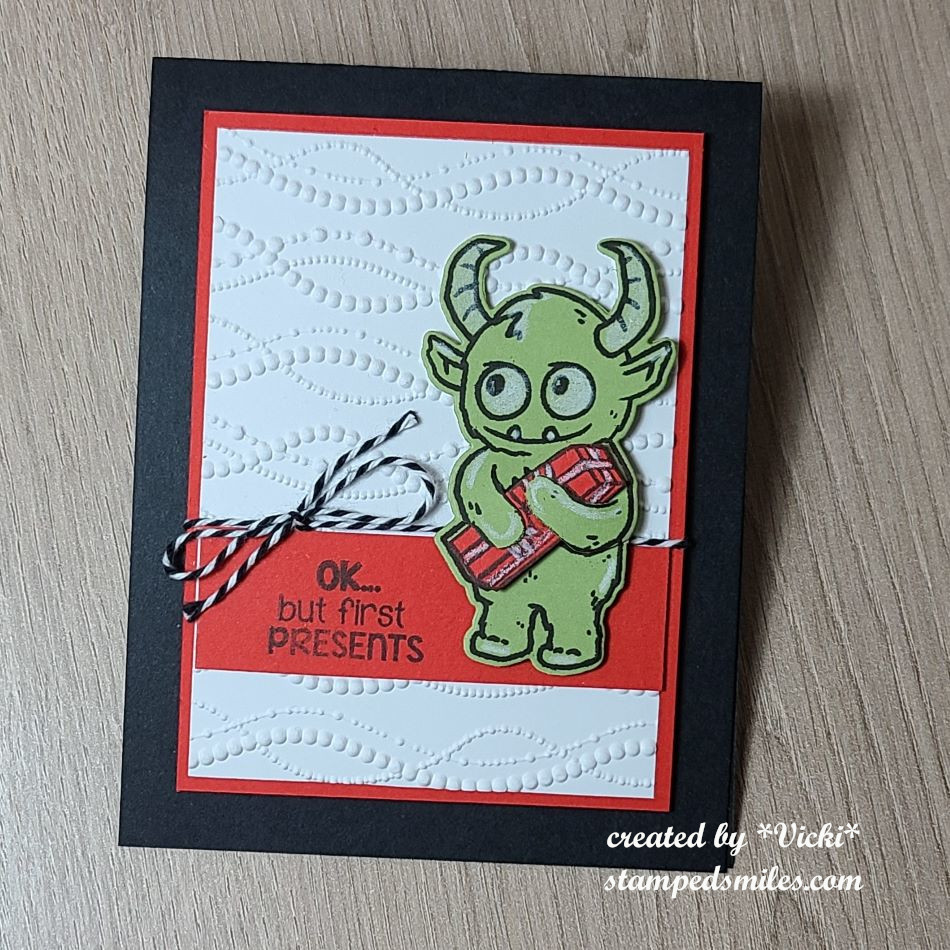
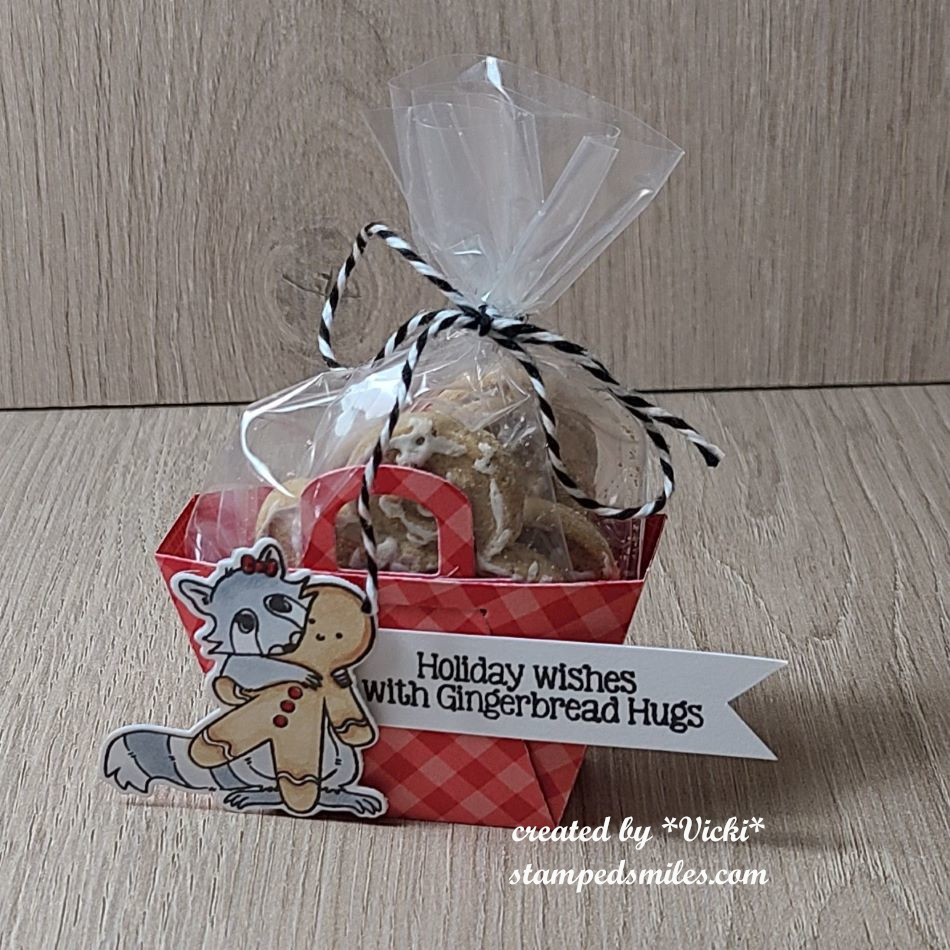
Camel stamp set used. Images were stamped on colored cardstock and cut out.I TOADally FROGgot to run the black cardstock through an embossing folder! Doh! Orange Cream candy cane inside pocket with paper bow and frog on wobbler.My favorite stamp set of this release is the Gifter set. He was stamped on cardstock and cut out. Present was paper pieced inside his arms.Cute gingerbread treat container came complete with gingerbread cookies wrapped with twine!Bonus make-n-take was easy peasy with some very cool Aall & Create washi tape that made this image!We chose the “winter” gnome that we wanted, but mine was so messed up I had to ditch it! I came home and made a birthday one that similar from my own card kit stash! LOL
The first four make-n-takes were made using the brand new Inky Stamper release that came out during this event! You should go check them out now on the website! (They’re all shown on the home page under “Featured Products”.) My favorite is that darling “Gifter” stamp set! I’m sure you’ll be seeing something from that set soon from me! *wink*
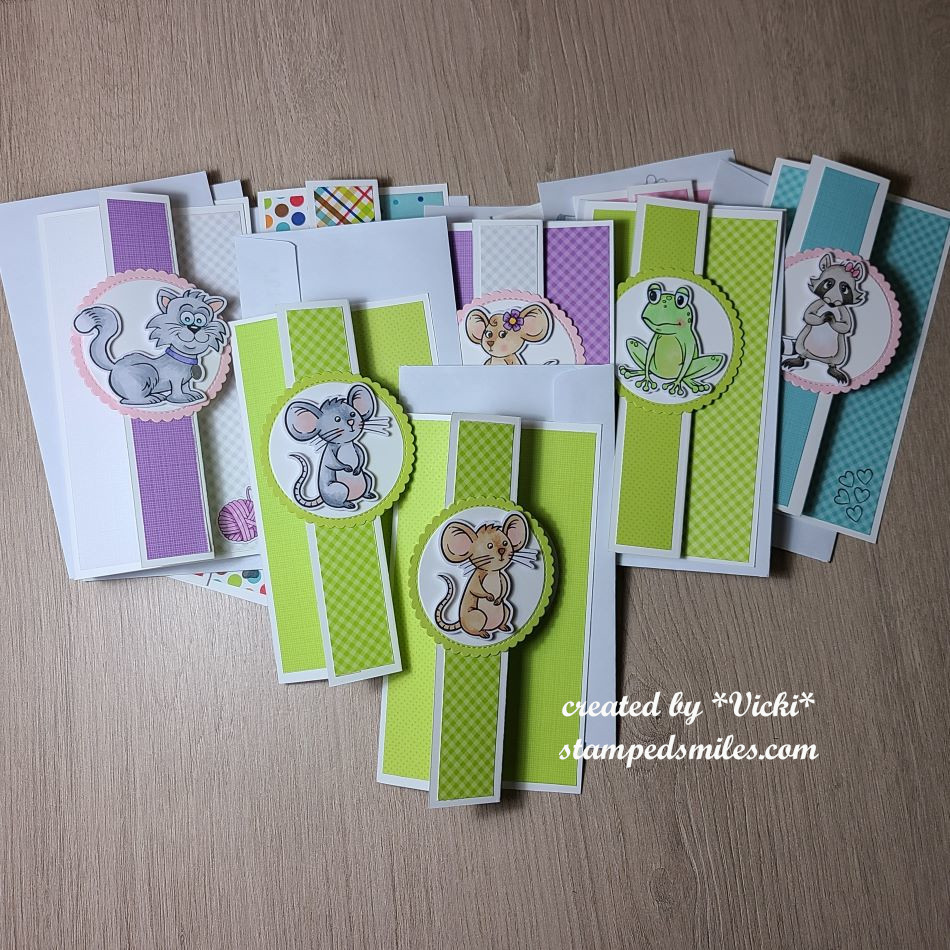
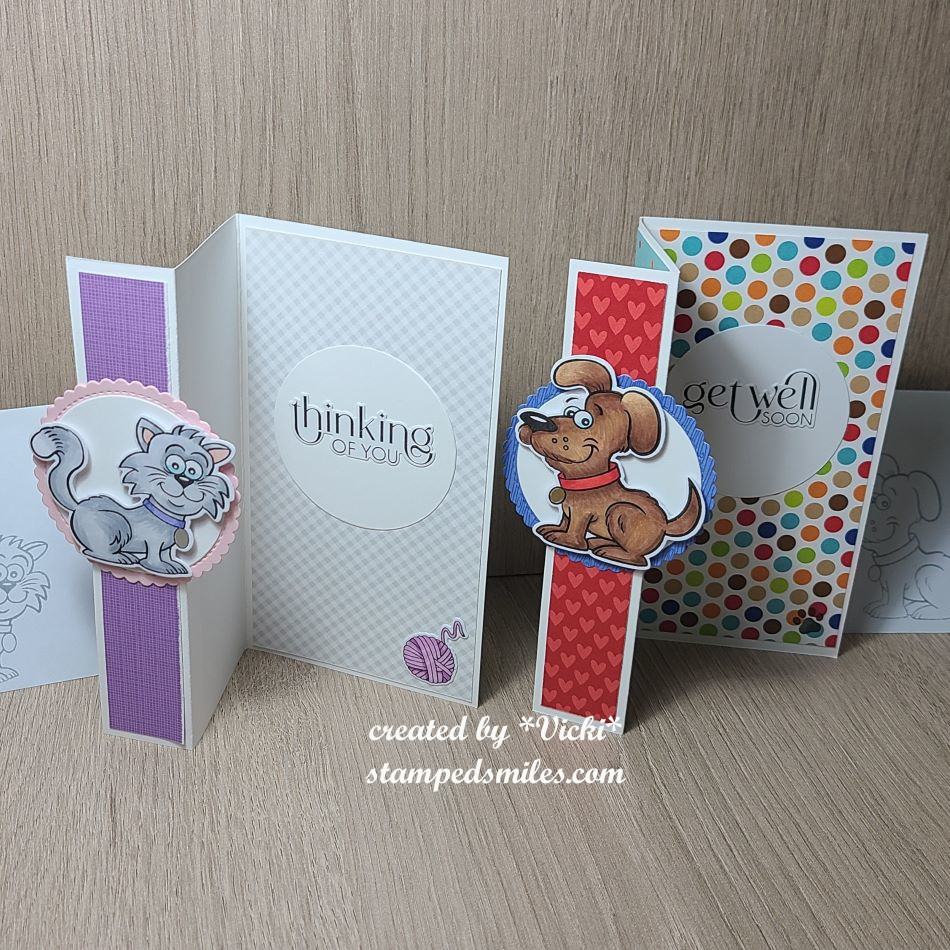
And since I was there to “crop” (as they say), I brought some things to work on that I really wanted to get done. So I decided to pull out some more Inky Stamper images to color and make a “Sheetload of Cards” using the September Sheetload of Cards Template by Crafty Al. If you’re not familiar with her, check out her You Tube Channel and look for all of her “Sheetload of Cards” videos to see how you can find instructions for each month. #SUYSSep2024 #ShowUsYourSheetLoad
I utilized her template to create the full 12 cards as demonstrated. The dimensions of the finished card design is 3.5″ x 6.25″ which I really liked as it helped to use up the full 6″x6″ size of those paper pads! Also, you don’t have to create envelopes for these as they fit perfectly inside those #6 envelopes (3-5/8″ x 6.5″) that you can find at any office supply area of a store.
As you can see, I used a variety of images that I stamped, colored and cut out for each design. I matched up my design papers to coordinate with the images. All of the images I used are from Inky Stamper. All papers come from a variety of Doodlebug Design papers.
Here’s a closer look at two of the cards I made from the set so that you can see how the card opens up and the greetings on the inside of each card. (Sentiments come from Taylored Expressions.) You can also see the coordinating envelopes next to them with the matching critter stamped in grey ink.
These cards are on the way for a special charity for ill children patients to help lift spirts and I hope each one will!
I know there were so many things going on during the event that I was even surprised that I got all of these finished. They were mostly finished with the exception of the greeting which I added when I got home. I had plenty to do while I was there and also enjoyed all the activities too!
I hope you’ve enjoyed my post today as well! I thank you so much for stopping in!
Hello friends! Welcome to the weekend and hoping it’s a good one for you.
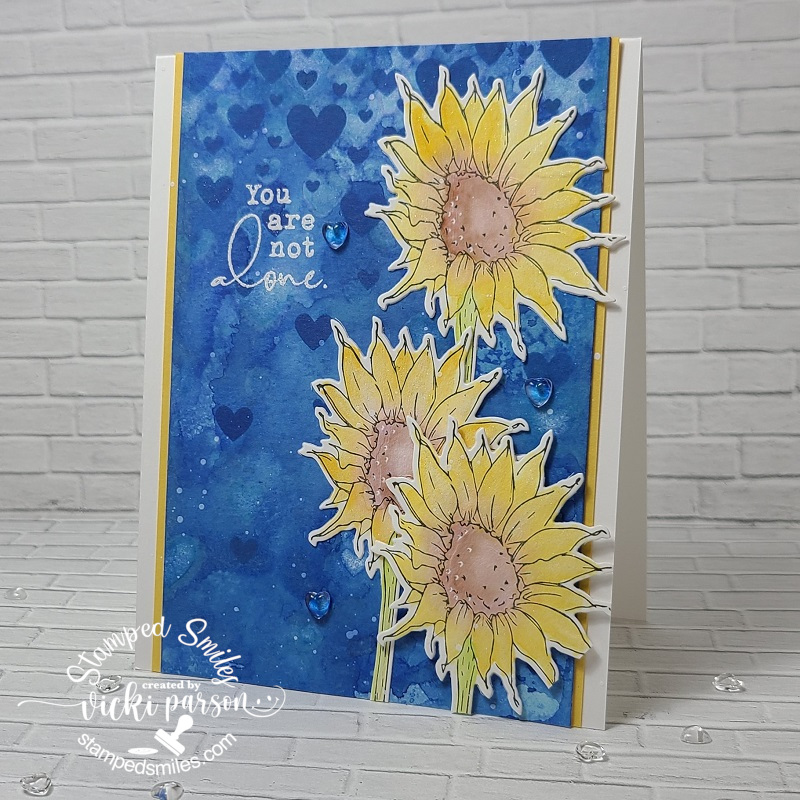
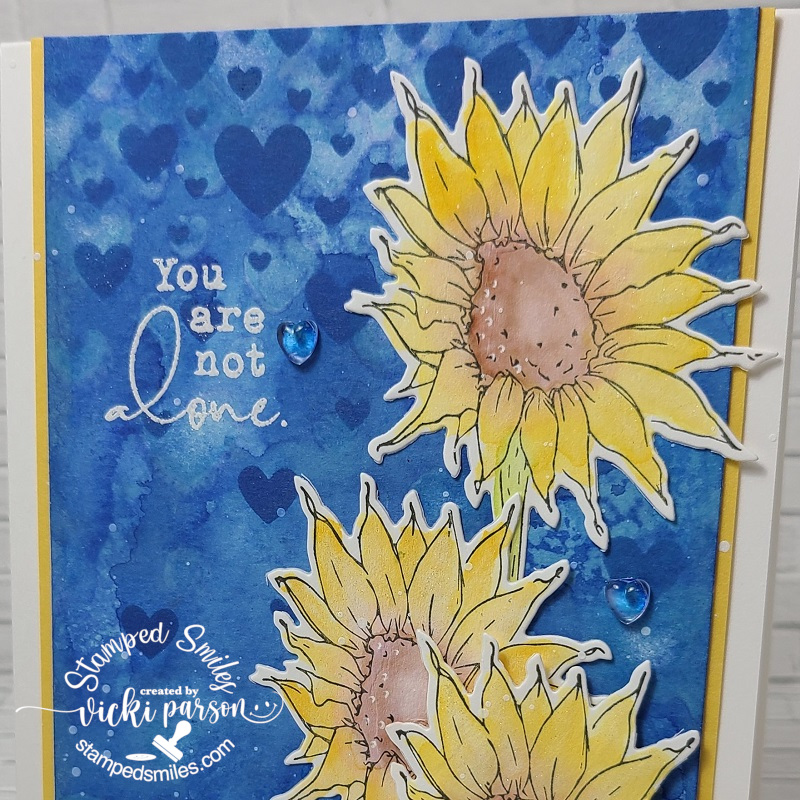
So as I’m sure you’ve been seeing lots of card makers pulling together in making some beautiful inspiration with the Ukraine flag colors and Sunflowers in support. I’m seeing where there is some sort of card auction going on over at Instagram too, but I’m not on there to see anything. It has moved and inspired me, so I would still like to help support in some way as a card maker to share some inspiration and hope for peace in the world too.
So my first thought was to turn to one of my favorite sunflower stamps which comes from the Taylored Expressions Wheatfield Dreams and I thought they would be appropriate for me to pull out some of my Karin Brush markers to watercolor. I’ve also used the coordinating die for the set to die cut the flowers.
For the background, I’ve used some watercolor paper and some Ranger Blue Ribbon Oxide ink for the background by smooshing the ink pad onto my glass mat, spritzing with water and smooshing it over again with layers of water, smooshing, drying, spritzing, etc. I also used the Taylored Expressions Heart to Heart stencil with the same ink and foam tool to go over top of it.
I prepped the background with an anti-static tool and white heat embossed the sentiment from the Taylored Expressions Beautiful Soul stamp set. I cut down the sides of the watercolor paper and added some strips of yellow cardstock to the edges and attached it over an A2 sized top folding white card base.
I then glued down the die cut sunflowers except for the one in front where I used some foam tape to pop it up.
I took a white gel pen and added a few light dots in the center of each flower for some highlights and then took a glitter brush pen for some shimmer to the petals, but it’s so hard to see in the photo. I decided to water down some white paint to add a few splatters.
Lastly, I’ve taken some heart shaped clear dew drops and attached a few to the background.
I’m pleased with how the card turned out and hope you’ve been inspired in some way too. Thanks for stopping in and sharing your wonderful inspiration and lovely thoughts my friends. Take care of yourself and one another.
Challenges:
1. Festive Friday – ###0104 Choose 3 from list: I chose Flowers/Plants, Encouragement & Stencils
Hey friends! Hope you’ve had a wonderful weekend and will be enjoying the first ‘official’ day of Autumn tomorrow!🍂 Yay! I know that this is my most favorite time of the year and today it seems like it has finally cooled off a bit which is very welcoming to give the air condition a break! Decorating for Fall/Halloween is also a favorite thing I like to do along with being outside…so I’ll be doing that this week and weekend for sure!
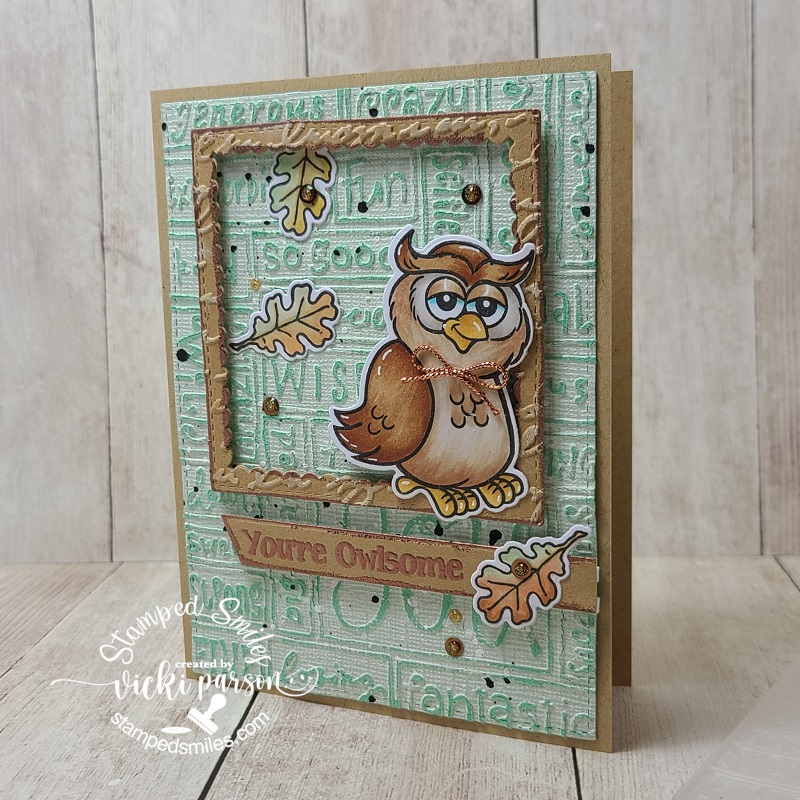
Today I have some creations that I’ve been working on. The first one comes from a challenge that I wanted to enter along with breaking out a new stamp set, but excited about using an older embossing folder and some paper that has been in my stash for far too long:
He even looks like a wise old owl…and I thought he would be cute with a little bow around his neck too! This is not a ‘new’ stamp set from Inky Stamper, but it’s the first time I’ve broken out to use this Owl stamp set! Their challenge issued this month was “embossing” and so I pulled out a VERY old embossing folder (remember the Cuttlebug days?! LOL) I think it was one of my very first ones! Plus, I pulled out some Coordination’s textured and colored cardstock. It is weathered looking, but when you sand over it, the color comes out underneath…really cool stuff that I haven’t used very much! You can get the coordinating dies for this ‘Owl’ set which also cuts out the owl and the leaf in the set. I’ve colored them up with Copic markers and used the die to cut them out with.
For the embossing folder card front, I took a piece of the Coordination’s paper, die cut it out and then ran that piece through the selected embossing folder and then sanded over it with a sanding block. I also die cut a frame the same color as the card base and took a separate embossing folder from Stampin’ Up! to go over that with and sanded it a bit as well before popping it up on the card front.
Before placing all of the elements on the card front, I decided to add some white and black paint splatters over the background. I also copper heat embossed the sentiment underneath the owl, die cut the strip and popped it up with one of the leaves over top. (You can also see along the edges that I’ve heat embossed too!) I popped up the owl but left him grounded to the frame and then finished it with copper sequins filled with glitter drops. The copper twine bow was a last element decision. LOL🦉
Speaking of sanding, it reminded me of this class I took with Inky Stamper making these cards. (couple weeks ago)
Anyway, the sanding reminded me of this class because at the bottom of the card, the kit included sandpaper for the beach. Really love the look it gave to the design with the texture and tiny bit of sparkle in it!
And the same day I had the class above, I had this class from Craft Fancy during their OOAK event. These were made from their “Alcohol Pearls Butterfly card kit” (I think they have some left in store if interested). The kit came with one alcohol ink color in Celestial Pearls, which is beautiful, but I decided to also add some copper metallic from my stash for another bit of color. I also went on my own a bit with the white heat embossed sentiments at the bottom. I really had fun playing with the alcohol backgrounds and being able to cut them out in one pass for different looks.
I thought this set of four cards would be perfect to add to my donation box to The Butterfly Project in support of domestic violence. So, I was able to send off a batch of cards for that this past week too.
Hope you’ve enjoyed my mixed collection of projects here and I’m sure I’ll have more fun things coming soon! Thank you for stopping in!
Hello friends! Happy Labor Day! Can you believe we’re in September already? The time goes so quickly! I’ve been helping my husband around the house so we can finish up some projects before the weather starts getting cooler on us! He does keep me busy since being retired! LOL!
As I had mentioned, although I wasn’t posting on my blog, I was still crafting. I’ve also been trying to organize my craft room with my husband helping me to move things around as my space had really gotten to be over-whelming. Carrying several card kits (many never used) and boxing them up to store, I realized how many things I actually have and never used! It’s fun to buy stuff, but I think it’s even better to use something I have…as I’m becoming my own store! So for this reason, my purpose has really shifted to TRY using what I already have if possible! I know many of us are in the same boat, so perhaps I can help inspire too!
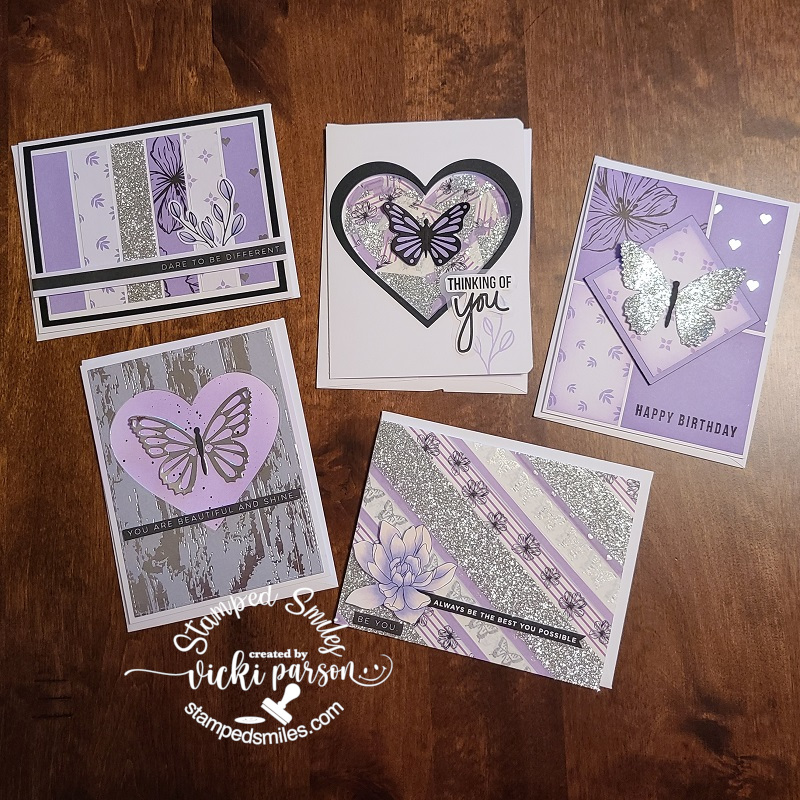
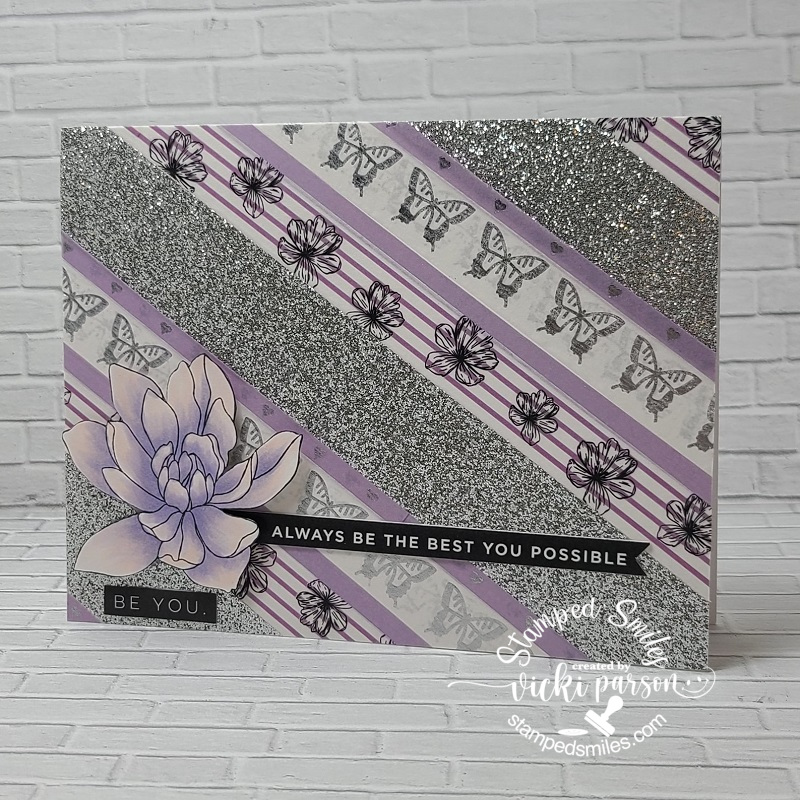
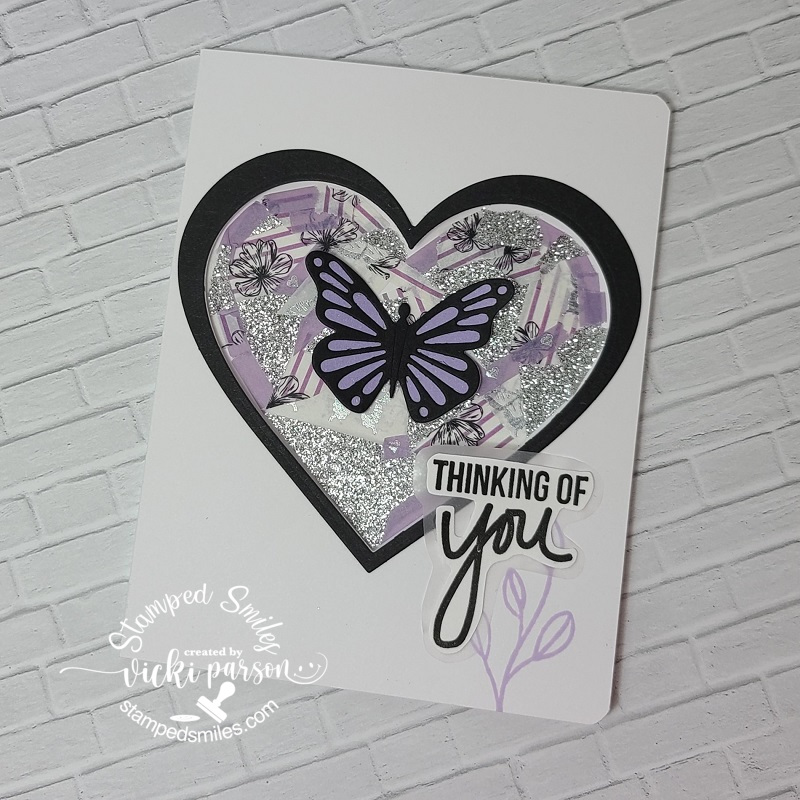
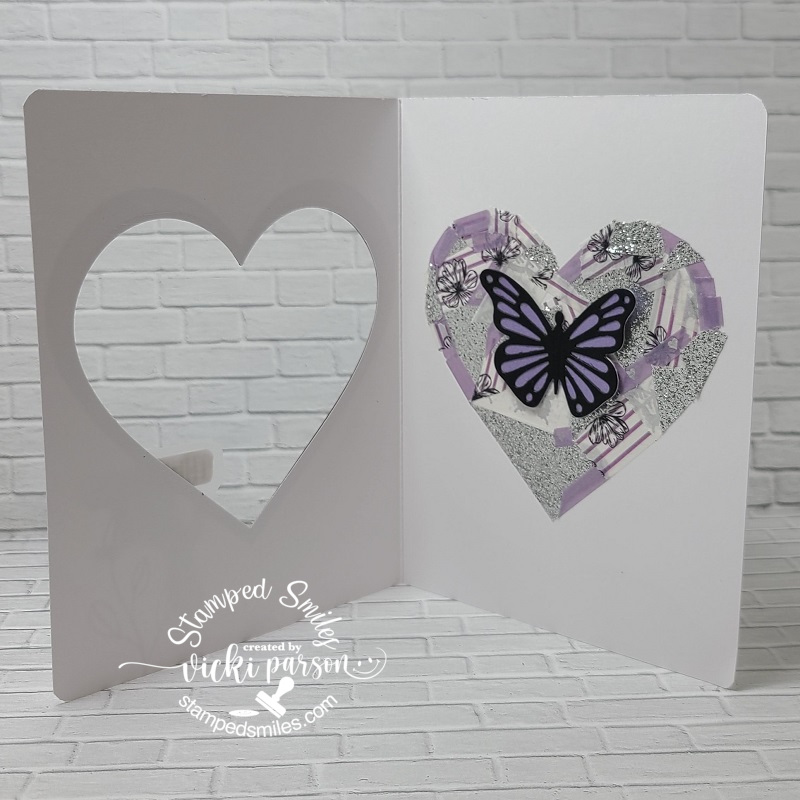
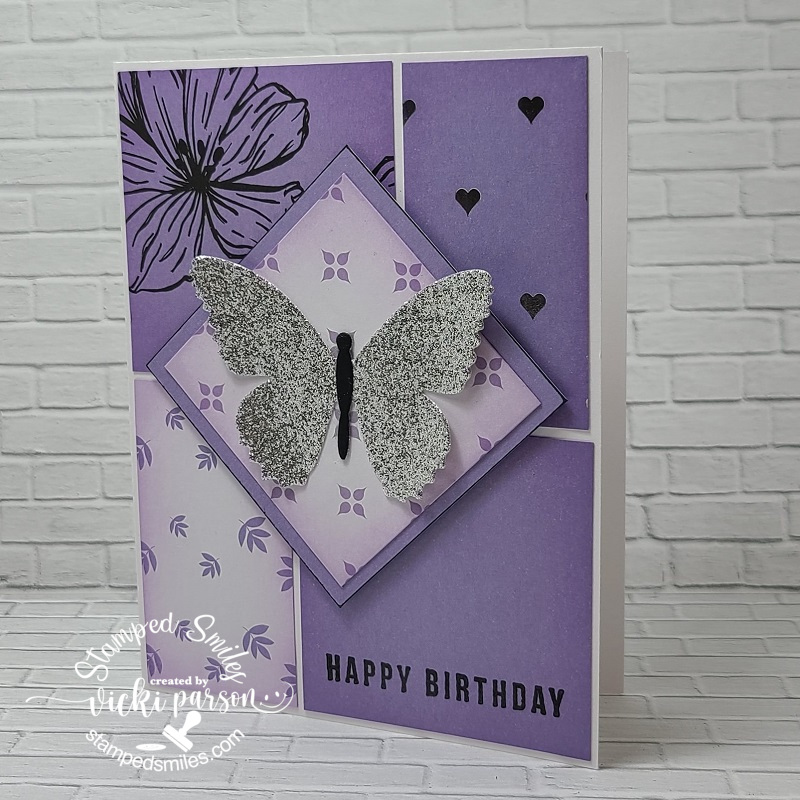
Here’s a set of cards that I’ve been working on from a virtual class that took place sometime in July. It was supposed to be a set of 4 cards created with this gorgeous paper, stamp set and washi tape collection from Teresa Collins (Called “Create a Beautiful Life”). The purple and butterflies really spoke to me, and I got the kit…which I honestly didn’t need, but this is how it’s been! I was supposed to get some already cut butterflies with the kit, which I didn’t…but it was fine, as of course, I had some dies that worked just fine for these cards, and I decided to go off a bit on my own anyway.
Remember the post I had recently done about the washi tape challenge? This is what made me think about this card kit class and that I needed to finish it up! There are a couple ideas in there using some of the pretty washi tape from the TC collection. I think taking all of these virtual classes has taken a tole and burned me out a bit as well because although I’m making the cards (and have a huge stash of them), I usually still have extra product/material to use up too! It sort of compounds the problem and doesn’t really help much. I think it’s just time to consider a heavy freeze on it all! Or at least until some of my stash gets used up anyway! 🙄
Here’s a closer look at each one of the cards in the set. If you’re on my website, just click on each photo below to enlarge it or if you are set up with e-mail, it will probably show in original form. (There’s a caption under each card with the details too.)
The background is made using washi tape.Left over washi tape pieces from previous card to form heart.Inside of heart window with washi tape pieces.layout using pattern paper.More papers used with an ink blended heart window and black splatters.Used more snippets from paper collection.The washi tape cards are the top 3 and the paper snippets/scraps are the bottom 3.
I stamped some of the sentiments that were included with the stamp set from the collection, but there were also strips at the bottom of some of the pattern papers, so I took some of them and used them for some of the other cards.
I really like how they’ve turned out and this will be a nice set of encouragement cards to send along for my donation box this month to “The Butterfly Project” for domestic violence.
Really hope they were inspiring for you as well and that you’re reminded to use your own stash of papers, washi tape and other forgotten materials too!
Hello there friends! I hope that you enjoyed Thanksgiving Day for those of you that celebrate. It’s difficult not being able to celebrate the holiday in the usual way with sitting at the table with family and I really miss them all so much and look forward to being able to hug them tightly in the future. I did have a nice dinner with hubby and we stuffed ourselves, also enjoyed spending time with each other.
After Thanksgiving comes the “Black Friday” shopping which I don’t go out and do in the department stores anyway let alone during this time, but I do enjoy taking advantage of deals online! Did you shop any sales or plan to this weekend?
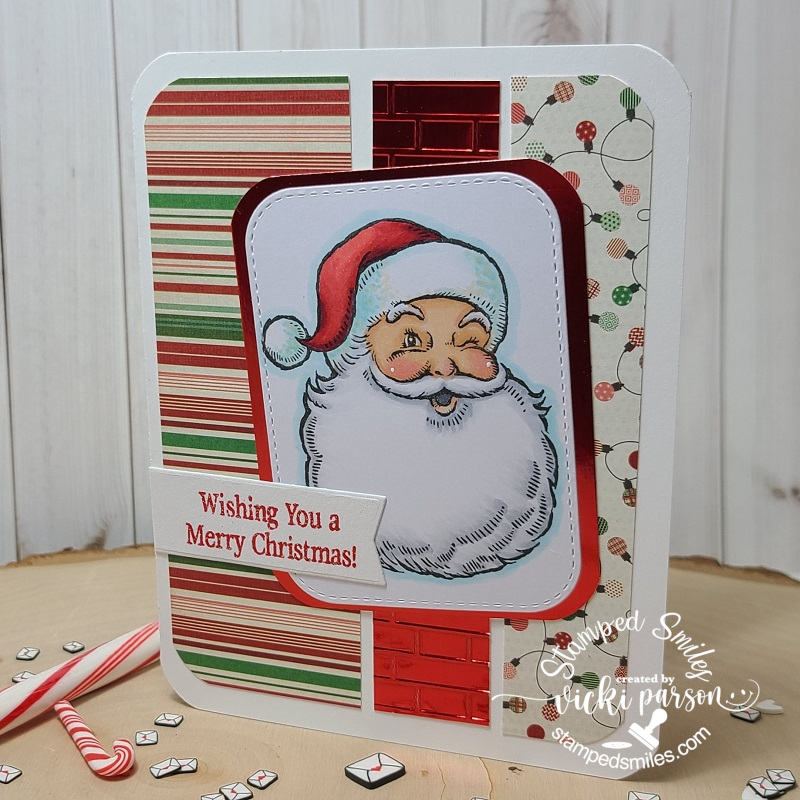
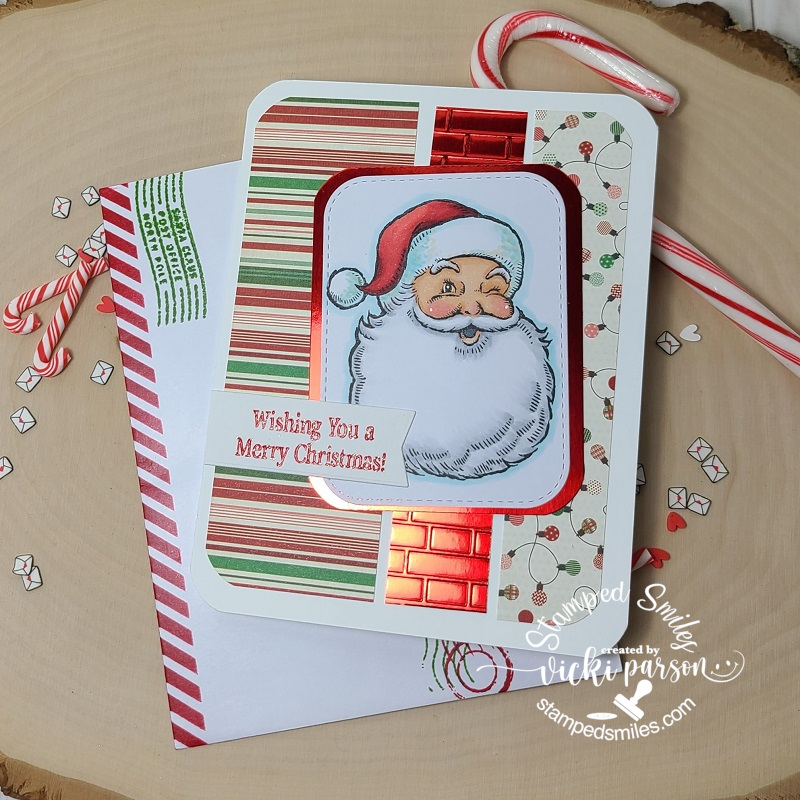
Today I have a Christmas card that I’ve made for a very special individual with Down Syndrome. He has a very weakened immune system and is unable to go out and visit Santa like he usually does (6 times at least each year)! Santa is his friend, and he doesn’t understand why he can’t see him and thinks he’s been “bad” this year. 😥 Although he is an adult in age, he doesn’t understand with his mental handicap and his mother has asked if people would help in sending a Christmas card to him. Of course, THIS is the reason I love making cards! Here’s the card I made for Danny:
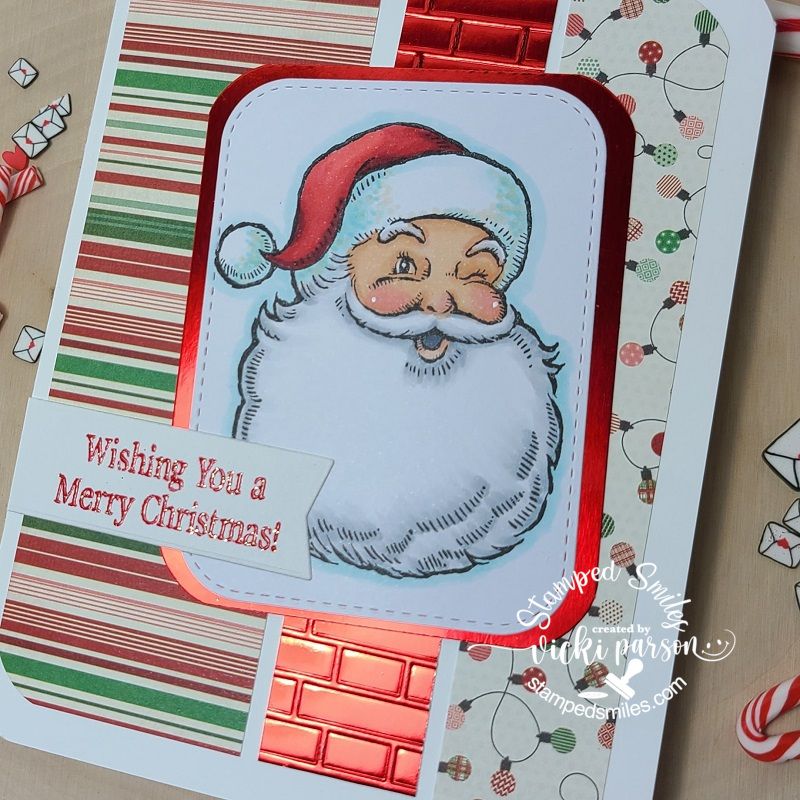
I was trying to go through all of my stamps that had a Santa and the first one that came to my mind was this older Stampin’ Up! stamp set called “Jolly Old Saint Nick” and it’s one of my favorite images for a Santa! I love how he’s got that “wink” going!
I colored him up with Copic markers and cut it out with a stitched round rectangle die and then layered it over a piece of red mirror cardstock that was cut with a rounder punch. For the design of this card, I’ve used a current sketch challenge (see below this post). I found some festive papers in my stash and cut the strips that I rounded the corners on with the punch as well. For the middle strip, I used some more of the red mirror cardstock and ran it through a brick embossing folder before attaching it to the other pieces. I layered them over a white A2 sized side folding card base that I also rounded the corners on as well.
For the sentiment, which also came from the same stamp set, I heat embossed it with Brutus Monroe Christmas Eve EP over a piece of white cardstock and cut it out with a banner die and cut off the edge of the card.
Here’s a closer look at Santa and how I’ve colored him in. I couldn’t resist giving him white highlights on his cheeks with a gel pen. You can see the beautiful mirror effect with that embossed middle strip as well as the pretty sparkle in the sentiment from that EP I mentioned above.
And of course, I wanted to make the outside envelope that it’s getting mailed in just as fun! I took a diagonal striped stencil and inked it up with red ink along the bottom on both sides. I also had a fun “Postal Christmas” stamp set (unknown) and stamped a few of those all over the envelope in red and green inks. I sure hope that he enjoys this card and helps to bring a smile to let him know that Santa KNOWS he’s been good! 😉
I had also told you in a previous post that I was still working on projects from the Whimsy Stamps Virtual Workshop that I participated in during October…well I’ve just been slowly enjoying completing them as I go, and I saved the Christmas projects for last for this reason! LOL! I’m getting closer to finishing up all of those projects! (Only 3-4 left to do I think!) For now…here’s some Christmas projects from the retreat:
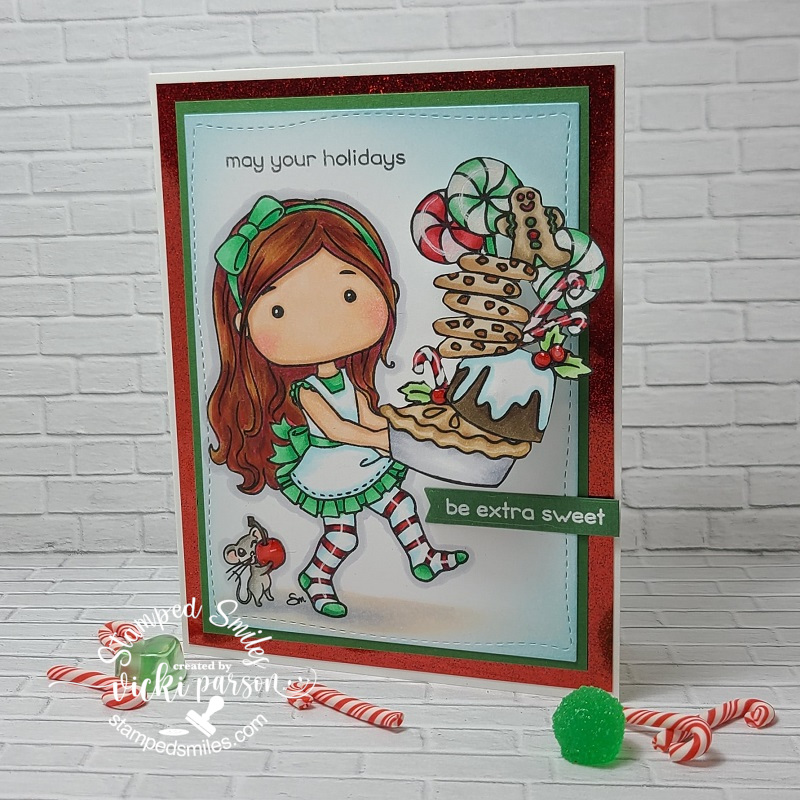
This was for kit 8. What’s fun about this card is that there is an action wobbler behind the pile of treats she’s holding! I had fun coloring her up and I couldn’t stop playing with the wobbler! LOL! PS: This is a good reminder for the {Cupcake Inspirations} challenge too!😋😉
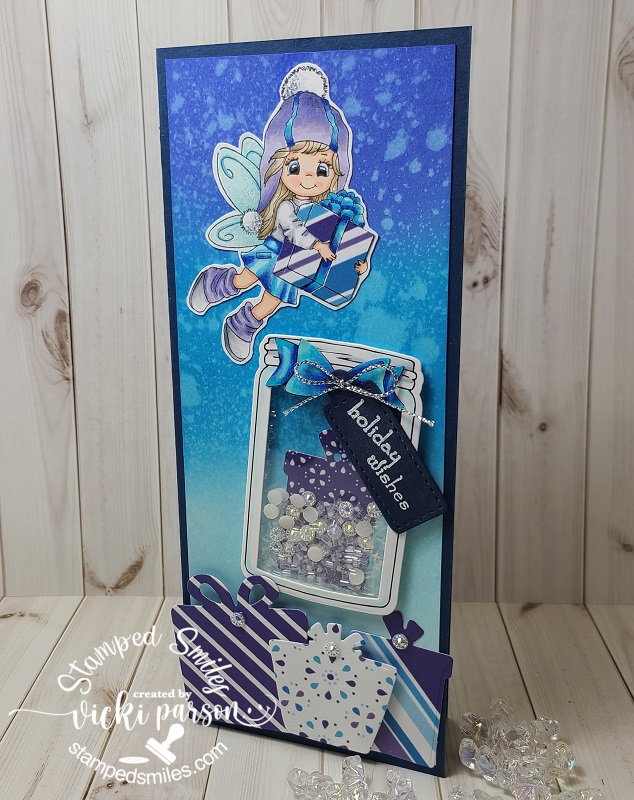
This was for kit 13. I slightly changed up the card, but not much. I actually made a shaker with the jar and put some acetate behind it and then I also added a tag and silver ribbon at the top of the jar. I paper pieced the fairy’s gift box instead of coloring the strips too. I love the colors in this one!
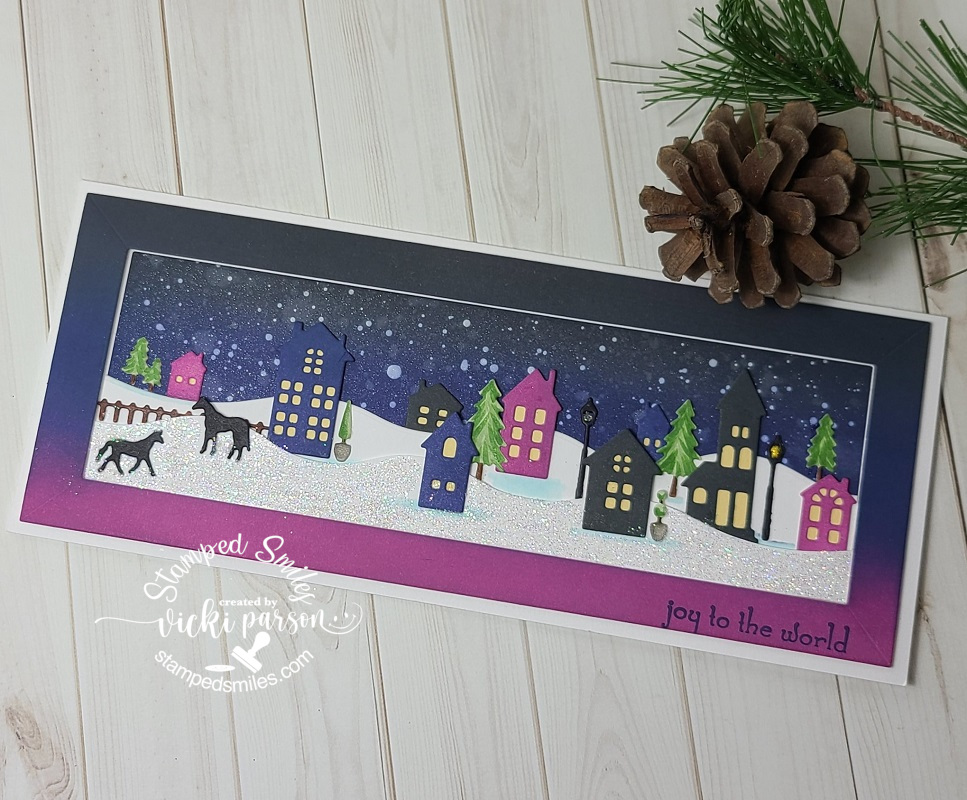
This slimline card was for kit 17. All of the dies were actually really fun to color and arrange to create a scene with. I didn’t change things up too much with this one other than covering the bottom snow with glitter and then adding a sentiment onto the bottom of the frame. I splattered the sky with white paint instead of using a white gel pen.
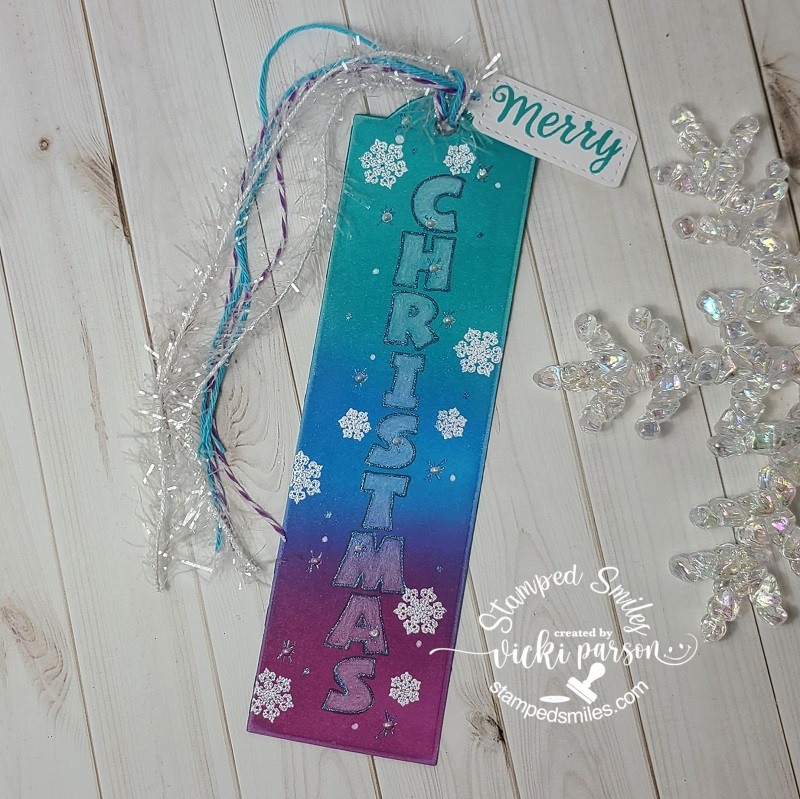
And this fun bookmark was for kit 18. The ink blended colors were similar to the above card, but I colored in the letters with a white pencil and then used a gel pen to trace around the letters. I white heat embossed some snowflakes and added doodles with gel pens as well as pearl drops. I also added some tinsel ribbon to go along with the twine given. I might use this as a tag…not sure yet.
That was a rather long post! I’m a bit behind and trying to catch up with my projects, posting right now. I hope that you’ve enjoyed my projects today and have been inspired to get some festive projects going! I’ll be back very soon with another project and challenge reminder soon!
Hello friends! I hope that your week is finding you in a good place right now. Sometimes I feel a bit overwhelmed with things that are going on in the world, but I am so thankful that I have the crafty time to keep my mind creative and music to help alongside to keep on keeping on. This is one way that I know I can express myself in a postitive way and hopefully inspire someone too.
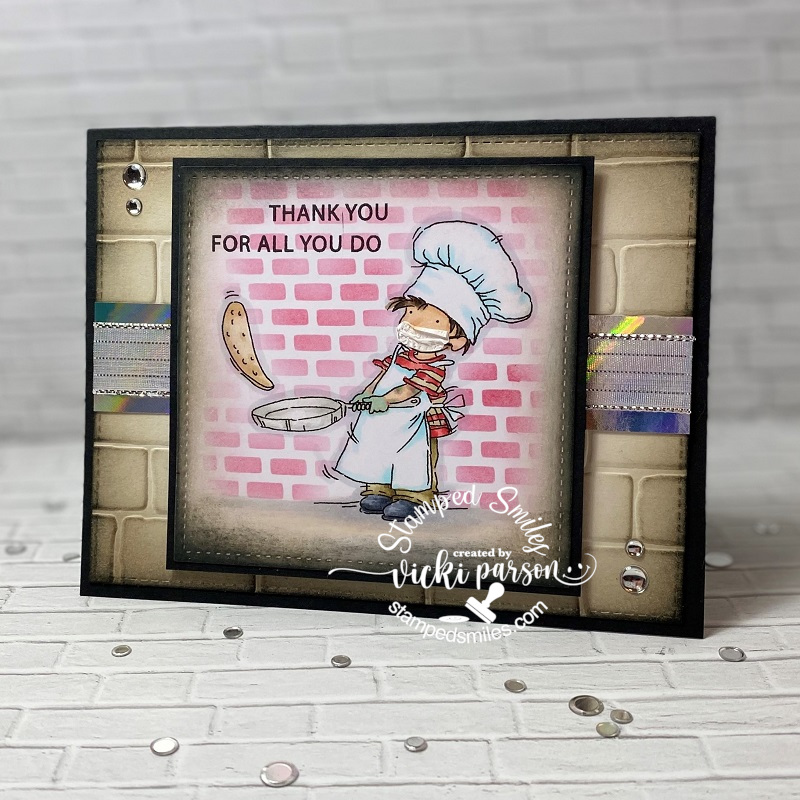
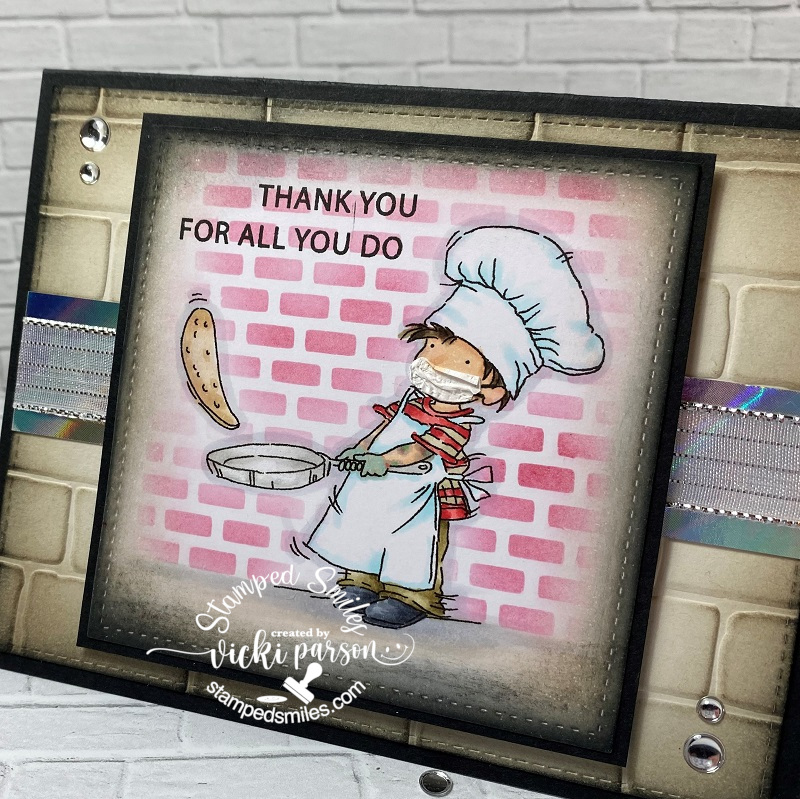
In my previous post, I had made several healthcare worker cards and I had made one for my son who is a mail carrier, but I was having a hard time finding an image for a food service worker. (check out that post HERE.) I asked if anyone knew of any images. Someone had reached out to me and shared a few images that were just too adorable and I couldn’t pass up on nabbing one for my other essential worker son:
Isn’t he just as cute as can be?! I’ve used the LOTV Pancake Day digi stamp for my card. It actually reminds me of my son making crepes for a restaurant that he used to work for. I was treated with a delicious pumpkin pecan cream crepe by him a few years back on my birthday! It was yummy!
As you can see, I’ve altered the image a bit to fit with the current covid-19 restrictions by giving him a make-shift face mask as well as coloring some plastic-style gloves on his hands. To make it even more personal, I decided to give him a couple of colored tattoos on his arms as my son has tattoos on his arms and dark brown hair.😁
For the card, I’ve used some Sidewalk cardstock from Brutus Monroe and used a Stampin’ Up! brick embossing folder over it and then sponged some distress ink around the edges. It was cut out with a stitched rectangle die. I added a strip of Prism paper and some silver metallic ribbon over it before attaching it to a top folding A2 sized black card base. I finished it off with some silver Glossy Dots from Pink and Main.
I colored the image with Copic markers and as mentioned above added the special coloring for the tattos and gloves for his hands. I’ve also covered the pan with a glitter brush pen.
To make the face mask, I took a Copic liner to draw in the lines for the cord around his ear and then I took a tiny piece of thin tissue style paper that was used between the packages of acetate sheets you buy. I wanted it because it was thin and I was able to create tiny folds and wrinkles in it…I just glued it over the area on his face and manipulated it before it completely dried.
I stamped the sentiment from a Lawn Fawn stamp set with black ink next to the image and then I used a stencil that was cut out by my mom, thanks mom, on her Cricut machine and inked it up with some red ink using a foam brush tool. I wasn’t very accurate with not covering the image, but thankfully the sand eraser helped out! I finished coloring up the “ground” area and sponged around the stitched square cut out of the image. I layered it onto another piece of black cardstock and popped it up over the card with craft foam.
I think this card turned out so cute and it’s on the way to him now! I think he’ll get a kick out of it and he’ll probably notice the extra personalized details I’ve added to it too!😂
I hope you have enjoyed my special essential worker card today and brought you a smile! Thank you so kindly for stopping in and I’ll see you again soon!✌
Hello friends! I haven’t really mentioned too much about what’s going on in the world right now, and I know it has tremendously affected many people around me. In the crafting community I sense changes as well in different ways. I do hope that crafting can help either take your mind off the situation or at least help with making you ‘feel’ that creating from the heart, as we stay at home, is a fantastic way to contribute and help bring about smiles in many ways.
I would like to ask you if you want to respond about it:Has crafting helped you during this time or has it made it difficult to concentrate? I have found that taking TONS of classes have actually been my savior right now especially as I was taking that break I had. (Helps me to concentrate on something like a technique.) I found MANY having classes (free or having group parties going on with crafters teaching and sharing). Due to this pandemic, I know many people/companies in the crafting community have revved up their classes and challenges as well… along with giving out free digital images!
This brings us to my post for today….
I have made several stacks of “thank you” cards geared towards our healthcare workers and it has been very rewarding for me to be able to color in all these images in my post today as a salute and honor to those that have been “on the front line” dealing day to day since the beginning of this pandemic. My heart goes out to all in this uncertain time and although there are many horrible stories related to this, there are also some good ones too. Let’s rise up.
Taylored Expressions put on a card drive to send cards to the healthcare workers and it ended today, so these cards have already been sent.
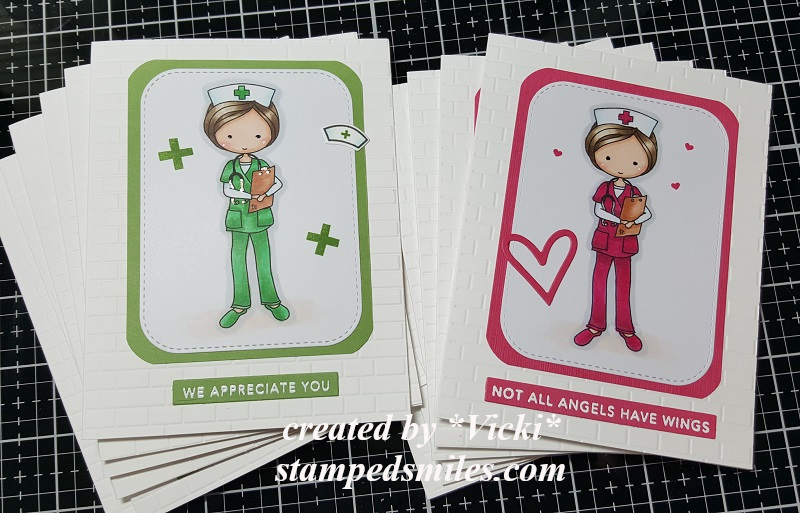
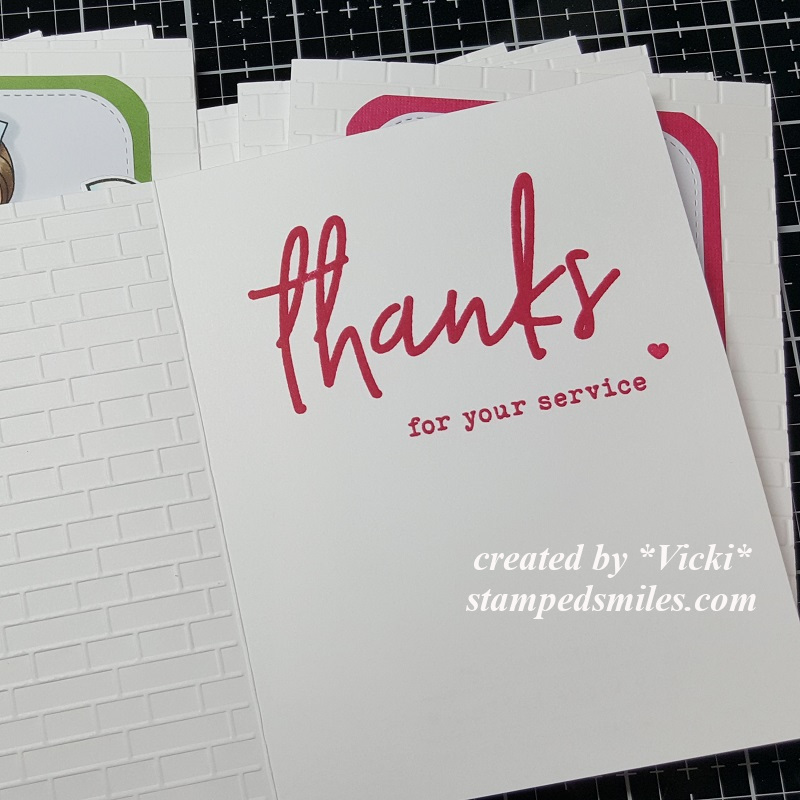
For this particular stack of cards, I’ve made 6 of the pink and 6 of the green using this adorable MOKA Melissa Nurse free download from Taylored Expressions. I’ve also used the Subway Tiles embossing folder for the background as well as white heat embossed the sentiments from the Life Saver Mini Strips stamp set and die cut them out with the clever Mini Strips Die. I’ve used a heart die that came with an order I had and then I took some tiny images from other sets for the accents.
I stamped a message on the inside of all of the cards from TE Big Thanks stamp set too. (This set came for free with an order I placed.)
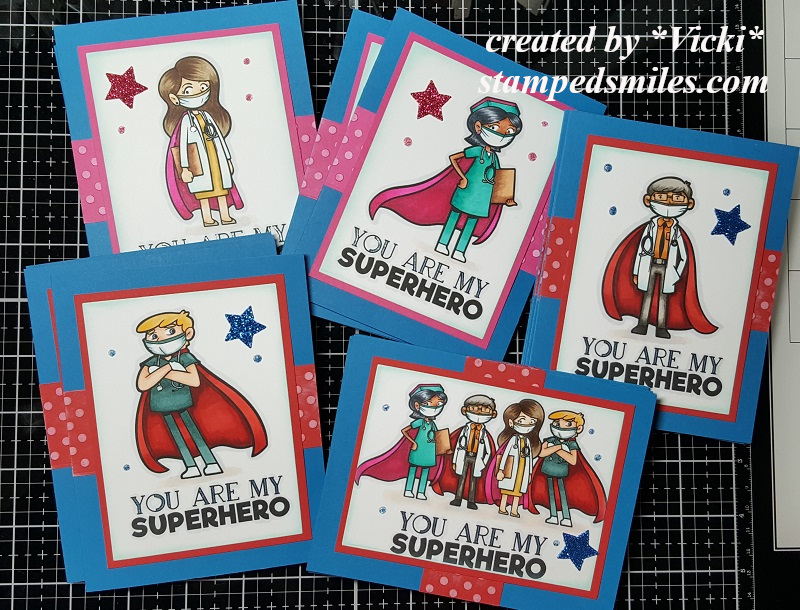
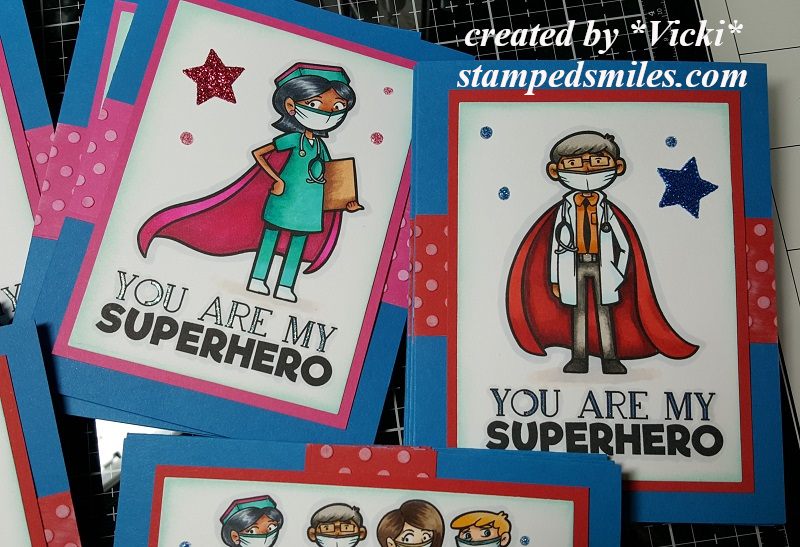
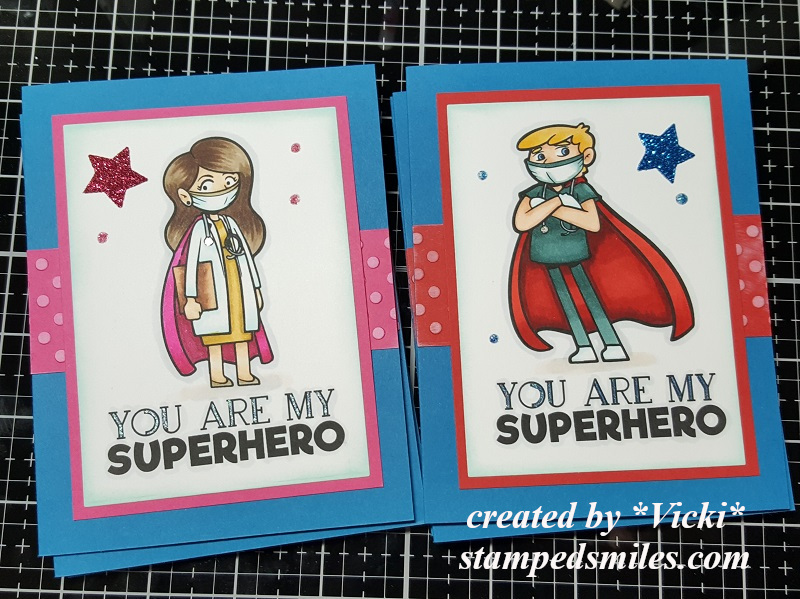
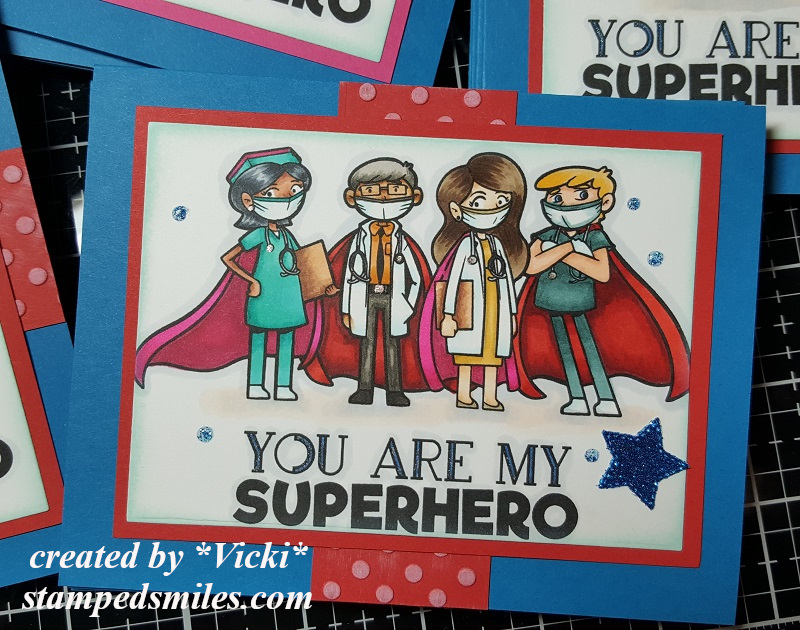
Here’s another set of 20 cards I made for healthcare workers using the Freebie Healthcare Super Hero Coloring Pages. (To print these out to fit over an A2 sized card base, I used my printer settings to print out 4 pages on one sheet.)
I layered them over some pink and red cardstock and then the base of the card is some A2 sized side folding blue cardstock. The left over pieces from the pink and red cardstock strips were ran through and embossing folder and white white Ink was ran over it.
Here’s a closer look at the individual sets. I used a star die to cut out some stars with Glitter paper. I also took some blue and pink glitter glue to create extra “dots” around them. This was good practice for me to experiment with different skin tones too.
I’ve used Copic markers to color all of these in with and then I took some gel pens to color in parts of the image as well as the outline in the sentiment too.
I thought this was a fun one with all of them together and I like that they’re all wearing capes and masks too. I had these finished up at the end of April, but just now getting all of these out where I wanted them to go. I’m sending some masks along with the cards to our local hospitals.
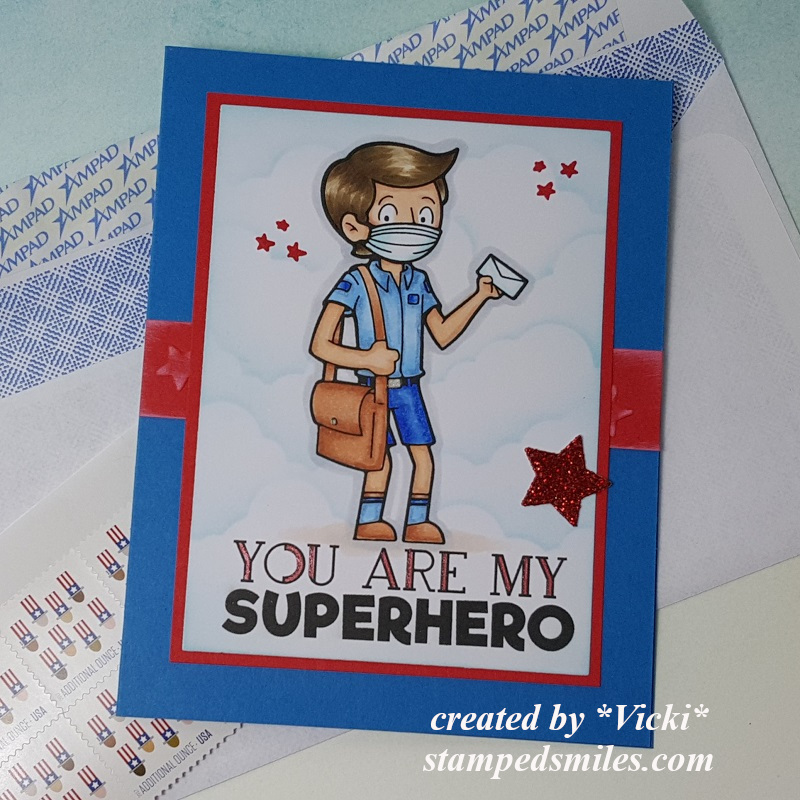
One last and important card I made was specifically for my son who’s a postal carrier. Of course I tried coloring it in with the same hair color he has too. LOL! After I made the batch of cards above, they came out with more superhero freebie downloads, so I grabbed the Mail Carrier Superhero Coloring Pages to make one for him too. And this one is already on it’s way as well. For the background, I used the Scene stencil for the clouds with blue distress ink.
I finished this one similar to the ones above.
The ONLY superhero I’m missing is one for my other son who’s a food service worker and I haven’t seen any of those images out yet. Does anyone know where to find one? I would love to make a “thank you” card for him as well. I may just come up with my own version with what I already have…but have to think about how first. LOL!
This particular song came to my mind and was something that I listened to while coloring….
It was somewhat catchy and upbeat I thought. I always like to try and think of the positive ways that cards I make give a positive impact or inspiration somehow. Could be wishful thinking, but it’s my hope anyway.
Thank you so much for taking the time to stop by today to read my post! I hope that you’ve been inspired in some way! Have a beautiful weekend my friends!
First, I want to thank you so much for your support and kind comments for the Purple Day Epilepsy Blog Hop! It’s a fantastic cause to be apart of and I was happy to help my friend bring awareness for it!💜
I had a total of 12 entries left from the comments after it closed and drawing from those names….
The winner of my blog candy chosen by random.org is……..
#10 Karen Ladd
Yay!!!🎉✨🎈 Congratulations on your win!! Please be sure to contact me with your snail mail address so that I get these goodies sent out to you asap!
Thank you again for your support in raising awareness about epilepsy!💜
Hello my friends! Today starts the annual “Purple Day” blog hop and I have joined with my friend Fiki to help bring awareness about epilepsy.
Please take a moment and read important information about this special day:
Purple Dayis a global grassroots event formed with the intention to increase worldwide awareness of epilepsy, and to dispel common myths and fears of this neurological disorder. Further intentions of this movement are to reduce the social stigmas commonly endured by many individuals afflicted with the condition; to provide assurance and advocacy to those living with epilepsy that they are not alone in their ongoing endurance; and to initiate individuals living with the condition to take action in their communities to achieve these aims.
The day occurs annually on March 26. To read more about epilepsy or how you can help in the U.S., check out the Epilepsy Foundation’s website.
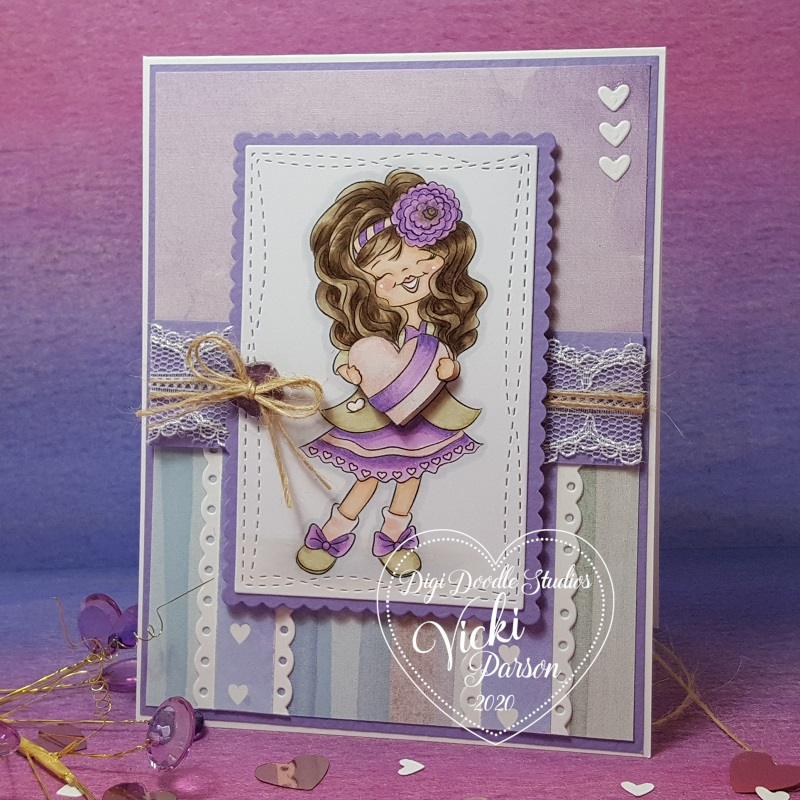
My card inspiration:
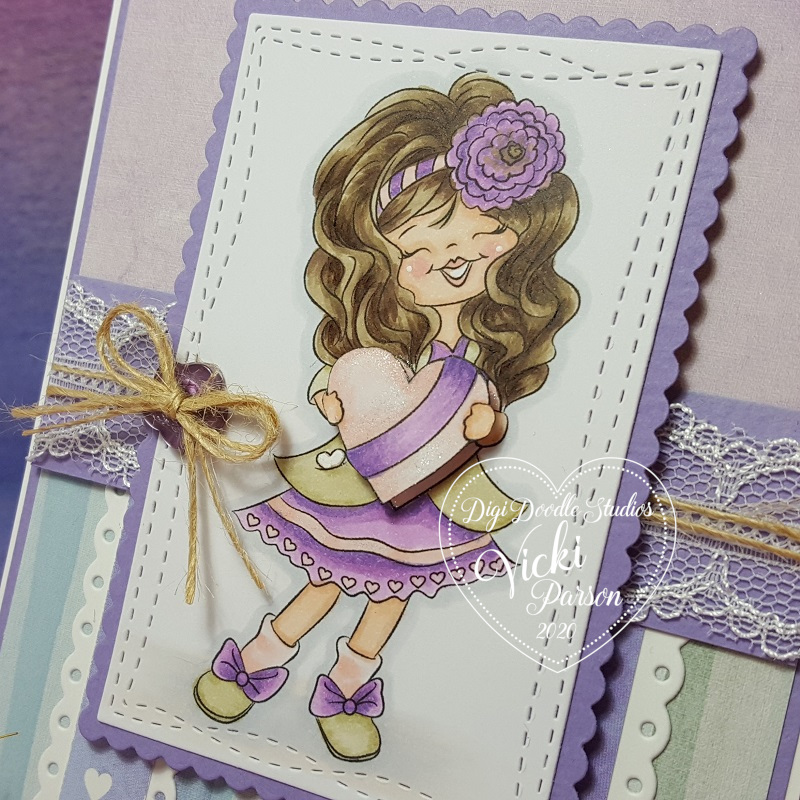
Isn’t she just the sweetest little girl with her big heart?! So delighted, of course, to have been provided this darling image from Digi Doodle Studios which is one of the sponsors for our blog hop today! This image is called Sweet Carlina and I’ve got her colored up in purples and pinks. She has a little white heart tucked in her jacket pocket to go with the white hearts on my design.
I found some pretty purplish decorative papers from a recent card kit I had and then I just followed along with a sketch to complete my design. (See challenges below.) After coloring her out, I’ve cut her out with a MFT Wonky Stitch rectangle die and then layered with a purple cardstock layer cut out with a MFT Scallop Stitch rectangle die. I popped it up with craft foam over strips of lace, twine and accents I’ve created with the papers. I’ve used a LF scallop border die to cut accents to go with my heart paper strips. Extra hearts left over were used in the top corner. I also added a purple flower button with twine to finish it off.
Here’s a closer view of the coloring I’ve done on her with my Copic markers. I’ve used white gel pen to dot her checks and color the heart in her pocket. You can barely see the shimmer that I’ve done over the heart she’s holding with a glitter brush pen.
You’ll also notice that I’ve printed out this image twice, fussy cut out just the portion of the heart she’s holding along with her hands and popped it out over the colored image to give it some depth.
I hope you’ve enjoyed my inspiration for the blog hop! I sure enjoyed creating it and helping to give support to my friend along with creating awareness for epilepsy!
Challenges:
Time Out – Purple (helping to support epilepsy awareness with us!)