Hello friends! Just poppin’ in here today as promised to reveal who the winner is of the Taylored Expressions Pretty Postage stamp set and the package of 2025 tear-off calendars! (Check out THIS POST to see what the give away was.)
I know the names can be picked in a variety of ways, but I thought this would be more fun and fair to share with you how a name was picked for this drawing in my video below:
WOOT WOOT!!!🎉
Congratulations MARGREET!!
So excited that you’ve won and I look forward to sending your prize! Please contact me at vparz70@gmail.com with your snail mail so I can get a package sent out!
Thanks again for each and every one of you for your kindness and support! I already have another give away planned out for next month, so I do hope you’ll be back to try again at another fun give away soon!
Hello friends! I hope you’re having a great month so far and being able to enjoy the nice Spring weather! It’s been really nice over my way, but I’m seeing we have a bit of cooler temps coming too. Hopefully not too chilly!
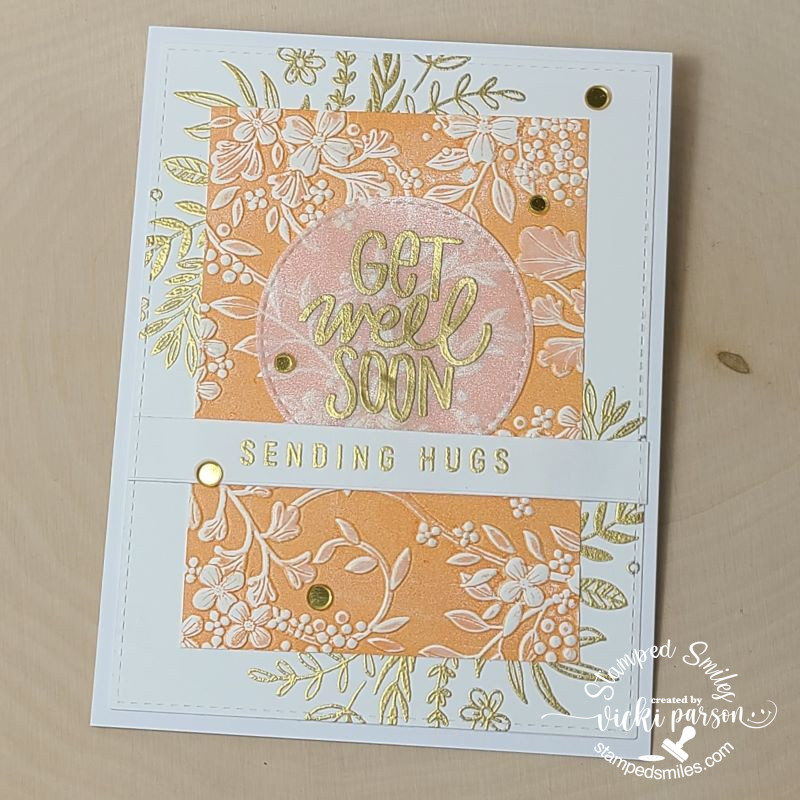
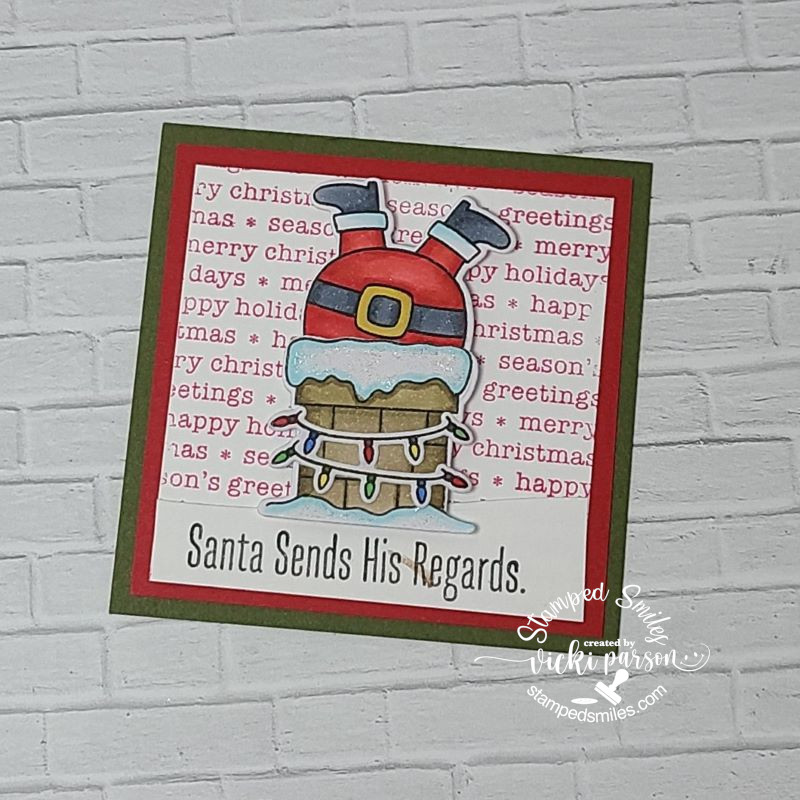
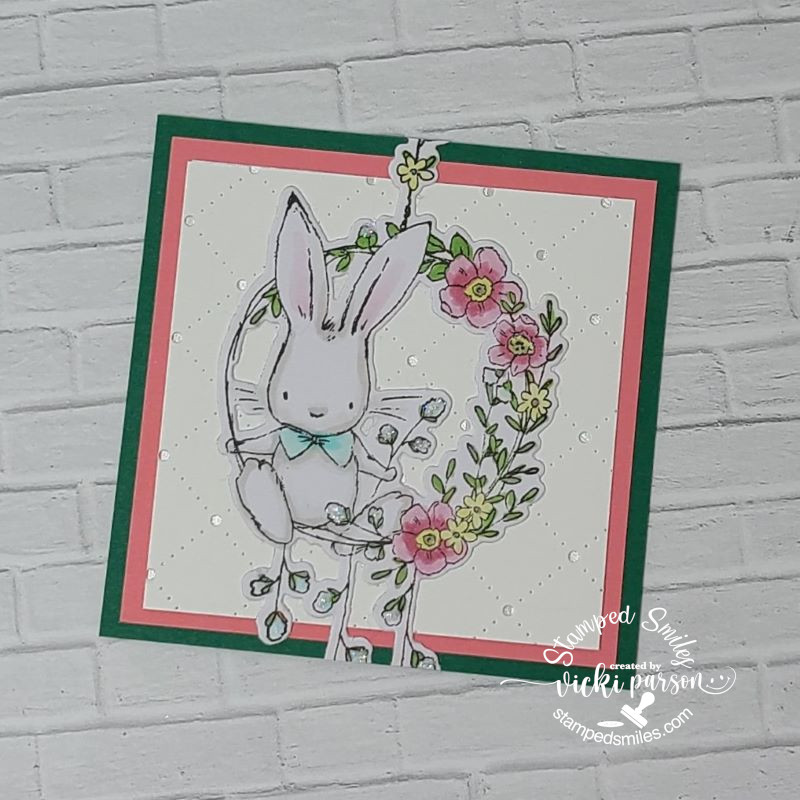
Today starts a new challenge over at the Sparkles Monthly Challenge Blog and this time we would like for you to “Emboss it”! I hope you will hop on over to see the inspiration from the team and consider joining in the fun with us this month!
Here’s the DT creation that I’ve made:
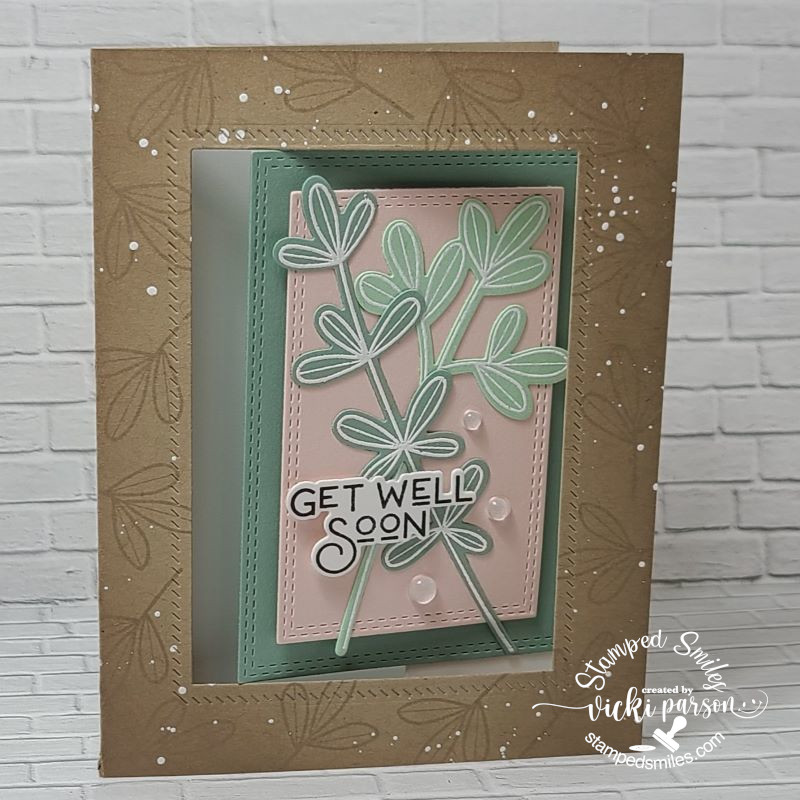
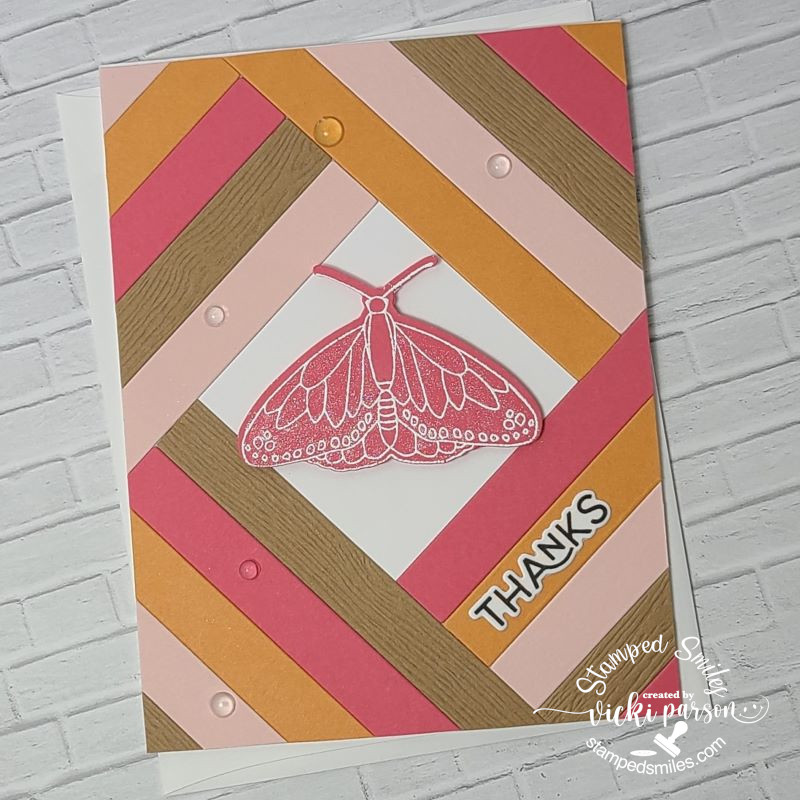
I love to do embossing on my cards, and I know it’s a favorite for many! I’ve decided to do a “Letterpress Embossing” technique and inked up an embossing folder to achieve the effect on my orange layer panel. The raised areas stay white on the white cardstock.
For the two corners, I’ve taken a Simon Says Stamp Garden Greetings stamp set and gold heat embossed the floral spray image. I’ve also used the same gold embossing for the “sending hugs” sentiment strip as well as the “Get Well Soon” sentiment over the shimmer vellum which was cut from a stitched circle die. I added some gold sequins over it.
I wanted to keep it somewhat flat for mailing purposes, but I think some of it popped up would be pretty too. I was also very happy to pull out a past card kit and make another card with it.
I would love to see your embossed creations in the gallery this month, so I’ll hope you’ll play along! Check out the challenge here – Sparkles Monthly
***ARE YOU A WINNER?!!***
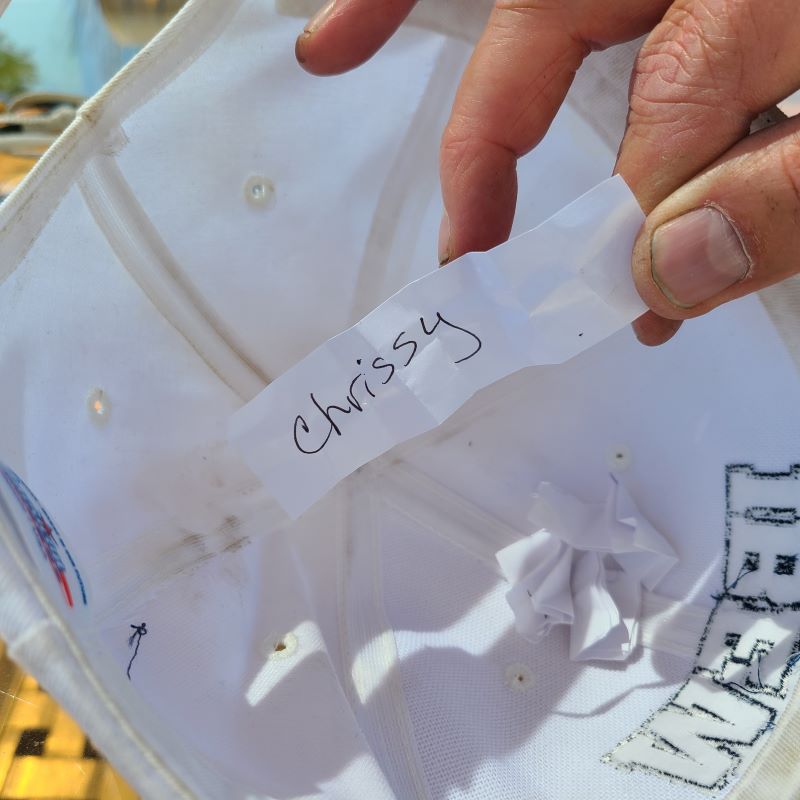
I have taken all of the comments from my last post, added all of the names that mentioned they would be interested in the Beautiful Butterflies dies and foil package and wrote those names on pieces of scrap paper. I folded and crumpled them up and had my husband pick out a name. He threw them all into the hat he was wearing and pulled one out!
HERE IS THE NAME THAT HE PICKED OUT…………….
Yay! Congratulations Chrissy!
Please contact me and send me your full name and snail mail address so that I can pop your package in the mail to you! I hope you enjoy it! (I haven’t even used mine yet!) Sorry if your name didn’t get pulled as I only had one, but I know I have several “double” items that I’ve placed in a bin and will be pulling them out at some point to give away! So, stay tuned!
Thanks so much for dropping in and taking the time to say hello! I appreciate you!
Happy April friends! We have finished March already and onto Easter very quickly approaching! I hope you’re enjoying all things Spring coming up your way! We’ve had several storms and we’re in the tornado season as well, so I hope everyone is staying safe out there whatever the weather. I do have some things that I had previously finished and wanted to share:
First, I wanted to share about the Virtual Stamp Joy Event by Taylored Expressions that I participated in a few weeks ago. I always have so much fun and enjoy the motivation that it seems to generate! I’m sharing them in the gallery below, so if you’re on my website post, then just click on each photo to enlarge it.
The first four photos were from a class using the same floral stamp set and the others are from the next day of make-n-take projects. Please let me know if you have any questions about any of them!
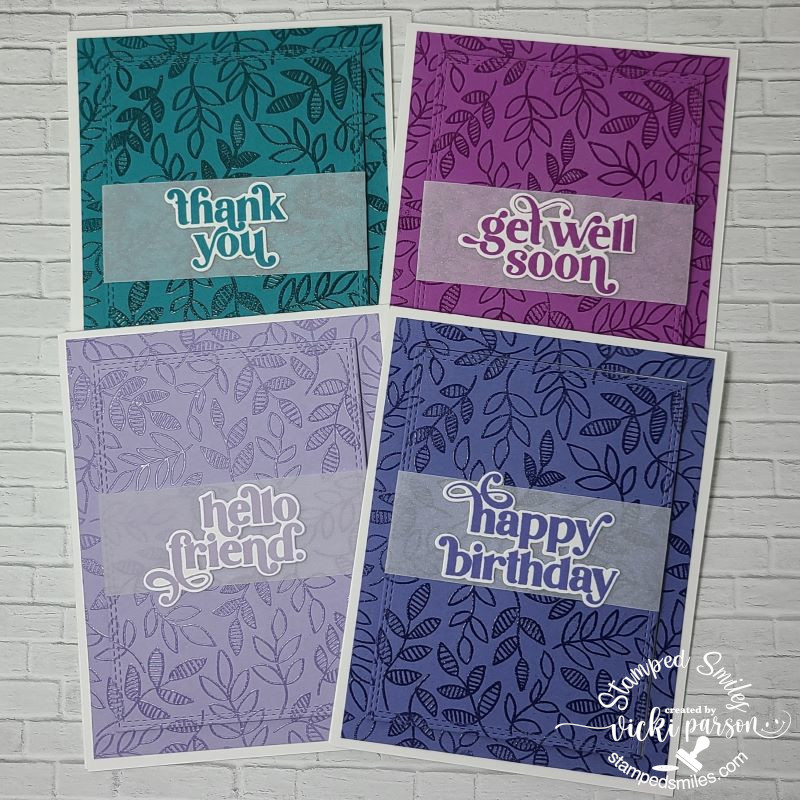
The last set of four cards were a “mass production” using a background stamp in different colored cardstock panels and clear heat embossing over them. The class sample had “hello” sentiment on each one, but I changed up the sentiments and have placed them in a card box to give them out with envelopes as a gift for someone.
Hope you’ve enjoyed the inspiration as much as I enjoyed putting them all together!
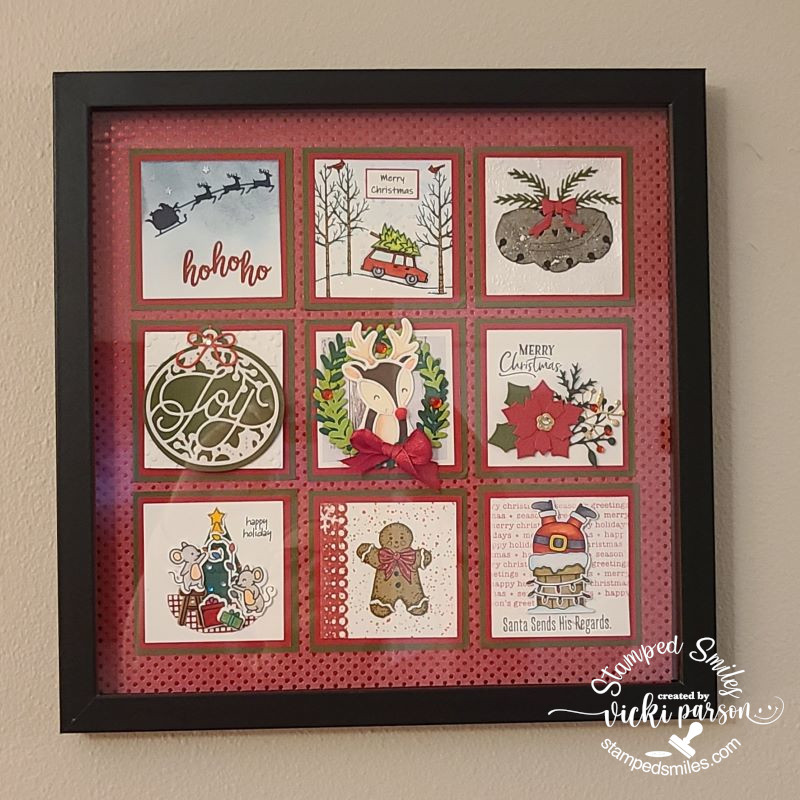
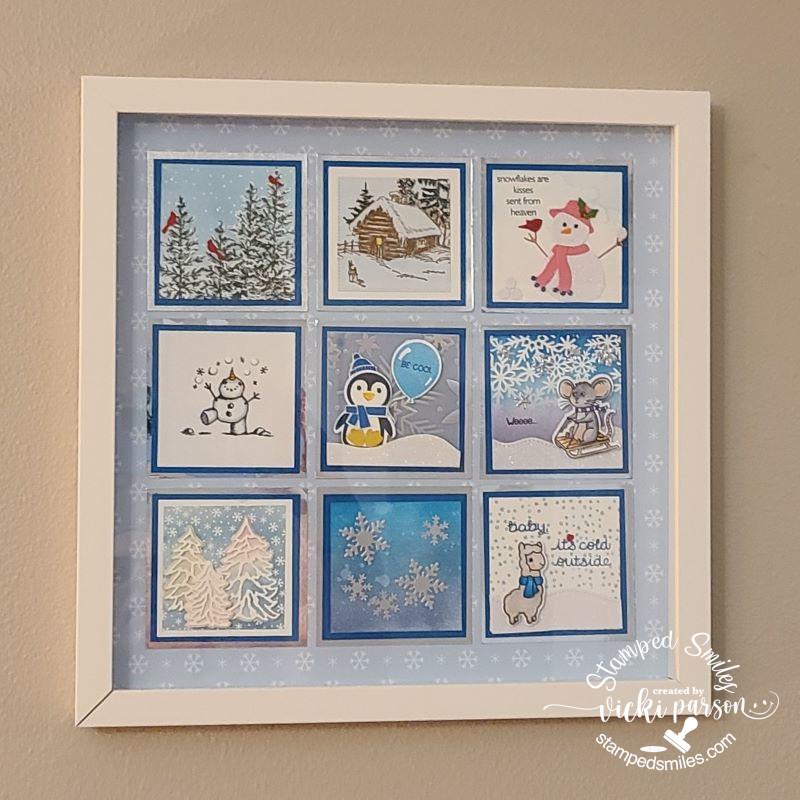
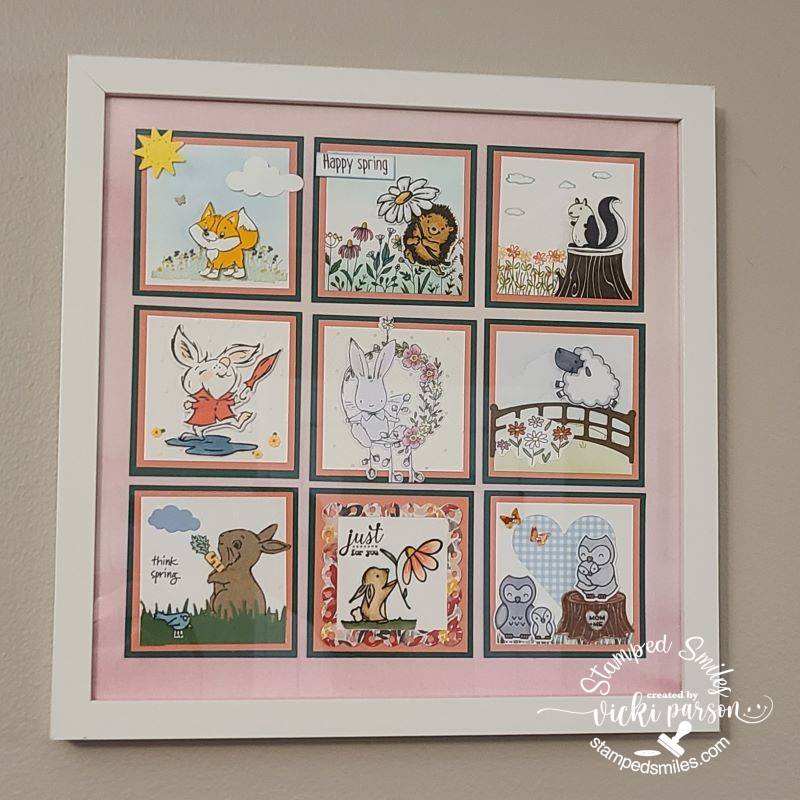
From the end of last year up until this last month, I didn’t have much time with the Holidays and everything going on, but as you may have seen in previous posts, I participate in a “square sampler swap” and when everyone sends out their squares, we then complete a home décor piece with all of the squares, so I thought I’d share mine finally completed:
CLICK PHOTOS BELOW TO ENLARGE
This was for the Christmas Sampler SWAP and you can see that I’ve used a black shadow box frame for my sampler and placed some red with red metallic dotted paper behind it. The square on the right is the one that I made. (I’ve used My Favorite Things products for my square.)
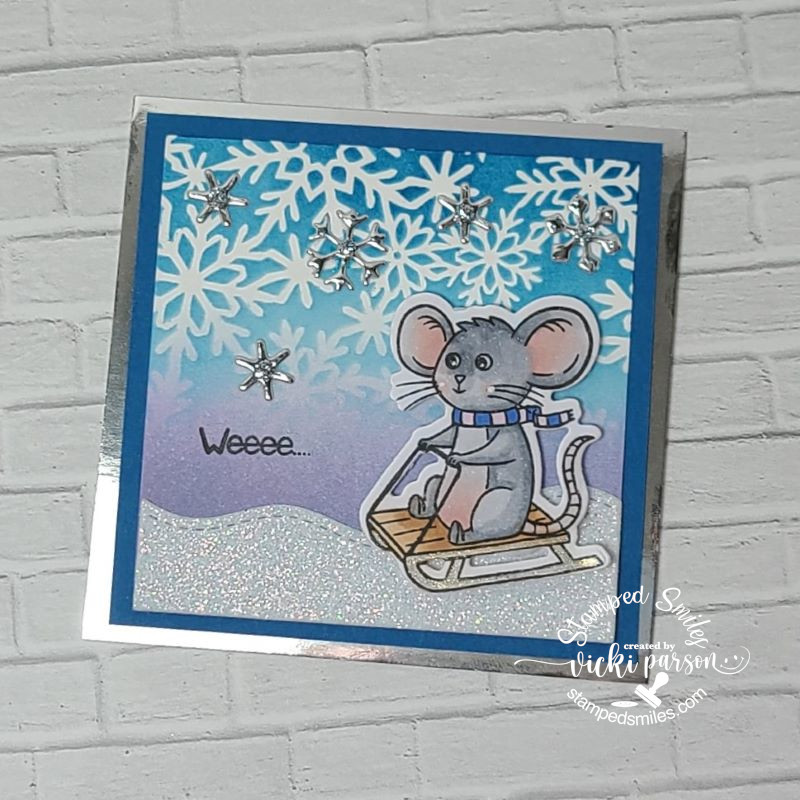
This was for the Winter Sampler SWAP and I went with a white shadow box for this one. I’ve placed some soft blue snowflake papers for behind my sampler as I thought it was soft enough to not look too busy. The square on the right is the one that I made. (I’ve used Inky Stamper products for my square.)
And recently we finished up our Spring Animals Sampler SWAP that I used another white shadow box for the sampler. I’ve added a piece of pink colored “Watercolor Wishes” paper from Lawn Fawn behind it. It looks a little off in the photo, but it looks better IRL. The square on the right is the one that I made. (I used Taylored Expressions products for my square.)
Not sure if we’re doing any more or not, but I had so much fun making the squares to swap with friends!
Lastly, I have a fun little thing to give to whoever is interested in these Taylored Expressions dies + foil-it panels package. (It’s not sold in stores anywhere as it was a free gift with purchase) I have an extra and so I thought I’d give it away to someone! Just leave me a comment below if you’re interested and I’ll pick someone from the comments.
Leave a comment below if you’re interested!
That’s all I have for today! Thanks so much for stopping in! I’ll be seeing you soon!
Hello friends! It has been while since my last posting, but was having some back issues and hobbling around a bit which is never a fun thing to deal with, but I’m getting a bit better day by day. Hoping to get back to doing some crafting soon! I’m going to be working on an AJ page for tomorrow’s post…so stay tuned!
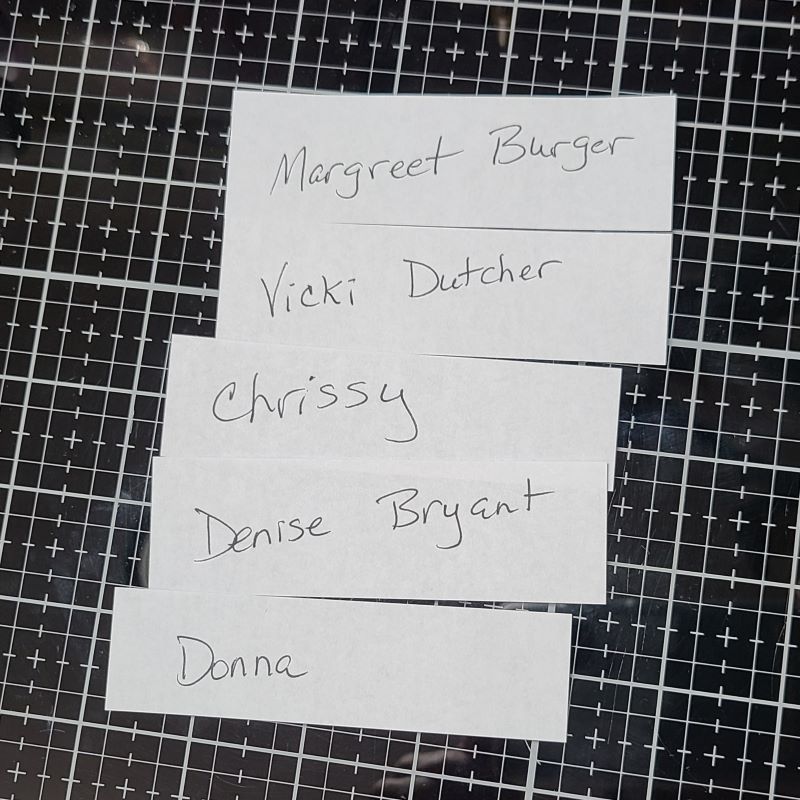
I realized that my giveaway had ended and I needed to pull some winners of the Taylored Expressions background stamps for 4 people!😀 So the way I drew out the names, I did sort of “old school” by printing out the names of everyone according to which stamp or stamps that were indicated via comments from the GIVEAWAY POST. So if you were only interested in one of the stamps, your name only went in the draw for just that particular stamp. If you indicated that you were interested in all of them, then your name went in for each one. I cut the names in strips, wadded them up and had my husband hand-pick out a name strip for each stamp. If there was a duplicated name, I would’ve had him draw another, but there was not any duplicates. Here are the winners for each stamp……..
WOOO-HOOO!!🥳🎈 CONGRATULATIONS TO ALL OF THE FOUR WINNERS!!!
If you are one of the winners above, please be sure to CONTACT ME via the form and share your snail mail address with me so that I can promptly mail out your stamp package to you! (I will also try contacting you myself to let you know you were a winner as well.) I would appreciate you contacting me as soon as you can so I can get your stamp to you. If I don’t hear from you within 2-3 weeks, then I will try to draw another winner to claim it.
I’m very sorry if you were not a winner THIS time, (blame my husband!😁) but you never know when I’ll have “extra duplicates” in my craft room that I’d like to share with a fellow friend! Thank you for your kind support! Happy crafting!🤗
Hello friends! It’s been a minute or two since my last posting as I had been sick and then totally lost my “MOJO” during that point! So I was trying to get it going again with a few Halloween projects! I have been playing with some new Taylored Expressions goodies and I thought it would be fun to give away some TE stuff as well!😀 Stay tuned to the end of this post!
click on the photos below to enlarge them if you’re on my website:
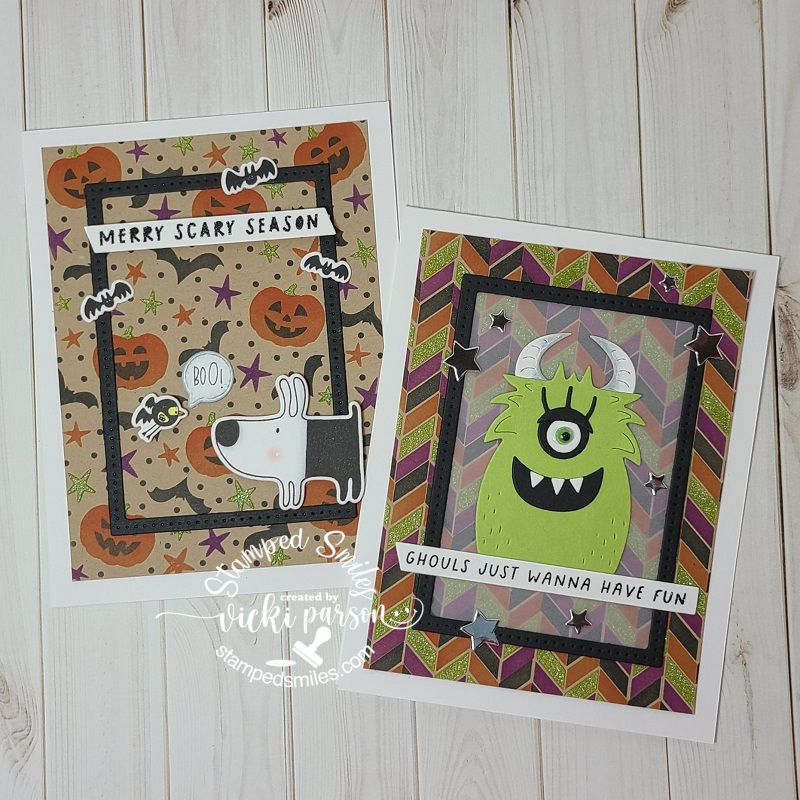
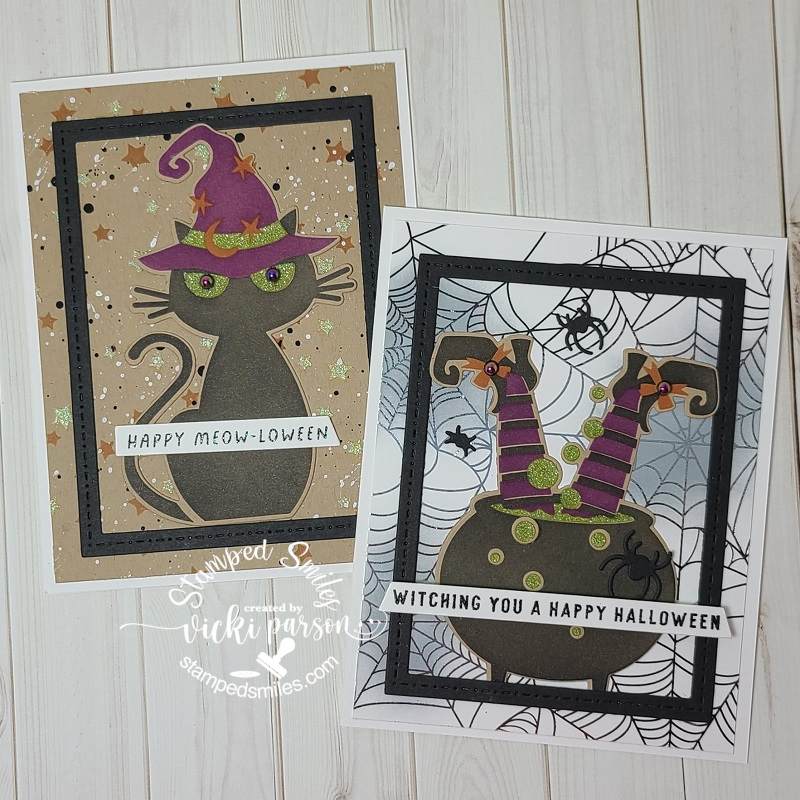
Now how cute are all of these critters, ghouls and creeps?! As you may remember from my last post, I had been having so much fun creating with the Taylored Expressions Create-in-Quads stencils, so I had my play with the Halloween Create-in-Quads with the makes above! I stenciled some black, candy corn, plum punch and lime zest colors, plus I went over the lime zest with some glow-in-the-dark glitter paste. The stencil quads make two A2 sized backgrounds as well as the cat and witch cauldron too! There is also coordinating dies to cut out the cat and witch that I used to cut out for the second set of cards. For all of the cards, I’ve used the TE Frame in Frame 3 dies (free from an order a while back) that was cut with some black cardstock. I’ve also used the TE Simple Strips-Halloween stamped and heat embossed with some black glitter EP and cut out with the TE Asymmetrical Simple Strips Die for each card.
The set of cards on the left were created with the stenciled backgrounds and then with the black frames, I’ve added a character from a “free with purchase” Gus & Gertie Halloween stamp set. The bird saying “boo” is in a bat costume. 😅 I popped up the sentiment strip, bird and dog with foam tape. I die cut the “boo” sentiment with a speech bubble die from my stash. The ghoul card was made with the awesome TE Monster Squad die set. I placed a piece of vellum behind the black frame, so the ghoul stood out a bit more, die cut my pieces as I wanted and attached it right above the sentiment strip. I added a green googly eye as well as a few die cut stars from silver metallic cardstock.
The set of cards on the right was put together with a couple of different unique backgrounds. On the black cat card, I used the TE Superstar Rotating Stencil and stenciled once with candy corn and only rotated once using the glow-in-the-dark glitter paste again. I finished it by splattering black and white paint over it. Topped it off with the black frame, the kitty and sentiment strip. I also used some Cosmic Drip Drops for kitty’s eyes. (These were also used on the bows of the witch’s shoes too!) For the witch background, I silver foiled one of the TE Foil It-Spiderweb panels and then ink blended some grey ink over a couple of the webs. I then added the black frame, the witch and the sentiment strip. Lastly, I added a couple of spiders cut out with the TE Little Bits-Spiders die set.
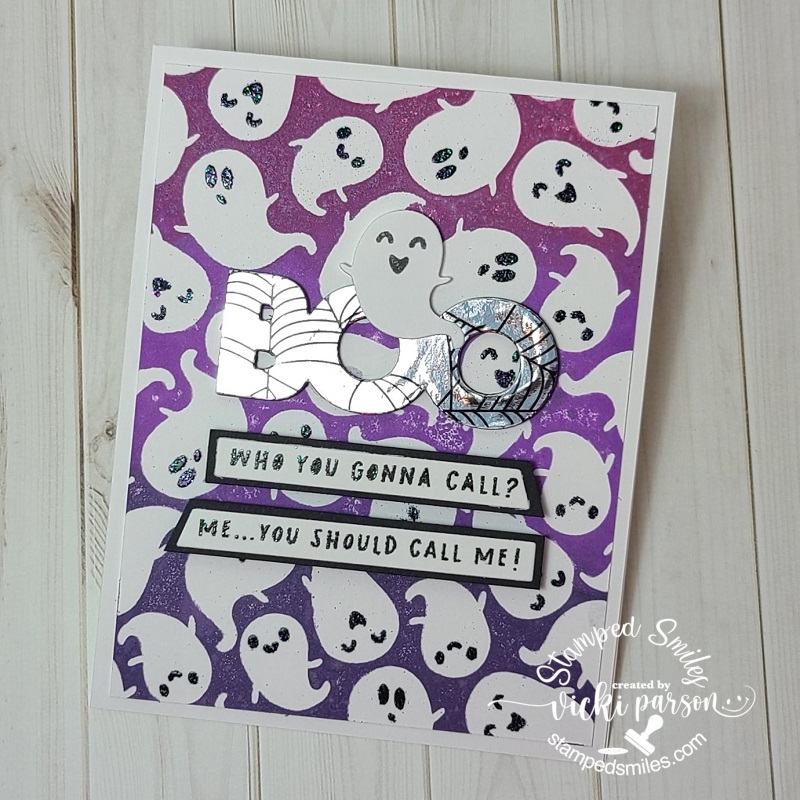
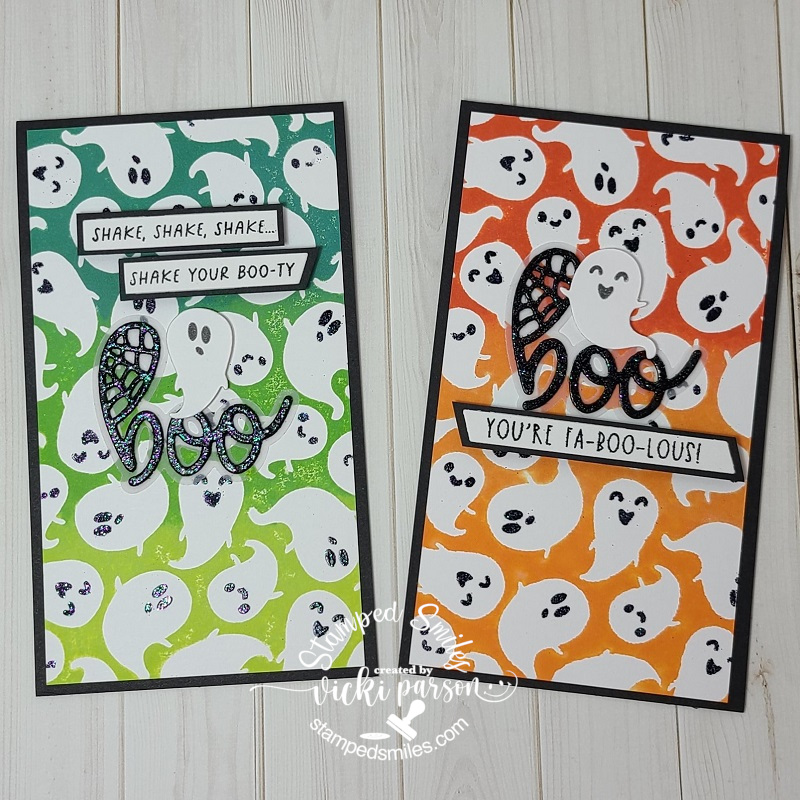
These ghosts make me smile every time I see them with those faces! 👻 For these set of cards, I pulled out the TE G-G-G-Ghost Stamp & Stencil Combo. I didn’t used any TE inks but pulled out my oxide inks for an ombre looking color to make these different backgrounds. The stencil was used for the faces by heat embossing some black glitter EP over VersaMark ink through the stencil. The purple is A2 sized and the set of cards on the right as mini slim cards. I continued using my sentiment strips that were previously used on the card sets above, but with these I’ve added a black layer that I just cut from cardstock. I’ve also used TE Ghost Gang Die & Clear Combo set to cut out the ghosts popped up around the sentiments and stamped their faces.
For the purple ghost card, I used the silver foil negative from the “witch spiderweb background” card and foiled a cut out TE On the Block-Boo Shadow die which was popped up with several layers of die cut black ones. I popped up the die cut ghost over the foiled “boo” as well as the sentiment strips.
For the set of mini slim cards, I did pretty much the same style as the purple, but for the “boo” sentiment I used the TE Boo Script + Backer and die cut 2 of the sentiments with black cardstock and then heat embossed it with the black glitter EP. I placed it over the vellum die cut backer and attached to the card front. I popped up the ghosts and the sentiment strips with foam tape.
**GIVE AWAY!!!**
(CLOSED)
So, because I’ve placed some TE orders, I have gotten multiple sets (duplicates) of goodies!! If you or someone you know would like to get one of these stamp sets, please let me know in the comments below! (Which one(s) you want!) I have FOUR large rubber stamps to give away!! Check it out….
Click on each photo below to enlarge if you’re on my website!
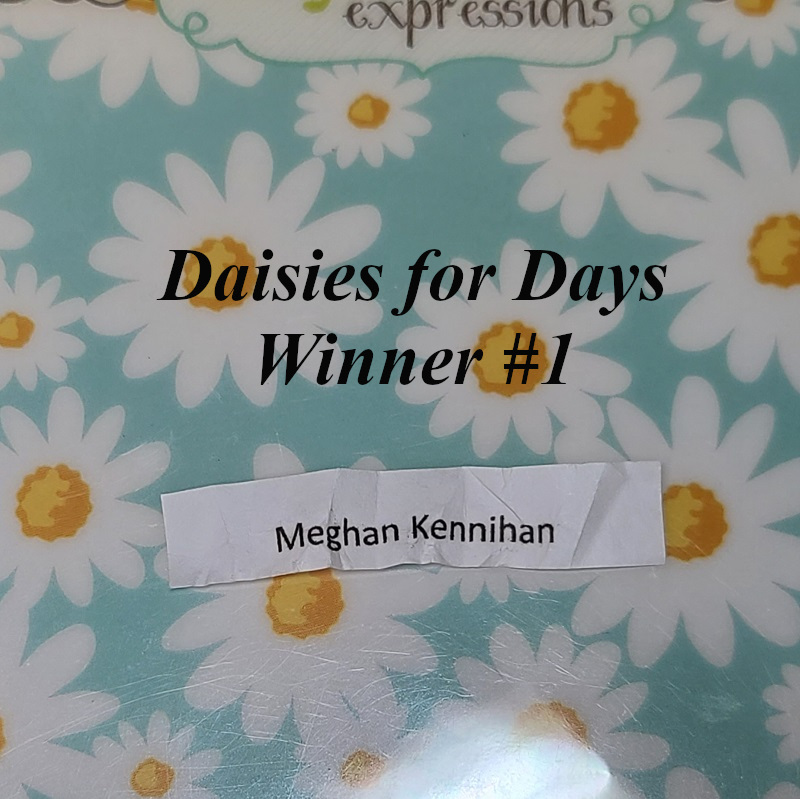
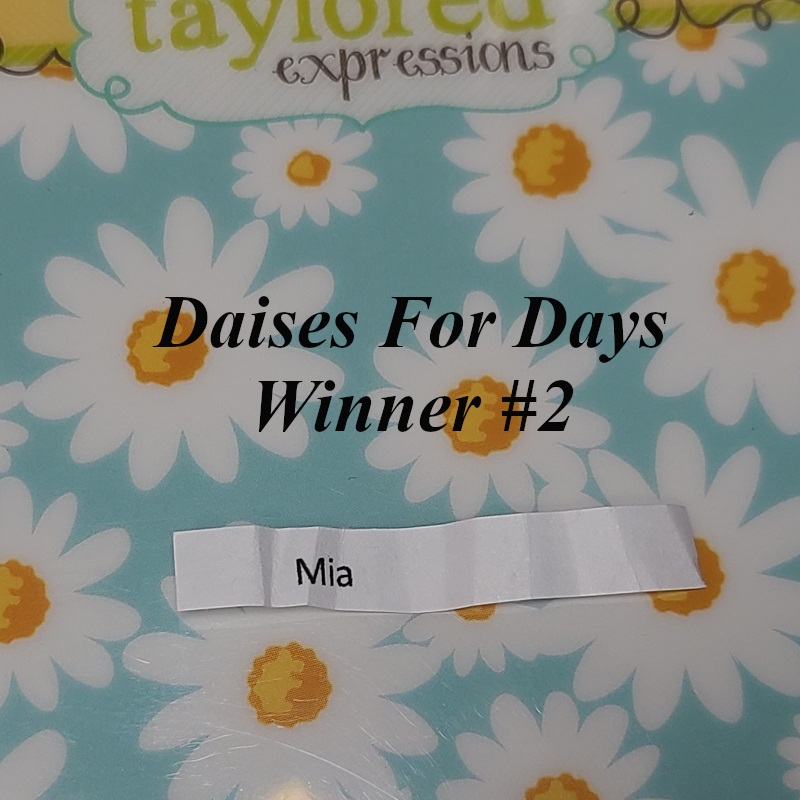
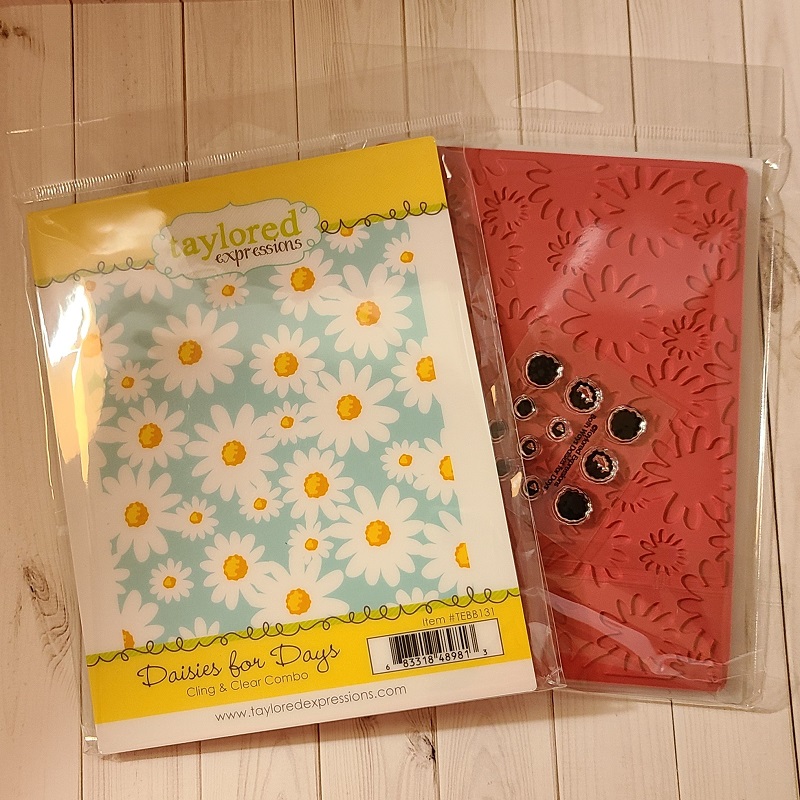
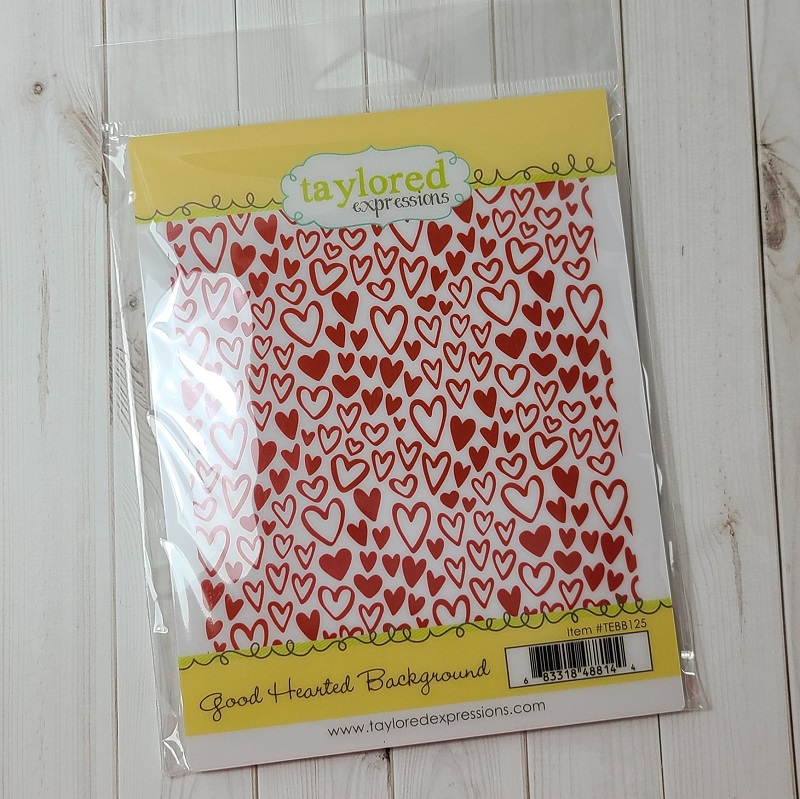
I have TWO of these sets to give away!!
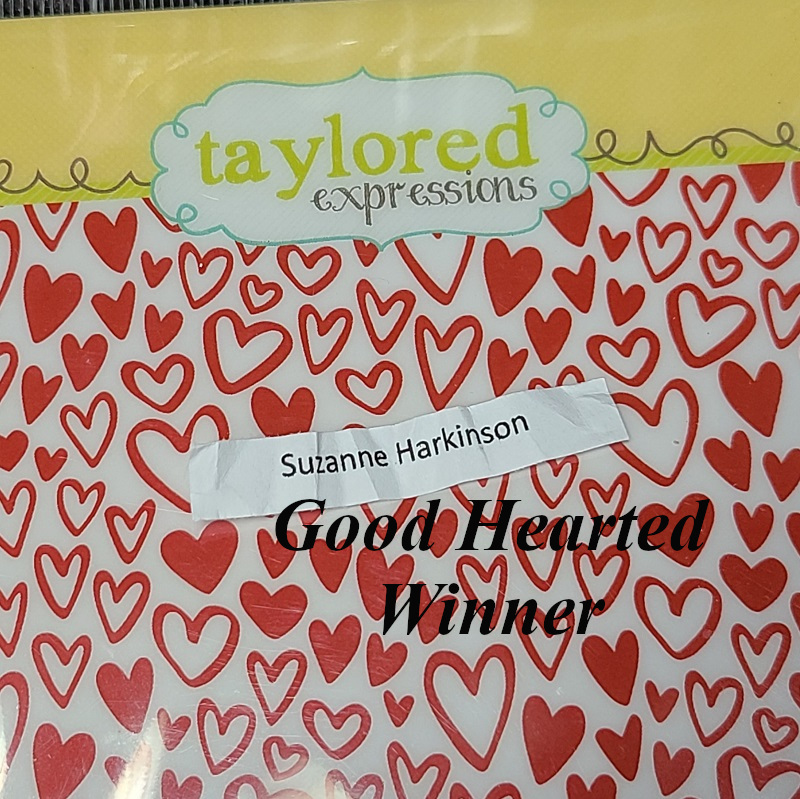
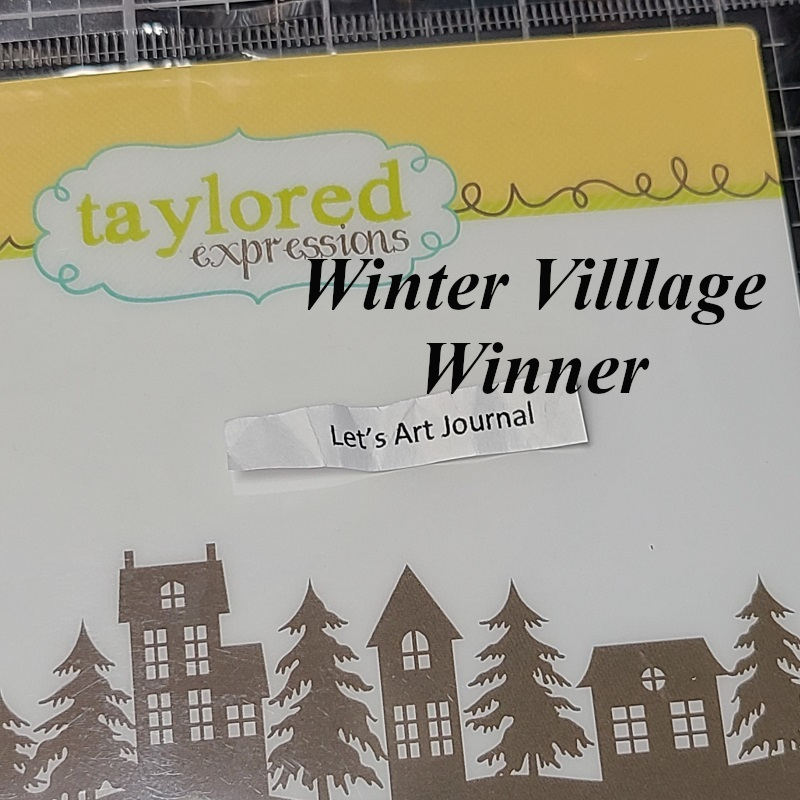
These are all background A2 sized rubber stamps. The last stamp photographed is “Winter Village Background” which measures approx. 6.25″ x 2.5″ in size. I have TWO of the “Daises for Days” to give out. (See the photo where it shows the clear stamp set included for stamping the flower centers.) The “Good Hearted Background” stamp is perfect for almost any occasion just by adding a quick sentiment with it! I also have a little “extra” to go along with each one of these to accompany the package too!
If you click on the names in orange above, you can see some examples using them on the TE website for ideas!
Just leave me a comment below if you’re interested in my give away and tell me which one(s) you’re interested in by September 22nd, 2022 which is the first day of Fall for us here in the U.S. This will give everyone time to see the post and tell a friend that might be interested too! – CLOSED!!!
Thanks so much for stopping by and sharing your support and inspiration with me as it helps keep me going! 😉
Hello friends! How are you dealing with the 2022 year so far? I hope that you have a fantastic start and look forward to a brilliant and crafty future ahead of you! Speaking of starting a New Year, I realized that I needed to start my crafty calendars…which really should’ve been started sooner!🙄 I actually enjoy putting them together, especially the coloring as it’s very relaxing for me.
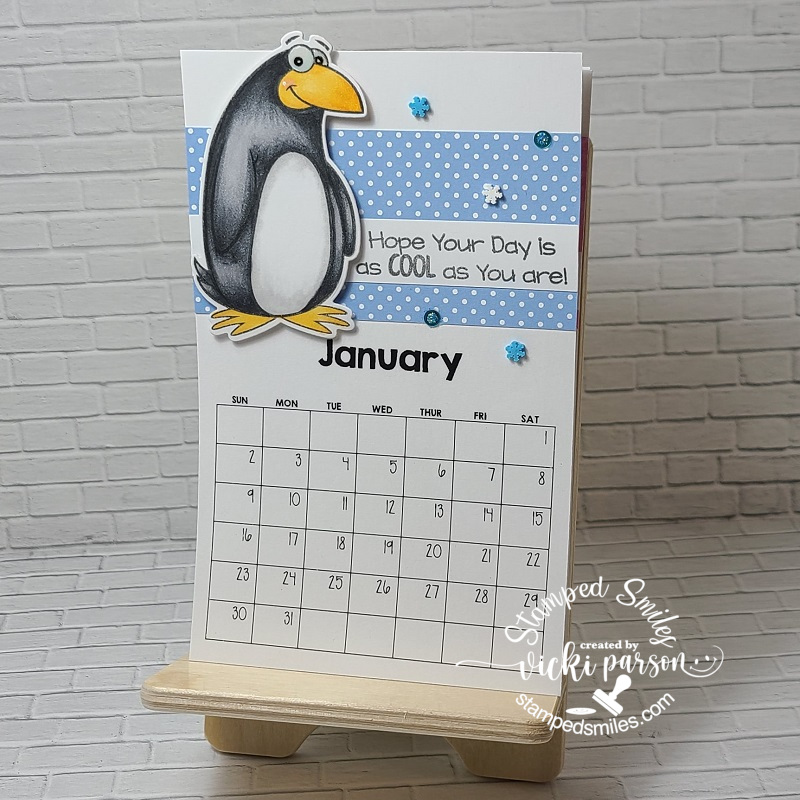
I’ve had this set of calendar cards along with this stand since this last Spring from Taylored Expressions and of course I’ve waited until recently to get them finished up! I’m glad I did though as I think these will be so fun to look at and chuckle to change out each month:
Tee hee! What got me interested in Taylored Expressions from the start were these adorable and funny Grumpy characters that she has in one of her product lines! (You may have seen a “Grumpy” calendar I’ve made in the past on THIS POST.) She has LOTS of different types of calendars and accessories to choose from, but this is a set that had come out this past year. I thought this would be a fun way to help motivate me this year for creative inspiration!😁
I’ve taken a white piece of cardstock cut to size my calendar stand that would accommodate the tear-off calendar pad and hold the “snarky cards” in place with the gold clip. I’ve used some TE inks and blender brushes to blend over top of the white piece. I then used the TE Striped Squares stencil to go over it using the same colors and then mounted this piece over a black cardstock layer. (This piece and the changeable cards are held to the stand with the gold clip.)
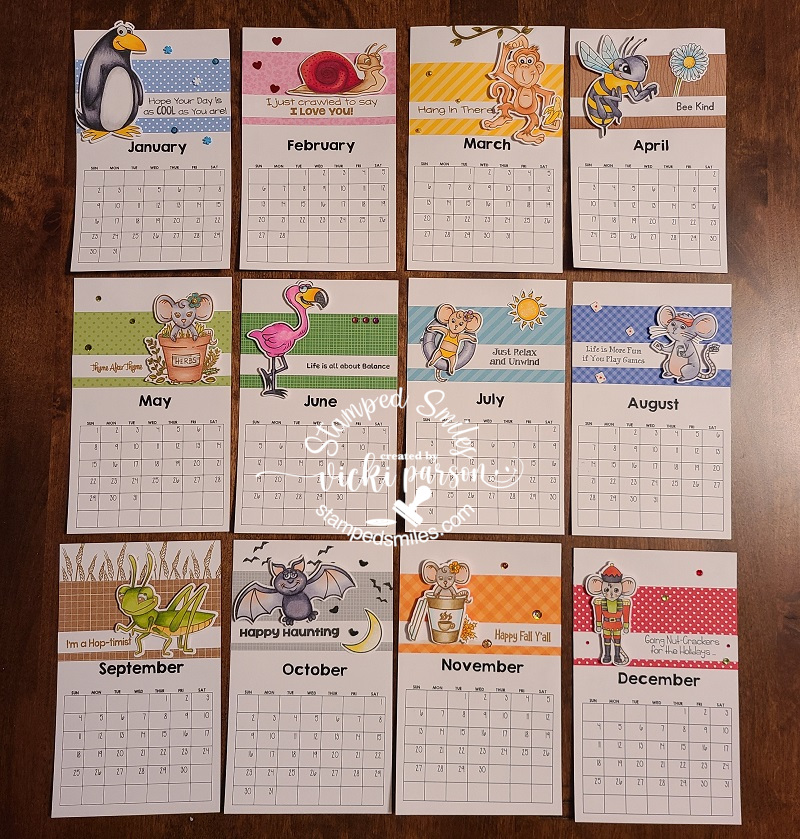
Here are all of the completed cards in the set that I can change out each month or whenever I want. I’ve used the TE Clipboard Calendar Cards-Snarky for my own personal calendar that I’ve colored up with Copic markers. The frames were colored with coordinating colors that matched up with the rainbow stenciled background for my calendar front. Really enjoyed coloring and giggling while making this set!
I also wanted to show you the back side of this TE Walnut Wood Clipboard Stand so that you can see how I store all of the extra cards on my calendar when I need to change one out. You can choose to add a package of the TE Calendar Storage Sleeves with the stand if you get one, but I thought this whole system was a nice and sturdy option of creating a calendar that you can personalize for yourself or for a gift. I ended up creating a calendar last year for Mother’s Day and gave it as a gift. I used the TE Clipboard Calendar Cards-Sweet for that one and did some foiling on them. (Just don’t forget to purchase the next year’s tear-off calendars to replenish the recipient for next year!)
And I also wanted another calendar for my computer area which also brings a smile to me each month! I bought a calendar set last year from Inky Stamper and really enjoyed flipping the cute characters each month as the year went on. Happily, she came out with another new calendar set for this year and I happily purchased it BEFORE it ran out! (So sadly, it sold out quickly!)
With these calendar kits, the stand, the monthly calendar cards as well as all of the pattern paper strips, stamped and die cut characters and sentiment strips ALL come with this kit! I think it’s a pretty good bargain for all that was included with it. Of course, you have to color and put together each card…but THAT’S what the fun is about!
And here’s a look at the entire set of calendar cards that I colored and put together. There were instructions for each card along with the Copic markers used in the examples. For some of the cards, I already owned the stamp set, so I added a few extra details to some of them and I also added a few of my Inky Stamper Gems and Sequins mixes to some of them. Square dots and a strip of gold enamel dots were also included to decorate with.
So, I had an awesome time putting this one together as well! I look forward to seeing every single month throughout the entire year!
Since I had a couple of left over Taylored Expressions 2022 Tear-Off calendars, I thought it would be fun to just create a “calendar card stand” for crafters and give them out to whoever wants one!
EDITED UPDATE: All of the calendars have been claimed! Sorry if you’re looking to get one as I have no more left. Hope everyone enjoys their calendar all crafty year!
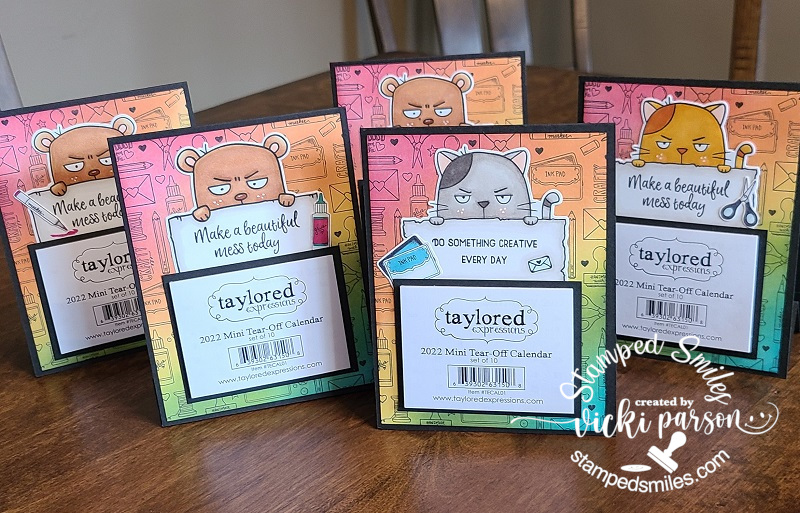
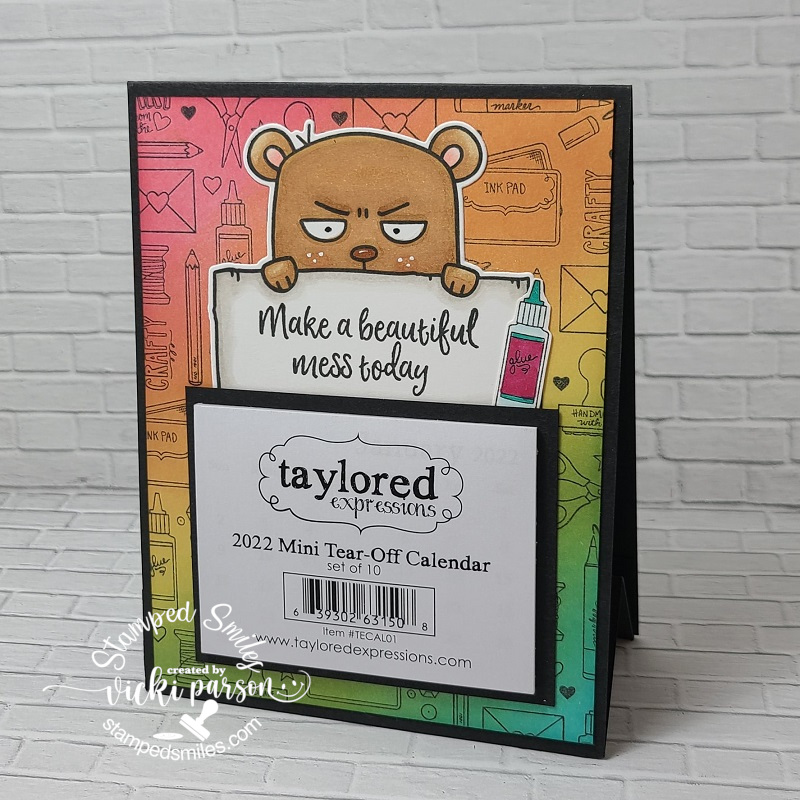
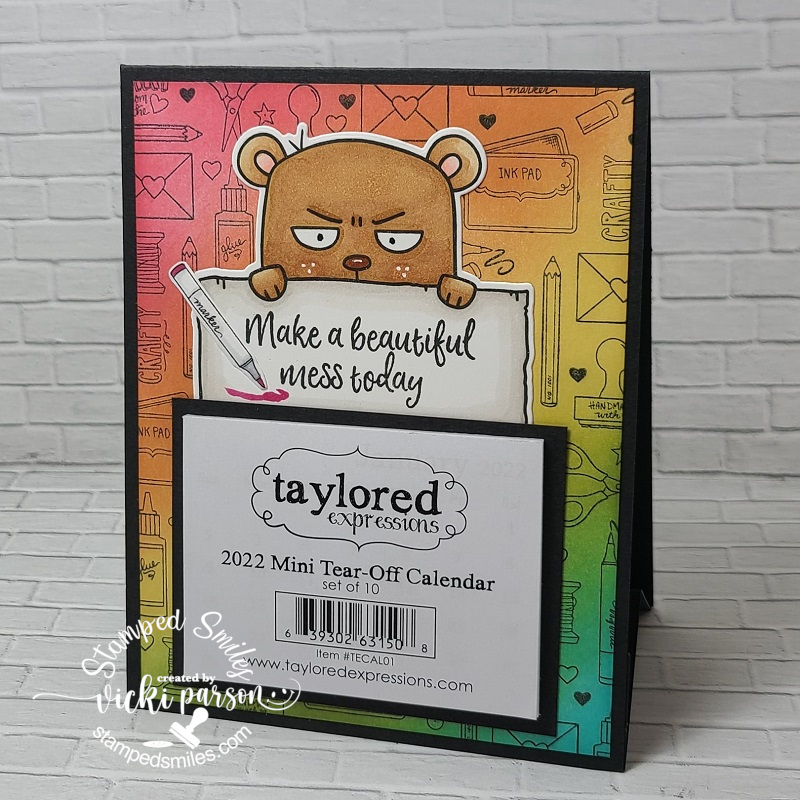
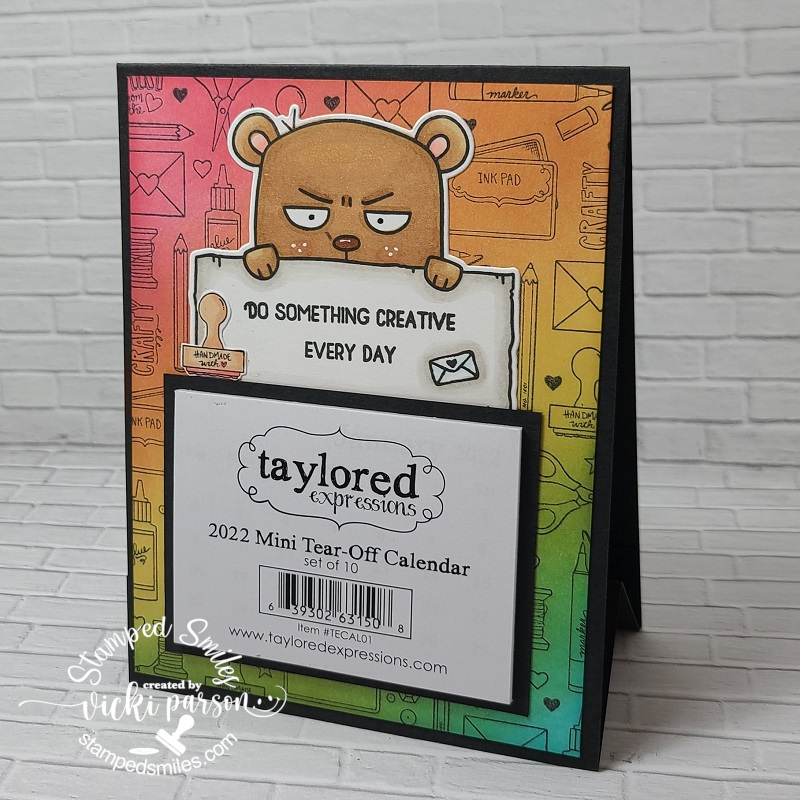
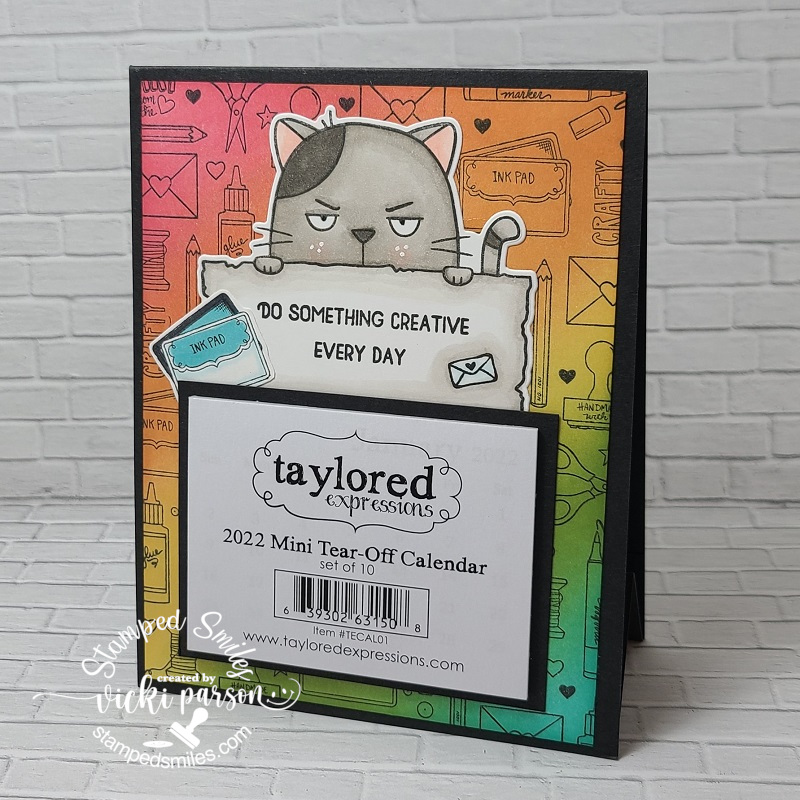
So, I had 5 of these calendars left over and I knew I wasn’t going to use them, but of course I didn’t want to just throw them out either! So, I took the TE Big Grumpy Bear and the TE Big Grumpy Cat sets to help motivate a fellow craft friend throughout the year! TEE HEE! I’ve made a rainbow-colored background for these by taking the TE Art From the Heart background stamp and stamping it with black over a white piece of cardstock. I used some TE ink and blender brushes to blend in the rainbow colors. I stamped an extra background image to color in some of the images and fussy cut them out for accents.
I attached the “Grumpies” over the background and layered the calendar with a black layered piece behind it to go over top of the “Grumpies” with their “feet” underneath so you can see them. I then added the fussy cut out images that I colored in a corner of each one.
I made a “stand” for this by creating a valley fold piece to attach in between the top folding A2 black card base. This will make for a permanent stand to display your calendar through the year! (And hopefully motivate someone’s crafty process throughout the year) I receive so much inspiration from many of you crafty friends, so it would be nice if I could possibly reciprocate that in some way!
Check out each one of these calendars I’ve made below in detail! Just click on the photos to enlarge them if you’re on my website:
Grumpy Bear with glue bottleGrumpy Bear with markerGrumpy Bear with stampGray Cat with ink padOrange Cat with scissors
So now that we’ve got the year started and in place, let’s hope for a really creative and productive one ahead!
I have some more craft projects that I’ve been working on as well as a really BIG craft project that I’m taking on for the love and excitement of it all! I look forward to sharing with you soon!
Thanks for stopping in and I wish you a happy, healthy and productive rest of your week!
Challenges:
Sweet Stampin’ – NEW (stamped New Year calendars with new products!)
Hey friends! I’m just popping by to tell you who the winner is of my Taylored Expressions Giveaway! Thanks so much for all of you for stopping in to say hello, those that just follow my posts, those of you that have been such really good long-time crafty friends and your kind support! It always makes crafting that much more enjoyable for sure!
This time I’ve asked hubby to help me out with choosing a winner because, honestly, he doesn’t know who anyone is and I know he would be very direct in what reason for choosing someone. So hubby picked out…….
SHIRLEY HOTOP
Here’s her comment about the give away: “…..As for the give away – we have new neighbors and I just started her out with a few stamping supplies – and so far she is loving how creative she can be. I know she would be tickled with a win.“
Congratulations!! I will be sure to send you an e-mail that you’ve won and we’ll get this mailed out to you as soon as we can so you can enjoy! Yay!!
The reason for hubby picking this person is because he said: “I like that this person is sharing her craft supplies so that they can enjoy crafting together and she is trying to help her out with getting supplies.” Sounds like a win to me too!! Really hope that it is enjoyed and shared many times over!
Thanks again everyone for your support and friendship!
Hello friends! Happy Friday and are you ready for the weekend? I’m supposed to be helping hubby with some outside work, but my allergies have been bad and I’m not feeling well. Hopefully some medicine will be helping so we can get things finished up!
I have been a “grumpy” fan of Taylored Expressions for a few years as you might have seen in some of my past posts…so of course I get “pulled in” by other cute products too and that’s what happened…my story anyway! In their FB fan group there is a monthly #TEmakerchallenge with prompts to follow as long as you use at least one of their products. So I’ve made a fun card for this month I’d like to share:
Now how CUTE are these little critters?! During TE’s Sept birthday month (13 years in business), they released a collection of birthday related items, and this is the introduction of “Chip & Charlie Party“! I’m saying that Chip is the bird and Charlie is the raccoon…not sure, but that’s what I’m saying! LOL I’ve colored them up with Copic markers and added some shimmer to the balloon, party hats and cherry on cupcake with a glitter brush pen. I’ve also added some highlights with a white gel pen.
I wanted something in the background, but not too distracting from the critters, so I stamped the Party Time background stamp in the same cardstock color (Cherry Pop) I then used the stencil from this combo set to white ink blend the tops of the hats. The paper strip accents came from a TE paper pack I had in my stash. I thought it needed an extra little image element on the front of the card, so I added some Doodlebug Twine and the party hat from Big Grumpy-Birthday, colored with Copics and popped up with foam tape on bottom corner. It was covered with a glitter brush pen, and I also added a Doodlebug Matte Sprinkle at the top of the party hat and in the center of the twine bow.
You might notice that the image panel is not completed adhered to the card front and there’s a score mark in the center as well. So, I was going for something a bit different than a regular A2 birthday card…and the Sept challenge prompts are 1. Heat or non-heat embossing, 2. Napa Valley color quad and/or 3. Something that begins with “E” You have to pick at least one of these along with a TE product. So, for the “E” I’ve decided on making an Easel card…
So, when you open up the bottom flap, you place it behind the popped-up sentiment that was white heat embossed (also a challenge prompt) and cut out with the coordinating die from the “Get the Word Out-Celebrate” set. I’ve also added some more of those yellow polka-dot papers and a thin strip of Cookie Monster cardstock which is what I used to mat behind the image panel as well as for the sentiment. There is still room to line the inside of the card with a special birthday message.
I hope you’ve enjoyed my card and please see at the end of this post for other challenges I’ve entered…PLUS a special birthday give away if you’re interested!
Taylored Expressions was holding a special set of birthday challenges this month in their FB fans group with certain prompts for each one. There was a set of four different challenges, and I decided to make something for each challenge, and I ended up winning a future guest design spot for a future release! WHAT?! Taylor shared which one was her favorite I made in THIS FB ANNOUNCEMENT, but I will share all the creations I made here: (click on the photos to enlarge them if you are viewing them on my blog.)
The first challenge was using Toffee color cardstock/ink + ROYGBIV (rainbow) colors. I made a theater fold design with the Toffee card base and a stenciled rainbow colored background. I also counted out exactly 13 candles to use on the front of the card for TE’s 13th birthday. I’ve also stenciled a few Toffee confetti sprinkles over top. When you pull on each side of this card, it opens up which you can see in the photo below.I white heat embossed the sentiment on the inside and then I took the same confetti stencil and added some white ones over the toffee inside. You can see the candles popped up in the center opening. This card was Taylor’s favorite pick! 🙂 These cards were made for the 2nd challenge which was to create a CAS design and then take the similar style and “Step it up”.For the third challenge, you were given a choice of two different photos for inspiration and you had to pick one to create a project from. I sort of was inspired by both and I some what combined the two for my mini slimline card here. This took a bit of time to white heat emboss the sentiments in the rainbow colors and cut all the stars, etc, but I like how this turned out.The fourth challenge was called “shake it up” which meant to create a shaker card. I’ve used this adorable Gus & Gertie set along with some other elements for design from my stash. I ran an embossing folder over the silver foil frame a die cut to make my shaker element from. Check out the next photo for the shaker bits…And this is the shaker lying flat with all of the inside shaker elements. I’ve used some snowflakes from a past kit as well as silver sequins and ice beads.Taylored Expressions 13th Birthday Challenge entries
I honestly wasn’t thinking about winning anything! I was basically just enjoying the process of creating and pulling out some stash that I hadn’t yet used and wanted to use so I thought I’d just play along. I was very surprised to see that I was picked as a winner! Very humbled and honored by that! So be watching for an upcoming GDT post!
I have actually joined several of Taylor’s classes, virtual events, etc. and have made many cool things during the time that I wasn’t blogging, so I never shared them… but like I said, I’ve been creating and having fun! I do remember something fun she taught in a virtual event from July I was a part of that was Halloween themed, so I’ll have to pull those cards out soon as well since the time is coming up and I do love me some Halloween! 🎃
One last thing! With all of the fun and exciting things going, I realized it’s my birthday month as well! I’m not 13, but let’s just say a few years older!😁 So I think the best thing to do for my birthday is to give rather than receive! If you feel the same and think someone would enjoy this little Taylored Expressions bundle that I have shown above in the photo, let me know! If you’d like to gift this for yourself, let me know! I would love to give someone these extra set of items already in my stash to someone! There is a Banner Simple Strips die, a 3 piece balloon layering stencil with a clear stamp set combo, a Cupcake ink pad (unwrapped, but NOT used at all, I just noticed I already had one after unwrapping it!) and a tiny cake and celebrate stamp set all from Taylored Expressions and perfect for party making! (There may be a few other things added as well!)
**Please just leave me a comment that you are interested in the TE give away by October 10th, 2021 and I will be happy to pick someone to send it out to!**
Whew! I think that’s about it! Thank you for stopping by friends and enjoy your weekend!
I’d like to enter the top easel card ONLY in these challenges:
Hello friends! I hope you’ve had a fantastic week! It seems like this month is flying by!
I’m excited to share with you a fun video hop collaboration with Pink and Main on my You Tube Channel today! (Be sure to check it out on MY VIDEO because there is a giveaway and you’ll need to leave comments on the videos to be entered to win!) So head on over to see the wonderful inspiration with the Pink and Main products going on!
Here’s the fun Autumn themed slimline card I’ve made for the video hop today:
So Pink and Main has come out with some fabulous new products which I’ve used for my card here and I’ve added some fun techniques to use with some of those products as well!
The background was really fun to create using the Pink & Main Blending Brushes along with the new Crackling Campfire Distress Oxide Ink color that just came out! I’ve also used the wonderful Leafy Stencil from Pink & Main over the background too. The cups and leaves were also colored using the oxide inks and a waterbrush which you can see in my video as well as how I’ve inked and cut out the one image backwards so I have two cups with the handles in opposite directions on my design here.
You can check out how I’ve put this design together and the techniques I’ve used in this video below, or to leave a comment and see the link to the next person in the video hop, CLICK HERE to go to the video on You Tube.
I absolutely fell in love with that Need to Venti stamp set and coordinating dies! I loved that older Christmas Mugs stamps they had previously came out, but Autumn is awesome to add to my collection because it’s my favorite time of the year! So be sure to check out how to stretch out the use of this set in video above!
The Blessings slimline die was so fun to use on my card too and I love that the frame cuts out separately from the center and there was room to layer behind it before attaching to your slimline card base. The Brutus Monroe Copper Glitterstock was the perfect accent behind the scallop frame. That frame was cut out with several layers of cardstock and stacked together for thickness.
The same Copper Glitterstock was used to cut out the sentiment dies as well. I’ve used some vellum to layer behind the Autumn sentiment, which the backing diecut was also included in this same slimeline die set! The final measurement of my slimline card was a piece of brown cardstock measuring 8.5″ x 7″ and scored at 3.5″ in the center. The finished card will fit inside a #10 envelope when closed.
Here’s a closer view of the details with my colored cups using the distress oxide inks and waterbrush. I’ve also used the same Need to Venti stamp set and oxide ink colors to stamp the leaves and die cut them out to arrange over my scene as well.
I popped up the cups with foam squares and added some drops over the whip topping in the cups with some Nuvo Honey Gold Crystal Drops.
Hopefully you can see the pretty Autumn colors and dimension in the card. I sure had lots of fun putting all of this together!
Thanks so much for dropping in today and I’ll be seeing you soon!
First, I want to thank you so much for your support and kind comments for the Purple Day Epilepsy Blog Hop! It’s a fantastic cause to be apart of and I was happy to help my friend bring awareness for it!💜
I had a total of 12 entries left from the comments after it closed and drawing from those names….
The winner of my blog candy chosen by random.org is……..
#10 Karen Ladd
Yay!!!🎉✨🎈 Congratulations on your win!! Please be sure to contact me with your snail mail address so that I get these goodies sent out to you asap!
Thank you again for your support in raising awareness about epilepsy!💜