On the Farm Reminder for {Cupcake Inspirations}

Hello friends! I hope that you’ve enjoyed your weekend. I’m still spending some time with my husband as it’s a long Labor Day weekend for him. The weather over our way will certainly start to shift now and I’m looking forward to everything Autumn which is my favorite time of the year! Such a great time to be outdoors before the Winter sets in!

Today is our midway reminder over at the {Cupcake Inspirations} challenge blog with our “On the Farm” theme.  So if you haven’t played along with us yet, I hope you’re able to share your project with us within the next week!  We are enjoying seeing the wonderful creations so far!

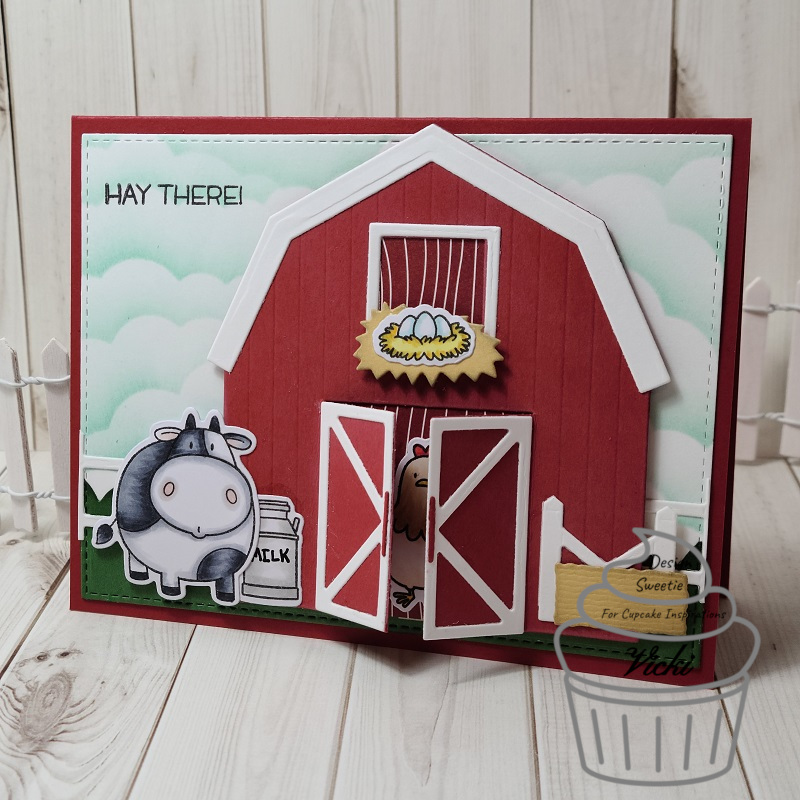
Here’s my reminder project for this week:

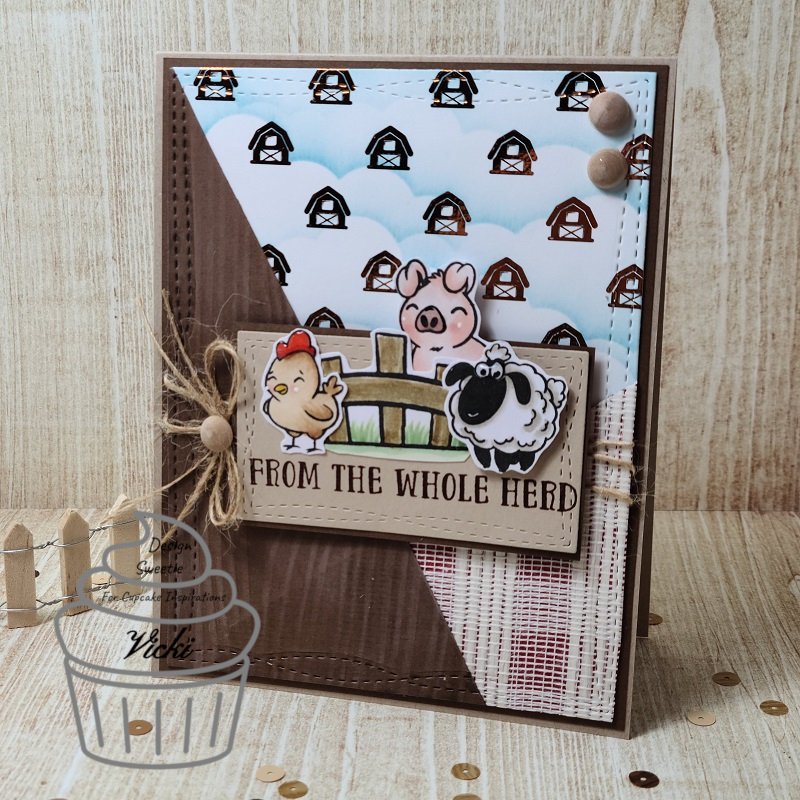
I decided to pull out one of my past card kits that I didn’t get much a chance to play with and put together a card with that Farmhouse Friends stamp set included with it.

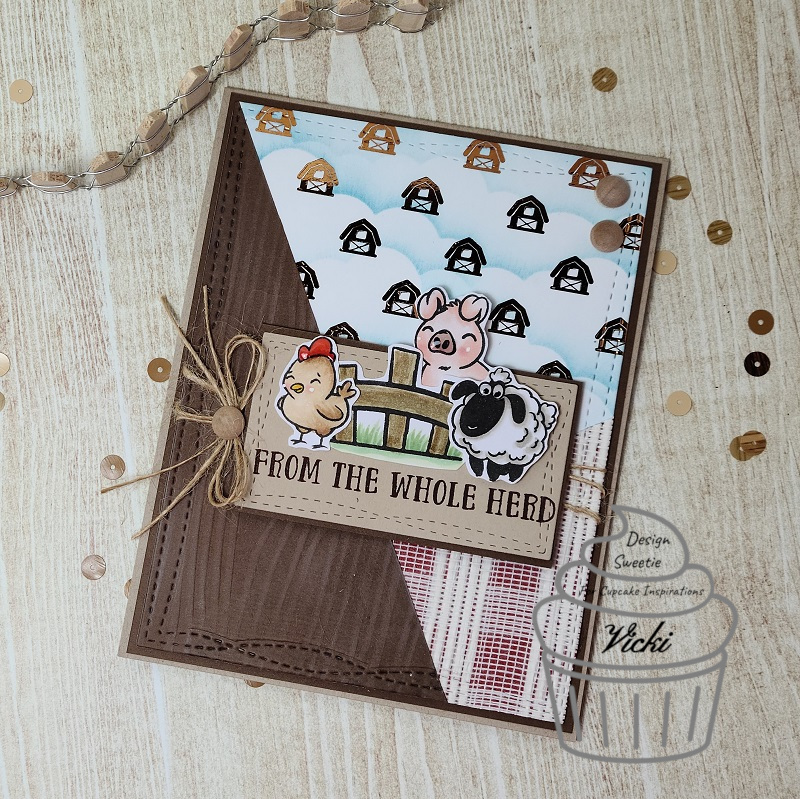
There were lots of different textures included with the kit including that piece of buffalo check pattern mesh fabric that I put a layer of red cardstock, included in the kit, behind it.  I ran a piece of brown cardstock through an embossing folder as well as stenciled a cloud background over one of the printed panels included in the kit.  I also took some copper DecoFoil Transfer papers and foiled over the printed barns on it.  I put together this fun layout with those different pieces, cut them up and then die cut the entire panel with a Wonky Stitched Rectangle die from MFT.  I used the die again to cut an additional panel out with some kraft cardstock. 

That layer is where I’ve added the stamped, colored and cut out images from the stamp set.  I’ve also stamped a sentiment from the set at the bottom of the panel as well.  I layered this piece over some more of the brown cardstock and popped it up with foam tape.  Before attaching it to the panel, I wrapped some twine around the front panel and added a bow next to the animal panel. I added another layer of brown cardstock behind this and attached it all to an A2 sized top folding kraft card base.

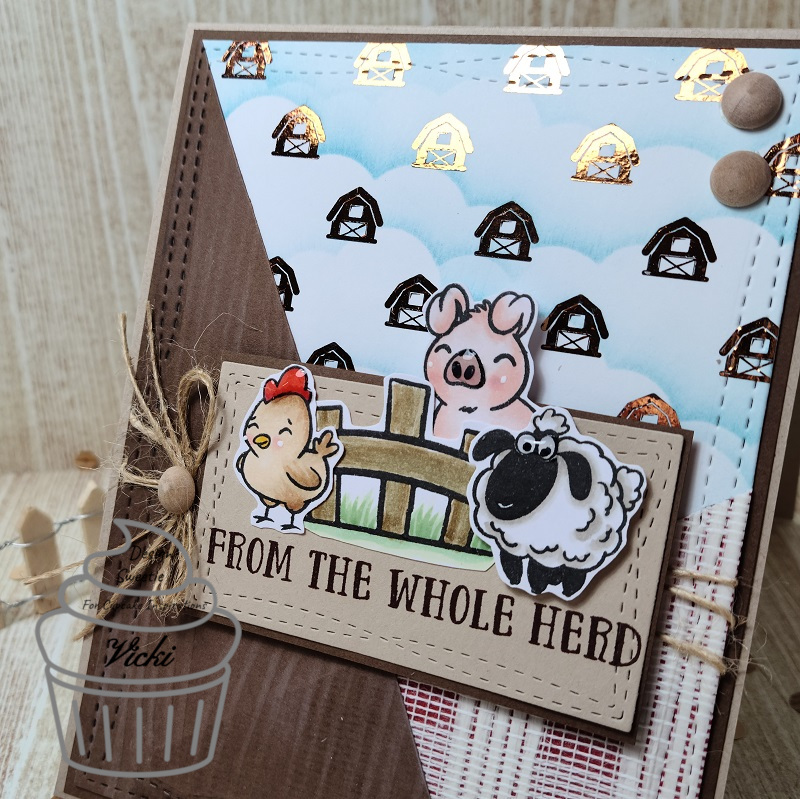
Here you can see the shine from where the printed barns were foiled over the cloud stenciled background.

There was a “stain pen” included with the kit that you could actually use on the tiny wooden fence also included in that kit which you can see as a prop in my photo.  But I used it to color in my stamped fence on the card this time.  I’ve also taken a white gel pen for highlights on the animals and then I added some glossy accents to the chicken’s head, the pig’s nose and the sheep’s eyes which you can sort of see the reflection of light over those parts.

I lastly added some real wooden dots over the design including in the center of the twine bow.

Have you ever been to a farm or are familiar with the setting of a farm?  I grew up out in the country and have pretty much lived most of my life either near a farm or in a rural small town setting, so farm surroundings are very familiar to me and I forget that not everyone has had the experience of it.  I can’t imagine not being able to hear the sound of a cow “moo” for instance.  If you’ve not been on a farm, it’s quite an experience and lots of hard labor, but also a rewarding experience at the same time…so check it out sometime in your life if you can!

Hope you’ve enjoyed my creation today friends and thanks for stopping in!

Challenges:

  1. 2 Crafty Critter Crazies – Anything Goes + animal
  2. Crafty Animals – Anything Goes + animal 
  3. QKR Stampede – #403 Anything Goes
  4. Arty Divas – #29 Anything Goes
  5. Crafty Creations – #413 Anything Goes
  6. Simon Says Stamp Wednesday – Stamp It! (no digis)
  7. Aud Sentiments – Anything Goes + sentiment
  8. Krafty Chicks – #523 Stamp Act
  9. My Time to Craft – #440 Embossing (Wet/dry)

Sending a Smile to a Hunter and Winner on You Tube!

Hello friends! Welcome to the month of September! I cannot believe that Fall is at the door here! The weather has already started to cool us down a bit and Summer is starting to fade as you can see the flowers starting to die off. Now I will look forward to the changing color of leaves which is always amazing.

Today I have a project to share that I’ve made for the Splitcoaststampers Teapot “Make it Pop” challenge. This card is in need of a special SCS friend’s father who is having some difficulties with health and I wanted to help with a smile for him if I could:

“Pop” as he is lovingly called, enjoys the outdoors and hunting which is something that several men in my own life enjoy, so I knew that this would be a direction I was going in with some stamps I have from Newton’s Nook.

For the background, I took a woodgrain embossing folder before fully assembling the card.

Since this is a hunting theme, I thought it would be fun to make a camouflage background and so I’ve used the fabulous tutorial on SCS HERE to create the look.  I also cut off a thin strip towards the bottom to add some interest to the design as well.  Over top of the background, I layered the sentiment from MFT and also cut it out with a banner die.  I used a grassy feilds border die from MFT for the strip at the bottom of the panel and stamped the “Pop…” over it in brown ink.  I stamped and cut out the deer from the Newton’s Nook Serene Silhouettes set with coordinating dies.  I also die cut a few green leaves with an older MFT die for a few accents inside and out.

When you open up the card…

vicki-mmtpt632-forpop-open-1

Because of the name “Pop”, the challenge was “Make it Pop”, we needed to show some sort of element like this on our design.  So I found this really fun “Pop-Up Diorama” card tutorial on SCS for my design.

I’ve used an oval die to cut the center of my card and then used a piece of cardstock for the background to attach behind it.  On this panel, I created a scene with blending inks and adding stamped and die cut elements from the Newton’s Nook Whispering Pines stamp set that I’ve also used the sentiment from on the inside.

For the rest of the card, I’ve used the same stamp set that I used on the outside of the card and arranged them to create this scene with different layers that are popped up.

Hope this helps bring a smile over to “Pop”.  Thanks so much for stopping in today and I hope you were inspired in some way too!

Have a great day friends and I’ll see you soon!

Challenges:

  1.  Splitcoaststampers Teapot Tuesday – Make it Pop
  2. International Art & Soul – Include an animal
  3. Crafting Happiness Anything Goes
  4. 2 Crafty Critter Crazies – Anything Goes + animal
  5. Moving Along with the Times – Create a Scene
  6. Crafty Animals – Anything Goes + animal

We’re On the Farm for {Cupcake Inspirations}!🐄

Hello friends!  Hope that you’ve had a wonderful weekend!  I sure enjoyed my time with hubby relaxing and enjoying the cooler temps for sure!  After all the “partying”, are you ready for a new challenge?

Today we’re starting with a brand new challenge over at {Cupcake Inspirations} with the theme “On the Farm“!  So whatever farm related project you’re working on, please be sure to link it up in our challenge!  We look forward to seeing what you all come up with!

Here’s what I’ve made for the challenge:

Vicki-CIC501-week1

I’ve been wanting to use this fun barn die from My Favorite Things for a while and this was super fun to create a farm scene with!  It even has the little embossed markings on the barn along with a bail of hay!🐓

I started out using the MFT cloud stencil and Tumbled Glass Distress Ink for the background panel, then layered over a grass border at the bottom and then cut this panel out with the stitched rectangle die.  I also stamped the sentiment as well as a few animals from the MFT The Whole Herd stamp set, colored and cut them out with the coordinating dies. (can’t find in the store!)  I then placed my fence border over top of the grass border, popped up the barn with foam tape where I wanted it and then placed all of the other images arranging them over the scene.  This front panel was attached to a top folding A2 red card base.

Vicki-CIC501-week1-close

So I love how the door on the barn can open up with that die cut!  Of course I had to add something inside the barn and with the nest of eggs sitting on top, it only felt right to place the chicken in there!  For the backing of the barn, I’ve taken a piece of paper from the MFT Woodgrain Whimsy Paper Pad and attached it from behind before popping it up with some foam tape.  I’ve also taken a pen and wrote the “milk” word over top of the colored can next to the cow.

Vicki-CIC501-week1-flat

Hope you’ve enjoyed my creation today!

Thanks so much for stopping by and I’ll be seeing you again soon!

Challenges:

  1.  Cardz 4 Guyz – #252 Explore Outdoors
  2. 613 Avenue Create – Anything Goes

{Cupcake Inspirations} Bithday Celebration Day 12 -Party Ending Soon!

Here we are friends!  This is my final day of inspiration to share with you on Day 12 of the special celebration over at {Cupcake Inspirations} for our 500th “birthday celebration” challenge!!  WHAT A PARTY IT HAS BEEN!! WOW!🧁🎉

Today, we are highlighting with our last but not least sponsor Inky Stamper – Please check out the challenge blog for more details about this sponsor.

The DT was generously given a stamp and die set to use for our creations:

Vicki-CIC500-Day12-InkyStamper

I have used this Oh so adorable Cupcake stamp and die set for my 4.5″ square card design.  So I thought it would be fun to create a fun little scene where you have the mouse coming out of his little “mouse hole” in the wall where he discovers this delicious looking cupcake with the sprinkles falling about! 😂

I started by masking off the middle of the square panel and created the “floor” by ink blending from the middle out.  I then moved my masking by covering that area up and used the negative from an oval die cut area to ink blend the “mouse hole” on the scene.  Lastly, I wanted it to look like a “wall”, so I just took a brick stencil and inked over it to go around the “mouse hole”

I stamped, colored and die cut the image and then popped him up with foam tape over the scene and stamped the sentiment underneath him.  I just glued on the sprinkles for the card.  I mounted the image panel over a die cut scallop square and then added a strip of sparkle washi tape over the card base.  (The scallop square panel was popped up with some craft foam.)  Hard to see in the photo, but I’ve brushed some glitter over the cupcake frosting!

Thank you so much for joining me here every day to check out the inspiration I’ve made from each of our sponsors.  I’m so glad that you took the time to celebrate right along with us!   I’ll be seeing you soon!

Challenges:

  1. The House That Stamps Built – A2620 Anything Goes
  2. Simon Says Stamp Wednesday – Anything Goes
  3. Cute Card Thursday – Inky! (used distress inks, masking and stencils for background)
  4. Creative Knockouts – #365 Anything Goes

{Cupcake Inspirations} Birthday Celebration Day 8 – Halfway Reminder! Cupcakes or Bust!

Hey there friends!  We’re now at the half-way mark of our wonderful “Birthday Celebration” challenge over at {Cupcake Inspirations}!


Have you been adding your birthday/celebration themed creations to the gallery yet for your chance to win a prize from one of the amazing sponsors we’ve enjoyed sharing the inspiration with?!  If you haven’t, we hope you will be able to join in the fun with us as we’re really loving the wonderful projects we’ve been seeing so far!


Today I thought it would be fun to create a unique card with my friends for {Cupcake Inspirations} as well as another of an old favorite from our sponsor Riley and Company that was also featured for yesterday!  I have loved this adorable moose for many years and so I couldn’t help but use another image to create something for a little chuckle….

Vicki-CIC500-Day8reminder-RileyandCo

I had so much fun with this easy to make card!  I’ve used my Cricut Explore to print out and cut the shape of the cupcake.  I actually did this twice so that I could make a folding card with the shaped design.  I made a score mark on the bottom cupcake along the left side and glued it together so that it would open up on the right side.

I’ve taken this really adorable Riley and Company “Or Bust” stamp that I’ve had for a few years and stamped and colored him up.  Since the space above the “or bust” words is empty, I filled it with a sentiment from a MFT set that was perfect! 😂  I then fussy cut him out and popped him up with foam tape over the card.

I used a gold metallic gel pen to color the frame of the sign he’s holding, wrapped some gold metallic ribbon around the cupcake with a bow and a cupcake button in the center and then finished it off with some glitter over the sprinkles on the top of the cupcake.

Hope that you’ve enjoyed my fun little shaped card today!  Thanks for dropping in and I’ll see you on Day 10 for more inspiration with another sponsor!

Challenges:

  1. Cut It Up – #207 Old School + die cut (Have had this Riley for years! Used Cricut)

A Unicorn with Sprinkles & Rainbows for Dare to Get Dirty

Hello again today my friends! Yes, still posting and with another “twofer post” again today! It will calm down eventually, but for now I have lots of things to share with you!😀

As you may have read in my second post from yesterday, we kicked off the “Dare to Get Dirty” Event over at Splitcoaststampers and I shared the card I made for one of the challenges. I have another creation to share with you that I made for one of the challenges released today and this one is for the lovely Lori:

This really brought out the little girl in me when creating this card with the rainbow colors and magical scene! This sweet little unicorn image along with the rainbow in the background and the sentiment all come from the Digi Doodle Studios Unicorn Wishes Pairables set. I’ve printed them out, colored them with Copic markers and fussy cut them out with the exception of the sentiment which I left and cut out as a cloud with my Lawn Fawn Cloud Border dies. I’ve also used that die to cut some clouds from a piece of vellum and an additional piece of white cardstock.

I’ve used an older My Favorite Things Stitched Rainbow die from white cardstock that I colored with Copic markers to place behind the first set of clouds behind the unicorn. Before layering my clouds, I took some distress ink and blending tool to add a bit of blue shadow behind them. After attaching all the cloud and rainbow layers, I cut it out with the MFT Blueprints 27 die set .

Lastly, I’ve attached this layer over an A2 sized white top folding card base and popped up the fussy cut unicorn with foam tape. I took some random sequins to attach over the design.

Here’s a closer view of some of the details in the card. I added some loose glitter over the unicorn’s wings with a 2-way glue pen and some loose glitter. Hard to tell, but I’ve also added some shimmer to the rainbows and the unicorn’s mane with a glitter brush pen. I also added a bit more blue cloud shadow under the unicorn’s feet before attaching him on the card.

This was really fun to create and I know it will make a fun card to share.

Thanks so much for dropping in!

{Cupcake Inspirations} Birthday Celebration Day 7🧁

We are rolling now!  We are on day 7 of celebrating over at {Cupcake Inspirations} with another feature of sponsors for our 500th “birthday celebration” challenge!! Super cool!!

Today, we are highlighting Riley and Company – Please check out the challenge blog for more details about this sponsor.

I have loved this little moose for many years and have collected some stamps from them over the years including some recent ones and I always get a chuckle from either the moose or the “Funny Bone” sentiments! So I had to help with featuring this sponsor:

I had to combine this funny sentiment with the cupcake theme and I thought it would be so fun to have little Riley peeking out from the edge holding a cupcake!😂

I took one of the images from the Basic Dress Up Riley, colored him with Copics and cut him out with coordinating dies. The sentiment was white heat embossed over a strip of black that I added Riley partially to the back of before attaching it to the background paper. I’ve also added a couple of banners and tied some black twine around the top of the card. I used a cupcake image from my stash, colored and cut it out and popped it up with a foam dot over Riley’s hand.

I finished the card with some sequins and some clear glitter Stickles.

Hope you’ve enjoyed my inspiration card for today’s sponsor and be sure to play along with us soon! Thanks so much for dropping by and I’ll see you again tomorrow!

{Cupcake Inspirations} Birthday Celebration Day 6

Hey there friends!  We are on day 6 of celebrating over at {Cupcake Inspirations} with another feature of sponsors for our 500th “birthday celebration” challenge!!  FUN FUN!

Today, we are highlighting Bugaboo Stamps & Lawn Fawn – Please check out the challenge blog for more details about these sponsors.

So on our first day, I had used some fabulous products from our sponsor Lawn Fawn.  But for today’s post, I wanted to highlight our other sponsor Bugaboo Stamps

Vicki-CIC500-Day6-Bugaboo

Now how stinkin’ CUTE is this little guy with his ginormous cupcake coming at you?!

I printed out this Picnic Ant-Cupcake2 from Bugaboo Stamps and colored him up with Copic markers.  I sponged some clouds behind him and colored some grass with my markers too.  I used my oval dies to cut the image out with along with the scallop oval layer behind it.

Found some fun papers from my stash along with the rectangle die, sentiment die, ribbon, twine and button to complete the card.

I “dressed up” the cupcake with some liquid applique that was heated up to make it “puffy” and then added some glossy accents over the cherry on top.

Really had fun with this cutie and I hope he brought you a little smile today friends!  Thanks for joining me!  See you again tomorrow!

Challenges:

  1.  Catch the Bug Challenge – End of Summer (what could be better than celebrating a picnic?!)
  2. Little Red Wagon – Use a Stencil (cloud background)
  3. Creative Knockouts – #364 Something to Say
  4. Aud Sentiments – #258 Anything Goes + Sentiment
  5. Colour Crazy Craft – Anything Goes + Coloring

{Cupcake Inspirations} Birthday Celebration Day 5

Let’s keep on celebrating!  We are on day 5 of celebrating over at {Cupcake Inspirations} with another feature of sponsors for our 500th “birthday celebration” challenge!!  Yeehaw!🥳

Today, we are highlighting Newton’s Nook – check out the challenge blog for more details about this sponsor.

I adore the stamps from this company and already own some faves..including retired ones that I refuse to give up! LOL!  I have recently gotten some new ones to party with though!  Check it out…

Vicki-CIC500-Day5-NewtonsNook

Winston is one of the cute characters I adore!  I’ve used the Sending Hugs stamp set with the coordinating dies.  And the special thing about the coordinating dies is that they cut out the arms of each of the characters within the set so that they can be holding different objects!  I think that’s too cute!

So I’ve colored up my Winston character with Copics and for the item he’s holding, you can see he has a cupcake, which is included in this set!  I stamped, colored and die cut an additional cupcake next to the banner sentiment which was included with the set as well.

For the background, I’ve done some fun watercoloring.  I’ve used a balloon image from a retired set “Winston’s Birthday” which is also where I’ve got his party hat from as well.  Love it along with the “Winston’s BBQ” set that I won’t give up either! LOL!!  I pull it out pretty much every Father’s Day!  (I made a cute apron card with it this year and forgot to take a photo of it! Sigh….)

I photographed the card laying flat so that you could see the fun shaker contents inside the square frame!  Lots of sprinkles, little cupcakes and balloon sequins in there!  I thought it needed a pink glittery frame along with metallic shine on the party hat too!  I finished it off with a metallic clear ribbon bow at the bottom.

Hope you’re having fun with the inspiration so far and I’ll see you again tomorrow!

Challenges:

  1.  2 Crafty Critter Crazies – Anything Goes + animal
  2. Papercraft – #61 animals
  3. Crafty Animals – Anything Goes + animal
  4. Pammie’s Inky Pinkies – PIP2033 Anything Goes
  5. Simon Says Stamp Wednesday – Oh So Cute

{Cupcake Inspirations} celebrates it’s 500th Challenge! WOW!🥳

Hello friends!!  Happy Monday!  I have something very special to share with you today!

The {Cupcake Inspirations} Challenge Blog has hit a wonderful milestone and is celebrating their 500th challenge! How cool is that?!

I’m so thrilled to be apart of the celebration with them and share in the excitement!  I hope that you will be celebrating right along with us and join the challenge too!  We also have an AMAZING list of sponsors to share in the celebration with us!  Please be sure to check out the challenge blog for the complete list…AND…we will be sharing inspiration EVERY SINGLE DAY throughout the 2 week challenge using products from our sponsors, so you won’t want to miss any of the posts so you can see the inspiration!

  • I WILL BE POSTING INSPIRATION FROM MOST OF THE SPONSORS RIGHT HERE ON MY BLOG EACH DAY AS WELL!  SO STAY TUNED IN!

The theme for this challenge is “Birthday Celebration!  We can always use birthday cards!  So we look forward to seeing your creations!!🥳🧁

Vicki-CIC500-Day1-LawnFawn

Remember those fun birthday parties as a child and all of those fun photos you took with your friends?  Everyone is having a great time together!  I miss those days for sure!

I have used the Wild for You stamp set along with the coordinating dies for the animals friends and colored them up with Copic markers.  I have also taken the Party Animal stamp set and coordinating dies for the sentiment over the black banner that was white heat embossed as well as the balloon that is tied around the gator’s tail with black twine.  I popped up the balloon and covered it with glossy accents.  The cupcake on the gator’s back came from the “Party Panda” stamp set and dies that I received as a gift for my birthday month.  (P.S. You may notice a cupcake in almost every one of my creations for these two weeks…see if you can spot them!)

I’ve used the Selfie Frames die set to cut out the polaroid frames, plus I die cut some grass in them with the Grassy Border die.  I pulled out a piece of paper from the Watercolor Wishes paper pad and cut it out using the Small Dotted Rectangle die.

I finished my card with some bright blue and purple sequins.  (Although it almost looks black on the photo! LOL!)    I’ve added details with metallic gel pens and glitter too.

Really fun card to make with some really adorable products…love Lawn Fawn!

Thanks for stopping in today friends!  Be sure to check and see what I’m making for tomorrow’s post with another sponsor!

Challenges:

  1.  Not Just Cards – August Anything Goes
  2. Retro Rubber – rrcb141 Anything Goes (have had all at least 1 year or more!)
  3. Arty Divas– #28 Anything Goes
  4. Watercooler Wednesday – WWC284 Occasions
  5. Colour Crazy– Anything Goes + coloring