Nautical Reminder for {Cupcake Inspirations}⚓

Hello friends!  Hope you had a wonderful weekend!  Stopping in today to share more inspiration for the current {Cupcake Inspirations} challenge:

Nautical” is the theme for our challenge and you still have another 5 days to play along with us!  It really is such a fun theme to play with especially during the Summer!

Vicki-CIC499-nautical-week2

I don’t get a chance to be near any oceans as I live in the middle of the U.S., but I’ve always wanted to travel near the East Coast near Maine as I imagine how interesting it would be to see it all!

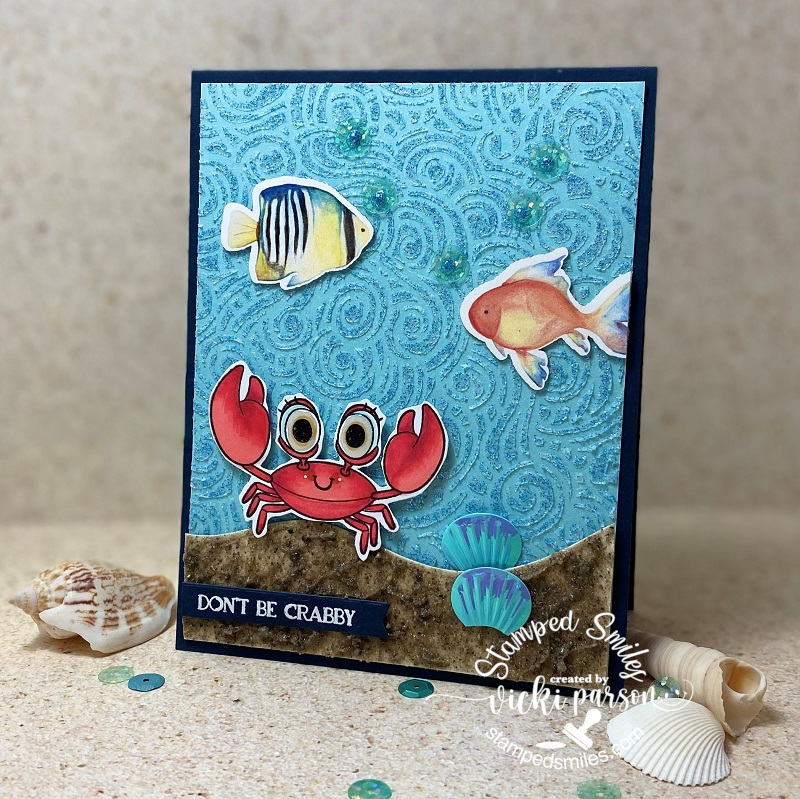
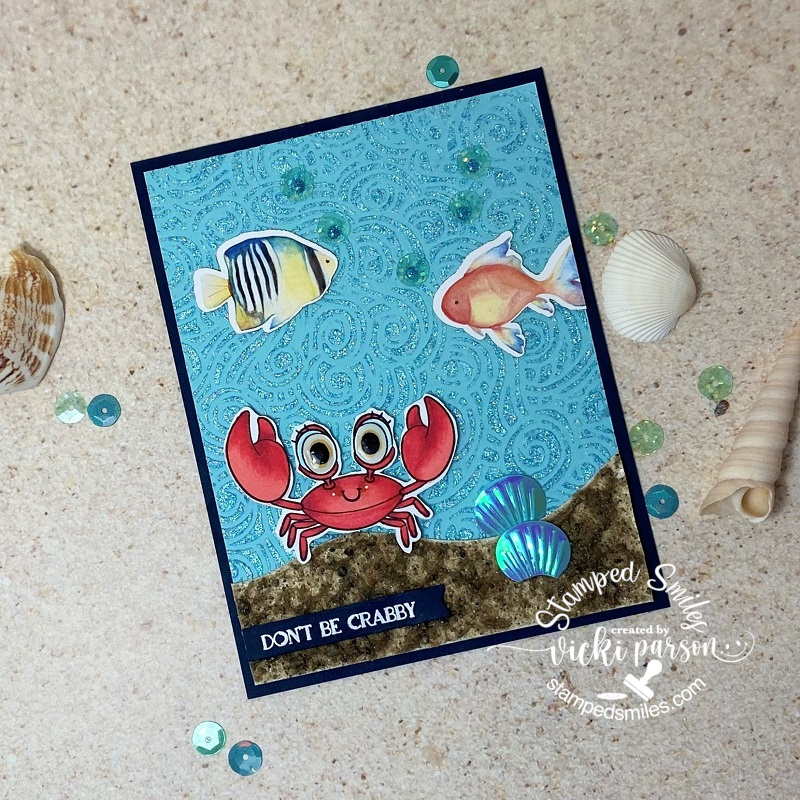
I don’t own very many nautical style crafty products, but I remembered this older Stampin’ Up! stamp set called “By the Tide” and it reminds me of those sailor type Inns or Pubs and you can see the wording of that with the circle anchor accent.  I went with colors that related to the feel of “nautical” for me.

I also recently purchased this anchor stencil from Brutus Monroe and thought it would make a cool background with red foiling over the navy-blue color.  So, I took some DecoFoil Transfer Gel Blanco so that it would be white over the dark background and the Red Static DecoFoil Sheet would show up over it.  I put it through my laminator.

I just stamped the images from the SU! set in various colors, cut out layers of cardstock and added some stitch marks by hand along with a strip of anchor paper I found in my stash.  I punched a hole in the circle anchor accent and tied a piece of twine through it and popped it up with foam tape.

Vicki-CIC499-nautical-week2-close

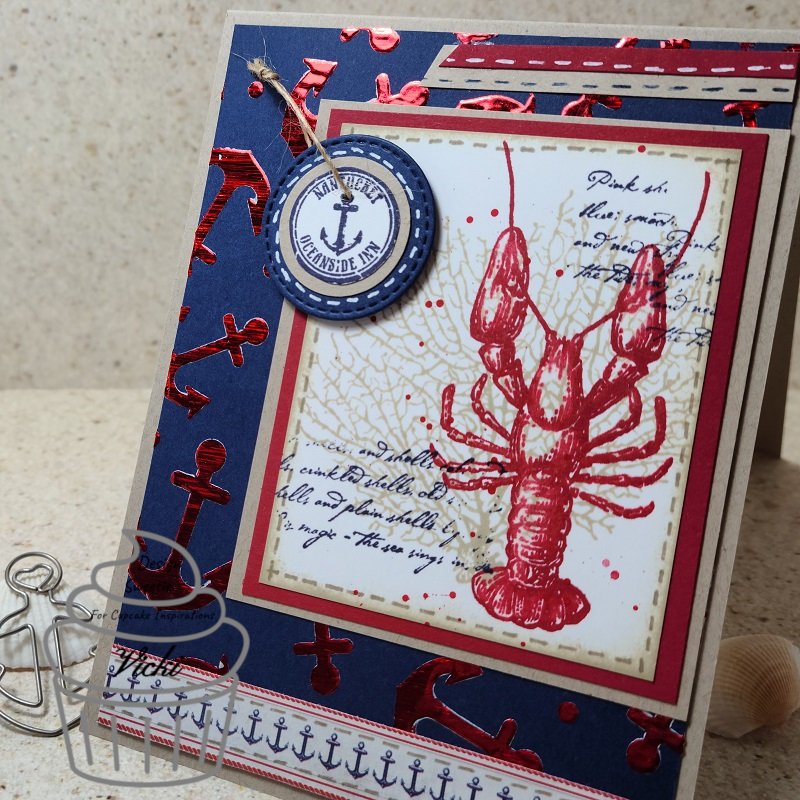
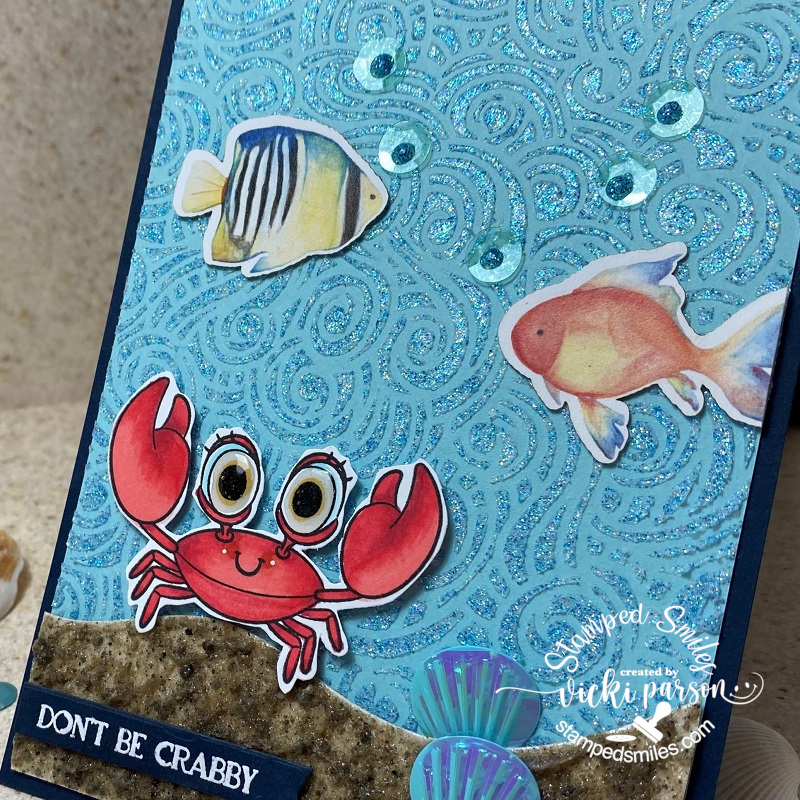
Here’s a different angle of the card so that you can see the red shine of the DecoFoil background in the card.

I also took some of the Brutus Monroe Ruby Fluid Acrylic and watered it down to splatter over top of the crab image panel.  I didn’t want to add too much in fear that it would look like blood or something.  LOL!

Vicki-CIC499-nautical-week2-flat

Hope you’ve enjoyed my “nautical” style card today and that you’ll hop on over to the {Cupcake Inspirations} Challenge Blog and see what the rest of the design team has for inspiration and play along with us!

Thanks so much for stopping in today my friends!  I appreciate you taking the time and I’ll be seeing you again soon!

Challenges:

  1.  Crafty Animals – Anything Goes + animal
  2. 2 Crafty Critter Crazies– Anythiing Goes + animal
  3. Allsorts – Make it Masculine
  4. Joy of Sets – I went with Splash (hope splatter works), Sand (color), blue
  5. Crafty Calendar – Anything Goes
  6. Stamping Sensations – Make it Masculine
  7. Daisy Chain – #44 for the Boys/Men
  8. Let’s Craft and Create – #162 Anything Goes + optional Lots of Layers

MFT Summer School: Rule of 3 Sympathy

Hello there friends!  Hope you’re having a great week.

It seems, unfortunately, that every time I make another sympathy card, I run out and need to make another…it almost makes me hesitant to create another one to build my stash for the fear of it.  But as a card maker, I create with my heart and it’s important for me to share that with others and especially in times like this.  I know that those people that  know me, understand this.

(This post is dedicated to a family friend that has been around since I can ever remember him.  RIP Bill)

Vicki-MFTbutterflysympathy

Upon knowing that I needed to create a sympathy card, I had seen that the My Favorite Things Summer School had started and their first lesson was about “The Rule of 3” and so with that in my mind, I went to my MFT stash to create this card.

I first started with a piece of Whip Cream cardstock that was cut out with the A2 Stitched Rectangle Stax die and then stamped the large leafy image from the Dandelion Greenery stamp set with Grout Gray ink 3 times.  I also stamped the smaller leaf image 3 times over it as well.  I took the sentiment from the Deepest Sympathy stamp set and stamped it with the MFT Extreme Black ink.  I layered this panel over a top folding A2 sized Grout Gray cardstock base.

The butterflies were cut out with a die set no longer available…but I love them and can’t part with them!  I’ve used the Whip Cream cardstock for the outline of the butterflies, black for the middle sections and then I used:  Lemon Chiffon, Tickled Pink and Berrylicious cardstocks for the layers behind the butterflies.  I glued the centers only down so that the wings would pop out a bit.

Vicki-MFTbutterflysympathy-close

Here’s a closer look at the butterflies and you can see on the colored portion of each of the butterflies that there is a bit of a shimmer on the wings.  I took my glitter brush pen to go inside each section of them.  I’ve also added 3 Ice Sparkle Crystals to the design for a bit more sparkle.

Vicki-MFTbutterflysympathy-flat

So as you’ve noticed, I took the “rule of 3” quite literally with my design here!  It actually helped me to focus on that particular lesson to finish up my card.  Sometimes, I’ve noticed it really helps to “challenge myself” with a project so that I have something to focus on when I need to complete a task that would otherwise be difficult if I was just staring at a blank piece of cardstock.  Don’t back down from a challenge or anything in particular that helps keep you focused…especially during times like these right now, as it is something that may be of help for you in more ways than you realize!  It sure is for me anyway, and I really need it!

Thanks so much for stopping by and I hope that I’ve helped inspire in some way!  Be well and happy friends.  I’ll see you again soon!

Challenges:

  1.  MFT Summer School – Lesson 1 “Visual Triangle”
  2. Dragonfly Dreams – Anything Goes
  3. Lil Patch of Crafty Friends Anything Goes
  4. Pearly Sparkles – #54 Anything Goes
  5. A Perfect Time to Craft – #8 Anything Goes
  6. A Bit More Time to Craft Anything Goes
  7. Love to Craft – LTCCB49 Anything Goes
  8. Double D – Butterflies

Name That Bird!

Hey there friends!  Ever have one of those days where you were up late or you got up in the middle of the night and then realized you weren’t sure if you got any sleep at all?  Sometimes I have days and then forget to do something and then I’m thinking about it all night only to realize that I’ve spent my time thinking about it and not sleeping when I could’ve just got up and done it!😂

This post is sort of a representation of that issue!  Not only did I forget or run out of time to get my post ready, but it’s also THE last day of the month to get these projects finished for the challenges they were intended for!  Story of my life!

Vicki-TEpigeon

Oh my gosh this is too funny!!🤣  A few months back I had spent some time at the Taylored Expressions store and had a laugh at some of the sentiments that I didn’t realize were in the store and decided that they would make some great cards to send out and they go well with those Grumplings stamps too!  I also wanted to participate in the #TEMAKER challenge before it ends, so I enjoyed putting this one together!

Believe it or not, I had a sample of dental floss in my purse and decided to pull some out and use it for this card!  LOL!  It meets the challenge which is to use something from your purse or junk drawer!  I just tied it around the card front!  I used some dies from my stash for the tree branch and the hexagon shape.  The papers comes from Taylored Expressions along with the Grouchy Grumplings II stamp set (owl) that I cut out with the coordinating die and popped him up with foam tape over the branch.  The hilarious sentiment comes from the Pitch Black stamp set and I know I’ll be using some of those others on more cards soon!  Tee hee!  I also found some fun yellow sequins laying on my desk and added them to finish it off!

Vicki-TEpigeon-close

Here’s a closer view of the “bird” and how I’ve colored him up with my copic markers.  I’ve used the TE papers to cut out the pieces in the branch as well as the background and hexagon shapes.  If you look at the “bird’s” eyes, you can see where I’ve added some glossy accents.  He does look a bit tired!!

Vicki-TEpigeon-flat

The reason for the strip at the bottom actually came from a mistake in calculating measurements for my card panel, so I just added a strip that I cut out from the hexagon die and used it as part of the design.  Sometimes there are ways to fix mistakes, so never think you’ve ruined something!

I hope you’ve gotten a chuckle from my card today as it has made me laugh!!😆  Thanks so much for dropping in today as I really appreciate your support and thoughts here!

P.S.  I have been busy “behind the scenes” doing various different things and haven’t shared them as of yet in my posts, but here’s a little look at what I’ve been doing lately:

Vicki-DDSLadyinWaiting-colored1Vicki-DDS-New Little OnesVicki-DDSPrimrose-colored2Vicki-DDS-Sunflower DreamsVicki-DDS-WintertimePenguins

I also haven’t shared my latest masculine cards, so I’ll be sharing those soon as well as other things I’m working on too!  Just getting things sorted out and taking the time to do it is all!

Have a great day and I’ll be seeing you soon!

Challenges (for bird card):

  1.  Taylored Expressions – #TEMAKERCHALLENGE – hexagon, yellow & purse
  2. Simon Says Stamp Wednesday – Anything Goes
  3. Colour Crazy Craft – Any Handcolored Image
  4. Creative Fingers– #189 Anything Goes
  5. Crafting Happiness– #55 Anything Goes
  6. Use Your Stuff – Free Week
  7. Creatalicious – #190 Anything Goes

Dir-Tea Birthday Bunny Coffee Card🐰

Hello friends!  I’m back again today with another fun card that I wanted to enter before the time runs out!  So check it out:

Vicki-TSDir-teaBunnyCup

This adorable smiling bunny is so fun and I really loved creating this coffee themed cup shaped card using some products from Trinity Stamps.  I’ve used the Dir-Tea Bunny stamp set along with the coordinating dies that also cut out his hands so you can stick stuff between them like I did with the coffee cup and balloon!  The coffee cup came with the stamp set and I added that sentiment to it!  The balloon is a die set from MFT.  I cut out the balloon with vellum and used my Copic marker to color it in.

I used the Trinity Stamps Coffee Mug Card die set in white cardstock and then took the Slimline Stripes stencil to sponge over it.  I completely sponged over the handle of the cup and then I sponged the center of the cup in grey colored ink for the bunny to be on top.  I also stamped a few coffee beans from the stamp set with the same sponged ink.  I took some Glitterstock to cut the die cut piece for the top of the coffee cup and for the inside of the card is where I added my gift card holder which comes with this die…which is pretty cool!  It’s already to go for my coffee loving birthday person now!!

I did not have a Trinity Stamps birthday sentiment, so I pulled out one from my stash and white heat embossed it over a strip of cardstock that is the same color of ink from my cup.  The banner was actually cut out with the Trinity Stamps Slimline Scalloped Card Panels and Banners die set.  (I just shortened it as needed.)  I used foam squares to pop up the die cut bunny to sit on top of the banner.

Vicki-TSDir-teaBunnyCup-close

Here’s a close up view of the details on the card.  I’ve used Copic markers to color in the bunny and added dots to his cheeks with a white gel pen.  I’ve also took some glitter and added it to the inside of his coffee cup to make it look as glittery as the larger cup!

Hard to tell in the photos, but the blue vellum balloon was also covered with a Spectrum Noir glitter brush pen for a bit of shimmer.  To attach the vellum balloon, I ran it through my Xyron Machine so you couldn’t “see” any glue marks.

(I love how he can hold different items!) 😀🎈

Vicki-TSDir-teaBunnyCup-flat

Wished I remembered to take a photo of the inside of the card, but it just has a coffee gift card holder on the inside along with a greeting and more stamped coffee beans.

Hope you’ve enjoyed my funny bunny shaped coffee cup card today!  I sure appreciate you stopping in and I’ll be seeing you again soon!!

Challenges:

  1.  Trinity Stamps Crafty Troop Birthdays + Trinity Stamps products
  2. Pammies Inky Pinkies – PIP2025 – Anything Goes
  3. Dream Valley – #228 All Occasions
  4. Always Fun – #168 Anything Goes
  5. The Male Room Use Die Cuts
  6. The House That Stamps Built – J2420 Anything Goes
  7. Watercooler Wednesday– WWC277 All About Occasions

Turtley Adorable!🐢

Hello friends!  I hope you’re having a great week so far!  Really hate it when technology doesn’t cooporate and I have to figure it out, but hopefully I can soon!  Sometimes it just needs to be done!🤔

Anyway, I was wanting to post some masculine cards I made for Father’s Day earlier this week, but I’ll have to post another time as this card was already done and is needed to enter a challenge that is ending soon:

Vicki-BRMturtle

I love that wee little baby turtle riding on the back with his tongue out!  The stamp was colored up with Copic markers, cut out with a circle die, along with another circle layer of Cabbage cardstock that I’ve also used for the A2 top folding card base, and another circle layer of vellum.

I was super excited to try out the brand new Ranger Distress line color “Speckled Egg”  products!  I’ve used the Distress Oxide ink to sponge over the image onto a piece of Sidewalk cardstock that was cut out with a stitched rectangle die.  I also took the Circle Tone stencil and added some Opal Chroma Glaze over it.  You can see how pretty the shimmer is on those dots!

For the banner along the side, I took another piece of sidewalk cardstock and cut my own banner with scissors.  I took my embossing ink pad and covered the banner piece with it and then heat embossed the Speckled Egg Distress Glaze EP over it…turned out so pretty!  I heat embossed the sentiment from the same turtle stamp set over a piece of vellum and wrapped it around the banner before attaching it to the card.

Lastly, I’ve added some metallic shimmer ribbon from my stash and some pretty sparkling sequins that remind me of bubbles.  The card was designed based upon a sketch, see details below post.

Vicki-BRMturtle-close

Here’s a better view of the cute image and coloring I’ve done.  I’ve added some dots with a white gel pen for their cheeks as well as their eyes and noses.  I’ve also used it for highlights on their shell.

You can also see a better view of that pretty shimmer from the Metallic Chroma Glaze that I used over a stencil.  Thought it was great for the circle theme going on.

Vicki-BRMturtle-flat

I hope you’ve enjoyed my card today and have been inspired in some way or has brought you a smile!  Thanks so much for dropping in and I’ll be seeing you again soon!

Challenges I’d like to enter this card for:

  1. Colour Crazy Craft – Anything Goes + coloring
  2. The Divas That Cut…Paper! – Summer Fun + dies
  3. Crafting Happiness – #154 Anything Goes optional: Under the Sea
  4. Lil Patch of Crafty Friends – Anything Goes
  5. Make My Monday Use Stencils
  6. The Sisterhood of Crafters – Stenciling

4 Cards Using One Sheet Wonder Template✂

Hello friends! I hope you’ve enjoyed your weekend! We’ve had such beautiful weather and it was nice to be out in it! Warm temps are soon to follow, so I know I’ll be crafting indoors then!

Today, I’m sharing something I did for a challenge a couple of months ago and really enjoyed the process of just creating using a single sheet of pretty floral papers in my stash. Have you ever heard of or tried the “One Sheet Wonder” method?

I only have this ‘overhead shot’ of all the cards I made because I wasn’t blogging at this time, but if you notice in each one of these cards, I have used the same floral pattern in each one. I’ve pulled out a single 6×6 piece of decorative paper from the Farmhouse Floral Paper Pad.

For the top and bottom left cards, you can see that I’ve used the diagonal pieces from the *”One Sheet Wonder” template. For the top one, I’ve just used an image and sentiment from the Farmhouse Friends stamp set. For the bottom card, I actually cut out a floral image from another piece of the same paper pad I’ve used for the template as the focal for my design. (It’s a great way to use up more of the scraps you may have!)

(*See the diagram below for how I cut out a template from the 6×6 sheet to use on my cards.)

For the top and bottom right cards, I’ve taken a couple of the strips cut from the *”One Sheet Wonder” template and then made it my own by cutting it up for a banner and then just separating in half to make a unique design on my card. The top one uses the Eggcellent Gnomes stamp set and the bottom one uses the Take Flight stamp set.

Basically, all I needed to do was sit with my pattern paper and match up the colors to create cards with. It was a great thing to have as a starting point with just a piece of pattern paper in my hand. So if you’re struggling a bit, this is great way to get going! Give it a try!

Here’s the template that I used of the cut out pieces from the one 6×6 sheet of pattern paper. Please feel free to use this as an idea for yourself to get started.

Another idea that I used for this one is that this floral pattern has several different colors in it to work from, so I was able to choose a different color for each of my cards. I believe I could’ve gotten even more than just the 4 cards too!

Hope you’ve enjoyed my post today sharing a little tip for you when you might be struggling! I’ve learned that just getting started can be half the battle sometimes!🤔 Thanks for dropping in and I’ll see you again soon!!

Whimsy Retreat Crafty Fun Results

Hello friends! Hope you’re having a great week! I’m so glad you’ve joined me today as I have lots of fun creations to share with you!😀

This past weekend Whimsy Stamps held a “virtual craft retreat“, so I thought I’d tag along and join in on the fun! I’m glad I did because I made several cards:

The first challenge given was a tic-tac-toe challenge. I did 3 down: birthday, heat embossing and circles for mine. Almost had 2 bingos…but didn’t quite work out! Aren’t those penguin eyeballs the best?! LOL! I needed to send out a birthday card to someone so this was great timing!

The background papers, cover die, sentiment die and the penguin stamps are all from Whimsy Stamps. I even put little ice cube confetti for my shaker card!

This card was made for the second challenge given during the event which was to use a sketch and a color palette using at least 2 of the colors given. This was my take on the sketch along with using blue, green and brown from the palette.

Most all of the items used on this design came from an older card kit from Whimsy Stamps. The stamp set is still available in the store called Enjoy the Journey. For the sentiment panel, I heat embossed a sentiment from this stamp set and then used the Slimline Postage die to cut along the edges of it.

Tihs is the card that I created for the third challenge issued which was to follow a photo prompt with words: “When it rains, look for rainbows. When it’s dark, look for stars.” The first thing that came to my mind was these cool Rainbow Papers from Whimsy Stamps and so I’ve cut a panel out with an older Whimsy Stamps die along with the image panel.

This image is called Rainy Day Smiles by Sassy Cheryl’s which is what I had actually won as a prize from the event over the weekend for one of the games..so that was cool! I wanted to be sure to use it for one of my cards! I added some raindrop crystals on a few areas of the image too.

This card was made for the fourth challenge given which was simply to create a project with one of the digital freebie images that was given during the event.

Facebook actually kicked me out of the event a few times for leaving too many comments! LOL! I was trying to participate in games and it told me that I was leaving too many comments! This was one of the cute freebie images that they gave at the event called Sloth. After all that happened…I felt that this little guy was laughing at me!🤣🤣🤣 So I wanted to laugh right along with him, and I printed him out, colored him with Copics and used the Whimsy Stamps Notched Square dies and layered him over some papers from my stash and attached to a 5″ square card base that I stenciled some clouds on along with the background of the image. I die cut some leaves from the Whimsy Stamps No-See All Seasons Tree die set to add to the top corners of the image panel.

Needless to say, I did “hang in there” right along with him!!😄

And last but not least, the fifth challenge was to make a project based on one of the video tutorials that was shown at the event. Of course, I’m always inspired by Crissy Armstrong and her coloring! This sweet little penguin called Penguin Momma was a freebie given during the event and I watched Crissy color this up and I tried my hand at her tips and tricks.

I printed out another piece of the feather background and cut it out with the Whimsy Stamps Zig Zag Stitched Rectangle dies and added my own white feather to the design. I sponged some grey ink around the edges of the printed papers and added some yellow crystals.

  • I had such fun creating these projects and pulling out my Whimsy Stamps stash for the challenges. And now I have a few cards for sending out to people that I already have in mind! Hope you’ve enjoyed my makes today and I’ll be seeing you again soon!! (The links in this post contain affiliate links if you want to purchase anything! Thank you!!)

Challenges:

  1. Creatialicious – Anything Goes optional birthdays
  2. A Bit More Time to Craft – Anything Goes
  3. Love to Craft – Anything Goes
  4. Crafty Creations – Anything Goes
  5. Colour Crazy Craft – Anything Goes + colouring
  6. Crafty Friends – Anything Goes
  7. Creative Craft Cottage – Anything Goes
  8. Creative Moments – Anything Goes
  9. Lil’ Patch of Crafty Friends – Anything Goes

Don’t Be Crabby!🦀

Hello friends! Are you enjoying your month of June so far? Wow, did it get warm the last few days over my way! Thought it would be a good time to cool down and not “be crabby”! LOL!

How cute is this smiling little guy/gal?! This is Crabby and I’ve colored it up with Copics and fussy cut it out with my scissors.

I’ve decided to make a fun underwater scene with him using the Tangled Waves stencil and going over it with some sparkly Glitter Glaze. I stenciled this over some of the Sea cardstock. For the bottom portion of the ocean floor, I’ve die cut a wavy border strip and covered it with some “Sand Paste” which is very textured and thick. I think it took almost 2 days to dry completely, but I really put it on thick. I think it makes such an amazing texture and it’s flexible too!

I’ve attached it over the glitter glaze background, white heat embossed the sentiment from the crab set with the White EP over a piece of Midnight cardstock which is what I also used for the card base and cut a banner with it to glue over the sand.

I attached the crab over the sand and also some seashell sequins and tropical fish cut outs from a past card kit to help finish the underwater scene.

Here’s a closer look at the stenciled background with the glitter glaze over it as well as the sequins I added above the fish to give the appearance of “bubbles”. I used some Dazzling Blue Nuvo Glitter Drops in the center of each one and I’ve also covered the crab’s eyeballs with some Glossy Accents.

It was such a fun and simple design to create, it only required some patience for a little drying time is all. Plus, this really makes me smile anyway!😉 Hopefully the recipient will think so too!

Thanks so much for dropping by today and I hope you’ve enjoyed my card or been inspired in some way! I’ll SEA you again soon!!

Challenges:

  1. A Perfect Time to Craft – June Anything Goes
  2. Crafting Happiness – #52 Anything Goes optional: beach
  3. 2 Crafty Critter Crazies – Anything Goes + animal
  4. Pammie’s Inky Pinkies – PIP2023 – Anytihng Goes
  5. Crafty Animals – June Anything Goes + animal
  6. Crafts Galore Encore – #76 June Anything Goes
  7. As You Like It – Scenes or Not? Why? (I love making scenes because you can place different images together how you want to arrange them and create depth or personalize it to make it unique!)
  8. Craft Rocket embossing wet/dry (heat and paste)

Caffeinated Changito☕

Hello there friends! Really hope that you have enjoyed your long Memorial weekend! The weather finally turned warm and once it turned warm, it REALLY turned warm and humid over my way! So we were able to plant some flowers in our garden pots outside and enjoy some cookout time too!

I noticed that the “Spring/Summer Coffee Lovers Blog Hop” had started up this weekend and I thought it would be a great opportunity to pull out some old stamps and have some fun with it while making a masculine card for the up-coming Father’s Day holiday too:

Does anyone remember these cute little “Changito” stamps back in the day?! I have used the Changito Coffee stamp (only found this one online) and the sentiment to go with it too! I actually bought these wood mounted rubber stamps years ago at a convention I had went to and have kept them hoarded like my other old stamps. LOL!

I stamped the image on Copic blending card and then again on some blue gingham background paper for paper piecing his PJs in! For the sentiment, I heat embossed it over my background with some appropriately named “Coffee” EP which has a metallic copper with some brown speckling in it…very cool. the store is no longer active that it came from.

For the background of this card, I had some fun playing with my Oxide Distress Inks in Vintage Photo, Broken China, Scattered Straw and touches of Espresso. I sprayed and dried layers as I went. I even took the bottom of a jar I had laying on my table to ink up some Espresso ink to make the “ring” marks over the background. I also took some more of that “Coffee” EP and sprinkled some over the background for even more distressing.

I wrapped some twine around it and attached it to an A2 sized white card base that I sponged around the edges with some Vintage Photo ink.

Here you can see a better look at the image and how I’ve got him colored up with Copic markers. You can barely see the gingham pattern in his paper pieced PJs, but I thought it was cute! I also took a black Copic liner and drew lettering on the coffee cups. I added just a hint of sparkle over the coffee inside the cups with a Spectrum Noir glitter brush pen. I also took a black gel pen to dot his eyeballs, the buttons on his PJs as well as dot the bunny slipper eyes. I think that little detail really makes his pop more with a bit of character.

The image was cut out with a stitched circle die and then I also cut out an additional circle to mat behind him, which I took a VersaMark ink pad and then used the “Coffee” EP to heat set along the edges of it so it has the same look and texture as the background and sentiment. This was attached over the background with twine.

Lastly, I’ve taken some brown colored sequins from my stash and attached them to the background and filled the centers with some Nuvo Honey Gold Glitter Drops.

Hope you’ve enjoyed my masculine and quirky card for today! Thanks so much for dropping in and I’ll be seeing you again soon!!😉

Challenges:

  1. Spring/Summer 2020 Coffee Lovers Blog Hop – Coffee/Tea/Cocoa Related Project

2. Addicted to Stamps and More – #391 Anything Goes

3. Cute Card Thursday – #635 Critters

4. Creative Knockouts – #351 Embossing Delight (wet or dry)

5. QKR Stampede – #399 Anything Goes

6. Simon Says Stamp Monday – “Going Around in Circles”

7. Pammie’s Inky Pinkies – PIP2021 Anything Goes

8. Die Cut Divas – Make it a Beverage + die cut/embossing folder

Inspired By Crafty Friends❤

Hello there friends!

I have to say thank you for your lovely comments and thoughts!  Sometimes, you just never really know about something or how someone feels unless you are told or you ask!  I’m really amazed that there are people I didn’t realize that actually cared if I posted something!  Even if you have stats on your postings, you still don’t know who really DOES like to see what you’re posting.  I’ve had some blog friends that have been around for MANY years, even before this blog platform and I’m so thankful for you guys!  I am always truly inspired by you all for sure!  Thanks for being around!❤  (Even if you don’t comment!!) 😉

I have another card that I didn’t get a chance to share as it was created at the end of February and I never fit it in to post, but I pulled out a very old stamp to play with because I was inspired by a friend to use it:

Vicki-ShellysPenguin

Maybe you have heard or seen the Whipper Snapper Designs stamps?  I’ve had this adorable little penguin for a while now and I think he’s long gone from the website.  I don’t see him in the store, but the name on the side of the wood stamp is “Ice Cream Penguin” and no date.  I have a small collection of their stamps and they’re all older as I haven’t bought anything from them in years and not sure why really.  I hold them in high regard like my old Peanuts Gang/Snoopy wood rubber stamps as you can’t find those any longer either!  I don’t part with them! LOL!

Anyway, inspired by my friend Shelly that was featured on Splitcoast Stampers as the FS681 “mcshmidty” Featured Stamper.  This is a challenge where you find a project from their online SCS gallery and use it as inspiration to create something.  Here’s the card she made that I fell in love with in her gallery:

IMG_6447_12216_by_mcschmidty
card by Shelly Schmidt “mcshmidty” on SCS

I thought it would be fun to use an older stamp I had (I love penguins) and create a birthday style card with it.  I have a few birthdays to celebrate in the colder months, so I was just trying to think ahead and I liked that this could be a masculine or feminine card to give out too!  I can’t remember where I pulled the pattern paper from, but the colors really caught my eye!  Instead of the strip like Shelly has on her card, I made my strip into a banner.  I used a snowflake instead of a sun and two enamel dots.

Vicki-ShellysPenguin-close

I stamped and colored him up with Copic markers.  I used some liquid applique for the end of his hat and dotted his cheeks with a white gel pen.  I used glossy accents over top of the cherry on his ice cream cone.

The sentiment was pulled out from an older My Favorite Things stamp set that I white heat embossed over black cardstock and cut apart.  I also used MFT stitched die cuts for the banner and circle image.

Vicki-ShellysPenguin-flat

I must’ve been in the mood for ice cream before I took a blog break as I just realized my last post had ice cream too! LOL!!  Hope you like my card as I was really inspired by my friend’s card to make it!

Thanks for dropping in and I’ll be seeing you soon!!

Challenges:

  1.  Splitcoast Stampers Featured Stamper – FS681 mcshmidty
  2. Crafty Animals – #38 Anything Goes + animal
  3. 2 Crafty Critter Crazies – #38 Anything Goes + animal
  4. Challenge Up Your Life – #123 Animals
  5. QKR Stampede – #396 Anything Goes
  6. Lil Patch of Crafty Friends – #131 Anything Goes
  7. Crafting Happiness – #47 Anything Goes/optional: birds