Celebrate For 2 Crafty Critter Crazies + Other News

Hello friends!  Happy April 1st which means it’s time for a new monthly challenge for the 2 Crafty Critter Crazies Challenge!  Remember that it’s always an “ANYTHING GOES + CRITTER” challenge to enter your creation.  We’re looking forward to seeing your projects!

This month we’re being sponsored by Digi Doodle Studios!  They were kind enough to provide images for the design team to create their projects with, so here’s what I’ve made for my challenge project:

Vicki-2CCCwithDDS

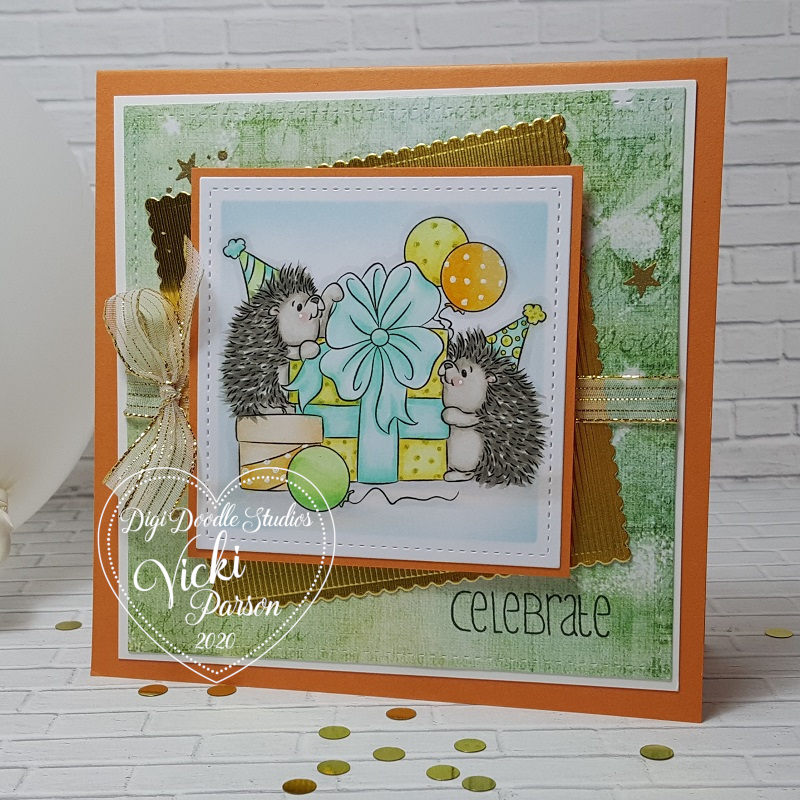
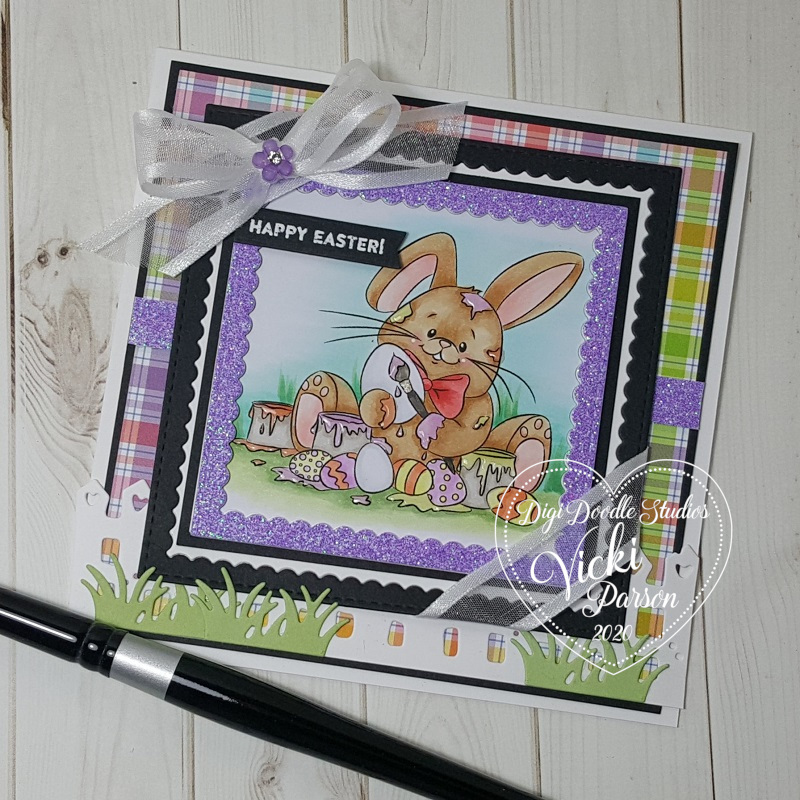
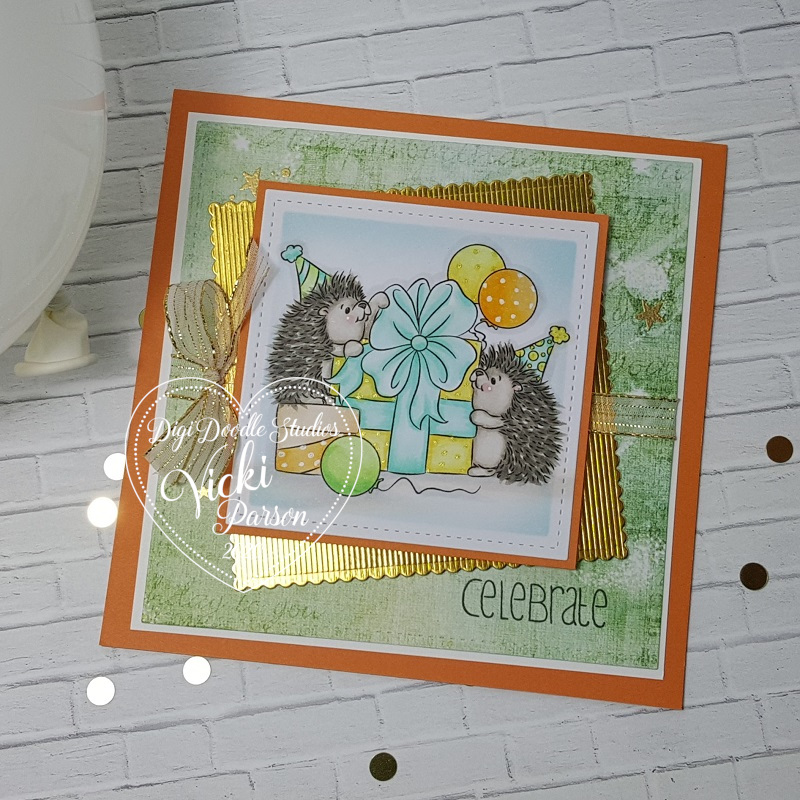
I think I could probably celebrate with these cute little hedgies, couldn’t you?!🦔🦔

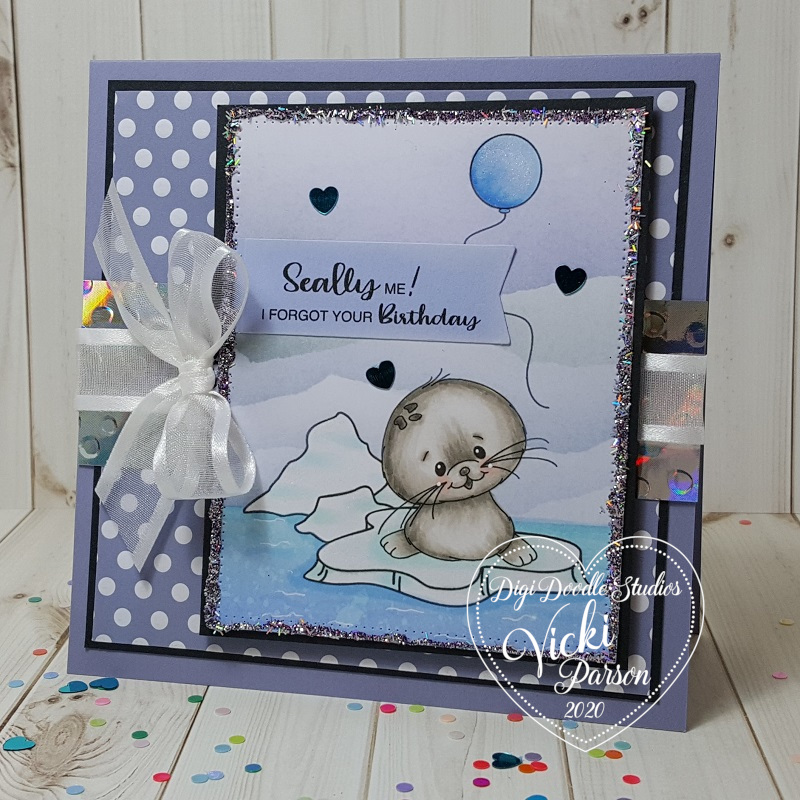
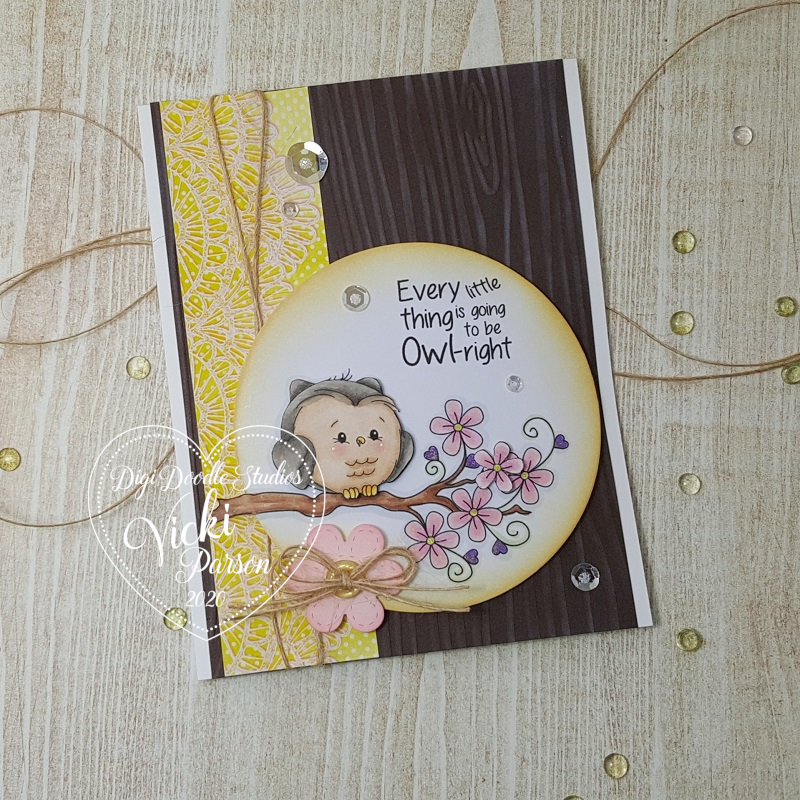
This image is called Hedgie Party from Digi Doodle Studios and it was super fun to color up for my card!  We can always use birthday cards in our stash, so I pulled out some papers from my stash…including some left over pieces to assemble the design.

I used a Simon Says Stamp stamp set to heat emboss the stars over the green decorative paper with gold EP.  I stamped the sentiment at the bottom of the paper from the same stamp set with black ink.  I cut out this panel with a square stitched die, layered over white cardstock and then attached it to a piece of orange top folding 5″ square card base.

I pulled out some gold mirror cardstock cut with a scallop square die and layered it over the design, wrapped some gold ribbon around it, placed the layered image panel over top of that with craft foam and added the bow.

Vicki-2CCCwithDDS-close

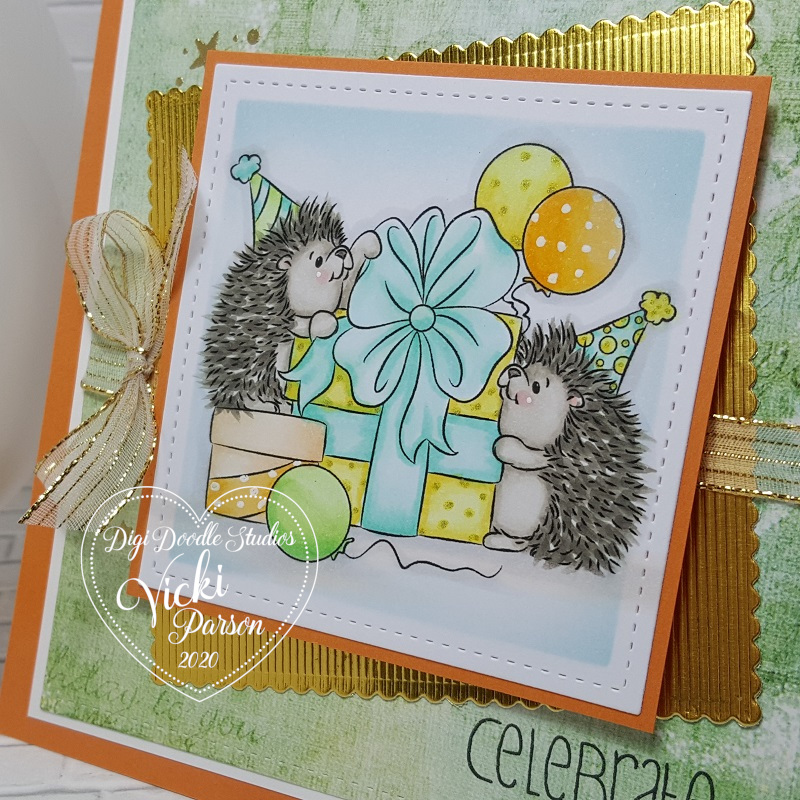
Here’s a closer view of the image I’ve colored with Copic markers.  I’ve also used a white and gold gel pen to create some polka dots over parts of the image.

Hard to see in the photo, but I covered the big present bow with a glitter brush pen too.

Vicki-2CCCwithDDS-flat

I hope you’ve enjoyed my card today using this sweet DDS image! Thanks for stopping in!

Other news:

Just FYI that this post will be my final creation as a design team member for not only 2 Crafty Critter Crazies, but also for Digi Doodle Studios as well.  Although I adore everyone on these design teams very much, it’s just time for me to let DTs go for a while.

Challenges:

  1.  Krafty Chicks – All Occasions
  2. Di’s Digi Challenge – Birthdays
  3. QKR Stampede – #391 Anything Goes
  4. Creative Knockouts – #343 Anything Goes
  5. Pammie’s Inky Pinkies – PIP2013 Ribbon
  6. Country View– Animal Magic

Peyton is Painting Eggs for Easter!

Hello there friends!  Where have I been?  Well, I went off looking for my “MOJO” and he’s doing some disappearing acts on me for sure!  I’m having such a hard time getting motivated and feel that my creative juices have completely dried out!  Do you ever feel this way too?  What are some things you have done to help you?  I will keep trying for now!  LOL!  So sorry for being MIA lately!

Today I must share with you a card I came up with using this really adorable image from Digi Doodle Studios just in time for Easter!

Vicki-DDSPayton-March13

Isn’t he adorable?!  This digital image is called Peyton’s Painted Eggs from DDS and he’s busy at work painting up eggs to get them done in time for Easter!  I’d say he looks like myself getting messy and into the job!  LOL!

After coloring him up, I used a MFT die to cut him out and create the layered frame around him with some purple glitterstock along with some black and white cardstock.  I white heat embossed a sentiment (from Simon Says Stamp) and cut it out with a banner die to go over the image panel.

I took some white ribbon and wrapped it around the corners and attached a bow on the top corner with a flower embellishment in the center…found in my stash.

Also “found in my stash” was the fence and grass dies that I used to attach to the bottom of the card front panel.  Some of the “grass” was placed behind the image panel and some in front of it.  I also attached in the center a strip of the purple glitterstock Lawn Fawn Spring Plaid paper for the front of the card and this was layered over another piece of black cardstock which was mounted over a top folding 5″ square white card base.

Vicki-DDSPayton-March13-close

Here you can see how I’ve got him all colored up with Copic markers.  He was actually really fun to color up.  My first notion was to make him a white bunny, but I thought he would really stand out if he was brown in color instead.  I added some blades of grass around him with my markers.

I left the egg he was in the process of painting white along with the plain one on the ground…after all, he IS in the process of working on them! LOL!

I’ve only used the white gel pen for his cheeks and  I’ve used a clear metallic gel pen on the paint brush.  The “shinny” areas you see on the “fresh paint” colors are the places that I’ve covered with glossy accents.  The light is naturally highlighting them!

Vicki-DDSPayton-March13-flat

I hope that you’ve enjoyed my Easter bunny card today and it’s helped get you in the mood thinking warm Spring thoughts!  I know I’m really looking forward to warmer weather and being outdoors for sure!  Easter is just around the corner now!

Challenges:

  1.  Crafty Animals – Anything Goes + animal
  2. A Bit More Time to Craft – Anything Goes
  3. Crafts Galore Encore – #73 Anything Goes
  4. Love to Craft – LTCCB44 Anything Goes
  5. Lil Patch of Crafty Friends – #127 Anything Goes
  6. Creative with Stamps – #48 Egg
  7. Pammie’s Inky Pinkies – PIP2010 Anything Goes
  8. Crafty Creations – #407 Anything Goes
  9. Creative Fingers – #181 Anything Goes
  10. Sweet Stampers – #42 Easter or Spring
  11. The Sisterhood of Crafters – Easter

Owl-rageous Thanks

Hello friends!  We’re finally on the last Friday of February!  Yay!

Although we’ve had snow in our forecast recently, I’m feeling Spring will be in the air soon and I really look forward to it along with all of the pretty flowers and green grass!  So today, I’m sharing a card I’ve made using this adorable Pairables set from Digi Doodle Studios:

Vicki-Owlrageous2

Isn’t this little owl the cutest?!  I love how he has his little wings out for a hug!  I’ve used several of the images from the “Owl-rageous” Pairables set to create the scene on my card.   I have used Word.doc on my computer to arrange and size the different images where I wanted them for my scene and printed it out to color.  I’ve also printed out the flower image from the set along with the sentiment separately to cut out for my design.

As you can see, I’ve taken the flower image and sized it differently and arranged it around the stump for the scene.  I’ve also used it to cut it out separately to attach to the twine next to the sentiment as well as the twine bow at the bottom.

I’ve printed out the sentiment, cut it out and then cut the fish tails on each end and ink blended with brown ink around it.  I’ve matted it with the same brown cardstock that I’ve layered the image panel on and it’s also the base of my top folding A2 sized card.

I’ve pulled out some textured woodgrain cardstock as well as the Spring Plaid papers from my Lawn Fawn stash.  I thought the woodgrain and Spring-like colors worked well for this cute owl.  I’ve finished it off with some clear sequins.

Vicki-Owlrageous2-close

Here’s a closer look at the coloring I’ve done on this cutie!  I’ve used the W tones to color him in and then the E20s to color the stump.  I also end up going for the G24, G21 and G20 for coloring my grass.  I love the bright Spring green it gives I think.  I highlighted his cheeks and eyes with a white gel pen.

You can also see a subtle cloud line behind him.  I’ve used the MFT Cloud Stencil with my ink blending tool and Tumbled Glass distress ink to create the background.

You can see that I’ve wrapped some twine around the center of the card where the two different papers meet as well as wrapped around each corner of the image panel.  This is where I decided to add the cut out flowers on each end.

Vicki-Owlrageous2-flat

I feel like this owl with my arms open and ready to take in all of Spring when it comes and thank Mother Nature for bringing it around! LOL!  How about you?

Thanks so much for stopping in today my friends!  I’ll be seeing you soon! 🙂

Challenges:

  1.  Creative Fingers – #180 Anything Goes
  2. Through the Craft Room Door – Anything Goes
  3. Pammie’s Inky Pinkies – PIP2008 Anything Goes
  4. Arty Divas – #16 Anything Goes
  5. Simon Says Stamp Wednesday – Anything Goes
  6. Cute Card Thursday – Spring Fever

Seally Me!

Hello friends!  I hope that you’ve had a great weekend!  The temps actually got up high enough that I was able to take a nice walk Sunday!  Then of course since it’s February, Mother Nature says we will be getting several inches of snow today!  For some reason this month seems really long, so I’m ready to move along to March! LOL!

Since we are still getting snow, I thought it would be a great time to pull out this adorable “Seally for You” Pairables digi set from Digi Doodle Studios and make some cards:

Vicki-DDSSeallyforYou (2)

For my first card, I’ve arranged the images from the set and printed it out.  You may recognize the balloon floating in the air which is another digital image that came from the DDS Little Ones Pairables set.  (So don’t forget that you can always mix sets together to come up with some really fun scenes!)

To finish out the scene, I’ve used some masking paper and ripped up pieces of scrap paper to create the “hills” in the background along with the “water” that the seal is taking a ride on over a piece of ice.  I used some blender brushes to blend the colors for the background.

I’ve used some liquid glue around the edges of this panel and covered it with some glitter.  I printed out the sentiment from the set separately over a piece of colored cardstock and cut it out for the banner.

Since I was trying to keep this a “wintry” style card, I kept the colors more blue and purple.  I found some fun papers in my stash that worked for a fun birthday theme and then I used an embossing folder and embossed that strip of Prism paper in the center that I’ve placed the ribbon over and added the bow.  Lastly, I’ve added the heart sequins and covered the balloon and ice images with a glitter brush pen.

Vicki-DDSSeallyforYou-close (2)

Here’s a closer look at the coloring on this cute little seal as well as all of the shimmer and sparkle everywhere!  I’ve used a white gel pen for his cheeks, eyes and for lines on the water.

“Seally Me”….I’m always forgetting a birthday here and there!  LOL!  Which I guess is why I’ve decided to create another card:

Vicki-DDSSeallyBday

For this card, I’ve kept it pretty much the same in a more simplified way with less layers and details.

As you can see, I’ve printed out the scene panel with just the seal on the ice platform and then I’ve used blender brushes here again to just give the “water” a bit of color that fades out towards the center of the panel.  I printed out the “icebergs” and sentiment separately and then cut them out to place over the design.

I’ve also used a MFT balloon die to cut out with black and turquoise glitter paper and popped that up along with the “icebergs” over the panel.  Lastly I’ve added some sequins.

Vicki-DDSSeallyBday-close

Here’s a closer view of the coloring on this seal.  I’ve kept him the same colors, but for this one, it’s a bit softer in tones.  Again, I’ve used a white gel pen for this cheeks, eyes and water as well as a glitter brush pen over the icebergs and ice platform.

I honestly am not sure which one I like better than the other, but that seal is cute regardless and that face might help me “get away” with being late for a birthday when I send it along! LOL!

Really hope that you’ve enjoyed my cards or have been inspired in some way!  Still struggling with no MOJO, but trying to work through it and hopefully it’ll miss me and want to come back soon!  Until then, I will keep trying to create through it.

Thanks so much for stopping in and I’ll see you soon!

Challenges I’d like to enter:

  1.  Di’s Digi Challenge – Use a Digi Image
  2. Papercraft– #55 Winter Fun
  3. Createful Heart Design – #17 Anything Goes
  4. Jan’s Digi Stamps– #8 Anything Goes
  5. The House That Stamps Built – F1920 Winter Color Palette
  6. Aud Sentiments – #245 Anything Goes + Sentiment
  7. Penny’s Paper-Crafty – #465 Anything Goes

It’s Going to be “Owl-right!”

Hello friends and welcome to the weekend!  I hope you have some great plans ahead of you and have some fun!

Today I’d like to share this card I’ve made with a darling feathered cutie and the punnyness that goes along with him….

Vicki-DDSOwlright

Isn’t this little guy the cutest owl you’ve seen?  This image was actually created on my computer with the “Owl-rageous” Pairables digital stamp set from Digi Doodle Studios.  The owl, the branch and the sentiment are all separate images, but I’ve pieced them together on my computer and printed it out to create this scene!

I’ve actually printed out an “extra” owl and flower to color in and pop up over the image for added dimension.  I used the “out-of-the-box” technique to circle die cut out the image.  The branch is sticking outside the circle.

I’ve used a woodgrain embossing folder and rubbed some white ink over it and also added a strip of yellow paper from my stash wrapped in twine along the edge.

I die cut a flower and rubbed some pink ink over it, attached a button and twine bow over it to pop up over the owl panel.  Then added some sequins filled with glitter glue in the centers.

Vicki-DDSOwlright-close

Here’s a closer look at the coloring I’ve done on the images.  I’ve used a purple glitter gel pen for the tiny hearts on the branch and then a yellow glitter gel pen for the centers of the flowers.  I’ve used some yellow ink to sponge around the circle panel.

Vicki-DDSOwlright-flat

This card actually has me longing for Spring to come with those flowers!  He’s letting us know that everything is OWLright!! ha ha ha!!  Hope you’ve enjoyed my creation today and I really appreciate you stopping in!  See you soon!

ETA:  Hubby said I should include the song….

Challenges to enter:

  1. Cheerful Sketches – Feb sketch
  2. Love to Craft – LTCCB43 Anything Goes
  3. Crafts Galore Encore – #72 Anything Goes
  4. Pammie’s Inky Pinkies – PIP2006 Anything Goes
  5. Not Just Cards – Feb Anything Goes
  6. Arty Divas Anything Goes
  7. Through the Craft Room Door – Anything Goes
  8. Alphabet Challenge – ‘W’ is for “Anything You Wish”

Seally For You

Hello there friends!

There’s something brand new in the Digi Doodle Studios store this month and it’s just perfect for making an adorable Valentine’s Day or love themed card!  Check out this sweet card I’ve made for you today:

Vicki-DDSSeallyForYou

Aren’t these snow seals just the sweetest?!  I’ve used the brand new Pairables digital set called Seally for You from Digi Doodle Studios for my card here.

It’s really easy to create a scene on your computer with the images and then just print them out to color!  I have this cute couple arranged in a “Titanic” situation (If you’ve seen the movie, then you know what I’m referring to! LOL!)  on my scene here, but also have printed out a couple of extra hearts along with the fish and floating ice cube to fussy cut out and add to my scene later after assembling it.  The “water waves” that I’ve added to my scene is actually from the DDS Otterly Loves Pairables.  That is what is so cool about these Pairables sets, is that you can use the different elements together with another set to create some fun & unique scenes!

I used cut out vellum for the water and added another strip that I actually clear heat embossed the sentiment as it came out of the printer.  You can heat emboss over vellum as the ink stays wet a little longer after printing it out.  (Not for too long though!)

I added the colored up fish, hearts and ice cube to the design as well as sponged some soft pastel clouds with a stencil.  I was also trying to be different by tilting the image layer over the card.  The card front panel was embossed with a falling snow embossing folder, I wrapped some ribbon around the corner and attached this piece to an A2 sized top folding white card base.

Vicki-DDSSeallyForYou-close

I’ve colored the images with Copic markers.  You can see that I’ve fussy cut out the smaller heart and then popped up the top heart with foam tape.  I tucked the ice cube and one of the fish behind the vellum and then popped up the fish over the ice cube with foam tape.  I took one fish and attached next to the heat embossed sentiment.

You can also see the hearts long with the ice cube and ice platform that I’ve taken a glitter brush pen to add some shimmer to them.

Vicki-DDSSeallyForYou-flat

I hope you’ve enjoyed my card today or have been inspired to create your own fun digital scene to play with too!  Thanks so much for dropping by today and I’ll see you soon!

Challenges I’d like to enter my card for:

  1.  Challenge Up Your Life – Winter Landscape/Scene (6 total challenges)
  2. Crafty Friends – Love/Romance
  3. Get Creative – Use Hearts
  4. Creative Inspirations – Anything Goes
  5. C.R.A.F.T. – Love/Valentine’s
  6. Creative Moments – #184 Anything Goes with twist:  love

Guest Design Spot for The Paper Girls With Birthday Fun!

Hello friends!

I’m very excited to share my post with you today for The Paper Girls Challenge as I’ve been invited to be a guest designer for their current challenge of “BIRHTDAY“!  We all need birthday themed projects, so this is a great way to join in the fun and add to your birthday card stash too!  Hope you will join us!

I wanted to pull out some stamps that I had bought a while back and never pulled out to use yet, so this was fun!  Here’s my card:

Vicki-PCGguestDT-MFTbday

Who could resist a couple of cute party animals! LOL!  I’ve pulled out this adorable “Sending Sweet Celebration Wishes” stamp set from My Favorite Things and made a fun party scene with it!

For the card front, I’ve die cut some Summer Splash cardstock with the Gift Box Cover-Up Dienamics and then used it to also cut some older MFT pattern papers to fit inside the die cut squares.  I layered these pieces over a piece of MFT Daffodil cardstock (looks to be retired) and then mounted it over an A2 sized top folding white card base.

I’ve used the same Summer Splash cardstock to stamp the sentiment from the stamp set and used a banner die to cut it out with and used the Gift Box Cover die to cut the end of it to match with the upper right box area.

For the Gift Box Cover-Up “frame”, I took a sentiment from the MFT Penguins in Paradise and stamped the “cheers” image randomly with VersaMark ink all over it, but then decided that you couldn’t see it very well, so I added the word to the yellow banners with a black pen in my own writing.

I’ve used the coordinating die set for the Sending Sweet Celebration Wishes set to cut out the colored images and attached them to the card front.  Some I’ve popped up with foam tape and the others were glued.  I also wanted to add a little sparkle, so I’ve attached a few confetti sequins to finish it up.

Vicki-PCGguestDT-MFTbday-close

Here’s a closer look at the coloring I’ve done on these cuties.  I’ve used a white gel pen for their cheeks as well as adding some polka dots to the party banner.

You can see where I’ve used a marker to write the words on the banners and I also used it to create stitches along the top of each banner too.

I’ve also added some shimmer with a glitter pen over the cupcake frosting.

Vicki-PCGguestDT-MFTbday-flat

I hope you’ve enjoyed my birthday party animals card today and have been inspired in some way!

Thanks so much for stopping in today and I’ll be seeing you soon!!

Challenges:

  1.  MFT Birthday Project– Jan “Cheers”
  2. Crafty Calendar – Use die cuts/punches
  3. Seize the Birthday– Creatures Great & Small or Anything Goes
  4. Creative Knockouts – Birthday Wishes
  5. Crafty Animals – Anything Goes + animal(s)

Just For You at 2 Crafty Critter Crazies

Hello friends!  It’s not only the weekend, but it’s also the first of February!  It’s what we call the “love dovey month”! LOL!  The first of the month also brings us a new challenge starting over at the 2 Crafty Critter Crazies blog!  It’s always an “ANYTHING GOES + ANIMAL” for your project each month.  We look forward to seeing your creations!

For this month we’re being sponsored by Jan’s Digi Stamps and here’s what I’ve come up with for my project:

Vicki-2CCC35-JansDigi-BlueRitz

Check out this dapper little penguin stepping out to hand his loved one a bouquet of flowers! 🙂  I’ve used the adorable Puttin’ On the Ritz digital set for my card here.  It had me at penguin! LOL!

I have pulled out some of those cool vintage looking papers from that SSS Valentine card kit that I had used earlier this week on my parent’s anniversary card and just loved the blue tones in them, so I went with that color scheme for my design!

The penguin was colored and fussy cut out.  The way he was positioned looked like he was popping right through an opening to hand out the flowers, so I’ve used some circle die cuts with more of the vintage papers for the background and tucked him in there with his foot and flowers outside the circle frame.  I’ve placed a silver doily behind him.

The base of the card measures 5″ square, I’ve taken a couple of strips of the papers and layered them over a white card panel that I’ve sanded the edges on before mounting it over the blue card base.  I took some seam binding ribbon to wrap around it and then attached the circle panel to the front with a bow and candy heart accent over top.

The sentiment was printed out from the same stamp set and cut out and layered with a heart die set.  I’ve also sponged around the edges of the white heart with grey ink.

Vicki-2CCC35-JansDigi-BlueRitz-close

Here’s a close view of the image and how I’ve got him all colored up with Copic markers.  I’ve used a white gel pen for dots on his cheeks as well as dots around the flowers.  Sometimes those bouquet of roses have the baby’s breath with them…for some reason I think it makes the bouquet look extra special!

For part of the penguin’s “cane” or “umbrella”…not sure, I’ve used a silver metallic gel pen to color in parts of it.

I kept his hands white as I felt like he was wearing white gloves.  LOL.

Vicki-2CCC35-JansDigi-BlueRitz-flat

I hope you’ve enjoyed my fancy little love penguin card today and have been inspired!

Thanks so much for stopping in!

Challenges:

  1.  Jan’s Digi Stamps Challenge Anything Goes
  2. Simon Says Stamp Monday – All Loved Up
  3. Cute Card Thursday – Valentines
  4. Krafty Chicks – Anything Goes
  5. As You Like It – Warm or Cool Colors (love the cool tones)
  6. Daring Card Makers – Layer it Up!
  7. QKR Stampede Anything Goes

Foxy Skater Spinner Card in Action With Video Tutorial!

Hello friends!  Really feeling the cold air around here, so I’m still thinking in winter mode and have another interactive winter card to share with you again today!  (Please be sure to check out THIS POST to see another interactive winter card and video tutorial if you’ve missed my last posting!)

What’s a better way to embrace the cold than to create interactive cards in your nice warm crafty space, right?!  So sit back, have a warm sip and get creative with me today!

Vicki-DDS-Spinner Fox Card video

This cute little guy is so fun to watch him spin around doing his cool ice skating trick!  I’ve used the Foxy Skater image from Digi Doodle Studios for my card here along with the Winter Plaids N’ Patterns Digi Paper Pack and Snow Days Sentiments set as well!

I’ve used several dies from My Favorite Things for the front of the card!  I’ve cut out the plaid papers with the A2 Stiched Rectangle die and mounted it over an A2 sized side folding white card base.  The spinner “window” was cut out with a Circle die that was also used to cut the center for the Scallop Stitched Circle frame around the opening.  The sentiment was printed out and cut with the MFT Slanted Banners die (not finding link in store).  I’ve also used MFT dies for the snowflakes (also not shown in store), that was cut from some Brutus Monroe Fallen Snow Glitterstock.  I’ve added some silver Stickles to the centers of the snowflakes and dotted around the front of the card.

I’ve also used some snowflake papers for the inside area of the card from the Candy Land Paper Pack from MFT as well!

Check him out below as he spins around:

What’s different about this particular spinner card is how I’ve used a single digital image to create the front AND back of this Foxy Skater guy!

To see how I’ve put together this card for the spinner action, check it out in my video below or you can watch it on You Tube HERE:

I still have this card along with the other interactive card from my last post sitting here on my desk playing around with them! Not sure I can give them up quite yet as I’m having fun!! LOL!

Vicki-DDS-Spinner Fox Card video-close

Here’s a closer look at the cute “Foxy Skater” guy that twirls around on the card.  I was going for a bit of a textured look on his fur, so I also used a white gel pen to mix in some white fur on his cheeks, chest and tail areas. I’ve also used a gel pen for the cheeks and a metallic gel pen for his skate blades.   It was a little more time consuming to color in two fox images, but as you can see, it’s totally worth having both sides for this spinner action design! 🙂

To flip the image in the opposite direction, I used Word doc. on my computer, copied the original image so that it was the exact size, pasted him again and then used the “rotate” setting to flip him in the opposite direction.

Check out the video to see how I was able to fussy cut him down for my card design.

Vicki-DDS-Spinner Fox Card video-flat

I hope you’ve enjoyed my spinner card today and that the video is helpful for you to create your own fun version during the wintry cold months ahead of us!

Thanks so much for stopping in today my friend and I’ll be seeing you soon!

Challenges I’d like to enter this card for:

  1.  Shopping Our Stash – Winter blues
  2. Through the Craft Room Door – Anything Goes
  3. The Male Room – It’s Snowing!
  4. Creative Moments – Anything Goes
  5. Penny’s Paper-Crafty – Anything Goes #463
  6. CCEE Stampers– CCEE2004 “Ice, Ice Baby!
  7. Aud Sentiments – Anything Goes + sentiment

The Skiing Bandit Raccoon in Action with Video!

Hello friends!  I hope you’re having a great week!

As I mentioned in my last post, it’s really cold and snowy over my way so I thought I’d join in with the winter season and have a little interactive fun in my craft room!  (Where it’s much warmer inside! LOL!)

I have used some Digi Doodle Studios products to create this really fun interactive card design:

Vicki-DDS-Pull Tab Slider Racoon

This cute little critter is just having a blast! 🙂  This card was so fun to play with and I couldn’t put it down!  This cute critter is the Skiing Bandit Raccoon digital stamp from Digi Doodle Studios.

I’ve colored him up with my Copic markers and used a glitter silver gel pen to color up his skiing poles.  He was fussy cut out with scissors. You will notice that his scarf and mittens resemble the background papers too, which were paper pieced from the Digi Doodle Studios Winter Plaids N’ Patterns Digi Paper Pack.

To create the scene, I’ve die cut some ‘hill slopes’ with a die cut, but you could use just scissors to cut one yourself.  I die cut a set of trees for the background  and ended up inking up the edges of the snow hills along with the banner sentiment at the top.

What’s fun about this card is that when you grab that little arrow at the bottom left of the card, this little skiing bandit starts flying down the glittery snow hills!

If you’d like to see how this card moves along and how to create one for yourself, be sure to check out the video below or watch on You Tube HERE!

I thought that the invisible way he flies over the hills along with the idea of how to create your own slider mechanics with scraps is something fun that anyone can put together with items they have on hand!

Vicki-DDS-Pull Tab Slider Racoon-close

And of course here’s the view of him flying down the hill as the arrow slider tab gets pulled from the card!  The pull tab slider sentiment comes from the Digi Doodle Studios Snow Days Sentiments set, which is what I’ve also used at the top front of the card.

For the sentiment on the pull-tab slider, I’ve taken a marker and underlined part of the sentiment and added an explanation mark on the end.

I also decided to stamp a black arrow at the end of this slider so that when it’s tucked inside, you can see that arrow so the recipient knows what to do!  You could of course just use a pen to draw your own arrow as well.

Vicki-DDS-Pull Tab Slider Racoon-flat

I hope you’ve enjoyed my interactive slider card today!  I’m still having fun pulling that skiing raccoon over the snowy hills! LOL!  I think this would be a really fun card to send along to a friend for a smile during these cold months, don’t you?

Thanks so much for stopping in!  I’ll be seeing you again very soon!

Challenges I’d like to enter for this card:

  1.  Sparkles Monthly – Winter Blues
  2. QKR Stampede – #381 Anything Goes
  3. Allsorts – More Than a Single Word
  4. Crafty Friends – Anything Goes
  5. Lil’ Patch of Crafty Friends – Anything Goes
  6. Pammie’s Inky Pinkies – Anything Goes #2003
  7. The Paper Girls – Winter Color Palette