Weather Related at Sparkles Monthly

Hello friends!  When I read about the weather from other areas, it always amazes me how different and even to extremes the weather gets especially during this time of the year!  I hear everything from rain, sun, snow, tornadoes, flooding, cold, warm, hot, etc.  So where do you find your own weather to be at right now?  In my area, we have reached past the snow, but it’s still pretty cool at night…so I know that Spring and the rain is here for us with a bright spot of flowers/sprouts starting to come out in the Midwest U.S.

With this in mind, we have a new challenge over at Sparkles Monthly and we have a very fitting theme of “Weather Related  (rain, wind, sun, etc.) this month.  Would love to see lots of different varieties of weather related projects, so I hope you’ll join us.  Here’s what I came up with:

I was so happy to finally get a chance to use this adorable set by Lawn Fawn called Beary Rainy Day as I’ve had it for a while, but never used it until now.  

I started with a kraft A2 sized top folding card base and stenciled some white clouds over it.  I then splattered some navy watercolor paint over it.

While that was drying, I worked on my scene.  For the background, I took some blue oxide inks in Blueprint Sketch and Salty Ocean and ink blended them on the stitched die cut panel.  I used some water to spritz over it for a watermark look.  While that was drying, I took another stitched panel and ink blended some Mowed Lawn and Rustic Wilderness Oxide inks for the grass area and die cut a hill to place at the bottom.  Before I attached it, I also die cut a white picket fence to go behind it.  I placed this scene onto a piece of navy cardstock and attached to the card base.

To complete the scene, I’ve stamped, colored with Copics and die cut the critters, rain puddles and clouds.  I used the coordinating raindrop die with the set and just die cut a few raindrops in silver glitter paper to add to the scene.  Lastly, I white heat embossed part of the sentiment on navy cardstock, cut out with a banner die and then just stamped the sentiment at the bottom in navy ink.  Also hard to see in the photo, but I’ve added some shimmer to the puddles with a glitter brush pen.

  • That’s all from me today!  Hope you’ll stop by the Sparkles Monthly blog is see what the team has come up with using this theme and join us in the challenge!  Thanks so much for stopping in as I love to read your comments!

Challenges:

  1. Craft Rocket Layer it Up 
  2. Addicted to Stamps & More Die cuts and/or stencils (clouds stenciled and variety of die cuts used)
  3. Penny’s Paper-crafty Anything Goes Using Paper
  4. Crafty Gals Corner Fill in the Blank:  “Adorable puddle jumping!”
  5. Time Out Pick 2 from list:  I picked Stencil & Water + Spots ( I was inspired to stencil some clouds and add some spots (splatter) to go with the colors/clouds of my scene and I was inspired by the water with the rain, puddles and watermark for ink blending)
  • Thank you to all the challenge blogs for keeping us all inspired to create and play along with our supplies!  I try to play along as much as I can.

Z is for ZOOM!

Hello there friends and welcome to April already!  I do not know if this year seems to be flying by because I’ve been busy with life or it’s just flying by anyway!  Speaking of things flying by…

Today starts up a new challenge over at the Alphabet Challenge Blog!  We are on the last letter of the alphabet this time and the hostess has chosen “Z” is for ZOOM (anything that goes fast) for the theme.  *Remember that this is a bi-weekly challenge, so you have two weeks to enter*  I hope you will find some time to join us in the gallery!  Here’s what I’ve created:
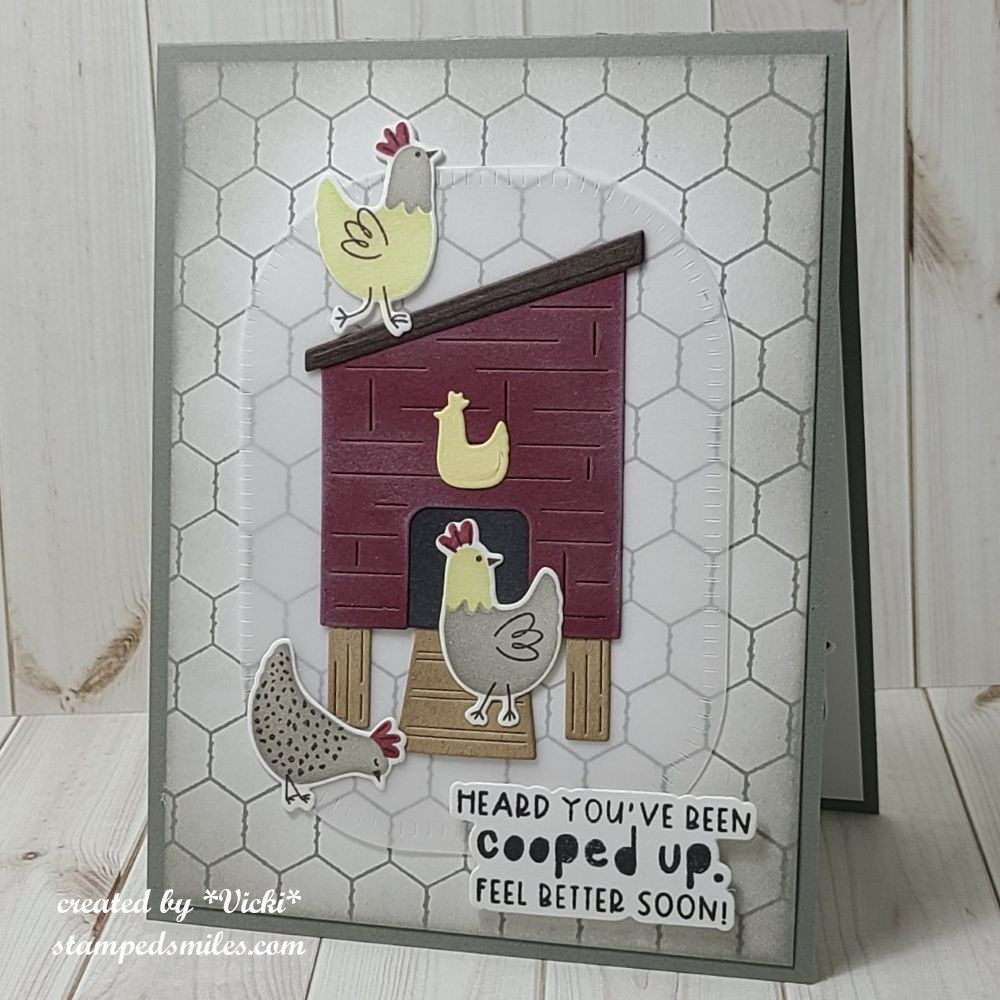
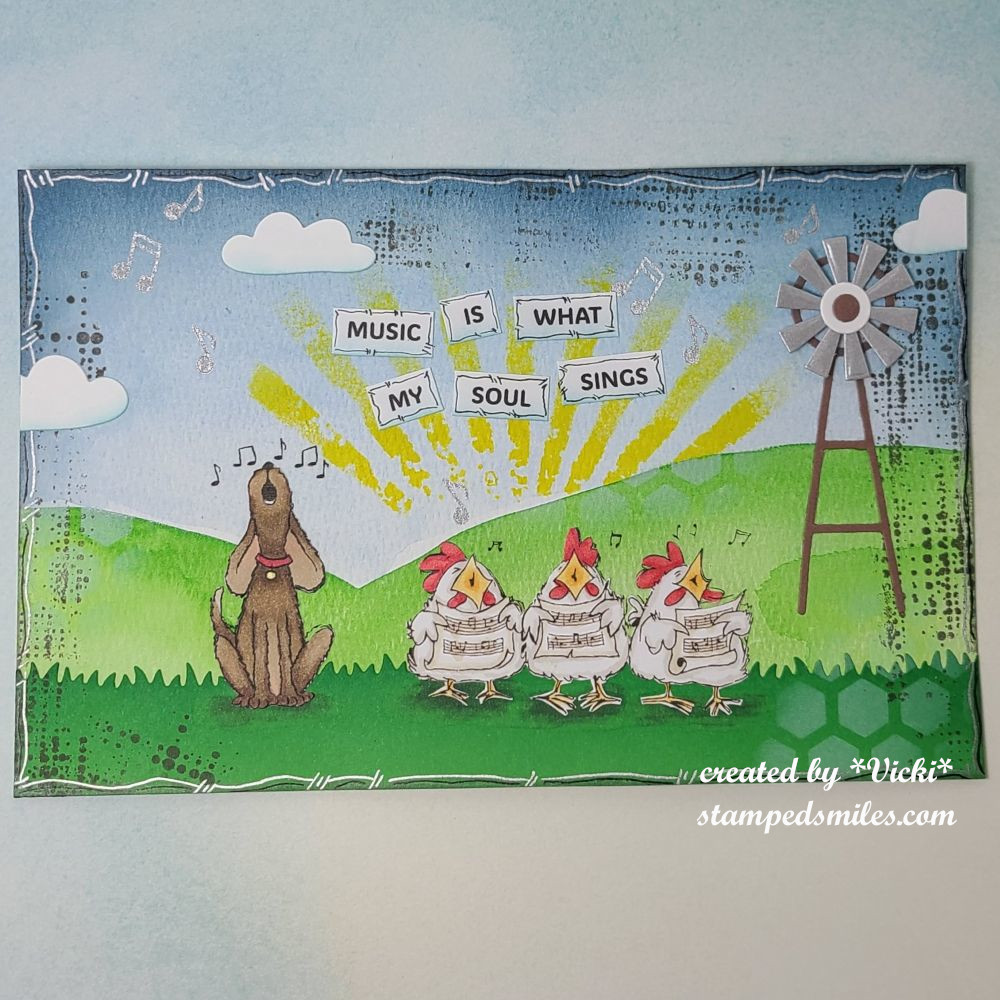
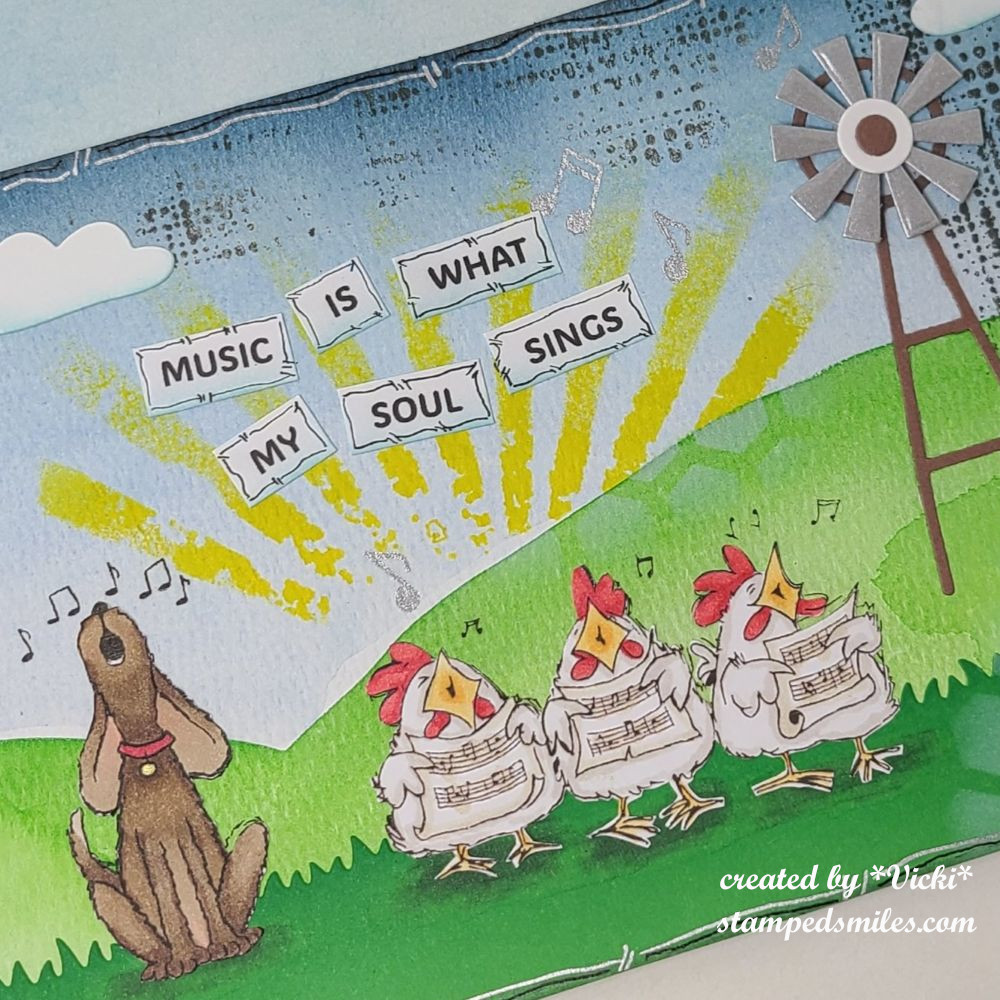
How cute is that pup standing on the bike seat to look over his bird friend perched on the basket!  The name of these adorable animal friends are called “Gus & Gertie” which are a set of characters designed by Taylored Expressions. (If you click on the link, you can see the full line of them.)  The set I’ve chosen is called Gus & Gertie Best Buds.  I like these animals because they’re very easy to color!

I could’ve chosen the airplane from the set, but I kept thinking of those electric bikes & scooters you can rent from cities and they seem to go really fast when I see kids whizzing by on them! LOL

I kept my scene in a circle and added some clouds in the background that I stenciled in and then layered some hills/slopes and a grass border on the front.  I just popped the “ride or die” sentiment at the top and attached the die cut image with foam tape.  I layered the scene onto a black circle base that was attached to a red brick embossed background.  All was attached to a top folding A2 white card base.

That’s all for me today!  Thanks so much for checking in with me as I enjoy reading what you have to say!  Enjoy your weekend and I’ll see you soon!

Challenges:

  1. Critter Crazy Anything Goes with a Featured Creature
  2. Unicorn Use Dies
  3. Crafty Animals Anything Goes with Animal(s)
  4. Crafts Galore Encore Anything Goes
  5. Just Us Girls Die Week (no flowers)

Y is for YUMMY!

Hello and happy Spring!  Hope you’re having a great March so far.  We just received about an inch of snow on Spring day, so I hope it starts getting warmed up from here!  I’m ready for warmer weather so I can cook out on the grill….YUM!  Speaking of that….

Today starts a new letter over at the Alphabet Challenge Blog and our lovely hostess would like to use “Y” is for YUMMY as the theme this time.  How fun is that!  Remember you have two weeks to join in the gallery to play with us.  Here’s my creation for this challenge:

I couldn’t resist getting out this fun “Food Truck” set from Riley and Company to color up!  I also paired it with the BBQ Riley to complete the scene full of yummy goodies!  The images were both stamped and colored up with Copics.  I used the coordinating die to cut out the Food Truck and I just fussy cut with scissors for the BBQ Riley.

Before attaching the images, I used a cloud stencil and blended the background and then took a piece of green cardstock to cut out a grass border for the bottom.  I ink blended the edges of the blades and then used a green Copic marker to add some shadowing for the stamped images before placing them down on the scene.  BBQ Riley was popped up with foam tape.

Here’s a closer view of the images.  I used a liner pen to draw “yum items” under the menu board on the truck with a drawing of a balloon.  I also used a silver gel pen to color in parts of the truck, the lights above the “food” word along with the utensils on BBQ Riley and parts of the grill.

I found a speech bubble and sentiment from my stash that I thought would be perfect for this card and stamped it above Riley’s head as he’s holding up a hot dog.

Do you like to stop and eat at food trucks?  What’s your favorite?  Last summer we went to a small town festival and they served some lemon shake ups at one place along with some BBQ shredded pork and it was so yummy!  We also like to grab some kettle corn to take home too.

Did I make you hungry now?!  Hope you’ve enjoyed my card today and I hope you’ll stop by the Alphabet Challenge Blog to come play along too!  We’d love to see your yummy creations!  Thanks so much for taking the time to stop by!  I enjoy reading your thoughts!  Have a great weekend!

Challenges:

  1. AAA Birthday Masculine
  2. Love to Craft Anything Goes
  3. 613 Avenue Create – Anything Goes with optional: Any Occasion
  4. Unicorn Boys/Men
  5. Passion for Markers Add a Sentiment (colored with Copic markers)
  6. Pammie’s Inky Pinkies – PIP2511 Anything Goes
  7. Lil’ Patch of Crafty Friends Anything Goes

It’s Easter at Sparkles Monthly!

Hello friends!  Hope your March is going along well and you’re starting to see some signs of Spring coming!  We even have a few flowers trying to pop up out of the ground which is so fun to see!  I hope they can hold out for a few cold days ahead.

Today I’m stopping in to share my card for the new challenge over at Sparkles Monthly and we have a very fitting theme of “Easter” this month.  I think I’m more than ready to start some Spring related projects, so I look forward to seeing the gallery.  Here’s the card I came up with:

How sweet is that bunny passing out his colorful eggs!  I pull out an older card kit (2019) and it had this adorable Simon Says Stamp set called “Bunny Wishes” (no longer available) mixed in with the kit which I don’t think came with it, but I wanted to use it with some of the other items that were in the kit like the papers.  It was like getting a brand new order and forgetting what I purchased! 😆 

I also used this beautiful oval die (not available) from SSS that cuts the oval, the flowers and the stitching marks around it.  I added a border of grass to place at the bottom and then I stamped the sentiment from the set and also stamped the “Easter” greeting on another piece of light blue cardstock cut with a banner die.  The gingham background was cut with a double stitched rectangle die and then I used the oval die to cut an opening for the bunny scene.  I added foam tape around the edges to pop up the panel on an A2 top folding pink card base.

Here’s a close-up view of the cute images that I’ve colored with Copic markers, cut out with the coordinating dies and then popped up over the floral oval scene with foam tape.  The extra Easter egg behind the basket was just glued to the scene.  It’s hard to see in a photo, but I’ve covered each egg with a glitter brush pen.  It’s sparkly IRL.

I did recently get this pretty Iridescent White Cord from SSS and took two strands of it to create a bow and then I attached it to the top of the oval.  It gives it a nice sheen and I might be using it again soon!

Thank you for stopping in today!  Hope you enjoyed my card and will join us for the challenge this month!  Have a great weekend!

Challenges:

  1. Pammie’s Inky Pinkies – PIP2510 Anything Goes
  2. Make My Monday Use a Die/Punch 
  3. Passion for Markers Dies &/or Punches + markers (used dies and Copics)
  4. Little Red Wagon Start Easter Projects
  5. Penny’s Anything Goes Using Paper
  6. Tic Tac Toe I used 3rd down or middle across
  7. Four Seasons – Spring/Easter

X is for X’s and O’s

Hello friends and happy Friday!  The weekend starts and we’ve had some snow blowing around over our way with wind and colder weather, BUT next week it’s supposed to be warmer with Spring-like temps…but that’s the Midwestern climate!   It will level out later in the month.

Today is another new challenge over at the Alphabet Challenge Blog!  Our theme for the next two weeks is “X is for X’s and O’s (as in hugs & kisses)“.  We look forward to your entries!  I had some fun with this one:

I’ve had this Tic Tac Toe set for years and never even broke it out to use!  It was from the My Favorite Things “X’s and O’s card kit (obviously no longer available).  I also used those adorable My Favorite Things Bitty Bears (retired) to help with the hugs and kisses part.  I’m so happy to be using something from my stash and especially something that I haven’t used at all!

The card was pretty simple as the die cuts for the tic tac toe square were cut in different colors, found some polka dotted papers to match and also used those same papers to paper piece the heart on the top bear.  I stamped the sentiment from the kit, popped up the colored and die cut bears with foam tape and added a few purple gems.

Before attaching all of the elements, I applied the polka-dot striped paper to a white front card base that was cut with a double-stitched rectangle die also from MFT, and then attached to an A2 top folding white card base.

  • Thanks for stopping in today and I hope you’ll join in the X’s and O’s with us over on the challenge blog!  Have a great weekend and I’ll see you soon!

Challenges:

  1. Crafty Animals Anything Goes with animal(s)
  2. Critter Crazy Anything Goes with Featured Critter(s)
  3. The Divas That Cut…Paper! – Critters plus a die cut
  4. Pammie’s Inky Pinkies – PIP2509 Anything Goes
  5. The Neglected Stuff – Anything Goes with neglected item (my neglected item is that MFT X’s and O’s card kit that was never used circa 2017!) About time, huh?!
  6. Crafts Galore Encore Anything Goes

Mixing It Up With Layers!

Hello friends!  WOW!  That last month went by really fast!  I think it’s because I was busier than usual on my blog, but that’s great that all of the crafting got me through the cold month quickly!  I know it will still feel cold in March, but hopefully it will start warming up little by little!  Until then, I still need to wear some layers!

Speaking of LAYERS… That brings us to a new challenge over at the Mix It Up Challenge Blog.    The challenges always run for 6 weeks so there is plenty of time to enter.  The theme given this time around is: LAYERS or you can do the ‘Anything Goes” too.  Here’s the card that I came up with for the challenge using the theme:

Aren’t these hedgies cute!  I’ve had this stencil set for a while and haven’t had a chance to use it until now and I thought it would be fun to try out the Triple Time Stamping technique.  (If you don’t know what I’m referring to, check out this video on You Tube HERE.)  I thought this would be a great way to insure several layers on my card.

The cute hedgehogs come from the Taylored Expressions Hedgehugs Stamp & Stencil Combo.  I used the technique to layer the panels together and then stamped and stenciled the hedgehogs and then layered each panel with the Spearmint cardstock.  The smallest layer on top was popped up with foam tape.  (I added the white shimmer ribbon around the middle and front panels before attaching to the card.)

I used the coordinating die to cut out some extra hedgehogs and I popped them up with foam tape over a white metallic heart.  I also white heat embossed the sentiment from the TE To the Point stamp set and cut it out to pop up under the “kissing hedgehogs”.  I’ve also added a few more tiny die cut hearts from the white metallic paper.

I THINK I’ve got about 7 layers all together not including the card base.

  • I hope you’ve enjoyed my card today and will stop by the challenge blog to see all of the inspiration from the team over there!  I would love to see your creation in the gallery too!

Thanks for dropping in and I’ll see you soon!

Challenges:

  1. Gem of a challenge – Anything Goes
  2. Pammie’s Inky Pinkies – PIP2508 Anything Goes
  3. Little Red Wagon “Tiny Dancer” (tiny things)  I used tiny white hearts
  4. Penny’s Anything Goes Using Paper
  5. Simon Wednesday – Anything Goes
  6. Just Us Girls Stencil Week

Art Journal Inspiration-Soul Singing

Hello friends!  I’m back today with one last inspiration for Art Journal Journey to remind you that there are still a few days left to enter your art journal project for this month!  So please be sure to hop on over to the Art Journal Journey Challenge Blog to see the details about how to enter.  I have really enjoyed all of the inspiration from the gallery!  So fun to see what everyone comes up with using my “MUSIC” theme this month!  I thank everyone for having me along as a host and sharing your kindness in welcoming me back this year.

I went with some animals this time:

I’m pretty sure that there has to be some sort of music going on at farm too, right?!  LOL  I found these cute “singing” critters online and thought that a farm scene would be a perfect platform stage for them!  This is also the first time that I’ve ever added an interactive element to an art journal page, so that was fun!

For the background:  Starting with an 8.5″x 5.5″ watercolor paper,  I printed the critters over it in the position that I wanted…this is so that the musical notes showed on the page.

I then used my Kuratake Gansi watercolors and brush to paint a scene starting with blues for the sky, letting that dry and then adding some green hills for the bottom of the scene.  I went over the areas a couple of times to get the look I wanted and let it dry.  I also die cut a green grassy border at the bottom of the page with green cardstock being careful to place it so that it covered the “legs/feet” of all the critters.

More layers over the background:  I used older Tim Holtz stamps to add some texture by stamping brown ink, then I used an old TH stencil and some yellow paint for the “sun rays” around the hill with a sponge to apply it.  I also used a sponge with white ink to stencil over another stencil in areas and lastly, I stamped some musical notes in silver ink in a few places.

Here’s a closer look at some of the details including the critters.  

Since I covered up the critters with the grassy border, I printed out the critters again on a separate piece of cardstock, colored them with Copic markers and fussy cut them out with my scissors.  I attached them over top of the printed out ones on the page so that they align with the music notes above them.  I used more markers to add some darker shadow grounding underneath each critter before permanently attaching to the page.

For the interactive element:  I used a die cut to cut out the pieces for the windmill in the brown, white and silver cardstock pieces.  I then used a circle die to cut a hole in the center of the windmill on the page and then added an element that makes the wheel portion spin in a circle when you spin it with your finger.

I went around the edges with some blue ink for the sky, attached some clouds and then printed out the quote on my computer and cut out each word attached to the page.  I used some blue ink to lightly add to the bottom of each one.

Lastly, I went around the edges of the page along with the edges of each word with a black micron pen and then I used a silver paint pen to go around the edges of the page again.

It’s a pretty flat page, but it made me happy!  What song do you think they’re singing?  

  • I hope you’ve enjoyed my page today as well as my art journal inspiration throughout the month!  Thank you so much for your kindness and support!  See you soon!

Challenges:

  1. Art Journal Journey – MUSIC
  2. Creative Artiste Anything Goes Mixed Media
  3. We Love 2 Create Mixed Media Anything Goes MM/Papercraft
  4. Creative Fingers Anything Goes
  5. Gem of a Craft – Anything Goes

For Someone You Love at Sparkles Monthly

Hello friends!  I hope that you had a great Valentine’s Day yesterday however you chose to celebrate it!  We chose to stay indoors where it’s warm and watch a movie!  

And speaking of love, this brings us to the February challenge over at Sparkles Monthly and for this month, our hostess is asking for a “Love Card (for anyone you love)” .  Be sure to stop by the blog to see what the rest of the design team has created for you.  Here’s my project for this challenge:

Aren’t these heart sweaters adorable?!  I had fun making a couple of cards to send to my kids (whom I love) for Valentine’s Day.  I was actually able to create two similar cards using a stencil set that allows you to make 4 sweaters at one time.

I love the Taylored Expressions Sweater Weather Stencil Set that you can ink blend up to four different sweaters at once.  This had previous come out for Christmas, but in December, they came out with a cute Valentine line to go with this stencil.  So I gold foiled a panel from the TE Foil It-Valentine Sweater Weather pack and then to decorate the sweaters, I used the TE Dinky Decorations Valentine die set.   I wanted more hearts, so I die cut a few extra to place around the background.

Speaking of the background, I used the TE Lots of Love 3D embossing folder and then sponged a bit of white over the hearts so they stood out a bit more.  I also die cut the A2 Thin Frame die for a gold mirror frame.  The sentiment came from the TE Love & Hugs stamp set

And here’s a closer look at the other card I made.  I know I could’ve used just one sweater for each card, but I thought these sweaters were too cute, so I decided to use all of them!  I’m thinking one of my sons would probably wear a sweater like one of these and the other would think it’s ridiculous! LOL  Regardless, at least they each know that they are loved by me!

I also had these fun TE Snarky Valentine Insiders panels that I gold foiled.  I have to share some snark with those I love too! LOL  (Click on the photos above to enlarge them if you’re on my website.)


I thought I’d share another card I had made for someone I love that was given to my husband for Valentine’s Day yesterday.  (Sometimes, I have to wait until he gets it before I share!):

This pup and his boing heart hat cracks me up!  Look at that face!  I actually made this last month during a Craft Roulette challenge.  I decided that I liked it so much that I put a Valentine greeting on it for my husband to give him on Valentine’s Day.

I used the Taylored Expressions Puppy Love (retired) stamp set and colored in this cute pup with Copic markers and die cut him out.  I stamped the TE Gingham Check BG Stamp in black ink over red cardstock.  I splattered some white Copic Opaque over top.

For the lace, I white heat embossed the border stamp from the TE Flip the Lace stamp/die (retired) over the Toffee cardstock and placed beneath the check background piece.  I added a black strip between the two and then popped the dog on it.  I stamped the “Seriously” from the pup stamp set and the Valentine greeting from the lace stamp set together and fussy cut them out to pop up with foam tape on the card.  I added a few white hearts around the pup.  The entire card is a mini slim from a pre-cut and scored Toffee card base.

  • Thanks so much for stopping by today and I hope that you enjoyed these “love” cards or have been inspired to make and send a card to someone you love too!  I look forward to seeing what you share in the gallery this month!  

HAVE A GREAT WEEKEND!

Challenges:

  1. Critter Crazy Anything Goes With a Featured Creature (Bottom card only)
  2. Crafty Animals Anything Goes + Animal (Bottom card only)
  3. Pearly Sparkles Love is in the Air
  4. Crafts Galore Encore – #132 Anything Goes
  5. Crafty Calendar – Hearts
  6. 613 Avenue Create – Anything Goes with optional: Lots of Love
  7. Crazy is Our Fame-Stencils Are Our Game – Pinks &/or Reds + stencil (sweater cards)
  8. Make My Monday – #245 Love (bottom pup card)
  9. Crafty Gals Corner – #264 Fill in the Blank:  “Pink________” (sweaters)

Art Journal Inspiration-Sing From Your Heart

Hello friends!  When it’s winter time, something I miss hearing are those birds happily chirping throughout the day.  We get the occasional bird chirp, but nothing like it is when the weather is warm.

So in honor of those singing birds, I have more inspiration to share for the “MUSIC” prompt I’m hosting this month at Art Journal Journey:

I had fun putting this one together with a quirky bird who’s singing with all his heart!

For the background:  I started with a 5.5″x8.5″ Bristol Smooth cardstock piece so that I could do some ink blending.  With a stencil, I inked over it with Salt Water Taffy oxide and then painted over it with a layer of white gesso.  (I was trying to keep the colors soft and light.)  I then took a different stencil and sprayed over it with Speckled Egg Oxide Spray and then used the left over from that in other places.  I then took Shabby Shutters, Mowed Lawn and Salvaged Patina oxide inks to go over the rest of the stenciled layers until I got the look I wanted.  I used a water spray over top and then splattered white paint over the page for more texture.

For the bird: I cut out the body, wing and beak shape in different pattern papers, used a distress crayon rubbed along the edges and pieced it together with the wing being popped up with foam tape.  I used a pen to doodle around the bird and create the legs.  The eye and heart on the bird were punched out pieces. (the heart paper is from a music sheet scrap)

The words were printed on my computer over some pattern paper.  While the ink was still wet from the printer, I clear heat embossed over it.  I cut out each word and attached over page.  I took a pen to doodle around each section.  I also doodled around the edges of the entire page with the same pen.

Lastly, I took some white paint and brushed a “heart bubble” coming from the bird’s beak.  I stamped a few music notes inside the bubble with brown ink.  I also stamped a few solid hearts around the words in pink ink to finish it off.

  • I hope you like my page today and have been inspired to play along with us this month!  I have enjoyed seeing all of the wonderful inspiration so far in the gallery!  Thanks so much for stopping in and I’ll be seeing you soon!

Challenges:

  1. Anything Goes in a Card Free Zone – No Cards
  2. Art Journal Journey – Music 

“U” is for Underwater

Hello friends!  It’s already closer to the end of our first month for 2025 and I hope you’re staying warm and/or cozy where you are!  

Today I’m excited to share that I’ve joined the Alphabet Challenge design team!  I’ve been playing along with the challenges for a few years, so this will be a fun one!  Please be sure to check out the challenge blog to see how to play as we go through the alphabet letters every-other week (fortnight) for each new challenge.

Blog Badge

For this challenge, we are at the letter “U” for Underwater and here’s what I’ve come up with:

Now how cute are these smiling underwater critters?!  It was hard to believe that going through my stash that I didn’t have much of any underwater critters besides mermaids, but last year I saw this adorable Doodlebug Sea Life stamp set on sale and decided to add it to my collection.  This is the first time I’ve used it.

For the background:  I’ve taken my Distress Oxide inks and ink blended the colors Salty Ocean, Mermaid Lagoon and Blueprint sketch over some Bristol Smooth watercolor paper.  I sprayed it with water and blotted it up with a paper towel.  I used a stitched wave die cut border at the top and another wavy landscape border die for the sand at the bottom with kraft cardstock.  I’ve used markers and gel pens to create “dots” for the sand and then attached it to the ink blended panel.  Once I had it all attached, I cut out the entire panel with a stitched rectangle die and then attached it to an A2 sized top folding kraft card base.

I stamped several of the images and colored them with Copic markers and die cut them out with each coordinating die.  The “seaweed” was part of the coordinating die set that I inked over in green Oxide inks and then attached all of the images to the underwater scene.

Lastly, I white heat embossed a sentiment from the stamp set (it says:  “with oceans & oceans of love”) in the top corner of the card base and stamped some blue solid hearts from the set for “bubbles”.  I couldn’t resist adding some googly eyes to the crab too.

I hope you’ve enjoyed my card today and hop on over to the challenge blog to play along with us!  I look forward to seeing your underwater creations in the gallery!

Thanks so much for dropping in and I’ll see you tomorrow for my monthly Art Journal Page!

Challenges:

  1. Allsorts – Close to Nature/Anything Goes
  2. Pammie’s Inky Pinkies – PIP2503 Anything Goes
  3. Little Red Wagon – #791 Can You Feel the Love Tonight (love theme)
  4. Critter Crazy Anything Goes with Featured Creature
  5. Crafty Animals – #90 Anything Goes with Animal(s)