In Stitches for Cute Card Thursday

Hello friends!  Wow, this week has really been flying by!  I seem to think this almost every week, but I know when the weather starts getting warm, I seem to get more busy outside and perhaps that’s why with the weather being so nice, warm and sunny.  I am enjoying it!

Today starts a brand new challenge over at Cute Card Thursday this week and the theme is “Stitching (faux or real)“.  There are all types of ways to incorporate stitching into your paper crafting and I enjoy adding it to my creations.  So here’s how I’ve added it to my card for today.  I thought this would be such a cute idea for a get well card.

Vicki-CCT582

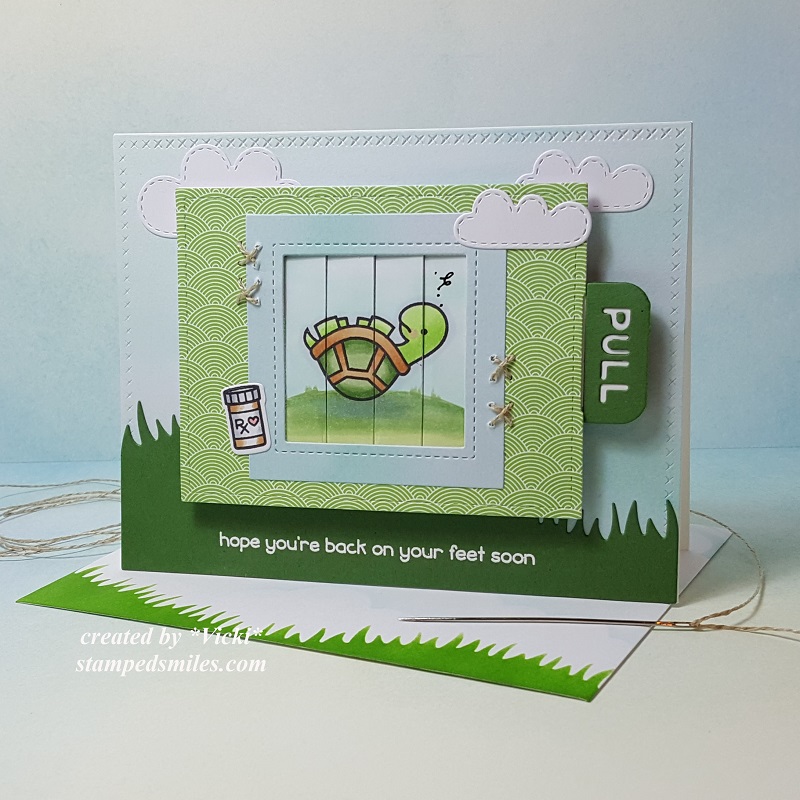
To make the slider for my card design, I have used the Lawn Fawn Magic Picture Changer and the Magic Picture Changer Add-On dies.  It looks pretty intimidating, but it actually wasn’t that bad to put together as the measuring and cutting is done with the die.  I’ve used the adorable Get Well Before ‘n Afters stamp set to create this and I know I’ll be making another one with the whale to make another card as I’m in need of one.  The turtles were colored with Copic markers and I’ve used them to also create the grass and sky background behind the turtle as he needed something to “ground” him and not be up in the air.  I took a water-proof pen and added a scribble above his head as he’s not happy being up-side-down!

I’ve cut the “add-on” pieces and the background of the card with the Lawn Fawn Watercolor Wishes and Really Rainbow paper packs.  But before attaching the “add-on” papers to the turtle frame, I took a needle and some linen thread and added a few cross-stitch marks around the blue frame.  I’ve also cut a few clouds from a retired LF die set and added the die cut “bottle” that I colored from the same “Get Well” stamp set.

Before I attached the turtle mechanism onto the card, I also die cut a strip of grass with the Grassy Hillside Pop-Up Add-On die in some green cardstock.  I then took one of the sentiments from the same “Get Well” stamp set and white heat embossed it at the bottom of this piece.  The turtle mechanism was popped up over the card front base with some foam tape which was all mounted to an A2 sized top folding card base.

I thought it would be fun to decorate the envelope too, so I die cut a piece of the grass again and used it as a stencil to sponge in some grass along the bottom of the envelope and then I also stenciled some clouds over it.

Vicki-CCT582-A

And here’s what the turtle looks like when you pull the tab out.  He is much happier now that he’s back on his feet again!  I think I played with this card and pulled that tab to watch that turtle get on his feet over and over! LOL!  I hope it will have the same effect on the person who receives it too!

Vicki-CCT582-close

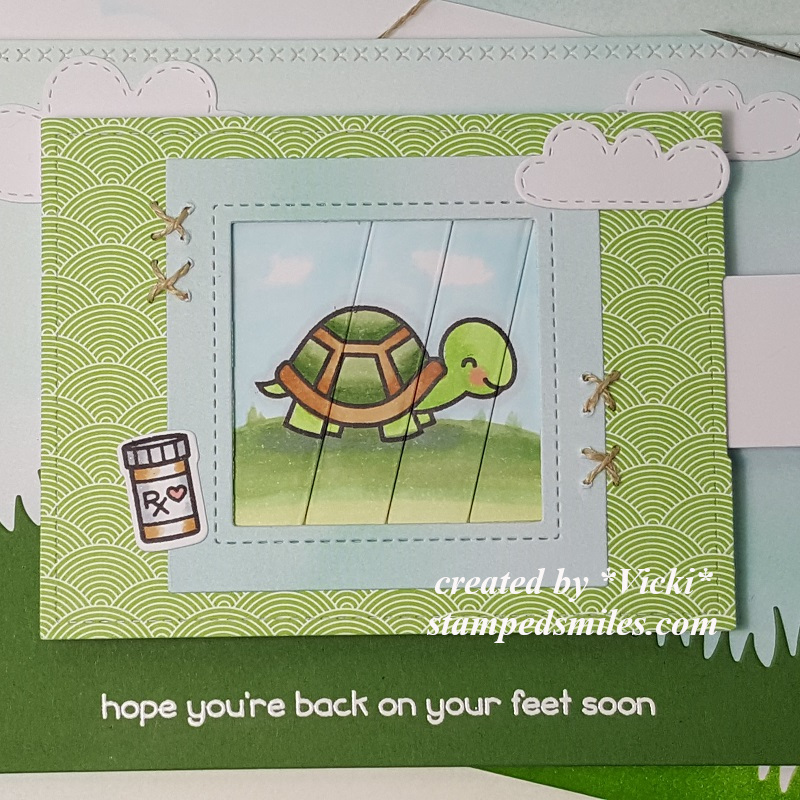
Here’s a closer view of the coloring that I’ve done.  It was a small image and so I’ve kept the coloring pretty simple.  For the “happy” turtle I’ve made a few clouds in the sky.  To make the slider part work, you don’t want to add anything other than the coloring so that it slides smoothly.

Vicki-CCT582-flat

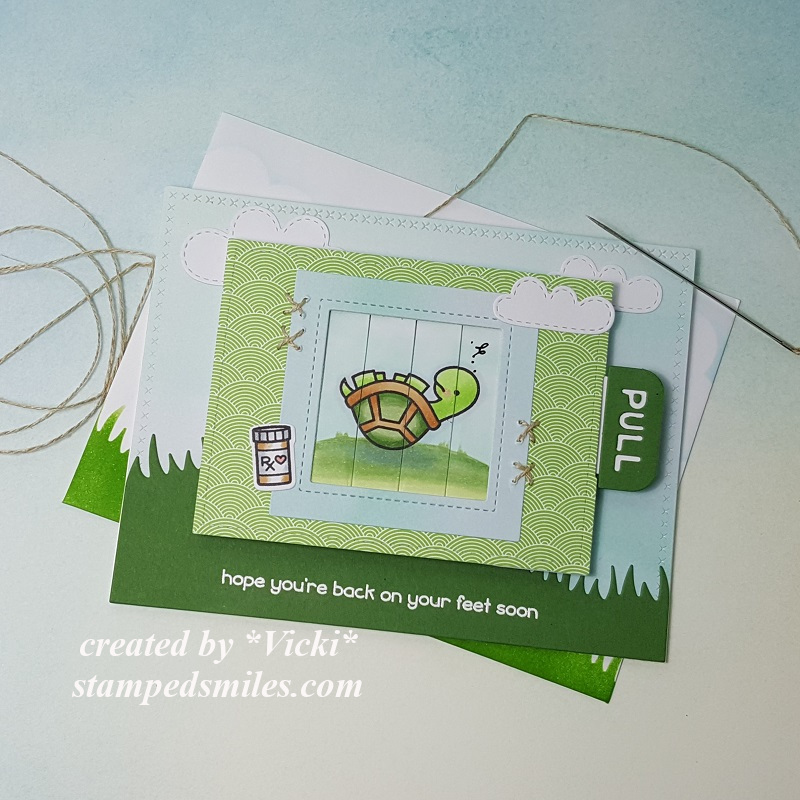
Here you can sort of get a better look at the coordinating envelope that I’ve made to go with the card.  Although I have made some hand stitched marks on my card, the dies themselves already have lots of cool stitch details in them when you cut it out, so I think it just helped add to the design.  This card is going to a male, so I didn’t want to create anything that was too over done.  I think this might bring a smile, what do you think?

P.S.  If you remembered my post the other day, I shared a photo of the Robin’s nest with one egg in it.  Well, since I’ve last checked, there are a couple more in there now:

3 robin eggs

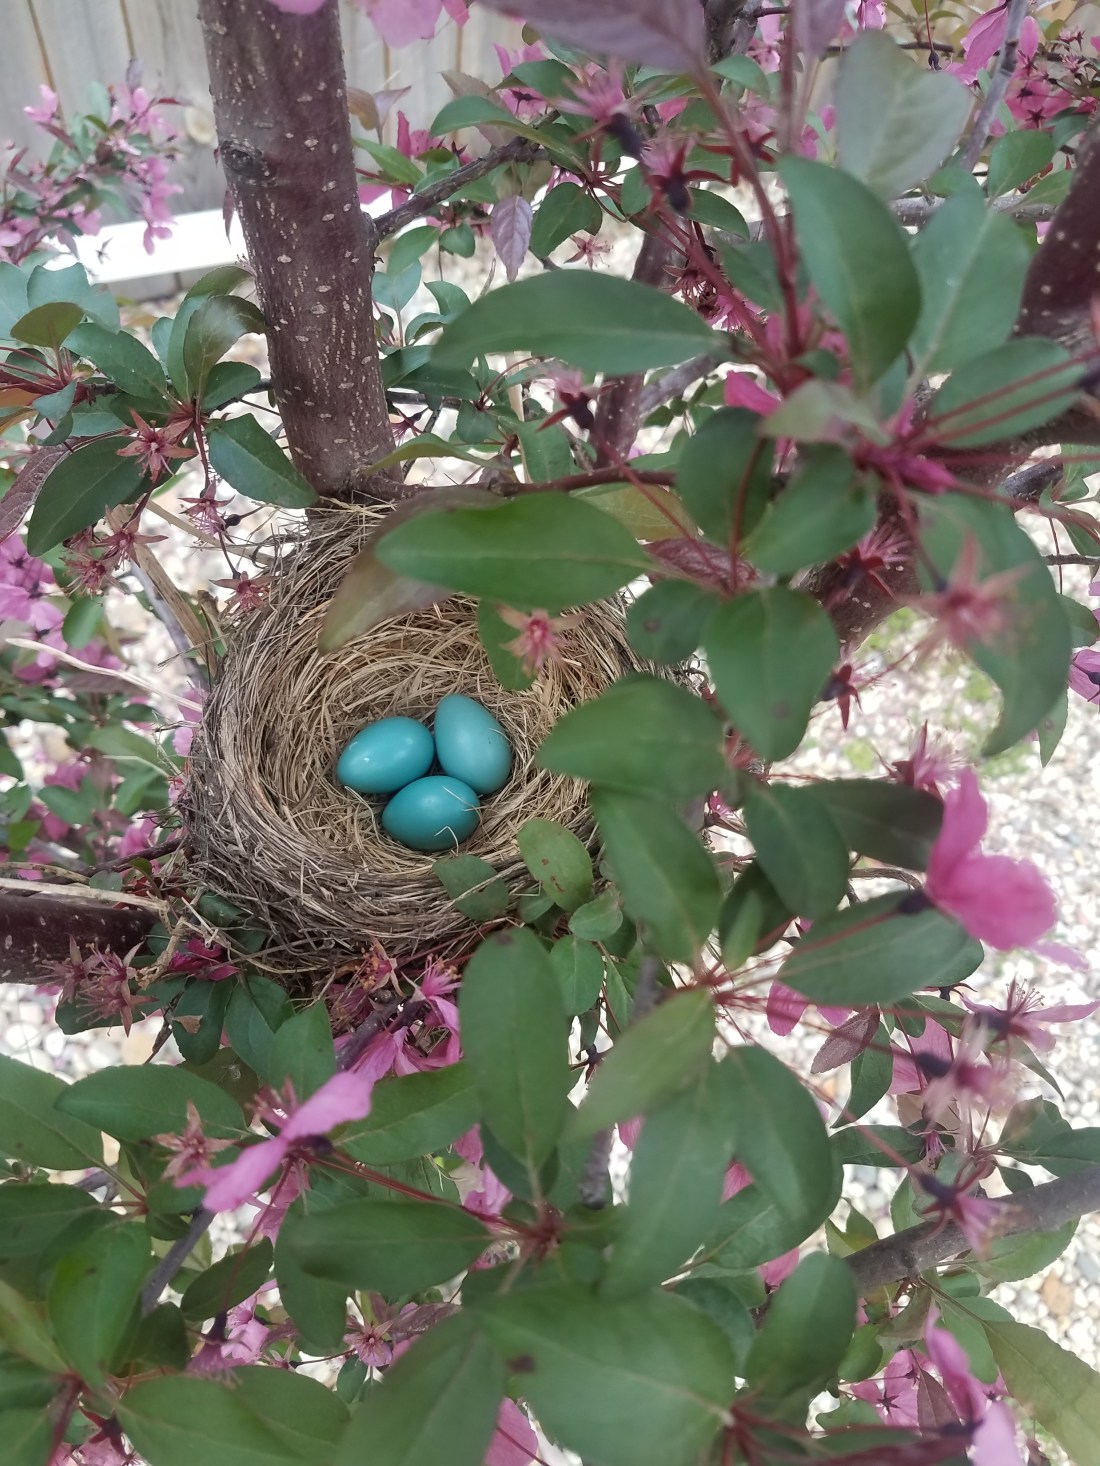
Every time we go out there, the mother watches for us to leave as she wants to sit on her eggs!  This is why we can’t get a photo of her actually sitting on it.  But we will see if anything happens in a few weeks! 🙂

Thanks so much for dropping by today!  I hope you are enjoying your week and I’ll see you soon!!

Challenges:

  1.  Sweet Stampers – Animals
  2. Pammies Inky Pinkies – PIP1919 Anything Goes
  3. Crafting From the Heart – Anything Goes
  4. A Bit More Time to Craft – Anything Goes
  5. Simon Says Stamp Wednesday – Stitches
  6. Watercooler Wednesday – masculine anything goes WWC221

Bubble Bath Beauty

Hello friends!  Yes, I’m still here! LOTS of fun stuff to share!

Today, I have a silly kitty card to share with you today:

Vicki-Bath Cat-May7

Oh my, that face just really cracks me up!!  It’s been several years since I have ever had to give a cat a bath, but I believe that’s pretty much how they feel about water in general.  I have used this Whimsy Stamps digital image called Bath Cat by Crissy Armstong.  (It was previously released as a rubber cling stamp, but now you can also get it in digital format if you prefer that!)

I started out my card with a piece of white cardstock and clear heat embossed several of the solid circle images from the Whimsy Stamps Circles Circles Circles clear stamp set.  I then took a few of the distress ink colors and blended them over the heat embossed circles.  The ink resisted those and then I spritzed it with some water and dapped it with a paper towel for water droplets.  I heat embossed the sentiment with white EP and cut it out in a banner to attach over my background.

The circle inked background was corner chomped on two of the corners and then I placed it over a blue A2 sized top folding card base which I also corner chomped the same two corners on that as well.  I then added the image panel and popped it up over some craft foam to attach to the front of the card.  I then cut off the edge of the circle with my scissors and lastly added some clear sequins to the design.

Vicki-Bath Cat-close-May7

Here’s a closer look at the coloring I’ve done on the kitty.  I’ve used the following Copics to color him in with:

  • Kitty – W7, W5, W3, W1, R11, R00
  • Bathtub – B24, B21
  • Bubbles – BG000
  • Duckie – Y17, Y15, Y13

After I cut the image out with a circle die, I sponged around the edges of it with some of the distress ink I used on the background.  I used a Wink of Stella glitter pen on some of the bubbles and then used some Nuvo White Blizzard Glitter Drops on the water drops.

Vicki-Bath Cat-flat-May7

This one gave me a chuckle and sometimes even when you are feeling yucky, you just want someone to tell you that you are beautiful!

Thanks for dropping in today!  I’ll see you again soon!

Challenges:

  1.  Simply Create Too – Anything Goes (no twist)
  2. Daisy Chain – Anything Goes
  3. Pammie’s Inky Pinkies – PIP1918 Anything Goes
  4. Get Creative – Anything Goes (no twist)
  5. Crafty Animals – Anything Goes + animal

Whimsy Stamps May Release + Anything Goes for Cute Card Thursday!

Hello friends!  Hope you are having a great week so far!

Today starts a brand new challenge over at Cute Card Thursday!  The theme for our challenge this week is an easy peasy “Anything Goes” theme!  Whimsy Stamps is also our sponsor this week and I have used one of the brand-new May digital releases for my card here:

Vicki-Penguin Prezzie-May2

This really SWEET penguin by Crissy Armstrong was previously released as a rubber stamp and now it’s available in digital format too!  I’ve used the Penguin Prezzie digital stamp on my card here along with some other Whimsy Stamps products!

The image panel was cut out with the Whimsy Stamps Notched Squares Dies Set and mounted over a piece of black cardstock.  I added some pearls in each corner.  For the tiny hearts and the “mom” sentiment at the bottom, I have used the Whimsy Stamps Mom’s Layered Flowers clear stamp set.  I stamped the tiny hearts around the penguin with some pink ink and the “mom” sentiment at the bottom over the pink gingham paper with black ink.  I also stamped the sentiment ‘for you’ with black ink on the image panel from the Whimsy Stamps Everyday Mini Sentiments clear stamp set.

I found some soft pink gingham paper to use and mounted it over another piece of black cardstock and another piece of gold cardstock too.  After adding the ‘mom’ sentiment, I took three strips of gold cardstock to add for accent pieces and then added some lace in the center strip that I wrapped around the card front panel.  I attached these layers onto a white 5×5 top folding card base.  The penguin image panel was popped up in the center with some foam tape.

Vicki-Penguin Prezzie-close-May2

Here’s a closer view of the coloring I’ve done on this image.  These penguins are so fun to color!  I have used the following Copic markers on my image:

  • penguin – C8, C5, C3, C1, blender, YR24, Y15, Y11
  • present – BG45, BG13, BG10
  • bow – R85, R83, R81, R00
  • ground shading – C1, E0000

Vicki-Penguin Prezzie-flat-May2

Although I think you could use this cute penguin image for a birthday or even Christmas, I thought since we are in the month of May, it would be a great card to send to mom!  All you need is to make it with a few feminine colors along with lace and pearls for accents!

Thanks so much for stopping in today and I appreciate your kind comments so much!

Flying Dragon for 2 Crafty Critter Crazies

Hello friends!  Welcome to May!  Yay!  I’m so happy that my flowers are finally up and blooming!  It always brings a smile to face when I see the colorful blooms!

Today is the 1st of the month which also means the start of a new monthly challenge over the 2 Crafty Critter Crazies challenge blog!  All you have to remember is that you need to use a critter somewhere on your creation…that’s it!  The sponsor we have for this month is Fabrika Fantasy:

Vicki-2CCCMay

I have used this adorable digital image kindly provided to us from our sponsor called Flying Elf.  I love how that dragon is looking up at her! 🙂

After coloring her in, I’ve taken a cloud stencil and sponged in some clouds behind her to give the appearance of being in the air!  I’ve used the ink foam blending tool and distress inks for that.  I then cut out the image panel with a cross-stitch rectangle die from Lawn Fawn and then used a cloud border die also from LF to cut out along the bottom that also adds to the “cloudy” feel of the design.  I stamped a sentiment from a My Favorite Things stamp set.

I wanted to add a “magical” element to my design, so I found some really cool cosmos looking papers from my stash and added that as a layer underneath the image panel which I popped up a bit with foam tape.  I then added a purple shimmer ribbon with a bow around the bottom portion and layered it over a piece of gold mirror cardstock and then an additional piece of black cardstock that was layered over a white A2 sized top folding card base.  Lastly, I added some black pearls in the upper right of the image panel.

Vicki-2CCCMay-close

Here you can see a closer view of the coloring I did on the image.  I’ve colored it in with my Copic markers.  Then on her belt, the trim on her boot and the middle of the dragon bridle, I colored those in with a gold gel pen.  Such a cute image!

Vicki-2cccMay-flat

Here’s a better view where you can see the shine from the gold mirror cardstock.  It helps to add a “magical” feel to the design, I think.

Thanks so much for dropping by!  I appreciate you being here with me!  Hope to catch up with you all at the end of this week to see what you’re up to!

Under the Sea Shaker for Cute Card Thursday

Hello friends!  Welcome to another Thursday and a new challenge over at Cute Card Thursday this week!  The challenge for this week is Brads, Sequins/Gems.  So pull out your embellishments and have some fun creating!  Looking forward to seeing your creations using these items!

I decided that I was going to use all three items for my card today:

Vicki-CCT579-SU

I’ve used an “oldie but a goodie” Stampin’ Up! stamp set for my masculine shaker card here.  I’ve pulled out the “By the Tide” and “Hardwood” rubber stamp sets that I’ve had for a couple of years now.  (Not sure if they’re still available or not in the catalog as it’s been such a long time since I’ve bought any SU! products.)

I started by stamping the background “Hardwood” stamp with Basic Gray ink over a piece of Marina Mist cardstock and then blended some gray and black distress inks along the edges of it.  I mounted it with some Basic Gray cardstock.  I’ve taken some twine pieces and used it to fashion a “netting” accent from the side of the card onto the bottom front and then added some blue glitter around it for some fun texture and sparkle.

Vicki-CCT579-SU-close

For the shaker element of my card, I’ve used some circle dies to create the frames and that’s where I’ve attached the silver brads all around the edge.  I’ve used some more distress inks and stamp some more images from the stamp set for the inside of the shaker design.  I’ve added some sequins for the inside of the shaker window and placed it over the front of the card over the netting accent.  I stamped the images with Gray and Cajun ink pads and then colored them in and randomly placed them over the card design.

Vicki-CCT579-SU-flat

Lastly, I’ve taken some rhinestones and colored them with a Copic marker so that I could get the blue color for my design.

Thanks for dropping in!

challenges:

  1.  Simon Says Stamp Monday – Going Around in Circles
  2. Use Your Stuff – Yarn/String/Twine
  3. Through the Craft Room Door – Anything Goes
  4. Retro Rubber – Anything Goes #rrcb109
  5. Crafty Creations – Anything Goes

Whimsy Critters Everywhere!

Hello friends!  Hope you are having a wonderful week so far!  I have been busy in my craft room trying to prepare for a class next week along with trying to help my son pack and move out of state…so my plate has been a bit full lately.  I do have a couple of really fun critter creations that I’ve made using some Whimsy Stamps products today:

Vicki-WS-ADSKitties-April24

If you don’t remember, Whimsy Stamps has come out with a couple of really adorable clear stamp sets to help promote their “Adopt Don’t Shop” campaign with $1 of the sale from each stamp sold going to the Gulf Coast Humane Society.  Vicki-WS-ADSKitties-close-April24

Now, normally I am a “dog fan”, but I know many of my blog friends and several others are huge cat fans as well!  I have also been requested to make up some cat friendly cards too!  So, I thought this would be such a great opportunity to make one!  I’ve used the adorable Adopt Don’t Shop CATS clear stamp set for this one.

Vicki-WS-ADSKitties-flat-April24

I have used a kraft colored A2 sized top folding card base and stamped the little paw print from the stamp set with the same color around the edges.  I also took the humorous sentiment from the set and white heat embossed it over a piece of espresso cardstock and cut a banner strip from it.  This same color of cardstock was used as a layer behind the kitty image panel that I’ve cut out with the WS Hand Stitched Nested Rectangles die.  I covered up the bottom portion of this panel with some plaid papers.  I then wrapped some twine around the middle of it and tied a bow which I have attached a wood veneer heart in the middle.


Vicki-WS-I'veGotYourBack

Here’s another card I had made to help cheer someone.

Vicki-WS-I'veGotYourBack-flat
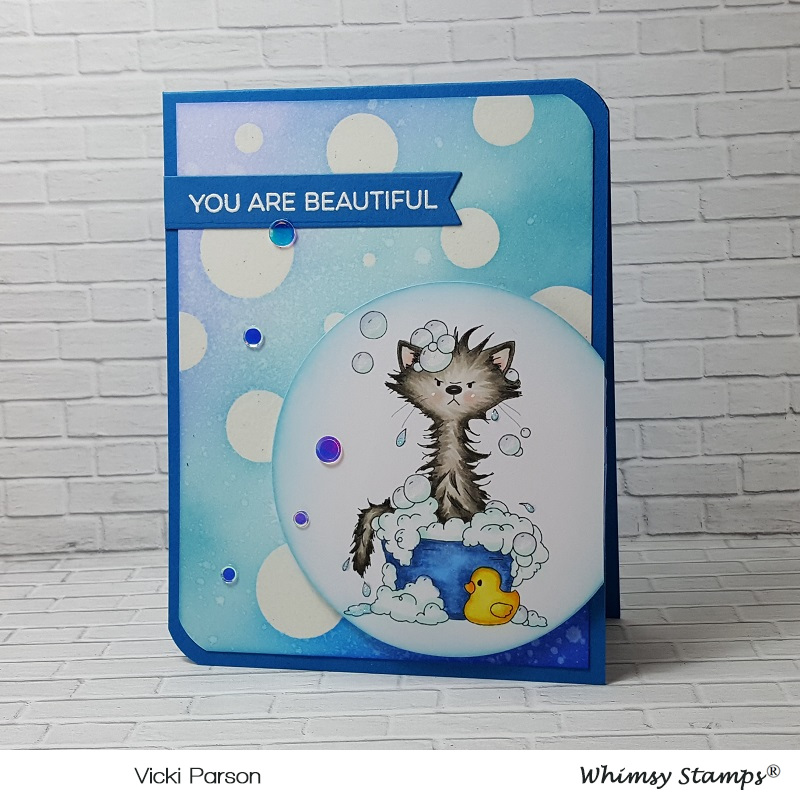
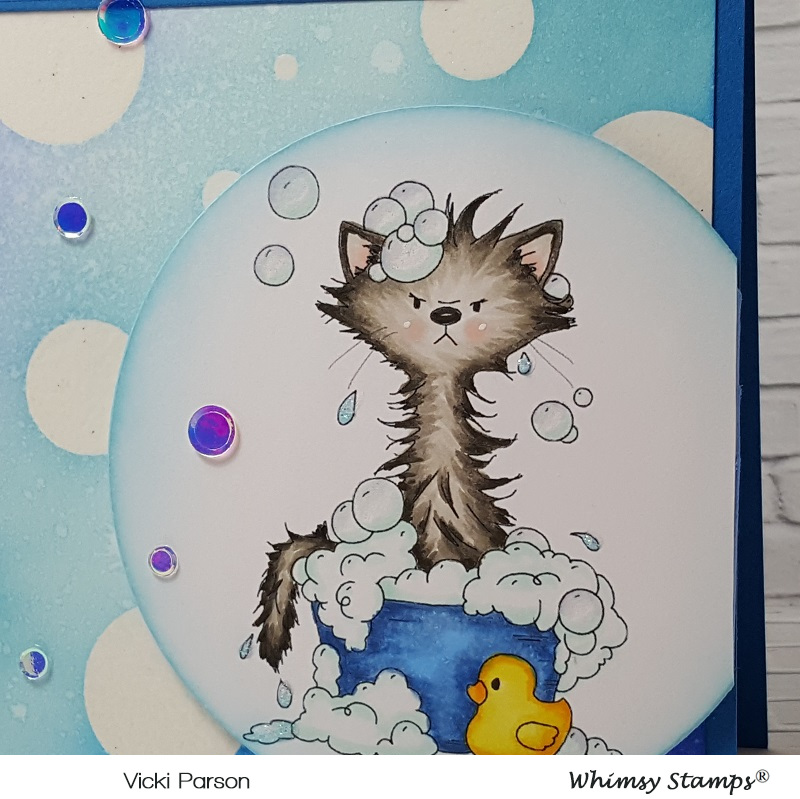
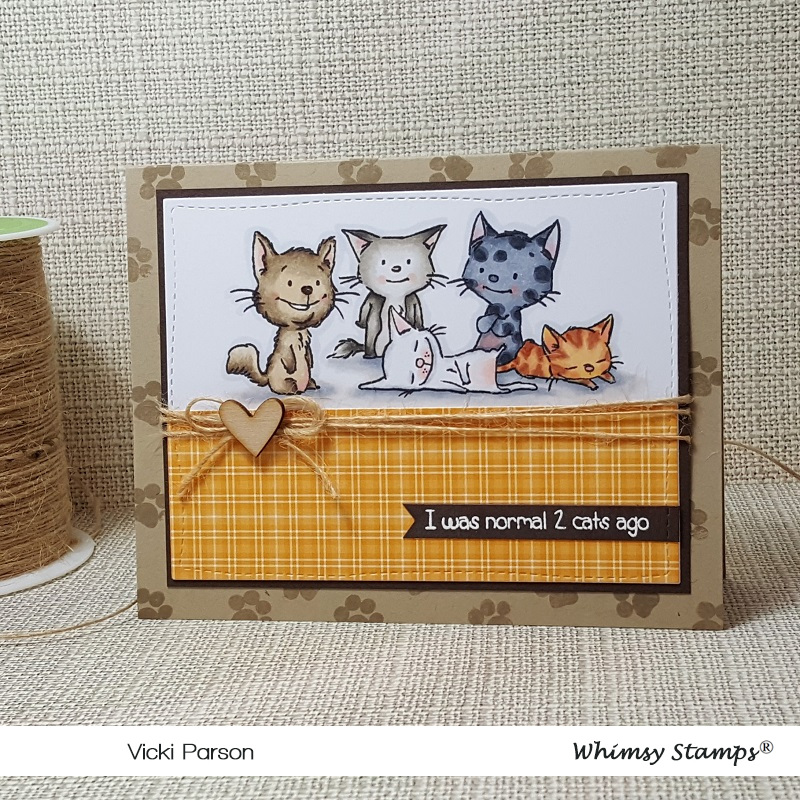
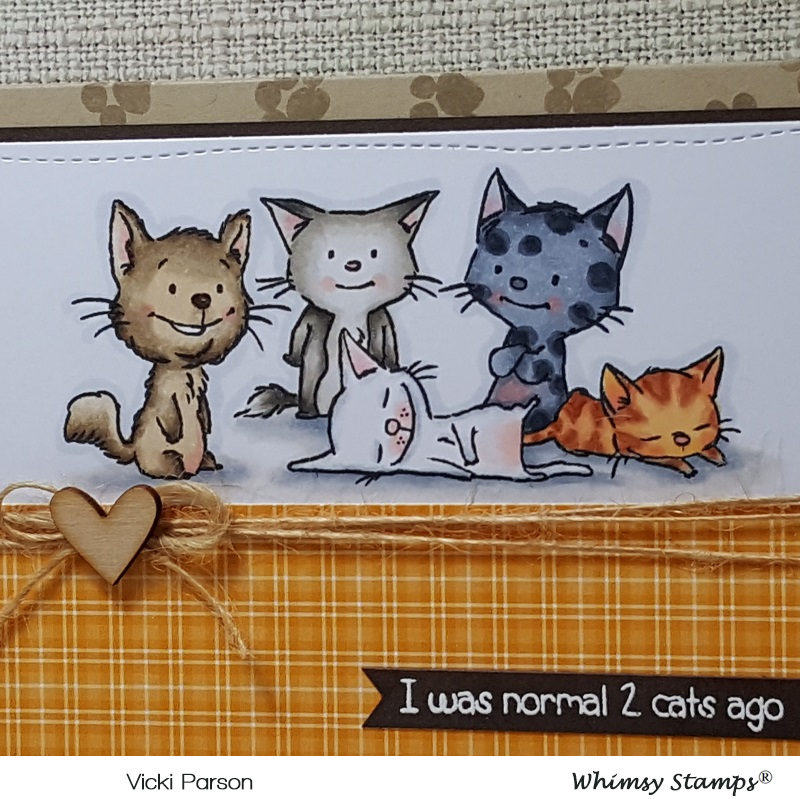
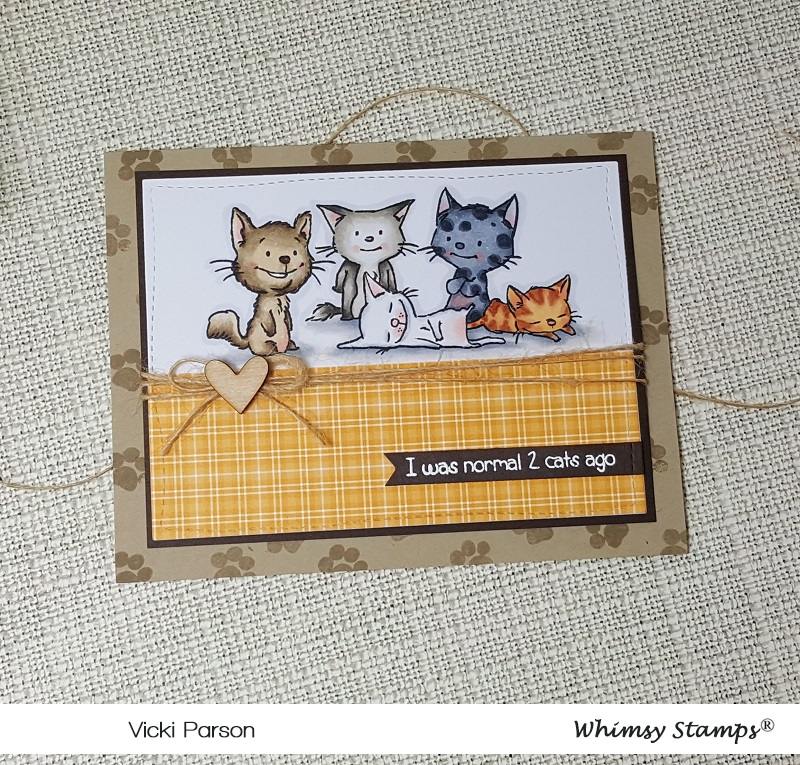
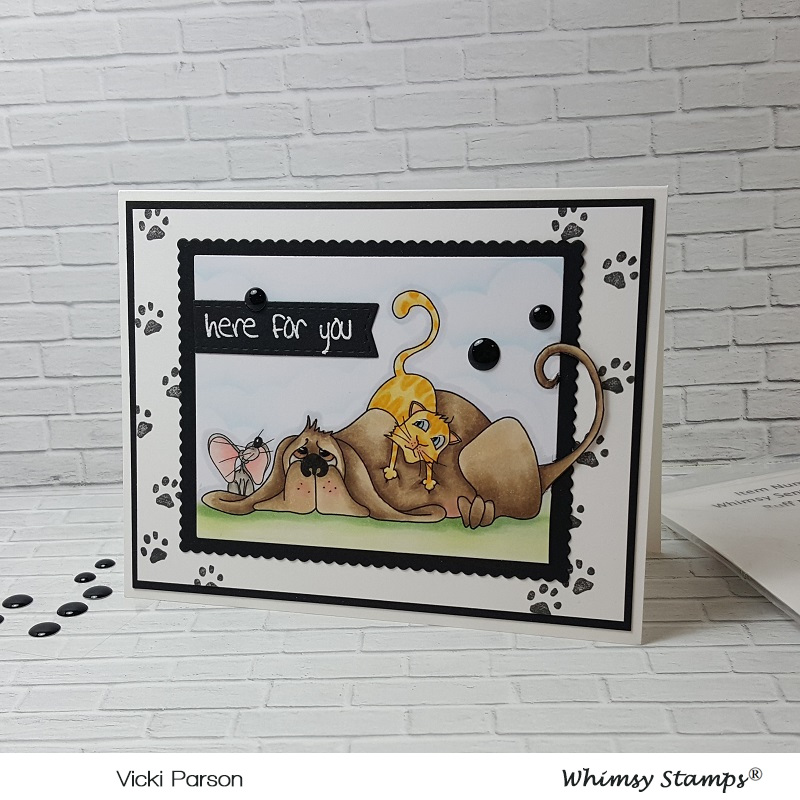
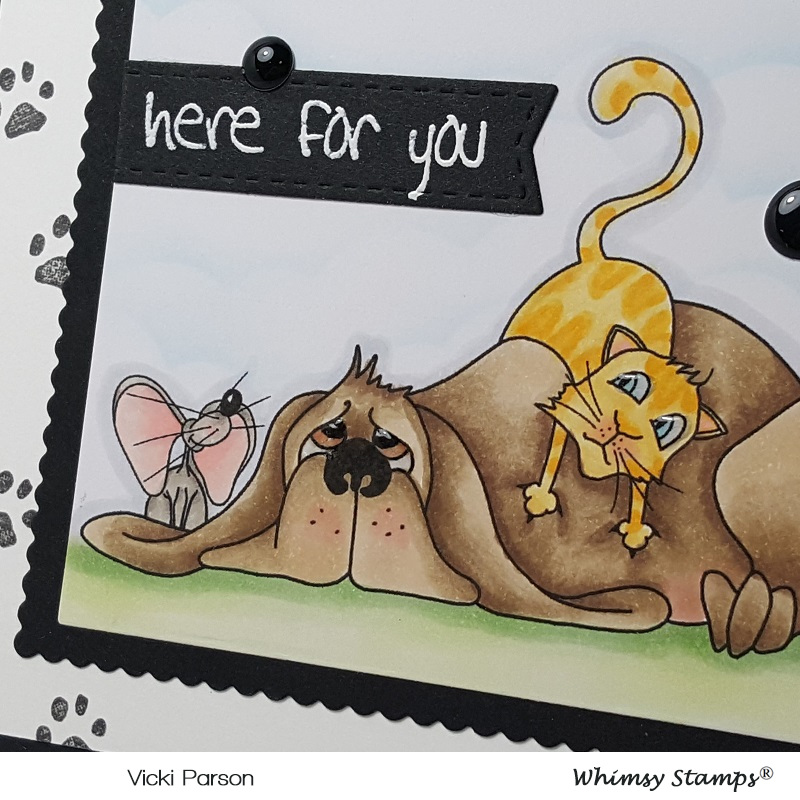
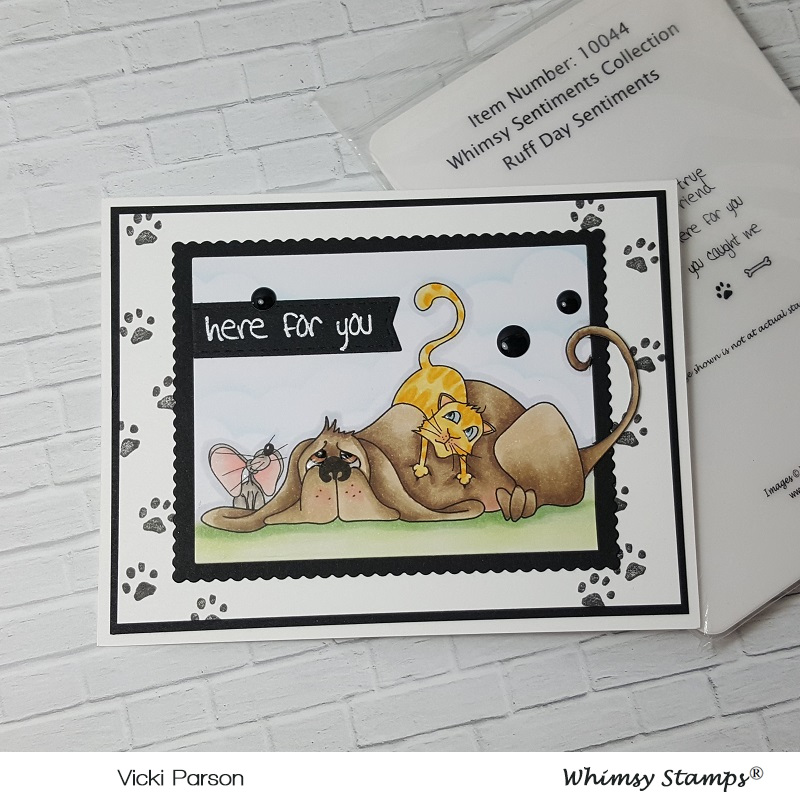
Here’s a pop quizz…. if you’ve known Whimsy Stamps for a while, does this particular image look familiar to you?  It’s a VERY old one and also one of the very first rubber stamp sets that Whimsy Stamps sold!  I believe mine is dated 2009!  I wanted to keep it as I’ve been a part of this company off and on since it started! 🙂  Really cool to still have it.  Obviously, it’s not available for purchase, but they did offer it as a freebie during their “Adopt Don’t Shop” party event last month.  The paw prints along the edges were also used from an older stamp set from Whimsy Stamps as well.  (You can see a portion of it on the right side of the photo above.)Vicki-WS-I'veGotYourBack1

Both of these images were colored with Copics.

The sentiment came from the same stamp set and was white heat embossed and cut out with the WS Quick Strips Die set.  I cut around the pup’s tail and then used a rectangle die to cut the rest of the image out and then layered onto a black piece of cardstock cut from a scallop rectangle die.  I layered the paw print piece, another piece of black cardstock and the image panel onto a white top folding A2 sized card base.  Lastly, I’ve added a few black enamel dots and even gave their eyes some shine with glossy accents.

Thanks so much for dropping in today!  Hope you’ve enjoyed my critter cards!  I’ll be back again tomorrow with a different kind of critter! 🙂

Challenges:

  1.   Crafty Catz – Anything Goes
  2. Creative Fingers – Anything Goes
  3. QKR Stampede – #344 Anything Goes
  4. Pammie’s Inky Pinkies – PIP1916 Anything Goes
  5. Creative Moments – Anything Goes

I Believe I Can Fly!

Hello friends!  It’s been a while since my last post, but the reason is that I was of course having some computer problems!  I had to reset my whole computer back to the factory setting and try to get it back up and going to what I had.  Thankfully because of my drive, I didn’t loose any photos or anything!  I think it’s back up to “normal” now, but it was scaring me there for a few days!

Speaking of “normal”…I’m not sure pigs can fly, but boy is this image so CUTE!

Vicki-WS-WhenPigsFly-Week3

I’m using this new April digital stamp by Crissy Armstrong for Whimsy Stamps called When Pigs Fly.  I love how he’s looking down as if he’s looking at the clouds below him with a huge smile!  I thought the sentiment from the Whimsy Stamps Bold Statements clear stamp set was the perfect compliment for this image too.

I took a cloud stencil and some Tumbled Glass distress ink with the foam blending tool to sponge on some clouds around the image.  I cut off the bottom portion of the image panel with the Whimsy Stamps Envelope Edger die set and cut an additional piece from the suede-colored cardstock for a layer behind it.  I also cut out some clouds from an older Whimsy Stamps die that I had and sponged some more of the distress ink on the bottom of each one to layer and stamp the sentiment in suede ink over a pink panel.  I added some pretty shimmer ribbon with a bow at the top of these layers and then attached it all over a top folding A2 sized suede card base.  Lastly, I’ve added some Studio Katia Crystal Clear Confetti sequins randomly over the card.

Vicki-WS-WhenPigsFly-Week3-close

Here’s a closer view of the image and how I went about coloring it in using Copic markers.  Here’s what I’ve used:

  • pig:  R20, R11, R00, R000 – wings:  BG13, BG10, BG000 – hooves:  C8, C5, C3
  • birds:  E47, E44, E43 – beaks:  E43, E41, Y11 – bellies:  E43, R00, Y11
  • I used white gel pen for cheeks and covered the wings with Wink of Stella

Vicki-WS-WhenPigsFly-Week3-flat

Something to note about my card is that because this was a digital stamp, I was able to size it the way I wanted to accommodate my card design.  This is what is great about a digital stamp.  You may not like it as small as what I’ve made mine for coloring purposes, but I didn’t mind it at all and enjoyed putting this together.  Hoping to give it to someone special soon! 🙂  Hope you like it too!

Thanks so much for dropping in today!  Now that computer is back up and running, I will be back again tomorrow with another post!  Have a great day!

Challenges for this card:

  1.  Krafty Chicks – Chicks/birds
  2. Pammies Inky Pinkies – PIP1915 Anything goes
  3. A Bit More Time to Craft – Anything Goes
  4. Crafting From the Heart – Anything Goes
  5. Little Red Wagon – Look Up, Way Up (things in the sky)

It’s Easter at Cute Card Thursday!

Yes!  Hello friends!  Easter IS on the way, isn’t it?!  I remember many Easters ago of hiding the eggs for the kids and then forgetting where I hid all of them myself, so I had to join in the Easter egg hunt too!  LOL!  Do you have any fun Easter memories?

So since it’s Thursday, it’s time for a fun new challenge at Cute Card Thursday!  Obviously, the theme this week is “Easter“!  We look forward to seeing what Easter makes you’re making this week, so come join us!  Here’s my card:

Vicki-CCT577-SSSEgg-stra Sweet Easter

I had a lot of fun creating this card!  I couldn’t help myself, I had to snatch up that Simon Says Stamp Limited Edition Egg-Stra Sweet Easter card kit. (Sorry, it’s sold out, but you can still purchase the stamp set, Background stamp, egg dies, and stencil separately from the kit though.  I have actually used all of those items on my card today too!

For the background, I took the jellybean background stamp and clear heat embossed it and then while I was cutting it out with a stitched rectangle die, I also took one of the eggs dies and cut out the center of the yellow card panel.  I cut a piece of white cardstock the same size as the yellow layer and then used the stencil and the Nuvo mousse that came in the kit and sponged it over the white panel.  I layered this piece along with a black heat embossed sentiment over vellum on a strip to wrap around the yellow panel along with a piece of black cord at the top.  I took some foam tape and mounted these pieces onto a white A2 sized top folding card base.  Lastly, I’ve added some clear sequins filled with some Nuvo glitter drops in the centers.

Vicki-CCT577-SSSEgg-stra Sweet Easter-close

Here’s a closer look at this sweet little Easter bunny that I’ve colored in with Copics.  I fussy cut it out and then decided to line up the bottom of it and cut it out with the same stitched die that I used on the yellow background panel.  I kept his ear out of it.

I took the glossy accents that also came in the card kit and covered the jellybeans with it.  I also took a couple of metallic gel pens to make some dots on a few of the Easter eggs and center of wheel.  Up close, you can see some of the shimmer from the Nuvo mousse in the white background egg that I stenciled on.

Vicki-CCT577-SSSEgg-stra Sweet Easter-flat

Lots of fun little details going on in this card, but that’s what I love about Easter…so many colorful and happy things going on!

Thanks so much for dropping in today!  I will see you soon!

challenges:

  1. Simon Says Stamp Wednesday – No Designer Paper
  2.  My time to Craft – Easter or Hedgehogs
  3. Brown Sugar – Spring or Fall
  4. Creative Craft – No Patterned Paper
  5. Crafty Cardmakers – Easter
  6. Crafty Gals Corner – Easter is on its way
  7. Crafting By Designs – Easter Challenge

Whimsy Stamps Cuddly Ride

Hello friends!  🙂

It’s been SO gorgeous outside with this wonderfully warm weather we’re having right now, so I find it hard to stay indoors right now!  We have rain coming, so I will be able to get some crafting done then!

Swinging by to share this really sweet digital image by Sylvia Zet for Whimsy Stamps called Cuddly Ride!  They have sold the rubber stamp version, but now they’re releasing these older images as digital files now!  So weather you like the rubber stamp or the digital images, it’s great to know that you can choose either!

Vicki-WSCuddlyRide-Apr9

I got her colored up in the following Copics:

  • Snail shell – E29, E27, E25, E23, E21
  • Snail body – W5, W3, W1, E21, E000, R20
  • Snail bow/patches, girl outfit – B37, B34, B32, YG13, YG11, C5, C3, C1
  • Girl’s Hair/Skin – E49, E47, E44, E43, E40, R20, R00, E21, E11, E00, E000
  • Pointillism under snail – W3, W1, W0
  • Used a white gel pen for highlights on snail and covered the ground with a Wink of Stella glitter brush pen

After coloring her up, I also sponged some clouds behind her with a stencil and then cut it out with the Whimsy Stamps Notched Square Dies.  I’ve also cut an additional larger blue layer for behind the image.  For the blue flowers scattered around as well as for the pieces for grass accents on my card, I’ve used the Whimsy Stamps No-See All Seasons Tree Dies.

I’ve taken a sentiment from my stash (retired Whimsy Stamps) and white heat embossed it over a piece of the blue cardstock and then I’ve used the Whimsy Stamps Quick Strips Die Set to cut it out.  Lastly, I’ve added some ribbon, a bow with a resin flower glued over the center of it and then I’ve added some rhinestones to the centers of the blue flowers.

Vicki-WSCuddlyRide-Apr9-close

From the same sentiment stamp set that I’ve used, I took a tiny heart image and stamped it with green ink around the colored image.  Of course, I tried to capture the wonderful shimmer underneath the snail where I’ve colored the Pointillism technique, but it just won’t show up in photos very well, but I just love the shimmer under him!  I also used a silver metallic gel pen to color the “buttons” on the girl’s jumper.

Vicki-WS-CuddlyRide-Apr9-flat

I thought she turned out really cute and I think this would make a wonderful card for that special friend who is always by your side!

That’s all for me now.  I think I may need to go back outside and enjoy some fresh air and sunshine before it’s gone!  Have a lovely day!

Challenges:

  1.  Simon Says Stamp Wednesday – Animal Antics
  2. Crafting With an Attitude – Anything Goes
  3. Creative Knockouts – Anything Goes
  4. Crafty Catz – Anything Goes + optional:  Use Your Dies
  5. Creative Fingers – Anything Goes
  6. Simply Create Too – Anything Goes

Rainbow Shaker Birthday!

Hello friends!  Yay!  It’s Friday and I thought I’d share this happy shaker card that I made.

Vicki-MFT Birthday Bear Rainbow

I saw over at My Favorite Things “Birthday Project” Challenge was a “rainbow” theme and I thought this would make for a happy and fun birthday card design!  So I pulled out the MFT Transparent Triangles Background stamp (now retired) and heat embossed it with white EP over some Bristol Smooth Watercolor paper.  I went to work with my rainbow background and sponged several colors of Distress Oxide ink in rainbow form over the heat embossed background for a “resist technique”.  I spritzed some water over it and my sprayer went a tad bit “droopy” and I ended up with a weird large droplet pattern, but I decided I wanted to keep it anyway, I liked it.

So to make sure that my shaker balloon was going to line up with my bear, I needed to stamp, color and fussy cut out this bear from the Beary Special Birthday stamp set.  I needed to fussy cut it out because the coordinating die cut would also cut out the balloon from the image, and I didn’t want to include it as I was making my own!  I’ve also white heat embossed a sentiment from the same stamp set and cut it out with the Essential Fishtail Sentiment Strips.  I also took the Mini Balloon Shaker Window & Frame Die-namics to cut out all of the pieces that I needed for the balloon.  (I used the fussy cut out bear for placement to see where I needed to die cut a hole in the background for the shaker area.)  Before attaching the bear down, I also took some green cardstock and cut out a border with the Grassy Fields Die-namics.  I sponged the edges with green ink and took a Copic marker to give a shadow around the bear.  So after I placed my “balloon hole” where I needed it on the background, I took the rainbow sequins to place inside the Mini Balloon Shaker Pouches and added a piece of black cardstock for the background, which was placed over an A2 sized white top folding card base.

Vicki-MFT Birthday Bear Rainbow-close

Here’s a closer look at the bear and how I’ve got him colored in.  I forgot that in addition to the rainbow sequins I had, I put some tiny star sequins in there as well.  At first, I thought I had gone a bit too dark for coloring the bear, but I like how he blended out and I think he really stands out on the rainbow background and doesn’t get lost with the black accents on the card.  I took a white gel pen to his cheeks and added some shimmer to his present with a glitter brush pen.

Vicki-MFT Birthday Bear Rainbow-flat

Here with the card lying flat, you can better see the shaker bits on the inside of the balloon and how they really stand out against the black balloon background.

I think I got a smile and it was passed around for the shaking.

Hope you’ve enjoyed my card today and I thank you so much for stopping in!  Wishing you a very happy and rainbow filled weekend too! 🙂

challenges:

  1.  MFT Birthday Project – Rainbow
  2. Creative with Stamps – Birthday
  3. Crafting By Designs – Anything Goes
  4. Little Red Wagon – “Shake It!”
  5. Always Fun – Birthday