Playing With Paper Blocks and Bunnies

Hello friends! Easter is coming for us for very soon and I’ve been enjoying all of the Spring that’s starting to come up outside with flowers and buds on the trees!  It’s still a little cool, but hopefully the weather will even out and stay warmer!

Since I’ve been trying to get motivated for Easter, I’ve pulled out some papers from my stash and have been inspired to CASE (copy & share everything) a friend that really inspires me to use things I have!  First, I’d like to share a fun Easter card that I’ve made for a sketch challenge that I was inspired by as well:

That sitting bunny is so cute!  (Thank you Carol…more on that later in post!)  If you check out the sketch from the Sketch Saturday challenge blog (see in challenge list below), you will see all of the fun angle strips in the sketch.  I thought it would be fun to pull out some Easter papers from my stash.  I wasn’t sure how to do the background until I saw that this sitting bunny worked perfect for a part of the paper pad that had this wheelbarrow image in it!  I cut it out from the paper and placed the bunny on it.

For the background of the card, I thought it would be fun to use my stencils to create a scene with grass and clouds.  The wheelbarrow bunny fit in the open area and then I used the angles from the sketch to cut pieces with the same Easter paper pad.  I just eyeballed everything by marking notches and lining those notches in my paper trimmer to get a straight cut.  Even the solid paper on the base layer came from the paper pad.  I just cut it A2 size to fit over an A2 top folding white card base.

The sentiment was stamped and cut out with the coordinating die.  I added some shadow under wheelbarrow with a green marker (not really the color I wanted, but it worked), and colored a bit of pink on the bunny too.  I added teal rhinestones next to the sentiment and done.


Next, I wanted to share something else that I was inspired by from my friend Carol at https://ourlittleinspirations.blogspot.com who sent me a very cool card and kind gift:

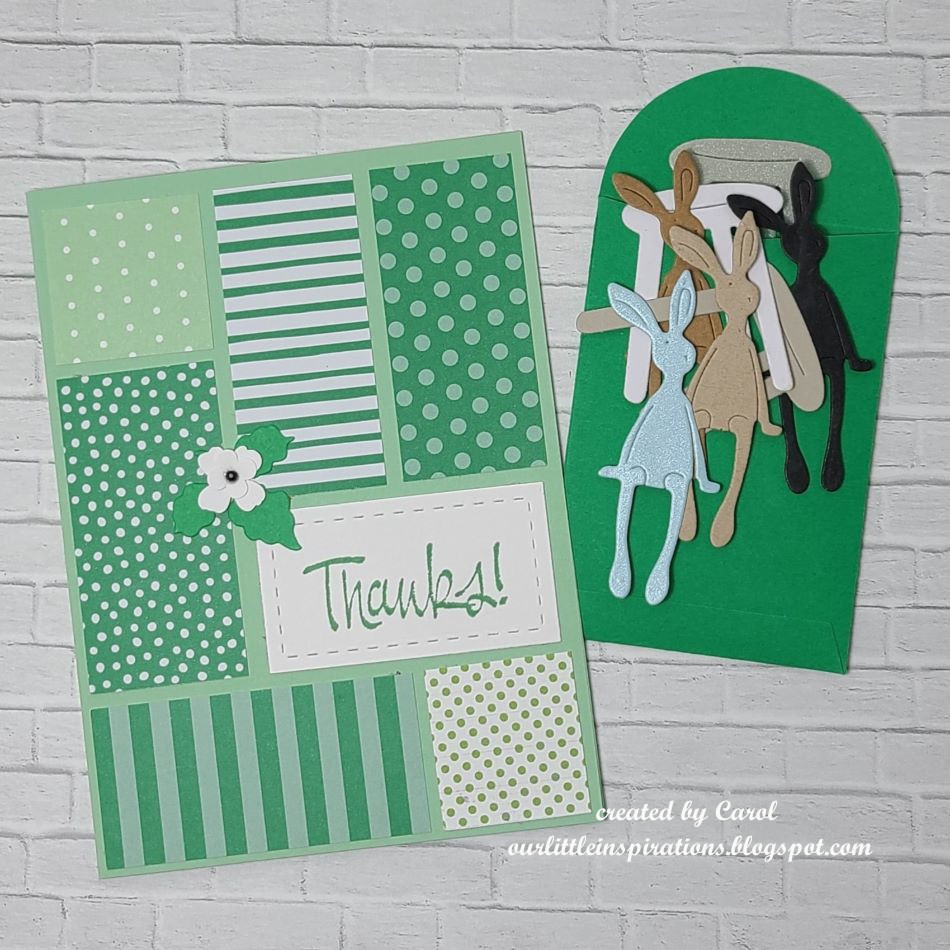
She always inspires me with her “snippet” creations and coming up with cards like this one to utilize those pattern papers we hoard so much!  The pattern is very pleasing to the eye and so I wanted to create one myself!  With all of the papers I have, I’m sure I could make a zillion cards! 😆  I also love how she used a monochromatic green theme with it…which I will need to try another one with this idea!  You should go check her blog out and be inspired too!

Also, she was very kind in sending me these die cut sitting bunnies & stools!  I do not know exactly where this bunny is from, but I’ve seen it around the craft world.  So cute!  Thank you so much for your kindness and inspiration my friend! 

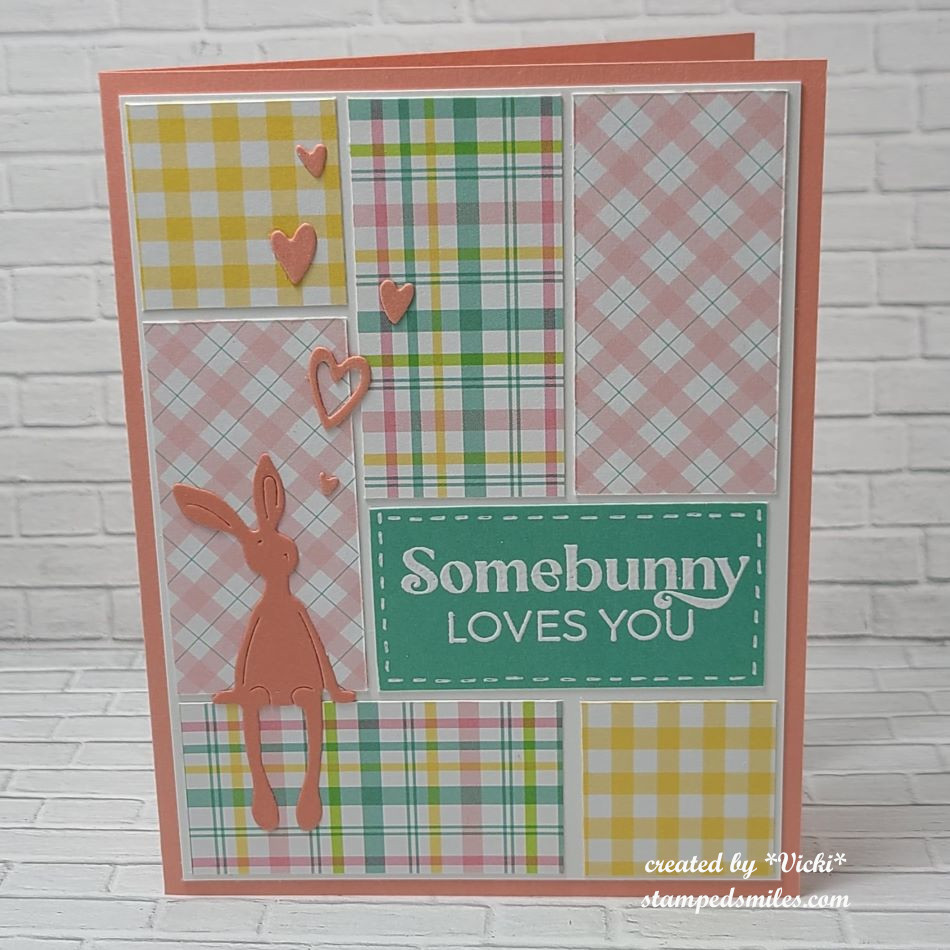
So here’s the card that I created inspired by Carol.  I really love plaids and I thought it would be fun to re-create her design which I measured out her pieces and cut based on what I thought they were.  It was really fun and not as hard as it looks like it might be.  I wrote the measurements and cut from the same Easter paper pad as I used on the card above.  I started with a white base…that way if I messed up, it wouldn’t matter too much.  The sentiment piece was also from the same paper pad.  I just white heat embossed the sentiment and added some stitch details with a white gel pen.

I used one of the sitting bunnies that Carol provided me with, and tried to match up what I had from my stash the best I could to die cut some hearts along with the A2 side folding card base.

I brushed the hearts with a glitter brush pen and called it done.


I had so much fun playing with these paper blocks and bunnies!  I hope you’ve enjoyed my creations and inspiration today as well!  Thanks so much for stopping by!  C U SOON!

Challenges:

  1. Sketch Saturday – #746 optional twist: feature an animal (top card)
  2. Simply Create Too – Bunnies & Blooms #198 (top card)
  3. Make My Monday – Spring, Flowers, Weather, etc. #221 (top card)
  4. Fab ‘N Funky – Spring (top card)
  5. Daring Cardmakers – Spring is in the Air (top card)
  6. The Paper Funday – Anything Goes optional: dies #63 (top card)

Mix it Up With a Fun Fold

Hello friends!  Happy March!  I’m happy to see this month come as signs of Spring start popping out everywhere!  Pretty soon the flowers will start coming up too!  Are you ready for Spring?

Today starts a new challenge over at the Mix It Up Challenge Blog!  There is always lots of wonderful inspiration from the team, so please go check it out and play along!  The challenges are always ANYTHING GOES with an optional themeThis month’s theme is FANCY FOLD!  For these challenges, you have plenty of time to enter as they run for 6 weeks!  I look forward to seeing what you come up with!   Here’s the project I made:

These birds are ready to party!  How fun are those party hats?!  I’ve found this really cool take on a “Z” fold card, but this one has been named “Diamond Z Fold Pop-Up Card“.  There are so many variations of this that I found on You Tube, but they’re all the same concept of the two diamond shapes on front and then an additional diamond pop-up mechanism on the inside that moves when you open the card.  (Click on the card name for a tutorial.)  The only thing I did differently than hers was using scallop square die cuts and I covered the pop-up mechanism on the inside with pattern paper so it’s not as noticeable.

I’ve used the My Favorite Things (retired) Birthday Chicks that I stamped, colored and die cut out and arranged over the design.  I’ve also used the My Favorite Things (retired) pattern papers and of course the same for the scallop stitched squares.  For the white squares, I’ve used a MFT cloud stencil with blue ink for the clouds and the sentiment was white heat embossed and cut out with a banner die.

When this card is closed, this is what it looks like.  Notice that you do not see the bird on the inside panel next to the bird on top of the balloon as he is hidden until you open it.

It folds up just like a Z fold would and it’s A2 and ready for a regular A2 envelope.  I’ve placed an extra panel on the back of the card for a special handwritten message and decorated it a strip of pattern paper and another party bird.  I didn’t put anything on the inside stars pattern because I thought it took too much away from the front of the card and you don’t want an inside message to show on the front of the card.  It takes a bit of maneuvering to decorate images and sentiments as to where to put them strategically on the card, but it was so fun!

  • I hope you’ve enjoyed my card today and go check out the challenge to come and play along with us!  I really look forward to seeing all of the different fancy fold projects in the gallery this month! 

Thanks so much for dropping by and I’ll see you soon!

Challenges:

  1. Make My Monday – Fun Folds #220
  2. Penny’s Paper-Crafty – Anything Goes using Paper #566
  3. Simon Says Stamp Wednesday – Anything Goes
  4. Crafty Catz – More Than One Fold/Anything Goes #666
  5. Krafty Chicks – #705 Anything Goes

Once Upon a Time GDT-Cat in the Hat

Hello friends!  I can’t believe that February is gone and we’re moving onto March!  That month went by quickly, but now I can look forward to Spring coming, which is a good thing! 

gdt

I had won a guest spot over at the Once Upon a Time Challenge blog in January, so I’m sharing my project for the March month’s book title:  “The Cat in the Hat“!  I remember this book so well as I read it so many times as a child!  You can be inspired to create with this book/book cover to make your project for this challenge:

3cat in the hat

I chose to use the cover photo for my inspiration and I remembered something that I had which went perfectly with this theme in mind too:

I kept my card simple because the book cover photo was simple as well.  This is a digital image by Bugaboo Stamps (no longer in business) that I’ve had in my computer for a long time.  I still pull one out from time to time as they’re so great to color with!  The file name on my computer was “Cat in Hat“.   Really love that quote from Dr. Seuss!

I printed the image out twice.  Once to cut out the entire image panel and then another to color just the cat’s head, cut out and pop up over the image for dimension.  I felt compelled to color the background behind the cat in blue to match the cover photo.   It was easy to color because the cat was done in black and white with a pop of red color in certain areas.  I also added some glossy accents over his nose.

The image panel was layered over a piece of red scallop and then attached to a top folding white A2 card base.  I thought it would be a great card to send for encouragement to someone.

I hope you can play along in the challenge as I’d love to see your take with this book!  Thanks so much for stopping by and sharing some time with me!  I’ll be back shortly with another challenge post, so stay tuned!

Challenges:

  1. Pammie’s Inky Pinkies – Anything Goes PIP2408
  2. Simon Says Stamp Monday – Fur or Feathers
  3. Digi Choosday – Anything Goes
  4. Gem of a Craft – Anything Goes

February Art Journal Page-Catching Stars

Happy weekend friends!  We’ve had some great sunshine for the last few days and it’s been really nice, but it’s very unusual for us to have these warmer temperatures for this time of the year.  I will enjoy whatever it brings for sure!  But in the meantime, I’ve also been enjoying time in my craft room getting creative too!  

As you know, this month I’ve been sharing several art journal pages as I’ve been hosting this month’s challenge theme over at Art Journal Journey.  There is still lots of time left to join in the fun with us and share your inspiration with the “LIGHT” theme and I’d love to see your take on it!

Today, I’m not only sharing my project for that, but it’s also time for our monthly Art Journal Page collaboration with my crafty friend, Carol (from Crafty-Stamper)! We get creative trying to use up our never-ending stash piles along with a prompt for each month.  I know she always has great inspiration to share, so please check out her blog too! Here’s my AJ page with the “SMASH OUR STASH” February prompt of “LIGHT” (of course!):

Oh my stars!  I don’t know if these guys are expecting several rainy days ahead, but they really want to be prepared for it!  For my “stash smashing” I went with using some metallics.  Do you have a problem hoarding those metallic things because they’re just so pretty?  I am guilty!  I’ve used some metallic paper to cut out the lettering, I’ve used some metallic watercolor that I avoid using so I don’t run out and those star sequins I have so many in every metallic color!

For the background:  I’ve used a 5.5″x8.5″ piece of Canson watercolor paper with the pre-punched holes at the top using my Zutter machine.  I’ve pulled out my watercolors and used shades of blues, but also dark turquoise and dark violet.  I’ve used the metallic copper watercolor to splatter over the background for those distant stars.  I also added a very light touch of this metallic watercolor on the top highlight areas of the critters, around the wheelbarrow, the net, the lantern and the star with the mouse.  (Sometimes it’s hard to capture all of the shine on a project, but this thing is very shinny and sparkly!)

But before I put all of the details on the images, I took a black marker and drew in a ladder to reach up towards the clouds so Mr. Fox could climb up to the clouds and catch his star.  I then took a grass border die and die cut a strip in black for the bottom.

All of the stamped critters and clouds came from Lawn Fawn sets.  I stamped, colored and die cut them to arrange my scene.  Some of images are popped up with foam tape for dimension.  As you can see, I’ve added tons and tons of metallic copper sequin stars filling the wheelbarrow, dropping from the sky and even the little bunny is holding his star.

Lastly, I die cut the metallic copper letters, backed them with black cardstock and popped it with foam tape over the page and printed off the quote on the computer and cut them in strips to arrange on the scene.

This was lots of fun to do as I was able to use up some of that hoarded metallic stash!  Hope you’ve enjoyed it and gotten some inspiration from it. 

Thanks so much for stopping by and enjoy your weekend!

Challenges:

  1. Art Journal Journey – LIGHT/KEEPING IT LIGHT
  2. Stamping Sensations – Animals/Birds/Creatures/Anything Goes
  3. Creative Fingers Anything Goes

Art Journal Inspiration and Valentine’s Day Cards!

Good evening friends!  Tomorrow is about “LOVE” for Valentine’s Day!  I hope that whatever you’re doing that you spend it with those that you love or at least tell someone how much they mean to you!  I have a special post this evening that is dedicated or inspired by love. ❤️

First up is my art journal page with the prompt/theme of “LIGHT/KEEPING IT LIGHT” that I’m guest hosting this month for the Art Journal Journey Challenge.   It’s been so fun to see all of the wonderful art created so far!

This page was inspired by not just the “light” prompt for the challenge, but it was also inspired by the love of my life.  We have spent many moons together and have enjoyed our time in the moonlight as we both love nature and have spent some time traveling and seeing some beautiful things.  I’m so thankful to have had these special memories with him.

For the background:  I started with a 5.5″x8.5″ watercolor with pre-punched holes at the top with my Zutter machine.  I used my watercolor to create the blue sky background with an idea of where I was going to place the moon.  I left that area to watercolor in the yellow rather than the blue.  I then used some white opaque copic watered down and splattered over top for stars.  The “moon” was die cut in white with a heart shaped die and I added a moon stencil over top to make it look like a heart shaped moon and glued it in the center of the watercolor background.

The bottom portion was made with just ripping some cardstock and ink blending one with the greens and one with greys and black.  I die cut the trees in black and glued them in place and then added the ripped layers over top.

I stamped the Lavinia Stamps “Star Gazers” stamp in black in and fussy cut it out.  I colored the rocks they were sitting on as well as their wings and popped them up on the grey ripped border.  I also hand drew more rocks around them and used a white gel pen to highlight.  I added some glitter to the wings.  Lastly, I wrote over black cardstock with a white gel pen, cut them out and attached to the ripped green border.  I then used a black pen to doodle around the words.


Next up are a few Valentine cards that I’ve made.  I’m actually really bummed because I would’ve shared another two cards that I made, but I forgot to take photos of them before I sent them out!  I used a pizza theme and they were so fun! 

This first one is for my husband and I’ve used the Craft Roulette #201 parameters to create it:

We had to make an easel card, so I decided to make a heart shaped one.  I’ve used the cute skunk from Lawn Fawn with all of the “sweets”. (which was also one of the parameters)  My husband loves his sweets!  I also had to use “quiet” colors and some sort of bokeh, so I’ve made a bokeh background and used a solid heart stamp in white over the blended colors.  It reminds me of those conversation hearts.  This skunk makes me smile!

This is another fun card that I’ve made for a friend!  I couldn’t wait to use this fun mosaic heart from Taylored Expressions.  It came as a freebie for a limited time with a Valentine release.  I like that it comes with the solid heart backer which makes putting it together easier.   I ink blended a panel in two shades of pink and then die cut the heart with the pieces.  I used the frame cut in white and then popped in the ink blended pieces inside the frame.  

The embossed heart background was made after cutting out a piece of Bubblegum cardstock with the postage rectangle die.  I stamped and die cut the sentiment over top of the heart and added some gold rhinestones. 

And this card was done for the Inky Stamper FB challenge which was to create a square card.  I have made this one 4.25″ square and used the cute Snail stamp set along with some Doodlebug papers which you can also find in their store.

I just stamped, colored and cut out the images, added a border at the bottom and cut out a scallop square in white and stenciled some clouds at the top.  More pink papers onto a white square card base and called it done!  There’s nothing better than getting snail mail!

  • I hope you’ve enjoyed my heart-filled post today and you’ve been inspired in some way!  Thanks so much for stopping in and I’ll see you again on Thursday for a new challenge to try!  Happy Valentine’s Day!

Challenges:

  1.  Art Journal Journey – LIGHT/KEEPING IT LIGHT (art journal page only)
  2. Crafty Animals – #80 Anything Goes + animal (skunk card)
  3. Critter Crazy – #83 Anything Goes + critter (snail card)
  4. Pearly Sparkles Love/Have a Heart (skunk card)
  5. Creative Knockouts – #514 Love/Valentine’s Day (skunk card)
  6. A Place to Start – Monochrome (mosaic heart card – pink)
  7. Aud Sentiments – #310 Dies/Love/Wed/Anniversary + sentiment (skunk card)
  8. Creative Inspirations – For Someone You Love/Special Friend (mosaic heart card)
  9. The Male Room – Valentine/Use a Heart (skunk card)
  10. Crafty Catz – Anything Goes optional: Valentine/Love (snail card)

January AJ Page-BRR!

Hello friends!  Hope you’re enjoying your day so far and staying warm!  We’ve just recently survived a very cold below freezing temps in my area, so going outdoors is not that pleasant even bundled up!  So with that, I stay inside and find crafting to be my happy space!  

I’m very excited to be joining with my crafty friend, Carol (from Crafty-Stamper) for another year of SMASHING OUR STASH!🎉  I love the inspiration that we bring each other as well as accountability for getting those piles of stash used up!  Thank you for joining me again and please be sure to check out the wonderful inspiration on her blog too! Here’s my AJ page with this month’s prompt of “COLD” (anything related to this word):

Of course when I think of cold, I think of my favorite animal…the penguin!!  I pulled out some Lawn Fawn stamps to use on my page today.  Lots of blues and silver and sparkle help with the feeling of cold too!  I have so many sparkly items, so it was great to use some up!

For the background:  I started with a piece of Canson Watercolor 140# coldpress 5.5″x8.5″ pre-punched holes at the top and covered it with blue colored acrylic paints using a baby wipe.  I also went around the edges with a darker blue and then used a number stencil with white paint which you can barely see as I’ve covered most of it up.  I then splattered with white paint using a fan brush for the snow.

  • I also found a cool icicle border and cut it out with my Cricut machine in silver glitter cardstock for the top of the page.  I then used my Zutter machine to punch the holes again and used a corner chomper to round the top edges.

For the bottom:  I used all Lawn Fawn border dies for the mountains and snow hills.  The blue ice water the penguin is standing on is just a straight piece of blue cardstock covered with a glitter brush pen.  I also used Stickles glitter to cover the snow cone that the penguin snowman is holding.

The lettering was done with a Lawn Fawn alphabet die that I ink blended in blues and covered with crystal effects.  I foiled over the “January” word with blue foil and cut it out with a die and placed a couple of silver rhinestones next to it.  This was popped up with foam underneath the “BRR” letters.

I hope you’ve enjoyed my AJ page today and have been inspired in some way!  Thanks so much for stopping in!

Challenges:

  1. Art Journal Journey – It’s On the Calendar (January is COLD!)
  2. Kreativ-Tanten – Snow
  3. Once Upon a TimeMr. Popper’s Penguin book cover
  4. Penny’s Paper-crafty– Anything Goes with Paper
  5. The Sisterhood of Crafters – Winter Blues

2024 Calendars Completed

Hello friends!  It’s that time of year when we turn over a new year and then realize that we need a calendar to keep track of our days…at least I do anyway!  I don’t feel ready for the year ahead until I’ve got my calendars up and ready to roll!  Usually, I’m ready to go by the end of the year, but I ran out of time with the Holidays, and I had planned on giving calendar gifts which I sent late, but I did get them done!  I still feel in Holiday mode because of this…Ugh!

So this month I’ve been working on several calendars and spending most of my time coloring them up.  It’s been very cold over my way, so I actually enjoyed doing them.  Here are a few sets that I sent out for gifts:

I think these Taylored Expressions Feisty Square Calendar Cards are my favorite!😆  I was laughing at each one as I was coloring them up!  The cards are already printed and makes it easy to get them colored up and attach them to the Desk Calendars.  All of the image cards are blank so that you can use them however.  I decided to just create my own background with each one using my markers in different ways while I was coloring them up.

I gave this set as a gift and wasn’t sure how they would choose to be displayed, so I added a magnet on the back of each one and also included a Walnut Wood Display, so they had a couple of options to use.

This next set was put together the same way I did the calendar above, expect these are the Taylored Expressions Scratch-Off cards.  (This one is not available in the store because I received the entire set with my Advent Calendar purchase.)  I thought these pups and cats were too cute and a perfect gift for someone that has both a dog and cat in their family.

After I colored them in, I added the Taylored Expressions Scratch Off Stickers to cover up the joke punch line.  I then used the TE Square Tear Off Calendar dies to create the design around the edges and a layer of cardstock to coordinate behind each one before placing on the calendar cards.  I also stamped “scratch off” under each card so that the person can scratch off the joke punch line for every month and see a new joke.

I also added a magnet on the back of each one as well as include a Walnut Wood Display so the recipient can choose how to display the calendar.

  • Click on the photos to enlarge on website!

Every year I always get the Inky Stamper Calendar kit that gets put together at the end of each year.  There is usually a number limit on how many are available each year, so if you are interested, you might want to click on the link to get one because I’m not sure how many more there are left.

These were also fun to put together and color.  I chose to stamp my own images and cut them out.  You still get the pattern papers and white sentiment strip with each month.

I absolutely love how this calendar turned out!  I’ve used the Taylored Expressions Friendly Square Calendar Cards and I thought they were so uplifting.  This time of the year positivity is something that is very important to me and can be hard to come by.  The days seem to be gloomy and short with little sunshine, so coloring all of these was great to fill my time with.

For this display, you may remember a calendar I had done a few years ago on THIS POST using the TE Snarky Calendar Cards.  I’ve decided to update that one and used the same display stand to create this one, which is why I prefer using this stand.  It’s nice and durable.

I have gold foiled each card and colored it.  I’ve made a new background display card with a layered stencil and I’ve layered everything with gold foil cardstock.  I’ve got a bag on the back to store my extra cards so that I can switch them out whenever I’d like.  All of the gold shine really catches my eye and is pleasant to view.

I hope you’ve enjoyed my post this afternoon and I REALLY appreciate you taking the time out of your day to leave me a comment.  It means very much to me as does your support!

Have a beautiful day and I’ll see you on Saturday for my first Art Journal Page of the year!

Challenges:

  1. Crafting From the Heart– Anything Goes
  2. Ally’s Angels – Anything Goes
  3. Love to Scrap – Anything Goes
  4. Love to Craft – Anything Goes
  5. A Perfect Time to Craft – Anything Goes
  6. Crafty Calendar – Anything Goes
  7. Lil Patch of Crafty Friends – Anything Goes

New Beginnings at Sparkles Monthly Challenge!

Hello friends!  With January comes a new year and every year people are thinking about everything “NEW” like resolutions, out with old, in with new sort of things.  It seems with cold and snow winter outside; I’ve been doing a majority of my time organizing and figuring out what to toss or keep!  I’m thinking I need a new “for sale page” here on my blog!  I will need to figure that out and update later!

Today brings a new challenge for the start of the year at the Sparkles Monthly Challenge Blog!  For the start of the year and this month’s challenge, we have the theme: NEW BEGINNINGS!  I received a Lawn Fawn gift last year and this is my first time using it for my card today:

Of course, a baby is a wonderful “new beginning”, and I was inspired to use this darling Lawn Fawn stamp set called Elephant Parade plus the Add-On.  I stamped, colored and die cut all of the images to arrange a scene over the arch opening of my card front made with the Lawn Fawn Secret Garden Window die set.

I wanted to keep the colors gender neutral, so I went with mint and yellow type colors.  I blended around the inside edge and white heat embossed the sentiment at the bottom.  I found a very old scrap of decorative paper and ran a stitched cloud background plate die over it.  (I think it’s been retired) This was the background for my window opening.  I added foam tape to the back of the mint card front and attached it to the decorative paper.  Some of the images were glued directly onto the background and some were popped up with foam tape. I’ve added this panel onto a top folding A2 white card base.

I finished out the design with some clear sparkling sequins filled with Stardust Stickles and a few white and black dots with gel pens.

I hope you’ve enjoyed my card today and have been inspired to come join us this month to enter your creation!  I look forward to seeing what you make!  Thanks so much for stopping by as I appreciate you taking the time!  Have a great day!

CHALLENGES:

  1. Simon Says Stamp – Cute Critters
  2. Critter Crazy – Anything Goes featuring a Critter
  3. Time Out – NEW
  4. CRAFT – NEW
  5. My Time to Craft – New in Your Stash (stamps/dies – first used for this card from gift given October 2023)

November AJ Page-Winter Wonderland

Hello friends!  Hope everyone has had a wonderful Thanksgiving for those that celebrate.  And with that, there is also the Black Friday deals, and today is “small business Saturday”.  So have you’ve gotten some really good deals or do you shop during this time?  I don’t really shop too much during this time, but I enjoy hearing about the great deals everyone has gotten!

The last Saturday of the month also brings us to the monthly Art Journal Page collaboration with my crafty friend, Carol (from Crafty-Stamper)! We get creative trying to use up our never-ending stash piles along with a prompt for each month.  I know she always has great inspiration to share, so please check out her blog too! Here’s my AJ page with the “SMASH OUR STASH” November prompt of “STENCILS” (can also make your own):

I do love stencils, don’t you?!  I have lots of them in my stash and I don’t always use them as much as I’d like to, so how fun to pull out several of them for this month’s prompt!  All of the ones I’ve used on my page are from Tim Holtz.  The entire page is stencil expect for the deer, sentiment and bottom snow!  (I would’ve used the deer for a stencil too, but I don’t have one.)

For the background:  Started with my usual 6″x9″ 140# watercolor pre-punched holes on the side.  I took the large star looking stencil and sponged some VersaMark ink over it towards the top of the page and heat embossed it with clear EP.  (This made a “resist” for the ink I layered on top.)  I took a long strip of masking paper and ripped it to create some hills for the bottom.  I needed to mask so the colors didn’t go over it.   I took several different colors of Distress Oxide sprays along with spritzing with water to help the colors move around and made a few layers with this.  Once dry, I went over the background with the dotted stencil and sponged ink over it with a blue color.

For the tree stencil, I needed to be sure that it would cover the background I created, so I used some green paint to sponge over the stencil, but because the background is blue, it’s sort of harder to see the green.  This stencil also had a second part where you can cover each tree with another layer for either another green or snow.  So I used some Hero Arts white paste to cover it with.  I also used the same paste to add another layer of stencil to the sky for snowfall.

The silhouette deer is a stamp that I stamped with black pigment ink and then I heat embossed it with clear EP.  My final touch to the page was to take the Hero Arts white paste and cover the hills at the bottom using my spatula.  Really love the dried look of the paste as it has a wonderful shine to it which works great for snow!  It didn’t take as long as I thought it would to dry. (About 2 hours it was hardened.)

I found a couple of the Tim Holtz sticker quotes to go with my theme, added to black cardstock and went around the edges with a silver paint pen.  I cut them out with scissors and glued to the page.  I took some silver wax and went around the edge of the page with my finger and lastly added some glitter drops to a couple of the centers of the “stars” in the sky.

Hope you’ve enjoyed my art journal page today or have been inspired!  I appreciate you taking the time to stop in! 

Challenges:

  1. Art Journal Journey – Nature (I love nature in the wintertime!  So pretty covered in snow!)
  2. Try It on Tuesday – Baby, It’s Cold Outside!
  3. Crafting From the Heart – Anything Goes
  4. Creative Artiste – Anything Goes Mixed Media (stencils, pastes, paints, inks)
  5. Stencil Fun – Anything Goes using stencil(s) optional: leaves
  6. 613 Avenue Create – Anything Goes optional embossing (heat embossed)

Winter Animals for Sparkles Monthly Challenge

Hello friends!  I hope you’ve had a great start to your November so far!  It’s been a few minutes since I’ve posted, but I have to say that I’ve been pretty busy in the background!  Hoping to share what I’ve been up to soon!

Today begins a new challenge over at the Sparkles Monthly Challenge!  This month, we’re looking to see some WINTER ANIMALS!  I hope you can join in the fun with us!  A reminder that this will be the final challenge for the year as we’ll be on Holiday break until January.  Here’s my take on the theme:

My first thought of a winter animal is a penguin of course!  I’m a huge fan of them and have so many in my collection…including other than stamp related!  These guys are really enjoying winter on this scene!  I’m using the My Favorite Things Playful Penguins stamp set and I started with a stencil from MFT that has “pond” shapes and lightly stenciled the soft blue for a place for my “ice platform” to be.

After creating the “ice pond”, I used some tape to mask off the bottom portion so that I could ink blend a sky at the top.  I used some White Opaque Copic and splattered it over the sky area.  I then used another MFT stencil to create some snow drifts in the background.

The two penguins, igloo, ice pad and sign were stamped, colored with Copic markers and die cut out to be placed over the scene.  I added the flattened penguin to the ice pad and then had the igloo in the background while the sign and penguin are waiting at the side of the pond.  I used a pen and wrote “FREE RIDES” on the sign.

I finished it off with a glitter pen over the “ice pad” and igloo and then used some Stardust Stickles over the snow on the sign.  I thought it needed some more snow falling down, so I took some sequins and added it to the scene.

If I were on that scene, I would probably be more like the flattened penguin on the “ice pad”!😆  How about you?  Do you like the snow?

Thanks so much for joining me here!  I hope you like my penguin card and will sharing your favorite winter animal in the challenge too!  Have a great day!

Challenges I’d like to enter this card for:

  1. Pearly Sparkles Christmas/Winter
  2. Craft Rocket – #109 Wintertime (No Christmas)
  3. Crafty Animals – Anything Goes with animal(s)
  4. Critter Crazy – Anything Goes featuring a critter(s)
  5. Love to Scrap – #164 Anything Goes
  6. Crafty Calendar – Anything Goes
  7. Creative Moments – Winter
  8. Penny’s Paper-Crafty – Anything Goes