Hello friends! I’m back again with more celebration fun as we continue with our celebrating over at {Cupcake Inspirations} for another feature of sponsors for our 500th “birthday celebration” challenge!! YAY!
Today, we are highlighting Digital Delights by Louby Lou – Please check out the challenge blog for more details about this sponsor.
The DT was provided with images from this sponsor to use for our creations:
Isn’t she a cutie?! I have used Cupcake Josie for my image here that was colored with Copics and cut out with a stitched rectangle die. I used some fun birthday papers I’ve found in my stash to layer my design with along with a sentiment that was white heat embossed and die cut with a banner die that I’ve attached over the design.
I’ve added some glossy accents over the cherry on her cupcake as well as some dotting with a metallic gel pen for the sprinkles as well as for her bows.
Please be sure to add your birthday/celebration creations in the gallery soon before the challenge ends in a few days! We look forward to seeing them all!
Thank you for popping over here today friends! See you tomorrow!
Hey there friends! We’re now at the half-way mark of our wonderful “Birthday Celebration” challenge over at {Cupcake Inspirations}!
Have you been adding your birthday/celebration themed creations to the gallery yet for your chance to win a prize from one of the amazing sponsors we’ve enjoyed sharing the inspiration with?! If you haven’t, we hope you will be able to join in the fun with us as we’re really loving the wonderful projects we’ve been seeing so far!
Today I thought it would be fun to create a unique card with my friends for {Cupcake Inspirations} as well as another of an old favorite from our sponsor Riley and Company that was also featured for yesterday! I have loved this adorable moose for many years and so I couldn’t help but use another image to create something for a little chuckle….
I had so much fun with this easy to make card! I’ve used my Cricut Explore to print out and cut the shape of the cupcake. I actually did this twice so that I could make a folding card with the shaped design. I made a score mark on the bottom cupcake along the left side and glued it together so that it would open up on the right side.
I’ve taken this really adorable Riley and Company “Or Bust” stamp that I’ve had for a few years and stamped and colored him up. Since the space above the “or bust” words is empty, I filled it with a sentiment from a MFT set that was perfect! 😂 I then fussy cut him out and popped him up with foam tape over the card.
I used a gold metallic gel pen to color the frame of the sign he’s holding, wrapped some gold metallic ribbon around the cupcake with a bow and a cupcake button in the center and then finished it off with some glitter over the sprinkles on the top of the cupcake.
Hope that you’ve enjoyed my fun little shaped card today! Thanks for dropping in and I’ll see you on Day 10 for more inspiration with another sponsor!
Challenges:
Cut It Up – #207 Old School + die cut (Have had this Riley for years! Used Cricut)
Hello again today my friends! Yes, still posting and with another “twofer post” again today! It will calm down eventually, but for now I have lots of things to share with you!😀
As you may have read in my second post from yesterday, we kicked off the “Dare to Get Dirty” Event over at Splitcoaststampers and I shared the card I made for one of the challenges. I have another creation to share with you that I made for one of the challenges released today and this one is for the lovely Lori:
This really brought out the little girl in me when creating this card with the rainbow colors and magical scene! This sweet little unicorn image along with the rainbow in the background and the sentiment all come from the Digi Doodle Studios Unicorn Wishes Pairables set. I’ve printed them out, colored them with Copic markers and fussy cut them out with the exception of the sentiment which I left and cut out as a cloud with my Lawn Fawn Cloud Border dies. I’ve also used that die to cut some clouds from a piece of vellum and an additional piece of white cardstock.
I’ve used an older My Favorite Things Stitched Rainbow die from white cardstock that I colored with Copic markers to place behind the first set of clouds behind the unicorn. Before layering my clouds, I took some distress ink and blending tool to add a bit of blue shadow behind them. After attaching all the cloud and rainbow layers, I cut it out with the MFT Blueprints 27 die set.
Lastly, I’ve attached this layer over an A2 sized white top folding card base and popped up the fussy cut unicorn with foam tape. I took some random sequins to attach over the design.
Here’s a closer view of some of the details in the card. I added some loose glitter over the unicorn’s wings with a 2-way glue pen and some loose glitter. Hard to tell, but I’ve also added some shimmer to the rainbows and the unicorn’s mane with a glitter brush pen. I also added a bit more blue cloud shadow under the unicorn’s feet before attaching him on the card.
This was really fun to create and I know it will make a fun card to share.
Hello again friends! We are on day 3 of celebrating over at {Cupcake Inspirations} with another feature of sponsors for our 500th “birthday celebration” challenge!! Yay!
Today, we are highlighting Crafty Scrappers & Gerda Steiner Designs – check out the challenge blog for more details about these sponsors.
The DT was given images from Crafty Scrappers to use for our creations:
Isn’t she the cutest with her oversized cupcake and glasses?! I’ve used images including the sentiment from the Ms. Cupcake stamp set provided by our sponsor.
I had so much fun coloring her up with Copic markers and then adding lots of details to it like the gold glitter shimmer over the ribbon on the cupcake, the shimmer over the frosting and then some glossy accents for the chocolate syrup, cherry on top and over her glasses too! I’ve also used a white gel pen for highlights on areas. I actually fussy cut her out and popped her up over the circle die cut panel with foam tape.
I thought she fit the circle nicely and would work for a circle easel card design. I matted her over a purple fancy circle die cut layer and then made the circle easel base a pink color. I cut a strip for the sentiment and layered that over purple cardstock for the inside which is helping to keep the front layer propped up. I’ve also added some gold sparkle crystals over the design to match her ribboned cupcake.
Thanks for dropping in today friends and I’ll see you tomorrow!
As You Like It– Favorite Color to Pair With Pink and Why? (Purple is my favorite color, but I think it’s amazing with pink because it gives a wonderful feminine look…and it’s great for princesses and unicorns too!)
Creative Knockouts – #363 Finish the Inside (my inside is propping up the front of card!)
Hello friends!! Happy Monday! I have something very special to share with you today!
The {Cupcake Inspirations} Challenge Blog has hit a wonderful milestone and is celebrating their 500th challenge! How cool is that?!
I’m so thrilled to be apart of the celebration with them and share in the excitement! I hope that you will be celebrating right along with us and join the challenge too! We also have an AMAZING list of sponsors to share in the celebration with us! Please be sure to check out the challenge blog for the complete list…AND…we will be sharing inspiration EVERY SINGLE DAY throughout the 2 week challenge using products from our sponsors, so you won’t want to miss any of the posts so you can see the inspiration!
I WILL BE POSTING INSPIRATION FROM MOST OF THE SPONSORS RIGHT HERE ON MY BLOG EACH DAY AS WELL! SO STAY TUNED IN!
The theme for this challenge is “Birthday Celebration“! We can always use birthday cards! So we look forward to seeing your creations!!🥳🧁
Remember those fun birthday parties as a child and all of those fun photos you took with your friends? Everyone is having a great time together! I miss those days for sure!
I have used the Wild for You stamp set along with the coordinating dies for the animals friends and colored them up with Copic markers. I have also taken the Party Animal stamp set and coordinating dies for the sentiment over the black banner that was white heat embossed as well as the balloon that is tied around the gator’s tail with black twine. I popped up the balloon and covered it with glossy accents. The cupcake on the gator’s back came from the “Party Panda” stamp set and dies that I received as a gift for my birthday month. (P.S. You may notice a cupcake in almost every one of my creations for these two weeks…see if you can spot them!)
I’ve used the Selfie Frames die set to cut out the polaroid frames, plus I die cut some grass in them with the Grassy Border die. I pulled out a piece of paper from the Watercolor Wishes paper pad and cut it out using the Small Dotted Rectangle die.
I finished my card with some bright blue and purple sequins. (Although it almost looks black on the photo! LOL!) I’ve added details with metallic gel pens and glitter too.
Really fun card to make with some really adorable products…love Lawn Fawn!
Thanks for stopping in today friends! Be sure to check and see what I’m making for tomorrow’s post with another sponsor!
Hello friends! Hope you’ve had a great weekend and enjoying your Summer so far!
Today starts up a brand new challenge over at {Cupcake Inspirations} and this time we have a fun color challenge for you to try out.
When I saw this challenge, the first thing that went through my mind was this unique and fun bicycle image from the Blooming Bicycle stamp set.
I left the “wheels” white for daisies and colored the rest in blues and yellows with Copic markers, fussy cut it out and popped it up with foam tape over the sponged cloudy background. I cut that panel with a stitched rectangle die, layered it over a piece of yellow cardstock and used some pretty daisy papers from my stash for the background. I’ve also used these papers for the strip on the front and stamped the sentiment from the same stamp set with navy ink. I’ve mounted these layers over an A2 sized top folding navy blue card base. (I followed a sketch design for a challenge, see below.)
The flower from my stash was actually a bright turquoise color, but I’ve used some white gesso and painted over it. I’ve also taken some crackle paint and went over it along with some sparkly white paint and went over the crackle with that. (I’ve always hoarded my paper flowers because I believe you can always change the colors for your project.) I’ve added some yellow ribbon around the strip and added a blue button and yellow bow with the ribbon over the flower to finish it off.
Here’s a closer view of the bicycle colored in as well as the details of the painted flower.
I colored parts of the bike in blue colors and then left some areas on the bike that I thought would be metal and colored those areas with a clear metallic gel pen. I popped up the bike with foam tape and left it sticking off the edges to make it look like it’s ready to get on for a ride!
You can really see the shimmer over the flower with the Lumiere acrylic paint I’ve used…love that stuff! (The white flowers in my photo props I felt weren’t “daisy” looking enough, so I opted to paint over a colored one with longer petals. I’m silly like that😉!)
Well I don’t know how you feel about this color combo, but it really makes me feel happy and so I thought that the sentiment was just perfect for this one!
Hello friends! I hope you’re having a great week so far! Really hate it when technology doesn’t cooporate and I have to figure it out, but hopefully I can soon! Sometimes it just needs to be done!🤔
Anyway, I was wanting to post some masculine cards I made for Father’s Day earlier this week, but I’ll have to post another time as this card was already done and is needed to enter a challenge that is ending soon:
I love that wee little baby turtle riding on the back with his tongue out! The stamp was colored up with Copic markers, cut out with a circle die, along with another circle layer of Cabbage cardstock that I’ve also used for the A2 top folding card base, and another circle layer of vellum.
I was super excited to try out the brand new Ranger Distress line color “Speckled Egg” products! I’ve used the Distress Oxide ink to sponge over the image onto a piece of Sidewalk cardstock that was cut out with a stitched rectangle die. I also took the Circle Tone stencil and added some Opal Chroma Glaze over it. You can see how pretty the shimmer is on those dots!
For the banner along the side, I took another piece of sidewalk cardstock and cut my own banner with scissors. I took my embossing ink pad and covered the banner piece with it and then heat embossed the Speckled Egg Distress Glaze EP over it…turned out so pretty! I heat embossed the sentiment from the same turtle stamp set over a piece of vellum and wrapped it around the banner before attaching it to the card.
Lastly, I’ve added some metallic shimmer ribbon from my stash and some pretty sparkling sequins that remind me of bubbles. The card was designed based upon a sketch, see details below post.
Here’s a better view of the cute image and coloring I’ve done. I’ve added some dots with a white gel pen for their cheeks as well as their eyes and noses. I’ve also used it for highlights on their shell.
You can also see a better view of that pretty shimmer from the Metallic Chroma Glaze that I used over a stencil. Thought it was great for the circle theme going on.
I hope you’ve enjoyed my card today and have been inspired in some way or has brought you a smile! Thanks so much for dropping in and I’ll be seeing you again soon!
Hello friends! Hope you’re having a great week! I’m so glad you’ve joined me today as I have lots of fun creations to share with you!😀
This past weekend Whimsy Stamps held a “virtual craft retreat“, so I thought I’d tag along and join in on the fun! I’m glad I did because I made several cards:
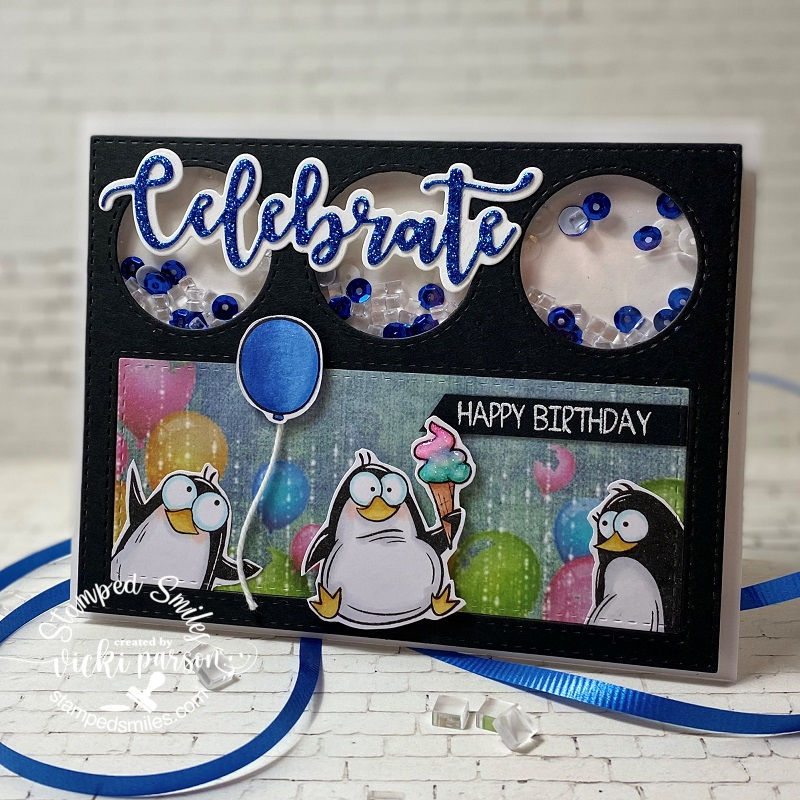
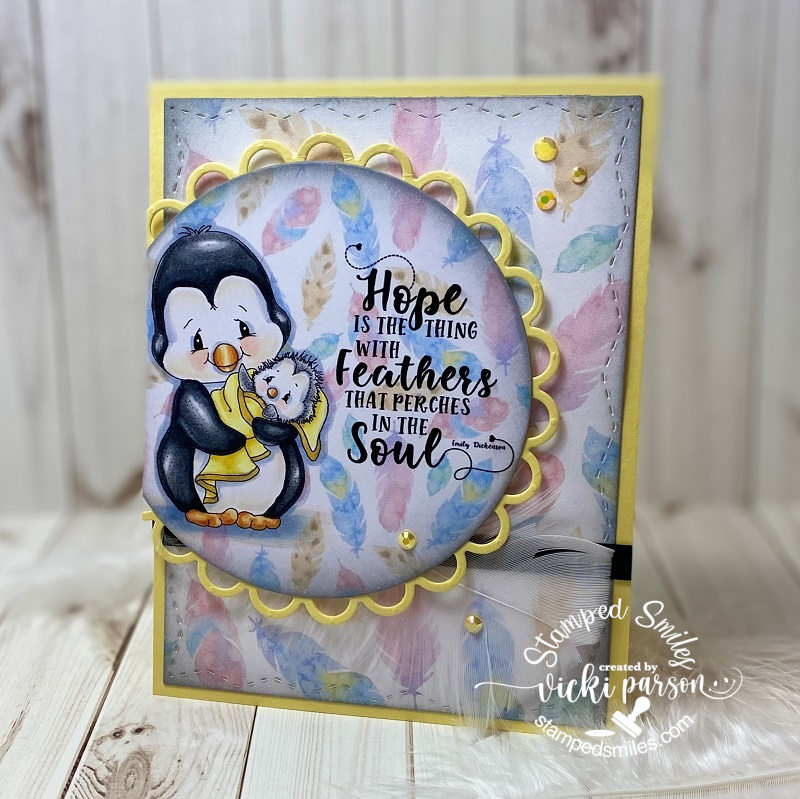
The first challenge given was a tic-tac-toe challenge. I did 3 down: birthday, heat embossing and circles for mine. Almost had 2 bingos…but didn’t quite work out! Aren’t those penguin eyeballs the best?! LOL! I needed to send out a birthday card to someone so this was great timing!
The background papers, cover die, sentiment die and the penguin stamps are all from Whimsy Stamps. I even put little ice cube confetti for my shaker card!
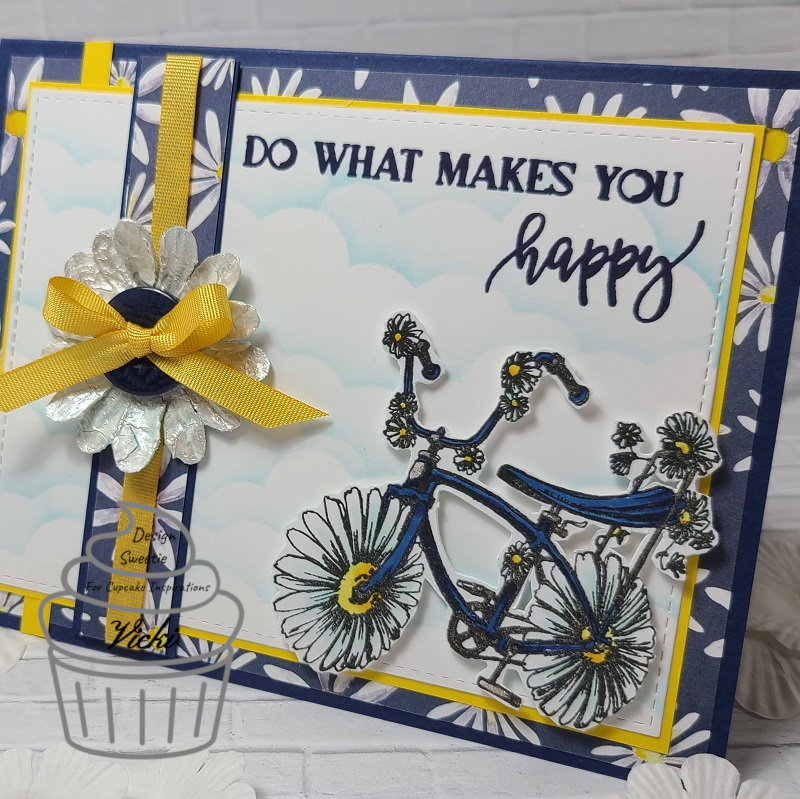
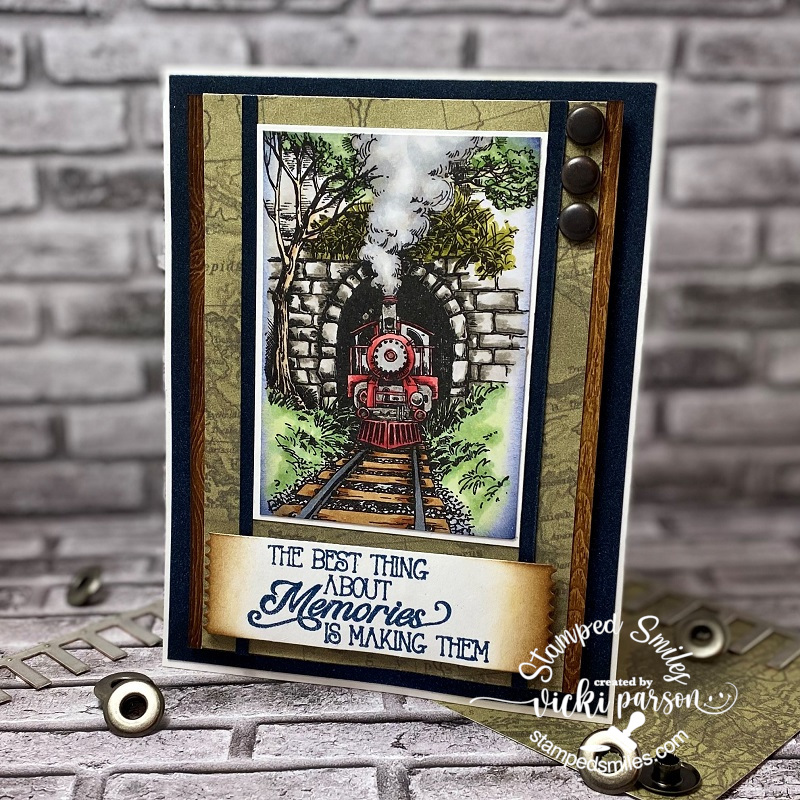
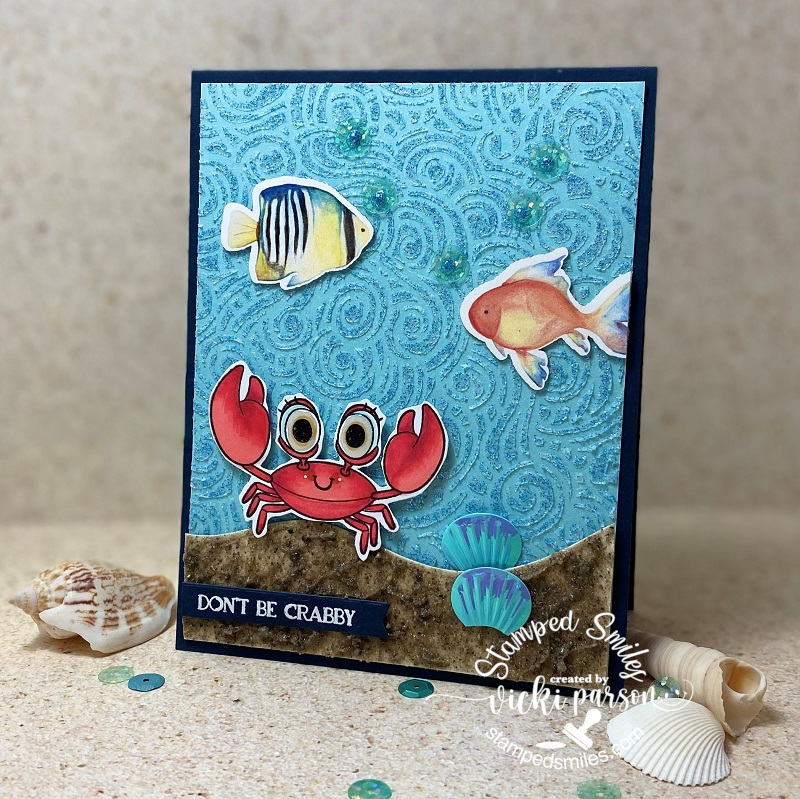
This card was made for the second challenge given during the event which was to use a sketch and a color palette using at least 2 of the colors given. This was my take on the sketch along with using blue, green and brown from the palette.
Most all of the items used on this design came from an older card kit from Whimsy Stamps. The stamp set is still available in the store called Enjoy the Journey. For the sentiment panel, I heat embossed a sentiment from this stamp set and then used the Slimline Postage die to cut along the edges of it.
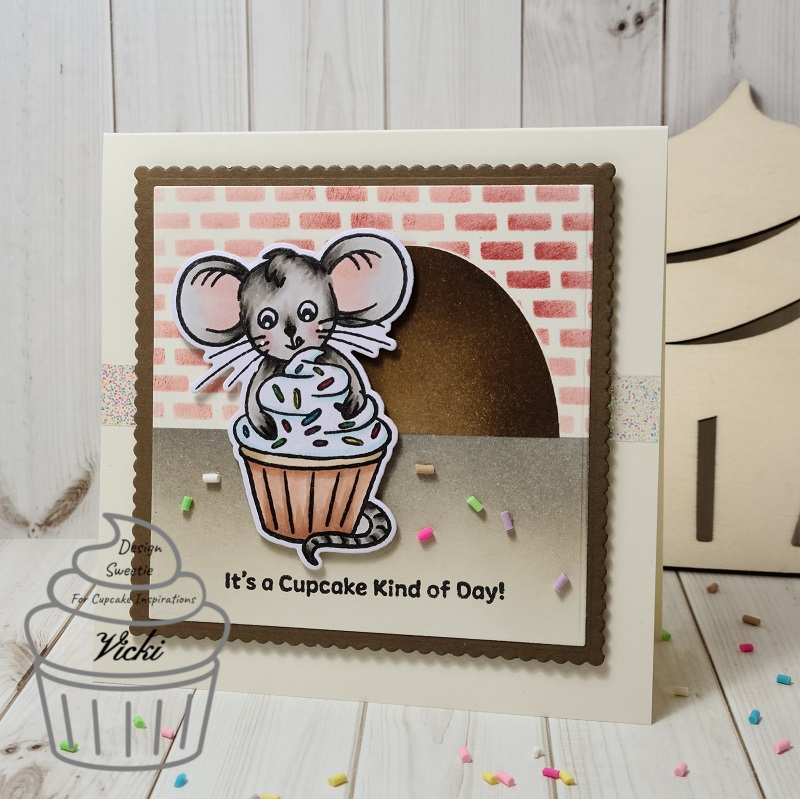
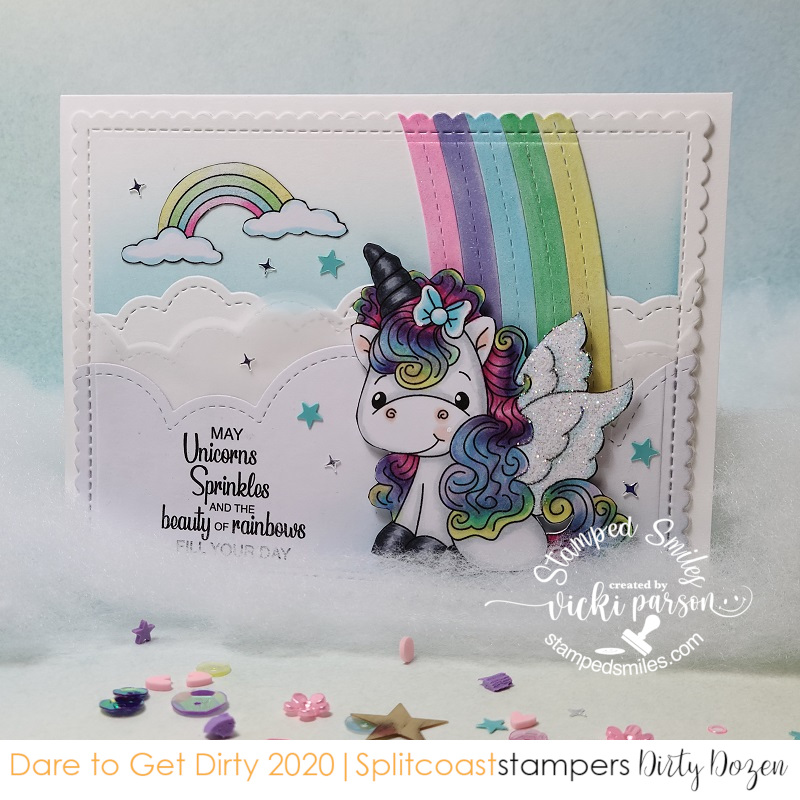
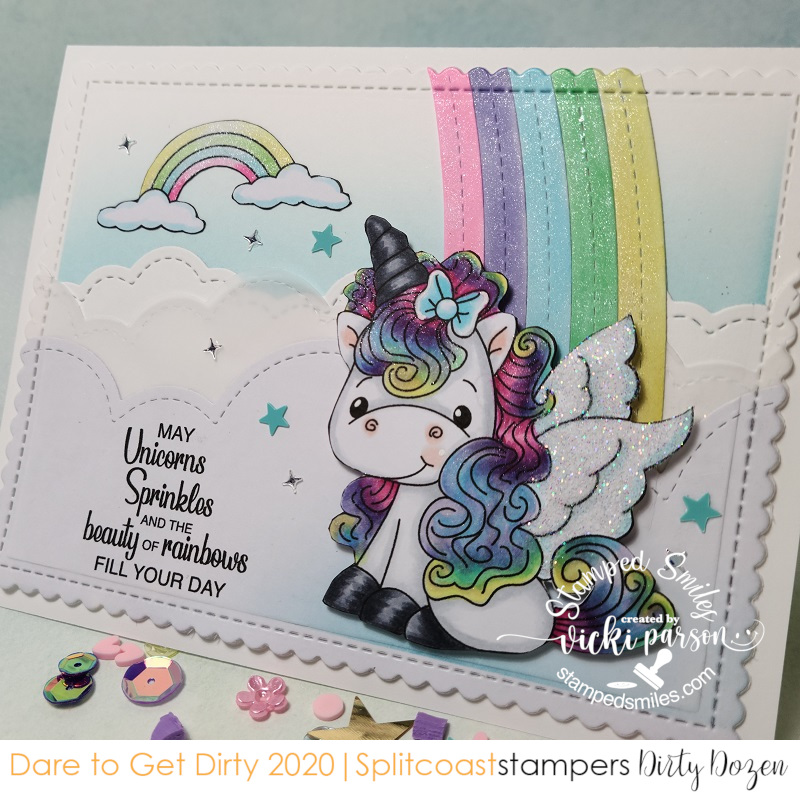
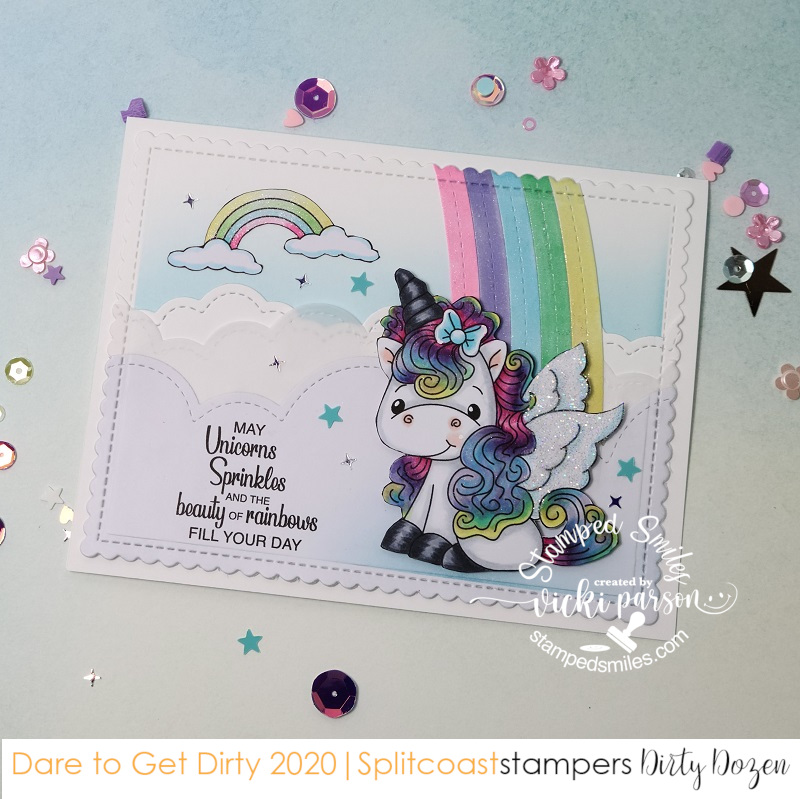
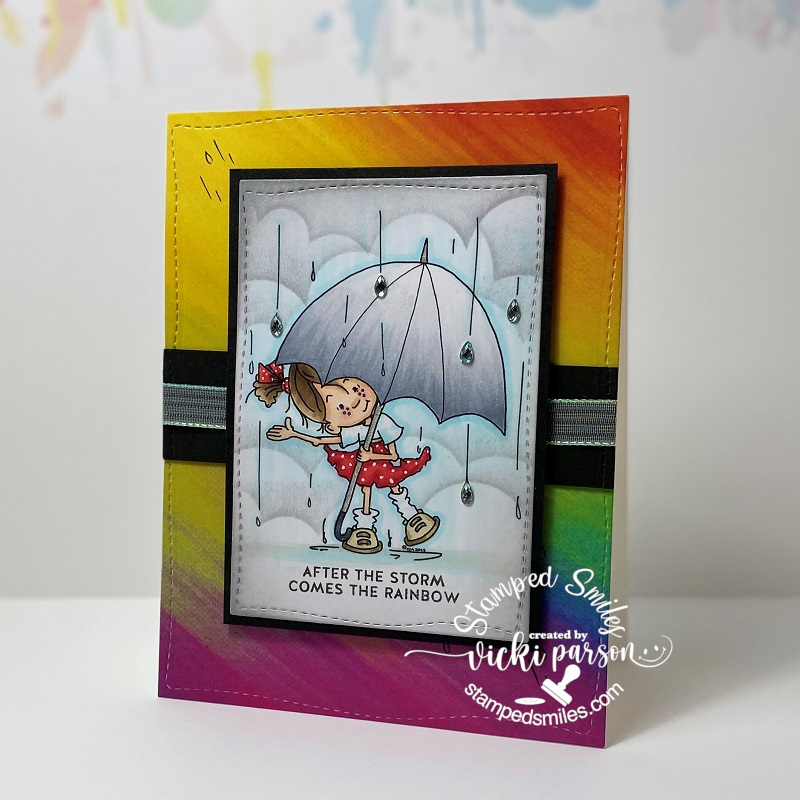
Tihs is the card that I created for the third challenge issued which was to follow a photo prompt with words: “When it rains, look for rainbows. When it’s dark, look for stars.” The first thing that came to my mind was these cool Rainbow Papers from Whimsy Stamps and so I’ve cut a panel out with an older Whimsy Stamps die along with the image panel.
This image is called Rainy Day Smiles by Sassy Cheryl’s which is what I had actually won as a prize from the event over the weekend for one of the games..so that was cool! I wanted to be sure to use it for one of my cards! I added some raindrop crystals on a few areas of the image too.
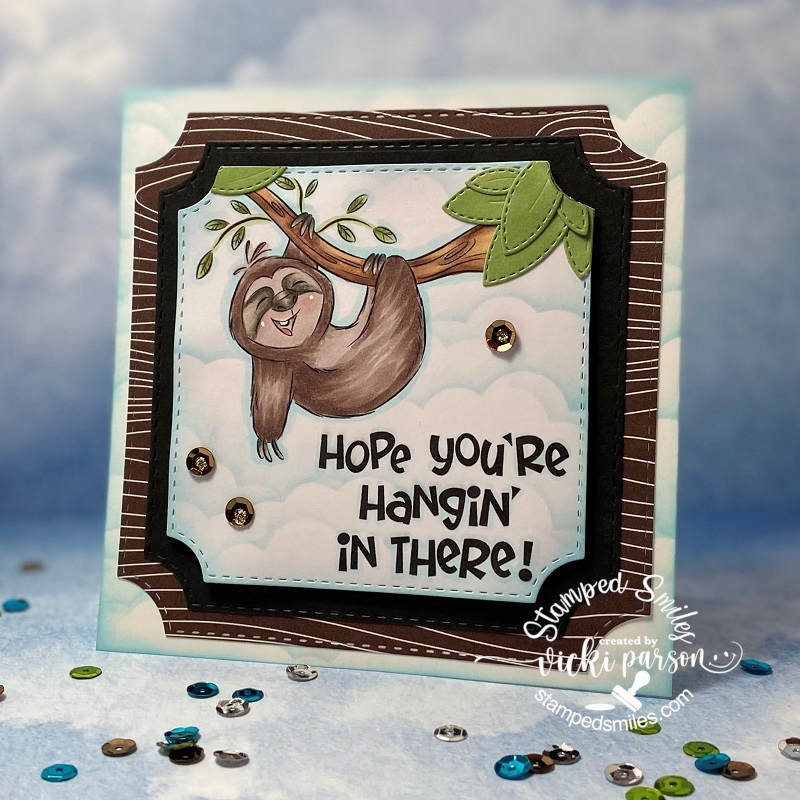
This card was made for the fourth challenge given which was simply to create a project with one of the digital freebie images that was given during the event.
Facebook actually kicked me out of the event a few times for leaving too many comments! LOL! I was trying to participate in games and it told me that I was leaving too many comments! This was one of the cute freebie images that they gave at the event called Sloth. After all that happened…I felt that this little guy was laughing at me!🤣🤣🤣 So I wanted to laugh right along with him, and I printed him out, colored him with Copics and used the Whimsy Stamps Notched Square dies and layered him over some papers from my stash and attached to a 5″ square card base that I stenciled some clouds on along with the background of the image. I die cut some leaves from the Whimsy Stamps No-See All Seasons Tree die set to add to the top corners of the image panel.
Needless to say, I did “hang in there” right along with him!!😄
And last but not least, the fifth challenge was to make a project based on one of the video tutorials that was shown at the event. Of course, I’m always inspired by Crissy Armstrong and her coloring! This sweet little penguin called Penguin Momma was a freebie given during the event and I watched Crissy color this up and I tried my hand at her tips and tricks.
I printed out another piece of the feather background and cut it out with the Whimsy Stamps Zig Zag Stitched Rectangle dies and added my own white feather to the design. I sponged some grey ink around the edges of the printed papers and added some yellow crystals.
I had such fun creating these projects and pulling out my Whimsy Stamps stash for the challenges. And now I have a few cards for sending out to people that I already have in mind! Hope you’ve enjoyed my makes today and I’ll be seeing you again soon!! (The links in this post contain affiliate links if you want to purchase anything! Thank you!!)
Hello friends! Are you enjoying your month of June so far? Wow, did it get warm the last few days over my way! Thought it would be a good time to cool down and not “be crabby”! LOL!
How cute is this smiling little guy/gal?! This is Crabby and I’ve colored it up with Copics and fussy cut it out with my scissors.
I’ve decided to make a fun underwater scene with him using the Tangled Waves stencil and going over it with some sparkly Glitter Glaze. I stenciled this over some of the Sea cardstock. For the bottom portion of the ocean floor, I’ve die cut a wavy border strip and covered it with some “Sand Paste” which is very textured and thick. I think it took almost 2 days to dry completely, but I really put it on thick. I think it makes such an amazing texture and it’s flexible too!
I’ve attached it over the glitter glaze background, white heat embossed the sentiment from the crab set with the White EP over a piece of Midnight cardstock which is what I also used for the card base and cut a banner with it to glue over the sand.
I attached the crab over the sand and also some seashell sequins and tropical fish cut outs from a past card kit to help finish the underwater scene.
Here’s a closer look at the stenciled background with the glitter glaze over it as well as the sequins I added above the fish to give the appearance of “bubbles”. I used some Dazzling Blue Nuvo Glitter Drops in the center of each one and I’ve also covered the crab’s eyeballs with some Glossy Accents.
It was such a fun and simple design to create, it only required some patience for a little drying time is all. Plus, this really makes me smile anyway!😉 Hopefully the recipient will think so too!
Thanks so much for dropping by today and I hope you’ve enjoyed my card or been inspired in some way! I’ll SEA you again soon!!
As You Like It – Scenes or Not? Why? (I love making scenes because you can place different images together how you want to arrange them and create depth or personalize it to make it unique!)
Hello friends! I haven’t really mentioned too much about what’s going on in the world right now, and I know it has tremendously affected many people around me. In the crafting community I sense changes as well in different ways. I do hope that crafting can help either take your mind off the situation or at least help with making you ‘feel’ that creating from the heart, as we stay at home, is a fantastic way to contribute and help bring about smiles in many ways.
I would like to ask you if you want to respond about it:Has crafting helped you during this time or has it made it difficult to concentrate? I have found that taking TONS of classes have actually been my savior right now especially as I was taking that break I had. (Helps me to concentrate on something like a technique.) I found MANY having classes (free or having group parties going on with crafters teaching and sharing). Due to this pandemic, I know many people/companies in the crafting community have revved up their classes and challenges as well… along with giving out free digital images!
This brings us to my post for today….
I have made several stacks of “thank you” cards geared towards our healthcare workers and it has been very rewarding for me to be able to color in all these images in my post today as a salute and honor to those that have been “on the front line” dealing day to day since the beginning of this pandemic. My heart goes out to all in this uncertain time and although there are many horrible stories related to this, there are also some good ones too. Let’s rise up.
Taylored Expressions put on a card drive to send cards to the healthcare workers and it ended today, so these cards have already been sent.
For this particular stack of cards, I’ve made 6 of the pink and 6 of the green using this adorable MOKA Melissa Nurse free download from Taylored Expressions. I’ve also used the Subway Tiles embossing folder for the background as well as white heat embossed the sentiments from the Life Saver Mini Strips stamp set and die cut them out with the clever Mini Strips Die. I’ve used a heart die that came with an order I had and then I took some tiny images from other sets for the accents.
I stamped a message on the inside of all of the cards from TE Big Thanks stamp set too. (This set came for free with an order I placed.)
Here’s another set of 20 cards I made for healthcare workers using the Freebie Healthcare Super Hero Coloring Pages. (To print these out to fit over an A2 sized card base, I used my printer settings to print out 4 pages on one sheet.)
I layered them over some pink and red cardstock and then the base of the card is some A2 sized side folding blue cardstock. The left over pieces from the pink and red cardstock strips were ran through and embossing folder and white white Ink was ran over it.
Here’s a closer look at the individual sets. I used a star die to cut out some stars with Glitter paper. I also took some blue and pink glitter glue to create extra “dots” around them. This was good practice for me to experiment with different skin tones too.
I’ve used Copic markers to color all of these in with and then I took some gel pens to color in parts of the image as well as the outline in the sentiment too.
I thought this was a fun one with all of them together and I like that they’re all wearing capes and masks too. I had these finished up at the end of April, but just now getting all of these out where I wanted them to go. I’m sending some masks along with the cards to our local hospitals.
One last and important card I made was specifically for my son who’s a postal carrier. Of course I tried coloring it in with the same hair color he has too. LOL! After I made the batch of cards above, they came out with more superhero freebie downloads, so I grabbed the Mail Carrier Superhero Coloring Pages to make one for him too. And this one is already on it’s way as well. For the background, I used the Scene stencil for the clouds with blue distress ink.
I finished this one similar to the ones above.
The ONLY superhero I’m missing is one for my other son who’s a food service worker and I haven’t seen any of those images out yet. Does anyone know where to find one? I would love to make a “thank you” card for him as well. I may just come up with my own version with what I already have…but have to think about how first. LOL!
This particular song came to my mind and was something that I listened to while coloring….
It was somewhat catchy and upbeat I thought. I always like to try and think of the positive ways that cards I make give a positive impact or inspiration somehow. Could be wishful thinking, but it’s my hope anyway.
Thank you so much for taking the time to stop by today to read my post! I hope that you’ve been inspired in some way! Have a beautiful weekend my friends!