Welcome Little One From Digi Doodle Studios!

Hello friends!  So now that we have celebrated the Holidays and have started the year, it’s time to look at all things “new”, right?!  I have some new things to share with you today using Digi Doodle Studios products!

To me, there’s nothing better to celebrate “new” than new crafty items to play with as well as a new baby theme:

Vicki-DDSBOJ-Jan7

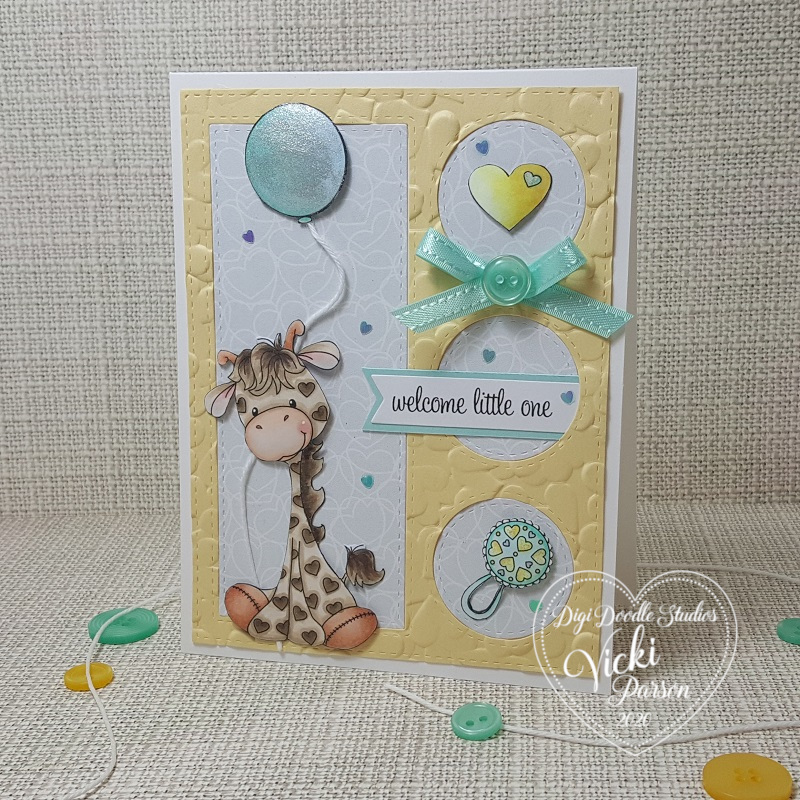
I hope you just said “Awe!” right along with me here!  Absolutely fell in love with this precious digital Pairables set that’s BRAND NEW at Digi Doodle Studios called “Little Ones“!

I started by printing out the images and coloring them up.  I colored the giraffe, balloon, heart and baby rattle and then fussy cut them out for my card design.  There is a very soft interlocking heart grey background papers from the Digi Doodle Studios Baby Boy digital paper pack that I’ve used for the background with the frame layout.

The frame was cut out using the Whimsy Stamps Peekaboo Window 3 die from some yellow cardstock.  I then took a brand new textured embossing folder from Sizzix that I got over the Holidays and embossed it.  Love the texture of the hearts!

I used some pop dots to lift the images up a bit and added some white twine to the balloon and giraffe.  The sentiment was printed out (also from the same Pairables set) and cut out with a banner die.  Lastly, I’ve added the ribbon bow, button and some tiny heart sequins in random areas.

Vicki-DDSBOJ-Jan7-close

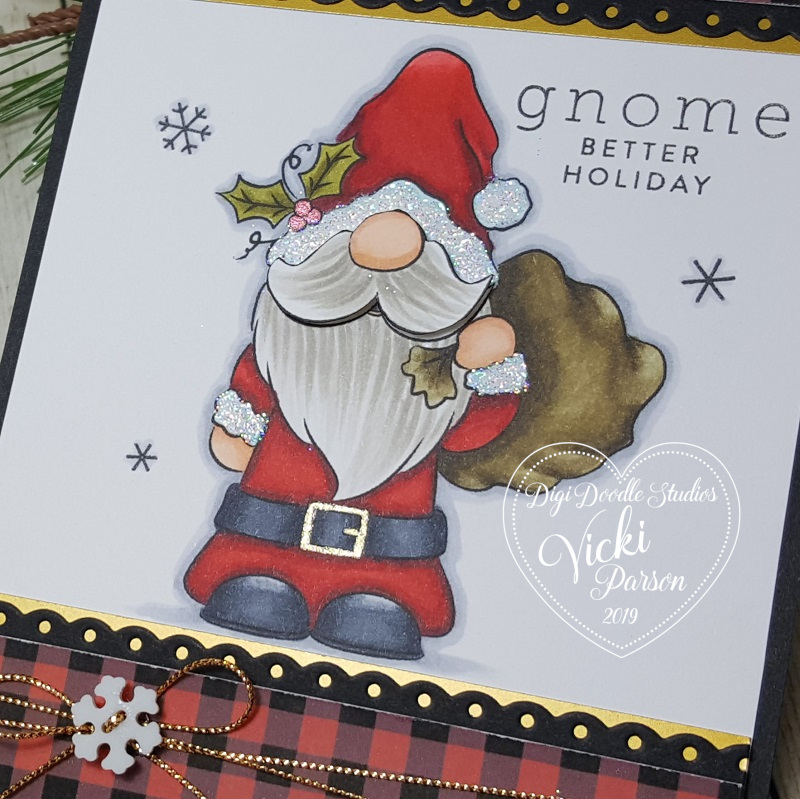
Here’s a closer look at the coloring I’ve done on this sweet little giraffe.  I’ve used Copics to color all the images.  You can see how pretty that texture from the embossing is!  Lots of little hearts going on here! (Including on the giraffe in case you didn’t see that!)  🙂

You can see where I’ve added some shimmer to the balloon, tiny hearts on rattle and the tiny heart inside the yellow heart with a glitter brush pen.

Vicki-DDSBOJ-Jan7-flat

I hope you’ve enjoyed my “NEW” creation for you today!  Please be sure to stop in the store and check it out along with all of the other new items available!

Challenges I’d like to enter this card for:

  1.  Crafty Creations – Anything Goes #405
  2. Pearly Sparkles – Anything Goes
  3. Moving Along With the Times – All Things New (new digi stamps/papers/embossing folder and new baby)
  4. Simon Says Stamp Wednesday – Something New
  5. Craft Rocket – Something New
  6. QKR Stampede – Anything Goes #379
  7. Crafty Friends – Something New
  8. Crafter’s Castle – Anything Goes

Falling in Love With Wintertime Penguins!

Hello friends!  We are now past Christmas and getting ready for a New Year, but soon the feeling of love will be in the air!  So I thought I’d start that off with something that I personally love, which you might know, are those cute penguins!

Vicki-DDSWintertimePenguins-SnowMelt

And of course you’ve already seen me use this super fun Wintertime Penguins Pairables set from Digi Doodle Studios in a couple of different ways, but this time I’ve added the hearts above his head and sentiment from the same set to make this a “lovey dovey” style card!

I kept the colors in pink and red to go with Valentine’s Day, but you could easily make this a wonderful anniversary or “any day” card for your favorite love penguin as well!  LOL!

So I grabbed some fun papers from my stash with both pink snowflakes and red/pinkish hearts paper for my 5″ top folding white base card that I layered the turquoise colored cardstock over and then applied the papers to.  I embossed some hearts on the middle strip with a piece of white cardstock and then rubbed some turquoise colored ink lightly over them.  I layered that strip onto a piece of turquoise cardstock again and then wrapped some white/clear metallic ribbon with a bow over it before attaching it down.

The sentiment was printed out from this cute set with the penguin and then I just used a banner die to cut it out with and attach to the front of the card.

I added the penguin image that was die cut and layered with some stitched and scallop circle dies.  I’ve used some craft foam to pop it up over the center, then added a heart button with twine in the center of the bow.  Lastly, I’ve added a couple of snowflake sequins and some liquid pearl “dots” randomly over the card.

Vicki-DDSWintertimePenguins-SnowMelt-close

Here’s a closer look at this cutie and how I’ve got him colored up with my Copic markers.  I’ve used a white gel pen to dot his cheeks and then I took a glitter brush pen (Spectrum Noir) and covered the hearts above his head as well as the “snowy” ground under his feet for a bit of shimmer.

Vicki-DDSWintertimePenguins-SnowMelt-flat

I hope you’ve enjoyed my “lovey dovey” card today and have been inspired in some way!  Thanks so much for joining me on my blog today!

I can’t believe that the New Year is just about to start!!  I will most definitely be seeing you in 2020 my friends!

Challenges:

  1. Tuesday Morning Sketches – Annual Anything Goes
  2. The House That Stamps Built – Anything Goes D2519
  3. Aud Sentiments – Christmas/Winter + a sentiment (DDS is sponsoring!)
  4. Crafting By Designs – December Anything Goes
  5. Let’s Craft and Create – Anything Goes with optional Let it Snow

Check out the Digi Doodle products used on my card today – click photo below to see/purchase in the store:

Wintertime_Pairables_w_1024x1024@2x

Gnome Better Holiday!

Hello friends!  Have you noticed the craze over the gnomes this season?!  Well I guess I jumped right on board with it and got a little love crazy with them myself! LOL!  This particular one really grabbed my heart though…

Vicki-DDSGnomeSanta

Check out this guy!! LOL!  This image is called, of course, Santa Gnome from Digi Doodle Studios!

Again, with this being a Christmas card for mailing, I wanted to keep it somewhat simple and flat, so I used the entire image panel for my card and trimmed it down to layer over an A2 sized black card base.

I thought it would be fun to pair this image with a couple of strips of the digital paper from the Digi Doodle Studios Buffalo Flannels Collection, so I added a strip to the top and bottom.  I also used a scallop die cut border to cut out a piece with black cardstock along the edges as well as a strip of gold cardstock under those strips for a border.

Before attaching the bottom buffalo check strip, I wrapped some gold twine with a snowflake button and bow over it.  I took the sentiment and a couple of snowflake stamps from the SSS Gnome for the Holidays stamp set and stamped them on the image panel with black ink.

Vicki-DDSGnomeSanta-close

Here’s a closer view of the image and how I’ve got him all colored up with Copics.  I used a red gel pen to color in the “hollies” on his hat and a gold gel pen to color in his belt buckle.  I then took a glue pen and covered his outfit trim with glitter.

You will also notice a bit of dimension on his face.  I printed out this image twice and one of them I only colored up his nose and moustache, fussy cut it out and then used some foam tape to pop it up over my colored up image panel.  Just thought it would be cute!

Vicki-DDSGnomeSanta-flat

Really had so much fun making up this card and this cutie really has me feeling festive for the Holidays now!  So what do you think?

Thank you for stopping by today!  I sure enjoy hearing your thoughts as they make me smile!

Challenges:

  1.  Sunday Stamps– SSC220 Keep it Open Sketch
  2. The Sisterhood of Crafters – Anything Christmas
  3. Penny’s Paper-Crafty– Anything Goes
  4. Use Your Stuff – It’s Christmas Time!
  5. Always Fun – Santa Claus
  6. Arty Divas – Anything Goes
  7. Tuesday Throwdown – Anything Goes
  8. Crafty Gals Corner– ‘Tis the Season

Bringing You Joy With Digi Doodle Studios

Hello friends!  I hope you are having a wonderful weekend!  It’s getting closer to the big day now!  Only 11 more days until Christmas!  If you’re like me, then you wait until the last possible minute to mail out all of your Christmas cards!   So guess what MY plans are this weekend?! LOL!  Have you got all of your Christmas done and ready to go?  I keep telling myself that NEXT year I will be prepared! LOL!

To help inspire those that are still looking for a fun and simple Christmas card, I have a cute one to share with you today using a Pairables set from Digi Doodle Studios:

Vicki-DDSWintertimePenguins-Joy

You probably remember not too long ago the fun tags I made on THIS POST.  I’ve used that same Pairables Wintertime Penguins digital set that I’m using on my card today!  I love that you can get a whole set of digital stamps that coordinate together so that you can use them to create fun scenes or have them doing different things!  Do you recognize the sled that this penguin is pulling full of gifts?  I took that same sled image and used it as “ice skates” for the penguins feet on my tags in the previous post!  That’s how fun and versatile this set can be!

This time my card is really simple.  I just arranged the images how I wanted them on my computer and printed it out.  I printed it again over some masking paper so that I could mask off the images to create my background.

To create the background, I ripped a piece of the masking paper to go along the bottom of the die cut panel after I masked off the images.  I used ink blending for the background and then spritzed with water and dried it with a towel.  I then took watered down white paint and splattered it for the snow effect.

Once it was dry, I removed the masks and colored up the images, made the sentiment (also from this same digital set) banner and mounted both pieces with some red cardstock which was mounted over an A2 sized white card base.  I added some glitter to the snow ground at the bottom and on the penguin’s hat.  Topped it off with some twine and a snowflake rhinestone.

Vicki-DDSWintertimePenguins-Joy-close

Here’s a closer look at the coloring details of the penguin and his sleigh full of gifts.  I used a white gel pen for dots on the one present and his cheeks.  I also took some pencils for a few highlights.

I kept this card flat except for the sentiment banner so that I can mail it better.  You could even leave it more flat than that if you prefer.

Vicki-DDSWintertimePenguins-Joy-flat

If you know me, then you know how much I love penguins.  I have a special collection of stamps and will probably always keep them around.

I hope you’ve enjoyed my card today and perhaps this little cutie has brought you some joy too!

Thanks so much for stopping in today friends!  See you soon!

Challenges:

  1.  Arty Divas – Anything Goes
  2. Tales From the Craft Room – It’s Christmas!
  3. Penny’s Paper Crafty– Anything Goes
  4. Cardz for Galz – Cute Christmas
  5. CRAFT – Christmas Present
  6. Let’s Craft and Create – Anything Goes with optional:  “Let it Snow!”
  7. Crafting With an Attitude – Anything Goes
  8. Winter Wonderland– Anything Christmas Goes

DDS and PND Collaboration Blog Hop is Here!

Hello friends!  Today is the “special day” of our really fun and festive Collaboration Blog Hop!  Hope you will be joining along with us for lots of inspiration and prizes!  Woohoo!

MY HOLIDAY HOP PROJECT:

I am on the Digi Doodle Studios Design team and here is my interpretation of combining each companies’ images together to come up with this fun snow scene for the Holidays:

Vicki-DDSandPND blog hop

For my card here I have taken the Digi Doodle Studios Penguin Wobbles Special Delivery digital stamp along with the Paper Nest Dolls Holiday Friends digital stamp and printed them out over a piece of Copic Blending Card.  I’ve colored them up and fussy cut them out for my scene here.

To create the scene, I’ve used some blue cardstock for the background and splattered some watered down gesso over it and then used a die cut to create the fun frame within it.  I layered it over a piece of gold cardstock so it shows through.  I also die cut some snowy hills with white glitter cardstock and some pine trees with green cardstock.

I arranged them over my blue cardstock panel  and created the scene.  I popped up the front layer of snow hill along with the penguin image with foam tape.  I covered this snow hill layer with some texture snow paste…it’s so glittery!!  I also added some more glittery details here and there on the images too.

I white heat embossed the sentiment and placed a peppermint candy embellishment next to it and attached the strip over the blue background.  I then mounted this entire scene layer over some fun and festive foiled striped papers and then onto another blue piece which was then mounted over a top folding white 5.5″ square card base.

Vicki-DDSandPND blog hop-close

Here’s a bit of a closer look at the images and how I’ve colored them up with Copic markers.  You can see that I’ve used my white gel pen for details on the bow in the present along with the shinny look on the candy cane and the cheeks of all the images.  I’ve added a few dots on the deer’s back tail too.

I’ve used a gold gel pen to color in the sleigh runner, the band around the gift sack, the “lettering and dots” on the penguin’s sign as well as the bells the little girl is holding.  I used a red gel pen to color in the little deer’s nose.  I’ve used a green gel pen to create “dots” on the penguin’s present and the deer’s bow.

I’ve also added some glitter to the heart candies and the girl’s outfit trim.

You can also see just how puffy and dimensional that snow is too! It’s really glittery and was so fun to add to the scene!  It looks like they’re gearing up to deliver some presents and the cute little Mr. Penguin Wobbles is all loaded and ready to go! LOL!

Vicki-DDSandPND blog hop-flat

I really hope that you’ve enjoyed my card today and have been inspired with it in some way to get you into the festive Holiday spirit!

Thanks so much for stopping in today my friends!

Challenges:

  1.  Stamping Sensations– Dec Anything Goes
  2. Love to Craft – LTCCB41 – Dec Anything Goes
  3. Lil Patch of Crafty Friends – Anything Goes
  4. Shopping Our Stash– Happy Holidays!
  5. Crafting By Designs – Dec Anything goes
  6. The Paper Funday – Dec Anything Goes with optional twist:  Christmas Holiday
  7. Winter Wonderland – Anything Christmas Goes

Wintertime Penguin Tags

Hello friends!  I’m on a roll with the tags and back again to share some more fun tags that I’ve been working on!

Vicki-DDSWintertimePenguins-tags
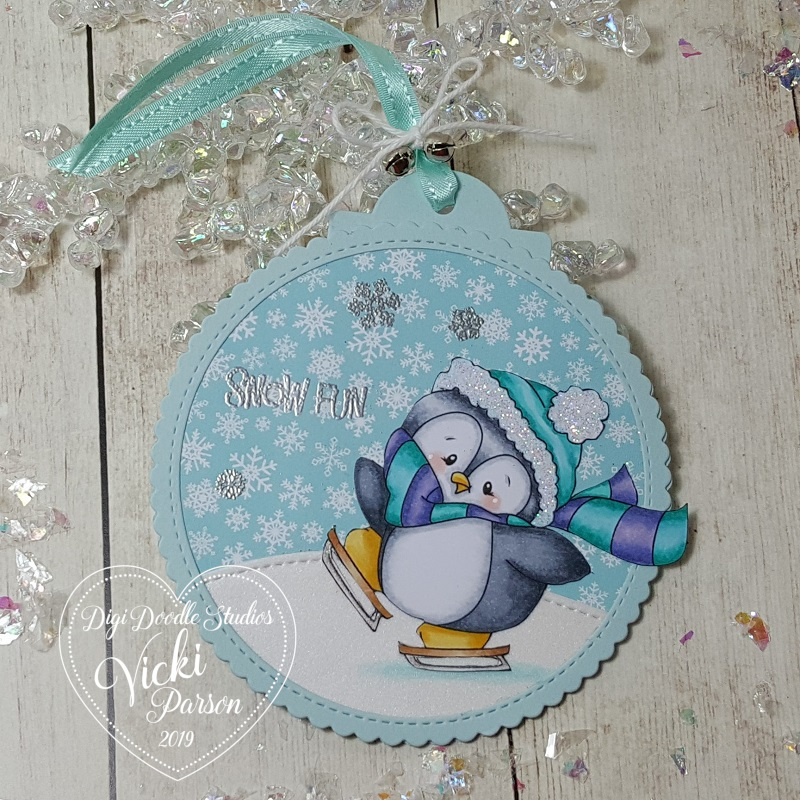
Check out these adorable penguins having some fun doing winter activities!  Penguins are probably one of the top animals that I love!  I have SO many penguin stamps in my stash and seem to keep on collecting more of them…so of course I was super excited to be able to add this Wintertime Penguins Pairables set from Digi Doodle Studios to my collection as well!  🙂

There is seriously so much fun you can have playing with this digital set and if you like penguins as much as I do, then stay tuned in as I will be sharing even more creations using this same set in December!  You will see what I mean by all the different things you can do!

For both of the tags, I’ve used several dies from my stash to create my own tags.  I took a stitched scallop circle die (MFT) and cut two of them out in the blue and pink colors along with a small tag cut with the same colors for the very top.

On one of the scallop circles, I used a circle die (Hero Arts) to cut out the center to create the “frame” for the front.  I then took some snowflake papers (MFT) and cut out another circle that was slightly larger than the opening to attach behind it.  I also took some pretty shimmer white paper and cut a “snow slope” for both penguins with a stitched border die (Lawn Fawn) and then cut it out with the same circle die as the snowflake papers.

I silver heat embossed the sentiments along with some snowflakes and then added my colored penguins over top.  Then when I flip it on the back side I can put my “To: and From:” on it.

Vicki-DDSWintertimePenguins-tag-pinkHere’s a closer view of the pink tag.  For the digital image, I used Word on my computer to add the penguin and place it over one of the “ski” images from the set and enlarged it to make it look like a snow board instead of a ski!  Then printed it out.

I’ve used my Copics to color her up and fussy cut her out.  I even added some shadow on the snow hill for her.  I took a glue pen and covered her hat trim with glitter.

Lastly, I found some more pink ribbon and tied some silver bells over it with some white twine in a bow.

Vicki-DDSWintertimePenguins-tag-blue

And for this little guy…he cracks me up….I made him using Word again, but this time I actually took the “sled” image and sized it down so that it would fit on the penguin’s feet to make it appear as if he is ice skating!  I did it for each foot.  LOL!

I’ve colored him up with the Copics again only using more blue tones instead of the pinks and did the similar traits to it like the other one.  I did use a clear metallic gel pen to color the “blades” of the ice skates.

Hope you’ve been enjoying my tags so far!  Thanks so much for dropping by.

Challenges:

  1.  Digi Choosday Crafting – Anything Goes
  2. The House That Stamps Built – Anything Goes N2719
  3. Simon Says Stamp Wednesday – Anything Goes
  4. Aud Sentiments – Christmas or Winter Sentiment
  5. Krafty Chicks aka 4 Crafty Chicks – #483 Monochrome

A Special Present from Santa for Digi Doodle Studios

Hello friends!  Happy weekend!  It has warmed up slightly for us this weekend and the sun is out…for now!  It’s supposed to get below freezing again soon though and I’ll have my warm slippers ready for it!

Today I have another fun card to share with you using a Pairables set from Digi Doodle Studios:

Vicki-DDSChristmasElves-Nov16

Surprise!  This cute little girl is popping out of the gift marked:  “From Santa” and she threw open the box lid and is tossing blue ribbon around everywhere!  She seems to be so happy about celebrating in the cold!  LOL!

All of the images I’ve used for this card came from the Christmas Elves Pairables set from Digi Doodle Studios. (There are so many elements to play with in this set!)  I have actually enlarged a couple of the images from the set and sized them the way I needed them to fit with my scene and make it appear as if she was popping out of a large box.  I printed out the girl a couple of times so that I could place her behind the box with the lid and then another image to cut her out without the lid of the box and make it more dimensional.

I’ve used several layers of cardstock and more decorative papers behind her with both stitched and scallop rectangle dies.  I used my Martha Stewart “goo” border punch to add the “snow” look at the top of the layers with white Glitterstock.

I’ve added some silver metallic ribbon behind the smaller layers and placed a snowflake rhinestone in the middle of the bow.  I die cut the sentiment with a stitched tag die and added some silver twine to tuck alongside the present.  I stamped some pink snowflakes over the tag and crinkled it up a bit for dimension and movement.

Vicki-DDSChristmasElves-Nov16-close

Here’s a closer look of the coloring I did on her with Copic markers.  I’ve used a white gel pen for her cheeks as well as to help create the texture on her coat.

I’ve used some Nuvo White Blizzard Glitter Drops for the sparkle on her hat trimmings and she was popped out from the background paper with foam tape.

Vicki-DDSChristmasElves-Nov16-flat

I hope my card gave you a smile today and were inspired in some way!

Thanks so much for popping in here today my friends!  So happy you’re here!  I’ll see you again soon!

Challenges:

  1.  Addicted to Stamps – Anything Goes
  2. Pammie’s Inky Pinkies – PIP1945 Anything Goes
  3. Through the Craft Room Door – Anything Goes
  4. Fab ‘N’ Funky – Add Some Sparkle
  5. Creative Knockouts – Anything Goes
  6. Jingle Belles – Baby, It’s Cold Outside!
  7. Send a Smile 4 Kids – Happy Holidays or Anything Goes for kids

Naughty or Nice for Digi Doodle Studios

Hello friends!  Hoping you all had a wonderful weekend!

Today I’m sharing a fun circle shaped design using a cute new Pairables set from Digi Doodle Studios:

Vicki-DDSChristmasElves-Nov4

This cute little elf is sitting atop of an ornament, getting out the list for Santa and marking down who’s naughty or nice! LOL!  This image and sentiment are apart of the Christmas Elves Pairables Digi stamp set.   On my computer I actually expanded the ornament image to make it larger and then added the cute little elf from the set right on top of the ornament.  I printed it out as one image and colored it up with Copics.  I’ve also stamped some snowflakes around the image and cut him out with a circle die.  I used some Broken China distress ink to sponge around the edges.

I layered him onto a brushed gold die cut circle and added some gold stickles around the edges.  I then layered these onto a red die cut circle that was embossed with an embossing folder, which is also the same one that I used for the green piece on the inside of the card.

I made a circle easel card and then cut out the sentiment from the digi set in a strip  (also sponged with Broken China ink) and mounted it over another piece of red cardstock and attached it on the inside right above the green embossed layer.  (This strip is what helps keep the front layer propped up.)

Vicki-DDSChristmasElves-Nov4-side

Here you can see the side view of the card design.  These are very simple to make with die cut shapes and I love how they nicely display for the recipient.

I’ve add some green saddle stitch ribbon to the center of the red circle before attaching it to the easel card backing and then added a bow that I’ve tied 2 gold bells on with a piece of twine.  I then used the twine to make a double bow to go behind the green one and glued them on my card.

I added some snowflake accents and placed a blue rhinestone in the center of each.

Vicki-DDSChristmasElves-Nov4-close

Here’s a closer view of the details on this cutie.  I actually have lots of thing going on with this image.  First, I covered the bottom of his ornament with glossy accents.  It’s a fairly thick layer and you can see the details of it in the photo below, but I had to let it dry over night!

I have taken a gold gel pen and colored the “bells” on the elf’s outfit.  I then took a white gel pen for his cheeks.  On top of the ornament, I used a glue pen and covered it with some clear loose glitter.

For the trim on his hat, I took some Brutus Monroe Snow Paste and a small brush to apply it.  It’s REALLY thick stuff, so for a small area like that, I had to be a bit careful.  Love the sparkle in it and you can see, in the photo above this one, the side view of how thick it actually is!  I heat set it with my heat gun because it “puffs” up a bit when you heat it.

Vicki-DDSChristmasElves-Nov4-flat

Here’s what the card looks like when it is closed up.  I think this would also make for a really cute ornament too!  You can really see the shine on the glossy accents from this photo and why it took all night to dry! LOL!

I hope you’ve enjoyed my easel card today and gotten some inspiration and/or a smile!  Thanks so much for stopping in today!  I’ll be seeing you again soon!

Challenges:

  1.  Merry Little Christmas – November Anything Christmas Goes
  2. Pearly Sparkles – Christmas
  3. My Time to Craft – No Rectangle or Square Cards Allowed
  4. Stamping Sensations – Traditional Christmas Colors (Red, Green, Gold)
  5. A Bit More Time to Craft – Anything Goes
  6. Crafts Galore Encore – Anything Goes

Z-Fold Gift Card Holder with Digi Doodle Studios for Coffee Lovers Blog Hop + Video Tutorial

Good morning friends!  Aaah!  It sounds like a great morning for coffee, doesn’t it?!  Well it sure does to me anyway!  Today, my post is all about coffee…so grab yourself a cup, sit back and enjoy!

I’m so excited today to share my post with you because Digi Doodle Studios is a first-time sponsor for the Coffee Lovers Blog Hop!  There are lots of fun coffee themed products in the store and I’m thrilled to be sharing some with you today:

Vicki-DDS-CoffeeHop-ZfoldGiftCard

Isn’t she just adorable with coffee in hand?!  This image is called “Ginger” from Digi Doodle Studios and I’ve got her all-colored up front and center of my Z-Fold Gift Card Holder.

If you have ever made a Z-Fold card, then this is something with a little bit of extra added fun with a gift card holder pocket on the inside, plus you can see how the card nicely displays on the front which is perfect for popping into an envelope to mail out to your coffee loving friend!

The papers that I’ve used for this work perfectly with the theme today which are also from Digi Doodle Studios called Coffee Break Digi Papers.  (I love that I never have to worry about running out of my favorite pattern!!)  There are also several sentiments from Digi Doodle Studios used on my project called Coffee Anyone Sentiments.

*If you want to see a video with detailed instructions on how to make one of these Z-Fold Gift Card Holders along with a sharing of the full collection of the digital papers that I’ve used on my project, check out the video below or CLICK HERE to view it on You Tube:

This is such an easy and fun project to put together especially for the up-coming Holidays, but as you can see this is very neutral so that I could easily use it for most any time of the year.

Vicki-DDS-CoffeeHop-ZfoldGiftCard-close

Here’s a closer view of “Ginger” and how I’ve colored her up with Copic markers.  Of course, if you know me, I had to add a bit of sparkle somewhere.  I took a glitter brush pen and added some sparkle to her pink bow, the heart on her coat and the lid and flower on her coffee cup.

I die cut her out with a stitched rectangle die and then layered a piece of brown cardstock die cut with a scallop rectangle die.  For the around the edges of the image panel as well as the other sentiments I printed out, I sponged some Tea Stain Distress Ink around the edges.  The sentiment were cut out with a stitched circle die and then layered with a piece of brown cardstock cut with a scallop circle die.

To keep the image panel in place, a foam dot was used at the bottom panel so that when you pull up on the flap it opens up:

Vicki-DDS-CoffeeHop-ZfoldGiftCard-open

And this is what is so fun, is that when you flip up the front panel, you see how it opens up with the fun coffee sentiments inside and the surprise gift card holder at the top!

I have an urge to go to Starbucks now! LOL!

I hope you’ve enjoyed my fun Coffee themed project today as well as the video tutorial on how to make one yourself!  I’d love to see yours if you make one!  If you have any questions about anything, please let me know!

Now to sip on some more coffee and join in on all of the coffee inspiration today!  Thanks so much for stopping in and I’ll see you again soon!

Challenges:

  1.  Coffee Lovers Blog Hop – Anything Coffee/tea/cocoa/cider related.
  2. Watercooler Wednesday – WWC245 Anything Goes
  3. Simon Says Stamp Wednesday – Anything Goes
  4. As You Like It – Favorite Papers and Why? – Digital papers because I never have to worry about running out of my favorite pattern and I don’t have to worry about storage!

Ghostly Haunts with Digi Doodle Studios + a Bag-a-lope Video Tutorial!

Hello friends and happy weekend to you!  Hope that you have some fun included in your weekend.

Today I’m sharing this really adorable digital stamp set from Digi Doodle Studios called “Ghotstly Haunts” and I had SO much fun with it that I made several projects using it including a fun video tutorial that may give you ideas for not only your favorite goblin, but for other fun ideas that I’ll reference:

Vicki-DDS-Bag-a-lope video

Now how cute are the ghosts in this set?!  As you can see, I had tons of fun creating several projects using the Ghostly Haunts Pairables digital stamp set!

The two projects on the ends are actually what I’ve created for the “bag-a-lope” video tutorial.  If you’ve been crafting for as long as I have, then I’m sure you’ve heard of this idea somewhere along the way.  People buy up those dies, but this way seems so much easier and cheaper to deal with to me.  Here’s the project idea that I share in the video:

Vicki-DDS-Bag-a-lope1

This is such a fun and easy bag to create and fill with treats for your favorite goblin!  You can fill with yummy treats or a small gift.  It would be great to put a gift card inside with some tissue or bag fill too!  Not only for Halloween, but for Christmas too!

In the video below, I share how I created this bag along with another fun project using the same idea with just a plain old envelope!  That’s all you need to make these along with your own ideas!  I’ve used the Ghostly Haunts Pairables set to create the fun spider web paper in the background as well as the spider and sentiment.

If you’d like to see how to create this treat bag along with some other fun ideas with tips and tricks, then be sure to watch my video tutorial below or CLICK HERE to view it on You Tube. – If you haven’t yet, please be sure to hit “like”, comment and subscribe to my channel!

Vicki-DDS-Bag-a-lope2

As seen in the video, I have also used this adorable set using the same “bag-a-lope” idea to create a fun Lumiere using a vellum envelope.  I have printed out an additional ghost and attached him to the clip on the top of the bag.  LOL!

For the spider web strips at the top and bottom, they were the same left over papers that I’ve used on the treat bag above, but for these strips I’ve heat embossed over them with some clear sparkle EP.  It’s hard to see in the photos, but I’ve taken a sparkle glitter brush pen and covered every single ghost on my projects.  I’ve used my Copic markers to color in all of the images after printing out my scenes from the computer.  The sentiment for this project was actually made by myself using a font from my computer.

Vicki-DDS-Bag-a-lope-candle

Here you can see how the battery tea light candles are glowing through the vellum Lumiere bag.  I also thought this would be a fun idea for Christmas time as well!

Vicki-DDS-Ghostely Haunts

Lastly, I HAD to create a card using this adorable digital set too!

For this card, I created the scene on my computer and printed it out.  I printed it out again over some masking paper.  I cut the images out of masking paper and put them over the printed out scene so I could do the ink blended background.  I actually fussy cut the ghost and popped him up over the tombstone.  I covered him with a glitter brush pen too!  (I’ve also added a touch of “moon glow” on the top of his head.

I die cut the scene and attached it over a piece of purple glitterstock and then die cut the black frame to go over top of the card.  Before adding the frame, I attached the die cut fence and a couple more pieces of “grass” from the digital stamp set.  That sentiment cracks me up!  I sponged over it, added to a black strip and attached it over the card front panel.  This was all attached to an A2 sized top folding card base.

Hope you’ve had as much looking at my projects as I had making them! Thank you so much for dropping by today and I’ll be seeing you soon!

Challenges:

  1.  Try it On Tuesday – Witches/Wizards/Halloween
  2. The Creative Crafters – Anything Goes
  3. Creatalicious – October Anything Goes with optional Autumn/Halloween
  4. Simon Says Stamp Wednesday – Halloween
  5. The Male Room – Halloween
  6. Krafty Chicks – #477 Ghost Card
  7. CRAFT – Box or Bag
  8. Creative Knockouts – Halloween
  9. TGIF Challenges! – #tgifc234 – Happy Halloween