Enjoy the Changes Life Brings

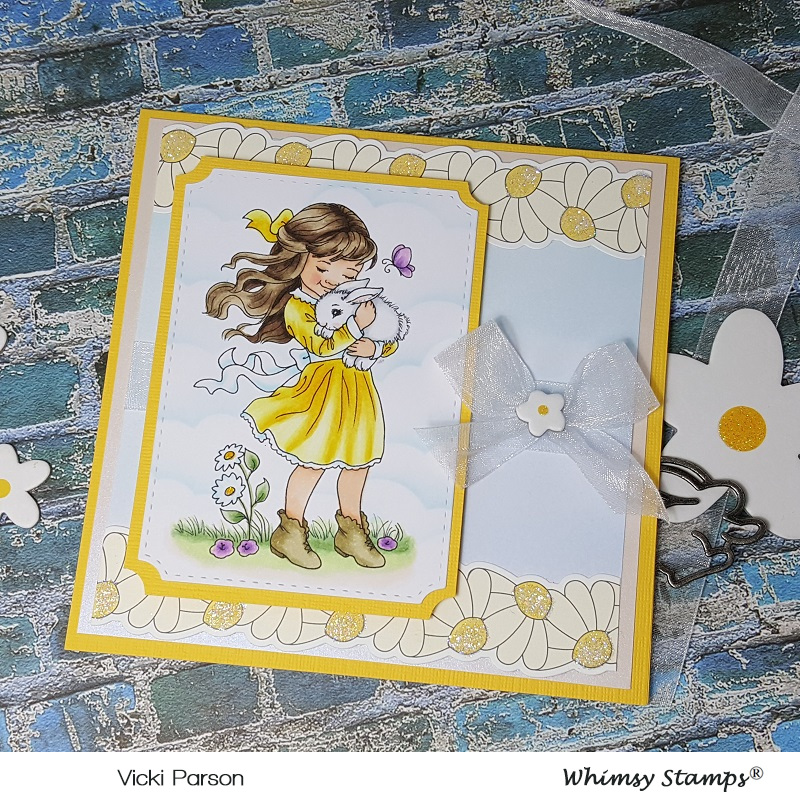
Hello friends!  Back with you today to share a card I’ve made using the January release stamp set called Early Spring Nest!

vicki-earlyspringnest-cardep-project2

I had so much fun playing with this pretty Spring image and playing with some new embossing powders on this one!

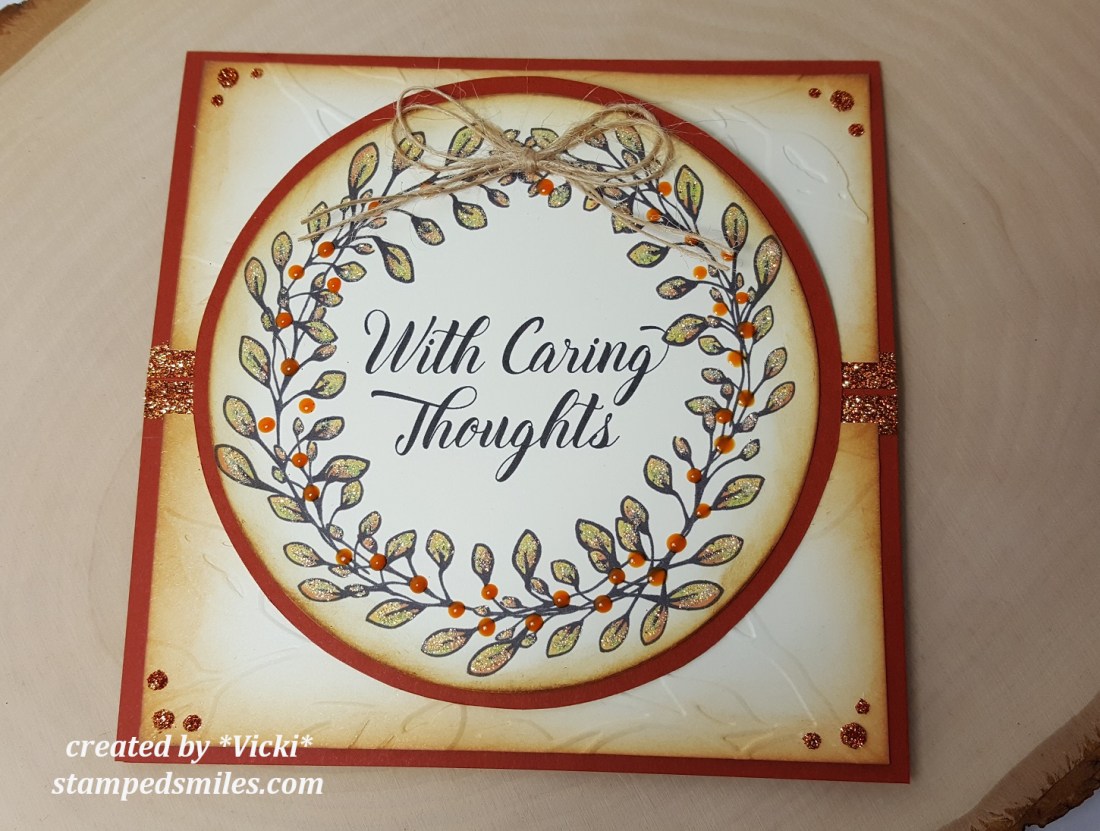
To get the background, I’ve taken a piece of watercolor paper and sprinkled it with some Nuvo Blue Blitz Shimmer Powder and spritzed it with water to also move it around the paper until I got the look I was wanting for it.  I set it aside to work on the rest of my card until it was COMPLETELY dry.  After it dried, I took my Static Free Bag to rub over the area and prep for heat embossing.  I stamped the Crackle Background stamp (Really love the versatility of this image!) with VersaMark and heat set the image with the Robin’s Egg embossing powder.  (Sounded like the perfect product to use for my card!)  I also used my corner chomper to round the corners on this panel.

For the scallop layer behind this panel as well as the layer behind the sentiment, I took my VersaMark ink pad and smeared on a layer around the edges and heat embossed them with the Coffee embossing powder.  I also used this for the sentiment as well as the nest image, so this also works for a nice, detailed embossing powder!   I made the fishtail banner layer before I did the embossing with my Tim Holtz 5″ scissors.  I took some craft foam and attached the front base panel to the embossed scalloped layer which was mounted onto a white A2 sized top folding card base.

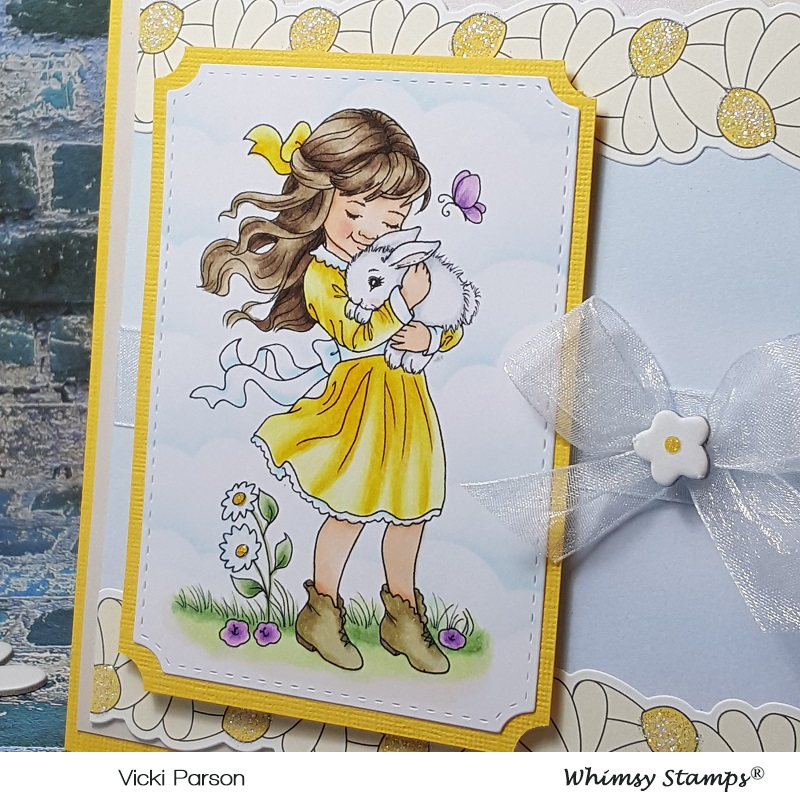
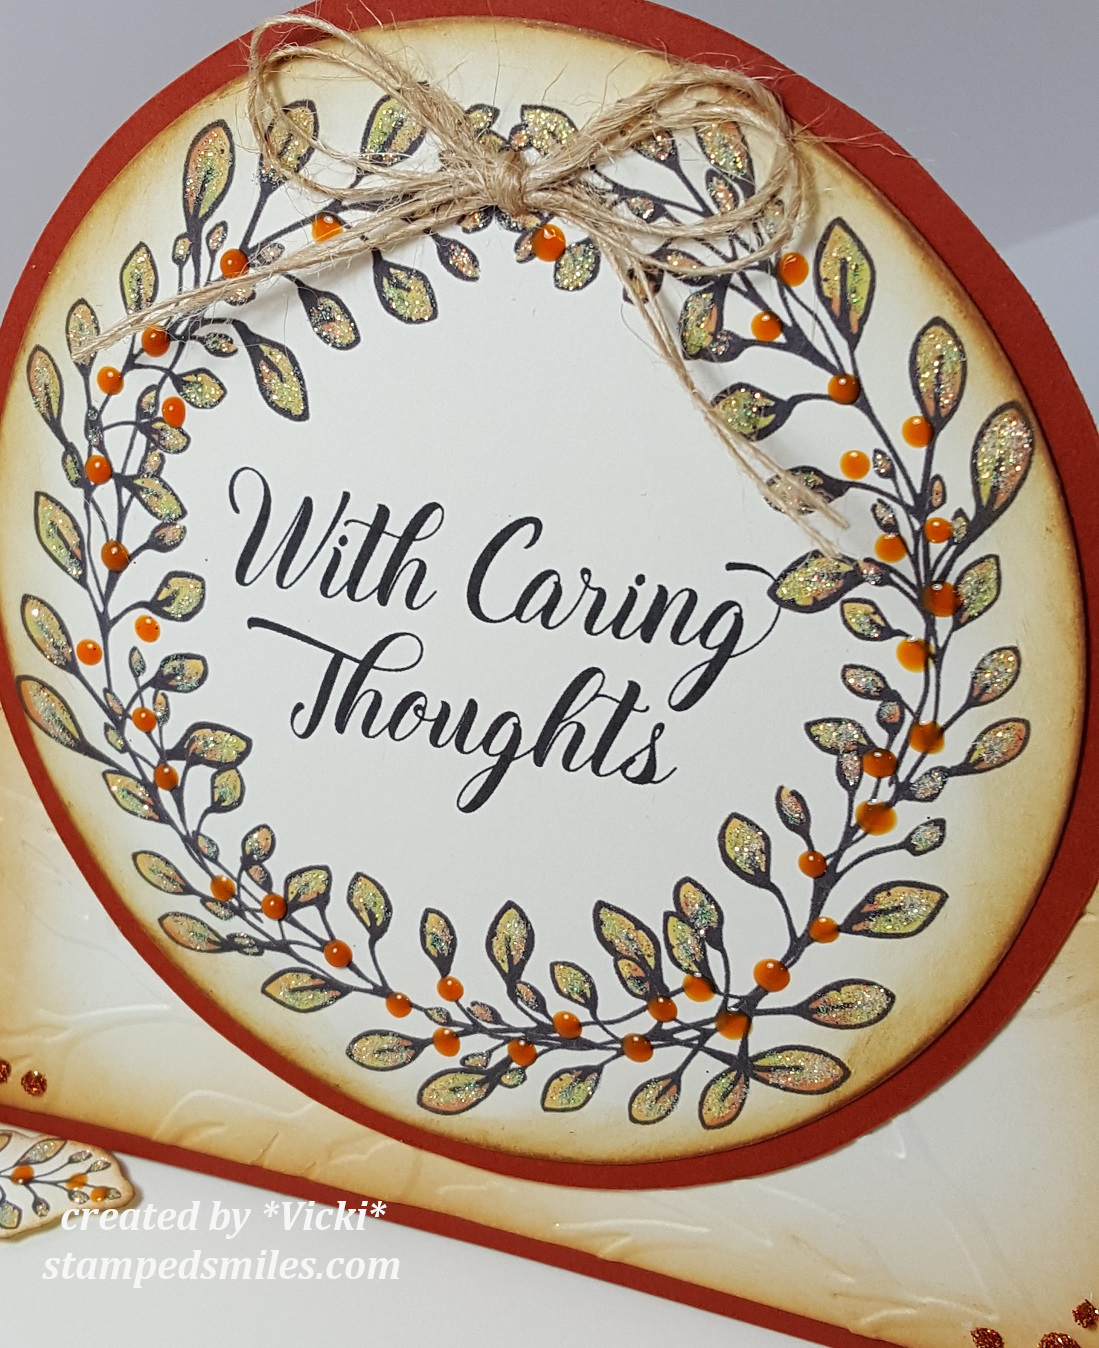
Here’s a closer look at the stamped Crackle background with the Robin’s Egg heat embossing over the watercolor background.  I just love the shimmer it has in it!  You can also see the Coffee heat embossed layers.  I love the pretty Copper sheen it has as well as the dark brown flecks in it!  You can also see how well it embossed the fine detailed stamped images too.

There are so many different things going on with the embossing powder on this design that you really need to capture all the different angles throughout the design to see it!

vicki-earlyspringnest1

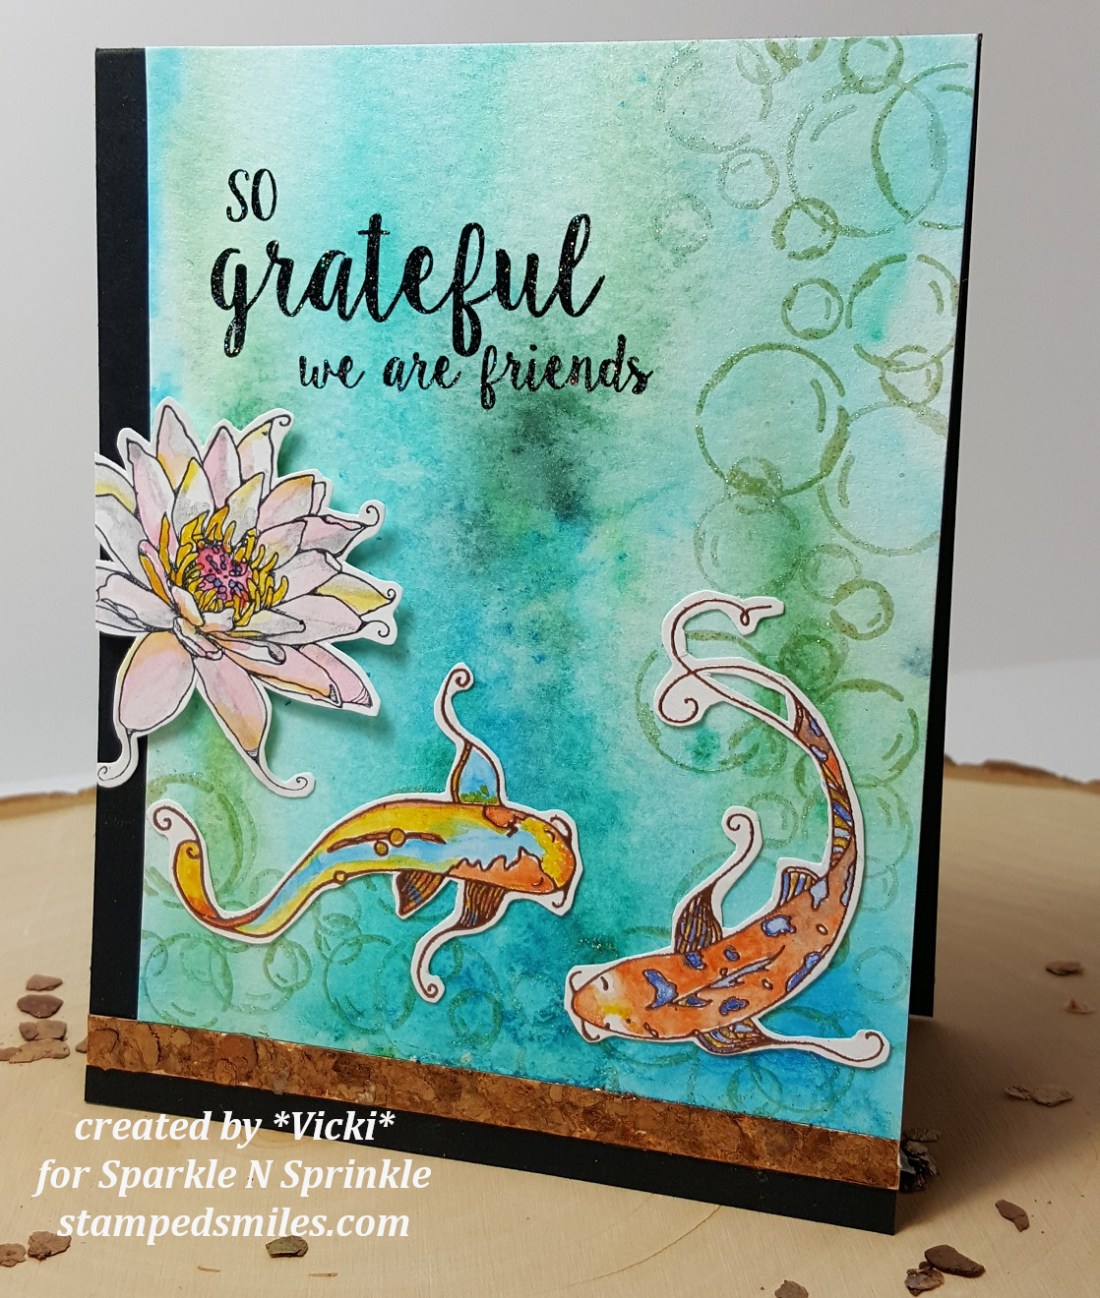
For the coloring of the image, I just used some Clean Color Real Brush markers for it.  I like to heat emboss the images when I do this sort of coloring as it helps to keep the water coloring inside the lines and acts as sort of a “well” so that the colors stay where you want them.

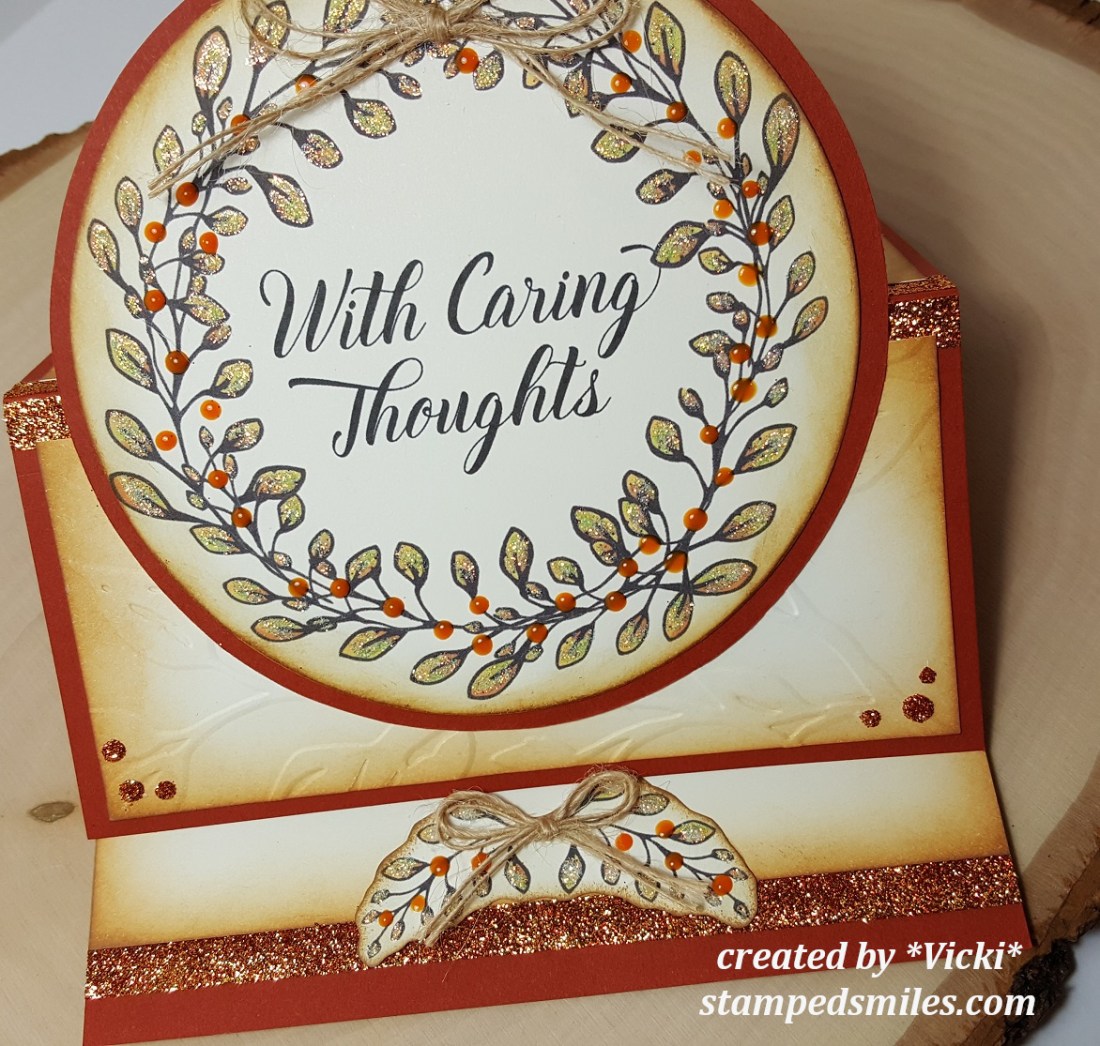
For the eggs inside the nest, I took a VersaMarker pen and colored them in with it.  Then I took the same Robin’s Egg embossing powder and heat set the eggs with it.  It really creates a fun and unique look with the blue tint and speckle flakes in it, plus it gives it a nice embossed shine for an “egg like” appearance!

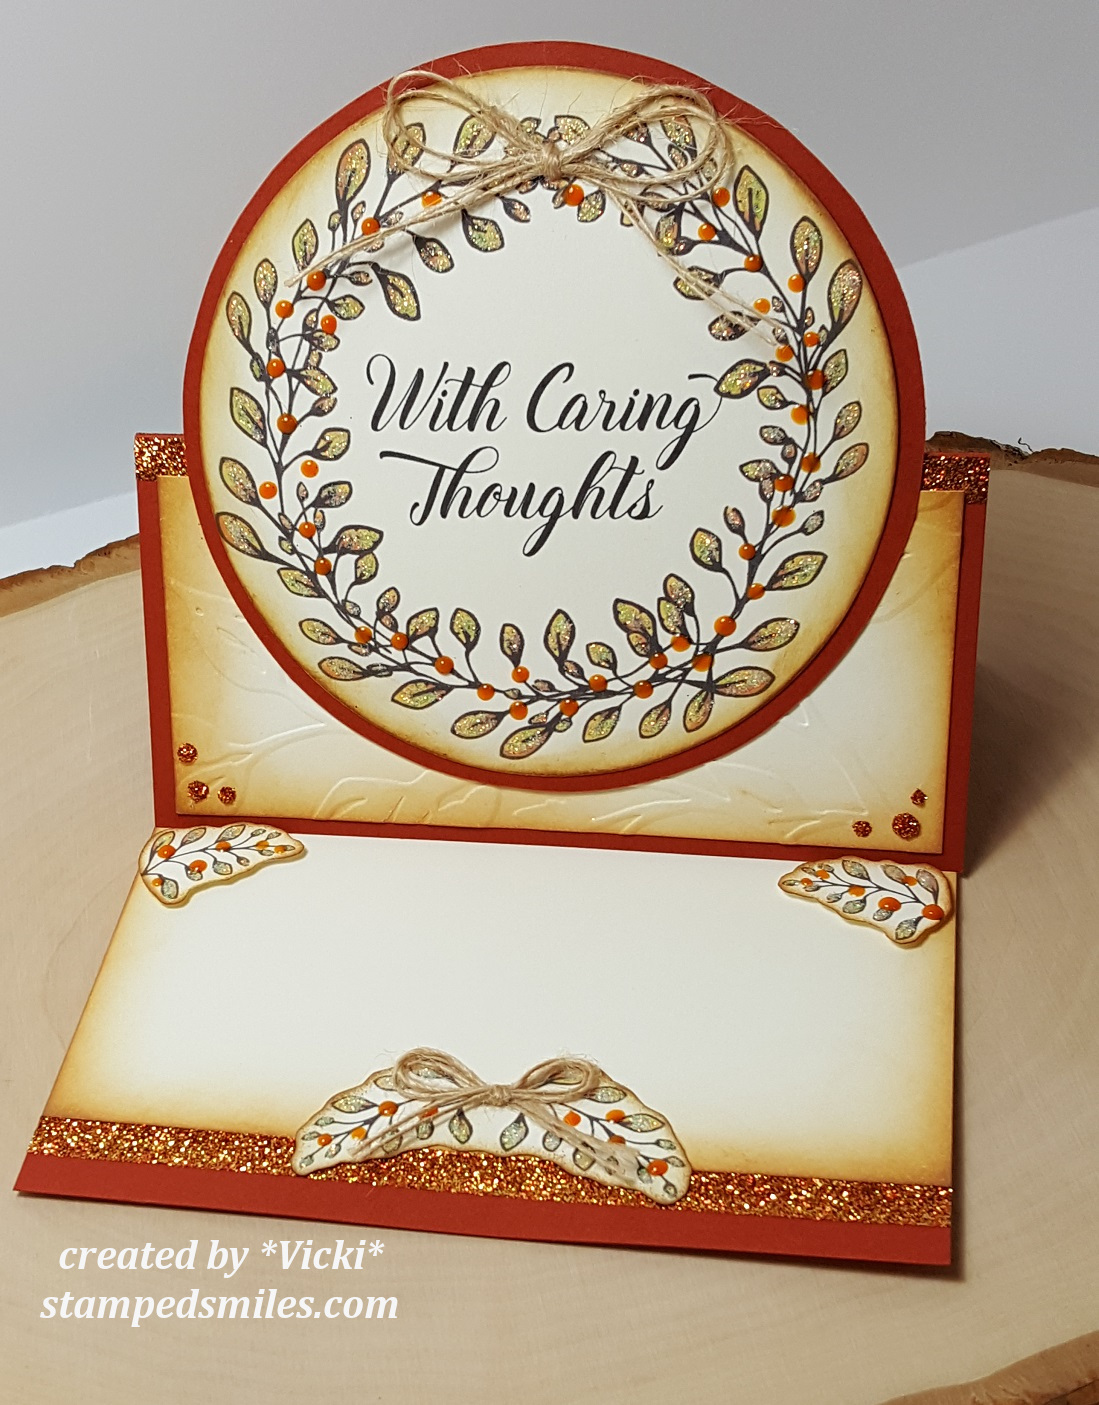
After coloring in the image, I used my scissors to fussy cut it out and then added a couple of feathers from my stash and attached this image over the card front panel with some foam tape.  I finished off my design by adding a few random drops with some Nuvo Dazzling Blue Glitter Drops.

I hope that you’ve enjoyed my card today and thank you so much for stopping in!

Challenges I’d like to enter:

  1.  Fab ‘N’ Funky – New Beginnings  MISS IT!!!
  2. Not Just Cards – Jan Anything Goes
  3. Crafty Friends – New Beginnings
  4. Stamps & Fun = Creativity – #338 Anything Goes
  5. Pammies Inky Pinkies – PIP1902 Anything Goes

Cuddle Bunny at Whimsy Stamps

Hello friends!  Hope you’ve had a great weekend!  The last time I posted I mentioned it was so nice that we could cook out on the grill, well this week it’s snow conditions and very cold!  With life in the Midwest, you never know what you’re going to get.

I thought it would be nice to turn that warm weather feeling to the inside of my craft room and create with this January released digital image from Whimsy Stamps:

vicki-wscuddlebunny-jan15

Fell in love with this darling image by Crissy Armstrong called Cuddle Bunny.  This had been a previous rubber stamp that is now available in digital format!  I think there are many advantages to getting a digital version:  1) It NEVER runs out of stock in the store because it’s a digital file, PLUS, you don’t have to wait for it to come in the mail!  2) You can size the image(s) whatever size you want it to be!  3) You can easily combine other images with it and arrange them as you’d like before printing it out.  4) You can color with Copic markers without worrying about anything getting smeared and lastly:  5) You can still feel like you’re “getting your hands crafty” by coloring and finishing out your creation with other products!  So, if you haven’t jumped on the “digital wagon”, an image like this would be a great one to try out!

vicki-wscuddlebunny-flat

For my card, I have colored my image with Copic markers, see the detail list below and then sponged some Tumbled Glass distress ink with an ink blending foam tool and a cloud stencil.  I then cut it out with the Whimsy Stamps Notched Rectangle dies and added a yellow layer behind it that I’ve notched out by hand.

For the background I’ve taken a piece of blue watercolor paper panel and lined the top and bottom of it with a strip of flower borders from my old stash.  I used a glue pen for the centers of the flowers and attached some glitter over top.  I added a strip of sheer white ribbon across it and attached it to a piece of shimmer luster paper which was mounted onto a 5″ square yellow card base.

Lastly, I used some craft foam behind the image panel and attached it over my card and then added the ribbon bow with a chipboard flower in the center.

vicki-wscuddlebunny-close

Here’s a closer look at the image where you can see how I’ve colored it.  Hard to capture in the photo, but I’ve also taken some Nuvo White Blizzard Glitter Drops and added a tiny dot in the centers of the white flowers.  I have also used the Wink of Stella Clear Glitter Brush and went over the butterfly.

I hope you’ve enjoyed my creation today and I thank you so much for stopping in!  I look forward to sharing another project with you tomorrow!  See you soon!

Here’s the list of Copic markers I’ve used:

  1.  Dress, Hair Bow & White Flowers:  Y17, Y15, Y13, Y11, B00, B000
  2. Shoes:  E87, E84, E81
  3. Hair & Skin:  E49, E47, E44, E42, E21, E11, E00, E000, R20
  4. Bunny:  C3, C1, R00
  5. Butterfly & Flowers:  V15, V12
  6. Grass & White Flower Stems/Leaves:  G24, G21, G20, YG67, YG63, YG61

Challenges I’d like to enter this card for:

  1.  Crafty Creations – Anything Goes
  2. Crafty Animals – Anything Goes #22
  3. Creative Knockouts – Anything Goes
  4. QKR Stampede – Anything Goes #330
  5. Use Your Stuff – Furry Friends

What’s New at Cute Card Thursday

Hello friends!  It’s Thursday time again and we have a new challenge for you over at Cute Card Thursday today!  The challenge for this week is…..”What’s New?

And remember these challenge themes are always your own interpretation!  Here’s what I’ve created for it:

vicki-cct564-adu-new

I thought this image was so TWEET!! 🙂  It is a “new to me” image from our sponsor this week by All Dressed Up Stamps called Home Sweet Home.  I thought this would be such a nice card for someone with a “new home”.

It was also nice to be able to use some older items from my stash as well!  I have colored up the image and used a heart die to cut it out with.  I’ve also sponged some color around the edges and added some stitching details with a marker.  For the patterned papers in the background, I’ve used a paper piercer tool and made stitch marks over the holes with a white gel pen.  I layered it onto a piece of white cardstock which I then layered onto a piece of 5″x5″ Sahara Sand top folding card base.  BEFORE attaching my white layer onto the base, I’ve added some twine around it.

I cut out a smaller heart from the die set I’ve used from some craft foam and attached it to the image heart panel and placed it over the twine on the front.  Lastly, I’ve added the wood veneer bird cage and flowers and twine bow.

vicki-cct564-adu-close

Taking a closer look at the image, you can see that I’ve used various colors of Copics to color it in with.  I went around the images with a W0 which matched up nicely with the colors of the main card panel.  You can also see places where I’ve added a bit of sparkle from some colored gel pens and extra “dots” around the image with a white gel pen.  It was actually a really simple and fun image to color!

vicki-cct564-adu-flat

Thanks so much for stopping by today and I wish you a wonderful day!

Challenges I’d like to enter for this card:

  1.  CRAFT – New (year/job/baby, etc.) – for me:  new home and new stash
  2. All Dressed Up Stamps challenge – Anything Goes + ADU image
  3. Cardz 4 Galz – New Year/New Stash (image and hearts dies)
  4. Alphabet Challenge – ‘U’ is for ‘Use Some Stitching:  faux or real’
  5. Crafting From the Heart – Anything Goes
  6. Try it On Tuesday – Something old/something new (new image/wood veneer, new home and old papers, old flowers, old tools!)
  7. Words 2 Craft By – HOPE (W2CB61):  “Hope is the thing with feathers that perches in the soul & sings the tunes without the words & never stops at all.” ~ Emily Dickenson                     Absolutely LOVE that!!

Rose Heart Card

Hello friends!  I’m back again to share my Rose Heart card!  I’m still “in the mood for love”, so here’s what I’ve got for you today:

vicki-roseheart-card-project1

I absolutely love this new Rose Heart stamp set!  It’s a wonderful layering stamp set, and I can see so many creative possibilities with it!  I really hope to get some time to play with it some more!

I thought this stamp set had an elegant Vintage feel to it and I wanted to create with it in that way.  There are lots of fun heat embossing, ink blending and layering going on in this design.

Thanks so much for stopping in today!  I appreciate your time and comments very much! 🙂

Challenges I’d like to enter my card for:

  1.  QKR Stampede – Anything Goes #329
  2. Simply Create Too – Anything Goes/No Twist
  3. Allsorts – Hearts and Flowers
  4. Happy Little Stampers Mixed Media – Layers
  5. Pammies Inky Pinkies (PIP1901) – Anything Goes

Grateful We Are Friends

Hello friends!  Stopping in today to share my card using the Koi Pond Friends rubber stamp set.

Vicki-SnSNov-KoiPondFriends

I started out with a piece of watercolor paper and sprinkled three different colors of Nuvo Shimmer Powders on it:  Atlantis Burst, Green Parade and Blue Blitz.  I sprinkled all the colors at once before applying any water to it.  I sprinkled VERY little and just added a bit more here and there as I spritzed it with water.  I saturated the paper and moved it around until it was covered how I wanted it to look.  I dabbed it up with a paper towel and used a heat gun to dry it up a bit.  I just love the beautiful shimmer on this background!

Vicki-SnSNov-KoiPondFriends2

Also, for the background, I took the bubbles image from the same stamp set and stamped them in VersaMark ink around the right corner and bottom over the watercolor piece.  I heat embossed the bubbles with some Frosted Juniper and Sparkle (Semi-transparent) embossing powders.  I then mounted this watercolor background panel onto the top edge of a black A2 Sized top folding card base.

With the close-up view of the fish, I heat embossed them with the Copper Embossing Powder over some Bristol paper.  For the flower image, I just stamped it with black waterproof ink in the same Bristol paper.  Below I will share how I went about coloring both the fish and the flower.

After heat embossing the fish and stamping the flower, I took the Nuvo Glitter Markers in the following colors:  Midnight Shadows, Ember Glow and Urban Graphite and pressed the pens down onto my Tim Holtz Glass Media Mat to get a “pool” of it and then used my Water brush to blend and color the images. It leaves a beautiful shimmer and blends the colors together so nicely!

Vicki-SnSNov-KoiPondFriends3

Here’s a closer view of the colored flower with the shimmer.  I fussy cut all the colored images and glued them on the card base with glue.  For the flower image, I decided to off-set it and trim off the edges with scissors.

For the greeting, using the same rubber stamp set, I stamped it with a black pigment ink and then sprinkled it with some Sparkle (semi-transparent) and heat embossed it to give it a nice sparkly look!

Vicki-SnSNov-KoiPondFriends1

For the bottom portion of my card, I cut out a strip of cardstock the width that I wanted to go across the bottom and underneath the watercolor panel.  I covered the entire strip with Glue and then covered that up with these stunning Bronze Mica Flakes and let it dry.  After it was dried, I pressed and burnished them into the strip with my finger and bone folder.  The extra pieces will come off the sides as you rub it around or you could also trim it off if you prefer, but I found it to not be necessary.  You can see how big the flakes are in the photo as I scattered a few of them around my card in the photos.  This was by far my favorite thing to play with on my card! 🙂

I hope you’ve enjoyed my creation today and I thank you so much for stopping in!

Caring Thoughts Wreath

Hello friends! Sorry to be throwing so many posts out to you at once, but as you can see there are so many exciting things going on the first of the month and I’m happy to be sharing it with you!

I have come up with an easel card design that I’ve created using the digital set called Memory in Our Hearts:

Vicki-SnS-MemoryinOurHearts-OctGDT

The great advantage to using a digital set is that they come with pre-colored images as well as outlined images to create many different looks you’re wanting.  In addition to that, you can also manipulate the size and structure of your image as I have done with my card here.  (This is a great way to come up with a unique design too!)

I have taken some of the pre-colored “sprigs” in the fall theme color and sized and moved them around in a Word doc. to create my own Fall wreath with it!  I then added the beautiful sentiment to the center and placed where I wanted it and then printed it out along with a couple more sprigs that you see on the inside of this design.

Vicki-SnS-MemoryinOurHearts-OctGDT1

To step things up a notch, I’ve used a protractor to draw a circle around my wreath image as well as a larger circle for a mat behind it and fussy cut them out. (I didn’t have a circle die large enough to accommodate my wreath image.)  I took my ink blending tool and some Tea Dye and Vintage Photo distress inks to add some color around the edges.  Since I made a Fall wreath design, I wanted to add some glitter to the leaves.  So, I took the Nuvo Precision glue pen and added some glitter over them.  For the “berries”, I took some Ripened Pumpkin Nuvo Crystal Drops in random areas around the leaves.  I made a bow with some natural twine and added it to the top of the wreath.  (I did this same process for the smaller “sprigs” on the inside of the card as well.)

Vicki-SnS-MemoryinOurHearts-OctGDT2

For my card design, I have made an “easel style” card (more on that below).  My card size is a 5 1/2″ square.  I have used the same cardstock color that I’ve used to print out my wreath image and separated it in two panels to fit on the front of my card base.  I took an embossing folder from my stash to add some texture to my design and also used the distress inks again to add some color around the edges.  I used glue to add some “dots” in the corners and then sprinkled some “Autumn Medley” glitter over them and let it dry.  I have also taken some 1/4″ Tear Tape to the middle edges of the card base and burnished some of this same “Autumn Medley” glitter to that.  I think it really brings in that pretty Fall color theme with some added sparkle!

Vicki-SnS-MemoryinOurHearts-OctGDT3

And for the inside of my card, you can see that those extra “sprigs” that I’ve printed and cut out create an easel style “stopper/display” function for my card design.  It’s easy to create this look with a score mark made in the center of the card front base as you can see with the circle wreath shown fully.

I have used some of the same-colored cardstock as the printed-out wreath for the inside of my card with some more distress inks along the edges as well as another strip of 1/4″ Tear Tape along the bottom edge burnished with some more of that “Autumn Medley” glitter.  I’ve used some foam tape to pop up the “sprig” cut out images so that they create the “stopper” for the front card base to rest while being displayed.

I hope that you’ve enjoyed my interactive card today and I look forward to sharing many more projects with you during my guest design spot!

Thanks so much for stopping in today my friends!  Please be sure to check out my earlier posts from today!  See you soon!

challenges:

  1.  {Cupcake Inspirations} CIC457 – Fall
  2. Try It On Tuesday – Thankful

It’s a Monochromatic Cute Card Thursday

Hello friends!  Trying to work hard on projects and getting things ready for next month.   So please excuse me if I seem a bit sporadic in my presence!

Stopping in to share a new challenge with you over at Cute Card Thursday!  This week the theme is “monochromatic” or some people say “monochrome” which simply means that your project mainly consists of one color or tone.   Stop by the challenge blog and be sure to check out the rest of the inspiration from the design team while you’re there!  Here’s my project for the challenge:

Vicki-CCT548-monochrome

I absolutely fell in love with this flower image from the My Favorite Things card kit that they came out with!  And I can’t say that I came up with this idea all on my own either, as it is very similar to one of the samples on the project sheet that comes with the kit.

It’s very simple to do, just white heat embossed the floral image and color areas in with a Copic marker and then I used a sentiment from Lawn Fawn to white heat emboss over vellum and the card stock again and then die cut the word out and attach over the vellum strip.  I had been requested to make up some wedding cards and so I’m trying to make up a few of them as this is something that I’ve completely missed in my card creating.  Taking mental notes for myself!

Thanks for stopping by friends!  See you soon!

challenges:

  1.  QKR Stampede –  #313 Anything Goes
  2. The Flower Challenge – Anything Goes + flower(s)
  3. The Creative Crafters – Anything Goes

Card Results For Dare to Get Dirty Event

Good evening friends!  I don’t normally post in the evening, but I had been working on some other things this weekend and today and hadn’t had a chance to create a post to share my creations with you for the “Dare to Get Dirty” challenge on Splitcoast Stampers!

And of course since the challenges are exclusively for the SCS fan club members only, I cannot share the details with you about what the challenges are about…so please keep that in mind when you see my creations for this without full details! 🙂

The first three cards that I’m sharing were created for my challenge during this event.  It went “live” yesterday and there are really so many wonderful and creative entries in the gallery for this!  I’m so glad everyone has been having fun playing along with it!

Vicki-DTGD18basementstamper-paperpeicing

I couldn’t stand how stinkin’ CUTE this My Favorite Things stamp set was, so of course I HAD to go grab it!  I had been holding off on it for quite a while and then finally broke down and just got it!  That cow in there just kills me! LOL!!  I am talking about the MFT BB The Whole Herd stamp set.  I’ve used a ton of different paper from my stash to create a scene for the pigs.  I’ve also used various MFT dies to put everything together.  I have handwritten the words that are on the trough the little piggy is standing in.

Vicki-DTGD18basementstamper-paperpeicing1

My next card is made using the tutorial on SCS called the Herringbone technique. (You do NOT have to be a fan club member to see this technique…it’s open for everyone.)   It’s been around for a while, but I really love the results it can bring to a background on a card!  I have used the flower image from a retired Lawn Fawn stamp set and a greeting set and die from Impression Obsession.

Vicki-DTGD18basmentstamper-paperpiecing2

This final card for my challenge is done using an ‘Iris Fold‘ technique.  I have used a circle die cut to create my design and then went around the circle with a tag die from Lawn Fawn that I also used an additional circle die that I’ve used to cut out the center of it for a framing effect and so that it looks more like an ornament.  I used an embossing folder from SU! as well as the snowflake image in the middle of the ornament along with a wonky stitched rectangle die to cut the panel out with and then added a sentiment cut with a die from CAS-ual Fridays with gold foil card stock.  The gold thread was added through the tag hole at the top and secured around the back of the main image panel and lastly, I added a crystal in the center of the snowflake.


Another card I wanted to share was for another challenge issued from a fellow Dare to Get Dirty Dozen design team member.  This one took me a while to grasp how to make it happen, but once figured out, it turned out pretty cool:

Vicki-DTGD18KelliJoA-pulledpopart

Again, I can’t share with you the details about the challenge, but it’s sort of a ‘mixed media’ based design! 🙂  I’ve die cut some stars using some silver foil card stock and added a sentiment to go with it embossed with white EP over a black banner strip.

Thought this would make for a fun masculine style card.

Be sure to stop by again tomorrow!  I have something fun to share with you!!!

Masked Floral Eclipse and ICAD Week 4

Hello friends!  Posting a bit later than what I had wanted today, but sometimes I get caught up in other things going on and just keep crafting when I have totally forgotten that I need to post something…especially if you can’t remember if you’ve posted or not! LOL!  Does that make sense?  I hope so!

I just love all the beautiful blooms that are coming up around the house as we continue with Summer!  It is a bit hot outside and I’m only out for a brief time watering and that’s about it right now.  So I decided to take the idea of flowers indoors with a card!

Vicki-LawnFawn-Floral Eclipse

I created a floral bouquet and then used the “Eclipse technique” (click link for a tutorial on Splitcoaststampers.com) for my design using all Lawn Fawn products on my card!

I started off with the Fab Flowers stamp set and made several masks from Post-It Notes and cut them out as needed to create the bouquet on white cardstock.  I’ve used several colors of Stampin’ Up! inks pads which is what I have the most of in any ink pads I own.  I masked off the flowers that I needed so that I can put the ones that I wanted to show up in the front.  I’ve also used a white gel pen to create “dots” all around the flowers.

After completing my masked floral bouquet, I used the LF Scripty Hello die and cut it right in the center of the bouquet.  When I first tried this technique, it freaked me out, but it’s pretty cool how it turns out!  I also cut this out several times with black cardstock to stack them up and place behind the stamped bouquet on the front.

I finished the card by cutting out the panel with the LF Stitched Rectangle Stackable and the LF Fancy Scalloped Rectangle Stackable in black which I mounted onto a top folding A2 white card base.  I then added some clear sparkling sequins filled with Clear Nuvo Crystal Drops in the centers.

Vicki-LawnFawn-Floral Eclipse1

Here’s a closer look at what the technique looks like on the card.  It shows up best when you put dark cardstock behind it.  it takes a bit of planning and maneuvering, but it’s totally worth it when you’ve done.

Hope you’ve enjoyed my Friday floral bouquet!

And now of course I have the Week 4 ICAD 2018 index cards to share with you!

Vicki-ICAD2018-week4

I have noticed that as I go along, some days I just don’t want to put much effort into it and others I find spending a great deal of time putting one together.  LOL!  I guess some days you just “feel it” and other days you don’t!  These may seem a bit weird, but if I was able to share the prompts and ideas behind each one, they would totally make sense…. but for now, I’m just enjoying the process and being able to get out and play with all the different media that I either don’t use or want to learn more about.

I hope you are enjoying seeing the results each week.  I know I enjoy looking back at them each week rather than seeing each one for the day it’s done.  It gives a different perspective and makes me feel proud for completing one every day despite what’s going on around me!

Thanks so much for dropping in and I wish you a fantastic weekend!  Stay cool!

Challenges I’d like to enter my floral card in:

  1.  Lawn Fawnatics – Flowers, Floral and Foliage
  2. Crafty Creations – Anything Goes (#369)
  3. Simon Says Stamp Wednesday – Anything Goes