Hearts and Flowers for Sparkles Monthly Challenge

Hello friends!  I hope you’re having a great week so far and enjoyed a nice Valentine’s Day yesterday with some yummy sweets!  We enjoyed some treats of our own! 😉

Today I have a new challenge to share with you for the Sparkles Monthly Challenge blog and this month the lovely Dawn would like to see some “Hearts & Flowers” on your creations!  Although Valentine’s Day is over, I think hearts are great for adding any time of the year, so check out the inspiration from the design team and here’s what I’ve made:

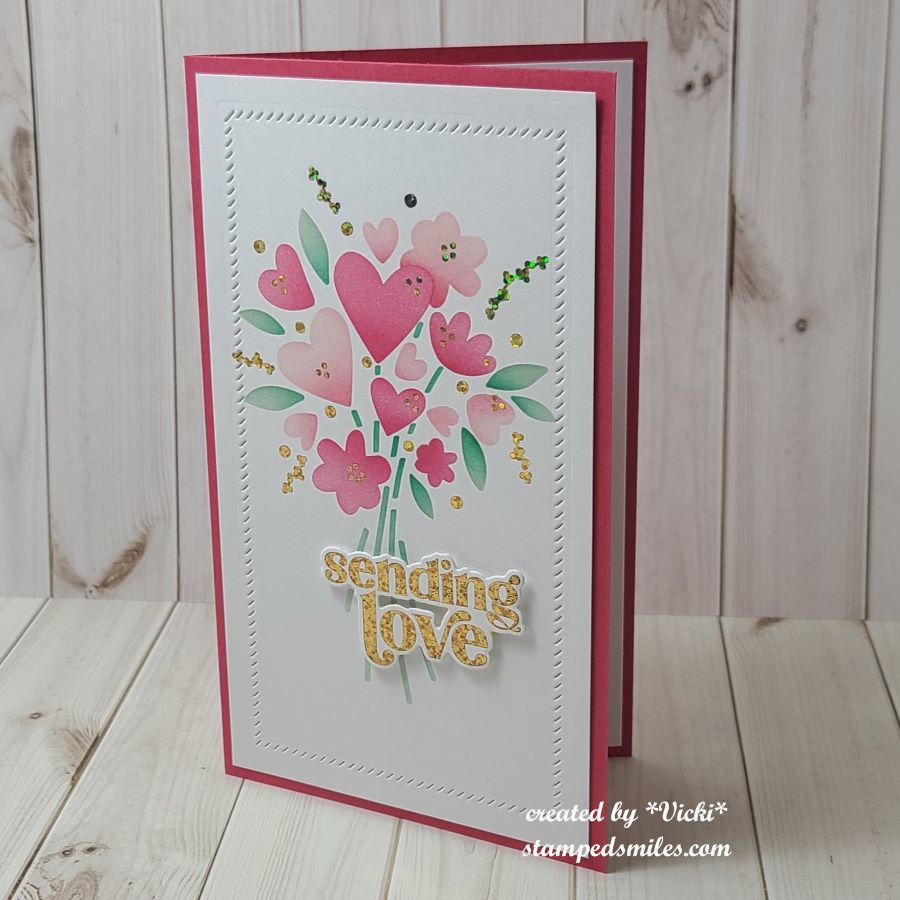
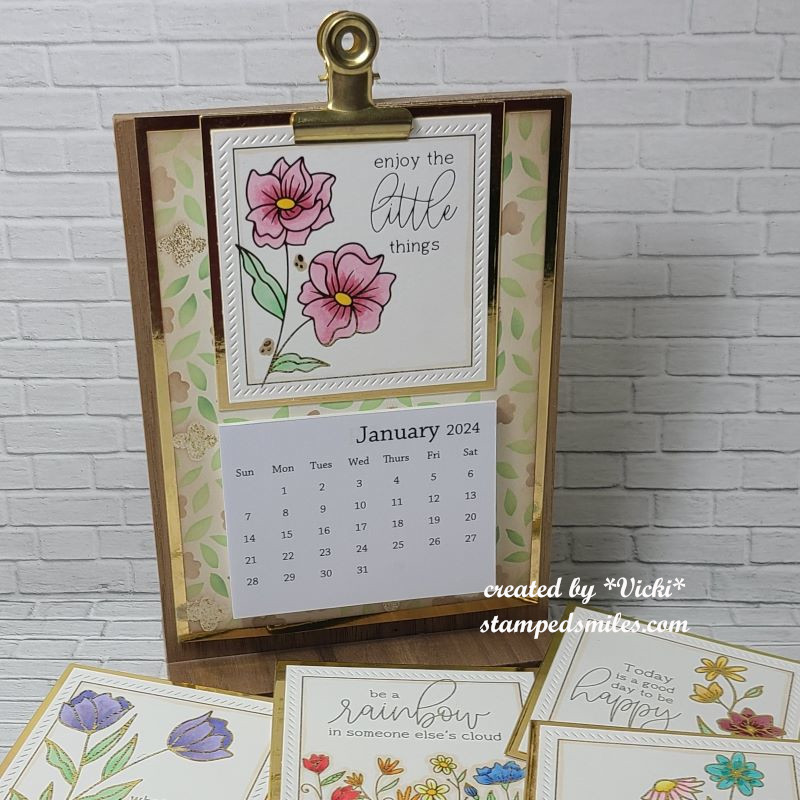
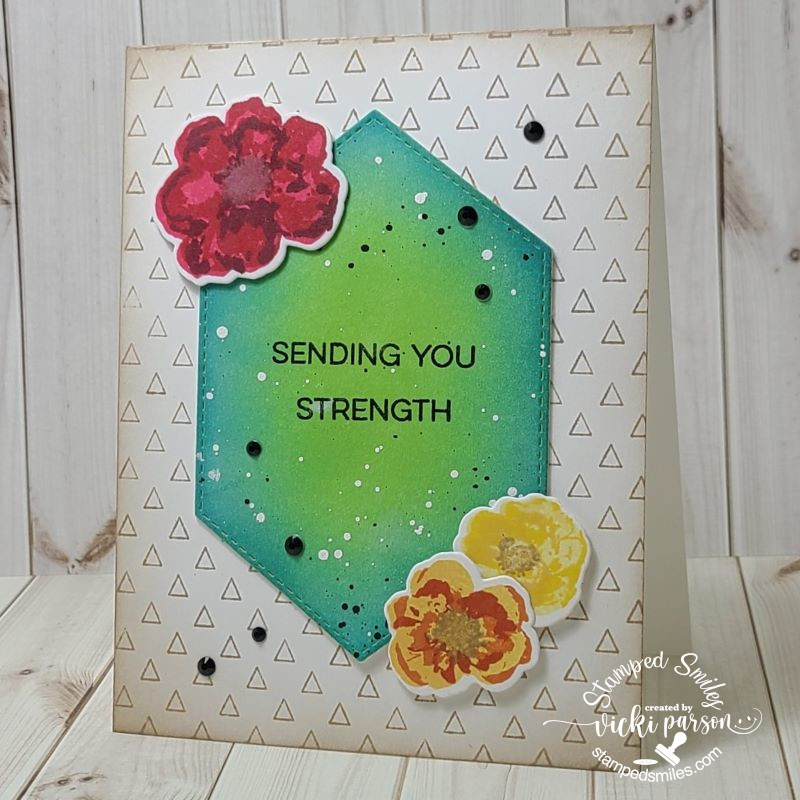
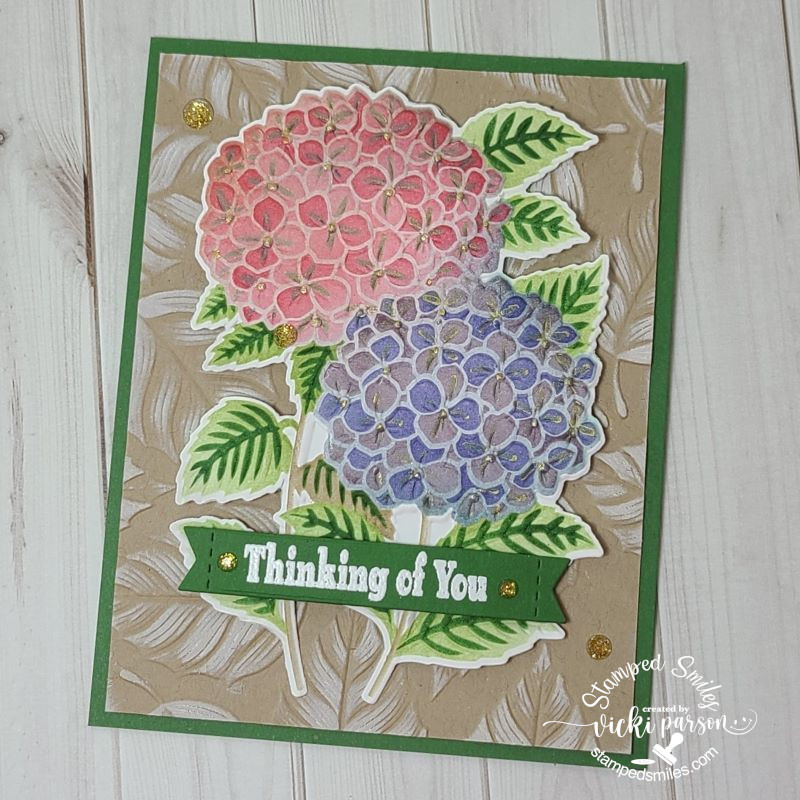
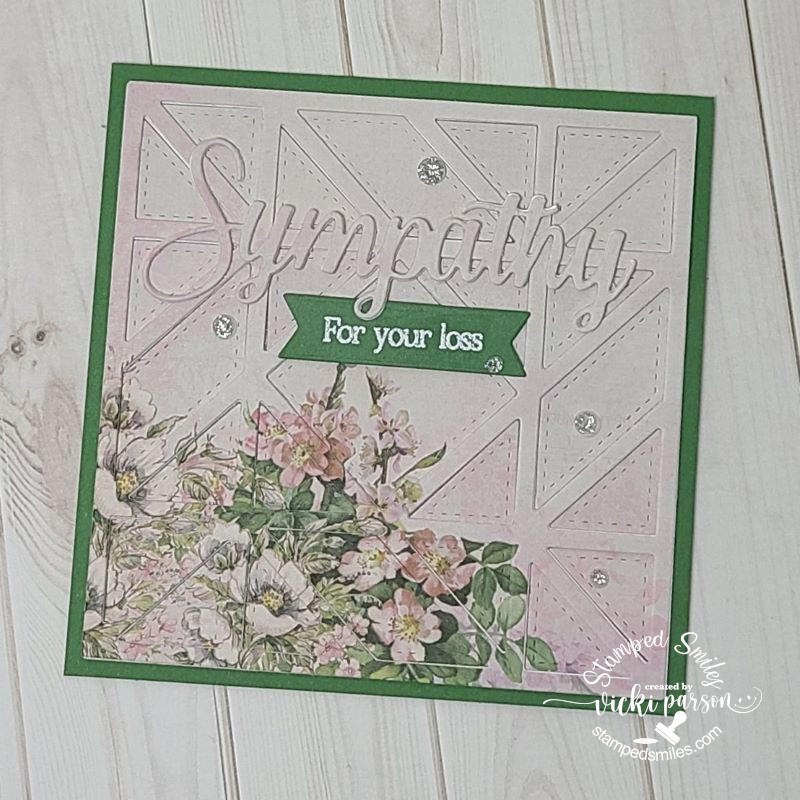
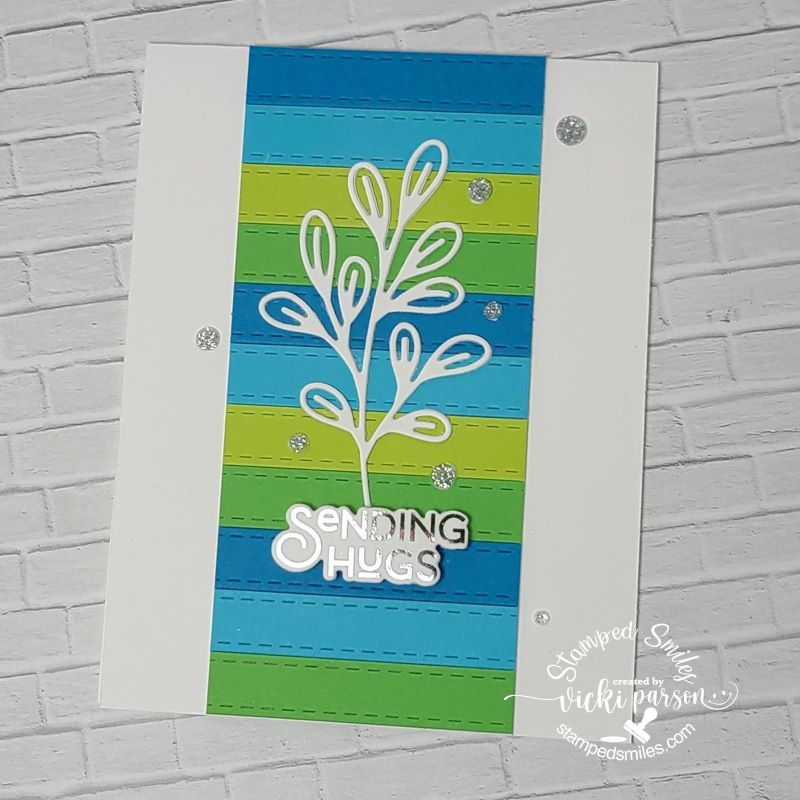
I’ve made a mini slim card using the Taylored Expressions Hearts in Bloom Layering Stencils which are so great for mass producing several cards at once.  For this card and the other cards below, I decided I wanted to use the TE Hearts in Bloom Foil Panels which works with these stencils. I foiled them with gold foil.  I think the foiling adds such a pretty shine and glitter.  I also used the TE Love & Hugs Foil Panels for the sentiment and die cut it out with the coordinating die set.

So after foiling everything, I used the stencils to create the pretty bouquet of flowers with the hearts in it and then added a frame around the edge with a TE Diagonal Stitch Mini Slim die that doesn’t cut anything, but adds those slash marks.  I used some foam tape to pop up the foiled sentiment and just attached everything to a coordinating mini slim card base.

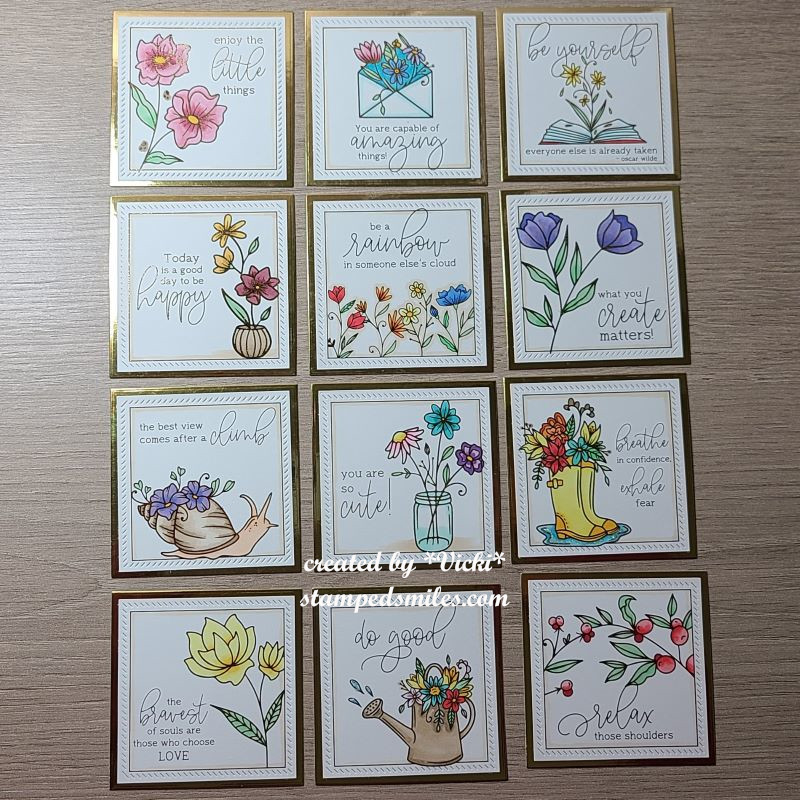
I couldn’t just make this one to show you, so here is the whole set of cards I’ve made together:

Those stencils create all of these patterns at one time.  I just lined the foil panels up at one time and then used each stencil for the colors.  If you didn’t want to use the foil panels, you could also just use the stencils on one sheet of cardstock and then cut them apart to make the card fronts.

I found these sets to become very addicting!  And just like that, two of them have been sent out!  

I’ve been really busy with creating behind the scenes and I will be sharing more soon!  I will be around to see what’s been going on with you all shortly!  I really appreciate your kindness and support…it really means so much!❤️  Thanks for stopping in!

Challenges:

  1. Try it On Tuesday – Hearts &/or Flowers
  2. Make My Monday – Love
  3. Allsorts – Anything Goes/Hearts
  4. Ally’s Angels – Anything Goes
  5. Little Red Wagon – Show Us Some Love/Valentine
  6. Crafty Gals Corner – Add a Heart
  7. Simon Says Stamp Wednesday– Fun with Foil

2024 Calendars Completed

Hello friends!  It’s that time of year when we turn over a new year and then realize that we need a calendar to keep track of our days…at least I do anyway!  I don’t feel ready for the year ahead until I’ve got my calendars up and ready to roll!  Usually, I’m ready to go by the end of the year, but I ran out of time with the Holidays, and I had planned on giving calendar gifts which I sent late, but I did get them done!  I still feel in Holiday mode because of this…Ugh!

So this month I’ve been working on several calendars and spending most of my time coloring them up.  It’s been very cold over my way, so I actually enjoyed doing them.  Here are a few sets that I sent out for gifts:

I think these Taylored Expressions Feisty Square Calendar Cards are my favorite!😆  I was laughing at each one as I was coloring them up!  The cards are already printed and makes it easy to get them colored up and attach them to the Desk Calendars.  All of the image cards are blank so that you can use them however.  I decided to just create my own background with each one using my markers in different ways while I was coloring them up.

I gave this set as a gift and wasn’t sure how they would choose to be displayed, so I added a magnet on the back of each one and also included a Walnut Wood Display, so they had a couple of options to use.

This next set was put together the same way I did the calendar above, expect these are the Taylored Expressions Scratch-Off cards.  (This one is not available in the store because I received the entire set with my Advent Calendar purchase.)  I thought these pups and cats were too cute and a perfect gift for someone that has both a dog and cat in their family.

After I colored them in, I added the Taylored Expressions Scratch Off Stickers to cover up the joke punch line.  I then used the TE Square Tear Off Calendar dies to create the design around the edges and a layer of cardstock to coordinate behind each one before placing on the calendar cards.  I also stamped “scratch off” under each card so that the person can scratch off the joke punch line for every month and see a new joke.

I also added a magnet on the back of each one as well as include a Walnut Wood Display so the recipient can choose how to display the calendar.

  • Click on the photos to enlarge on website!

Every year I always get the Inky Stamper Calendar kit that gets put together at the end of each year.  There is usually a number limit on how many are available each year, so if you are interested, you might want to click on the link to get one because I’m not sure how many more there are left.

These were also fun to put together and color.  I chose to stamp my own images and cut them out.  You still get the pattern papers and white sentiment strip with each month.

I absolutely love how this calendar turned out!  I’ve used the Taylored Expressions Friendly Square Calendar Cards and I thought they were so uplifting.  This time of the year positivity is something that is very important to me and can be hard to come by.  The days seem to be gloomy and short with little sunshine, so coloring all of these was great to fill my time with.

For this display, you may remember a calendar I had done a few years ago on THIS POST using the TE Snarky Calendar Cards.  I’ve decided to update that one and used the same display stand to create this one, which is why I prefer using this stand.  It’s nice and durable.

I have gold foiled each card and colored it.  I’ve made a new background display card with a layered stencil and I’ve layered everything with gold foil cardstock.  I’ve got a bag on the back to store my extra cards so that I can switch them out whenever I’d like.  All of the gold shine really catches my eye and is pleasant to view.

I hope you’ve enjoyed my post this afternoon and I REALLY appreciate you taking the time out of your day to leave me a comment.  It means very much to me as does your support!

Have a beautiful day and I’ll see you on Saturday for my first Art Journal Page of the year!

Challenges:

  1. Crafting From the Heart– Anything Goes
  2. Ally’s Angels – Anything Goes
  3. Love to Scrap – Anything Goes
  4. Love to Craft – Anything Goes
  5. A Perfect Time to Craft – Anything Goes
  6. Crafty Calendar – Anything Goes
  7. Lil Patch of Crafty Friends – Anything Goes

Grateful & Encouraged

Hello friends!  It’s Thanksgiving tomorrow for us in the United States and I’d like to send a heartfelt Thanksgiving greeting to you all!  I would also like to say a huge thank you to everyone for your kindness and friendship.  I’m very grateful for you and encouraged by your support!

I’ve been working on several things and haven’t spent the time to photograph and share everything yet, but I will be sharing soon.  In the meantime, I’d like to share a few projects that I’ve made in lieu of the Thanksgiving holiday:

I don’t normally send Thanksgiving cards, but it’s a great way to say thank you to someone that hosted a dinner or brought something to share or just spend time with you!  That is the ONLY turkey stamp I own!  The stamp set is called “Sassy Thanksgiving” by CZ Designs at Simon Says Stamp.  I thought the sentiments in it were too cute and funny.  You certainly could make this any type of thank you as well.

This is also a fancy/fun fold card called a “Swing Easel Card”.  I found a tutorial using a vertical style on You Tube here – SWING EASEL TUTORIAL (I also used the same detail of embossing an additional panel with leaves and went over the texture with some gold paste.)

I made another panel for the center area and ink blended some blue that faded out and then splattered some gold paint over it.  I then layered it over a piece of gold that fits in the center panel of the easel.  I gold heat embossed the large sentiment and cut it out with the die.  It was popped up over the leaves.  I also cut an additional strip with the gold for the “catcher” of the front panel of the easel card.  I added the turkey and leaves along with the stamped sentiment on the inside bottom.


Autumn is my favorite time of the year and I enjoy using the colors and images in the cards I make, so here’s more that I’ve made:

I’ve made a couple of encouragement cards to send out to some people and I’ve used a favorite card kit from my stash by Taylored Expressions.  The images come from the stamp set Wheatfield Dreams.  I’ve used an oval die and oval mask to do some ink blending and just cut out the colored image to pop them over top.  Both sentiments were copper heat embossed.

I kept the backgrounds simple with the one on the left stamped with a background stamp from TE and the other was cut out with a wonky stitch die and layered over a green card base.

Hope you’ve enjoyed my creations, and I am so grateful you’ve chosen to stop by!❤️

Challenges:

  1. Creative Fingers – Anything Goes
  2. Lil Patch of Crafty Friends – Anything Goes
  3. Pammie’s Inky Pinkies – Anything Goes
  4. Crafting Happiness – Thanksgiving/Harvest #148
  5. Four Seasons – Fall Season
  6. The Crafty Addicts – Anything Goes
  7. Crafts Galore Encore – Anything Goes

Rainbow of Strength

Hello friends!  Hope you had a great weekend and maybe did some crafting?  Did you participate in the World Card Making Day events?  There were so many things going on, so I basically opened up the You Tube video marathons and watched while I did a bit of crafting.

I was inspired by the Craft Roulette WCMD event with several crafters showcasing their version of the parameters they were to use for that event.  It was several hours long!

Here’s the card that I made with the Craft Roulette World Card Making Day parameters of – PROJECT: A2 card, COLORS: rainbow, ELEMENT: nature, and RANDOM: black dots

I also combined my card using one of the sponsor’s products which I’m entering for this week’s sketch challenge from My Favorite Things.

I’ve had these stamps in my collection for quite a while and it was nice to pull them out for this card.  I actually needed a card for an elderly woman who recently fell and broke her hip, so she’ll be recovering with therapy for a while. 

For my card, I used the MFT Watercolor flowers and stamped them in red-, orange- and yellow-colored layers and cut them out (This was my nature element parameter).  The middle was cut with the MFT Stitched Hexagon dies that I ink blended with green and blue inks (These colors make up the rainbow parameter).  I splattered the shape with white and black. *Before I splattered, I stamped the sentiment from the MFT Essential Sentiments set with black pigment ink and heat embossed it with clear EP.  (The sentiment was cut in portion to fit my design.)

For the A2 sized card base (makes up project parameter), I used a MFT Triangle background stamp (retired) in the same kraft color that I inked the centers of the flowers with.  I also used this color to ink around the edges of the card.  I than layered two more cut out shapes for the ink blended sentiment panel for dimension and attached to the stamped card base.  I used foam tape to pop up the flowers and lastly added some black gemstones (for the black dots parameter).

Thanks so much for stopping by today!  Hope you’ve enjoyed my inspiration!  See you soon!

Challenges:

  1. My Favorite Things Wednesday Sketch – MFTWSC666
  2. Aud Sentiments – Ink Blending &/OR Fall Colors + sentiment
  3. The Crafty Addicts – Anything Goes
  4. The Flower Challenge – Anything Goes with Flowers – Happy 7 years!
  5. Krafty Chicks – #684 Stamp Act
  6. Alphabet – ‘N’ is for Nature

Occasional Blooms

Hello friends!  I hope that you’re having a wonderful week!  I’m excited about the changes I’m seeing outside with the weather!  Looking forward to that cooler temperature and pretty colors!

  • I wanted to do a bit of “house keeping” regarding my blog.  I apologize if you’re having problems trying to leave a comment.  I’ve had a few people contact me about this and I noticed that when I cleared the “cookies/cache” from my end…it somehow changed the appearance of my blog comment area…I don’t know why!?  I did find out that if you start typing in the comment box, buttons above the box will appear in which you can choose how to login.  I suggest that if you don’t have a WordPress/Gravatar account, to choose the envelope button to leave your name and e-mail address that way. (The Facebook login does not work.)  Then you can hit the reply button below the box to publish it.  I tried letting the commenter leave an anonymous reply (without having to type in name and e-mail), but then I’ll have NO idea who it is unless a name is given within the comment, so I had to re-engage that again.  I have also contacted a support person to help me navigate what’s going on and maybe I can get it back the way it was before.  I do apologize if it’s giving you a problem.  You can also go to gravatar.com to create an account which will work with ANY WordPress platform blog….but you don’t have to unless you want to do that!  You should still be able to leave a comment regardless.  Thank you for taking the time to care enough to share your support with me…I deeply appreciate it!

So now to get on with some crafting projects!  I’ve had to change gears on the seasonal makes and create some cards that I needed to send out to some people and they all happen to be in blooms:

First up is a “thinking of you” card creating for a friend using several Lisa Horton products.  These particular LH products all came from Inky Stamper.

I started with the craft background and embossed it with the LH Variegated Leaf 3D embossing folder and went over the texture with white ink.  I then used the LH Hydrangea Stencil/Die/Embossing Folder to create the blooms…love how it turned out!  I took some gold ink on the last layer of the stencil to go over the centers of the flowers.  I popped the bloom up over the embossed craft background and white heat embossed the sentiment from the IS Pig Cause stamp set and cut it out in a banner to place over the blooms.  I finished it with some gold gems.

My next card is a sympathy card needed for a craft friend who lost a loved one.  This person likes to cross-stitch and quilt, so I thought this MFT stitched quilt die (this one retired) would be fun to do over some pretty floral papers.  I had to die cut several white frames with it and lay the centers of the paper cut pieces on the first frame and then I layered two more of the white frames over top with the last pattern paper over that to give it that 3D look.  (Not sure where the paper came from other my stash!)

I cut the sentiment from the Whimsy Stamps Sympathy/Heartfelt/Condolences die set and layered it in the same way I did the quilt frame die.  I also white heat embossed the sentiment from the WS Deepest Sympathy stamp set and cut it out from a banner to attach right underneath the “p” in the die cut word.  I finished this one off with some clear gems.

And on a happier note, I’ve made another bloom card to wish someone turning 75 years young a happy birthday!  This is the first chance I’ve had to use this fun die set from Taylored Expressions!  The bottom container came from the TE Antique Pails die set.   I stamped the TE Burlap Background over it with the same color ink as the cardstock as well as Butter Cream ink to give it some texture.  The flower arrangement was cut out from the TE Garden Variety die set in various colors.  I also brushed some of the same colors in the centers of the flowers.  The centers of the flowers have a silver metallic enamel dot.

For the frame, I’ve used the TE Diagonal Stitch Rectangle die that only leaves the marks but doesn’t cut anything out.  The sentiment was stamped and cut out with the TE All Together-Occasions 2 set/die and popped up with foam squares over the panel.

I think the most fun was arranging the flowers in the container!

I hope you’ve enjoyed my cards today and you’ve been inspired!  Thank you so much for stopping by!  I appreciate you!  Have a wonderful weekend!

Challenges:

  1. Addicted to Stamps & More – Any Occasion
  2. The Sisterhood of Crafters – Die Cuts/Anything Goes
  3. Lil’ Patch of Crafty Friends – Anything Goes
  4. Pammie’s Inky Pinkies – Anything Goes
  5. Cardz 4 Galz – Use a Stencil, a Sentiment, an Image (top card only)
  6. Crafts Galore Encore – Anything Goes
  7. 613 Avenue Create – Anything Goes no twist
  8. The Corrosive – Anything Goes

Bugging Out With Sketches

Hello friends!  I hope you’re having a good week so far and staying safe wherever you are in the world.  Sending hugs to all experiencing a troubled time.  I hope that my post can bring a smile to you today.

I needed to create some get well type of cards and so I thought I’d try to incorporate some challenges while working on them which helps me to concentrate more in what I’m doing and maybe think outside the box a bit.

My first card is made with the Beccy’s Place Challenge freebie this month and she also challenged us with a sketch which I’ve decided to use for my card. (see sketch below)  I was really happy to use up some more pattern papers with it and I also decided to add a tiny dragonfly at the top to enter another challenge and to adhere to my “bug” theme today!

I printed the image in black and white and colored with Copics.  The dragonfly and the center pink strip were stamps that I cut out and added to the design.  The rest is pattern paper from my stash except the scalloped kraft border in the center that I cut out with a die.  I stamped the sentiment and cut it out to go with my twine around it. *You will notice in ALL of these cards that I’ve used some sparkly gems.  I wasn’t aware until posting them!  I must be on a kick of wanting to use them!*

Challenges for 1st card:

  1. Beccy’s Place – August challenge + sketch
  2. Paper Dragonfly Creative – Anything Flies (Goes) or Party
  3. Kreativ-Tanten – Anything Goes
  4. The Crafty Addicts – Anything Goes
  5. Crafty Calendar – Anything Goes
  6. Dragonfly Dreams – Dragonflies

And for this next card, I’ve played with a large bug:

Around my area this time of year, you can hear the sound of these cicada bugs with their distinct noise throughout the trees.  My husband likes the sound when a bird catches one! EEW!  This bug is a cute one from Inky Stamper called Cicada and I’ve colored it up with pencils this time.  Hard to see, but I’ve also added some shimmer with a glitter pen on his wings.

I’ve used the Picket Fence Tree Bark stencil over kraft on the background and then splattered it with brown and white paint. The leaves under the bug and the accent came from the Lisa Horton Variegated Leaf EF+die that I cut over light green cardstock.  I used some metallic green wax to go over the details in them.  I also used some gel pens to make some doodles around the strip, the circle and under the sentiment along with following a sketch. (details below) You will also notice more sparkly gems!  I’m also entering this in the Inky Stamper FB challenge this month which is using an IS bug image.

Challenges for card

  1. Sketch Saturday – #732 sketch + twist: add a doodle
  2. Creative Knockouts – #501 Anything Goes
  3. We Love Stamping – Masculine
  4. Lil’ Patch of Crafty Friends – Anything Goes
  5. Pammie’s Inky Pinkies – Anything Goes
  6. A Place to Start – Anything Goes optional: leaves/trees
  7. The Corrosive – Anything Goes

For my last card I decided to keep this one simple’ish’:

So, I know these aren’t real bugs because I’m not squealing, but these guys are too cute! They’re popping up out of the dirt for a special greeting!  I mixed in both a new and older stamp set from Lawn Fawn on this one. I’ve used another sketch for this one and decided to keep it very simple.  The hardest part of this was the coloring which honestly wasn’t all that difficult either because they’re small images.  I’ve also added some shimmer with a glitter pen on the wings and of course, there’s those sparkly gems again!

Challenges for card

  1. Sunday Stamps – SSC316 in the corner sketch
  2. The Paper Players – CAS using any Bug
  3. Simon Says Stamp Wednesday – Clean and Simple
  4. Krafty Chicks – CAS (Clean and Simple)

Thanks so much for stopping by today!  I appreciate your time and thoughts!  I’ll be seeing you again on Saturday with another AJ page!

NO STAMPING ALLOWED at Sparkles Monthly

Hello friends!  It’s been a bit since my last posting!  I’m still crafting, but I’m also enjoying the outdoors lately too!  I’m just not making the time I need to post on my blog here!  However, being on a design team helps to keep me focused on posting and hopefully it’s something that will bring motivation because I need it!  So I will try and get some more posts in!

Today starts a new challenge over at the Sparkles Monthly Challenge and the theme is “No Stamping Allowed!This may seem a bit challenging, but I look forward to seeing what people come up with for it!  Be sure to check out the blog to see what the design team has come up with for inspiration!  Here’s what I’ve made for the challenge this month:

I was trying to channel something that would work and realized that I had these fun strip dies from Taylored Expressions and I wanted to play with some new colors, so I ran with that on the middle of my card front by alternating the strip colors.

I also die cut a frond three times and glued them together for thickness and sturdiness.  I attached it over the colored strip panel and then added a sentiment that was already toner printed so that I could foil over it with silver Deco Foil.  I also had a die that cut it out which was popped up with foam strips and added to the bottom of the die cut frond.  Lastly, I’ve just added some silver glitter drops randomly over the card front.

Hope you’ve enjoyed my non-stamped card today and will think about joining in the challenge with us this month!  Thanks so much for stopping in! Have a great week!

Challenges:

  1. Craft Rocket – Use Dies
  2. NBUS – #51 June – new colors and dies
  3. Creative Fingers – Anything Goes
  4. A Place to Start – Anything Goes and/or twist: flower + one other thing
  5. Penny’s Paper-Crafty – Anything Goes using paper
  6. The Crafty Addicts – Anything Goes
  7. CAS on Friday – Leaves


May AJ Page-Start a New Beginning

Hello friends!  I feel like the time keeps moving whether or not I do!  At the last minute before getting something done, I finally started this page! Once I got going, it was fun to just play around to see what happens!

It’s time for the monthly Art Journal Page collaboration with my crafty friend, Carol (from Crafty-Stamper)! We get creative trying to use up our never-ending stash piles along with a prompt for each month.  I know she will have some wonderful inspiration to share, so please check out her blog too! Here’s my AJ page with the “SMASH OUR STASH” May prompt of “FLOWERS”.

I noticed looking back on my AJ pages that I rarely use flowers on them unless it’s already apart of some papers that I’m using.  So this was a good challenge for me and it was fun to pull out these Tim Holtz “Flower Garden” stamps and dies from my collection to use for this one.

For the background:  I started with my 9″x6″ pre-punched holes of Canson 140# cold press watercolor and used a brick stencil and model paste.  I covered the entire page with some linen and umber paints mixed together.  I dabbed a bit of orange and spritzed it with water for a rust look.  I then went over that with a dry brush effect with some light ivory paint to bring out the texture of the brick pattern.

The flowers and stems were stamped over a watercolor Bristol that I previously made and splattered with chocolate paint.  I also covered the die cut flowers with shimmer spray. (Not sure if you can catch that in the photo.)  All of the stems were glued, and the flowers were glued with some being popped with foam tape.  I covered the bottom area over the stems with grit paste and then went over it with brown paint to give the appearance of dirt.

I took a Dylusions stamp and white heat embossed it over chocolate cardstock for the sentiment, hand cut it and popped up with foam tape at the top of the page.  I added a butterfly from a Tim Holtz ephemera pack.


Hope you’ve enjoyed my AJ page today!  Thanks for dropping in and checking it out!

Challenges:

  1. Art Journal Journey – Flowers
  2. Creative Artiste – Anything Goes Mixed Media
  3. Simon Says Stamp Monday – Watercolor (I watercolored the flowers/stems)
  4. Arty Divas – Anything Goes

Sparkles Monthly Challenge-Things with Wings

Hello friends!  I hope you’ve had a lovely Mother’s Day weekend and are enjoying the month of May so far!  I look forward to seeing those beautiful blooms and digging in the garden! 

Today starts a brand new challenge over at the Sparkles Monthly Challenge and the theme is “Things with Wings“!  This is a good one as there’s several ways to interpret it!  Be sure to check out the blog to see what the design team has come up with for inspiration!  Speaking of design team, Caz is looking to add to the team, so be sure to check out the details if you would be interested in joining.  Here’s what I’ve made for the challenge this month:

I thought the butterfly from this Taylored Expressions stamp set called Endless Joy would be so fun to color and use for this challenge.  They were stamped with Copic markers and cut out with the coordinating dies.

For the background, I’ve taken the rectangle masking stencil and blended some blue ink over the center and then I’ve added an additional stencil over top of it and blended bluer to get the pattern.  I then added some raw umber paint and opaque white Copic to splatter over top of it.  I cut out a stitched frame and added it over the blended area.

I added the flowers and butterfly to the card by gluing and popping out the smaller flower as well as the wings on the butterfly.  The sentiment was gold foiled and cut out with a coordinating die that was glued at the top.  I added some highlights on the butterfly with a white gel pen and added some Stickles glitter to the center of the flowers.  The white panel was attached to a top folding A2 white card base.

I hope that you have enjoyed my card today!  I hope that you will stop into the challenge and play along with us this month!  Looking forward to seeing the gallery of wings!!

Have an amazing day and see you again soon!

Challenges I’d like to enter this card for:

  1. Four Seasons – Spring Season
  2. Triple B (Birds, Blooms &/or Butterflies) – Spring 
  3. Love to Scrap – Anything Goes
  4. Unicorn – Flowers
  5. Crafty Animals – Anything Goes + animal
  6. Critter Crazy – Anything Goes + featured critter
  7. Fab ‘n’ Funky – Things with Wings
  8. The Crafty Addicts – Anything Goes

Creative Artiste Guest Designer with Altered Mixed Media Frame

Hello friends and welcome to May!  I’m happy to see this month come with all of the beautiful Spring things that pop out like the flowers and sun with the warmer temps!  I look forward to going out and working in the yard soon!  Hope that you’ve had a wonderful week and look forward to a great weekend!  I’m getting ready for a fun crafty retreat and I’m really looking forward to crafting with friends!

5 May 2023

I’m super excited to be a guest for this month’s challenge over at the Creative Artiste Mixed Media Challenge!  If you’ve been around, then you know how I enjoy creating a few mixed media projects once in a while besides my Art Journaling that I do each month.  The theme is always “Anything Goes” with Mixed Media, so this time, I decided to make some altered art with an old frame:

I thought this would be a perfect item to alter with a Spring theme in mind.  I know the frame “looks old”, but it was actually a really old wooden frame that was stained/varnished about 30 years ago!  I’ve sanded, painted, added some crackling paste, and painted over it some more to give it a Vintage “falling apart” look.  I like the texture and the crackling from the paste that came out in it. The total frame size is about 9″x13″ and it’s shown hanging on my wall.

The center of the frame was done using a piece of cardboard sized to fit inside the frame.  (I threw out the glass front as I didn’t have a need for it.)  I had some papers that I thought was so pretty along with the sentiment.  The sentiment was way too large for a card and I thought it would work great for this project.  Of course, the size of the paper wasn’t quite large enough, so I worked on collaging some musical papers around the edges for a border.  I also went over it with a floral stencil and paste, paint splatters and waterproof ink before inserting behind the frame.

Here’s a closer look at the top of the frame where you can see that I’ve added a butterfly ephemera that was painted with some clear glitter paint and attached next to the sentiment with glue and foam dots on the wings.

I have tons of flowers in my stash, so I’ve created an arrangement along the frame with a vine and different sized flowers that I’ve added with twirled vines.  I’ve used more paint and even some art stones around the flowers as well as various places over the background for texture and interest.  More paints and metallic wax was used over all of these places to keep the Vintage feel to the design.  I tried to keep them coordinated with the papers in the background.  (It’s weird how the colors vary so much when you take a photo compared to what it looks in person.  The top frame photo looks more blue, but it’s actually more this muted green color.)

And as you scroll down to the bottom of the frame, you see I have this 3D arrangement with the painted chicken wire against the back panel with the papers.  (the flowers were added on top of that.)  On the bottom left you see I’ve made a “nest” for my bird with Spanish moss and even added a couple of twigs from my backyard underneath it.  I’ve also added a pinch of green moss in there which is also what I’ve used over top of the white picket fence section to the bottom right.  It actually sticks out in front of the flowers.

You can also see where I’ve added some more art stones and paints.  I’ve finished the whole design with some Finnabair white gold metallic wax.  This is hard to capture unless you get really close, but it adds a wonderful detail that brings out lots of the texture in your finished piece.

I really enjoyed creating this altered frame while I was thinking about Spring coming to life outside!  It was also fun to be able to find something I’ve had for so many years and give it some new life!  I hope you’ve enjoyed it as well and I look forward to seeing what mixed media art you make this month for the challenge

Thanks for dropping in today!

Challenges:

  1. Crafting From the Heart – Anything Goes (NO CARDS) challenges are back after 4 years!
  2. Crafting Happiness – Flowers
  3. Pearly Sparkles – Anything BUT a card
  4. Simon Says Stamp Monday – Paint It!
  5. Love to Craft – Anything Goes