DDS and PND Collaboration Blog Hop is Here!

Hello friends!  Today is the “special day” of our really fun and festive Collaboration Blog Hop!  Hope you will be joining along with us for lots of inspiration and prizes!  Woohoo!

MY HOLIDAY HOP PROJECT:

I am on the Digi Doodle Studios Design team and here is my interpretation of combining each companies’ images together to come up with this fun snow scene for the Holidays:

Vicki-DDSandPND blog hop

For my card here I have taken the Digi Doodle Studios Penguin Wobbles Special Delivery digital stamp along with the Paper Nest Dolls Holiday Friends digital stamp and printed them out over a piece of Copic Blending Card.  I’ve colored them up and fussy cut them out for my scene here.

To create the scene, I’ve used some blue cardstock for the background and splattered some watered down gesso over it and then used a die cut to create the fun frame within it.  I layered it over a piece of gold cardstock so it shows through.  I also die cut some snowy hills with white glitter cardstock and some pine trees with green cardstock.

I arranged them over my blue cardstock panel  and created the scene.  I popped up the front layer of snow hill along with the penguin image with foam tape.  I covered this snow hill layer with some texture snow paste…it’s so glittery!!  I also added some more glittery details here and there on the images too.

I white heat embossed the sentiment and placed a peppermint candy embellishment next to it and attached the strip over the blue background.  I then mounted this entire scene layer over some fun and festive foiled striped papers and then onto another blue piece which was then mounted over a top folding white 5.5″ square card base.

Vicki-DDSandPND blog hop-close

Here’s a bit of a closer look at the images and how I’ve colored them up with Copic markers.  You can see that I’ve used my white gel pen for details on the bow in the present along with the shinny look on the candy cane and the cheeks of all the images.  I’ve added a few dots on the deer’s back tail too.

I’ve used a gold gel pen to color in the sleigh runner, the band around the gift sack, the “lettering and dots” on the penguin’s sign as well as the bells the little girl is holding.  I used a red gel pen to color in the little deer’s nose.  I’ve used a green gel pen to create “dots” on the penguin’s present and the deer’s bow.

I’ve also added some glitter to the heart candies and the girl’s outfit trim.

You can also see just how puffy and dimensional that snow is too! It’s really glittery and was so fun to add to the scene!  It looks like they’re gearing up to deliver some presents and the cute little Mr. Penguin Wobbles is all loaded and ready to go! LOL!

Vicki-DDSandPND blog hop-flat

I really hope that you’ve enjoyed my card today and have been inspired with it in some way to get you into the festive Holiday spirit!

Thanks so much for stopping in today my friends!

Challenges:

  1.  Stamping Sensations– Dec Anything Goes
  2. Love to Craft – LTCCB41 – Dec Anything Goes
  3. Lil Patch of Crafty Friends – Anything Goes
  4. Shopping Our Stash– Happy Holidays!
  5. Crafting By Designs – Dec Anything goes
  6. The Paper Funday – Dec Anything Goes with optional twist:  Christmas Holiday
  7. Winter Wonderland – Anything Christmas Goes

I’ve Been Published!

Hey friends!  This is just a quick post to share my excitement with you about having a card I made for Whimsy Stamps published in the December 2019 “Handpicked” article on p. 38 of the Making Cards & Papercraft Magazine!

Vicki-published in Making Cards magazine

I would’ve shared this a bit sooner, but I wanted to take a photo of the issue in hand with me here.   The stamp set that I’ve used for my card is from the brand new December release at Whimsy Stamps called “Winter Wonderland“.  It’s a clear stamp set with lots of really sweet snowman images in it!  It’s one of my faves from the new release too!

Vicki-WSmagazine-WinterWonderland

Here’s a photo of it that I took myself before sending it along to the magazine back in October.  🙂

I won’t go into great detail about it, but I’ve also paired this with the Whimsy Stamps Winter’s Magic Blue Digital Papers Collection as well as the Whimsy Stamps No-See All Seasons Tree die set (snowflakes only die) for my card design.

If you get the magazine, then you can see below in the article how it was put together.

Vicki-WSmagazine-WinterWonderland-close

Here’s a closer view of the image and you can see the bits of glitter over it.

Vicki-WSmagazine-WinterWonderland-flat

This was just a really fun card to make and quite simple to put together too!  I really enjoyed it and how fun to get published with it as well!

Thanks so much for stopping in and letting me share my excitement with you!

P.S.  I have a spot along the sidebar of my blog where there will be a photo of the magazine to click on my blog post link in case you’re interested about my card.

Cute Card Thursday – Anything Goes with Reindeer Farts

LOL!  Hey friends!  Did I grab your attention with my title today?!

Today starts a brand new challenge over at Cute Card Thursday and it’s an easy ‘ANYTHING GOES!’  Since it’s the first Thursday of the month, we are being sponsored by Whimsy Stamps!  Yay!  So please be sure to remember to add whatever creation you’re working on over in our gallery this week!

*News update:  This will be my last challenge as a design team member for Cute Card Thursday.  I have really loved being apart of the team and the wonderful ladies over there for over a year and a half. I wish them all well.  I’m sure I’ll be playing along in future challenges of course!*

Here’s the card I made with products from our sponsor:

Vicki-CCT611-WSReindeerFarts

BWHAA!! HA! HA!  Yep, I’m most positive it’s probably been that cold out over my way!  LOL!  It’s supposed to get down to the teens next week! Brr!

This hilarious digital image is called Reindeer Farts by Dustin Pike from Whimsy Stamps.  It comes with the sentiment which I wouldn’t want it without that!  LOL!  This image was released back in October, but with all of the Halloween going on, it sort of didn’t get a good “spotlight” on it, so I thought now would be a good time to pull it out and perhaps send it out to my brother for Christmas…which he’ll get a kick out of!  🙂

I started out with a white cardstock panel cut with a stitched rectangle die with the printed out sentiment at the top of it.  I pulled out the Whimsy Stamps Snow Flurry clear stamp set and white heat embossed some snowflakes in the background.  I ink blended some  Distress Oxide Inks over top of them in the colors:  Salty Ocean, Wilted Violet, Mermaid Lagoon and Blueprint Sketch.  I spritzed some water over it, dapped it with a paper towel and once completely dry, I stamped out some more snowflakes in a few of the Distress Oxide Inks over that to give it a little depth.  The ink marks left over the white snowflakes were easily wiped away because the heat embossing resists the inks.  I covered this entire panel with a Shimmer Spray.  (You can see it in the photo below!)

I layered this piece onto a purple cardstock base and then layered it over a blue piece of cardstock cut from a stitched A2 sized rectangle die which was then mounted over a top folding A2 sized white card base.

I’ve used some White Glitterstock and cut a “snow hill” for the deer with a stitched hillside border die and glued that to cover the entire bottom of the card.  I also took another strip of that Glitterstock and used my MS goo border punch to create the small border above the sentiment, which generates a more “cold feeling” to the card.

Vicki-CCT611-WSReindeerFarts-close

I’ve printed out the deer image with Copic Blending Card, colored it up with Copics and then fussy cut it out…including the “fart cloud” and popped it up over the snowy hill with some foam tape.

Before attaching it to the glittery snow hill, I took a couple of Copic markers to create a bit of shading for the deer standing on the snow.  I also took a white gel pen and added some dot markings on the back of the deer.

You can also see where I’ve added some glossy accents to his eyeballs and I even took some Star dust glitter and added it to the snowflake in the “fart cloud”.

Vicki-CCT611-WSReindeerFarts-flat

Well I hope you got a giggle from my card today! LOL!  This will be a fun one to send along!

Thanks so much for stopping in today and I’ll see you soon!

Challenges:

  1.  Creatalicious – #176 Anything Goes with optional Winter
  2. Sparkles Christmas– Winter Wonderland
  3. A Bit More Time to Craft – Anything Goes
  4. Crafts Galore Encore – Anything Goes
  5. Cute As a Button – Anything Goes with optional twist:  Let it Snow!
  6. Cardz 4 Guyz – Christmas Critters
  7. Creative Inspirations – Festive Fun

Tidings of Joy with Whimsy Stamps

Hello friends!  It’s December and that means Whimsy Stamps has fun things coming out!

I have this really sweet card just perfect for this time of the year….

Vicki-WSChristmasManger-Dec3

Today I’m sharing this really sweet image called “Christmas Manger” by Crissy Armstrong.  Isn’t this just as precious as can be!  You may remember a card I did last year IN THIS POST with a penguin style manger.  Really love Crissy’s sweet images and I’m thinking I may have to start collecting her mangers she comes out with each year now! LOL!

After coloring up this image, I’ve fussy cut it out while I worked on the background design.  I started by ripping a piece of masking paper and covered the bottom portion of a square 4″ piece of cardstock.  I took a “Light Ray” stencil and ink blended some Chipped Sapphire distress ink over it.  While the stencil was still on it, I took some white watered down paint and splattered over the background.  After removing the stencil, I let that dry while cleaning up my stencil and work area.  After it was dry, I took some Scattered Straw and Mustard Seed distress inks and blended over top.  I then took a glitter brush pen and went over each of the yellow strips in the background.  (I also covered the tops portions of the images too.  You can see this all better in the photos below.)  Lastly, I’ve used the other side of the masking paper that I ripped to cover up the sponged rays and ink blended with Rusty Hinge, Walnut Stain and Ground Espresso.  I used a marker to add some shading around the image and glued it down.

For the card, I’ve used a navy 5.25″ square card base and I’ve also used it as part of a layer behind the image panel along with a piece of gold mirror cardstock.  It’s hard to completely see this, but I’ve printed out some digital papers from the Whimsy Stamps Christmas Red, Gold and Green collection as well as the Whimsy Stamps Rustic Wood and Brick Collection.  The background was sponged with the same colors that I’ve used for the bottom of the image panel.  I’ve used some twine for the center strip area and tied a bow along the side with it.  The image panel layered with the Gold Mirror cardstock was popped up with some craft foam over that.

I’ve used a wooden star that I’ve heat embossed several times with some Gold Sparkle EP which is what I’ve used to heat emboss the sentiment at the bottom of the image panel from the Whimsy Stamps Holiday Mini Sentiments.  To finish it off I’ve decided to add some Studio Katia Sparkling Crystals.

Vicki-WSChristmasManger-Dec3-close

Here you can better see the sparkle and shimmer on the yellow “light rays” as well as the tops of the images where the light might be shining on them.  I’ve got the image colored up with my go-to Copic markers.

You can also see the sparkle and shine on the wooden star and sentiment from the gold sparkle embossing powder.  Plus of course the shine from the gold mirror cardstock.

Vicki-WSChristmasManger-Dec3-flat

I hope you’ve enjoyed my card today!  I sure had fun putting it together and I know someone special that this needs to get sent to as soon as I can!  Time is running out for it to make it on time!  Oh yes…that dreaded time running out is near isn’t it?! LOL

Thanks so much for stopping by today!  I appreciate you being here!  I will be seeing you again soon my friends!

Challenges I’d like to enter this card for:

  1.  Creative Knockouts – Winter/Holidays
  2. Daring Cardmakers – Anything Crafty with theme Shining Lights
  3. Crafty Friends– Anything Goes
  4. Merry Little Christmas – December Anything Christmas Goes
  5. Country Views– Stars
  6. Crafty Animals – #33 Anything Goes

Teddybear Tags for 2 Crafty Critter Crazies

Hello friends!  Welcome to December!  We have already arrived at the final month of the year!  Can you believe how quickly this year went by?!  The first of the month means it’s time for a new challenge to start over at 2 Crafty Critter Crazies!  Remember that it is an always “ANYTHING GOES + A CRITTER“.   I love adding critters to my crafty projects so it’s easy for me!  🙂

Since I’ve been on a tag making binge, I’ve got some more to share today:

Vicki-2CCC33-tags2

Isn’t this the cutest little bear?!  We’re sponsored this month by Beccy’s Place and I have opted to try out this cute freebie that she has offered on her blog called Stanley’s Bauble.

I thought he was too cute and I wanted to try coloring him up in a couple of different ways and even a couple of different sizes too!

I just took my Sunny Studios scallop circle tag dies and die cut a couple of them in my selected color choices of course to match up with his bauble and then I’ve die cut some coordinating circles and pattern papers to match.  He was fussy cut out and placed over top of the tag.  I’ve added some silk ribbon for both and added a twine bow around them.

Vicki-2CCC33-tags-red

Here’s  closer view of the Stanley’s Bauble red and black tag.

For this tag, he’s a bit larger than the other an he was popped up over the tag with some foam tape.  I’ve colored the bauble hanger with a gold gel pen and then went over the red bauble with a glitter brush pen.

Vicki-2CCC33-tags-blue

Here’s a closer view of the smaller tag.  The light has caught this one just right to where you can really see the glitter brush over the blue bauble.  I’ve also colored his bauble hanger with a silver gel pen.

The circle layer behind the snowflake paper was cut from some silver glitter paper.  I’ve taken a Simon Says Stamp sentiment strip and cut it out, sponged it with blue ink and glued it above the bear.  Since he was smaller than the other bear, I had room for a sentiment.   He was just attached with glue this time.

I hope you’ve enjoyed these teddy bear tags today!

Challenges:

  1.  Fab ‘n’ Funky – Anything Christmas Goes
  2. Penny’s Paper Crafty – Anything Goes
  3. Polkadoodles – Anything Goes
  4. QKR Stampede – #374 Anything Goes

Wintertime Penguin Tags

Hello friends!  I’m on a roll with the tags and back again to share some more fun tags that I’ve been working on!

Vicki-DDSWintertimePenguins-tags
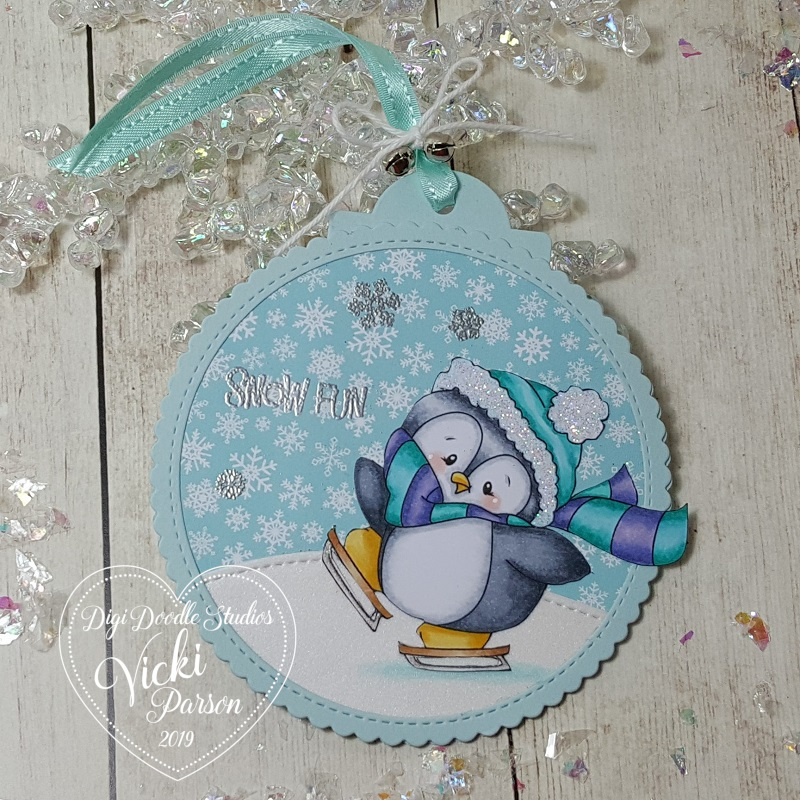
Check out these adorable penguins having some fun doing winter activities!  Penguins are probably one of the top animals that I love!  I have SO many penguin stamps in my stash and seem to keep on collecting more of them…so of course I was super excited to be able to add this Wintertime Penguins Pairables set from Digi Doodle Studios to my collection as well!  🙂

There is seriously so much fun you can have playing with this digital set and if you like penguins as much as I do, then stay tuned in as I will be sharing even more creations using this same set in December!  You will see what I mean by all the different things you can do!

For both of the tags, I’ve used several dies from my stash to create my own tags.  I took a stitched scallop circle die (MFT) and cut two of them out in the blue and pink colors along with a small tag cut with the same colors for the very top.

On one of the scallop circles, I used a circle die (Hero Arts) to cut out the center to create the “frame” for the front.  I then took some snowflake papers (MFT) and cut out another circle that was slightly larger than the opening to attach behind it.  I also took some pretty shimmer white paper and cut a “snow slope” for both penguins with a stitched border die (Lawn Fawn) and then cut it out with the same circle die as the snowflake papers.

I silver heat embossed the sentiments along with some snowflakes and then added my colored penguins over top.  Then when I flip it on the back side I can put my “To: and From:” on it.

Vicki-DDSWintertimePenguins-tag-pinkHere’s a closer view of the pink tag.  For the digital image, I used Word on my computer to add the penguin and place it over one of the “ski” images from the set and enlarged it to make it look like a snow board instead of a ski!  Then printed it out.

I’ve used my Copics to color her up and fussy cut her out.  I even added some shadow on the snow hill for her.  I took a glue pen and covered her hat trim with glitter.

Lastly, I found some more pink ribbon and tied some silver bells over it with some white twine in a bow.

Vicki-DDSWintertimePenguins-tag-blue

And for this little guy…he cracks me up….I made him using Word again, but this time I actually took the “sled” image and sized it down so that it would fit on the penguin’s feet to make it appear as if he is ice skating!  I did it for each foot.  LOL!

I’ve colored him up with the Copics again only using more blue tones instead of the pinks and did the similar traits to it like the other one.  I did use a clear metallic gel pen to color the “blades” of the ice skates.

Hope you’ve been enjoying my tags so far!  Thanks so much for dropping by.

Challenges:

  1.  Digi Choosday Crafting – Anything Goes
  2. The House That Stamps Built – Anything Goes N2719
  3. Simon Says Stamp Wednesday – Anything Goes
  4. Aud Sentiments – Christmas or Winter Sentiment
  5. Krafty Chicks aka 4 Crafty Chicks – #483 Monochrome

Believe Tag

Hello friends!  I hope you all had a wonderful Thanksgiving and maybe even took advantage of some great Black Friday deals today?!  I was happy about shopping a little bit this morning and almost forgot to post about my tag here! LOL!

Vicki-NNTag-Day3

The scene on this tag was always a fun vision in my head from a child!  I would imagine Santa in his sleigh flying over the moon under a snowy night sky.  I love the peace and magic of it all with even little critters stopping to watch and listen to the magical sleigh bells ringing in the night.

I constructed my own tag the size I wanted and snipped off the top edges to make it look like a tag.  It was made with Navy cardstock.  I punched a hole at the top and made a reinforcer with white Glitterstock.  I then took some white watered down paint and splattered it over the background for a snow fall effect.

I bought this set a few years back from Newton’s Nook called Whispering Pines and I’ve used the coordinating dies to create the scene at the bottom.  I took some white Glitterstock for the snow the critters are sitting on.

For the “moon” I punched out a circle from vanilla cardstock and sponged around the edges of it.  I took a glitter brush pen to go over it.  The Santa’s sleigh was given to me from a fellow blog friend that I’ve attached over the tag.  I die cut the sentiment from red cardstock.

Lastly, I’ve added some red striped ribbon from my stash and tied on a couple of silver bells with white twine around it.  Those bells make a fun jingle sound like I imagine from my scene! 🙂

Vicki-NNTag-Day3-closer

Here’s a tad bit closer view of the tag.  Here you can some what see the shimmer on the moon and the sparkle on the snow ground where the critters are.

Have a great evening my friends!  I’ll see you soon!

Challenges:

  1.  Crafty Creations – Anything Goes
  2. Little Red Wagon – Snow
  3. The Sisterhood of Crafters – Trees
  4. My Time to Craft– Christmas Scene

I’m Going to be Tagging You!

Hello friends!  This year I’ve been really inspired with all of the cool tags I’ve been seeing lately during this festive season and I wanted to join in on the fun too!  So you’re going to be seeing lots of tags from me scattered within my postings for the next several days!

The inspiration that I’ve been seeing comes from Tracey’s 25 Tags of Christmas Event and this is her 9th year of doing it!  Every day there has been some really cool and inspiring tags, so I had to join before the time runs out!  I did make a tag earlier…but a few more are to follow starting now:

Vicki-BMTags-Day 1 and 4

I’ve been wanting to pull out a few of my stash that I and haven’t had a chance to take the time to play with!  So I decided making tags would be a quick and fun way to play around a bit!  These were really fun to make!

Vicki-BMTags-Day1 only

The “Joy Coffee” tag was something that I had actually started during the “Coffee Lovers Blog Hop” this last time and never got around to posting it!  I was trying to combine the two events together as the inspiration for that tag came on Day 1 from Jen Schow’s tag for Altenew inspirational tags post.  I like how she cut out the wording on her globe and I thought I’d do the same idea with the word “joy” over my coffee cup.

I’ve used the Cozy Coffee stamp set and colored in the coffee and fussy cut it out.  I stamped the sentiment from the same stamp set, but only cut out the word “joy” from it and popped it up over the cup.  I also took the hearts from the stamp set and stamped them over the kraft background with kraft colored ink.

I’ve taken the Holiday Essentials stamp set and heat set the snowflakes in the background of the tag with white EP.  Also for the background, I took some metallic gold watercolor and splattered some over it as Jen did on her tag and I liked that subtle look to it.

I’ve taken some gold thread and made a nest under the cut out coffee cup that was popped up with some foam tape over the tag.  (The tag itself was an old die cut from my stash BTW!)  Added seam binding and twine at the top.

Vicki-BMTags-Day 4 only

For this tag, I was really inspired with Kim’s tag on Day 4 of the Uniko post.  LOVED the monochromatic red with all the sparkle!

I really love the glitter paper and I didn’t have a large enough tag die that I wanted to use, so I took a tag from my stash and traced around the backside of the Red Glitter paper and cut out my shape.  I had some rounded rectangle dies (Hero Arts) which I made a frame with the white glitter paper.

Within that frame I took the Holiday Essentials stamp set again and used several of the images to stamp over a piece of white cardstock with red ink.  (It was fun to create a stamped background panel for this!)  I heat embossed one of the sentiments from the stamp set over a red piece of cardstock with the White Sparkle EP…it sparkles really pretty IRL!  I die cut the sentiment out with a banner die and tucked it behind the white frame I made with the stamped images.

I finished the tag with some sparkling clear sequins with some White Blizzard Nuvo Glitter Drops in the center of each one and then I added some white organdy ribbon with a bow at the top.

Hope you’ve been inspired in some way as I’ve been inspired to create these!  Thanks for stopping in and I will have a new post to share again with you tomorrow so stay tuned!

Challenges:

  1.  25 Days of Christmas Tags – Day 1 and Day 4
  2. Always Fun Anything Goes
  3. The Holly & Ivy Christmas Challenge – Anything Christmas Goes
  4. Try it On Tuesday – Inspired by a Song or Christmas Carol (I was inspired by “Joy to the World” on the first tag and “We Wish You a Merry Christmas” on the second with music notes!)
  5. Through the Craft Room Door – Anything Goes

It’s Winter at Cute Card Thursday!

Hello friends!  Brr!  Can you feel it?  I sure can where I live!  Although winter is not quite here yet, it will be around very soon!  ‘Tis the Season to make wintry type creations and that is the theme this week over at the Cute Card Thursday Challenge Blog…so hop on over and join us!  We look forward to seeing your creations!

Here’s what I’ve created for the challenge:

Vicki-CCT609

This week we are being sponsored by Di’ Digi Stamps and I have actually used the digital stamp designed by this company that is available at Kit and Clowder.

This is my first try at creating a “northern lights” background and I thought it was was fairly simple to do.  I thought this sweet image was perfect for it!  I’ve used some dies from My Favorite Things for the glittery scallop frame as well as the sentiment and the iceberg dies in the background.

After coloring up the image, I fussy cut it out for the top layer of the design.  It was that simple because that glittery star was left in place while I created the background, so I’ve printed it out twice and placed the fussy cut image over top.  For the “water” I took a fine line marker and made my own markings around the piece of ice the critters are on.

I also sponged around the edges of the “water” die cut panel and also white heat embossed the sentiment in the corner and added some more ink over top of that to pop it out a bit more.

Vicki-CCT609-close

Here’s a closer view of the colored up image with Copics.  You can see where I’ve taken a glitter brush pen over the piece of ice they’re on.  On the star above them as well as the little critter’s hat trim, I used a glue pen and added some glitter over top.  I kept the colors more wintry than Christmas for this design.

For the “stars” or “snow fall”…however you want to look at, I’ve taken some watered down white paint and splattered it with a fan brush.

Sometimes when you have an idea in your head, you feel like it will come together fairly simply and quickly, but for some reason, this one kept me occupied for way too long!  I had to reprint several times and had a couple of attempts at trying to line up everything correctly too!  It just seems way faster in your head sometimes! LOL!

Vicki-CCT609-flat

This was also my first time using one of these images too!  They’re really adorable and I enjoyed coloring this one up for my aurora borealis sky!

Thanks so much for stopping in and I’ll see you soon!

Challenges:

  1.  Simon Says Stamp Wednesday – Starry, Starry Night
  2. Pammie’s Inky Pinkies – PIP1946 Anything Goes
  3. Through the Craft Room Door – Anything Goes

A Special Present from Santa for Digi Doodle Studios

Hello friends!  Happy weekend!  It has warmed up slightly for us this weekend and the sun is out…for now!  It’s supposed to get below freezing again soon though and I’ll have my warm slippers ready for it!

Today I have another fun card to share with you using a Pairables set from Digi Doodle Studios:

Vicki-DDSChristmasElves-Nov16

Surprise!  This cute little girl is popping out of the gift marked:  “From Santa” and she threw open the box lid and is tossing blue ribbon around everywhere!  She seems to be so happy about celebrating in the cold!  LOL!

All of the images I’ve used for this card came from the Christmas Elves Pairables set from Digi Doodle Studios. (There are so many elements to play with in this set!)  I have actually enlarged a couple of the images from the set and sized them the way I needed them to fit with my scene and make it appear as if she was popping out of a large box.  I printed out the girl a couple of times so that I could place her behind the box with the lid and then another image to cut her out without the lid of the box and make it more dimensional.

I’ve used several layers of cardstock and more decorative papers behind her with both stitched and scallop rectangle dies.  I used my Martha Stewart “goo” border punch to add the “snow” look at the top of the layers with white Glitterstock.

I’ve added some silver metallic ribbon behind the smaller layers and placed a snowflake rhinestone in the middle of the bow.  I die cut the sentiment with a stitched tag die and added some silver twine to tuck alongside the present.  I stamped some pink snowflakes over the tag and crinkled it up a bit for dimension and movement.

Vicki-DDSChristmasElves-Nov16-close

Here’s a closer look of the coloring I did on her with Copic markers.  I’ve used a white gel pen for her cheeks as well as to help create the texture on her coat.

I’ve used some Nuvo White Blizzard Glitter Drops for the sparkle on her hat trimmings and she was popped out from the background paper with foam tape.

Vicki-DDSChristmasElves-Nov16-flat

I hope my card gave you a smile today and were inspired in some way!

Thanks so much for popping in here today my friends!  So happy you’re here!  I’ll see you again soon!

Challenges:

  1.  Addicted to Stamps – Anything Goes
  2. Pammie’s Inky Pinkies – PIP1945 Anything Goes
  3. Through the Craft Room Door – Anything Goes
  4. Fab ‘N’ Funky – Add Some Sparkle
  5. Creative Knockouts – Anything Goes
  6. Jingle Belles – Baby, It’s Cold Outside!
  7. Send a Smile 4 Kids – Happy Holidays or Anything Goes for kids