Clearly Foiling

Hello friends!  I had so much “foiling fun” that I kept going with making more!  This time, I’m using those “clear sheets” from the Designer Toner Sheets:

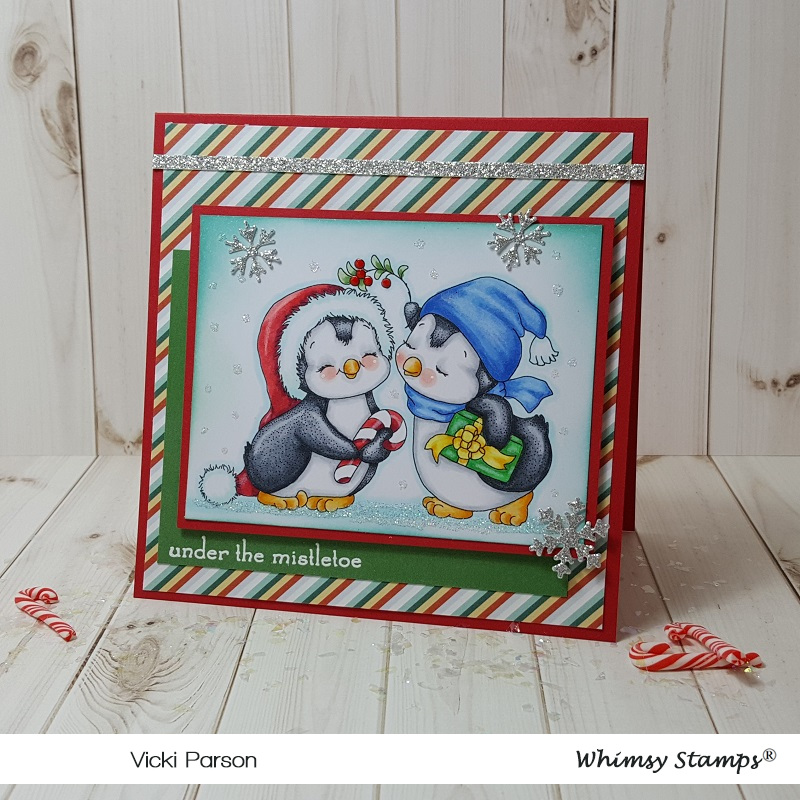
For my Christmas card here, I’ve used my laminator to foil over the “clear sheet” from the Peppermint Twist Designer Toner Sheets with the Red Static Foil Sheets.  This creates a “see-through” area for the shaker contents.

For the shaker part, I’ve taken a Self-Adhesive Shaker Pouch, attached it to a piece of white cardstock, very carefully trimmed off the edges, filled it with lots of sequins and confetti stars and then sealed it up to keep the contents inside moving freely.  I then placed the clear foiled piece over top of it by using some Stick-It sheets which helps to keep the adhesive from showing through.

I then took an A2 sized top folding white card base and used some score tape along the two edges and then rubbed some of the Gold Static Foil over it.  I then took the shaker panel and mounted it over top.

Vicki-FoiledShaker-Christmas-close

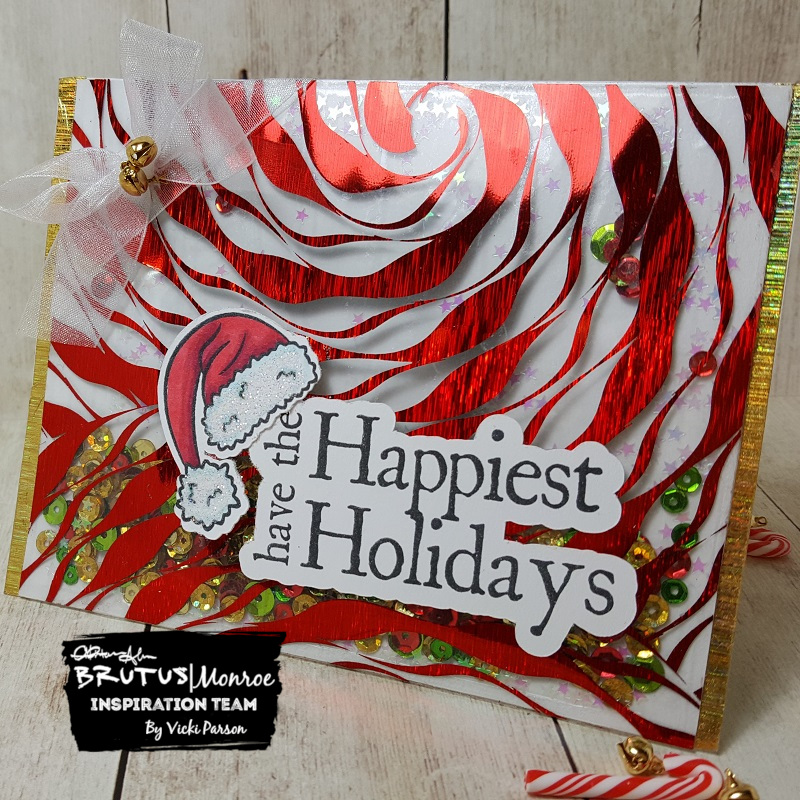
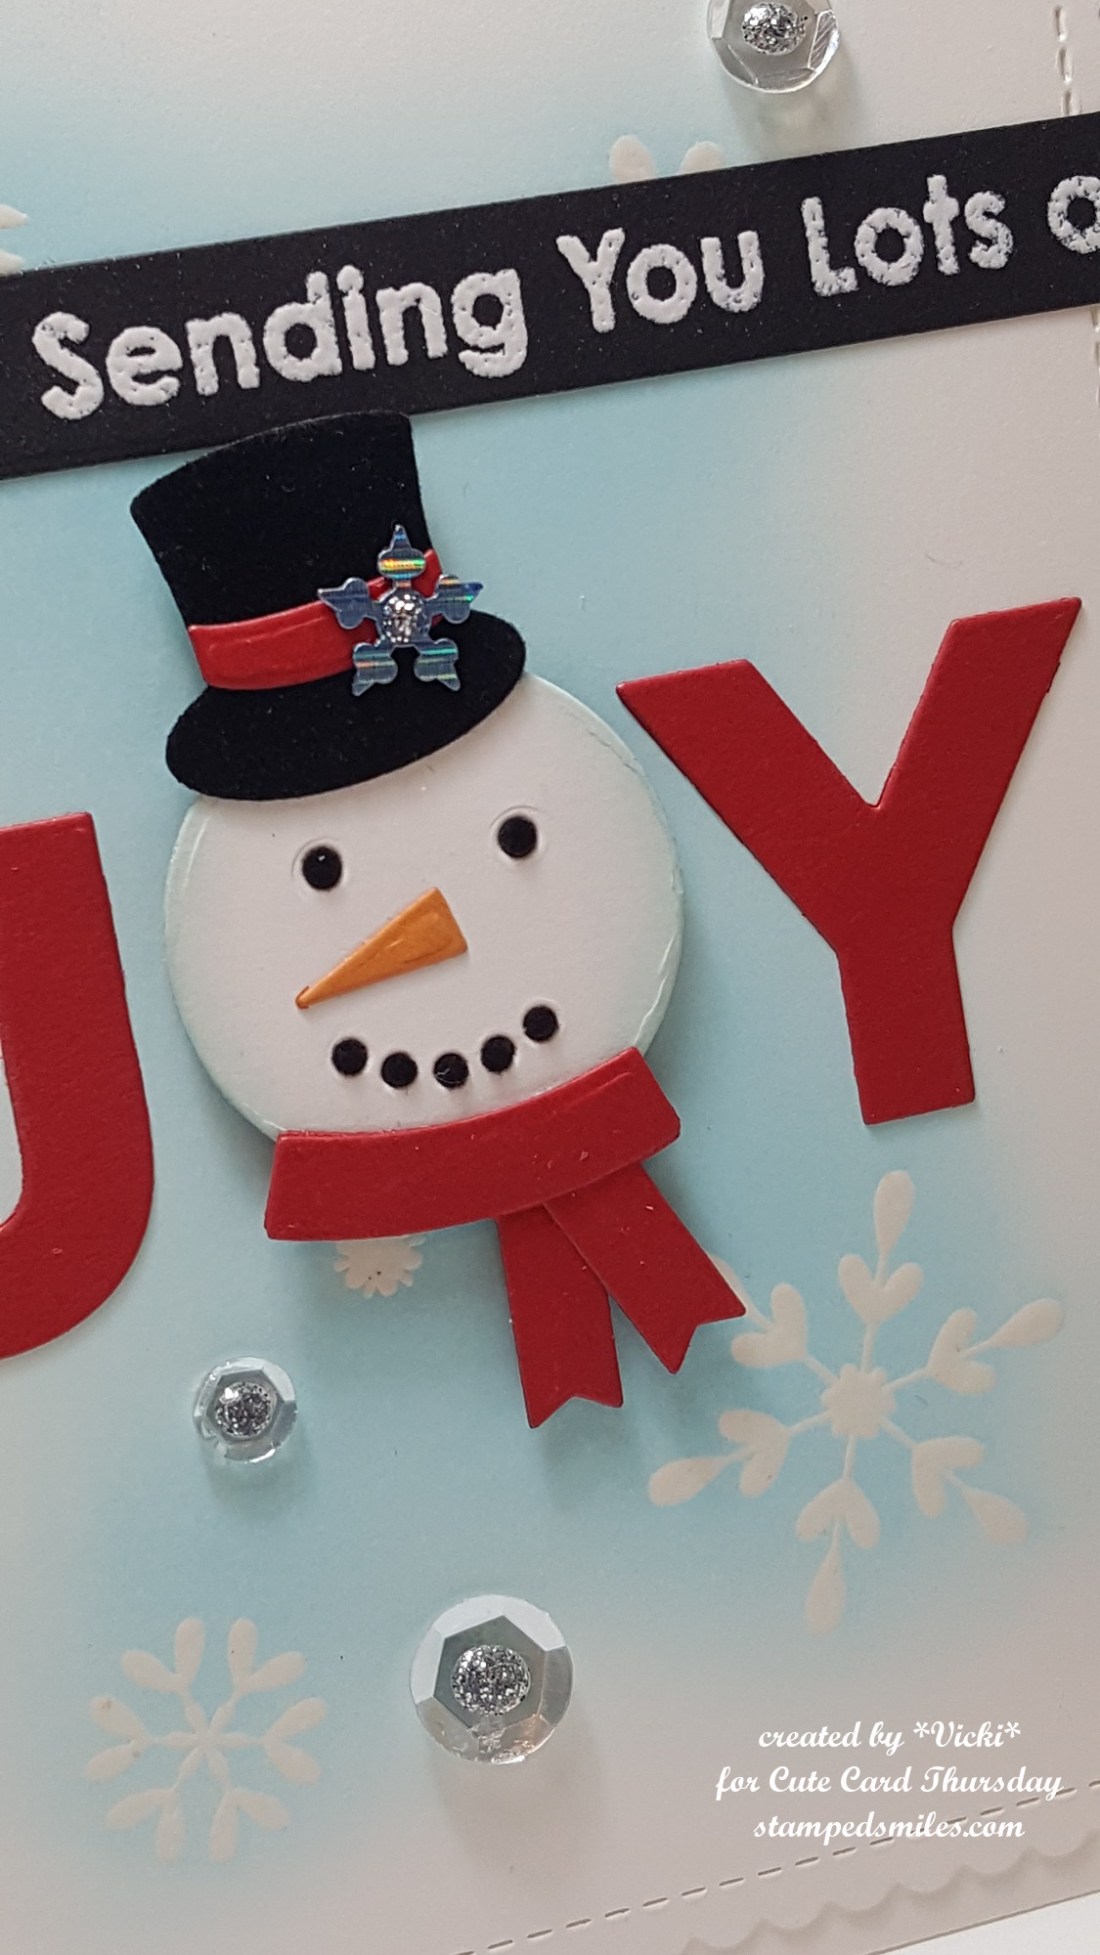
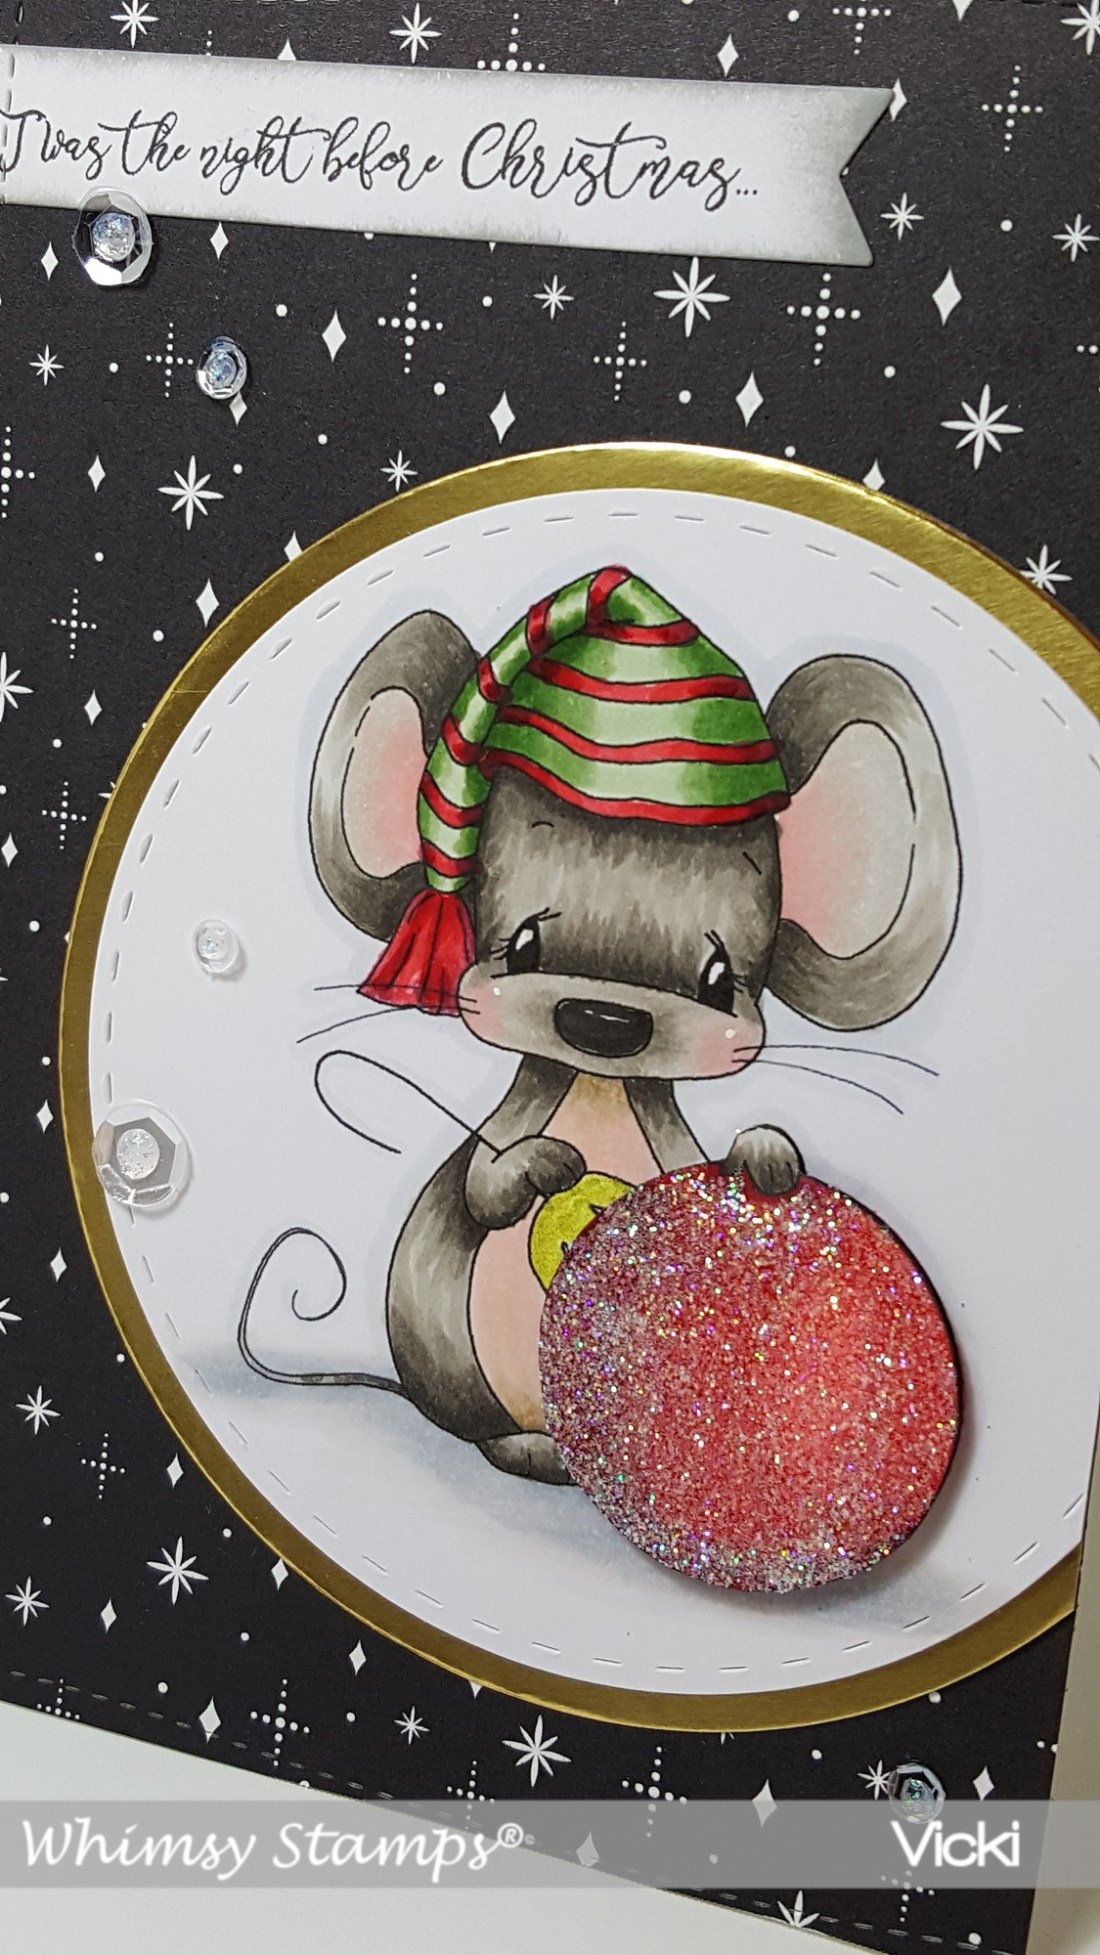
The greeting and the Santa hat were attached over top from the Yuletide Greetings stamp set that I’ve cut out using the Yuletide Greetings Cut File.  I’ve colored up the hat with Copic markers and then added some glitter over the fur trimming.  I’ve just used my Xyron machine to run adhesive on the back of these pieces to adhere them.

Vicki-FoiledShaker-Christmas-Flat

I’ve added a ribbon in the upper corner with a couple of gold bells tied to the center of the bow.


So I continued on with my “foiling fun” by also making Halloween too….

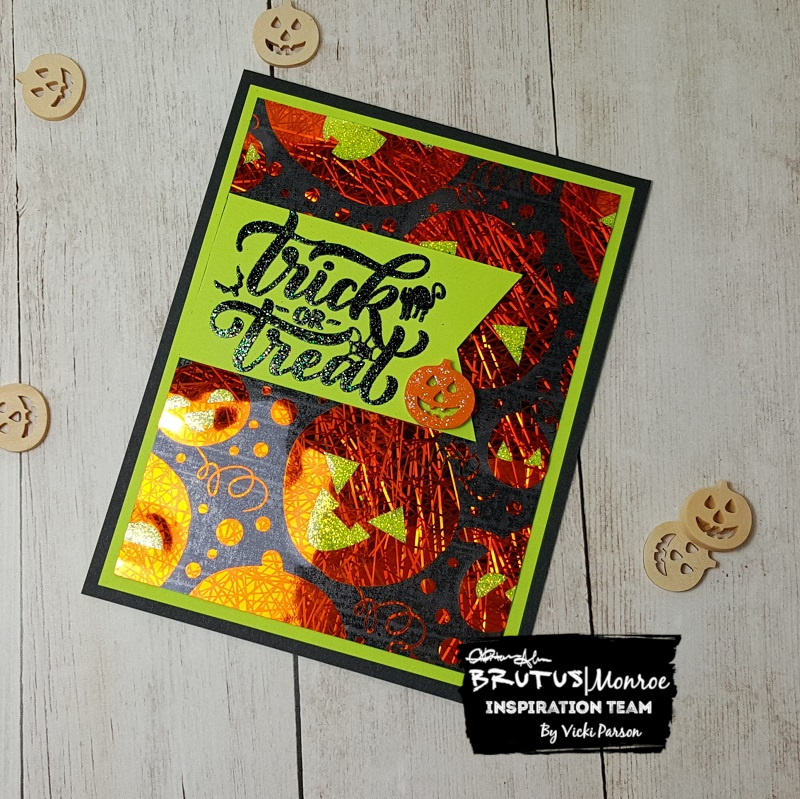
My second card uses one of the clear sheets as well from the Carved Designer Toner Sheets and I’ve used the Orange Sketch Foil sheet over that.  Since this is a clear sheet, I thought it would be fun to make the pumpkin faces stand out a little bit.  So I turned the sheet over and added some glitter behind each pumpkin face and let it dry.  (This might take some time to dry depending upon how thick you make it.)  Once dry, I took a Stick-It sheet again to attach it to a piece of black cardstock.

I mounted this over a piece of Green Neon Cardstock that I’ve also used for my sentiment banner.  I then added these layers over an A2 sized top folding card base.

Vicki-FoiledPumpkins-close

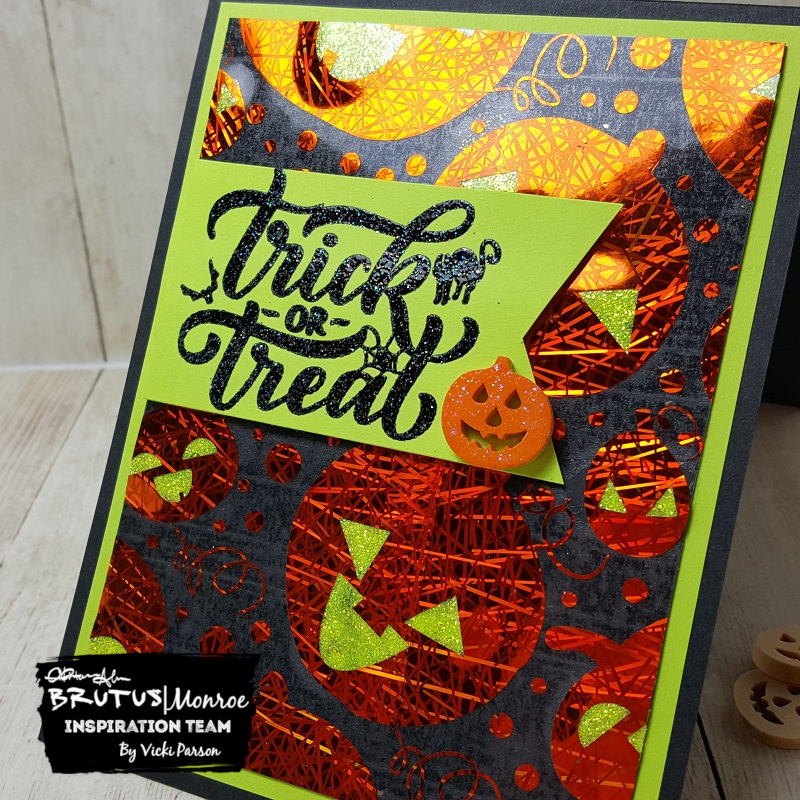
Here you can see the glitter showing through pumpkin faces and how they appear to somewhat “glow” with the darker panel behind them.

For the sentiment banner, I took the sentiment from the Trick or Treat stamp set and heat embossed it with the Raven Sparkle EP and cut it into a banner.  I added a small wooden pumpkin for the accent that I painted with orange paint and clear glitter paint over that.

Vicki-FoiledPumpkins-flat

Thanks so much for stopping in today!  I hope that you’ve enjoyed my creations and were inspired in some way!

Wishing you all a wonderful rest of your weekend and I’ll be seeing you again soon! 🙂

It’s Time for Foiling Fun!

Hello friends!  Happy Saturday!!  I hope you have a fun weekend planned!

I’d like to share with you a couple of creations that I’ve made using some new Deco foil products:

For this card, I used both the Red and Gold Static transfer sheets and foiled it with the Ornamental Toner Sheet.  I first foiled it in red (but that sheet wasn’t used for this.)  I took the negative of that red piece and placed it over a full Deco Foil Toner Sheet and then the black areas where the ornaments are, I took the gold transfer sheet and foiled the ornaments in that.  So it’s sort of a double foiling!

I added this foiled panel over a piece of white cardstock that I wrapped some gold ribbon around and then I heat set the sentiment from the Yuletide Greetings stamp set with Gilded embossing powder.  The sentiment was stamped with Embossing Ink from a Yuletide Greetings Cut File.  I also had fun making a Halloween card:

For this card, I pretty much did the same as the card above in where I took the “negative” from the foiled Webbed Toner Sheet using the Gold Transfer Sheet which made the webbing black.  I left it like that for the background of my card.

For the “ground” I took a piece of black cardstock and ripped some strips for the “dirt” and sponged the edges of it with a gold ink.  I took the images from the Trick or Treat stamp set and colored them up, fussy cut them out and arranged a scene at the bottom.  I took a Copic liner to write in my own grave markers. 🙂

I took the silhouette bat from the stamp set and heat embossed it over the foiled background with Raven Sparkle embossing powder.  I also used this for the sentiment banner that I made from some Speckled Egg card stock.  I also took some of the same cardstock and layered it behind the card front and then mounted this over an A2 sized top folding card base.

Hope you’ve enjoyed my fun foiled cards today!   Thanks for stopping in today and I’ll see you again soon!!

Challenges:

  1.  Always Fun – Create a Scene #127 (bottom Halloween card)
  2. Pammies Inky Pinkies – PIP1936 Anything Goes
  3. Simon Says Stamp Monday – Stamp It
  4. Sweet Stampers – Use a Sentiment
  5. Through the Craft Room Door – Anything Goes
  6. Crafty Creations – Anything Goes

It’s Anything Goes for Cute Card Thursday!

Hello friends!  Here we are with the first week of September already coming to the end!  Wow!  I think it may be time to start thinking about that “C” word! (Christmas of course!)

Today is a new challenge over at Cute Card Thursday today and we have our first of the month “Anything Goes” challenge this week!  We our sponsored again by the lovely Whimsy Stamps, so be sure to enter for a chance to win a fun prize!

Here’s what I’ve made with our sponsor’s product:

Vicki-CCT598-WSPenMistletoe-Sept5

I’ve used this really sweet digital image from Whimsy Stamps called “Penguins Under the Mistletoe” and of course Crissy’s penguins are so fun to color up!

I have followed a sketch for my design using a challenge (see below) and have pulled out some older papers in my stash that I thought looked really festive and went with the colors I have picked out.

I white heat embossed the sentiment from the Whimsy Stamps Holiday Mini Sentiments on the green colored layer and popped the image panel layered in red cardstock over top with some foam tape.

I’ve taken some silver glitter paper and die cut a few snowflakes from the Whimsy Stamps No-See All Season Tree die set along with cutting a strip for the top of the card too.

Vicki-CCT598-WSPenMistletoe-Sept5-close

Here’s a closer view of the image so you can see how I’ve colored it up.  I’ve used the following Copic colors below:

  • penguin bodies:  C8, C7, C5, C3, C1, R20, R00, Y38, Y35, Y32
  • Santa Hat and Candy Cane:  R39, R37, R35, R32, BG000
  • Mistletoe:  YG67, YG61 (berries are red Nuvo Drops)
  • Hat and Scarf:  BB26, B24, B21, BG000
  • Gift:  G09, G07, Y17, Y15, Y11
  • I used BG000 for snow ground shadows

I went around the edges of the image panel with Tumbled Glass Distress Ink and the ink foam blending tool.  I ten took my quicky glue pen and added some dots for the snow as well as underneath the penguins and sprinkled on some glitter.

Vicki-CCT598-WSPenMistletoe-Sept5-flat

Thanks for stopping in and I’ll see you again tomorrow for something fun!

Challenges I’d like to enter this for:

  1.  The Holly and Ivy Christmas Challenge – Anything Christmas Goes
  2. Sketch Saturday – Pick any sketch from 215-578 (I chose sketch #356)
  3. Merry Little Christmas – Anything Christmas Goes
  4. Love to Craft – September Anything Goes
  5. Pammies Inky Pinkies – PIP1935 Anything Goes
  6. ABC Christmas Challenge – ‘S’ & ‘T’ are for Sparkle and Texture

Be Merry for Paper Nest Dolls New Release!

Hello friends!  I hope you’ve had a wonderful weekend!  I was busy making “treats” for my husband to content him for the week!  LOL!  Speaking of treats, Paper Nest Dolls has a brand new mid-month release and it’s full of ADORABLE images!

As a matter of fact, I’ve made a card with one of them here and it’s my very first Christmas card of the year!

Vicki-PNDElfJackinBox-Aug

Isn’t she so sweet?!  This one is called “Elf with Jack-n- Box” and she is available from the store.

I thought this “elf” needed to be colored up in green and so I found some fun papers to compliment her along with a sparkly silver glitter strip of cardstock, and added some seam binding, twine with button and festive embellishments too!

Everything was mounted onto a 5×5 white top folding card base.

Vicki-PNDElfJackinBox-Aug-close

Here’s a closer look at how I’ve colored her in with my Copic markers.  I’ve used some gel pens to color in parts of the “Jack in the Box” as well.  I’ve cut her out with a stitched rectangle die and white heat embossed the sentiment over a strip of red cardstock and I cut out and attached along the side of the image panel and then I used some white ink to sponge around all the edges.  I’ve added some rhinestones on the sentiment strip and then I popped up the image panel with some craft foam before attaching it onto my card.

Vicki-PNDElfJackinBox-Aug-flat

I hope you’ve enjoyed my festive card today!

Thank you so much for stopping in today and I’ll see you soon!

Challenges:

  1. Merry Little Christmas Challenge – August Anything Christmas Goes
  2. Double D – Pearls, Gems or Rhinestones
  3. Creative Knockouts – Tic-Tac-Toe (I went diagonally from top left:  stamp, sentiment, ribbon/twine
  4. QKR Stampede – #360 Anything Goes
  5. Crafty Friends – Add embellishments

Crafty Retreat Results

Hello friends!  I finally found the time to make a post and gather all of my photos together so that I can share a post with you from last week’s “Crafty Retreat” that I went to at my friend’s house.

So the “theme” for the crafty retreat was called “Hats off to Painting!”  The majority of the group likes to tole paint, but we all (including myself) like to try our hands at many other crafting avenues to try different products that we may not be familiar with…so there are some “mixed” projects today I’m sharing!  I had such fun during the entire 3 days!

7558

Here we are with our decorated hats on for a group photo!  Even little ‘Gizmo’ had his hat on, but not sure he was feeling the fun like the rest of us! LOL! (Unfortunately the host was taking the photo!)  We all had our Dick Blick aprons and shirts on which was very kindly donated for our “Painting Divas” group…they were VERY generous with the bag of goodies they gave us!  We had all 3 days worth of fun, classes and prizes!

20190501_141117

So, the reason for all of the fun crafty hats is that we were to take a hat and decorate it for a challenge.  Here is a photo of all of our hats.  There were some really fun and creative ideas as you can see!  One of the girls was quite tired from all of the crafting and decided to take a little siesta during the festivities!  LOL!  It was very cool that I was the winner voted for my created hat design.  (You can see on the table above and here’s a closer look below):

Vicki-Sreampunk Hat

I guess it’s a bit hard to see in the photo above of me wearing it, but I had hubby bring home one of his hard hats from work along with a pair of goggles and then I went to decorating it in “steampunk” style!  I had fun with it and enjoyed the process!

Vicki-Configuration Spell BookVicki-Configuration Spell Book open

Here is the altered “Potions and Spells” book that I taught for the class!  Last year at the “Crafty Retreat” they saw my “altered book” that I had previously made during my time as a Splitcoaststampers.com “Dirty Dozen” DT member and asked if I could teach how to make one for this year’s class.  So instead of the “altered book” idea, I had them all use a Tim Holtz Configuration Book.

20190501_132745

Here are some of the book covers all lined up that we were waiting on to dry before we were able to start painting them.  A couple of the book covers were left at the work table, but while those were drying, we worked on the inside of the book.

20190501_175745

Here’s another photo of me standing there holding one of the books and everyone was finished with their books looking at them at the end of class.  They seemed to really enjoy this messy project!  I just loved teaching these fun ladies too!

Vicki-Santa Gourd Ornament Class

This is from my mom’s class where she taught us this cute Santa ornament that we painted on a gourd.

Vicki-PenguinChill Class

The host lady is the one that taught this cute penguin class!  I adore penguins and I’m so happy that I took the time to finish this up when I got home!

I really hope that you’ve enjoyed all of these projects as much as I enjoyed creating them!  I also had another set of calendars that I finished, but I’ll share on another post on another day as this one is pretty full!!  LOL!

7590

One more thing to share is that we have a robin’s nest with one little blue egg inside.  We have a a Prairie Fire Crab Apple tree in our backyard full of pretty blooms and I guess the robin thought it was a nice place to make a nest…so we’ll wait and see if there is a baby bird coming soon!

HAPPY MOTHER’S DAY to all of you moms out there!  Hope you have a wonderful weekend!!  Thanks so much for stopping by and I’ll see you soon!!

Find Peace with a Winter Deer

Hello friends!  As I had mentioned in yesterday’s post, we are currently being hit with snow AND ice over my way…so I might as well embrace it, right?!   Although I’ve been trying to sneak in some Spring creations, I also enjoy creating Christmas/Winter cards throughout the year so that I can take my time and not be hurried during the rush of the Season at the end of the year which makes it more enjoyable…and peaceful! 🙂

I’m using a stamp set called Winter Deer which I’ve used on my card for today:

Vicki-SnSWinterDeer-Feb

I started out with a piece of watercolor paper and used the Blue Blitz and Atlantis Burst Nuvo Shimmer Powders to create the background by spritzing it with water until I achieved the look I wanted and set aside to dry.

I cut this panel out with an oval die and using my cut-out deer for reference to see where I wanted to position the sentiment, I embossed the sentiment from the stamp set with White EP.  I used some Magic Speckle EP for a really cool background effect over the watercolor panel! (You can see it better in the photos below.)  I’ve used both Dimensional Glue as well as foam dots to attach the deer image and oval layers together.  I’ve used both white cardstock as well as some gold mirror cardstock for the layered panels.

Vicki-SnSWinterDeer-Feb-Close

Here’s a closer look at the Copic coloring I’ve done on the deer as well as the Magic Speckle EP effect on the background!  Since it’s a thicker type of powder, I didn’t attach it with anything.  I just added “piles” of it where I wanted and melted it from underneath, so it didn’t blow all over.  Loving how it has that “icy look” to it!

For the deer, I’ve used my Tim Holtz 5″ Mini Scissors to VERY carefully cut this image out and then used a black marker to go along the edges to hide my imperfections. For the snow over the branches, I’ve used a Nuvo Precision Glue Pen to go over it and then sprinkle some Sparkling Snow Glitter over it.  I also took the Nuvo Red Berry Crystal Drops and covered the “berries” with it.  I set this aside until dry to work on the rest of my card.

Vicki-SnSWinterDeer-Feb-Flat

So for the glittery background panel behind the oval layers, I took a piece of white cardstock and attached it with a piece of the Adhesive Sheets and die cut it out with a scallop rectangle die.  I removed the release paper from it and burnished some of the same Sparkling Snow Glitter into this panel.  I attached it over another piece of gold mirror cardstock and then wrapped some organdy ribbon around it and attached a bow along the side.

In the center of the bow, I added a snowflake sequin and then put a dot of the Dimensional Glue in the center of it and then added some more of the Sparkling Snow Glitter.

These layers were attached to an A2 sized top folding white card base and then the oval layers were attached over the glitter panel next to the bow.

I hope you’ve enjoyed my card today and got inspired to keep ahead of making your Christmas cards this year!  Thank you so much for dropping in!  I really appreciate your kindness and support so much!!  (Reading your comments always brightens my day more than you know! HUGS)

Challenges I’d like to enter this card for:

  1.  Winter Wonderland – Anything Christmas Goes
  2. Merry Little Christmas – (MLCCB7) Anything Christmas Goes
  3. The Holly and Ivy Christmas Challenge – Anything Christmas
  4. 4 Crafty Chicks – Lots of Layers
  5. Happy Little Stampers – Anything Goes with Dies
  6. Allsorts – Winter Sparkle

Anything Goes for Cute Card Thursday!

Hello there friends!  Have you been busy with your Christmas festivities?  I am doing a “run-run Rudolph” right now and trying to finish up my Christmas cards let alone some baking, preparing for a Christmas dinner and finish wrapping up presents!!   It is the fun of the Holiday Season and I enjoy spending time with my family, so I look forward to seeing them all!

It’s a new challenge today over at Cute Card Thursday!  Since it’s that time of year and busy, we made this any easy “ANYTHING GOES” challenge for you!!  We are looking forward to seeing what you’re making!

Since I am trying to finish up some Christmas cards, I thought I’d try and work on some doing “mass production” of a design.  I only do so many of these before I have to switch things up, but I thought these turned out pretty cute:

Vicki-CCT561-Snowman Joy-mass produce

I have used the My Favorite Things “Filled with Joy” card kit (sold out) to make these plus I have pulled out the MFT “Simply Snowflakes” stamp set (retired) to clear heat emboss the background and then rubbed some Tumbled Glass Distress Oxide ink over it.  The panel was cut out with the MFT Die-namics Blueprints 27 and the heat embossed sentiment strip was cut out with the MFT Die-namics Essential Fishtail Sentiment Strips.

Vicki-CCT561-Snowman Joy

Here you can see how I’ve pieced together the snowman.  The die in the card kit cuts out everything including the letters.  I’ve cut his top hat with some black felt paper that was also included in the kit and then I decided to cut out the snowman head so that I could cut out those tiny eyes and mouth with the felt paper as well!  So, if you happen to get this card from me, please be sure to rub your finger over the felt pieces in his hat and face!!  I very carefully and lovingly placed each tiny felt dot in!! 🙂  I think that the blue snowflake background really makes him stand out even more!

Vicki-CCT561-Snowman Joy-close

On an even closer look at the card, you can see that I’ve added a sequins snowflake to each snowman’s hat and then added some sequins to the card background.  I filled each one of these with some silver Stickles.  The snowman head was popped up with a foam circle and the rest is just glued down.

Thanks for dropping by and I’ll be back again soon!

Challenges I’d like to enter:

  1.  Daring Cardmakers – Snowflakes Falling
  2. A Bit More Time to Craft – Anything Goes
  3. Always Fun – Snowman
  4. The Creative Crafters – Anything Goes
  5. Double D – Let it Snow!

Anything Goes for Cute Card Thursday

Well can you believe the first week in December is almost already done?!  Yikes!  Christmas is coming very quickly, so I’m happy to be making up some more Christmas cards as I post along here! 🙂

Today starts another new challenge over at Cute Card Thursday and this week it is an easy “Anything Goes“!  So play, create and have fun to your heart’s content and share it with us in the gallery over there!  We look forward to seeing what you’re working on!

Vicki-WS-Christmas Unicorn-CCT559-Dec6

Now I don’t know about you, but I think a unicorn for Christmas would be a “yes please”!  I have used the new December image by Crissy Armstrong called A Christmas Unicorn.  I thought there was lots of opportunity to really bling up this fun image!

First, I have colored up this image with the following Copic markers:

  1.  Unicorn mane/tail/hooves: W9, W7, W5, W3, W1, W0
  2. Unicorn body:  C3, C1, C0, R00 (nostril/ear)
  3. Unicorn horn:  YR24, Y23, Y21
  4. Candy Cane/Ornaments:  R39, R37, R35, C1 (white areas)
  5. Tree:  YG67, YG63, YG61
  6. Star/Bell:  YR24, Y17, Y15, Y13
  7. Ground/Around entire image:  B00, B000

Then I thought one of the sentiments from the Whimsy Stamps Penguins Christmas Sentiments 1 digital set fit perfect with this image.  I fussy cut it out by hand as to capture the curve in the design and then I used a sponge dauber to apply a bit of ink around the edges of it and glued it right underneath the image.  (I think it makes it look sort of like a little ‘snow drift’ in front of the unicorn.)

For the card front base, I’ve picked out some papers to use from the Whimsy Stamps Christmas Red, Gold & Green digital collection and then added a silver glitter strip as well as a red cardstock strip that I ran through an embossing folder and then rubbed some white ink over the raised areas.  I glued these pieces to the green paper and then cut it out with a stitched rectangle die.  I mounted this piece over a piece of red cardstock that I attached to an A2 sized top folding white card base.

Vicki-WS-Christmas Unicorn-CCT559-close

Now for the details of my image, I’ve used a Spectrum Noir clear glitter brush pen to go over the unicorn horn and bell around his chest.  I then covered the candy cane with some glossy accents.

For the garland around the tree, I took a Nuvo Precision Glue Pen and sprinkled on some Sassy Silver Glitter.  For the star, I used Diamond Dust Glitter, and then, for on top of the sentiment as well as along the edges of the image panel, I ran some Nuvo Liquid Glue over it and then sprinkled on some Waterscape Glitter.  (You can see the difference in the glitters next to each other.  The Waterscape is finer than the one I used on the star.)

Vicki-WS-Christmas Unicorn-CCT559-1

I’ve then mounted the image panel onto a piece of red cardstock and attached it to the front of the card front.  I took some silver sparkle cardstock and die cut three snowflakes and attached them to the left side of the image panel and added a red star rhinestone to the center of each one.

Really had fun with the festive colors and details on this one!  Hope you’ve enjoyed my card today!

Here are some challenges I’d like to enter my card for:

  1.  Tuesday Morning Sketches – TMS482 (I flipped the sketch around)
  2. Fussy and Fancy Friday – Winter/Christmas
  3. Inkspirational – Anything Christmas
  4. Crafty Animals – Anything Goes + animal
  5. Crafty Friends – Christmas
  6. Crafty Calendar – It’s Christmas Time

Whimsy Stamps New Release Snowman Couple

Hello friends!  I’m thinking after the several inches of snow we received last week; this is a really “time appropriate” creation to share with you!! LOL!  The first of the month is always a brand-new release for Whimsy Stamps.

Vicki-WS-SnowmanCouple-Dec3

For my card today, I’m using this darling new image called Snow Couple for my design!  Super quick and easy image to color up, so adding more details to it is always something fun! 🙂  I’ve taken the Whimsy Stamps Notched Rectangle dies to cut it out with.  I’ve also cut out a separate navy cardstock layer to mount behind it.

For my card front base, I’ve used the Whimsy Stamps Christmas Azure digital papers and cut it out with the Whimsy Stamps Hand Stitched Nested Rectangles die for the background and then mounted this over a navy A2 sized top folding card base.  Then I’ve also cut a strip of the musical papers from the Whimsy Stamps Christmas Traditions digital paper collection and then ripped each side of it.  I took some distress ink and sponged around the edges of it and mounted it over the card front base along with some white ribbon.

I took the image panel and navy layer and added some craft foam to the back of it and attached it to the front of my card base layer.  I took some more of the white ribbon and made a bow to attach to the side of the image panel.  I’ve also taken a sentiment from the Whimsy Stamps Penguin Christmas Sentiments 1 digital set and cut it out with a banner die that I then placed over the Hand Stitched Nested Rectangle die to make the stitch lines in it.  I then took some foam tape and attached it on the bottom corner.  For the sentiment, I’ve taken a Copic marker to go around the “cold” word and added some glitter for the snow details on it.

Lastly, I’ve taken an old Whimsy Stamps Snowflake die and cut out a piece from white card stock to attach at the top as an accent.  I put a rhinestone in the center of it.

Vicki-WS-SnowmanCouple-Dec3-close

For coloring up this image, I’ve used the following Copic markers:

  1.  Snowman top hat/coal buttons:  C8, C5, C3
  2. Snowmen bodies/arms:  BG000, R00 (cheeks), E33, E31 (arms), YR24, YR15 (noses)
  3. Snowman top hat trim/scarf:  B39, B37, B34
  4. Snowwoman hat/scarf:  V17, V15, V12, C1, C0
  5. Background Sky/Ground:  B01, B00, B000

After coloring this image, I’ve taken a snowflake stencil and then added some Nuvo Glimmer Paste Moonstone over top of it with a palette knife which created these cool glittery snowflakes over top of the image.  You can still see through to the image which is exactly what I was looking for.

I then took some glitter and added it to the ground, the snow around the snow couple as well as the letters on the word “cold” within the sentiment with both a Nuvo Medium Tip Glue Pen (for the ground), as well as a Nuvo Precision Glue Pen for the snow on the lettering.

Hope you’ve got inspired with my creation with the new Whimsy Stamps digital release this month!  Be sure to come back for more inspiration later on in the week!  Thanks for stopping by!

Here are some challenges that I’d like to enter my card for:

  1.  Try it On Tuesday – Winter Wonderland
  2. Crafty Catz – Anything Goes with optional twist:  Too cute
  3. A Perfect Time to Craft – Anything Goes
  4. Sisterhood of Snarky Stampers (SOSS124) – ‘W’ is for Winter
  5. That’s Crafty! – Winter Wonderland
  6. Stamps & Fun = Creativity – White/Blue

Whimsy Stamps Christmas Mouse!

Hello friends!  I’m back to share with you a very special treat from Whimsy Stamps!

I have used this special image to share some inspiration with you as I am a Whimsy Stamps fan myself! 🙂

Vicki-WS-MouseFreebie-Dec1

Isn’t this darling?!  Crissy Armstrong has created this adorable “Christmas Mouse” digital stamp as a special treat in appreciation for loyal fans of Whimsy Stamps!  How cool is that?!

I have colored up this cutie with Copic markers in the following colors:

  1.  mouse body:  W9, W7, W5, W3 Ear/tummy/cheeks:  R20, R00, W3, W1, W0
  2. hat:  R59, R29, R27, R24 (same as ornament), YG67, YG63, YG61
  3. Shading/Ground:  C3, C1, E0000

I have also printed out this image an additional time to color up the ornament, fussy cut it out and then covered it with some Diamond Dust Glitter using the Nuvo Medium Glue Pen to adhere it.  I then popped it up over the original image with some foam tape for dimension.

I cut the image out with a stitched circle die and added a gold cardstock circle layer behind it.  I found some cool papers to represent the “night sky” that I was looking for.  (I think these are Stampin’ Up! papers.)  I’ve cut a piece out using the Whimsy Stamps Hand Stitched Nested Rectangles die and then I attached this piece to a white A2 sized top folding card base and off set it along the right side of my card.  I then cut a thin strip of that gold cardstock to place alongside of the papers.

The circle was attached to the card with part of it sticking off the right which I cut off to align with the card.  I thought this sentiment from the Whimsy Stamps Penguin Christmas Sentiments 1 digital set fit perfectly with this image.  I cut it out to form the banner, sponged some light grey ink over the edges and attached it to the top of the card.  Lastly, I’ve added some sequins with some Nuvo White Blizzard Glitter Drops in the center of each one.

Here’s a closer look at the design:

Vicki-WS-MouseFreebie-Dec1-close

Here you can see the glittery details of the ornament…. love these types of ornaments on my Christmas tree!!  I’ve also colored the ornament cap with a gold gel pen and added some ‘dots’ with a white gel pen for his cheeks.  Looking at this, I’m thinking some glossy accents for his nose would be cute too but didn’t do that for this one!

Thanks for dropping in!  I’ll see you soon!

Challenges I’d like to enter this card for:

  1.  Watercooler Wednesday -“All About Holidays” WWC198
  2. Simon Says Stamp Wednesday – Anything Goes
  3. 4 Crafty Chicks – “Crazy Egg” Anything Goes
  4. Jingle Belles – Christmas Cards