Snowflakes at Cute Card Thursday

Hello friends!  It’s time already for a new challenge over at Cute Card Thursday and as I can feel it growing even cooler by the day outside, I find that this challenge is very fitting and a great way to keep going on my Christmas pile!  We would like to see some “Snowflakes” on your creations this week!  We look forward to seeing what you come up with!

Our sponsor for this challenge is All Dressed Up Stamps.  They’re kind enough to provide an image to use for this challenge, so here’s what I’ve come up with:

Vicki-CCT555-ADU-Snowflakes

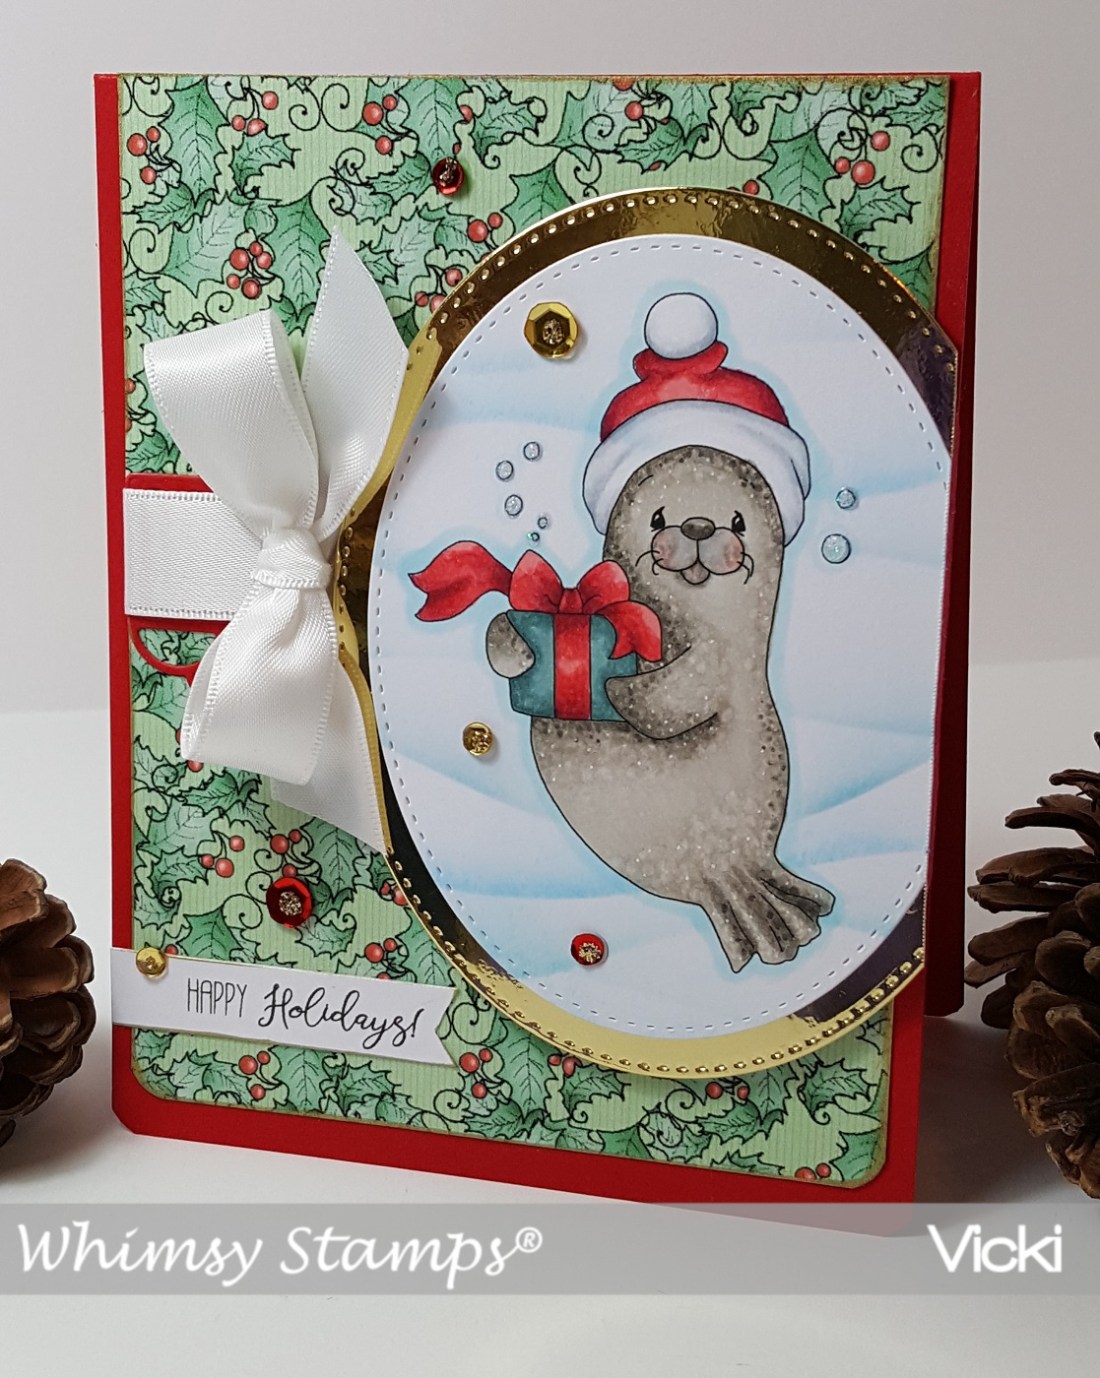
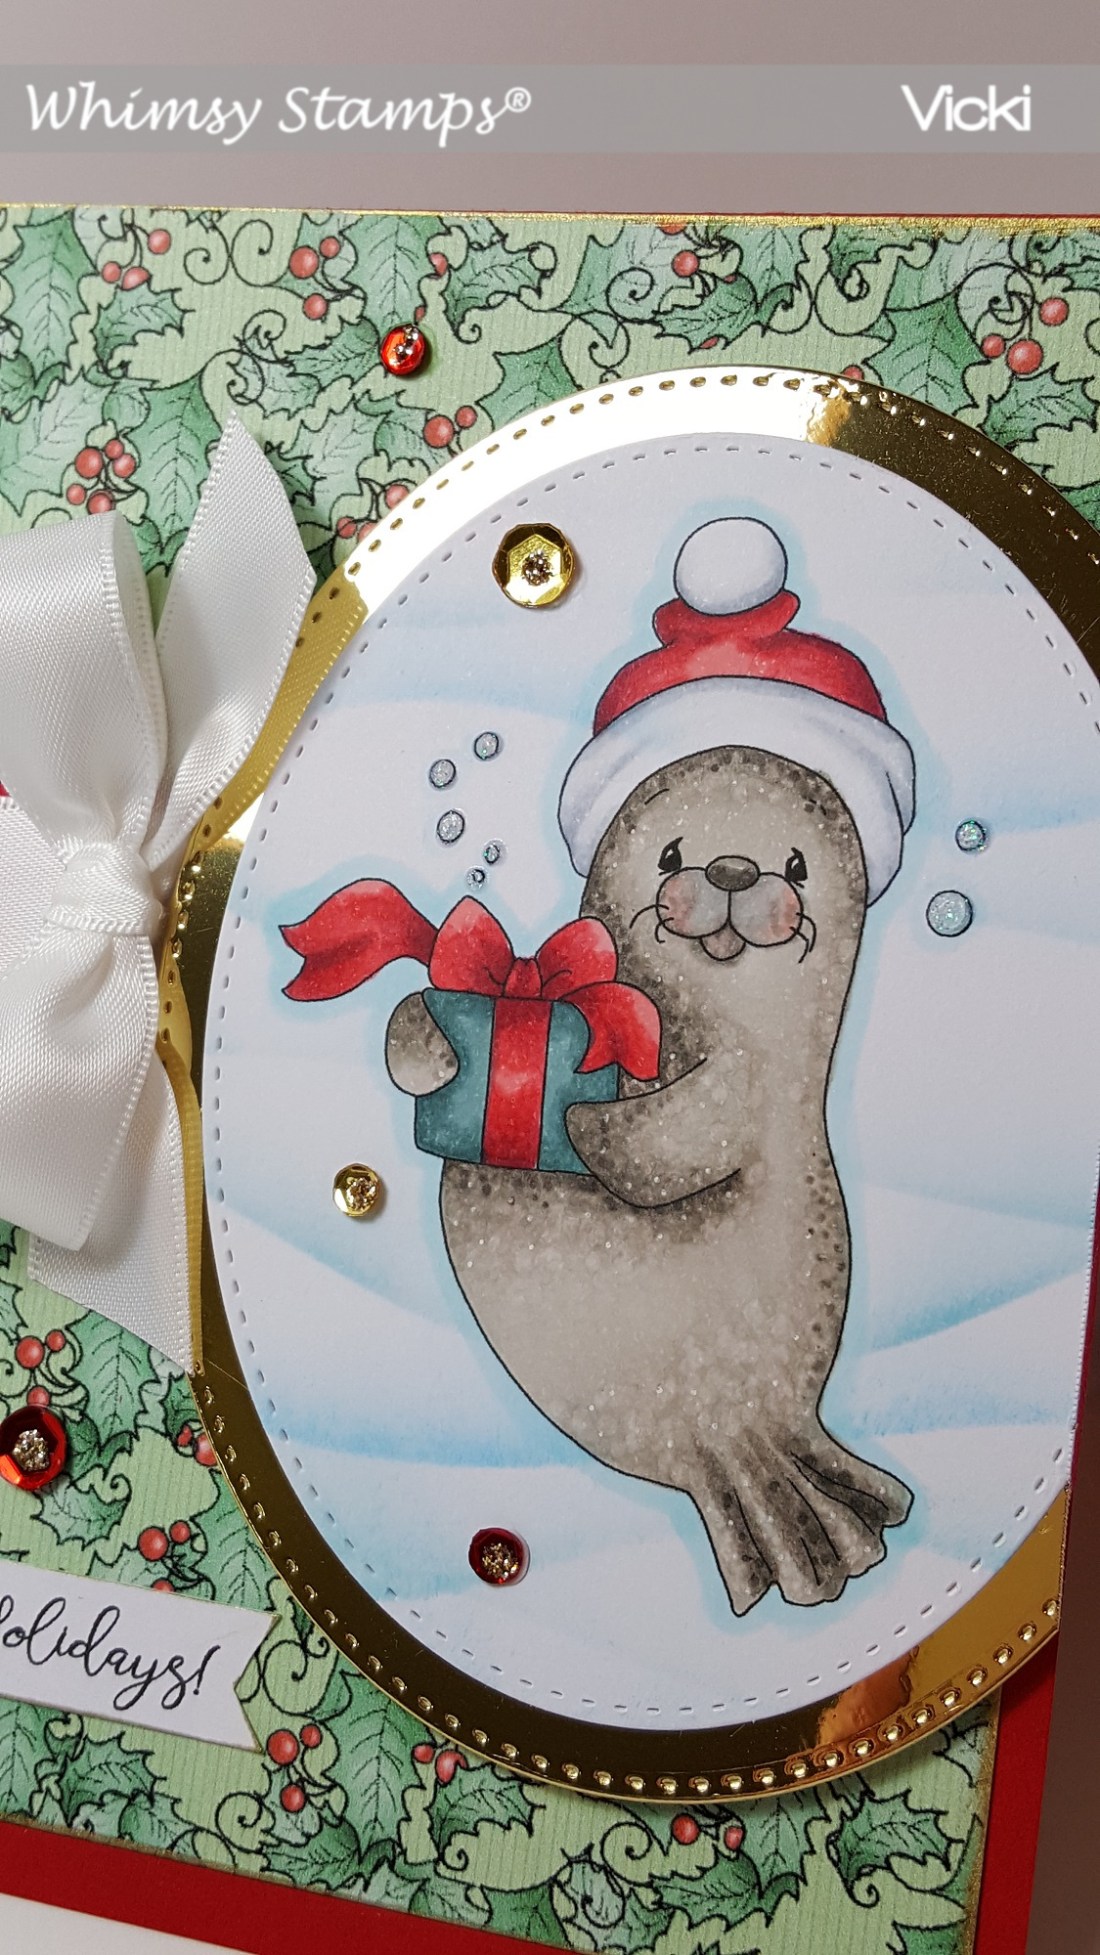
This image is so sweet with the pup and kitty delivering their letters to Santa for Christmas is coming soon! 🙂  The image I’ve used is called Christmas Post from All Dressed Up Stamps and it already had some snowflakes within the image, but I always feel that snowflakes are big, small and fall everywhere, so I decided to add a few more with items from my stash.

I’ve colored my image with Copic markers and used some gel pens for the eyes, cheeks, parts of the mailbox lettering, center of snowflakes as well as adding some adding some random dots in the background for tiny snowfall flakes.  I’ve also had this Christmas Postmark stamp set in my stash and thought it was perfect to use as a sentiment for my card.  I stamped the circle, punched it out and layered it with another scallop circle that was punched from red cardstock.  I stamped the wavy lines post mark image behind that on the image panel.  The image panel was cut with a Wonky Stitched rectangle die.

Vicki-CCT555-ADU-Snowflakes1

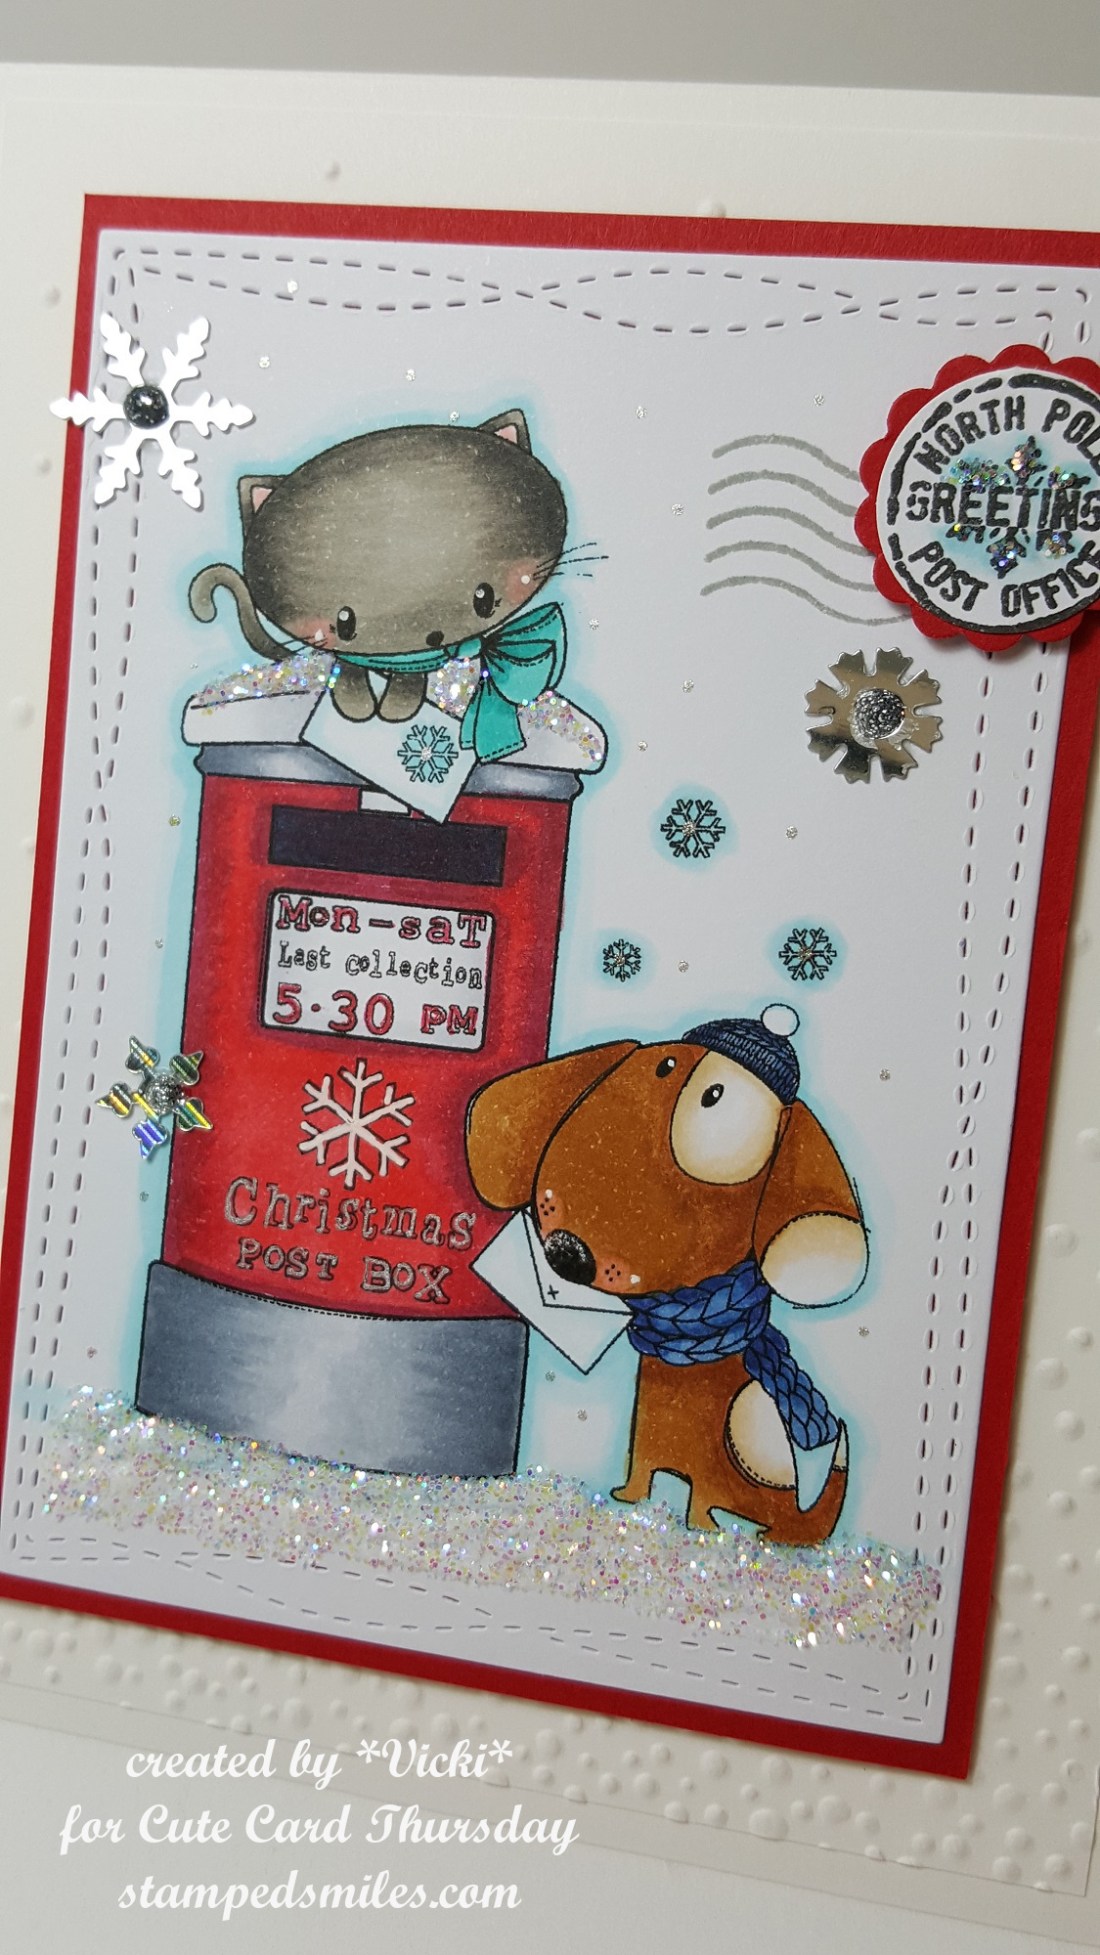
Here’s a closer look at the image and how I’ve colored it.  For the top of the mailbox, the snowflake on the circle postmark and for the snow-covered ground, I used some glue in those areas and then sprinkled some Diamond Dust glitter over top of it for some nice sparkling snow coverage.  (I love using that stuff for snowfall!)

You can also see the silver snowflake sequins that I’ve attached and then I’ve added some silver Stickles to the centers of each one.  I’ve layered this image panel to a red cardstock layer and then added some foam tape to the back of it and mounted it over my card front.

Vicki-CCT555-ADU-Snowflakes2

So, for the card front panel, I took a white piece of cardstock measuring 4″ x 5-1/4″ and ran it through my die cut machine with a snowfall embossing folder and then I mounted this to a white top folding A2 sized card base and added the layered image panel over top.

Thanks for stopping by and have a fabulous day!

Here’s the challenges I’d like to enter this card for:

  1.  Daisy Chain – Christmas/Winter
  2. Crafting From the Heart – Anything Goes
  3. The Holly & Ivy Christmas Challenge – Anything Goes Christmas
  4. Shopping Our Stash (SOS379) – Raining Cats and Dogs
  5. Creative Craft Cottage – Christmas is Coming
  6. All Dressed Up Challenge –  Oct Anything Goes + must use ADU image

Joy to the World a Penguin is Born

Hello friends!  I hope that you’ve had a great weekend and a great start to your week so far!  I’m back to share another image from the November digital release at Whimsy Stamps.

Vicki-WSPenguinNativity-Nov6

This one is so sweet and makes me smile!  This image is called Penguin Nativity by Crissy Armstrong.  I really enjoyed coloring up this cute image for my card!  I’ve used several Copic markers to fill the entire panel:

  1.  Penguins’ bodies:  C8, C5, C3, C1, C0, Y00, R00, Y17, Y15, Y11 (wings:  C3, C1), (Halo: Y17, Y11, Y00 and finished with gold gel pen), (Gown:  E84, E81)
  2. seal:  W7, W5, W3, W1, W0, R00
  3. tree:  W7, W5, W1, W0
  4. eggshell:  E53, E51 (straw:  YR24, YR21, Y15), (manger:  E29, E27, E25, E23)
  5. Star:  Y17, Y15, Y13 (finished with shimmer brush pen and gold gel pen)
  6. Ground:  E21, E00, E000
  7. Sky:  BG000, BG10, BG13, Y11, Y00, 0 blender

After I was finished with the coloring, I ripped it out along the edges and then went over the edges with some distress ink and swiped it with a gold ink pad.

I’ve also taken some digital papers from the November release called Christmas Traditions (namely the musical sheet paper) and printed it out and the also ripped along the edges and attached that to another piece of ripped up brown cardstock that was also swiped with a gold ink pad.  I attached these panels to an A2 sized top folding brown cardstock base and then took an additional strip of the musical sheet paper to add to the base of the card and took a white ink pad and sponged around the edges of the card base.

I took some natural twine and wrapped it around the musical sheet and ripped cardstock pieces before attaching it to the card base.  I took an additional strip of brown cardstock and white heat embossed the sentiment from the Whimsy Stamps Holiday Mini Sentiments clear stamp set and made a tag with it by punching a hole at the top and threading the twine through it.  I made a bow and attached it to the card front panel.  I then used my fingers to bend the tag a bit for a more natural feel of the design.

Lastly, I took some foam tape and added my colored image panel to the front of the card.  I took some tiny confetti stars and glued them to random places in the sky.

Vicki-WSPenguinNativity-Nov6-close

Here in the close-up details of the image, you can see where I’ve added some shimmer touches with a gold gel pen and then the places where the animals are ‘glowing’ as well as the side of the tree, I’ve added some shimmer with a clear glitter brush pen.  (Still not sure I was able to fully capture this in my photo.)  I think the ‘glowing’ feature turned out nicely.

Hope you’ve enjoyed my card today and I’ll see you again soon!  Thanks so much for stopping in!

Challenges:

  1.  Crafty Catz – Anything Goes with an Optional Twist:  “Must Have a Sentiment”
  2. QKR Stampede – #320 Anything Goes
  3. Papercraft – Anything Goes with optional:  “Christmas Animals.”
  4. Just Us Girls – Word Week:  Music
  5. 613 Avenue Create – Anything Goes with optional twist:  “Christmas/Winter”

Merry & Bright Kitty

Hello friends!  Hope you’re having a great weekend so far!  I’m back to share another creation that I’ve made using the adorable Christmas Kitty Digital Stamp Set:

Vicki-SnS-ChristmasKitty-OctGDT

I wanted this kitty to be the main focus of my card along with the lights and I wanted them to pop out on my design.  I also wanted to add my panel complete with the “extra” light string and greeting.  So I opened up a blank Word doc. to add my images.  I sized and arranged the kitty where I wanted him, then next to him I’ve added the additional “extra” lights and then positioned my greeting from the set where I wanted it, printed it out and colored in the lights and kitty with Copic markers.  To make the lights appear as one continuous string of lights, I took an alcohol friendly fine line marker to draw a line to the existing lights on the kitty.  I just love the look on his face as he was so much fun to color! 🙂

Vicki-SnS-ChristmasKitty-OctGDT1

To get the glowing look on the lights, I added some color around each light with the same color of chalk.  Then I took the Diamond Dust Glitter and added it over the light bulbs with the Nuvo Smooth Precision Glue pen.

I then cut this panel out with a rectangle cross stitch die cut from my stash.  After it was cut, I took some blue colored ink and stamped the pinecone image from the Holiday Greetings Rubber stamp set to frame in the kitty panel.

I decided to cut out some pine leaves with the same light blue card stock with a die cut from my stash and then I covered them with VersaMark ink and heat embossed them with the Vanilla Ice embossing powder.  You will also notice a bit of sparkle around the kitty panel edge too.  I took the panel and pressed the edges into the VersaMark ink pad and then heat embossed the edges with the Sparkle embossing powder.

Vicki-SnS-ChristmasKitty-OctGDT2

Here you can see the design on my light blue card front as well.  This is where I took the same pinecone rubber stamp image and stamped randomly along the edges of the card front and heat embossed it with the Vanilla Ice embossing powder.  The heat embossed pinecone leaves were attached to the edge of the kitty panel along with a sparkly ribbon bow and a snowflake accent.  I layered a piece of black cardstock around the image panel and popped it up with some craft foam and mounted that over the front of the heat embossed light blue card front which was wrapped with some more of the sparkly ribbon.  This was mounted over an A2 sized top folding white card base.

I hope you’ve enjoyed my sparkly cute card today!


Challenges I’d like to enter:

  1.  Crazy 4 Challenges (C4C458) – Card with Cat or Halloween themed
  2. Crafting By Designs – Get Ready for Christmas
  3. 4 Crafty Chicks (4CC427) – Christmas
  4. Craft Rocket – Christmas is Coming
  5. Crafting With an Attitude – Anything Goes

Whimsy Stamps Seal On Ice

Hello friends!  Back with you today to share another image from the November brand new digital release from Whimsy Stamps!  Check it out:

Vicki-WSSealonIce-Nov2

These seals by Crissy Armstrong have stolen my heart!  I had to create with this Seal on Ice digital image too and share it with you today!

I started with my image by coloring it up with the following Copic marker colors:

seal:  C5, C3, C1, C0 W1, W0, R00 – Hat/scarf:  BG49, BG45, E53, E51, E50

I fussy cut him/her out and went along the edges with a black Copic friendly marker.

For the card design, I found some matching cardstock to go with the seal’s outfit and used it as the 5×5 Top folding card base as well as a mat layer behind the image panel.  I took the Whimsy Stamps Pierced Border Trio Dies to cut some pieces for the snow with some glitter paper.  I put one strip at the bottom of the card base and another on the bottom of the woodgrain paper I’ve used to place the seal on.

Before adding the seal to the snow border with foam tape, I took the Whimsy Stamps Snow Flurry clear stamp set and stamped some of the snowflakes with pink ink over the woodgrain paper.  I added this layered panel onto a piece of the new digital papers this month called Christmas Roses & Snowflakes which I’ve cut out with a square stitched die along with the woodgrain paper.  I took a sentiment from the Whimsy Stamps Holiday Mini Sentiments clear set and white heat embossed it and cut it out with a portion of the square stitched die as well and attached it to the design.

I’ve finished it off by adding a bow to the corner of the woodgrain paper panel with some clear sparkly ribbon and added another one of those snowflake gems to the center of it!

Vicki-WSSealonIce-Nov2-close

Here’s closer look at the coloring details.  Isn’t this a cutie?!  I love the feminine look to it by adding in the pink snowflake digital papers and sparkly ribbon.

Thanks so much for stopping by today!!  See you soon!

challenges:

  1.  Cardz 4 Galz – Let’s Go Digital
  2. Addicted to Stamps and More! – Anything Goes
  3. Watercooler Wednesday (WWC194) – Anything Goes
  4. Crafty Animals – Anything Goes + animal/teddy bear
  5. CRAFT – Winter

Caring Thoughts Wreath

Hello friends! Sorry to be throwing so many posts out to you at once, but as you can see there are so many exciting things going on the first of the month and I’m happy to be sharing it with you!

I have come up with an easel card design that I’ve created using the digital set called Memory in Our Hearts:

Vicki-SnS-MemoryinOurHearts-OctGDT

The great advantage to using a digital set is that they come with pre-colored images as well as outlined images to create many different looks you’re wanting.  In addition to that, you can also manipulate the size and structure of your image as I have done with my card here.  (This is a great way to come up with a unique design too!)

I have taken some of the pre-colored “sprigs” in the fall theme color and sized and moved them around in a Word doc. to create my own Fall wreath with it!  I then added the beautiful sentiment to the center and placed where I wanted it and then printed it out along with a couple more sprigs that you see on the inside of this design.

Vicki-SnS-MemoryinOurHearts-OctGDT1

To step things up a notch, I’ve used a protractor to draw a circle around my wreath image as well as a larger circle for a mat behind it and fussy cut them out. (I didn’t have a circle die large enough to accommodate my wreath image.)  I took my ink blending tool and some Tea Dye and Vintage Photo distress inks to add some color around the edges.  Since I made a Fall wreath design, I wanted to add some glitter to the leaves.  So, I took the Nuvo Precision glue pen and added some glitter over them.  For the “berries”, I took some Ripened Pumpkin Nuvo Crystal Drops in random areas around the leaves.  I made a bow with some natural twine and added it to the top of the wreath.  (I did this same process for the smaller “sprigs” on the inside of the card as well.)

Vicki-SnS-MemoryinOurHearts-OctGDT2

For my card design, I have made an “easel style” card (more on that below).  My card size is a 5 1/2″ square.  I have used the same cardstock color that I’ve used to print out my wreath image and separated it in two panels to fit on the front of my card base.  I took an embossing folder from my stash to add some texture to my design and also used the distress inks again to add some color around the edges.  I used glue to add some “dots” in the corners and then sprinkled some “Autumn Medley” glitter over them and let it dry.  I have also taken some 1/4″ Tear Tape to the middle edges of the card base and burnished some of this same “Autumn Medley” glitter to that.  I think it really brings in that pretty Fall color theme with some added sparkle!

Vicki-SnS-MemoryinOurHearts-OctGDT3

And for the inside of my card, you can see that those extra “sprigs” that I’ve printed and cut out create an easel style “stopper/display” function for my card design.  It’s easy to create this look with a score mark made in the center of the card front base as you can see with the circle wreath shown fully.

I have used some of the same-colored cardstock as the printed-out wreath for the inside of my card with some more distress inks along the edges as well as another strip of 1/4″ Tear Tape along the bottom edge burnished with some more of that “Autumn Medley” glitter.  I’ve used some foam tape to pop up the “sprig” cut out images so that they create the “stopper” for the front card base to rest while being displayed.

I hope that you’ve enjoyed my interactive card today and I look forward to sharing many more projects with you during my guest design spot!

Thanks so much for stopping in today my friends!  Please be sure to check out my earlier posts from today!  See you soon!

challenges:

  1.  {Cupcake Inspirations} CIC457 – Fall
  2. Try It On Tuesday – Thankful

A Beary Sweet Christmas Tag for 2 Crafty Critter Crazies

Hello friends!  I’m back with another new challenge for you today!

It’s the first of the month, so that means it’s time for a new monthly challenge over at 2 Crafty Critter Crazies!  As always, the challenge will last for 1 whole month and all you need to remember is to add a critter to your creation!  We look forward to seeing your critter makes this month!

Vicki-2CCC-SnS-tag

I have used this darling digital stamp set called A Peppermint Christmas. I used a Word doc. to design it before printing it out.  Once printed out, I cut it down to size for my black tag and rounded the corners with a corner chomper.

I’ve been trying to develop my skills a bit with colored pencils and invested in a large set of them recently.  So, this is what I have used to color in the images of my tag.  After coloring it all in, I took out my Quicky Glue Pen and then sprinkled some Glitter (Semi-Transparent) over the snowflakes and dark gold star bursts.  For the stars, I’ve sprinkled the Lemonade Ultrafine Glitter (Semi-Transparent) over it for a bit brighter sparkle!  I’ve also covered the peppermint candies with the Nuvo Aqua Shimmer Glitter Gloss Pen for some shimmer.  AND… if that wasn’t enough, I took the Quickly Glue Pen again and went along the edges of the white image panel and added the Waterscape Glitter to the edges.

For the assembly of my tag, I’ve used a pre-made tag from Graphic 45 and sponged around the edges of it with white ink.  I took some green colored glitter paper from my stash and added a strip of it across the center of the black tag.  I then added some pink silk ribbon strips on each side of the glitter paper.  I then used some craft foam to pop up the image panel and placed it on the tag.

I finished it off with a pink silk ribbon bow and added some more of it to the tag hole for a hanging element and tied that together with a piece of white twine.  Decided for a finishing touch to add a sparkly snowflake gem in the center of the bow.

I hope that you have enjoyed my critter project!  Thanks for hanging in there with me!

Challenges:

  1. QKR Stampede – Anything Goes (319)
  2. Sunny Day Crafting – Animal
  3. The Holly and Ivy Christmas Challenge – Anything Christmas Goes
  4. The Merry Christmas Challenge – Anything Christmas Goes

Anything Goes at Cute Card Thursday + Whimsy Stamps November Release

Hello friends and welcome to November!!  It’s hard to believe that we are closing in on the end of another year!  Time has went by so fast especially since I’ve started back up on my new blog here! 🙂  So glad you are here with me!  Thank you for that!

Today starts a brand new challenge over at Cute Card Thursday!  For this week, it’s an easy “Anything Goes” challenge!  And since our sponsor this week is Whimsy Stamps, I thought this would also be a great time to introduce to you an image from the brand new Digital Release that has just came out TODAY!!  Check it out:

Vicki-WSSealinWater-Nov1

This cute seal critter is presenting his underwater gift for the Holidays!  This new digital image from Whimsy Stamps is called Seal in Water by Crissy Armstrong.  I had fun coloring him up with my Copic markers.  I decided to use the markers in a “pointilism” fashion to give him a spotted seal look. (I’ve also added some light dots with a white gel pen.) Copics used:  for seal – Blender 0, W7, W5, W3, W1, R00 for hat/bow – R39, R37, R35, R32 for package – BG99, BG96, BG93 for trimming/bubbles – C3, C1, C0, BG000

For the background I used a stencil to blend some blue colors to make them appear as if he’s underwater as he has bubbles around him.  I cut him out with a stitched oval die and cut out a piece of gold foil cardstock with a larger stitched oval for matting behind the image.

If you take a look at those fun festive papers on my card, this is also part of the new Whimsy Stamps November Digital release as well!  The papers are from the Christmas Traditions Collection.  I’m sure I’ll be using more from this collection on an upcoming card soon!  I have took the corner chomper and rounded the two bottom corners and then took a gold ink pad to rub along the edges with it.  You can also see that I’ve used one of the Whimsy Stamps Penguin Christmas Sentiments 1 digital set and cut a banner with it to place on the bottom of my card.  I’ve die cut a border in red cardstock going across the middle and added some white silk ribbon with a bow.  I mounted the oval image panel on the card front with foam tape and then cut off the edge.  I mounted everything over an A2 sized red top folding card base.

I’ve finished off my card with some Christmas sequins filled with Tinsel Stickles and I’ve also covered the bubbles with some Nuvo White Blizzard Crystal Drops.

Vicki-WSSealinWater-Nov1-close

Here’s a closer look at the coloring details of my spotted Holiday seal along with the sequins, glitter and bubbles!  Gotta love that popped out belly!! 🙂

Be sure to check out not only the new Whimsy Stamps release on the Inspirations Blog, but please be sure to check out the Cute Card Thursday challenge to see the inspiration from the rest of the design team and play along this week!  We love to see what you’ve created!

Thanks for stopping in!  Please stay tuned in for more posts today!

Challenges:

  1. Winter Wonderland – Color It!
  2. Crafting From the Heart (226) – Anything Goes
  3. Make My Monday – Stencil Stories (Used a wave stencil for behind the seal)

Happy Halloween – All Treats & No Tricks! :)

Hello friends!  I want to thank you thank you thank you from the bottom of my heart for everyone of you that has left such sweet comments full of birthday wishes and lots of kindness that you’ve shared through something we have in common which is creating and sharing smiles!  I so enjoyed the stories that you’ve left about how you share your handmade creations with others.  PLEASE continue to create doing what you love and share those smiles with as many people as you can!  It really makes the world a much better place when we can serve one another in kindness.

I have always loved Halloween as a child and have so many fond memories dressing up each year and thinking about what I would be.  I tried to pass that tradition onto my children, and I dressed up right along with them!  For me, Halloween is full of lots of fun things besides just treats!  I wanted to celebrate those memories with a card today:

Vicki-BM-HalloweenBox

I’ve stamped the trick-or-treaters and bat and then colored them up with my Copic markers and fussy cut them all out and put them aside while I worked on the rest of the card.

For the background of the card, that “tree branch” panel came in the kit, so I ran it through my laminator to foil it…it turned out awesome!  (See photo below!)  I then took my distress inks and blended in a night sky over it.  I spritzed it with water and dried it off with a towel to get the water drop look.

I took this awesome border silhouette die from Impression Obsession and attached to the bottom of the scene for the trick-or-treaters to stand on.  I sponged the bottom edge with white ink.  Speaking of white ink, this is what I used to stamp the sentiment on a piece of black cardstock as well as sponge around the edges with it.  I used the glow-in-the-dark embossing powder over top of it.  (Unfortunately, I couldn’t get a good photo of it glowing in the dark…. but it does, and it looks cool!)  I made a banner with that strip and attached it to the left side of the card and then popped the bat up over it with foam tape.

Vicki-BM-HalloweenBox-foiled

Here you can capture a better look at the foiled tree branch in the background as well as the heat embossed sentiment.  I glued down the mummy girl and then I took foam tape to pop up the Frankenstein for dimension and depth.  I also added some yellow Stickles to the eyes and mouths on the pumpkins.

This card was so fun to do!  Hope you’ve enjoyed it as well!

Wishing you all a very fun Halloween however you choose to spend it!  I think I will be watching some scary movies and eating some popcorn which is something I enjoy doing with hubby!

Challenges I’d like to enter:

  1.  Creative Moments – Anything Goes with optional twist: Spooktacular
  2. Crafty Gals Corner – Halloween Colors
  3. Simon Says Stamp Wednesday – Halloween/Spooky
  4. The House That Stamps Built (O2418) – Anything Goes
  5. Moving Along With the Times – Halloween
  6. Crafty Catz – Anything Goes with an Optional Twist:  Halloween
  7. Always Fun – Halloween

It Sparkles at Cute Card Thursday!

Hello friends!  Yes, that quick and we are ready for a new challenge over at Cute Card Thursday!  This is a really fun one too!  This week we’d love to see your “Sparkles” on your creations!  We look forward to seeing what you come up with for it!

Here’s the creation I made:

Vicki-CCT553-KC-Sparkles

I have used one of our sponsor’s image this week called Reindeer and Snowman from Kinda Cute Stamps.  Now how cute is that reindeer making a snow reindeer?!  I just had to give them both a red nose! 🙂

I printed out the image on white blending card and cut it out with a wonky stitched rectangle die, and then cut out some snowflakes with silver sparkle paper along with layering the image panel over some as well.  I took a sentiment from a new My Favorite Things stamp set and silver heat embossed it over the top of the image panel.  I’ve also dotted the center of the snowflakes along with making some additional dots with some silver Stickles.

Vicki-CCT553-KC-Sparkles1

Here’s a closer view of the image.  You can see where I’ve taken a glue pen and covered the snow-reindeer with loose glitter.  I’ve also taken a Spectrum Noir Glitter Brush Pen and covered the noses as well as the snow on the ground.  I used a glitter pen to color the charm on the reindeer’s collar.

Thanks for dropping in!  See you soon!

Challenges:

  1.  Jingle Belles – Animals (Christmas Flock)
  2. Christmas with the Cuties – Wrap Up Warm
  3. City Crafter – Silver Bells (lots of silver)
  4. Crafty Creations – Anything Goes
  5. Fab ‘n’ Funky – Christmas
  6. Watercooler Wednesdays (WWC193) – Holidays

Gingerbread Christmas Tag

Hello friends!  It seems like it’s been a while since my last post!  I have been feeling a little under the weather for a few days and I’m trying to get myself back on track…so hopefully I’m getting there!  Thank you to all who’ve left comments and a big welcome to my new followers!  So happy to have you here and hope you enjoy the postings!

I have a cute Christmas tag to share with you today using an oldie but a goodie Whimsy Stamps digital image:

Vicki-Oct24-Gingerbreadman Tag

This sweet little Gingerbread Man was so much fun to color and “bling up” a bit with some accents!  I have him colored up with Copic markers in the following:

  1.  Body:  E39, E37, E35, E15, E13 (Cheeks 0blender, R20 and frosting BG000 in certain areas.)
  2. Candy Cane and circle candy:  R39, R37, R35, R32, C3, C1, C0
  3. Nose and arm accents:  G16, G09
  4. Outer Edge of image:  BG10, BG000

I used a manila tag and got out a zig zag image from an older Whimsy Stamps clear set called Basic Backgrounds & Borders (retired) and stamped it on the tag with Rusty Hinge Oxide Ink.  I also used that color along with Tea Stain and Vintage Photo Oxide inks to sponge around the edges of the tag.  I used a water spritzer to add some drops and then blotted it with a towel to get the watermark look.

The gingerbread man panel was cut to fit the tag and I used some Tumbled Glass Oxide ink to stamp a few snowflakes around the gingerbread man from the Whimsy Stamps Snow Flurry stamp set and then sponged around the edges of this panel with the same brown oxide inks listed above.   I also stamped a sentiment at the bottom of the tag from the Whimsy Stamps Penguins Winter Adventure stamp set with Archival Jet Black ink.  I then added a strip of black washi tape from Tim Holtz Ideaology Christmas collection and then added some “faux snow” flakes at the bottom of the gingerbread man panel with some liquid glue.

For the ribbon, I used some seam binding ribbon and sprayed it with distress ink sprays in the same brown colors as inks that I’ve used, crinkled up and let it dry.  I added that to the top of the tag along with some tinsel ribbon.  I thought it went well with the snow!

Vicki-WS-Oct24-gingerbread-close

A closer view of the gingerbread man and you can see the added extra details that I’ve added to him.  For the candy cane and circle candy on his head, I covered them with a Spectrum Noir Glitter Brush Pen.  I’ve added some Nuvo White Blizzard Glitter Drops to the green dots and then some Nuvo Clear Crystal Drops to the frosting lines.  (You can see how it shines in the photo!)

Thank so much for stopping in today!  Hope you’ve enjoyed my tag and I’ll be seeing you very soon!! 🙂

Challenges:

  1.  The Holly & Ivy Christmas Challenge – Anything Christmas Goes
  2. QKR Stampede – Anything Goes #318
  3. Sweet Stampin’ – Chevrons or Stripes
  4. Crafting From the Heart – Anything Goes
  5. Little Red Wagon – distressing (Distress Oxide inks)