P is for Pumpkin(s)

Hello friends!  I hope that your month of November has been a good one for you so far!  It’s getting cooler by the week, but I try to get out to enjoy the warmer days as much as I can before the winter gets here!  

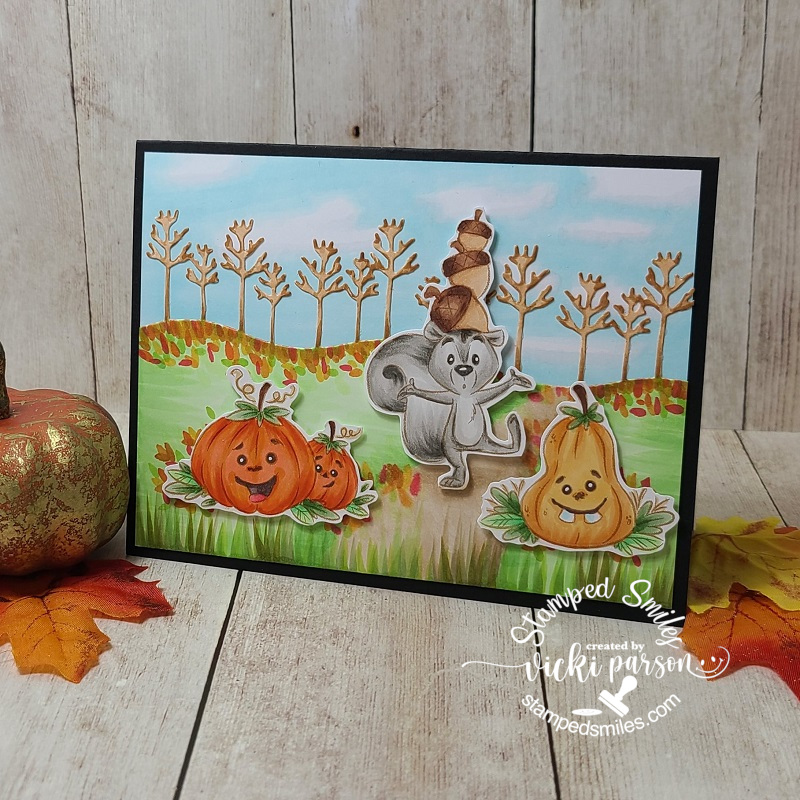
Today is a new challenge over at the Alphabet Challenge Blog!  Our next letter is “P”, and our hostess, Deborah, has chosen “Pumpkin(s)”   I hope you will join in the fun with us!  *Please remember that this is a bi-weekly challenge, so you have two weeks to enter.*  Here’s the project I’ve made for this challenge:

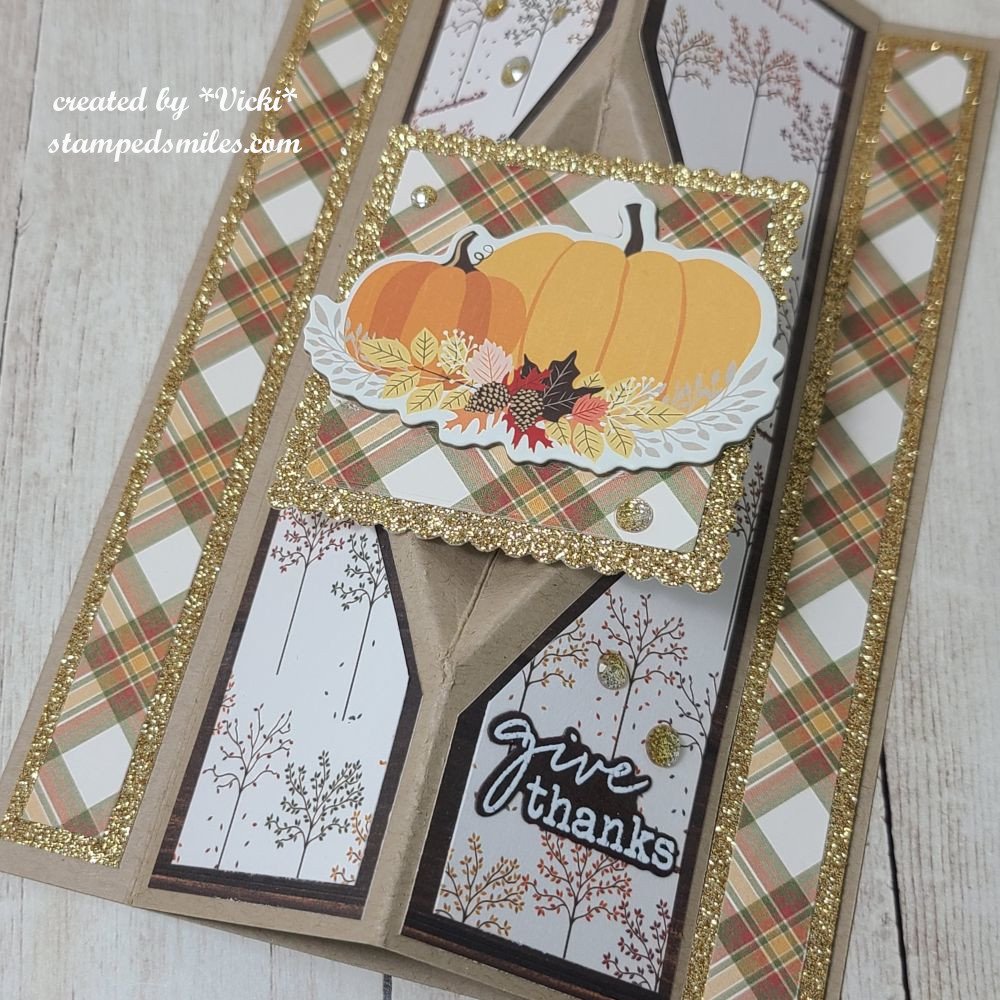
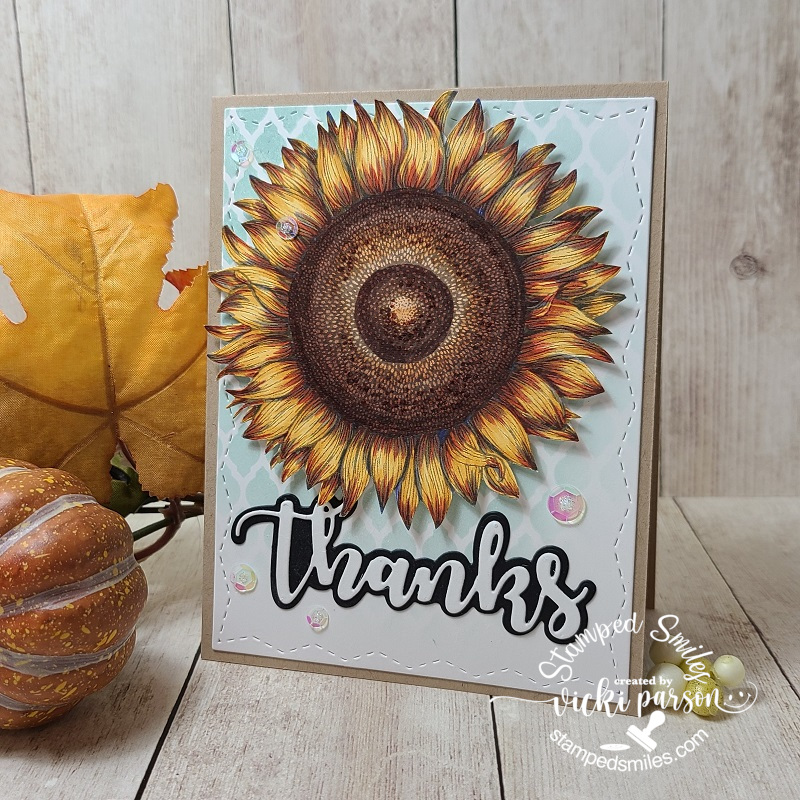
When I saw this challenge, I remembered that I had gotten a stitched pumpkin die set from Lawn Fawn a few years back and haven’t used them yet, so I pulled them out to use for this challenge!  (I had to clip the metal dies apart, so I knew I hadn’t used it yet!)

I decided to cut them out in different colors of cardstock and then ink blended the bottoms of each in a darker shade including the stem on the top pumpkin.  I also took them and splattered some gold, brown and white over all three pumpkins before assembling them in stacking order.

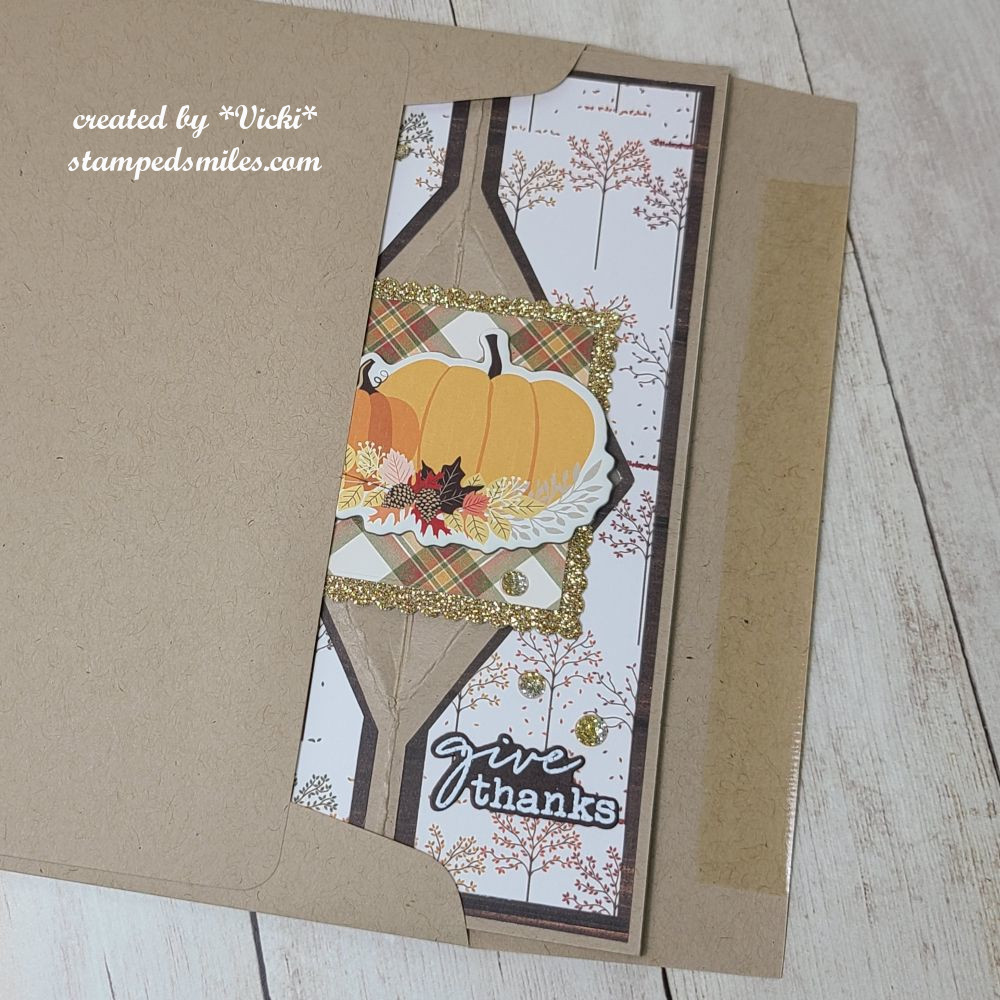
For the card front, I took a stitched white panel and stenciled some leaves (Pink & Main-not in store) in light tan ink.  I made my scene for the pumpkin stack by using some Fall Plaid papers (not in store anymore) by Lawn Fawn for the background and die cutting a hill for the pumpkins to set on.  I placed the plaid paper and ground over a darker brown cardstock layer and popped it up with foam tape over the stenciled leaves card front.  I attached all of these layers onto a white top folding A2 card base.

For the sentiment, I white heat embossed the sentiment (not sure what Lawn Fawn set I used this for it) over dark brown cardstock and cut out a banner to pop up above the pumpkin stack with thin foam squares.  I added a few gold rhinestones for sparkle.

  • Hope you’ve been inspired by my card today and stop on over at the challenge blog to join in the fun with us!  I look forward to seeing what you come up with!

Thanks so much for stopping by and I’ll be back tomorrow with another challenge project!

Challenges:

  1. Four Seasons – Fall
  2. Lil’ Patch of Crafty Friends Anything Goes
  3. A Place to Start – Anything Goes with optional:  Something new (I used a “new to me” stitched pumpkins die set from Lawn Fawn!)
  4. A Cut Above – Anything Goes with a die cut (used several Lawn Fawn dies!)
  5. Addicted to Stamps & More – Die Cuts and/or Stencils (I used both!)

Autumn Leaves & Pumpkins for Sparkles Monthly

Hello friends!  I hope that your October month is going well so far.  We’re starting to get some noticeably cooler temps in the forecast as we creep towards Halloween at the end of the month.  Love this time of year when those leaves start showing their pretty colors as they fall from the trees!  We should be getting that soon as well to clean up the yard! LOL

This brings us to a new monthly challenge over at Sparkles Monthly and we have the theme of “AUTUMN LEAVES & PUMPKINS  this month.  I look forward to seeing all of the projects in the gallery for this one.  Here’s what I came up with: 

I fell in love with this cute scarecrow from Newton’s Nook called Autumn Fields and I knew that I wanted to use it for this challenge.  I colored up the image along with a few pumpkins and cut them out in the coordinating dies.  I was going to add a couple of leaves for the background, but I thought it would be cool to pull out the NN Fabulous Fall Toner Card Fronts and ink blend over it for the background.  So I gold foiled the background and blended some various inks to create the background scene for the scarecrow.

I die cut a grassy hill border from Lawn Fawn and inked the blades with a gold ink pad and layered that onto my foiled leaves background.  I tucked in the scarecrow and pumpkins for grounding and then white heat embossed a sentiment (from the scarecrow set) that was cut out with a banner die (from MFT- closed).  I also used the gold ink pad around that as well.

I cut out the entire layered panel with a cross-stitched rectangle die from Lawn Fawn and then used a scalloped rectangle die from Taylored Expressions cut from white cardstock to layer behind it.  I attached everything to an A2 side folding card base in the Latte color from Taylored Expressions.

  • Hope you’ve enjoyed my card and will hop on over to the challenge blog to check out what the rest of the design team has made for inspiration.

THANKS SO MUCH FOR STOPPING BY TODAY!!

Challenges:

  1. Try it On Tuesday – Autumn Colors
  2. Pammie’s Inky Pinkies – PIP2541 Anything Goes
  3. Four Seasons – Anything Goes Fall
  4. Pearly Sparkles Pumpkins and/or Fall Leaves
  5. Creative Fingers Anything Goes
  6. Stamping Sensations – Autumn/Anything Goes
  7. We Love Stamping – Anything Autumn/Anything Goes
  8. Cupcake Inspirations Fall Harvest
  9. Aud Sentiments Ink Blending and/or Fall/Thanksgiving + sentiment

Mix It Up with a Fancy Fold

Happy September friends!  Can you believe we’re getting ready to get into the Autumn season already?!  It seems like the summer flew by, but I have to say that I’m so very ready for the falling leaves and all things Autumn to start up now…especially cooler temps!

Today also brings us to a new challenge over at the Mix It Up Challenge Blog.    The challenges always run for 6 weeks so there is plenty of time to enter.  The theme given for us this time is: Fancy Folds or you can always do the ‘Anything Goes” too.  Here’s the card that I came up with for the challenge using the theme:

This is a something I came across a while back and saved the tutorial for later to give it a go.  This is called a “Faceted Vertical Easel Card” and this is a 5″x7″ size.  I would give you a link to the tutorial, but when I started creating half-way through to come upon the layers, I noticed the measurements were not quite right, so I had to figure out an adjustment to make it work correctly.  I do love the look of it with its unique faceted design.  It’s basically just an easel style card with a bit of a design in the center fold area and going vertical instead of horizontal.  (If I make another again, I’ve decided another easier way to work it.

Since I was in the mood for the Autumn season, I decided to make my design with that in mind.  I started with a kraft cardstock base measuring 10″x7″ with all of the different scores/cuts for this design as well.  For decorating it, I’ve pulled out some Autumn papers by Photoplay in my stash and added a layer of glitter gold cardstock.  To make square aperture with the pumpkins, I pull a cardboard cutout from the paper pack to use with it, and then white heat embossed a sentiment and die cut to place on the bottom right of card.  Lastly, I’ve added some gold gems to both panels as well as the square panel in the center of the card.

I think what I like most about this is that it folds completely flat for mailing in an envelope.  Once the recipient receives it, you can slide it open to catch the strip on the right side of the card and it will stand up like the first photo in this post.

  • I hope you’ve enjoyed my fancy fold card today and you’ll hop on over to the challenge blog to see what the rest of the team has come up with.  I look forward to seeing the gallery and what fancy folds will be in there!

Thanks so much for stopping in today!  Have a great day!

Challenges:

  1. Creative Creases Anything with a fun fold
  2. Penny’s challenge Anything Goes using paper
  3. Simon Says Stamp Wednesday – Anything Goes
  4. The Four Seasons Challenge – Fall
  5. The Crafter’s Cafe Anything Goes optional:  Use Pattern Papers
  6. The Creative Crafters Anything Goes

Grateful & Encouraged

Hello friends!  It’s Thanksgiving tomorrow for us in the United States and I’d like to send a heartfelt Thanksgiving greeting to you all!  I would also like to say a huge thank you to everyone for your kindness and friendship.  I’m very grateful for you and encouraged by your support!

I’ve been working on several things and haven’t spent the time to photograph and share everything yet, but I will be sharing soon.  In the meantime, I’d like to share a few projects that I’ve made in lieu of the Thanksgiving holiday:

I don’t normally send Thanksgiving cards, but it’s a great way to say thank you to someone that hosted a dinner or brought something to share or just spend time with you!  That is the ONLY turkey stamp I own!  The stamp set is called “Sassy Thanksgiving” by CZ Designs at Simon Says Stamp.  I thought the sentiments in it were too cute and funny.  You certainly could make this any type of thank you as well.

This is also a fancy/fun fold card called a “Swing Easel Card”.  I found a tutorial using a vertical style on You Tube here – SWING EASEL TUTORIAL (I also used the same detail of embossing an additional panel with leaves and went over the texture with some gold paste.)

I made another panel for the center area and ink blended some blue that faded out and then splattered some gold paint over it.  I then layered it over a piece of gold that fits in the center panel of the easel.  I gold heat embossed the large sentiment and cut it out with the die.  It was popped up over the leaves.  I also cut an additional strip with the gold for the “catcher” of the front panel of the easel card.  I added the turkey and leaves along with the stamped sentiment on the inside bottom.


Autumn is my favorite time of the year and I enjoy using the colors and images in the cards I make, so here’s more that I’ve made:

I’ve made a couple of encouragement cards to send out to some people and I’ve used a favorite card kit from my stash by Taylored Expressions.  The images come from the stamp set Wheatfield Dreams.  I’ve used an oval die and oval mask to do some ink blending and just cut out the colored image to pop them over top.  Both sentiments were copper heat embossed.

I kept the backgrounds simple with the one on the left stamped with a background stamp from TE and the other was cut out with a wonky stitch die and layered over a green card base.

Hope you’ve enjoyed my creations, and I am so grateful you’ve chosen to stop by!❤️

Challenges:

  1. Creative Fingers – Anything Goes
  2. Lil Patch of Crafty Friends – Anything Goes
  3. Pammie’s Inky Pinkies – Anything Goes
  4. Crafting Happiness – Thanksgiving/Harvest #148
  5. Four Seasons – Fall Season
  6. The Crafty Addicts – Anything Goes
  7. Crafts Galore Encore – Anything Goes

Thanksgiving Cuteness

Hello! Wishing a Happy Thanksgiving tomorrow for my U.S. friends!  Just wanted to pop in here to share this fun little card I made to help me get into the Thanksgiving mood and I needed a bit of a giggle which is what I was doing as I colored these fun critters:

Aren’t these guys hilarious?!  This is one of the stamp sets that was released during the Simon Says Stamp STAMPtember event this year and of course if you recognize the critters, then you know it was designed by Newton’s Nook.  The stamp set is called “Talk Turkey” and was only available during this event.  I don’t make very many Thanksgiving cards, but when I saw this stamp set come out, it just had me giggling and so I nabbed it up!  I think I would certainly enjoy a Thanksgiving dinner with this crew!

For the card, I ink blended the background with the distress inks:  Rusty Hinge, Wild Honey and Scattered Straw.  I spritzed with water and dried the splotches with a towel.  (I’ve done the same method with the sentiment strip too.)  I then used some black and white paint to splatter over it and set aside to dry.

While waiting for the panel to dry, I colored up all of the images with my Copics.  I’ve added some gold and white gel pen marks in certain places and then I fussy cut them all out leaving a white border around them.  

I took a strip of green cardstock and die cut a grassy border and attached to the background panel.  I cut both of these layers out with a stitched scallop die and then cut out the black embossed sentiment with a banner die.  I then arranged all of the images where I wanted them and glued them down.  I took the banner and popped it up with foam tape.  I added the leaves and covered them with a glitter brush pen for a bit of sparkle.  I attached all of these layers to a white A2 card base and cut off the sentiment strip along the edge.

Hope you’ve enjoyed my card today and it made you smile!  Thanks for dropping by!

Enjoy your Thanksgiving with love, laughter and lots of thankfulness in your heart. 🦃

CHALLENGES:

  1. Aud Sentiments – Anything Goes + sentiment.
  2. Creative Knockouts – Anything Goes
  3. Colour Crazy Craft – Anything Goes with coloring
  4. Lil’ Patch of Crafty Friends – Anything Goes
  5. Pammie’s Inky Pinkies – Anything Goes
  6. Shopping Our Stash – Triple Threat (3 of something- I used 3 different dies, 3 critters, 3 leaves)

Choose to be Grateful for Crafty Chefs

Hello friends!  I hope that you’re having a wonderful week so far!  The weekend is here, but it sure has been a beautiful couple of days this week with sunny and warm days so hubby and I were able to go out to walk around a bit before the snow starts hitting us!

Something that is great to go out in nature to see are the critters with the birds and the silly squirrels…we have them EVERYWHERE!  They’re busy gathering and burying their food for wintertime around here.  My thoughts turned to the Simon Says Stamp “Big Thanks Autumn” November card kit (sold out, but not papers) as I love all things Fall/Autumn and this card kit with those beautiful papers spoke to me and I wanted to create with it to make my project for this month’s Crafty Chef’s Group recipe from our lovely friend Meg’s recipe:

There were some blue colored A2 card bases already cut and scored inside the kit, so I used one for my side folding card base here and then layered a dark brown cardstock piece from the kit as well as a piece of copper mirrored cardstock which was then layered over a piece of the decorative papers (I mentioned above) in the kit, which is also where the critter, mushrooms and leaves images came from on this card.

The leafy background paper was cut from a MFT Wonky Stitched Rectangle Die and then I took a strip of the copper mirrored cardstock across the bottom third of the layered pieces and also added some twine wrapped around the bottom of the layers before popping them up with craft foam over the card base.  I die cut a branch from a die in my stash and then fussy cut the images out from the papers included in the kit which were glued or popped up with foam squares over the panel.  I sponged some Tea Stain Distress Ink around the edges of these pieces before attaching.

Lastly, I’ve taken one of the sentiments from the sentiment strips sheet included in the kit and ran it through my laminator with a piece of copper Deco Foil.  (I think that is a cool way to add a little extra something to those sentiments.)  I made a banner out of it, sponged it with some of the ink I used for the images and popped it up over the leafy background piece with foam tape.  

Here’s a closer look at the critters I’ve cut out and how I’ve arranged and popped some of them up to create my scene.  There was also a very pretty SSS Autumn Sequins Mix included in the kit, and I took some of those and added it to the layout and then filled the centers with some gold Stickles glue.

For the Crafty Chef’s recipe that was given, here’s what I MUST use:

  1. Mirror cardstock
  2. 3 layers or more
  3. ribbon (I hope my twine counts!)
  4. image of garden visitors (birds, hedgehogs, etc)

CAN do items:

  1. Sparkle/Glitter (I used sequins and Stickles)
  2. pearls/gems (I did not use) *passed onto next chef.
  3. dry embossing (I did not use)

There is a new recipe given for each month and no pressure to follow along or even when you want to follow along and play…which is great and I’m happy to be able to use up some of the goodies from my stash (NEW AND OLD) and just have fun with it.

I hope you’ve enjoyed my creation today as well and I will be seeing you all again soon!  Thanks so much for stopping in today friend, as I’m very grateful for you!

Challenges:

  1. 2 Crafty Critter Crazies – Anything Goes + animal(s)
  2. Crafty Animals – Anything Goes + animal(s)
  3. Creatalicious – #199 Anything Goes optional Autumn/Thanksgiving
  4. The Paper Girls – #212 Thankful/Grateful
  5. The Divas That Cut Paper – Thanks or Thanksgiving
  6. A Bit More Time to Craft Anything Goes
  7. Lil Patch of Crafty Friends – #146 Anything Goes
  8. QKR Stampede – #408 Anything Goes

A {Cupcake Inspirations} Color Combo Reminder with a Slimline

Hello there friends!  I hope that you’ve had a wonderful weekend!  It’s slowly getting cooler as we go along with this month and even some snow in the forecast.  I love the Autumn Season and will try to hold onto it for as long as I can!  So, with that, I’d like to remind you about the halfway point of our challenge:

There are still a few days left to enter your project for the Yellow, Orange and Red color combo challenge over at {Cupcake Inspirations} so I hope that you can join along with us!


Today, I have a fun Autumn style slimline card to share with you today using the beautiful color combo:

So, I’ve been wanting to pull out my Aqua Pigments to have some watercolor play time!  I pulled out a piece of Bristol Smooth watercolor panel that I cut down to a slimline size approximately 3.25″ x 8.25″ because I knew that I would be layering it over top of a Raven top folding 3.5″ x 8.5″ slimline card base.

The Aqua Pigments that I’ve used on this background have a gorgeous sparkle in them and I’ve tried to capture that in the photo, but it’s so sparkly and pretty in person!  I’ve used Sparkle Yellow, Heirloom Carrot (subscription only) and Firecracker (subscription only) Aqua Pigments that I’ve dripped randomly over my glass mat, sprayed with some water for more movement and “smooshed” the panel over it and let them run and drip together.  Once dried, I’ve splattered over it with gold and black paints.

A while back, I got me the beautiful Leafy Slimline Die from Pink and Main that I cut out with some brushed gold cardstock from my stash I’ve had for quite a while.  I also used the Blessings Slimline Dies to cut the sentiment including the shadow underneath with vellum and the words with Raven cardstock glued down over the leaves.

I’ve added the leaves frame die cut over the watercolor background and mounted it to the card base.  Lastly, I’ve added some sequins and crystals from an Autumn mix embellishment pack.  I filled the centers of the red sequins with some Nuvo Red Berry Crystal Drops.

Hope you’ve been inspired today with my slimline design!  Thanks so much for dropping in and please be sure to stop by and check out more inspiration using the color combo over on the {Cupcake Inspirations} Challenge blog to see more!  I’ll be seeing you soon!

Challenges:

  1. Make My Monday Elegant Fall/Autumn
  2. Not Just Cards – Anything Goes November
  3. Crafty Gals Corner – #213 Thankful
  4. Simon Says Stamp Wednesday – Thanks/Thanksgiving
  5. Creative Fingers – #197 Anything Goes

Retirement Time and More Whimsy Stamp Workshop Retreat Projects

Hello there friends!  It’s hard to believe that we’ve made it to November and rounding the corner to end 2020!  It’s been a very strange year all the way around, but I have to say that it’s a bitter sweet day today as hubby will have his last day of work on his 40 year career as an electrician.  So today I’m dedicating my post to him:

This would be a perfect situation for my hubby and something he talked about all the time…which was to go out to the lake, relax, enjoy some fishing time on a boat including staying in a cabin.  Sure look forward to spending some time with him doing just that next year too!⛵🌅  He is a hard worker and certainly deserves it.

The stamp set that I’ve used for this card was a perfect scene image from Whimsy Stamps called Happy Place.  I colored it up with Copic markers and cut it out with an oval die and layered another oval piece from black cardstock.

I found some papers in my stash that I thought would be perfect with this, so I’ve used the Whimsy Stamps Pierced Border Trio Dies to cut it with to fit half-way on my A2 white side folding card base.  Before attaching the piece down over the base, I took some Mustard Seed Oxide Ink and sponged across the middle of it and then used some Tumbled Glass Oxide Ink slightly at the top.  I then attached all piece including the image panel.

I took the sentiment from the Happy Place stamp set and stamped one of the sentiments at the top of the oval panel and then I white heat embossed the “relax” sentiment over black cardstock and cut it out with the Whimsy Stamps Quick Strips die set, glued it along the edge and trimmed off the excess.  Lastly, I’ve added some Whimsy Stamps It’s a Party Enamel Dots.

Then of course I wanted to share the inside of the card which you can see that I’ve used the same image from the stamp set from the front of the card and just stamped that in a lighter grey ink color.  I masked off the edge of the inside of the card so it didn’t stamp completely.  I also used it in the same way on the envelope as well.

For the greeting, I took the Whimsy Stamps Happy Large Word Die and cut it out with some black cardstock and then attached it with liquid glue.  I stamped the “retirement” greeting right underneath it from the Whimsy Stamps Happy Sayings stamp set with black ink.

It may be hard to tell in the photo above, but I’ve also taken a glitter brush pen and went over the sun as well as the water for some added sparkle.

This card was actually fun to put together and I was thinking about the future and all the things we had talked about the last few years and getting ready for this day.  Things are a bit different than we had envisioned of course, but we will have “our time” for sure.  We’re so excited about it!

This card is being handed to him this morning while we have our coffee before he leaves for work on his last day!😀


And now I also have some more finished kits that I’ve been working on since the Whimsy Stamps Virtual Workshop Weekend!  I’m still really enjoying finishing them up and still have MANY more to do!  I’m so amazed at how much we received and very happy that there were several Christmas projects which I’ll be working on next!  For now…here’s more of the finished kits:

This was for kit 12 and I LOVED the cute dragon in the purples! This card is going to my youngest grandchild as she is my “PURPLE girl”!!
This is the INSIDE of Kit 12. It was a really cool “FUN FOLD” design! I put my image off to the edge so I had room to write a message.
This was for Kit 6 and the entire scene was made using Copic coloring including the sky background! The squirrel and pumpkins were popped up with foam tape.
This was for kit 21 and my first time practicing with no-line coloring!
This was for kit 22. This mega large sunflower is gorgeous! Loved coloring and fussy cutting it out!

I hope you’ve enjoyed my projects and post today!  I sure have been having fun just playing and trying out different things with my cards.  I do look forward to finishing up these kits as we get near the Christmas time!  So be watching for more of those!

Thanks for dropping in with me today and I’ll see you again soon!

Challenges: (For Retirement Card ONLY)

  1. Colour Crazy Craft – Anything Goes + coloring
  2. A Perfect Time to Craft – Anything Goes Nov
  3. A Bit More Time to Craft – Anything Goes
  4. Crafts Galore Encore – Anything Goes Nov
  5. Love to Craft – LTCCB52 Anything Goes Nov
  6. QKR Stampede – #407 Anything Goes
  7. Lil Patch of Crafty Friends – #145 Anything Goes
  8. The Corrosive Challenge – #11Nov Anything Goes
  9. Pammie’s Inky Pinkies – PIP2044 Anything Goes

Pink & Main Video Hop with Hello Autumn Slimline

Hello friends!  I hope you’ve had a fantastic week!  It seems like this month is flying by!

I’m excited to share with you a fun video hop collaboration with Pink and Main on my You Tube Channel today! (Be sure to check it out on MY VIDEO because there is a giveaway and you’ll need to leave comments on the videos to be entered to win!)  So head on over to see the wonderful inspiration with the Pink and Main products going on!

Here’s the fun Autumn themed slimline card I’ve made for the video hop today:

So Pink and Main has come out with some fabulous new products which I’ve used for my card here and I’ve added some fun techniques to use with some of those products as well!

The background was really fun to create using the Pink & Main Blending Brushes along with the new Crackling Campfire Distress Oxide Ink color that just came out!  I’ve also used the wonderful Leafy Stencil from Pink & Main over the background too.  The cups and leaves were also colored using the oxide inks and a waterbrush which you can see in my video as well as how I’ve inked and cut out the one image backwards so I have two cups with the handles in opposite directions on my design here. 

You can check out how I’ve put this design together and the techniques I’ve used in this video below, or to leave a comment and see the link to the next person in the video hop, CLICK HERE to go to the video on You Tube.

I absolutely fell in love with that Need to Venti stamp set and coordinating dies!  I loved that older Christmas Mugs stamps they had previously came out, but Autumn is awesome to add to my collection because it’s my favorite time of the year!  So be sure to check out how to stretch out the use of this set in video above!

The Blessings slimline die was so fun to use on my card too and I love that the frame cuts out separately from the center and there was room to layer behind it before attaching to your slimline card base.  The Brutus Monroe Copper Glitterstock was the perfect accent behind the scallop frame. That frame was cut out with several layers of cardstock and stacked together for thickness.

The same Copper Glitterstock was used to cut out the sentiment dies as well.  I’ve used some vellum to layer behind the Autumn sentiment, which the backing diecut was also included in this same slimeline die set!  The final measurement of my slimline card was a piece of brown cardstock measuring 8.5″ x 7″ and scored at 3.5″ in the center.  The finished card will fit inside a #10 envelope when closed.

Here’s a closer view of the details with my colored cups using the distress oxide inks and waterbrush.  I’ve also used the same Need to Venti stamp set and oxide ink colors to stamp the leaves and die cut them out to arrange over my scene as well.

I popped up the cups with foam squares and added some drops over the whip topping in the cups with some Nuvo Honey Gold Crystal Drops.

Hopefully you can see the pretty Autumn colors and dimension in the card.  I sure had lots of fun putting all of this together!

Thanks so much for dropping in today and I’ll be seeing you soon!

Challenges:

  1. Challenge Up Your Life – Autumn Mood 
  2. The Paper Funday – #21 Anything Goes optional:  Fall/Autumn
  3. Dream Valley – Embossing wet/dry (embossed cup images)
  4. The Sisterhood of Crafters – Autumn Inspiration
  5. CCEE Stampers – CCEE2037 Slimline Cards
  6. Not Just Cards – Anything Goes
  7. Crafting Happiness – Anything Goes
  8. Pammie’s Inky Pinkies – PIP2037 Anything Goes
  9. Simon Says Stamp Monday – Frame It

Happy Thanksgiving with Gold at Cute Card Thursday!

Happy Thanksgiving!  (For those that celebrate the Holiday)  I will be busy today visiting with my family and having dinner.  I look forward to seeing my boys as it’s been a few months without seeing them!  So it will be fun!

Today starts up a brand new challenge over at Cute Card Thursday and the theme for this week is “GOLD!”  Really fun and versatile metallic to use in your creations, so I look forward to seeing what everyone comes up with for this!

In conjunction with the Thanksgiving Holiday today, I thought my creation for this week’s challenge needed to reflect that:

Vicki-CCT610-BMGold

Since the main goal of the challenge is using gold, I kept the main focus on doing that, plus there are a couple of challenges going on that helped me figure out how to put it all together.  (see bottom of post for challenges.)

I have pulled out a stamp set called Plaid Tidings and used a plaid foilable toner sheet for the strip in the background.

I started out with an A2 sized top folding white card base and used a Darice embossing folder to emboss the leaves over the kraft background panel.  I took the toner printed plaid sheet and Gold Static Foil Transfer sheets and layered it over a piece of Bazzil Gold Mirror Cardstock and another piece of white cardstock.  I attached this to the embossed background.

For the background panel and the cut out leaves, I’ve used the “Kissing Technique” to add the plaid image over the leaves.  I sponged around this panel along with the leaves with some kraft colored ink and attached the white panel to another piece of the gold mirror cardstock.  I’ve added some gold ribbon around it and used some foam tape to pop it up a bit.

Vicki-CCT610-BMGold-close

Here’s a closer view at some of the details in my card design.  (You can better see the foiling done over the plaid with that Gold Static foil!)

For the sentiment, I heat embossed it over white cardstock with some Gilded Embossing Powder.  I die cut it out with a circle die and sponged some more kraft colored ink around this and then attached it to another circle layer of the gold mirror cardstock.

I attached this over the square leaves and ribbon panel and added a gold ribbon bow at the top of it.  To finish it off I added some gold sequins filled with Ranger Gold Stickles.

Vicki-CCT610-BMGold-flat

Hope you’ve enjoyed my GOLD Thanksgiving card today!

Have a beautiful day!  I’m thankful today for my wonderful family and lovely crafty friends that I have right here!  I appreciate you being here with me!

Challenges:

  1.  Try Stamping On Tuesday – TSOT436 sketch
  2. Daring Cardmakers – Natural, Gold and White
  3. Shopping Our Stash – SOS409 So Thankful
  4. Stamp, Ink, Paper– SIP206 Thankful
  5. Crafter’s Castle – Anything goes November
  6. Pammie’s Inky Pinkies – PIP1947 Anything Goes