Hello friends! Can you believe we’re already through September?! Today is a scheduled post from me as I’m away in an area with spotty to no connection right now, but wanted to be sure that I had my Art Journal Page posted for this month.
It’s also hard to believe that this is the 9th page done for this year! I’m so glad I’ve done the monthly Art Journal Page collaboration with my crafty friend, Carol (from Crafty-Stamper)! We get creative trying to use up our never-ending stash piles along with a prompt for each month. I know she always has great inspiration to share, so please check out her blog too! Here’s my AJ page with the “SMASH OUR STASH” September prompt of “IMPRINT” (using gel plate, print machine, leaves or something to create an impression):
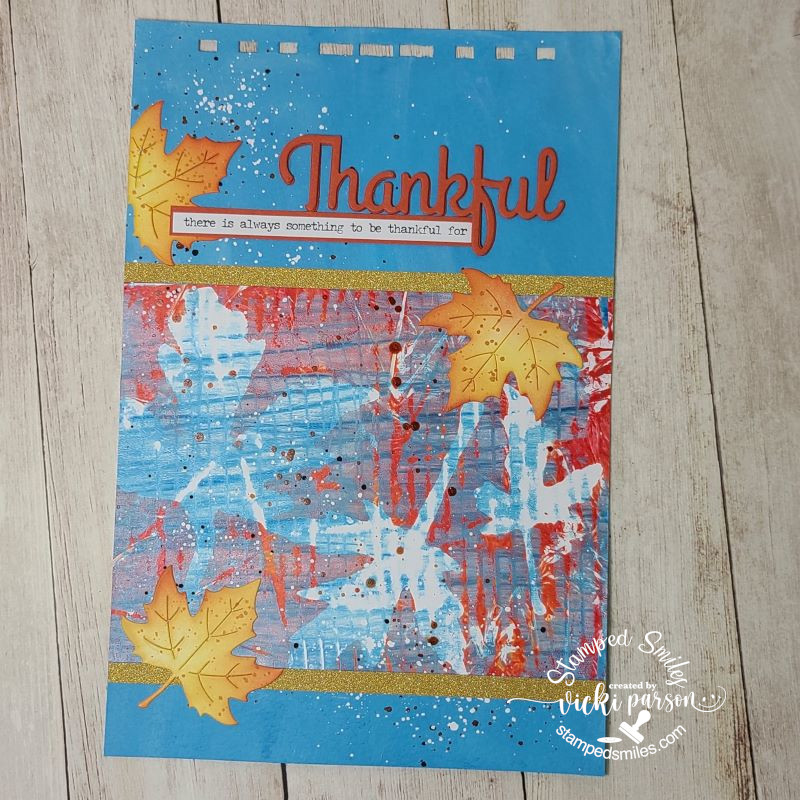
Really had a fun time with this as I hadn’t gotten a chance to play around with my gel plate very much and I received about 15 different prints in one sitting! It started out like I didn’t have a clue, but the more I kept experimenting, the more fun and unique prints came out. Do you have a gel plate and/or do you use it often? (If you’re new to Gel Printing, here’s a link to a You Tube video showing you basics on how to get started – The Basics of Gel Printing)
For my print here, I decided to try something from nature and found a couple of maple leaves in my yard that were laying on the ground starting to turn. I think there are about 3 layers of prints on this one…hard to remember when you just keep going! I cut it out to fit the size of my AJ page.
FOR THE BACKGROUND – I started with my usual 6″ x 9″ Canson 140# cold pressed watercolor paper with pre-punched holes at the top and covered it with DecoArt media fluid acrylic Primary Cyan applied with a baby wipe. Really love the blue background it gave here. Then this is when I applied the gel print piece to my background. I then used some orange, black and white colored acrylic paints to create some splatters over the background and gel print piece.
I die cut some maple looking leaves from the Taylored Expressions Garden Variety-Fall die set and ink blended them. I also splattered some orange paint over them as well. I had some gold glitter sheets that I cut down in a couple of thin strips to add to the top and bottom of my gel print piece. I then attached the die cut maple leaves.
I cut out the word “Thankful” from Impression Obsession three times in Pumpkin cardstock and layered them together for my page. I also grabbed this sentiment from the Tim Holtz small talk stickers and layered it over the same Pumpkin cardstock and attached it next to the “Thankful” word on the page.
I thought about adding something more, but I then thought it would distract from the printing which already has a “busy” look to it and so I called this one done.
- I’m very THANKFUL that you’ve taken the time to stop by and your kind support! It’s always more fun to craft with like-minded friends! I’m also THANKFUL to my crafty friend Carol for sharing this monthly AJ fun with me as well! (I will stop by to see your page as soon as I can my friend!)
Have a great day and see you in October! 😊
TO LEAVE A COMMENT:
- Start typing in the comment box below each post you’d like to comment on and leave whatever message you’d like.
- Once you start typing within the box, you will see 3 buttons show up with the options: “W” for WordPress icon, “F” Facebook icon and an “envelope” icon. Choose one of these buttons in which to “login” or enter your name/email because this blog doesn’t allow anonymous comments.
- If you’re a Gravatar.com user, then you can click on the “W” button to sign in which will automatically show your profile photo and a “gear” button next to it. If you already see your profile photo showing up, then all you need to do is leave your comment and hit the highlighted reply button.
- If you’d like to just enter your name and email (email address is not published), then click on the “envelope” icon. Once you’ve done that, the “reply” button should be highlighted so that you can leave a reply. Hopefully, once you’ve left your comment, it will “remember” who you are the next time you visit, and you won’t have to keep entering your information. **If you’re already logged into WordPress, this option WILL NOT work. If you see your Gravatar profile with a gear next to it, you are ready to leave a comment.
*****If you are NOT seeing your comment appear immediately after you’ve left your comment and hit the reply button, I may have to “approve” your comment. But once I’ve approved you, you shouldn’t have to be approved again unless you’re leaving several links within your comment.
I hope this helps! Sorry if you’re having a problem leaving a comment and I really appreciate you taking the time to support your kindness with me! BIGGEST HUGS