WARNING: Spooky post with Monsters/Ghouls for {Cupcake Inspirations}

Hello there friends!  Halloween is very quickly approaching us at the end of this week and it’s one of my favorite Holidays ever since I can remember and it was such a fun memory of things I passed onto my own children to have fun with as well.  We have lots of fun memories together.  I know there are some people that don’t like it…or maybe the “scary” things that come from it, but for me, the more scary, the better! (With the exception of the little ones, I don’t like to scare people that don’t like a good scare…but for me, it’s all in fun and make believe.)  This is the reason for my warning post title…just in case you happen to not like it.  It’s totally fine if you don’t!😉 – OR clowns!! LOL!


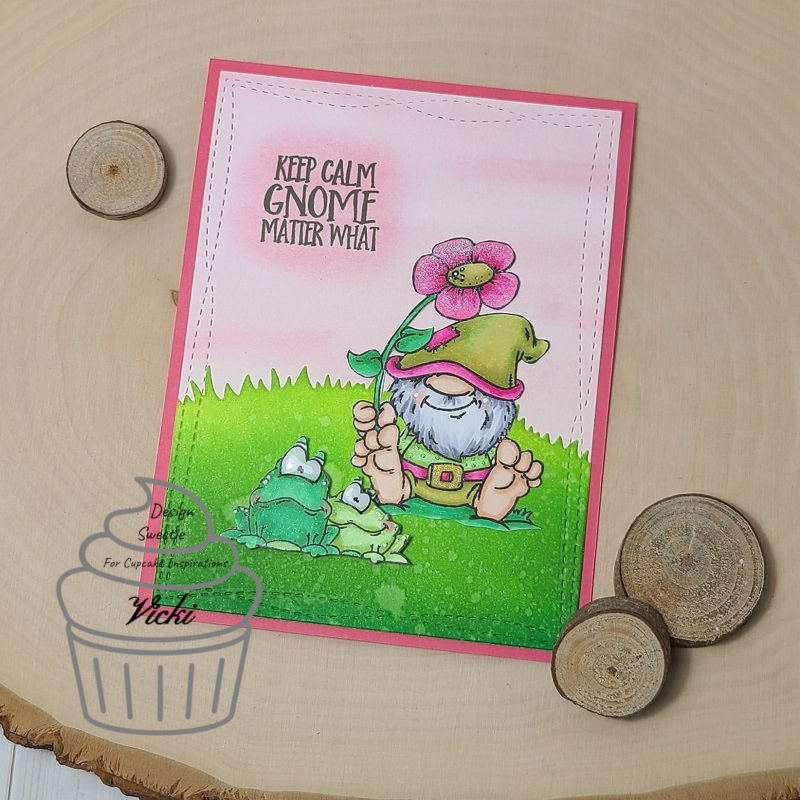
Today starts a fun new challenge over at the {Cupcake Inspirations} Challenge Blog with the theme of “Monsters/Ghouls“.  Looking at the photo, you can opt to make a cute little colorful monster/alien type of birthday card if you’re not into the Halloween or scary, so just another way you could interpret the challenge idea if you wanted to.

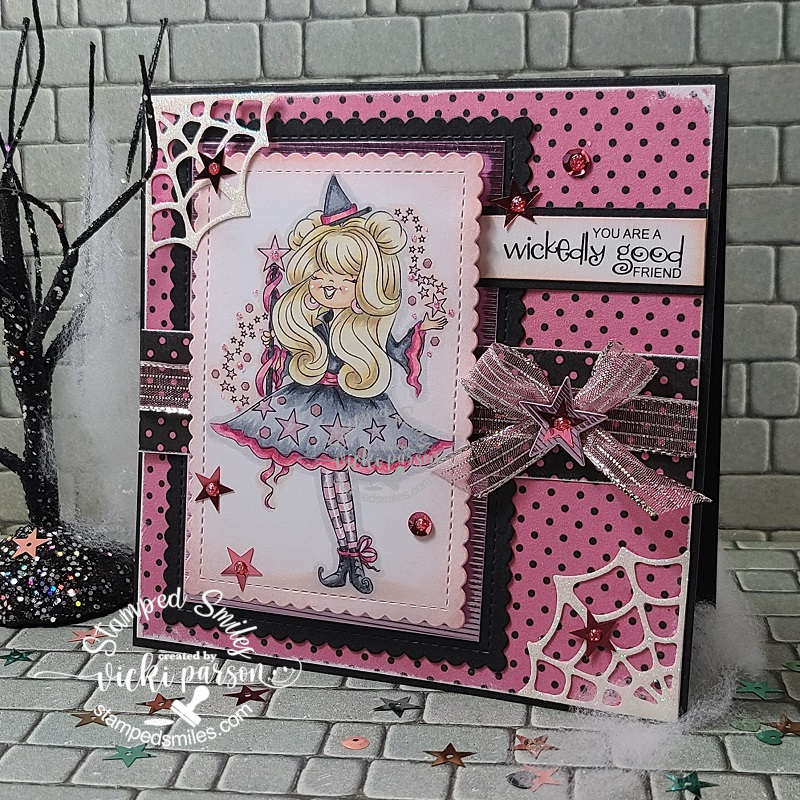
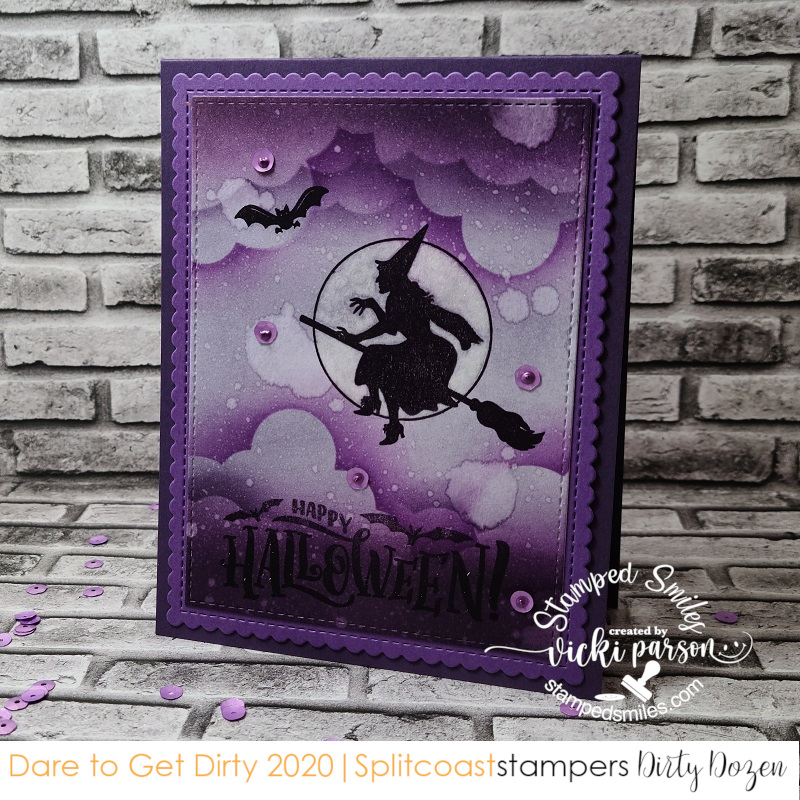
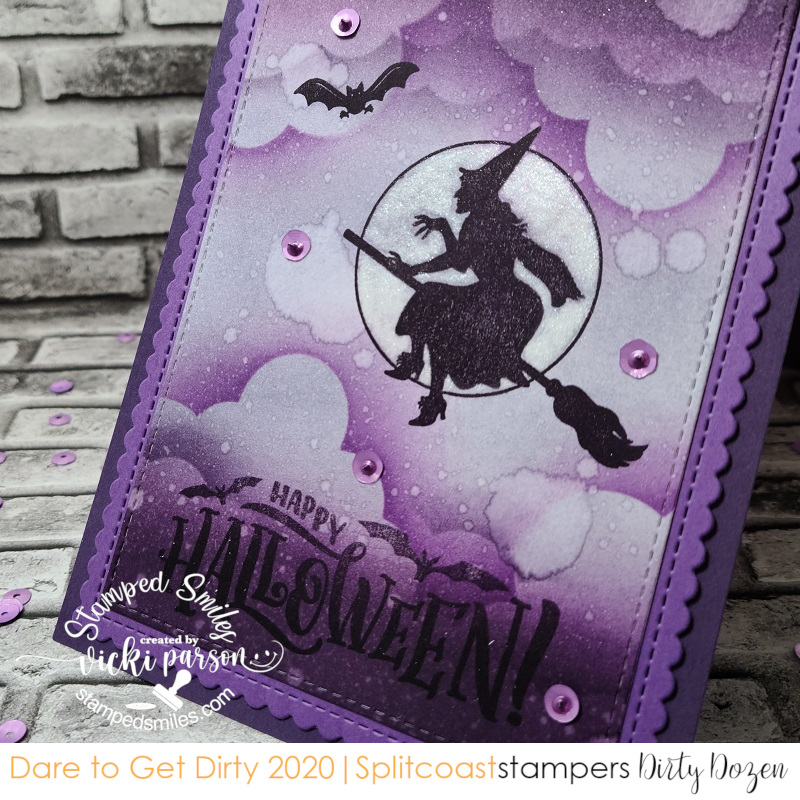
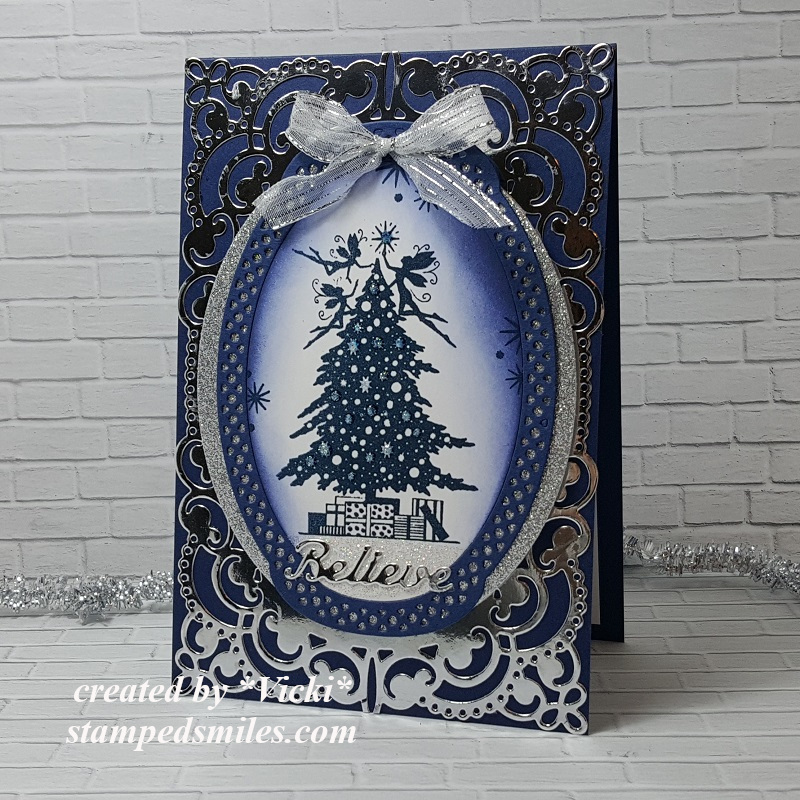
But here’s my scary “monster/ghoul” creation I made for the challenge:

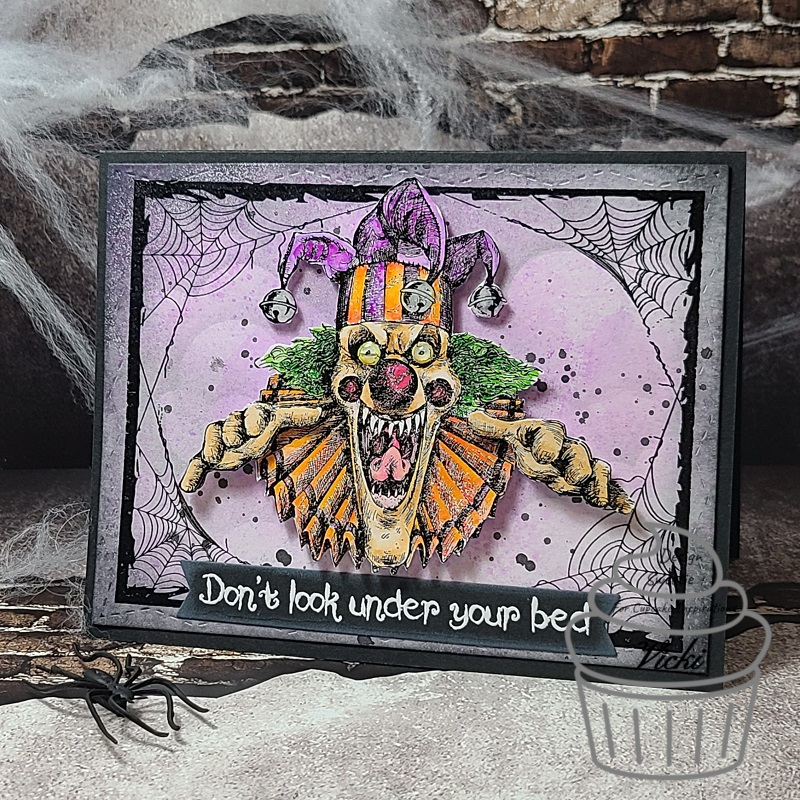
He is a bit on the spooky/scary side, isn’t he?!  I have been looking for a creepy clown image like this for a couple of years and finally Whimsy Stamps came out with this “Creepy Clown Sleep Tight” rubber stamp set and I knew I had to grab it up and specifically in reference to the movie “It” by Stephen King who’s a favorite author of mine.  My younger son is really into these type of things too, so this one’s going to him!

I started out the background with a piece of watercolor cardstock that I used some Black Soot Distress ink to sponge in some clouds with using a cloud stencil from my stash.  I then took some Wilted Violet Distress Oxide Spray and water and let the color run into the background with the sprayed water.  I also watered down some more Black Soot ink and made some splatters with a brush over it.  I then black heat embossed the Whimsy Stamps Spider Web Frame over top of it, cut it out with the WS Zig Zag Stitched Rectangle die and then added some more Black Soot ink around the edges.  I layered it over an A2 sized top folding black card base.

For the creepy clown image, I black heat embossed it twice over a piece of Bristol Smooth Watercolor panel and then used my Zig Clean Color Real Brush markers and a water brush to color it with.  I fussy cut it out and then just cut out the hands only of the second image, and used some foam tape to pop the hands over the image and then the entire clown image over the frame background.  I white heat embossed the sentiment from the “Creepy Clown Sleep Tight” set over a piece of black cardstock and then die cut it out using the WS Quick Strips die set.  (Note:  I used a partial die cut method to lengthen the die so that it would fit the sentiment.)  I sponged around it with white ink and then glued in place under the clown image.

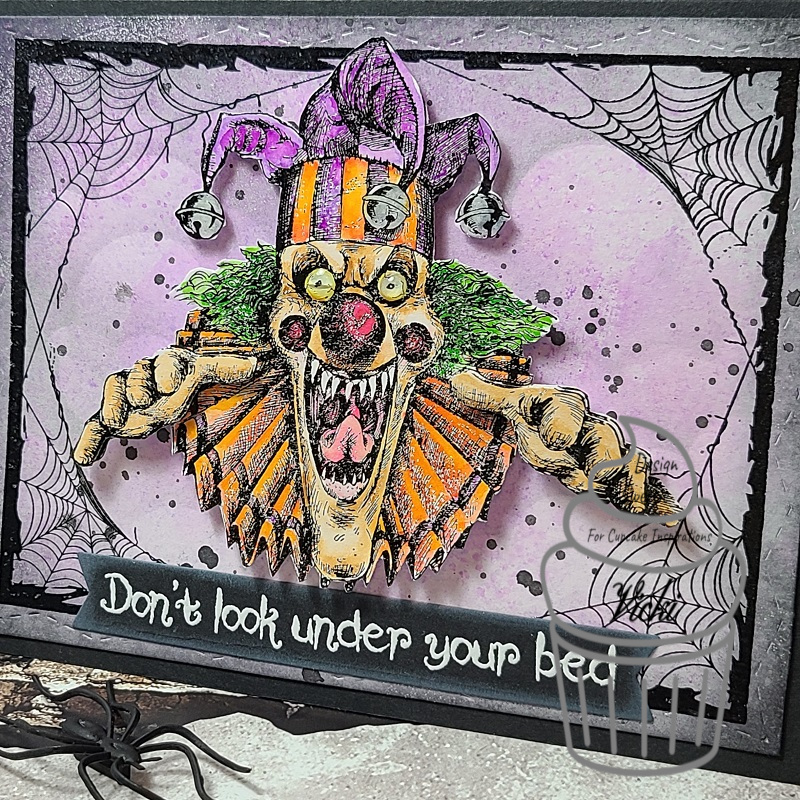
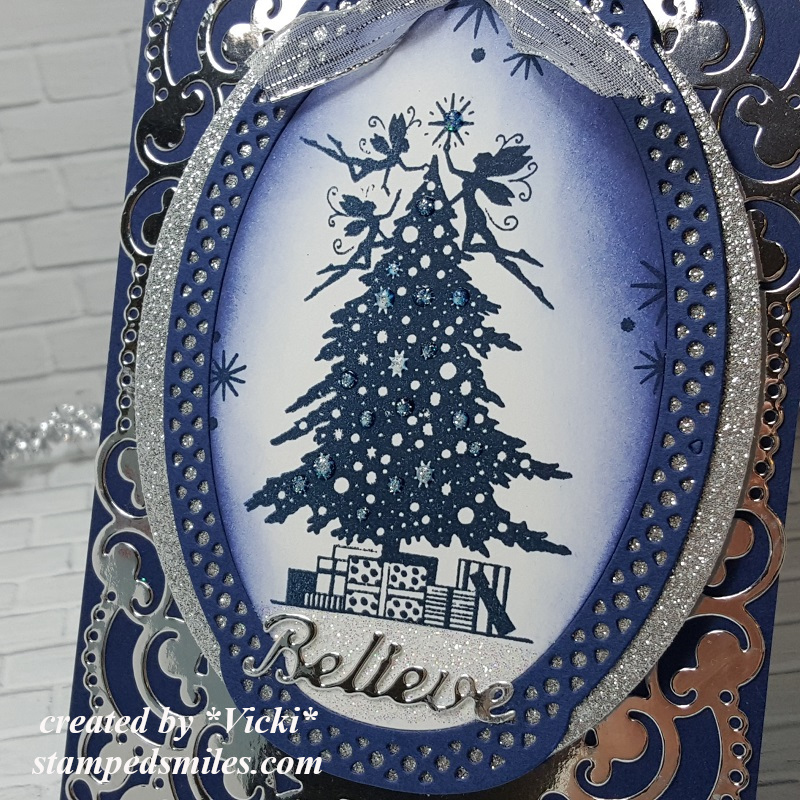
If you “dare” to take a closer look at mister creepy clown here, you see how I’ve colored him and cut him out.

I did use some brighter colors as he’s a clown and I really wanted him to pop from the design.  I used a silver metallic gel pen to color in the bells on his hat and then I’ve used some glossy accents over his yellow colored eyeballs to make them pop out a bit more as well.  The teeth were left white, but I used a white gel pen to color them in a bit for more prominent whiteness.  It is such a detailed image so it was fairly easy to color.

I hope you’ve enjoyed my good Monday morning scare for you today!😱🤡😂

Other Challenges I’d like to enter “Creepy Clown” for:

  1. Double D – October:  What does it mean to you? (spooky Fall fun Halloween!)
  2. Mod Squad – Spooky Halloween
  3. Simon Says Stamp Wednesday – Layer it Up (popped up layers over clown)
  4. Creative Moments – #201 Anything Goes
  5. Cute Card Thursday – Stamping
  6. Creative Knockouts – #373 Halloween (black, green, purple, orange)
  7. Crafty Catz – #524 Anything Goes optional: hats
  8. Daring Cardmakers – Spooktacular Makes
  9. Two Old Bats – Halloween Jump Start *NEW CHALLENGE BLOG

Spooky Undertaker Tag for {Cupcake INspirations} Color Challenge

Hello there friends!  I’ve been a bit MIA lately but that’s because I’ve actually been having fun attending a virtual stamp event which I will be sharing some things I’ve done with you later and I’ll be doing it all over again this weekend as well!🥳  Although it doesn’t replace an in-person live event, it was lots of fun!  I’ve also been enjoying time visiting with my son who stopped by for the weekend!


Today I’m stopping in to share my creation with you for the brand new challenge over at {Cupcake Inspirations} using this unique color combo:  OLIVE, RED and LAVENDER  The first thing I had thought of was the inspirational photo to go along with it and it reminded me of this cool Tim Holtz stamps/stencil set I bought a few years ago:

I thought it would be fun to play around a bit with my Distress Spray Stains over one of those Distress Tags.  So I sprayed a few of the colors over it and then also sprayed water over it as well to get the colors moving and blending together.  I think it turned out pretty cool.  I used the Distress Sprays I used were Crushed Olive, Fired Brick and Seedless Preserves.

I then took the stencil from the Tim Holt “Halloween 2 Stamps/Stencil” set and used some Black Soot distress ink to sponge the bats in the center of the tag.  I then used the coordinating distress ink colors and used the other portion of the stencil to sponge the colors with.  I took a thin strip of black cardstock to attach above and below the stenciled bat areas.

I took the skull image from the Tim Holtz “Halloween 2” stamp set and stamped it with black pigment ink over a piece of vanilla style cardstock and heat set it with clear embossing powder.  I fussy cut him out and added a piece of purple metallic ribbon around his hat and then glued on a purple flower along the side before popping him with foam tape in the center of the oval die cut piece from silver foil cardstock.

I stamped the “undertaker” sentiment from the stamp set with black permanent ink along with some scripty words in random places over the tag.  I also had some Tim Holtz Halloween rub-ons that I used for the spider and the “31” numbers.  I finished the tag with some more of that purple metallic ribbon and the key charm at the top.

Here’s a closer view of the skull with the embossed details along with the shine from the foil cardstock and ribbons.

Really had fun putting this tag together and I think it will make a fun spooky treat to share with someone I love because I have several family members that are really into the spooky Halloween theme besides myself! Yay!

Thanks for stopping by and leaving your kind support! It’s very much appreciated and I’ll be seeing you again soon my friends!!

Challenges:

  1. Unicorn – Spooky and/or Cute
  2. Arty Divas Anything Goes
  3. Creative Craft Cottage Spooky and/or Cute
  4. The Paper Funday – #22 Anything Goes optional: Halloween/All Hallows Eve
  5. Creative Moments – #200 Anything Goes
  6. As You Like It – Fave non-card project and why? (I love making tags because I feel like you can “experiment” with different media on it and I like that I can use it for putting on gifts or even add to a card later.)
  7. This is Halloween Anything Halloween
  8. The Divas That Cut Paper – Autumn-Thoughts of Halloween + die cut/punch
  9. Crafty Cardmakers – Create a Tag
  10. Two Old Bats Halloween – Anything Halloween Goes *new challenge blog*

Pink Halloween for Digi Doodle Studios GDT

Hello friends!  I hope that you’re all having a wonderful week so far!  The weather has really been changing this week as we get into Fall now.  Speaking of that, it’s time for sharing some fun Halloween themed projects!

I’m VERY honored to have won a guest spot for this month over at the Digi Doodle Studios Challenge Blog!  So, for the October challenge, the theme is “Pink and/or Halloween” You can choose to use either or both…I’ve decided to use BOTH on my creation:

As a winner, I was given this darling image to play with called Gwendoline DDS Good Halloween Witch and I thought she would be so much fun to color up in the pink and black colors!  I think she turned out adorable in her pinkness!

I have also decided to print out a sentiment from the DDS Halloween Happiness Digital Sentiments Collection that I’ve used as a strip on the right side of my panel placed directly under the image panel.  Both of these panels have been sponged with some pink ink around the edges.  The witch image panel was popped up with some craft foam.

For the  papers, I have printed out the fun pink and black dotted patterns from the DDS Wonky Halloween Digi Paper Pack and then used a sander around the edges of them for a bit of distressed look.  Before attaching the black with pink dots strip in the center, I wrapped some pink metallic ribbon around it with a bow.  This strip was placed behind the image panel, but in front of the layers behind the image panel. Those layers are pink metallic mirror cardstock and a scallop die cut black cardstock which was also layered behind the sentiment strip.  All of the panels were placed over a black top folding 5″ card base.

I’ve added a couple of die cut spider webs from some white glitter paper and attached them in the corners of the design and then found some pink sequins with stars that I filled the centers with some pink glitter drops scattered around as well as placing an extra die cut star and sequins in the center of the bow.

And here’s a closer look at the coloring I’ve done over her using Copic markers.  I’ve used a white gel pen for the dots on her cheeks as well as highlights on her legs.

It’s always hard to really show all of the wonderful shimmer and sparkle, but I’ve used a glitter brush pen over the pink stars in her dress as well as the stars surrounding her. (Her pink earrings were covered with it too.)  I took a pink metallic gel pen to color in the dots on her dress and the ones surrounding her.  I then took the pink glitter drops that I’ve used in the center of the sequins and add a couple more around her trailing stars and the center of the star in her wand too.

I also very lightly sponged in some pink chalk for the stars and dots area around her after it was all dry.

I hope you’ve enjoyed my card for today and have been inspired in some way!

Thanks for dropping in today my friends and I’ll be seeing you again very soon!😉

Challenges:

  1.  Daring Cardmakers – 3 Things Starting with ‘S”:  Stars, Spider Webs, Sequins
  2.  Pammie’s Inky Pinkies – PIP 2039 Anything Goes
  3. Always Fun – Die-cutting (my fave is stitched scallop!)
  4. A Perfect Time to Craft – Anything Goes Oct
  5. Creatalicious – Anything Goes
  6. Simon Says Stamp Wednesday – Anything Goes

Color Combo for {Cupcake Inspirations}

Hello friends!  I hope that you’ve had a very pleasant weekend!  I enjoyed spending some time visiting with my son for his birthday as I haven’t seen him for a while, so it was nice to laugh with him.  If you haven’t checked out the card I made for his birthday, check out my last post for the blog hop along with a video I shared!


Today starts a brand new challenge over at the {Cupcake Inspirations} challenge blog!  We are Playing with a fun color combination this time using the colors: Lime, Pink and Green It’s not only a yummy cupcake, but yummy colors too!  Looking forward to seeing what everyone comes up with!

Here’s my take with the colors for my first card for the challenge:

For some reason, the first thing I thought of was gnomes!  So I grabbed this really adorable Gnome Matter What clear stamp set from Whimsy Stamps and colored up that gnome and frog pair!  I fussy cut them out and made a grassy hill for them to sit on by ink blending a panel that was spritzed with water and then cutting it out with a mushroom border die from Lawn Fawn.

I also used the Lawn Fawn Watercolor Wishes paper pack in the pink shade for the background behind the grassy hill which I stamped the sentiment over and gently rubbed some more pink pastel over it.

The entire panel was cut out with my fave Wonky Stitched Rectangle die from MFT and layered over a bright pink A2 sized top folding card base.

A closer look at the images, you can see how I’ve got them colored up with Copics, but I’ve also added the usual details to the images with a white gel pen for the gnome’s cheeks and flower center.  I went over the flower with a glitter brush pen.  I’ve also added some dots to his shirt with a metallic green gel pen and then went over his buckle with a gold gel pen.

I’ve just attached the gnome with liquid glue, but I’ve used foam tape to pop up the frog pair and then I’ve added some more dots with the white and green metallic gel pens and then went over their eyes with glossy accents for shine.

I think maybe this is a fantastic message for all of us right now.  That gnome looks pretty chill!😉

Thanks for joining me today friends and I’ll be seeing you soon!

Challenges:

  1.  Love to Scrap – LTSCB137 Anything Goes September
  2. Crafty Catz – #518 Anything Goes optional:  gems and/or glitter
  3. Creative Craft Cottage – Include an animal (frogs)
  4. Colour Crazy Craft – Anything Goes + coloring

Guest Designer for *Cheerful Sketches*!

Hey there friends! I’m so excited to share with you my project I’ve made for the September *Cheerful Sketches* blog challenge as a guest designer for this month! Please be sure to check out the original September challenge post for details and where to link up your project.

Here’s the project that I’ve made with the sketch photo and image that was provided to me:

This darling little image is by Colour of Love Shop called Li’l Fidget Unicorn Girl – A Daisy Thing and you can click on the link to see/purchase image in the shop if you’re interested.  They’re sponsoring the *Cheerful Sketches* challenge for this month, so be sure to check out all of the wonderful inspiration from the team over there!

I have used the sketch for inspiration on how to layout my card here after I colored her up and then cut her out with a circle die.  I also ink blended around the edges for a bit of color and then I found some pretty papers in my stash to cut out wih die and accent the circle image panel as well.  I’ve used a Spellbinders scallop circle die as well as a MFT older die frame no longer available.

I had some pretty fairy style papers in my stash and I’ve added those as well as more of the papers from my layered die cut circle from Brutus Monroe called Mermaid Skin Cardstock and lavender cardstock from my stash.  I then added some pretty flowers as well as sequins and glitter over the design.

I’ve also stamped a “Make a Wish” sentiment in the bottom right corner of the card.

Here’s a closer look at the Copic coloring I’ve done on the image.  I’ve added some glitter to her unicorn horn on the top of her head and I’ve used several different gel pens to add dots and details to the image as well.  It was very hard for me NOT to use a purple color on her for the flowers…so I think it incorporated well into the design.

You can also see the wonderful shine over that Mermaid Skin cardstock I’ve used to!  It’s just beautiful when you’re holding it in person!

You can also see where I’ve taken some Ranger Stickles to fill the centers of the sequins and add additional drops.

Sometimes it’s fun to just sit and color up gorgeous images like this and I think this was a really good one to practice along with the sketch!  I really hope that you’ve enjoyed it as well and has brought you some inspiration today!

Thank you for stopping by and I’ll be seeing you again soon!

Challenges:

  1. Creatalicious – #194 Anything Goes with optional: pearls and/or lace 
  2. A Perfect Time to Craft – #9 Anything Goes September
  3. A Bit More Time to Craft – #123 Anything Goes September
  4. Crafts Galore Encore – #79 Anything Goes September
  5. The Fairy and the Unicorn – Anything Goes + fantasy
  6. Love to Craft – LTCCB50 Anything Goes
  7. Cute Card Thursday – Anything Goes
  8. Colour Crazy Craft – #35 Anything Goes + colouring
  9. Creative Fingers – #192 Anything Goes

Spooky Ombre & Welcome Gnomes for Dare to Get Dirty

Hello friends!  I’m back again today to share a couple more cards that I’ve made for the Splitcoaststampers “Dare to Get Dirty” event!  They’ve released another batch of challenge over there today!  There is certainly lots of crafty fun going on lately, isn’t there?!😀

My first card was made for a challenge from the lovely Lee:

Vicki-DTGD20LuvLee-ombre

This card was so much fun to create!  I’ve used only purple shades to make this entire design!  I started out with a white piece of cardstock using the MFT Rolling Clouds stencil and ink blended them in with several Stampin’ Up! inks that I’ve had in my stash for quite a while now! LOL!  After I was done, I spritzed it with a water bottle.

I took the awesomely spooky Trick or Treat stamp set and used some SU! Elegant Eggplant ink to stamp the witch image, bat and the sentiment at the bottom.  I used my MISTI to stamp several times to darken the ink up on them.

I cut out the panel with a stitched rectangle and then cut out an additional piece of Potion Cardstock with a stitched scallop rectangle die from MFT. I layered it over an A2 sized top folding Elegant Eggplant card base.

Vicki-DTGD20LuvLee-ombre-close

I then took a glitter brush pen to “color in” the inside of the moon around the witch that gave a really cool shimmer look to it. I then started noticing that it was taking away some of the purple ink while doing this, which was really awesome as it made the moon glow even more!  (I just had to be careful around the witch because she was stamped with regular dye purple ink and I didn’t want to blur it.)

I finished the design with some Lilac Matte Sequins that I filled with some Violet Galaxy Crystal Nuvo Drops.  It’s much more sparkly in person!


My next card was made for a challenge from the lovely Kelly:

Vicki-DTGD20MiamiKel4-gnomes

This scene was really fun to put together!  I fell in the love with the little house and gnomes from the Simon Says Stamp Gnome School.  I thought it would make a nice “new home” type of card.  I colored them up and cut them out with the coordinating dies to arrange over my scene.

The scene started with a piece of kraft that was ran over with the SSS Petal Plate die for the texture in the background.  I cut out some clouds and a border of grass with dies and inked them up with some inks for shadows.  I then took this panel and cut it all out with a stitched rectangle die and mounted it over a top folding A2 sized black card base.  I also took a sentiment strip from the SSS Gnome School Sentiment Strips to place over the design while arranging the images over the scene.

Vicki-DTGD20MiamiKel4-gnomes-close

For the sign on top of the “home”, I used one of the sentiments made for that spot and white heat embossed it over my coloring.  Hard to tell in the photo, but I’ve also covered the heart on the gnome’s hat as well as the glasses on the gnome with a glitter brush pen.  I also did the same for the windows on the home.

I hope you’ve enjoyed my creations for today and I sure appreciate you stopping in to check out all of the happenings that are going on!  Hope you’re able to join in some of what’s going on too!  See you soon!

Challenges:

  1.  Simon Says Stamp Wednesday – Oh So cute (bottom card only)
  2. Stamps & Fun = Creativity – #372 Lavender or Purple (top card)
  3. Always Fun – #177 In the Sky Scene (top card)
  4. Crafting Happiness – #63 Anything Goes

A Unicorn with Sprinkles & Rainbows for Dare to Get Dirty

Hello again today my friends! Yes, still posting and with another “twofer post” again today! It will calm down eventually, but for now I have lots of things to share with you!😀

As you may have read in my second post from yesterday, we kicked off the “Dare to Get Dirty” Event over at Splitcoaststampers and I shared the card I made for one of the challenges. I have another creation to share with you that I made for one of the challenges released today and this one is for the lovely Lori:

This really brought out the little girl in me when creating this card with the rainbow colors and magical scene! This sweet little unicorn image along with the rainbow in the background and the sentiment all come from the Digi Doodle Studios Unicorn Wishes Pairables set. I’ve printed them out, colored them with Copic markers and fussy cut them out with the exception of the sentiment which I left and cut out as a cloud with my Lawn Fawn Cloud Border dies. I’ve also used that die to cut some clouds from a piece of vellum and an additional piece of white cardstock.

I’ve used an older My Favorite Things Stitched Rainbow die from white cardstock that I colored with Copic markers to place behind the first set of clouds behind the unicorn. Before layering my clouds, I took some distress ink and blending tool to add a bit of blue shadow behind them. After attaching all the cloud and rainbow layers, I cut it out with the MFT Blueprints 27 die set .

Lastly, I’ve attached this layer over an A2 sized white top folding card base and popped up the fussy cut unicorn with foam tape. I took some random sequins to attach over the design.

Here’s a closer view of some of the details in the card. I added some loose glitter over the unicorn’s wings with a 2-way glue pen and some loose glitter. Hard to tell, but I’ve also added some shimmer to the rainbows and the unicorn’s mane with a glitter brush pen. I also added a bit more blue cloud shadow under the unicorn’s feet before attaching him on the card.

This was really fun to create and I know it will make a fun card to share.

Thanks so much for dropping in!

Slimline Waving Hello🧜‍♀️

Hello there friends!  Hope you’re having a wonderful week!  Just wanted to stop in with a Slimline style card I had made with a fun underwater scene.  (I’m thinking a magical place like this would be great to be in right now!  How about you?)

Vicki-BRM-mermaidslimline

These slimline cards are really great for creating scenes like this on and I was also having fun being able to “experiment” with my different products too!

I’ve the stamp set called Sea You Soon along with the background paper (mermaid skin) and the Lilac Shimmering Sand Paste were all items from a past card kit.

I created my underwater scene basically using the mermaid skin paper as the background.  Although it has a cool texture and smoothness to it, I was able to take the School of Fish stencil and add that Lilac sand paste over it.  Love that extra texture and purple hue it gave!  I also took the silhouette images from the stamp set and heat embossed them over this paper with black EP.

I stamped and colored the rest of the images from the stamp set with Copic markers and then fussy cut them out to arrange for my scene and popped some up with foam tape and then lastly added some clear acrylic bubbles over it.

Vicki-BRM-mermaidslimline-flat

You can see now that it’s lying flat how the color shifts and changes on the paper!

I’ve used some stitched wave border dies to help create the scene using some Kraft cardstock where I’ve also fit in to arrange the sand castle image that I colored and cut out.  I used Copic markers and gel pens to help fit the borders and image together.

I cut out the background paper with the Trinity Stamps Slimeline Stitched Card Panels and Windows die set.  I layered it over a piece of blue paper that was included with the kit and then layered that over a Slimline style card base measuring 8.5″ x 7″ folded in half from a piece of Aubergine Cardstock.  The sentiment was actually stamped from the Merfriends stamp set using black Ink.

You can see parts of the images with shimmer on them which have been colored with metallic gel pens.  I’ve also covered the mermaid tail and jelly fish with a Spectrum Noir Glitter Brush Pen.

The bubbles are looking a bit white instead of clear because my glue wasn’t quite dry enough when taking my photos, so my apology on that, but it took a couple of days to completely dry up clear for some weird reason!  Those babies aren’t going anywhere though!! LOL!

Hope you’ve enjoyed my magical underwater slimline card today!  Thanks so much for joining with me today and I’ll SEA you again soon!😁

Challenges:

  1.  Just Us Girls – #544 Trend Week:  Long & Skinny
  2. Crafting Happiness– #57 Anything Goes
  3. Pammie’s Inky Pinkies – PIP2028 Anything Goes
  4. Mod Squad – Slim Line Scene
  5. Little Red Wagon – #558 Fantasy
  6. Papercraft – Fantasy
  7. There’s a Stamp For That FB Challenge –  Summer and/or Slimline
  8. Not Just Cards – July Anything Goes

Lavina Christmas

Happy Friday friends!  As my “Countdown to Christmas” continues, today I’m bringing you a card I’ve made using some “new to me” stamps!

Vicki-LavinaChristmas

I’ve been very intrigued with seeing some of my blog friends out there using these very magical silhouette style stamps and loving what they’ve come up using them!  So I decided to make a purchase or two or so of these and have a play!  🙂

I’ve used the Christmas Eve and the Stars 2 Miniature Lavina World stamps for my card design here.  I’ve stamped the images out over some white cardstock with a Navy ink and then used some blue distress ink to sponge around the edges with.

For the layering of this card, I’ve used the Spellbinders “Chantilly Paper Lace” die along with some of my regular oval shaped dies.  I’ve also used an older Die-Versions “Believe” die cut for the sentiment.  That along with the large background panel were cut from some Silver Mirror cardstock.

The oval layers in the background were matted with some Silver Glitterstock along with some Navy cardstock which is also what was used for the card base.  I’ve added a silver metallic ribbon bow at the top.  I based the size of my card with the die cut so it is more of a 4″ x 6″ sized card rather than a standard A2 size.

Vicki-LavinaChristmas-close

Here’s a closer view of the image where you can see that I’ve added some Stickles “Star Dust” glitter in certain areas on the tree as well as the star on top.

I also covered the bottom of the image panel with a glue pen and then sprinkled on some dazzling diamonds glitter to give the appearance of snow on the ground.

Vicki-LavinaChristmas-flat

This isn’t my usual “coloring in” cute style that you’re used to seeing from me, but I really enjoyed putting this one together and playing with my new stamps!  I hope you’ve enjoyed it as well!

Thanks so much for stopping by today!  I’ll see you again soon!

Challenges:

  1.  Lavina World Challenge – Anything Goes + NO digital
  2. Sparkles – Add Glitter & Sparkle
  3. Jan’s Digi Stamps – Anything Goes
  4. Watercooler Wednesday – WWS252 Anything Goes
  5. Cute Card Thursday– Anything Goes
  6. Creative Knockouts– Anything Goes
  7. The Paper Girls – Holiday Lights (Fairies lighting the tree!)

Make a Wish for Whimsy Stamps

Hello friends!  Wow!  We are getting so close to Thanksgiving now within a few days!  I know that most people have been full steam ahead with making Christmas and I have really been quite festive myself with my own creations!  Today, I wanted to suspend the ‘Merry Making’ for just a moment….

Vicki-SZPreciousPresent-Nov26

This little cutie digital stamp is appropriately named Precious Present from Whimsy Stamps and she’s another adorable fairy image by Sylvia Zet.  You could certainly change up the colors to make her more festive, but I just felt like taking a “wee” break (LOL..Wee Stamps…see what I did there?!) and make something soft and light.

After coloring her up, I used the Whimsy Stamps Notched Square Dies to cut her out with and then layer with more panels behind her.  I also took a glue pen and went along the edges of the image panel then covered with some clear glitter.  I did the same with the purple strip in the background and the layer behind the sentiment panel, but just used some pretty sparkly purple glitter.

The background papers including the sentiment panel came from a pretty paper pad called “Fairy Garden” by Kaisercraft that I had purchased earlier this past Spring.  Love how soft and light the colors and patterns are in it.  I also found the perfect Stampin’ Up! cardstock color for my card base and one of the image layers called “Certainly Celery”.  It’s an oldie but a goodie for sure!   I finished it off with some more of that clear metallic ribbon (my fave) with a bow at the edge of the sentiment panel along with some twine and a button.  I also added some flowers by Prima and a couple of pearls in the corners of the green layer behind the image.

Vicki-SZPreciousPresent-Nov26-close

Here’s a closer view of the coloring I’ve done for this image using Copic markers.  I kept things really soft and simple for this.  I did add some shimmer over her wings with a Spectrum Noir glitter brush pen and I used a pink metallic gel pen to color the “dots” above her head.

The layers were popped up with foam tape and I’ve also popped up the sentiment layer with foam tape over that as well.  (You can see the glitter in the pink layer that was die cut too!  This came from that paper pad I mentioned above.)

Vicki-SZPreciousPresent-Nov26-flat

I hope you’ve enjoyed my non-Christmas card today!  I think you could turn it into something festive and I thought about doing that, but then decided I wanted to use soft and light colors and turn it into maybe a birthday type card.  Besides, I love soft subtle colors and lots of sparkle…so it was fun to put together!  🙂

It already has me longing for Spring and winter hasn’t even really started over my way yet! LOL!!  I do have TONS of creations going on in my craft room and haven’t really been sharing them on my blog, but I hope to be getting to that very soon as we are approaching the December month and there will be so much to share!  I’m excited to be sharing things with you soon!

Thanks so much for stopping in and have a wonderful day!

Challenges I’d like to enter this card for:

  1.  The Fairy and Unicorn – November Anything Goes + fantasy themed
  2. Fab ‘n’ Funky – Add a Button(s)
  3. Little Red Wagon – Birthday Card
  4. Alphabet Challenge – ‘R’ is for Ribbon
  5. Creative Moments – Anything Goes with optional:  Ribbons and/or Bows
  6. QKR Stampede – #373 Anything Goes