Feeling Young at Heart

Hello friends!  Stopping in to share another guest design creation that I’ve made!   Here’s another I’ve made using the very sweet digital set Doctor at Heart:

Vicki-SnSNov-YoungatHeart

Isn’t this image darling?!  My first thought on this set was to try and go a little “vintage” with my design.  I opened up a Word doc. to insert the image and sentiment and sized and arranged it how I wanted it to look.  I printed it out on some cream-colored card stock and then cut it out with the Tonic Studios Follow Your Heart die using the frame portion only.

I wasn’t sure I wanted the image to look “vintage” so in asking hubby, he told me that I needed to color him up with blue shorts, brown/tan shoes, orange top and blond hair!  He was very specific about that!! LOL!  So I colored this cute image up with my Copic markers and gave some “outlining” shadows around the sentiment too.  I took a gel Stardust Pen and colored in the ‘metal parts’ of the stethoscope and then added some Nuvo Crystal Drops Morning Dew (Gloss-clear) to the heart circle the boy is holding and let it dry.  I then used some distress inks and sponged around the edges of the heart image panel and spritzed it with water, waited a few seconds and dabbed it up with a paper towel.  I love the watermark look it gives to add that vintage flair and tie it all in together.

Vicki-SnSNov-YoungatHeart3

So when you tilt the card, you notice that the background looks like I’ve used some special glitter paper, but I did NOT!  I made my own glitter paper for the background!  I took another piece of black cardstock and covered the entire panel with VersaMark Ink and sprinkled it with some Black Magic embossing powder. Stunning sparkle!

Vicki-SnSNov-YoungatHeart2

For the look on the ribbon, I took some cream-colored seam binding ribbon and sprayed it with some water and rubbed it in some ink that I smeared onto my TH Glass Media Mat and crinkled it up and then let it dry.  I wrapped it around the embossed glitter background panel and added a bow with a button and natural twine for the center of it.  I mounted this glitter panel onto a 5 1/2″ squared cream-colored card base that I’ve ink blended around the edges in the same colors that I’ve used on the heart.  The heart image panel was then popped up over the ribbon strip and glitter background with craft foam and then the seam binding bow was attached along the edge of the heart.

Vicki-SnSNov-YoungatHeart1

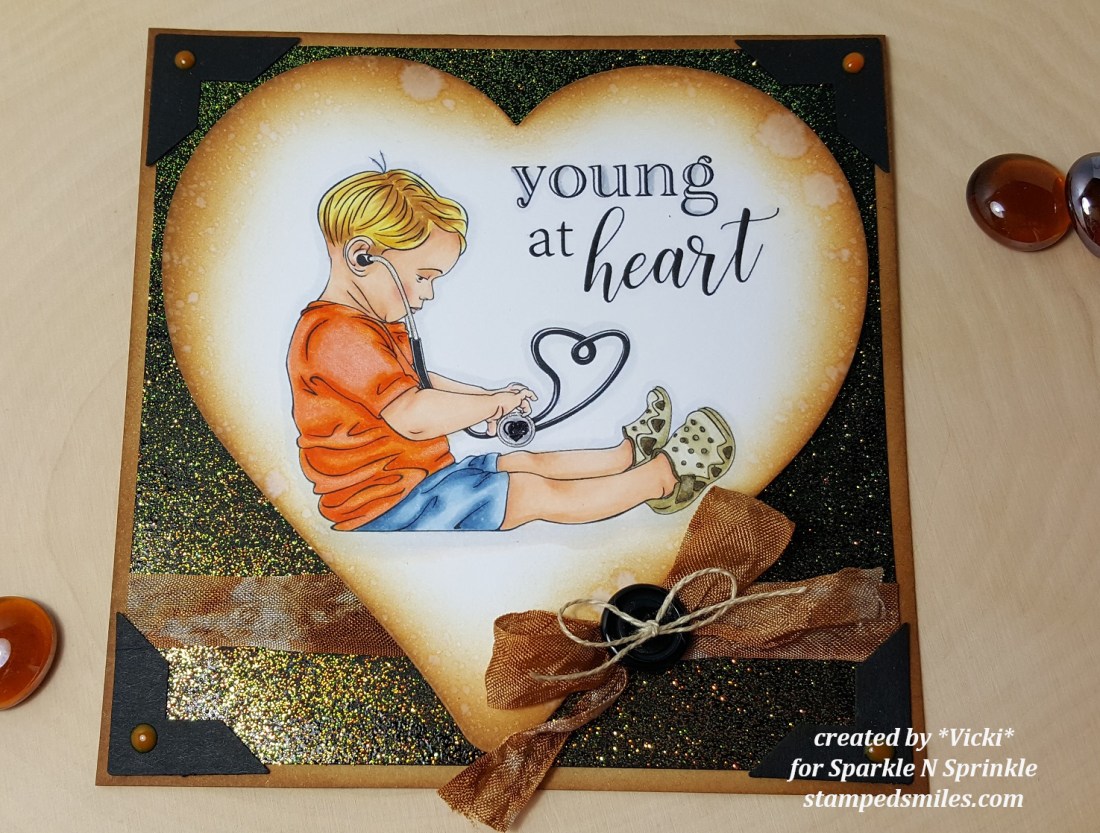
For the corners of my card, I had a very old corner punch that I punched out from black card stock and attached them to the corners of the card.  I then used the  Nuvo Crystal Drops Ripened Pumpkin to add some “dot” in the middle of each punched corner piece to finish it off.  I think that the tiny bit of orange color ties in nicely with the glitter background and his orange shirt.

I really hope that you’ve enjoyed my fun ‘vintage charm’ creation as well!  Thanks so much for stopping in today and I’ll see you soon!

Challenges I’d like o enter my card for:

  1.  Little Red Wagon – “Remember When” (used Crystal Nuvo Drops – Rippened Pumpkin – meant to be for Halloween)
  2. Crafty Creations – Anything Goes
  3. The Creatie Crafters – Anything Goes
  4. Fussy and Fancy Friday – Anything Goes

Seeing Stars at Cute Card Thursday

Hello friends and welcome to Thursday already!  It seems like the weeks are quickly going by faster and faster as we close in on the end of the year!  It’s the “crazy crafting season” for sure! LOL!

Today brings up another Cute Card Thursday Challenge and for this week’s challenge, we’d like to see “STARS” on your creations!  I think this is a good one for whatever it is you’re crafting even if it’s Christmas…or not!   I have decided to make mine non-Christmasy this time:

Vicki-CCT556-MFTStarShaker

I am pretty much “out-numbered” with males in my family, so most of my birthday cards are for men and I have a couple more birthdays to celebrate next month, so I thought this was a great opportunity to sneak one into my Christmas card-making time!

All the stamps and dies used on my card today come from My Favorite Things.  (I have recently purchased some Christmas items and look forward to getting my hands crafty with some of it soon!)

I started my card out with the Blueprints 27 scallop rectangle die.  I took some star images from a retired MFT stamp set called “Totally Happy” and randomly stamped them with VersaMark on this card front panel and then heat embossed them with clear embossing powder.  I taped off the scalloped edges so that they wouldn’t get inked.  I’ve used the Blueprint Sketch, Peacock Feathers, Tumbled Glass and Twisted Citron Distress Oxide inks and blended them over the stars for an ink resist effect.  I also spritzed this panel and dabbed it with a paper towel for the water drop look.

I thought it would be fun to make a shaker card, so I die cut a star from this ink blended panel with the MFT Star Shaker Window and Frame Die-namics set and then cut the frame out from some black card stock.

Vicki-CCT556-MFTStarShaker-close

What makes this such an easy shaker card is that MFT also has these Star Shaker Pouches that coordinate with the die!  So I’ve taken this and fit it through the die cut star area on my card front panel and then filled it from the back with some confetti stars, I found some matching-colored seed beads and pretty sparkly silver glitter chunks to fit inside and then covered the back with some white cardstock.  Just love the sound when it shakes because you can hear the seed beads! 🙂

Vicki-CCT556-MFTStarShaker-1

I then took a strip of black card stock and white heat embossed the sentiment (same stamp set mentioned above.) to stamp the greeting.  I first layered the scallop inked panel over a black piece of cardstock and then attached the sentiment strip and cut off the edges to match that layer.  I then mounted this panel over an A2 sized top folding white card base.  I finished it off by adding some silver star sequins filled with some Silver Stickles in the centers of each one.

Sometimes you wonder about “adding too much bling” for a guy, but I think this is a fun shaker birthday card that a male would enjoy too!  Hope you’ve had some fun on my blog today!  I thank you so much for stopping by!  I will see you soon!

Challenges I’d like to enter this card for:

  1.  Challenge Up Your Life – Celebrate/Anniversary, etc.  (Happy 100th Challenge!)
  2. Use Your Stuff – Stars
  3. Crafty Cardmakers – Lots of Layers
  4. Shopping Our Stash – (SOS 380) Tic Tac Toe (I used the middle row going down:  stamps, glitter was handed from my grandma to my mom and then to me..so yeah, older than 5 years probably! LOL & Happy Birthday)
  5. Watercooler Wednesday – WWC196 – “All About Occasions”

Birthday Wishes for Hubby

Hello friends!  Happy Friday!  I wanted to share a few things from my husband’s birthday we celebrated last night along with the card I made for him.

Vicki-MFTDeer-Bday

I was going for a masculine look of course and I know that he likes nature, wildlife, etc. and with his birthday being in November, I thought a Fall scheme would work out nicely.  Besides, I had gotten some My Favorite Things products and wanted to have a play with them, so I used the current color challenge when making this one.  (See challenges list below)

For my design, I went with a Natural cardstock base, rounded the corners with a corner chomper and ink blended along the edges with some Vintage Photo distress ink.  I got a little more carried away with the inking than what I wanted, but then went over it by spritzing some water and dabbing it up with a paper towel for the water marks.  (I’ve also cut out some leaves with the Falling Leaves Die-namics die set and then sponged some colors around the edges for them as well.  These were added as accents on the over-all design.)

Vicki-MFTDeer-Bday1

I was so excited about using this Delightful Deer Die-namics set.  There are some T-I-N-Y bits in there to cut out and attach! LOL!  I sponged around the edges and bottom of legs with a brown ink.  I die cut some white dots and the piece for tail as well as cut out a couple of brown dots for eye and nose as well as cutting out his antlers.  I also added a few extra “dots” with my white gel pen on the deer.  It was popped up over the scene with some foam tape.  The main deer was cut from Persimmon cardstock which is also what I’ve used to cut out a banner (from the Essential Fishtail Sentiment Strips die-namics) that I white heat embossed the sentiment from the Essential Sentiments stamp set.

Vicki-MFTDeer-Bday2

For my scene, I took some of the MFT Candy Land Paper Pack and use the dotted “Sour Apple” color piece and die cut a panel of it with the Stitched Rounded Rectangle STAX die-namics and placed it over my ink blended natural card front base.  I then used the Stitched Valley die-namics and cut some pieces from brown cardstock and lightly sponged some white ink over top of the “hills”.  I placed those over top of my natural card front base and also cut out some trees from one of the FREE die-namics dies that I received with an order from some Sour Apple card stock and attached them over the “hills”.

Lastly, I wrapped some twine around the card front base, added my die cut leaves where I wanted them, attached this panel to a top folding A2 sized white card base that I’ve also rounded the corners on with a corner chomper.  Lastly, I’ve added some clear crystal drops in random places.

I enjoyed creating this one using mainly die cuts and minimal stamping!  I hope you’ve enjoyed my masculine card design as well! 🙂

Here’s the challenges that I’d like to enter this card for:

  1.  MFT Color Challenge – Persimmon, Sour Apple, Milk Chocolate, Neutral
  2. Happy Little Stampers Anything Goes with Dies –
  3. City Crafter – #437 Woodland Animals
  4. Crafting By Designs – Anything Goes
  5. Creative Moments – Anything Goes

If you happen to follow along with me on FB, then you may have seen where I’ve had the talented lady Dina Kowal create a portrait for me using a past photo from our beloved family member Mocca that passed away this last February.  Dina is extremely talented with her pencils!  My hubby was amazed and here is a photo of him with it last night after he opened it up for his birthday present:

BertBday-11-08-2018-gift

He said, “Oh wow!” when he opened it and wanted me to tell her that she did an amazing job, it looks just like her!   I went through the photos with hubby (he’s not on social media) that Dina had shared of her on-going creative process with the portrait, and this was one from the beginning:

Mocca drawing photo 1

And this was the photo that she used for her creative process:

OLYMPUS DIGITAL CAMERA

We are thrilled and honored to have this stunning work of ‘Mocca’ art in our home and look forward to getting it framed and put up!  Thank you to Dina for sharing her talents with all of us! 🙂

Thanks for dropping by my friends!  See you soon!

Food and Drink at Cute Card Thursday!

Hello friends!  It’s time for a new Cute Card Thursday challenge!  This one may have a tendency to make you a little hungry as we are asking for your “Food and/or Drink” creations to add to the challenge gallery this week!  We really look forward to seeing what you come up with for it!

Here’s my take on the challenge:

Vicki-CCT552-NachoBday

LOL!  I can’t help but giggle at these silly puns and especially with the smiling faces on the food images too! 🙂  I just had to grab the Simon Says Stamp “I Chews You” card kit and I couldn’t wait to have a play with it!  Everything that I’ve used on my card including the paper all come from this card kit.

There were some pre-scored card bases, so I used one of those for my card base, then I took a strip of the colored stripes paper and a thin strip of the gold glitter paper included in the kit and glued it on at the bottom with the glue included in the kit.

I then stamped the images and colored them with my Copic markers.  I put the “salsa bowl” at the bottom so it looks like it’s setting on top of the colored stripes.  I added the speech bubble with the punny sentiment inside of it too.  I then added the sequins from the kit and then filled the centers with some Nuvo Crystal Drops for the centers.

Vicki-CCT552-NachoBday1

Here you can see a closer look at the coloring of the images.  I’ve also added some shimmer with a Spectrum Noir Clear Glitter Brush Pen over the “salsa” images.  I know that it shows it as “guacamole”, but I’m more of a “salsa” person myself and decided to go for that instead.  Hubby is not a guac fan either, but we love to eat Mexican food! 🙂

Thanks for joining me today!. What’s on your menu?!

Challenges:

  1.  Moving Along With the Times – For a Man
  2. Seize the Birthday – Anything Goes
  3. CASology – Menu
  4. Addicted to Stamps and More – Clean and Simple
  5. Watercooler Wednesday (WWC192) – Marsha’s Masculine Anything Goes

I’m Just Lion Around

Hello friends!  It’s the start of the very last week for August already!  Fall is quickly approaching, and no… I’m not “lying” around, but I have been playing with this really cute King Lion digital image from Whimsy Stamps:

Vicki-WSKingLion-Aug28

I really enjoyed coloring in this image!  I’ve used my Copics to color it and of course I had to add some fun little details as you will see in the photo below.

I was trying to keep this design somewhat simple as the star of the show needs to be this image.  To help with the design, I’ve printed out some Whimsy Stamps digital papers called Great Outdoors.  Although the distress coloring on the edges of the image panel looks a little bright in the photo, it is more toned down on the card when seeing it IRL.  I have also stamped the sentiment and some accents on the image panel from the Whimsy Stamps Painted Sayings clear stamp set.  I added some ribbon through the center and then I added some wood veneer accents on each side of the image panel before popping it up with foam tape.  I’ve also added a couple of gold enamel dots on each end of the sentiment above the image panel.

Vicki-WSKingLion-Aug28-close

Here’s a closer look at my coloring of the image and you can also see that I’ve added some glossy accents to his nose, some shimmer on his crown as well as some red glitter Stickles in the center of the red gems on his crown.  I’ve added even more glitter along the distressed edges of the image panel with some tinsel glitter Stickles.  I used a distress tool to go around the edges.

I hope you’ve enjoyed my card today!  I will be back again on Thursday for a new challenge!  Thanks so much for stopping by!  I appreciate you being here! 🙂

challenges:

  1.  Sketch Saturday – sketch #528

2.  Crazy 4 Challenges (C4C449) – masculine

3.  Crafty Friends – Animals/Birds

I’ve Been Schooled!

Hello friends!  Hope you are doing well and are having a great week!

I took some time over the last few days to try and follow along with all of the videos and classes going on over the My Favorite Things blog as they are doing “Session 2 of their MFT Summer School“.  I don’t know about you, but I find that there is always something new to learn and different things to try with crafting and I enjoy learning about it so that I can continue to improve in what I already enjoy doing.  Sometimes that self-doubt creeps into the skull to tell you that “you’re not good enough” and “give up”, etc.    The way for me to try and stomp out those feelings is to take classes and try something new.  I just want to enjoy the process and learning can help bring on more positive feelings.

Since there are SO MANY creations in this post, I won’t go into too many details other than share the links to the MFT Summer School links that I made each card for.  I hope you enjoy having a look at them:

Day 1 – Monochromatic (CAS)

Vicki-MFTcamp-monochromatic CAS

I used several colors of MFT purple (of course!) cardstock and stamped a background stamp with VersaMark over it.  I think the die I’ve used is from something retired.

Day 2 – Focal Point

Vicki-MFTcamp-FocalPoint

Really had fun with this sweet little bear! 🙂  I loved the layout so much from class and decided to follow that for my card here.  The balloon and die cut sentiment actually have shimmer over them which doesn’t show in the photo very well.

Day 3 – Visual Triangle

Vicki-MFTcamp-VisualTriangle

This one took me quite a bit to put together.  I think maybe part of it was all of the coloring, but I was struggling a bit with the concept…I’m hoping this was how she was going with it.  3 long strips at the bottom, 3 images at the bottom and 3 images at the top.  The purple in the background was a watercolor wash like she showed in the video, but I didn’t heat emboss any image like she did.

Day 4 – Rainbow

Vicki-MFTcamp-rainbows

I have done this before, and I really like how you can use up your paper scraps in a colorful way.  I used the same frame die here in a similar manner as I did the card above this one.  I cut the sentiment several times before laying down the top one and then I slightly off centered it to show the white slightly behind it.

Day 5 – Ombre

Vicki-MFTcamp-Ombre

And here I go with another purple card! LOL!  I actually remembered a fantastic video that I created this card based on a tutorial from Jennifer McGuire.

If you have any questions about these, please feel free to contact me or simply leave a comment below and I will be happy to reply.

Thanks so much for stopping by and I will see you again on Thursday for a new challenge! 🙂

Splish Splash New Design Team FUN!

Hello friends!  I am VERY excited to share my first post with you today as a new design team member for the Whimsy Stamps Digital Design Team!  Woot!! Woot!

For those of you that have followed along with me for a while on my other blog know that I have previously worked with them as a DT member for other positions on the team over a period of several years.  This is simply because I adore Whimsy Stamps along with the owner and several others involved with this company.  I just love the images and working with them.  What better way to enjoy creating and coloring with the products than being apart of the team!  I’d like to share my creation today with this new image that was released at the beginning of this month:

Vicki-WS-Aug-week2

I find these penguins from Crissy Armstrong in the store absolutely adorable!  They all make me smile, but how fun is this cute Penguin Bubble Bath image! 🙂  The image was colored with my Copic markers as well as certain areas with gel pens and then I brushed over the shower cap and bubbles with a clear glitter shimmer brush pen.  I also decided to do a little paper piecing with her shower cap using the August release digital papers called Wonky Circles.

Vicki-WS-Week2Aug-close

Of course, there is so much sparkly goodness on this card that it’s hard to capture in just one photo, so I tried to angle it a bit to give you another view from the sparkly gel pens on the bubbly drink, water and claw feet on the tub.  The shimmer brush pen details can be found on her shower cap as well as the bubbles.  And if that wasn’t enough sparkle, I’ve added a strip of glitter paper along the left side of the image and then finished it off with some Studio Katia Crystal Clear Confetti sequins.

The sentiment I’ve used in the upper right corner of the image panel comes from a Whimsy Stamps clear stamp set called Everyday Mini Sentiments.

I wanted to create a special birthday card with this image in mind, so that when you lift up the penguin image, the card opens up like this….

Vicki-WS-Aug-week2-inside

I’ve taken more of these Wonky Circles digital papers and used them for the inside of my card design and created a pocket for a gift card to fit inside.  I thought a Bath & Body Works gift certificate would be fun to use with this image! LOL!

For the inside sentiment, I’ve used the Whimsy Stamps Happy Everything Clear stamp set.  I stamped the sentiment in black ink and then added the circle elements with some ink to coordinate with the paper.

Here are some challenges I’d like to enter this card for:

  1.  2 Crafty Critter Crazies – Anything Goes with a critter.
  2. Aud Sentiments – For the Girls + sentiment
  3. Craft Rocket – Anything Goes
  4. Seize the Birthday – with toppings of “water!”
  5. Crafting with an Attitude – Anything Goes

Birthday BEAR Hugs & ICAD Week 5!

Happy Friday friends!  Just stopping by to share a few creations that I’ve been working on!  I can’t believe how crazy busy this week has been, but I’m still pressing on and having as much fun as I can stand in my craft room! 🙂

I feel like it’s been a while since I’ve pulled out some of the huge stash of My Favorite Things stamps, so I played around with some challenges!  Check it out:

Vicki-MFT-birthdaybear

How cute is that bear peeking out from the gift box?!  So, keeping with the challenges, I’ve used the MFT sketch and color challenges to base this card on.  I also wanted to play along with the birthday project challenge as well…so killing several ‘birds’ at once here. (See all challenge details below.)

I pulled out the MFT Ripe Raspberry card stock for the base of my card and used the MFT Beary Special Birthday stamp set with the sentiment in white ink to stamp all over the background of the base.  I colored the sweet bear and cut him out with the coordinating die and popped him up with foam tape at the bottom of the card.  For the top panel, I took the MFT Mini Clouds Edges stencil and created a cloudy sky on white card stock. (I didn’t have any but was trying to match up the colors with the MFT Blue Yonder for the color challenge.)  I then cut this panel with the MFT Stitched Basic Edges and then cut out a MFT Blu Raspberry piece of cardstock with the MFT Stitched Scallop Basic Edges die and layered it underneath the cloudy sky background.  I attached this to the Ripe Raspberry card base.

I took the bunch of balloons from the same stamp set and colored them with coordinating colors, I fussy cut just the balloons because I took the image and stamped it on the cloudy sky background so I could pop up the balloons with foam tape.  I also covered the balloons with some Spectrum Noir clear sparkle glitter pen.  I then took a sentiment from the same stamp set and heat embossed it in white embossing powder over some MFT Black Licorice card stock and cut the strip with fish tails and then popped it up over the balloon strings with foam tape.  Lastly, I added some Pretty Pink Posh sparkling clear sequins and added some silver Nuvo glitter drops in the center of each one.

I can’t believe that I have fully completed week 5 of the ICAD challenge so far!  Although things have been a bit hectic, I am determined to continue on with these index cards each day…I am surprised by how they turn out sometimes too!  Here are the weird and random tiny pieces of art I’ve created each day this last week:

Vicki-ICAD2018-week5

I truly am hoping that this will help me to become a better artist.  I am proud of myself for pushing on when I want to just give up sometimes, but that’s exactly why I need to challenge myself to continue when it gets hard.  I’m also happy to pull out media that I’m either not familiar with or pushed to create beyond what I am comfortable with…like drawing! LOL!  I can’t wait to look back at these all at one time when I’m done!

Have YOU challenged yourself lately?

Thanks for stopping by today!  Hope you’ve enjoyed my creations!

Challenges I’d like to enter my ‘Happy Bear-day” card for:

  1.  MFT ‘The Birthday Project’ – Use a bear image on your birthday card
  2. MFT Color Challenge – Blu Raspberry, Ripe Raspberry, Black Licorice & Blue Yonder
  3. MFT Sketch (MFTWSC392) – sketch
  4. The Paper Players – PP400 – Celebration

A Clean & Simple Cute Card

Hello again friends!  It’s Thursday and time for another Cute Card Thursday challenge!  Woot!  This week’s challenge is a Clean and Simple or CAS style theme!  I hope you can play along with us and share your CAS creations too!  We can’t wait to see what you come up with!  Here’s the card that I’ve made:

OLYMPUS DIGITAL CAMERA

I have used our sponsor’s image for this week from Kinda Cute called Girl and Balloons digital stamp.  I wanted to use some soft colors for the balloons and I have used my Copic markers to color in the image.

I have also taken some distress ink and a cloud stencil to create the cloudy background behind her.  I’ve also added a stamped sentiment from my stash.  I cut the image panel down to size so that it fit inside the black stitched and scallop rectangle die cut and mounted it over top.  I used some foam tape and mounted this entire piece onto a white A2 sized top folding card base.

OLYMPUS DIGITAL CAMERA

In this photo you can better see the details with the Spectrum Noir Glitter brush pen as well as the hightlights I’ve made with a white gel pen in her cheeks and balloons.  I had fun coloring this cute image!  Hope you’ve enjoyed it too!

Please be sure to stop by the Cute Card Thursday challenge blog to see the challenge details, find inspiration from the rest of the team and to add your link to the challenge this week!  Hope to see your creation there!  Thanks for stopping in and see you again tomorrow!

challenges for this card:

  1.  Addicted to CAS – Girl Power
  2. Seize the Birthday – Anything Goes
  3. Daring Cardmakers – What a Wonderful World (inspired by the “I see skies of blue and clouds of white” lyric) – this song always inspires me to look on the brighter side of the world…great challenge, thank you!
  4. The House That Stamps Built (J2718) – Anything Goes

Scooping Up a Card or Two Plus ICAD Week 3 results

Hello friends!  You ever have one of those weeks where no matter how you try to make ends meet, something always goes wrong to mess you up again and get you off track?  This week was just one of those weeks!  No matter how hard I tried to stay on top of things, something would go wrong and so much so that supper has been really late almost every night.  So I am glad to post something here and glad it is Friday honestly!  LOL!

I have a mixed bag of creations to share with you today, so I hope you enjoy this post and get some sort of inspiration with it!

Vicki-BM-SprinkledwithLove-cardkit

Let’s start with this fun birthday card I made using that piece of background paper that I made at the stamp convention!  (If you don’t remember it, check out THIS POST to see it!)  It seemed to be the perfect colors to use.  I actually die cut the background piece using the Lawn Fawn cross-stitched rectangle dies and then heat embossed the sentiment.  I took the ice cream cone image, stamped and colored it in and cut out that panel with the same die as the background.  Mounted it over black along with the background piece, added some glitter touches with gel pens, Spectrum Noir glitter pen for the heart and then covered it with glossy accents.  I then added a black piece of twine to the cone and then took those gorgeous colored pearls from the card kit and glued them in the upper right corner of the design.  All was mounted onto an A2 sized card base.

20180622_111655

And speaking of the Stamp Convention goodies, I fell in love with the sparkly bird card that I made from one of the vendor booths and bought up a couple of packages of the kits they had!  (Each kit contained enough to make 12 cards!)  The sparkle against the transparency looks amazing!  I embellished the corners and added the sentiment with the foil stickers from the kit.  The paper and envelope are furnished in the kit…pretty much just assemble…can’t get any easier than that!  Check it out from Stamp On It!  (They have many of them!)

Vicki-ICAD2018-week3

So as you know from the last couple of weeks of postings that I’ve been participating in this Daisy Yellow ICAD challenge.  You can find my postings about the past ones I’ve created by clicking on the “ICAD” archives link at the top left of this post.

As mentioned before, I cannot share the prompts or themes, but it is something that I work on each day…yes…no matter how hard it gets, I’m getting out my index card and playing around with something!  Today’s card is not shown (it’s in next week’s grouping), but I’ve noticed that my “makings” are in conjunction with the mood I have for that day…pretty interesting I’d say!  If you haven’t looked into this challenge, I encourage you to give it a try.  Some days are just hard to figure out what you’re going to be doing and other days you just know. 🙂

So that’s all the shares I have for you today and hope that will be enough to tide you over until next week as I will have a bit more time for a routine after this horrible week is now over with! LOL!    I thank you for your continued support by following, liking, commenting or just looking, it is always appreciated!  Enjoy your weekend!

challenges I’d like to enter my ice cream cone card for:

  1.  Crafty Gals Corner – Anything Goes
  2. Aud Sentiments – Anything Goes + sentiment.
  3. Seize the Birthday – Anything Goes