Guest Designer for *Cheerful Sketches*!

Hey there friends! I’m so excited to share with you my project I’ve made for the September *Cheerful Sketches* blog challenge as a guest designer for this month! Please be sure to check out the original September challenge post for details and where to link up your project.

Here’s the project that I’ve made with the sketch photo and image that was provided to me:

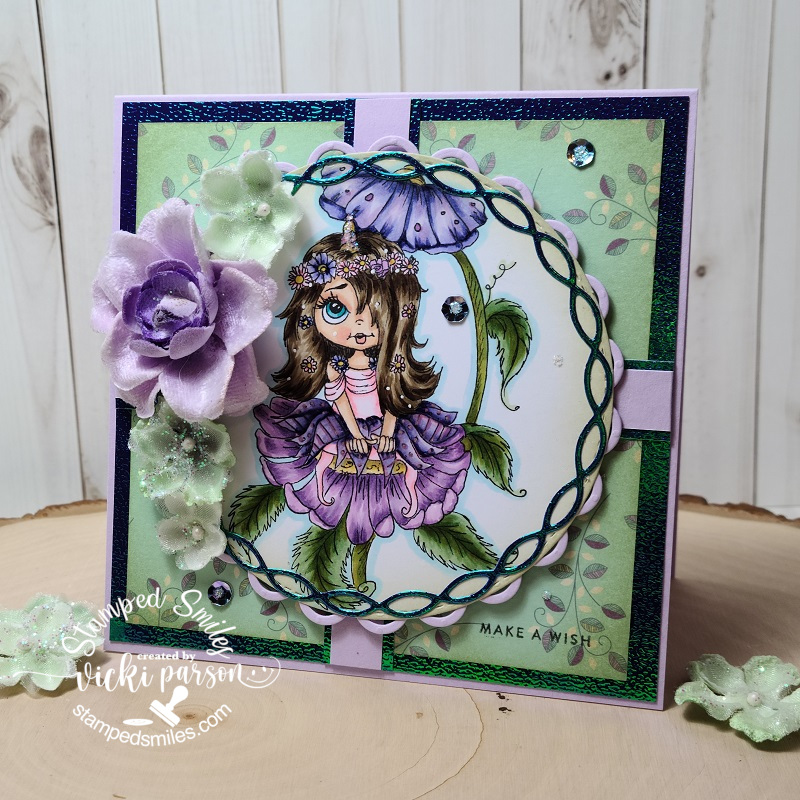
This darling little image is by Colour of Love Shop called Li’l Fidget Unicorn Girl – A Daisy Thing and you can click on the link to see/purchase image in the shop if you’re interested.  They’re sponsoring the *Cheerful Sketches* challenge for this month, so be sure to check out all of the wonderful inspiration from the team over there!

I have used the sketch for inspiration on how to layout my card here after I colored her up and then cut her out with a circle die.  I also ink blended around the edges for a bit of color and then I found some pretty papers in my stash to cut out wih die and accent the circle image panel as well.  I’ve used a Spellbinders scallop circle die as well as a MFT older die frame no longer available.

I had some pretty fairy style papers in my stash and I’ve added those as well as more of the papers from my layered die cut circle from Brutus Monroe called Mermaid Skin Cardstock and lavender cardstock from my stash.  I then added some pretty flowers as well as sequins and glitter over the design.

I’ve also stamped a “Make a Wish” sentiment in the bottom right corner of the card.

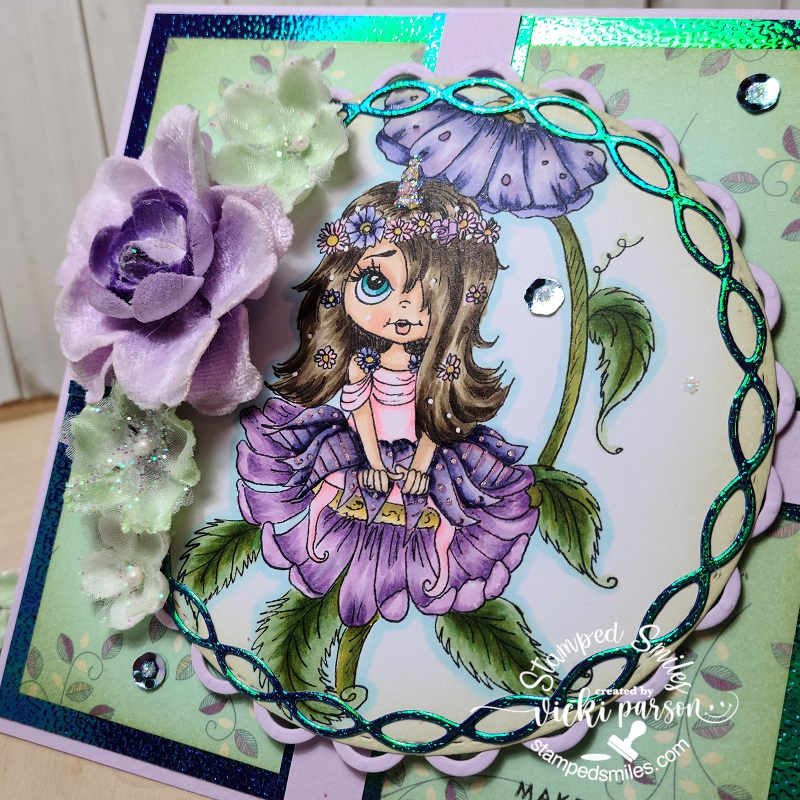
Here’s a closer look at the Copic coloring I’ve done on the image.  I’ve added some glitter to her unicorn horn on the top of her head and I’ve used several different gel pens to add dots and details to the image as well.  It was very hard for me NOT to use a purple color on her for the flowers…so I think it incorporated well into the design.

You can also see the wonderful shine over that Mermaid Skin cardstock I’ve used to!  It’s just beautiful when you’re holding it in person!

You can also see where I’ve taken some Ranger Stickles to fill the centers of the sequins and add additional drops.

Sometimes it’s fun to just sit and color up gorgeous images like this and I think this was a really good one to practice along with the sketch!  I really hope that you’ve enjoyed it as well and has brought you some inspiration today!

Thank you for stopping by and I’ll be seeing you again soon!

Challenges:

  1. Creatalicious – #194 Anything Goes with optional: pearls and/or lace 
  2. A Perfect Time to Craft – #9 Anything Goes September
  3. A Bit More Time to Craft – #123 Anything Goes September
  4. Crafts Galore Encore – #79 Anything Goes September
  5. The Fairy and the Unicorn – Anything Goes + fantasy
  6. Love to Craft – LTCCB50 Anything Goes
  7. Cute Card Thursday – Anything Goes
  8. Colour Crazy Craft – #35 Anything Goes + colouring
  9. Creative Fingers – #192 Anything Goes

Feeling Sentimental for Dare To Get Dirty

Hello again friends!  If you missed my previous post, be sure to check it out for details about a GIVEAWAY on my You Tube Channel!  You only have ONE week to enter it!

Today is my turn over at Splitcoaststampers “Dare to Get Dirty” Event to a host a challenge, so I wanted to share the creations that I’ve made for it.

Vicki-DTGD20basementstamper-words-shaker

First up I have this shaker style card I made with some of my fave Lawn Fawn products!

I’ve colored up that sweet little mouse standing over the banner from the Wild For You stamp set and cut him out with the coordinating die.  The black banner he’s sitting on was white heat embossed from the Happy, Happy Happy stamp set.  I also used the tiny smile face from this set to randomly stamp the background inside my shaker frame.  I then used the envelope at the bottom from the Love Letters stamp set that was colored and cut out with the coordinating die.

I’ve used some Stitched rectangle LF dies to create the shaker frame and the striped papers also come from some random LF papers in my stash.  I’ve used the  LF Scripty Smile die in black cardstock that I’ve attached over top of the acetate window area.

Vicki-DTGD20basementstamper-words-shaker-flat

Since the card was mainly black and white, I wanted to add a happy rainbow color which is where the shaker sequins came in.  I looked through my collection and found some Tie Dye Rainbow Sequins from Brutus Monroe.

Vicki-DTGD20basementstamper-wordsHUG

I guess I had rainbow colors in mind with my next card as well!  I absolutely LOVE this sentiment stamp from Trinity Stamps called Folded Hug.  I started by white heat embossing it over black cardstock and then I cut it out with my MFT Wonky Stitch Rectangle die and layered it over a white scallop rectangle layer and layered that again over a black piece of cardstock.  I also used the coordinating Sending Hugs die set to cut the “hug” letters out multiple times to raise them up over the image and then finished with the rainbow colors that I’ve used for the background of the card.

Vicki-DTGD20basementstamper-words-HUG-close

Upon a closer look at the image, you can see where I’ve colored in parts of the image with my Karin Brush Metallic pen set.  I think it showed up so pretty over the black cardstock.  I’ve also covered the rainbow letters with a glitter brush pen and then went over that with glossy accents.  I love how shinny the letters are IRL!

I hope you’ve enjoyed my share of creations during the Splitcoaststampers “Dare to Get Dirty” Event and has helped inspire you in some way!  I appreciate you stopping in!

Challenges:

  1. Lawn Fawnatics – Make the Sentiment the Star
  2. Aud Sentiments – Anything Goes + Sentiment
  3. Inkspirational – Rain or Rainbows (second card)
  4. The Sisterhood of Crafters – Sentiment as Focal Point

{Cupcake Inspirations} Birthday Celebration Day 11

Today is a new day!  We are on day 11 of celebrating over at {Cupcake Inspirations} with another feature of sponsors for our 500th “birthday celebration” challenge!!  YEEOWZA!

Today, we are highlighting Rachel Vass Designs – Please check out the challenge blog for more details about this sponsor.

The DT was provided with digital image sets to use for our creations:

Vicki-CIC500-Day11-RachelVassDesigns

I have the gorgeous Sunshine Daisies digital set for my design here by printing the image along with the sentiment that came with the set on a piece of Bristol watercolor paper.  I remember hubby brightening up my day a while back with some very pretty colorful rainbow of daisy flowers he brought home, so I based my colors that way.

I’ve used my watercolor markers and water brush to color the image with and then I took some yellow sparkle AquaPigment along with some Cream Grey Aquapigment from Brutus Monroe to splatter over top of the design before I cut it out with a Wonky Stitch rectangle die from MFT.

I layered this panel over an A2 top folding Soft Suede card base and finished it off with some clear sparkle sequins that I added some yellow Stickles to the centers.

Hope you’ve enjoyed my watercolor rainbow daisies today!  Thank you for stopping in to check my post today!  See you tomorrow!

Challenges:

  1. The Divas that Cut…Paper – Flowers + die cut
  2. My Time to Craft – Clean and Simple
  3. Simon Says Stamp Monday – Beautiful Botanicals
  4. Little Red Wagon – #564 Digi Do

A Unicorn with Sprinkles & Rainbows for Dare to Get Dirty

Hello again today my friends! Yes, still posting and with another “twofer post” again today! It will calm down eventually, but for now I have lots of things to share with you!😀

As you may have read in my second post from yesterday, we kicked off the “Dare to Get Dirty” Event over at Splitcoaststampers and I shared the card I made for one of the challenges. I have another creation to share with you that I made for one of the challenges released today and this one is for the lovely Lori:

This really brought out the little girl in me when creating this card with the rainbow colors and magical scene! This sweet little unicorn image along with the rainbow in the background and the sentiment all come from the Digi Doodle Studios Unicorn Wishes Pairables set. I’ve printed them out, colored them with Copic markers and fussy cut them out with the exception of the sentiment which I left and cut out as a cloud with my Lawn Fawn Cloud Border dies. I’ve also used that die to cut some clouds from a piece of vellum and an additional piece of white cardstock.

I’ve used an older My Favorite Things Stitched Rainbow die from white cardstock that I colored with Copic markers to place behind the first set of clouds behind the unicorn. Before layering my clouds, I took some distress ink and blending tool to add a bit of blue shadow behind them. After attaching all the cloud and rainbow layers, I cut it out with the MFT Blueprints 27 die set .

Lastly, I’ve attached this layer over an A2 sized white top folding card base and popped up the fussy cut unicorn with foam tape. I took some random sequins to attach over the design.

Here’s a closer view of some of the details in the card. I added some loose glitter over the unicorn’s wings with a 2-way glue pen and some loose glitter. Hard to tell, but I’ve also added some shimmer to the rainbows and the unicorn’s mane with a glitter brush pen. I also added a bit more blue cloud shadow under the unicorn’s feet before attaching him on the card.

This was really fun to create and I know it will make a fun card to share.

Thanks so much for dropping in!

Sparkly Rainbow Smile🌈

Hello there friends!  Just popping in here today to share a smile with you!

The MFT Summer School lessons continue with Day 2: RAINBOW!  For me, nothing says “smile” like a rainbow and we certainly need plenty of smiles these days!😀

Vicki-MFTsummerschool-day2rainbow

I wanted the rainbow on my card to really stand out, so I’ve used an older MFT background stamp no longer available called “Floral Fantasy” and stamped it with Steel Gray Ink over a piece of Grout Gray cardstock that was cut out with the Wonky Stitched Rectangle die.

I used the “End of the Rainbow” die, no longer available, to cut through the background and then I used the different strips in the rainbow to die cut the different colors of glitter paper to fill it in with.  I used the Sunset and Mermaid glitter paper stacks for the strips.  I then took an older MFT SMILE die and die cut over top of the rainbow and stamped background.  I die cut the words again with Black Licorice cardstock and inlaid the letters over top of the background.  I mounted the background over an A2 sized top folding Black Licorice card base.

Lastly, I stamped the sentiment from the “All Smiles” stamp set (no longer available) over more of the Grout Gray cardstock and cut out with a banner die and popped it up underneath the die cut letters with foam tape.  I finished the card with some sparkling clear sequins.

Vicki-MFTsummerschool-day2rainbow-close

Here’s a closer look at the glittery rainbow that I’ve inlaid for the background as well as the “smile” letters too.  Hopefully, you can see from this angle how all of it is incorporated into the background of the design.  The only thing that I popped up was the sentiment banner.

Vicki-MFTsummerschool-day2rainbow-flat

I hope that you’ve enjoyed my card today and it helped bring a smile your way!  Thank you so much for taking the time to stop in today my friends!  I’ll see you soon!

Challenges:

  1.  MFT Summer School – Day 2 Rainbow (ROYGBIV)
  2. The Corrosive Challenge – #8 Anything Goes
  3. Pammie’s Inky Pinkies – PIP2031 Anything Goes
  4. Little Red Wagon– #561 Happy Days
  5. Aud Sentiments Anything Goes + a sentiment
  6. Creative Knockouts – #362 Sparkle & Shine
  7. Crafts Galore Encore– #78 August Anything Goes

Galaxy Powders with LOTS of projects + video!🚀⭐

Hello there friends!  I’m a tad late with my post today, but I ended up hurting my shoulder and it was a bit hard to get on the computer to type things up! LOL!  I tihnk I’ll be able to recover a bit over the weekend…I hope anyway!

So today, I’ve pulled out some media that I hadn’t gotten a chance to REALLY play with until now.  I had so much fun and decided to turn on my camera and do a video with it as well!  (I’m a bit rusty with video making as I haven’t done one for a while and hope to do some more in the near future!)

Here’s my play with the Galaxy Powders:

Vicki-BRMSpaceATCs

My first of projects here are ATCs!  Do you remember back in the day for the “older crafters” that we use to trade those ATCs at conventions and such?!  I loved getting them from people from other countries!  ATCs (aka: Artist Trading Cards) are 2.5″ x 3.5″ with info on the back to trade with other artists.  You could even transform these to place on regular cards, etc. which I’ve done before too!

I’ve taken a piece of Midnight cardstock and started playing around with these Galaxy Powders and also used an ATC kit for the chipboard backs and the rocket details.

To show how the Galaxy powders work up close, check out my video below!  I started by making the backgrounds and then I worked each background into finished projects…CLICK HERE if you want to see it on You Tube or just watch it below:

Sometimes it’s fun to sit and just have fun playing around getting crafty!

Vicki-BRMEnjoy

And for this card, I’ve taken the High Tide stencil and went over it on black cardstock and brushed over it with the Galaxy Powders.

I’ve used this butterfly from the Take Flight stamp set and attached it over the panel along with the sentiments.  That Mirrorstock paper is really stunning and a little bit goes a long way with that!  (You can check out my video for full instruction on how I put this card together too!)

Vicki-BRMSmileOn

My last project here shows how I’ve used the Galaxy Powders over a stamp!  I’ve used the Smile On stamp set for that.  It’s hard to see in the photo the pretty shine on it, so be sure to catch the video to see it in action!  I used a white pencil to highlight some details on the image too.

I used a stitched rectangle die to cut it out and then used a stitched scallop rectangle die to cut out a piece of white cardstock to layer behind it.  I used Kraft cardstock for the A2 sized card base panel and then used the Embossing Ink to randomly stamp the “smile face” image for the background from the So Emotional stamp set.

I also layered on a piece of the Sequin Sheets between the layers of the sentiment panel and white scallop layered panel to attach to my card and then I used some metallic clear ribbon over that along with a bow before popping up my main image panel with foam tape.

Hope you’ve enjoyed my projects today along with my video on Galaxy Powders and learned a few things about them!

Have a wonderful day and I’ll see you again soon!

Challenges:

  1. Crafting Happiness – #58 Anything Goes
  2. Pammies Inky Pinkies – PIP2029 Anything Goes
  3. Fab ‘N’ Funky – Use Real Stamp (no digis)
  4. Simon Says Stamp Wednesday Challenge – Reach for the Stars (ATCs)
  5. ATC ARound the World – Sun, Moon and Stars (ATCs only)

It’s a Color Challenge for {Cupcake Inspirations}

Hello friends!  Hope you’ve had a great weekend and enjoying your Summer so far!

Today starts up a brand new challenge over at {Cupcake Inspirations} and this time we have a fun color challenge for you to try out.

Vicki-CIC498-week1

When I saw this challenge, the first thing that went through my mind was this unique and fun bicycle image from the Blooming Bicycle stamp set.

I left the “wheels” white for daisies and colored the rest in blues and yellows with Copic markers, fussy cut it out and popped it up with foam tape over the sponged cloudy background.  I cut that panel with a stitched rectangle die, layered it over a piece of yellow cardstock and used some pretty daisy papers from my stash for the background. I’ve also used these papers for the strip on the front and stamped the sentiment from the same stamp set with navy ink. I’ve mounted these layers over an A2 sized top folding navy blue card base.  (I followed a sketch design for a challenge, see below.)

The flower from my stash was actually a bright turquoise color, but I’ve used some white gesso and painted over it.  I’ve also taken some crackle paint and went over it along with some sparkly white paint and went over the crackle with that.  (I’ve always hoarded my paper flowers because I believe you can always change the colors for your project.)  I’ve added some yellow ribbon around the strip and added a blue button and yellow bow with the ribbon over the flower to finish it off.

Vicki-CIC498-week1-close

Here’s a closer view of the bicycle colored in as well as the details of the painted flower.

I colored parts of the bike in blue colors and then left some areas on the bike that I thought would be metal and colored those areas with a clear metallic gel pen.  I popped up the bike with foam tape and left it sticking off the edges to make it look like it’s ready to get on for a ride!

You can really see the shimmer over the flower with the Lumiere acrylic paint I’ve used…love that stuff!  (The white flowers in my photo props I felt weren’t “daisy” looking enough, so I opted to paint over a colored one with longer petals.  I’m silly like that😉!)

Vicki-CIC498-week1-flat

Well I don’t know how you feel about this color combo, but it really makes me feel happy and so I thought that the sentiment was just perfect for this one!

Challenges:

  1.  Cheerful Sketches – July sketch
  2. Arty Divas – #26 Anything Goes
  3. A Bit More Time to Craft Anything Goes
  4. Fab ‘N’ Funky Creaive Free-For-All
  5. Allsorts – Flowers All Over

Turtley Adorable!🐢

Hello friends!  I hope you’re having a great week so far!  Really hate it when technology doesn’t cooporate and I have to figure it out, but hopefully I can soon!  Sometimes it just needs to be done!🤔

Anyway, I was wanting to post some masculine cards I made for Father’s Day earlier this week, but I’ll have to post another time as this card was already done and is needed to enter a challenge that is ending soon:

Vicki-BRMturtle

I love that wee little baby turtle riding on the back with his tongue out!  The stamp was colored up with Copic markers, cut out with a circle die, along with another circle layer of Cabbage cardstock that I’ve also used for the A2 top folding card base, and another circle layer of vellum.

I was super excited to try out the brand new Ranger Distress line color “Speckled Egg”  products!  I’ve used the Distress Oxide ink to sponge over the image onto a piece of Sidewalk cardstock that was cut out with a stitched rectangle die.  I also took the Circle Tone stencil and added some Opal Chroma Glaze over it.  You can see how pretty the shimmer is on those dots!

For the banner along the side, I took another piece of sidewalk cardstock and cut my own banner with scissors.  I took my embossing ink pad and covered the banner piece with it and then heat embossed the Speckled Egg Distress Glaze EP over it…turned out so pretty!  I heat embossed the sentiment from the same turtle stamp set over a piece of vellum and wrapped it around the banner before attaching it to the card.

Lastly, I’ve added some metallic shimmer ribbon from my stash and some pretty sparkling sequins that remind me of bubbles.  The card was designed based upon a sketch, see details below post.

Vicki-BRMturtle-close

Here’s a better view of the cute image and coloring I’ve done.  I’ve added some dots with a white gel pen for their cheeks as well as their eyes and noses.  I’ve also used it for highlights on their shell.

You can also see a better view of that pretty shimmer from the Metallic Chroma Glaze that I used over a stencil.  Thought it was great for the circle theme going on.

Vicki-BRMturtle-flat

I hope you’ve enjoyed my card today and have been inspired in some way or has brought you a smile!  Thanks so much for dropping in and I’ll be seeing you again soon!

Challenges I’d like to enter this card for:

  1. Colour Crazy Craft – Anything Goes + coloring
  2. The Divas That Cut…Paper! – Summer Fun + dies
  3. Crafting Happiness – #154 Anything Goes optional: Under the Sea
  4. Lil Patch of Crafty Friends – Anything Goes
  5. Make My Monday Use Stencils
  6. The Sisterhood of Crafters – Stenciling

Boardwalk Slimline Cards🎡

Hello friends! I’m back again today to share some “experimenting” I’ve been doing with different products and style of card design! Won’t you share the ride with me?….

It seems that these “Slimline” cards have become very popular lately and there have been many products from companies that have come out with some really cool things to help with your designs! I remember several years back making some cards that were called “tall and skinny”, but they didn’t fit into a standard sized business envelope like this particular size does…so this is actually a “new to me” design to try out. These measure 8.5″ x 7″ folded in half on the 7″ side at 3.5″.

RIGHT CARD: I had purchased some Slimline dies from Trinity Stamps and wanted to try them out with my cards. I was looking at this Boardwalk Dreams stencil and thought it would be cool to divide up the sections like a film strip to place on my cards. I used some Kraft cardstock and blended some different Oxide Inks over it for the colors. I used the slimline dies for layering and took a thin strip of black cardstock to separate each square. I added some Spring Acrylic Bubbles along with a black sequin for the middle of the Ferris wheel and dotted areas with some Silver glitter drops. I stamped the sentiment with black Ink over Kraft cardstock and cut it out with a banner die to attach at the bottom of the panel.

LEFT CARD: I tried the same style of design with the stencil, but realized that the ink didn’t show up very well over the black cardstock, so I then took some of the Velveteen Glazes and went over each section with a different color with a palette knife. The Bananna Split on the top square still had some of the ink left on it and it mixed with the glaze! I heat embossed some of the images from the Boardwalk stamp set with black EP over vellum and fussy cut them out and ran it through my Xyron machine to attach over top. I added a gold glitter brad in the center of the ferris wheel and then added some gold glitter drops in areas. The panel was layered over another die cut piece using some Gold Glitterstock.

I wasn’t sure about the black design, but then it got me thinking what a cool eerie design it was and how fun it would be to add like a spooky/scary clown to it! I know some may not be into that, but I happen to really like those scary horror type movies. Halloween has always been my favorite holiday…just ask my kids! LOL!

Have you tried those Slimline cards? What do you think of them?

Thanks so much for dropping in today! I’ll be seeing you again soon!

Challenges:

  1. 613 Avenue Create – Anything Goes optional twist: blended background
  2. The Corrosive – Anything Goes
  3. Pammie’s Inky Pinkies – PIP2023 Anything Goes
  4. Make My Monday – Summer Activities
  5. Sweet Stampers – Something with ‘B’ (boardwalk, beach, blending, banner, bubbles)
  6. Aud Sentiments – Anything Goes + sentiment

Whimsy Retreat Crafty Fun Results

Hello friends! Hope you’re having a great week! I’m so glad you’ve joined me today as I have lots of fun creations to share with you!😀

This past weekend Whimsy Stamps held a “virtual craft retreat“, so I thought I’d tag along and join in on the fun! I’m glad I did because I made several cards:

The first challenge given was a tic-tac-toe challenge. I did 3 down: birthday, heat embossing and circles for mine. Almost had 2 bingos…but didn’t quite work out! Aren’t those penguin eyeballs the best?! LOL! I needed to send out a birthday card to someone so this was great timing!

The background papers, cover die, sentiment die and the penguin stamps are all from Whimsy Stamps. I even put little ice cube confetti for my shaker card!

This card was made for the second challenge given during the event which was to use a sketch and a color palette using at least 2 of the colors given. This was my take on the sketch along with using blue, green and brown from the palette.

Most all of the items used on this design came from an older card kit from Whimsy Stamps. The stamp set is still available in the store called Enjoy the Journey. For the sentiment panel, I heat embossed a sentiment from this stamp set and then used the Slimline Postage die to cut along the edges of it.

Tihs is the card that I created for the third challenge issued which was to follow a photo prompt with words: “When it rains, look for rainbows. When it’s dark, look for stars.” The first thing that came to my mind was these cool Rainbow Papers from Whimsy Stamps and so I’ve cut a panel out with an older Whimsy Stamps die along with the image panel.

This image is called Rainy Day Smiles by Sassy Cheryl’s which is what I had actually won as a prize from the event over the weekend for one of the games..so that was cool! I wanted to be sure to use it for one of my cards! I added some raindrop crystals on a few areas of the image too.

This card was made for the fourth challenge given which was simply to create a project with one of the digital freebie images that was given during the event.

Facebook actually kicked me out of the event a few times for leaving too many comments! LOL! I was trying to participate in games and it told me that I was leaving too many comments! This was one of the cute freebie images that they gave at the event called Sloth. After all that happened…I felt that this little guy was laughing at me!🤣🤣🤣 So I wanted to laugh right along with him, and I printed him out, colored him with Copics and used the Whimsy Stamps Notched Square dies and layered him over some papers from my stash and attached to a 5″ square card base that I stenciled some clouds on along with the background of the image. I die cut some leaves from the Whimsy Stamps No-See All Seasons Tree die set to add to the top corners of the image panel.

Needless to say, I did “hang in there” right along with him!!😄

And last but not least, the fifth challenge was to make a project based on one of the video tutorials that was shown at the event. Of course, I’m always inspired by Crissy Armstrong and her coloring! This sweet little penguin called Penguin Momma was a freebie given during the event and I watched Crissy color this up and I tried my hand at her tips and tricks.

I printed out another piece of the feather background and cut it out with the Whimsy Stamps Zig Zag Stitched Rectangle dies and added my own white feather to the design. I sponged some grey ink around the edges of the printed papers and added some yellow crystals.

  • I had such fun creating these projects and pulling out my Whimsy Stamps stash for the challenges. And now I have a few cards for sending out to people that I already have in mind! Hope you’ve enjoyed my makes today and I’ll be seeing you again soon!! (The links in this post contain affiliate links if you want to purchase anything! Thank you!!)

Challenges:

  1. Creatialicious – Anything Goes optional birthdays
  2. A Bit More Time to Craft – Anything Goes
  3. Love to Craft – Anything Goes
  4. Crafty Creations – Anything Goes
  5. Colour Crazy Craft – Anything Goes + colouring
  6. Crafty Friends – Anything Goes
  7. Creative Craft Cottage – Anything Goes
  8. Creative Moments – Anything Goes
  9. Lil’ Patch of Crafty Friends – Anything Goes