Wee Snippet & Mystic for Whimsy Stamps

Hello friends!  I hope you are having a wonderful week so far!  Thank you for all of your kind comments and wishes from my posts last week!  I really appreciate it so much!

Today I have a creation to share with you using a wonderful magical/mystical image from Whimsy Stamps:

Vicki-WeeSnippetMystic-June11

I have used this gorgeous image called Wee Snippet & Mystic by Crissy Armstrong.  This was previously released as a rubber stamp, but this month it has become available in digital format too!

I sort of let the colors of the card pull together after I had colored in the image and then I went from there.  I thought that this image would look nice with a woodgrain theme, so I’ve also taken some of the Whimsy Stamps Rustic Wood and Brick digi papers collection and cut a section and layered it with some purple cardstock for behind the image panel.  I had some pretty green colored woodgrain papers with flowers on it from my stash and used that for the background of the card design which was mounted over an A2 sized top folding card base.  The white woodgrain panel has some metallic purple ribbon wrapped around it that I’ve attached to the background of the card.

I’ve used a die to cut some edging accents for the sides of the image panel with the same color of cardstock as the background layer.  I popped this up over the card design with some craft foam.  I then added a stitched banner piece at the top right of the card design that hung over the image panel and then I have die cut some flowers from the Whimsy Stamps No-See All Seasons Tree Die set, sponged some ink around the edges and added them to the design.  I took some Purple Nuvo Crystal Drops and added a dot to the center of each one.  I’ve also taken a sentiment from an older Whimsy Stamps set and stamped it in black in the bottom corner of the card.

Vicki-WeeSnippetMystic-June11-close

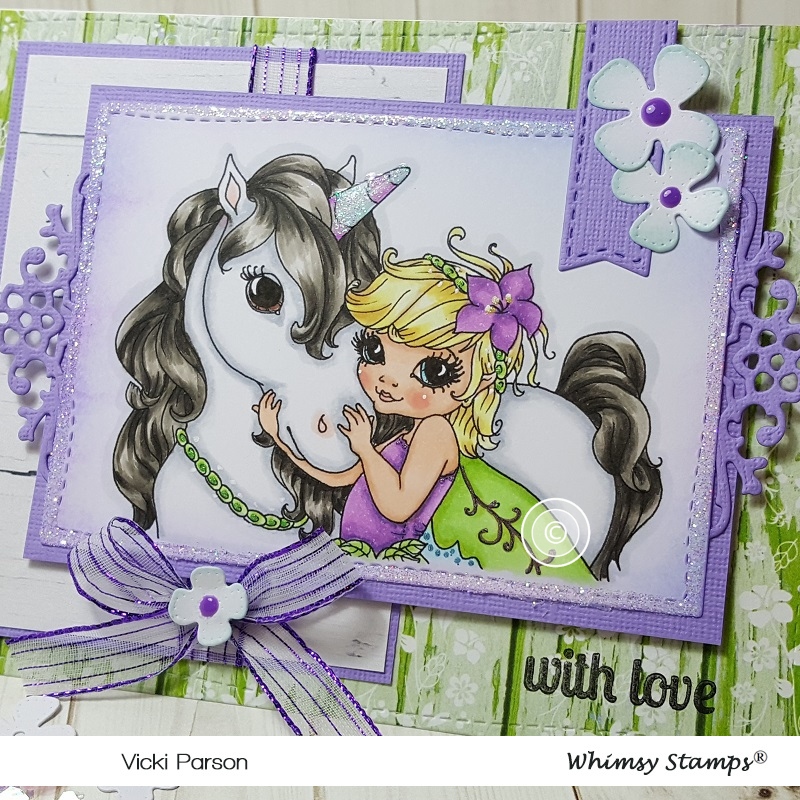
Here’s a closer view of the coloring on the image.  I’ve used the Copic markers listed below to color with and then used a few gel pens to add details.  I took a glue pen and went over the horn on the unicorn as well as along the edges of the die cut image panel and sprinkled on some clear glitter.  Before attaching the glitter along the edges of the image panel, I used an ink foam blending tool and some Wilted Violet distress ink over it.

  • Wee Snippet’s outfit/flower and Mystic’s saddle/reins/horn – V17, V15, V12, YG13, YG11, BG10, BG000 (gel pens for dotted accents)
  • Wee Snippet’s hair – Y11, Y15, Y17, E31
  • Wee Snippet’s skin/eyes – E000, E00, E11, E21, R20, R00 BG45
  • Mystic’s mane/tail – E49, E47, E44, E43
  • Mystic’s body/eyes – C3, C1, R11, R00, E25 (eyes)
  • Shadowing – C1, C0

Vicki-WeeSnippetMystic-June11-flat

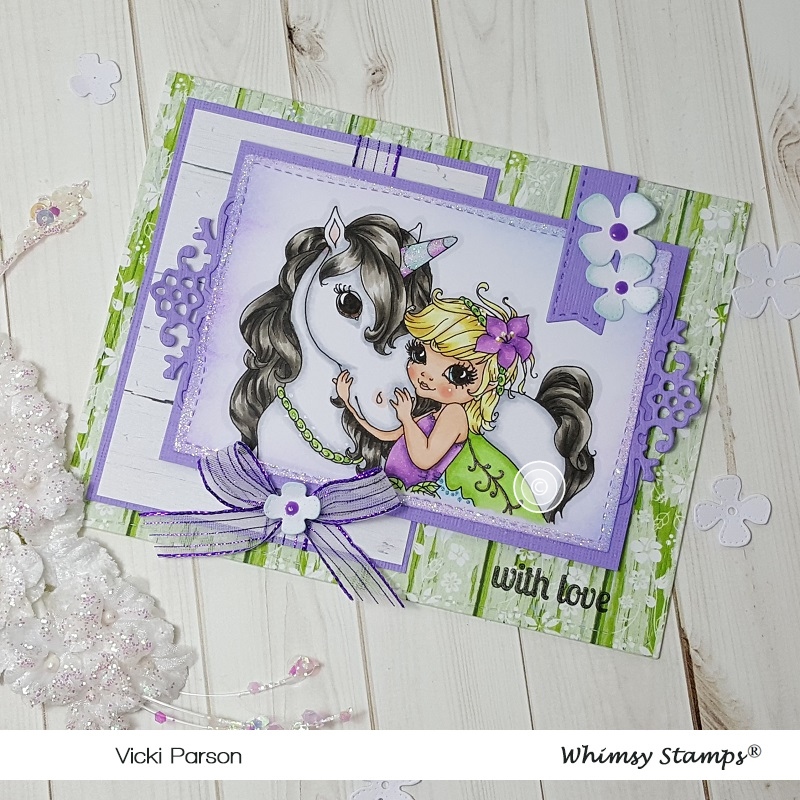
I tried to incorporate everything that I thought would bring out the “magical” essence of this image from the several layers with the paper, the glitter and metallic ribbon too.  I hope you’ve enjoyed my card today and I really appreciate you stopping by!  I’ll see you again soon!

Challenges I’d like to enter:

  1.  Creative Knockouts – Anything Goes
  2. Creative Moments – Anything Goes
  3. QKR Stampede – #351 Anything Goes
  4. Allsorts – Fantasy World
  5. Pammie’s Inky Pinkies – Anything Goes PIP1923

Conservatory of Quotes + video!

I had SO MUCH FUN with my creation today and I can’t wait to share it with you…

*To check out the full details on how I put together this card and how I created the rainbow background, be sure to check out this video!  (CLICK HERE to view it on You Tube.)

Vicki-Brutus Monroe-ConservatoryofQuotes-JuneGDT

One of my most favorite products is watercolor and all of the really cool affects you can get with them!  This is what I have used throughout the card here from the background to coloring the floral image.

Speaking of floral image, isn’t it gorgeous?!  It not only has this gorgeous floral image, but it has some really awesome quotes to go with it!

For my card, I first started by masking off an area with some purple tape on some paper that was large enough for my floral image.  Then I made the background with some help from a ruler and baby wipes.  I used a stitched rectangle die, added the sentiment at the bottom of my rainbow panel and made some splatters.  I mounted this piece onto an A2 sized top folding black cardstock.

Vicki-Brutus Monroe-ConservatoryofQuotes-JuneGDT-close

For the image, I had actually started out doing this card in one direction and then totally went a different way.  But the image was stamped with black ink a couple of times over the paper and colored with Aqua Pigments using a water brush.  I cut an entire image of one and attached it over the rainbow background with liquid glue and then I fussy cut just the flowers and popped them up with foam tape over the full image.  I added some of that gorgeous shimmer with the Aqua Pigment and then finished off the design by adding some clear sequins over it.

Vicki-Brutus Monroe-ConservatoryofQuotes-JuneGDT-flat

I hope you’ve enjoyed my card today as I had so much fun making it!  I can’t wait to create another project to share with you!

Challenges I’d like to enter this card for:

  1.  Stamping Sensations – Show Your True Colors
  2. Get Creative – Anything Goes with optional twist: Favorite color combo
  3. Through the Craft Room Door – Anything Goes
  4. Artistic Inspiration – Anything Goes
  5. Crafting By Designs – Anything Goes
  6. Alphabet Challenge – “F” is for Flowers
  7. Simply Create Too – Anything Goes with optional twist:  Lots of flowers
  8. Rainbow Card Challenge – Neon Rainbow

Guest Designing for Digi Doodle!

Hello friends!  I’m back today to share some fun news with you!!!!

I’m very excited to finally be able to share with you that I’m guest designing for

Digi Doodle Stamps!

Today, I’m sharing my first card for them with this really adorable image:

Vicki-DDLovesMeNot-June7

I have used the Loves Me Loves Me Not digital stamp to create my card.

What I had in mind when making this card was all of that crazy rain we were having this past month and how it seemed to never end.  I also loved the flowers she was holding because my daisies came up in my back yard and they really make me happy seeing them bloom.  So I combined this image with some rainfall in the background and took away the petals from the image to make it appear as if she’s holding out her hand in the rain!  🙂  Hubby has been taking extra great care of me while all of this rain was happening around us and I think this would be a special card for someone who always seems to bring out that happy sunshine no matter the weather!  (His favorite color is blue!)  Wink wink

Vicki-DDLovesMeNot-June7-close

Here’s a closer view of the coloring I’ve done on her with Copics.  For the background, I’ve taken a white panel and stamped some rain drops from another stamp set in my stash.  I fussy cut out my colored image and attached her over top of that rain panel.  I took some Nuvo Glitter Drops and added them over the rain drops in the background behind her.  I also white heat embossed the sentiment (From MFT) and cut it out with a banner die and slipped that under her foot when placing it on my card.

It’s hard to tell in the photo, but I’ve covered her bow and top of her hair with a glitter pen to make it look like she’s been wet in the rain.

Vicki-DDLovesMeNot-June7-flat

For the rest of my card, I’ve added the raindrop background light blue stitched scallop card panel over a dark blue layer and attached some pink ribbon around them.  I’ve added the bow to the side and then attached a yellow enamel heart over that.  These panels were mounted over an A2 sized white top folding card base.

Lastly, I’ve added the image panel and mounted it over the yellow scalloped panel and another piece of dark blue cardstock that was attached with foam tape.

I hope that you’ve enjoyed my card today and it brought you a smile!  Thank you so much for stopping by with me today!  I will be having another really super fun post to share with you tomorrow, be sure to stop by!

Challenges:

  1.  Love to Scrap – Anything Goes
  2. Creative Craft Cottage – Eileen’s Anything Goes (Digi Doodle is sponsoring!)
  3. Pammie’s Inky Pinkies – PIP1922 Anything Goes
  4. The Paper Girls – Top 5 Faves (Coloring, sparkle, hearts, ribbon, flowers)
  5. Watercooler Wednesday – WWC224Anything Goes Feminine
  6. Crafting with an Attitude – Anything Goes

Bee Happy for Whimsy Stamps June Release!

Hello friends!  There is so much to “bee” happy about for sure!  It’s been sunny out lately; it’s the weekend and I have some fun creations to share with you for the Whimsy Stamps June digital release today! 🙂

Vicki-BeHappy-June1-Trio

Check out these ADORABLE bees!!  I have made 3 different cards because I just couldn’t stand not being able to color each one of these which are all included in this set!  I have used Crissy Armstrong’s “Bee Happy” digital stamp set.  This is a set that was previously released as a stamp set, but now available in digital format starting this month!  Good news that you can now choose between either format you prefer!

I’ve sized each of these bees in the format to fit onto a 4″ square card design.  I’ve cut them out with a hexagon die cut and layered another black piece of cardstock behind each one.

For the background, I’ve taken a yellow piece of cardstock slight smaller than the 4″ square top folding white card base and embossed it with a fun hexagon embossing folder.  Before attaching them to the card base, I’ve added some black ribbon at an angle over it.  I then attached the image panels and added the ribbon bow which I then placed a bee wooden accent to the center of each one.

The story with the black splatters actually came about from an accident I had!  I opened up a black shimmer pen over top one of the cards and it had a leak in it!  When I popped open the cap, it spilled all over my card!!  OH NO!!!  Obviously, I had all of my cards done at this point and I loved the way I had colored them….so I just decided to “go with it” and added some more splatters to each one.  I actually like the way it looked after I completed it!  They look like “busy bee’s” now! TEE HEE!

Vicki-BeHappy1-BeeMine

Here’s a closer look at the “couple bees” image.  For each one of the hexagon image panels, I’ve taken a black marker along the edges to make the stitch lines.  I went around the edges of the image panel with some Tumbled Glass Distress Ink and ink foam blending tool for each card.  Also, for the sentiments on each card, I found an old “bee” style stamp set and used it to go with them.  I believe that the “Bee Happy” rubber stamp set comes with sentiments that go perfectly with these cuties!

Here’s how all of the bees were colored up with the Copic colors:

  • Wings/around bees – B00, B000
  • black stripes/nose/feet and hands – W9, W7, W5
  • Yellow stripes – Y17, Y15, Y13, Y11, R20 (cheeks)
  • The tiny heart from the sentiment was colored with Y15 and then I’ve added some Nuvo Glitter Drops over it.
  • All the wings for each card were covered with the Wink of Stella Glitter Pen.

Vicki-BeHappy2-BirthdayBee

This little dude was so fun to color up with his party accents! 🙂  Here are the Copic colors I’ve used for the accessories:

  • bag – E87, E84, E81
  • hat balloon, party hat, tissue from bag – V12, V15, YG11, YG13, YG25, YR04
  • I’ve covered the purple on his hat with the Nuvo Glitter Drops
  • The wings and balloon were covered with the Wink of Stella Glitter Pen

Vicki-BeHappy3-BzzzFriend

I just love how he’s trying to hand out a flower to you! 🙂  Here’s the following Copic colors that I’ve used for the flower:

  • flower stem – YG61, YG63
  • flower middle – Y15 (I covered it with the Nuvo Glitter Drops again)
  • flower petals – R32, R35, R37
  • His wings were covered with the Wink of Stella

I hope you’ve enjoyed my bee creation today!  Please be sure to BUZZZZ on over to the Whimsy Stamps store!

Thanks so much for stopping by and I’ll see you again soon!

Challenges I’d like to enter:

  1.  Through the Craft Room Door – Anything Goes
  2. TGIF – #TGIFC214 Create a Set!
  3. Aud Sentiments – Nature + a sentiment (hoping bees are apart of nature)
  4. Creative Knockouts – Embossing Delight (embossing folder on each card)

2 Crafty Critter Crazies Has So Mushroom

Hello friends!!  Yay!  Welcome to June!  I am hoping that this month will be a bit more dry than what it has been lately.  I’m growing tired of flash floods!  Rain vibes sent to those that need it too!

Today starts a brand new monthly challenge over at 2 Crafty Critter Crazies as well!  So please hop on over there and play along with us!  It’s an easy challenge!  All you have to do is add a critter somewhere on your project!  That’s it!

So here’s what I’ve made for the challenge:

Vicki-2CCC27-RickDennis

Isn’t he a cutie?  Now, I’ve never seen a teddy bear on a mushroom before, but they look so happy together, so I think it works! 🙂  Our sponsor for this challenge is Rick ST Dennis and we were provided some images to use.  I’ve used one of the images from the 2 Bearii Kawaii digital stamp set.

After coloring him up, I’ve used the Lawn Fawn Stitched Rectangle dies to cut him out with and then I’ve used some Tumbled Glass Distress Ink and an ink blending tool to go around the edges with it.  I also used this ink and tool to sponged some clouds in the background on a white piece that was cut with another Stitched Rectangle die.  I thought it would be fun to add some splatters, so I carefully covered up the image and added some splatters with the same distress ink that was watered down and splattered both the cloud background and image panel.

For the bottom of the card, I cut a piece of green card stock with the LF Mushroom Border die.  I also used this die set to cut out the mushrooms with some vanilla and red cardstock.  I white heat embossed the punny sentiment at the bottom of the grass border from the LF Oh Gnome stamp set.  I’ve attached these borders to the bottom of my cloud panel and lined it up to cut it out again with the stitched rectangle die so that it matched with the background of the card.

I then added some twine around the cloud panel and then attached this piece over top of a white top folding A2 sized card base.  Lastly, I took some foam tape and added it to the image panel and then attached the twine bow with the chipboard heart in the center of the bow.

Vicki-2CCC27-RickDennis-close

Here’s a closer view of the image details.  I’ve colored the image with Copic markers and then went over the bear’s bow with a glitter brush pen.  The white dots on the mushroom was covered with some Nuvo Glitter Drops.  For a bit more personality, I have decided to take a black marker and make dots in the center of the eyes on both the mushroom and the teddy bear.  I’ve also added some white dots on the teddy bear’s cheeks.

Vicki-2CCC27-RickDennis-flat

I have to say that this card was so fun to put together!   I hope you have enjoyed it too!  Thanks so much for stopping in today!

I will have another post coming up shortly to share a new release with you!

Challenges I’d like to enter:

  1.  Double Trouble – (Doesn’t begin until June 3rd!) – Use a Critter and used cloud stencil in the background.
  2. Sweet Stampers – Animals
  3. Simon Says Stamp Wednesday – Anything Goes

Whimsy Critters Everywhere!

Hello friends!  Hope you are having a wonderful week so far!  I have been busy in my craft room trying to prepare for a class next week along with trying to help my son pack and move out of state…so my plate has been a bit full lately.  I do have a couple of really fun critter creations that I’ve made using some Whimsy Stamps products today:

Vicki-WS-ADSKitties-April24

If you don’t remember, Whimsy Stamps has come out with a couple of really adorable clear stamp sets to help promote their “Adopt Don’t Shop” campaign with $1 of the sale from each stamp sold going to the Gulf Coast Humane Society.  Vicki-WS-ADSKitties-close-April24

Now, normally I am a “dog fan”, but I know many of my blog friends and several others are huge cat fans as well!  I have also been requested to make up some cat friendly cards too!  So, I thought this would be such a great opportunity to make one!  I’ve used the adorable Adopt Don’t Shop CATS clear stamp set for this one.

Vicki-WS-ADSKitties-flat-April24

I have used a kraft colored A2 sized top folding card base and stamped the little paw print from the stamp set with the same color around the edges.  I also took the humorous sentiment from the set and white heat embossed it over a piece of espresso cardstock and cut a banner strip from it.  This same color of cardstock was used as a layer behind the kitty image panel that I’ve cut out with the WS Hand Stitched Nested Rectangles die.  I covered up the bottom portion of this panel with some plaid papers.  I then wrapped some twine around the middle of it and tied a bow which I have attached a wood veneer heart in the middle.


Vicki-WS-I'veGotYourBack

Here’s another card I had made to help cheer someone.

Vicki-WS-I'veGotYourBack-flat
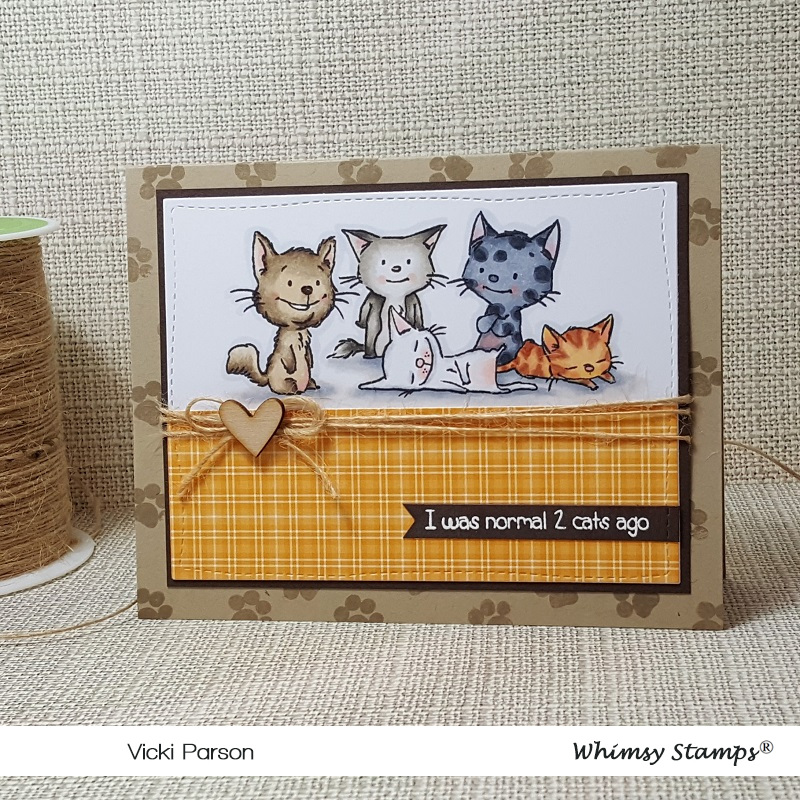
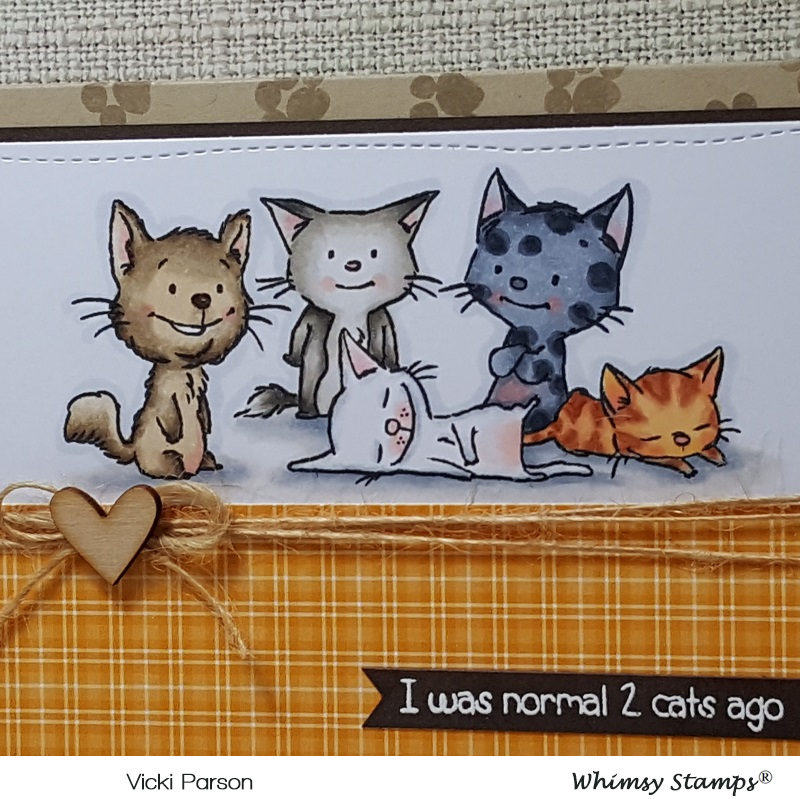
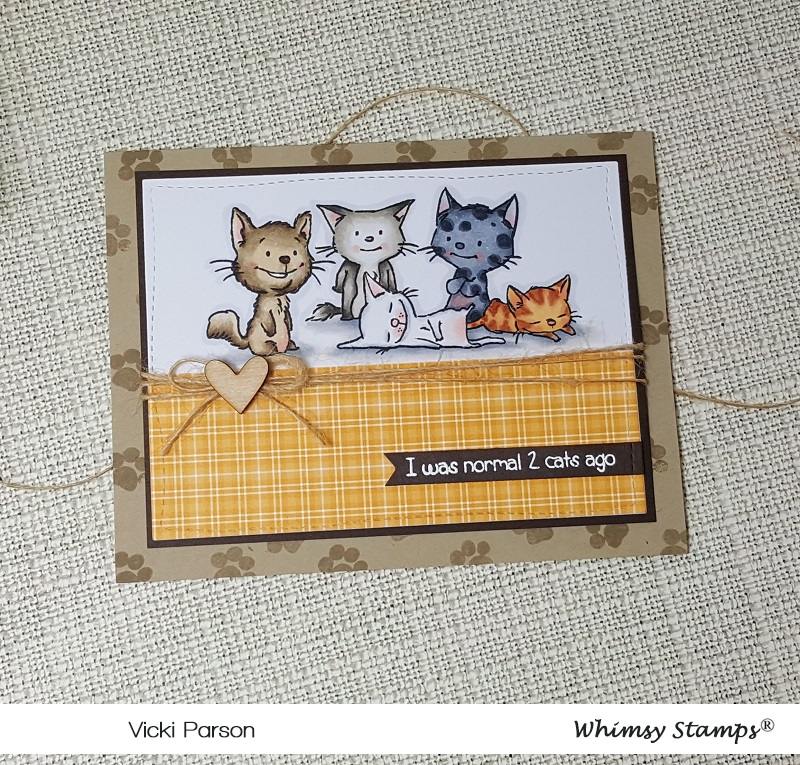
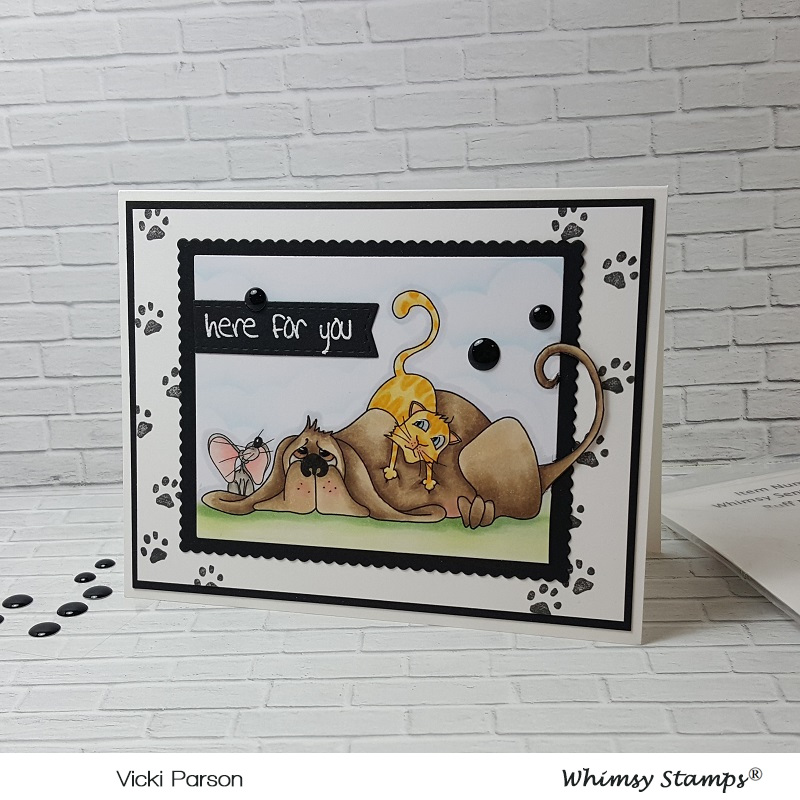
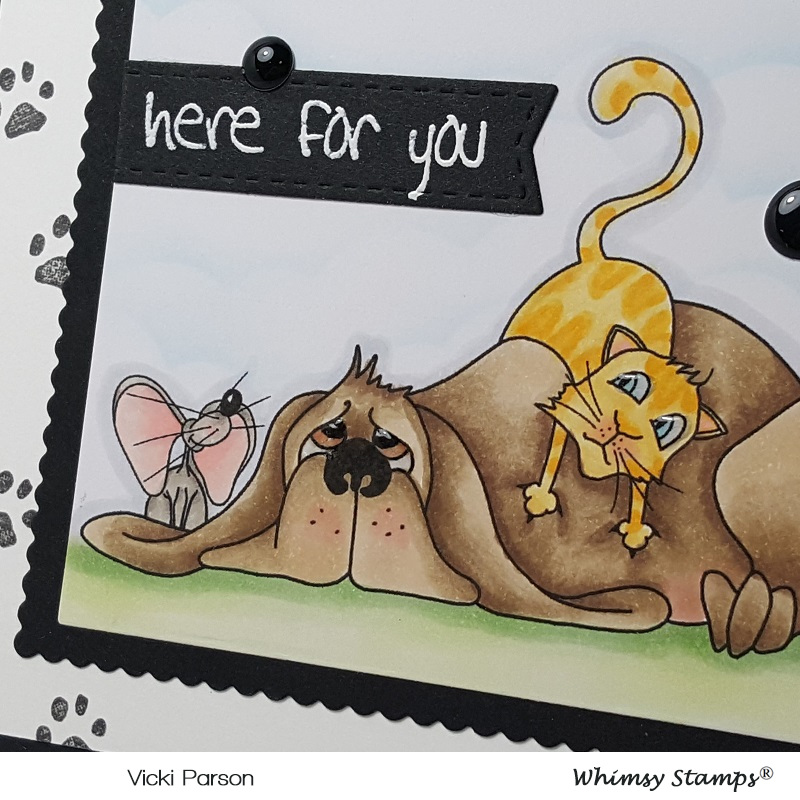
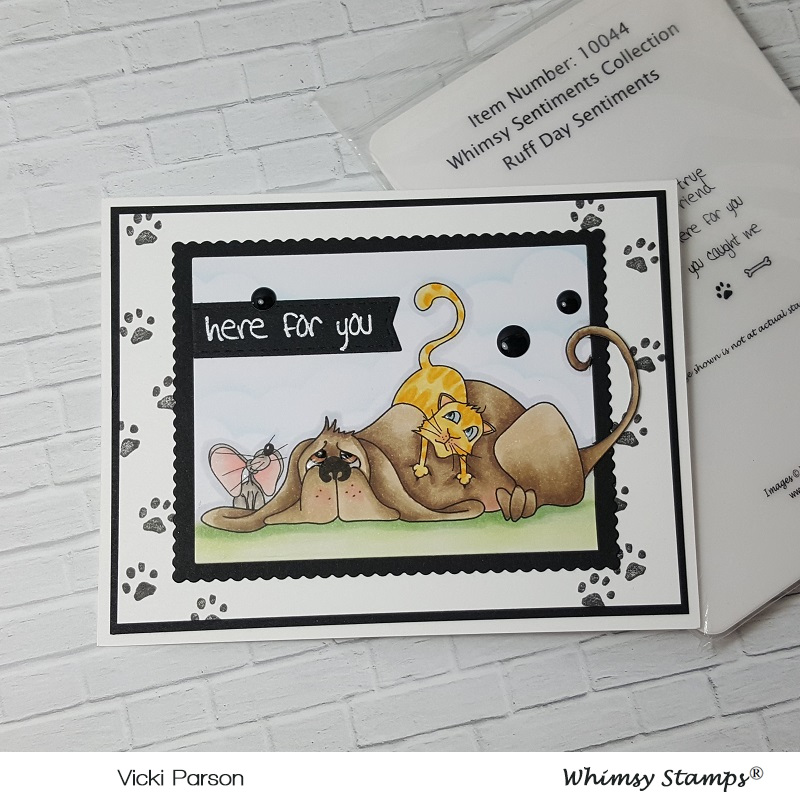
Here’s a pop quizz…. if you’ve known Whimsy Stamps for a while, does this particular image look familiar to you?  It’s a VERY old one and also one of the very first rubber stamp sets that Whimsy Stamps sold!  I believe mine is dated 2009!  I wanted to keep it as I’ve been a part of this company off and on since it started! 🙂  Really cool to still have it.  Obviously, it’s not available for purchase, but they did offer it as a freebie during their “Adopt Don’t Shop” party event last month.  The paw prints along the edges were also used from an older stamp set from Whimsy Stamps as well.  (You can see a portion of it on the right side of the photo above.)Vicki-WS-I'veGotYourBack1

Both of these images were colored with Copics.

The sentiment came from the same stamp set and was white heat embossed and cut out with the WS Quick Strips Die set.  I cut around the pup’s tail and then used a rectangle die to cut the rest of the image out and then layered onto a black piece of cardstock cut from a scallop rectangle die.  I layered the paw print piece, another piece of black cardstock and the image panel onto a white top folding A2 sized card base.  Lastly, I’ve added a few black enamel dots and even gave their eyes some shine with glossy accents.

Thanks so much for dropping in today!  Hope you’ve enjoyed my critter cards!  I’ll be back again tomorrow with a different kind of critter! 🙂

Challenges:

  1.   Crafty Catz – Anything Goes
  2. Creative Fingers – Anything Goes
  3. QKR Stampede – #344 Anything Goes
  4. Pammie’s Inky Pinkies – PIP1916 Anything Goes
  5. Creative Moments – Anything Goes

Cute Card Thursday Has Wings!

Hello friends!  It’s Thursday already which means it’s time for a brand new challenge over at Cute Card Thursday!  This is a really fun one to play with!  This week we’d like to see your “Wings” things!  Can’t wait to see what everyone makes!!

This week we are being sponsored by All Dressed Up Stamps and I have used one of their lovely images for my card today:

Vicki-CCT569-ADUWings

Isn’t she the sweetest little thing?  I have used the Fairy Magic image that was kindly donated from our sponsor, and I have colored her up using Copic markers.  I’ve also sponged some light blue ink around the image panel before matting it onto a green sparkly layer cut with a scallop square die.  I also used some craft foam to pop up the image panel over my card for a bit of dimension.

I have just bought these gorgeous Fairy Garden papers from Kaiser Craft and used them on the background panel of my card.  I also used some gorgeous shimmery light green cardstock to go with it!  I’ve taken a thin strip of the glitter cardstock and attached it up against the butterfly papers and then attached some lace over it.  I then mounted this entire panel over a white top folding 5″ x5″ card base.

Vicki-CCT569-ADUWings-close

Here’s a closer view of the coloring and the little sparkly details I’ve added to her.   For the wings, I’ve taken a glitter brush pen over them and then used some metallic colored gel pens to add some dots to her wings as well as the butterfly wings along with some gold dots around her ribbons and the sentiment.

Here you can also see the wood veneer butterfly accent that I’ve added at the top.  I painted it with white gesso and then painted over it with some pretty pearl shimmer paint before attaching it to the card.

Vicki-CCT569-ADUWings-flat

Lastly, I’ve added three pearls at the bottom left corner of the card.  In this photo you can see the pretty shimmer on the light green background cardstock.  It was hard to capture in the photos, but the butterfly papers are sparkle embossed as well.

Thanks so much for dropping in today!

Challenges I’d like to enter this card:

  1.  All Dressed Up Challenge – #89 Anything Goes + ADU image
  2. Not Just Cards – Anything Goes
  3. Crafty Creations – Anything Goes

Fistful of Flowers From Whimsy Stamps

Hello friends!  Hope that you are having a great week so far!  There is plenty of ice and snow over my way for the next several days, so I thought I would bring a little ‘happy’ today with a “Fistful of Flowers” from Whimsy Stamps!

Vicki-WSFistfulofFlowers-Feb12

Isn’t she the cutest?!  This was originally released as a rubber stamp from Crissy Armstrong, but this month it has been released in digital format now as well!

I have to be honest and say that after I had colored in the image, I was struggling with the colors of cardstock I wanted to use, and it seemed that anything I picked out wasn’t quite working.  (You ever have this problem?)  My hubby came in to visit me and I told him I was struggling, so he took me over to my paper and picked out these colors and I liked it, so I went with it!  Did he do good? 🙂

I have cut a piece of yellow cardstock out and then took the WS Mom’s Layered Flowers clear stamp set and white heat embossed the background with one of the daisy images.  I wrapped a piece of white ribbon around the yellow embossed piece that was also mounted onto a white 4.25 x 5.5 card front piece.  After wrapping the ribbon around both pieces, I added a bow and this panel was then mounted onto a white top folding A2 sized card base.

The colored image panel was layered with a blue cardstock which I’ve also cut a piece for a fishtail banner and added some daisy accent flowers to it.

Vicki-WSFistfulofFlowers-Feb12-close

                    This cutie has been colored up with the following Copics:

  • Jeans & Bow tie on shirt – B97, B95, B93, B34
  • Shirt & Hair Bows – R85, R83, R81
  • Flower Petals & White Band on Shirt – BG000 (also around image)
  • Flowers – center:  Y17 – Leaves/Stems: YG67, YG63, YG61
  • Grass – G24, G21, G20
  • Hair – YR30, E41, E43, E44, V95
  • Skin – E21, E11, E00, E000, R20

I took a glue pen and added some clear glitter over the edge of the flower petals for a bit of sparkle.  You can see that the daisy accents also have some light touches of glitter on the edges as well.

Vicki-WSFistfulofFlowers-Feb12-flat

So I hope you’ve enjoyed my card today and thanks for dropping by!

Challenges I’d like to enter this card for:

  1.  Crafting With an Attitude – Anything Goes
  2. Creative Fingers – Anything Goes
  3. QKR Stampede – #334 Anything Goes
  4. Crafty Friends – Anything Goes
  5. Pammie’s Inky Pinkies – PIP1906 Anything Goes
  6. Shopping Our Stash – Make Your Mark (colored with markers)

“It’s a Girl Thing” TSA Inaugural Blog Hop!

Hello friends!  So happy you are here!
Welcome to the “It’s A Girl Thing” Turner Syndrome Awareness Inaugural Blog Hop!   Before I share my project with you, here is some important information regarding what this special blog hop is all about:
Turner Syndrome is a genetic disorder where a female is born with only one X chromosome, instead of two, leaving her with life-long medical issues and learning disabilities. This condition occurs one in 2,500 female births worldwide but is more common among pregnancies that do not survive to full term. That is why Turner Syndrome Females are considered MIRACLES!

Turner Syndrome and the Butterfly

The butterfly has become the symbol for “Turner Girls”. Just like a butterfly, they are considered fragile and beautiful miracles. Turner Syndrome may also cause a myriad of health complications, such as heart defects, learning disabilities and infertility, according to the Mayo Clinic. Sept 14, 2013.

Because it represents femininity, strength, and uniqueness, the butterfly was designated by TSSUS to become the Turner Syndrome symbol. “Butterflies fly on their own which is our hope for our girls.”

Vicki-TSAbloghop-ribbonsoflove

I have used this digital stamp set called “Ribbons of Love” I think it’s awesome that you can choose to use the pre-colored versions from the set which I have for my card here.  It’s a perfect set to have on hand in multiple-colored ribbons that can be used for any cause you like to support!  It also has some fantastic sentiments to go with it too!  The butterfly was perfect to use for this particular cause!

vicki-tsabloghop-ribbonsoflove-close

I have used some papers from my stash for the background and the colors all chosen from the TS color palette!  I printed out the image and sentiment together and die cut it with a stitched circle die.  For the circle glitter layer behind it, I cut out another cardstock circle layer with some Super Adhesive Sheets over it, peeled off the backing and sprinkled some Gecko MF glitter and burnished it in.  Added some blue ribbon with a bow over the papers, attached the circle layers, flowers and pearls.  I then took a clear glitter pen and went over the butterfly with it for more shimmer.  This was all mounted over a SU! Pacific Point 5×5″ top folding card base.

I hope you’ve enjoyed my card and it has inspired you in some way!  Thanks so much for dropping by and taking part in this blog hop with us!

I am happy to be donating this card along with a few others to Lori so that she can use them to help raise funds for this cause as well.

Challenges I’d like to support with this card:

  1.  Creative Fingers – #156 Anything Goes
  2. Pammies Inky Pinkies – PIP1904 – Anything Goes
  3. Tuesday Throwdown – Anything Goes

Hello Cute Chicks!

Hello friends!  Err…should I say “Cute Chicks”!  🙂

I have some more Whimsy Stamps inspiration to share with you today using this sweet image by Crissy Armstrong called Penguin’s Cute Chicks.  Now it may look familiar to you and that’s because it was originally made as a rubber stamp, but starting with this month’s release it has been released in digital format!  So it’s great to now have both options available to you!

vicki-ws-penguincutechicks-jan22

I am a huge penguin fan and Crissy’s penguins are so fun to color!  I have colored this image with the following Copics:

  1.  Penguin Body, Beak, Feet, Cheeks:  C8, C5, C3, C1, C0 – YR18, YR15, YR12 – R00, R000
  2.  Penguin hat & scarf:  E89, E87, E84, E81
  3.  Chicks:  Y38, Y17, Y15, Y11 – Cheeks:  R00
  4. Chick blue & purple ribbons:  B39, B37, B34 – purple:  V17, V15, V12
  5. Egg shell and around image:  BG000
  6. Grass:  YG67, YG63, YG61

(More up-close details below!)

I have also used some fun digital papers from the January digital release called “Oh Boy” digital papers collection.  (You may remember the “Crateful of Kittens” card that I had previously done which was using these same papers.  I’ve used both the striped and solid papers for my card here.  At the top of the striped papers, I used the Whimsy Stamps Pierced Border Trio dies to cut a curvy border.  I cut another piece like that in black cardstock to layer behind it.

I took the WS Painted Sayings clear stamp set and stamped the greeting in the upper left corner of the image panel and I also used the splatter images from the set and stamped some black splatters over the solid colored digital papers.  Before attaching the striped panel to the solid background, I added some white ribbon with a bow and a black button with a bow twine through it.  I attached this to the solid panel and then attached all layers to a white 5″ square top folding card base.

vicki-ws-penguincutechicks-close

Here’s a closer view of the image with my coloring.  For around the edges of the image panel, I took a glue pen and sprinkled on some clear glitter for a bit of a sparkly touch around the design.  I layered this onto a black piece of cardstock and then added some craft foam behind it for a slight dimension and attached it to the card front.

Hope you’ve enjoyed my card today!  Thanks for stopping by!!  I’ll see you back again tomorrow for another really fun project I made!

Challenges I’d like to enter this card for:

  1.  As You Like It – Pearls or Buttons? (I love to add buttons in the center of bows and with different colors it can work on any style you’re designing.)
  2. Crafting From the Heart – #235 Anything Goes