A Unicorn with Sprinkles & Rainbows for Dare to Get Dirty

Hello again today my friends! Yes, still posting and with another “twofer post” again today! It will calm down eventually, but for now I have lots of things to share with you!😀

As you may have read in my second post from yesterday, we kicked off the “Dare to Get Dirty” Event over at Splitcoaststampers and I shared the card I made for one of the challenges. I have another creation to share with you that I made for one of the challenges released today and this one is for the lovely Lori:

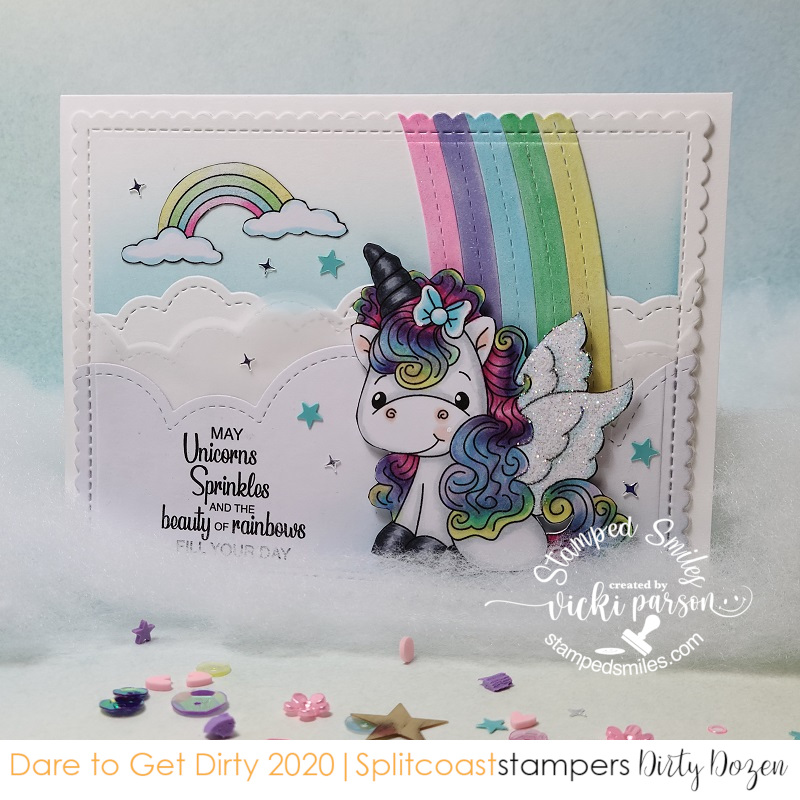
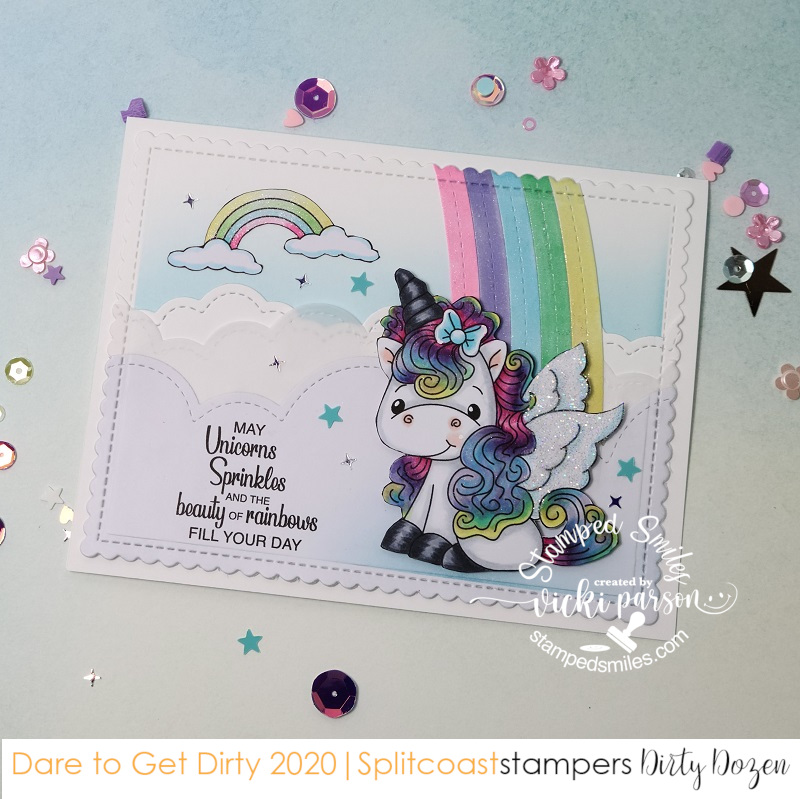
This really brought out the little girl in me when creating this card with the rainbow colors and magical scene! This sweet little unicorn image along with the rainbow in the background and the sentiment all come from the Digi Doodle Studios Unicorn Wishes Pairables set. I’ve printed them out, colored them with Copic markers and fussy cut them out with the exception of the sentiment which I left and cut out as a cloud with my Lawn Fawn Cloud Border dies. I’ve also used that die to cut some clouds from a piece of vellum and an additional piece of white cardstock.

I’ve used an older My Favorite Things Stitched Rainbow die from white cardstock that I colored with Copic markers to place behind the first set of clouds behind the unicorn. Before layering my clouds, I took some distress ink and blending tool to add a bit of blue shadow behind them. After attaching all the cloud and rainbow layers, I cut it out with the MFT Blueprints 27 die set .

Lastly, I’ve attached this layer over an A2 sized white top folding card base and popped up the fussy cut unicorn with foam tape. I took some random sequins to attach over the design.

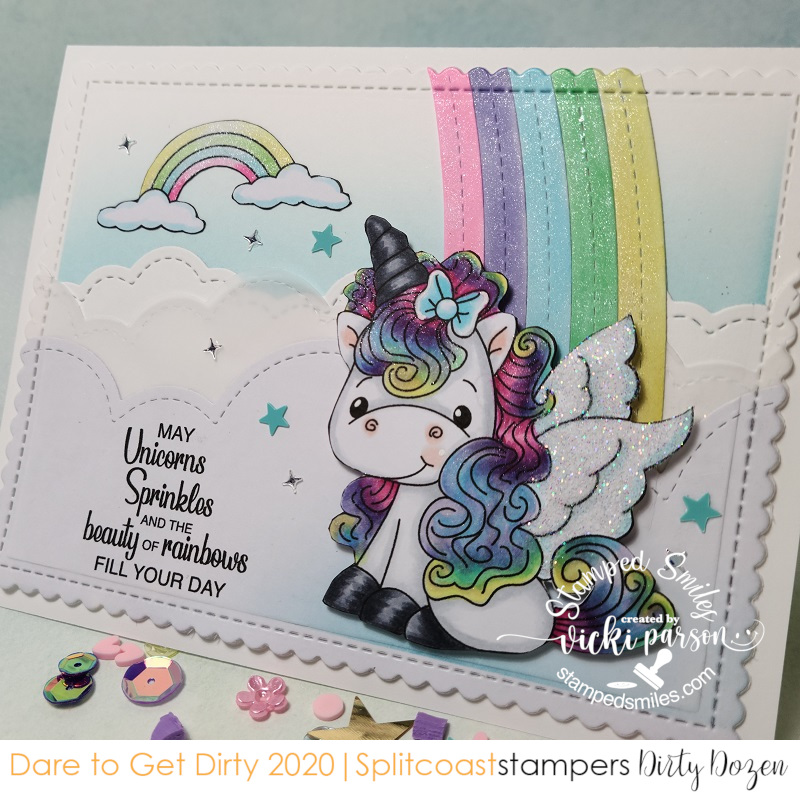
Here’s a closer view of some of the details in the card. I added some loose glitter over the unicorn’s wings with a 2-way glue pen and some loose glitter. Hard to tell, but I’ve also added some shimmer to the rainbows and the unicorn’s mane with a glitter brush pen. I also added a bit more blue cloud shadow under the unicorn’s feet before attaching him on the card.

This was really fun to create and I know it will make a fun card to share.

Thanks so much for dropping in!

Finishing Up Summer School With Cupcake Creations!🧁

Hello friends!  Hope you’ve had a great week!  Wow…it’s Finally Friday!  I’ve been SO busy “behind the scenes” and I will be getting to all of that later on, but I needed to squeak in with the final creations for the MFT Summer School!

I finished up Day 2 with my “smile rainbow” and now for Day 3, they’re asking for a “symmetry” style of creation.  I was told that basically it’s something that if you were to split it in half, it would be exactly the same on the other half…so this is what I thought of:

Vicki-MFTSummerSchool-Day3Symmetry

I was so excited about getting the My Favorite Things Cupcakes card kit, so I was determined that I was going to pull it out and use it for the rest of my Summer School cards! LOL!  It’s such a cute set with the dies and sentiment stamps!  I really had fun!

I used some papers from the kit and sponged ink around the edges of everything pretty much.  I just used the two cupcakes side by side for the symmetry class.  I just have opposite colors of sprinkles.  I added the red cherry on top, covered with the glitter brush pen and then some glossy accents.  (The glossy accents really got a work out!😮)

Vicki-MFTSummerSchool-Day4Ombre

So Day 4 class was “ombre” and that pretty much called to me to use the stencil from the card kit (sprinkles in background) and then I just heat embossed white over white and then used inks for the emboss resist technique moving the colors from lightest to darkest to get that classical “ombre effect”.  I also added a die cut cupcake that I used the same ink effect over it.  I die cut the words from the kit with the dark papers I used for the base of the card.  I finished with some sparkly crystal accents to finish it off!

Vicki-MFTSummerSchool-Day5WhiteSpace

And last but certainly not least was Day 5 “White Space” class.  I don’t often make cards like this, but I honestly love those CAS style cards, but I always want to “teeter” on the fine line between CAS and not…so I always think I’m not doing CAS.  I’m just not comfortable with the “CAS” definition or “rules” of what is or isn’t CAS.  I just feel happiest doing whatever happens to work out in my plan for a design…that’s pretty much it!    Be happy and you’re good!

I used this class to also follow along with the MFT sketch challenge going on as it looked like it was a good sketch for making a “white space” design.

I started by masking off the square and sponging lightly around it, I white heat embossed the sentiment over a black strip and added some silver ink over the stencil again and then attached the cupcake over top with the papers…and added the cherry on top with glossy accents too!

I finished it off with another little flag die from the kit and some silver sequins!  I like how it turned out!  I think I deserve a cupcake after all the creations I made!!😋

I hope you’ve enjoyed my creations today and I really appreciate you stopping in to see what’s going today!  Have a fabulous weekend!

Challenges:

  1.  MFT Summer School– Day 3 Symmetry
  2. MFT Summer School – Day 4 Ombre
  3. MFT Summer School – Day 5 White Space
  4. My Favorite Things – Wednesday Sketch Challenge MFTWSC502 (my last card and I flipped the sketch on the side)
  5.  Crafty Creations – #412 August Anything Goes
  6. Craft Rocket – #73 Birthday
  7. Creative Fingers – #191 Anything Goes
  8. Arty Divas – Bonus Birthday Challenge
  9. Crafty Friends – #142 Anything Goes

{Cupcake Inspirations} Color Challenge Reminder

Hello there friends!  Hoping you’ve had a wonderful weekend!  It’s gotten pretty warm again over my way after enjoying the slightly cooler and beautiful weather for a while!  I’ve been enjoying the flowers while they’re still around!

I’m sharing some more inspiration with you today for a reminder on our current color challenge for {Cupcake Inspirations}, so if you haven’t played along with us yet, you still have another week to join us!

For some reason this color challenge still had me thinking of daisy flowers…so I went with that again for my design this week as well:

Vicki-CIC498-week2

I’ve pulled out a Pink and Main stamp set called Daisy Bugs and colored up the bundle of flowers image with Copic markers and then used the coordinating dies to cu it out with which was popped up over my design with foam tape.

I used the sentiment from the same stamp set as well and white heat embossed it over Navy cardstock and used the coordinating die to cut that out with as well which was glued over the card.

The yellow decorative papers were pulled out from my older Stampin’ Up! stash as I thought it fit with the theme and I was super happy to use some more papers up!  I’ve used a stitched circle die to cut out the white layer behind the flowers and then another fancy circle die from Gina Marie cut out with Navy to layer behind that as well.  I also die cut a border strip with a Crafter’s Companion die to place across my design and I wrapped some stitched navy ribbon (SU!) over it before attaching to the design.

I glued the bow over top of the circle image panel and then I used a navy marker to create the stitch lines around the edges to finish it off.

Vicki-CIC498-week2-close

Here’s a closer look at the flowers popped up on the design.  You can see in the centers of the flowers that I’ve added some glossy accents.

I think it really makes the flowers pop off the design!

Vicki-CIC498-week2-flat

I hope you’ve enjoyed my card today and has brought you some inspiration!

Thanks so much for joining me here today and I’ll see you again soon!

Challenges:

  1.  The House That Stamps Built – JL2220 Anything Goes
  2. Krafty Chicks – #517 All Occasions
  3. Creative Knockouts – #360 Flora and Fauna
  4. Watercooler Wednesday – WWC281 All About Occasions

Galaxy Powders with LOTS of projects + video!🚀⭐

Hello there friends!  I’m a tad late with my post today, but I ended up hurting my shoulder and it was a bit hard to get on the computer to type things up! LOL!  I tihnk I’ll be able to recover a bit over the weekend…I hope anyway!

So today, I’ve pulled out some media that I hadn’t gotten a chance to REALLY play with until now.  I had so much fun and decided to turn on my camera and do a video with it as well!  (I’m a bit rusty with video making as I haven’t done one for a while and hope to do some more in the near future!)

Here’s my play with the Galaxy Powders:

Vicki-BRMSpaceATCs

My first of projects here are ATCs!  Do you remember back in the day for the “older crafters” that we use to trade those ATCs at conventions and such?!  I loved getting them from people from other countries!  ATCs (aka: Artist Trading Cards) are 2.5″ x 3.5″ with info on the back to trade with other artists.  You could even transform these to place on regular cards, etc. which I’ve done before too!

I’ve taken a piece of Midnight cardstock and started playing around with these Galaxy Powders and also used an ATC kit for the chipboard backs and the rocket details.

To show how the Galaxy powders work up close, check out my video below!  I started by making the backgrounds and then I worked each background into finished projects…CLICK HERE if you want to see it on You Tube or just watch it below:

Sometimes it’s fun to sit and just have fun playing around getting crafty!

Vicki-BRMEnjoy

And for this card, I’ve taken the High Tide stencil and went over it on black cardstock and brushed over it with the Galaxy Powders.

I’ve used this butterfly from the Take Flight stamp set and attached it over the panel along with the sentiments.  That Mirrorstock paper is really stunning and a little bit goes a long way with that!  (You can check out my video for full instruction on how I put this card together too!)

Vicki-BRMSmileOn

My last project here shows how I’ve used the Galaxy Powders over a stamp!  I’ve used the Smile On stamp set for that.  It’s hard to see in the photo the pretty shine on it, so be sure to catch the video to see it in action!  I used a white pencil to highlight some details on the image too.

I used a stitched rectangle die to cut it out and then used a stitched scallop rectangle die to cut out a piece of white cardstock to layer behind it.  I used Kraft cardstock for the A2 sized card base panel and then used the Embossing Ink to randomly stamp the “smile face” image for the background from the So Emotional stamp set.

I also layered on a piece of the Sequin Sheets between the layers of the sentiment panel and white scallop layered panel to attach to my card and then I used some metallic clear ribbon over that along with a bow before popping up my main image panel with foam tape.

Hope you’ve enjoyed my projects today along with my video on Galaxy Powders and learned a few things about them!

Have a wonderful day and I’ll see you again soon!

Challenges:

  1. Crafting Happiness – #58 Anything Goes
  2. Pammies Inky Pinkies – PIP2029 Anything Goes
  3. Fab ‘N’ Funky – Use Real Stamp (no digis)
  4. Simon Says Stamp Wednesday Challenge – Reach for the Stars (ATCs)
  5. ATC ARound the World – Sun, Moon and Stars (ATCs only)

Slimline Waving Hello🧜‍♀️

Hello there friends!  Hope you’re having a wonderful week!  Just wanted to stop in with a Slimline style card I had made with a fun underwater scene.  (I’m thinking a magical place like this would be great to be in right now!  How about you?)

Vicki-BRM-mermaidslimline

These slimline cards are really great for creating scenes like this on and I was also having fun being able to “experiment” with my different products too!

I’ve the stamp set called Sea You Soon along with the background paper (mermaid skin) and the Lilac Shimmering Sand Paste were all items from a past card kit.

I created my underwater scene basically using the mermaid skin paper as the background.  Although it has a cool texture and smoothness to it, I was able to take the School of Fish stencil and add that Lilac sand paste over it.  Love that extra texture and purple hue it gave!  I also took the silhouette images from the stamp set and heat embossed them over this paper with black EP.

I stamped and colored the rest of the images from the stamp set with Copic markers and then fussy cut them out to arrange for my scene and popped some up with foam tape and then lastly added some clear acrylic bubbles over it.

Vicki-BRM-mermaidslimline-flat

You can see now that it’s lying flat how the color shifts and changes on the paper!

I’ve used some stitched wave border dies to help create the scene using some Kraft cardstock where I’ve also fit in to arrange the sand castle image that I colored and cut out.  I used Copic markers and gel pens to help fit the borders and image together.

I cut out the background paper with the Trinity Stamps Slimeline Stitched Card Panels and Windows die set.  I layered it over a piece of blue paper that was included with the kit and then layered that over a Slimline style card base measuring 8.5″ x 7″ folded in half from a piece of Aubergine Cardstock.  The sentiment was actually stamped from the Merfriends stamp set using black Ink.

You can see parts of the images with shimmer on them which have been colored with metallic gel pens.  I’ve also covered the mermaid tail and jelly fish with a Spectrum Noir Glitter Brush Pen.

The bubbles are looking a bit white instead of clear because my glue wasn’t quite dry enough when taking my photos, so my apology on that, but it took a couple of days to completely dry up clear for some weird reason!  Those babies aren’t going anywhere though!! LOL!

Hope you’ve enjoyed my magical underwater slimline card today!  Thanks so much for joining with me today and I’ll SEA you again soon!😁

Challenges:

  1.  Just Us Girls – #544 Trend Week:  Long & Skinny
  2. Crafting Happiness– #57 Anything Goes
  3. Pammie’s Inky Pinkies – PIP2028 Anything Goes
  4. Mod Squad – Slim Line Scene
  5. Little Red Wagon – #558 Fantasy
  6. Papercraft – Fantasy
  7. There’s a Stamp For That FB Challenge –  #2 Summer and/or Slimline
  8. Not Just Cards – July Anything Goes

{Cupcake Inspirations} New DT!🧁

Hello friends!  I’m so excited to announce that I’ve been asked to join the {Cupcake Inspirations} Challenge design team!!

What could be better than crafting AND cupcakes, right?!  So be sure to join me here every Monday for new challenge and reminder inspiration!  I do hope you’ll check out the challenges and join us over there to play along!  (And maybe enjoy yourself a cupcake treat while you’re at it!😁)…if you’ve followed along with me for a while, you may have remembered about 5 years back that I used to be on this team before!  So I’m excited to be joining with them once again!

So here we go with the brand new challenge and a really fun theme to play with:

The theme for this challenge is “Flowers with Pearls/Sequins

**The challenges will last for 2 weeks, so you will have that long to play for each challenge!  There is a theme challenge and then a color challenge for every other one.  There will be a reminder week in between each one as well…so be sure to subscribe and follow the blog so you can see the inspiration and play along with us!**

**We are also partnering with the Double Trouble Paper Crafting Challenge Blog with their challenge of a tic-tac-toe board!  So be sure to check out all of the up-coming details and play along with them too!**

Here’s my take on the challenge:

Vicki-CIC497

I was really inspired with the flowers and pearl theme and I’ve been wanting to play around with a past card kit I had to color with pencils, which I hardly ever do!

The flower images come from the Simon Says Stamp Stronger Together stamp set and kit.  The kit had some colored pencils with it that I used to color the image and then I just used some dies from my stash to add the layers.  I took an additional floral image from the set and white ink to stamp the background and swiped the ink pad around the edges.

To fit with the challenge theme, I thought it would be fun to add several sizes of pearls along the edges of the oval panel.

Vicki-CIC497-close

Here’s a closer view of the coloring on the flowers.  I’ve also taken a sentiment from the stamp set and inked it up with some eggplant ink using my MISTI tool.  I inked it up again with some embossing ink and then added some clear sparkle EP over top of it to heat set.  The sparkle shows up so much better in person, of course!  I cut it out with my scissors and popped it up over the image with foam tape.

Vicki-CIC497-flat

Really hope that you’ve been inspired with my creation today!

I will be back next week with more inspiration for this challenge!  Thanks so much for dropping by!

Other Challenges I’d like to enter this card for:

  1.  Crafty Creations – #411 Anything Goes
  2. A Bit More Time to Craft – #119 Anything Goes
  3. Crafts Galore Encore – #77 Anything Goes
  4. QKR Stampede – #401 Anything Goes
  5. Love to Craft – LTCCB48 Anything Goes
  6. Love to Scrap – LTSCB135 Anything Goes
  7. Watercooler Wednesday – WWC278 Anything Goes Feminine

Name That Bird!

Hey there friends!  Ever have one of those days where you were up late or you got up in the middle of the night and then realized you weren’t sure if you got any sleep at all?  Sometimes I have days and then forget to do something and then I’m thinking about it all night only to realize that I’ve spent my time thinking about it and not sleeping when I could’ve just got up and done it!😂

This post is sort of a representation of that issue!  Not only did I forget or run out of time to get my post ready, but it’s also THE last day of the month to get these projects finished for the challenges they were intended for!  Story of my life!

Vicki-TEpigeon

Oh my gosh this is too funny!!🤣  A few months back I had spent some time at the Taylored Expressions store and had a laugh at some of the sentiments that I didn’t realize were in the store and decided that they would make some great cards to send out and they go well with those Grumplings stamps too!  I also wanted to participate in the #TEMAKER challenge before it ends, so I enjoyed putting this one together!

Believe it or not, I had a sample of dental floss in my purse and decided to pull some out and use it for this card!  LOL!  It meets the challenge which is to use something from your purse or junk drawer!  I just tied it around the card front!  I used some dies from my stash for the tree branch and the hexagon shape.  The papers comes from Taylored Expressions along with the Grouchy Grumplings II stamp set (owl) that I cut out with the coordinating die and popped him up with foam tape over the branch.  The hilarious sentiment comes from the Pitch Black stamp set and I know I’ll be using some of those others on more cards soon!  Tee hee!  I also found some fun yellow sequins laying on my desk and added them to finish it off!

Vicki-TEpigeon-close

Here’s a closer view of the “bird” and how I’ve colored him up with my copic markers.  I’ve used the TE papers to cut out the pieces in the branch as well as the background and hexagon shapes.  If you look at the “bird’s” eyes, you can see where I’ve added some glossy accents.  He does look a bit tired!!

Vicki-TEpigeon-flat

The reason for the strip at the bottom actually came from a mistake in calculating measurements for my card panel, so I just added a strip that I cut out from the hexagon die and used it as part of the design.  Sometimes there are ways to fix mistakes, so never think you’ve ruined something!

I hope you’ve gotten a chuckle from my card today as it has made me laugh!!😆  Thanks so much for dropping in today as I really appreciate your support and thoughts here!

P.S.  I have been busy “behind the scenes” doing various different things and haven’t shared them as of yet in my posts, but here’s a little look at what I’ve been doing lately:

Vicki-DDSLadyinWaiting-colored1Vicki-DDS-New Little OnesVicki-DDSPrimrose-colored2Vicki-DDS-Sunflower DreamsVicki-DDS-WintertimePenguins

I also haven’t shared my latest masculine cards, so I’ll be sharing those soon as well as other things I’m working on too!  Just getting things sorted out and taking the time to do it is all!

Have a great day and I’ll be seeing you soon!

Challenges (for bird card):

  1.  Taylored Expressions – #TEMAKERCHALLENGE – hexagon, yellow & purse
  2. Simon Says Stamp Wednesday – Anything Goes
  3. Colour Crazy Craft – Any Handcolored Image
  4. Creative Fingers– #189 Anything Goes
  5. Crafting Happiness– #55 Anything Goes
  6. Use Your Stuff – Free Week
  7. Creatalicious – #190 Anything Goes

Turtley Adorable!🐢

Hello friends!  I hope you’re having a great week so far!  Really hate it when technology doesn’t cooporate and I have to figure it out, but hopefully I can soon!  Sometimes it just needs to be done!🤔

Anyway, I was wanting to post some masculine cards I made for Father’s Day earlier this week, but I’ll have to post another time as this card was already done and is needed to enter a challenge that is ending soon:

Vicki-BRMturtle

I love that wee little baby turtle riding on the back with his tongue out!  The stamp was colored up with Copic markers, cut out with a circle die, along with another circle layer of Cabbage cardstock that I’ve also used for the A2 top folding card base, and another circle layer of vellum.

I was super excited to try out the brand new Ranger Distress line color “Speckled Egg”  products!  I’ve used the Distress Oxide ink to sponge over the image onto a piece of Sidewalk cardstock that was cut out with a stitched rectangle die.  I also took the Circle Tone stencil and added some Opal Chroma Glaze over it.  You can see how pretty the shimmer is on those dots!

For the banner along the side, I took another piece of sidewalk cardstock and cut my own banner with scissors.  I took my embossing ink pad and covered the banner piece with it and then heat embossed the Speckled Egg Distress Glaze EP over it…turned out so pretty!  I heat embossed the sentiment from the same turtle stamp set over a piece of vellum and wrapped it around the banner before attaching it to the card.

Lastly, I’ve added some metallic shimmer ribbon from my stash and some pretty sparkling sequins that remind me of bubbles.  The card was designed based upon a sketch, see details below post.

Vicki-BRMturtle-close

Here’s a better view of the cute image and coloring I’ve done.  I’ve added some dots with a white gel pen for their cheeks as well as their eyes and noses.  I’ve also used it for highlights on their shell.

You can also see a better view of that pretty shimmer from the Metallic Chroma Glaze that I used over a stencil.  Thought it was great for the circle theme going on.

Vicki-BRMturtle-flat

I hope you’ve enjoyed my card today and have been inspired in some way or has brought you a smile!  Thanks so much for dropping in and I’ll be seeing you again soon!

Challenges I’d like to enter this card for:

  1. Colour Crazy Craft – Anything Goes + coloring
  2. The Divas That Cut…Paper! – Summer Fun + dies
  3. Crafting Happiness – #154 Anything Goes optional: Under the Sea
  4. Lil Patch of Crafty Friends – Anything Goes
  5. Make My Monday – #125 Use Stencils
  6. The Sisterhood of Crafters – Stenciling

4 Cards Using One Sheet Wonder Template✂

Hello friends! I hope you’ve enjoyed your weekend! We’ve had such beautiful weather and it was nice to be out in it! Warm temps are soon to follow, so I know I’ll be crafting indoors then!

Today, I’m sharing something I did for a challenge a couple of months ago and really enjoyed the process of just creating using a single sheet of pretty floral papers in my stash. Have you ever heard of or tried the “One Sheet Wonder” method?

I only have this ‘overhead shot’ of all the cards I made because I wasn’t blogging at this time, but if you notice in each one of these cards, I have used the same floral pattern in each one. I’ve pulled out a single 6×6 piece of decorative paper from the Farmhouse Floral Paper Pad.

For the top and bottom left cards, you can see that I’ve used the diagonal pieces from the *”One Sheet Wonder” template. For the top one, I’ve just used an image and sentiment from the Farmhouse Friends stamp set. For the bottom card, I actually cut out a floral image from another piece of the same paper pad I’ve used for the template as the focal for my design. (It’s a great way to use up more of the scraps you may have!)

(*See the diagram below for how I cut out a template from the 6×6 sheet to use on my cards.)

For the top and bottom right cards, I’ve taken a couple of the strips cut from the *”One Sheet Wonder” template and then made it my own by cutting it up for a banner and then just separating in half to make a unique design on my card. The top one uses the Eggcellent Gnomes stamp set and the bottom one uses the Take Flight stamp set.

Basically, all I needed to do was sit with my pattern paper and match up the colors to create cards with. It was a great thing to have as a starting point with just a piece of pattern paper in my hand. So if you’re struggling a bit, this is great way to get going! Give it a try!

Here’s the template that I used of the cut out pieces from the one 6×6 sheet of pattern paper. Please feel free to use this as an idea for yourself to get started.

Another idea that I used for this one is that this floral pattern has several different colors in it to work from, so I was able to choose a different color for each of my cards. I believe I could’ve gotten even more than just the 4 cards too!

Hope you’ve enjoyed my post today sharing a little tip for you when you might be struggling! I’ve learned that just getting started can be half the battle sometimes!🤔 Thanks for dropping in and I’ll see you again soon!!

Boardwalk Slimline Cards🎡

Hello friends! I’m back again today to share some “experimenting” I’ve been doing with different products and style of card design! Won’t you share the ride with me?….

It seems that these “Slimline” cards have become very popular lately and there have been many products from companies that have come out with some really cool things to help with your designs! I remember several years back making some cards that were called “tall and skinny”, but they didn’t fit into a standard sized business envelope like this particular size does…so this is actually a “new to me” design to try out. These measure 8.5″ x 7″ folded in half on the 7″ side at 3.5″.

RIGHT CARD: I had purchased some Slimline dies from Trinity Stamps and wanted to try them out with my cards. I was looking at this Boardwalk Dreams stencil and thought it would be cool to divide up the sections like a film strip to place on my cards. I used some Kraft cardstock and blended some different Oxide Inks over it for the colors. I used the slimline dies for layering and took a thin strip of black cardstock to separate each square. I added some Spring Acrylic Bubbles along with a black sequin for the middle of the Ferris wheel and dotted areas with some Silver glitter drops. I stamped the sentiment with black Ink over Kraft cardstock and cut it out with a banner die to attach at the bottom of the panel.

LEFT CARD: I tried the same style of design with the stencil, but realized that the ink didn’t show up very well over the black cardstock, so I then took some of the Velveteen Glazes and went over each section with a different color with a palette knife. The Bananna Split on the top square still had some of the ink left on it and it mixed with the glaze! I heat embossed some of the images from the Boardwalk stamp set with black EP over vellum and fussy cut them out and ran it through my Xyron machine to attach over top. I added a gold glitter brad in the center of the ferris wheel and then added some gold glitter drops in areas. The panel was layered over another die cut piece using some Gold Glitterstock.

I wasn’t sure about the black design, but then it got me thinking what a cool eerie design it was and how fun it would be to add like a spooky/scary clown to it! I know some may not be into that, but I happen to really like those scary horror type movies. Halloween has always been my favorite holiday…just ask my kids! LOL!

Have you tried those Slimline cards? What do you think of them?

Thanks so much for dropping in today! I’ll be seeing you again soon!

Challenges:

  1. 613 Avenue Create – Anything Goes optional twist: blended background
  2. The Corrosive – Anything Goes
  3. Pammie’s Inky Pinkies – PIP2023 Anything Goes
  4. Make My Monday – Summer Activities
  5. Sweet Stampers – Something with ‘B’ (boardwalk, beach, blending, banner, bubbles)
  6. Aud Sentiments – Anything Goes + sentiment