Finishing Up Summer School With Cupcake Creations!🧁

Hello friends!  Hope you’ve had a great week!  Wow…it’s Finally Friday!  I’ve been SO busy “behind the scenes” and I will be getting to all of that later on, but I needed to squeak in with the final creations for the MFT Summer School!

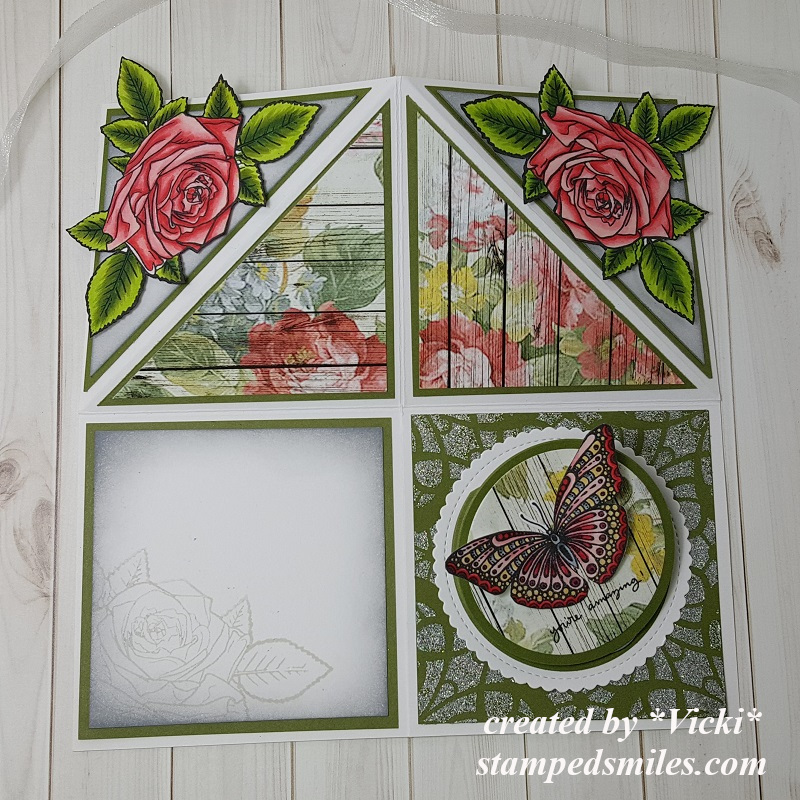
I finished up Day 2 with my “smile rainbow” and now for Day 3, they’re asking for a “symmetry” style of creation.  I was told that basically it’s something that if you were to split it in half, it would be exactly the same on the other half…so this is what I thought of:

Vicki-MFTSummerSchool-Day3Symmetry

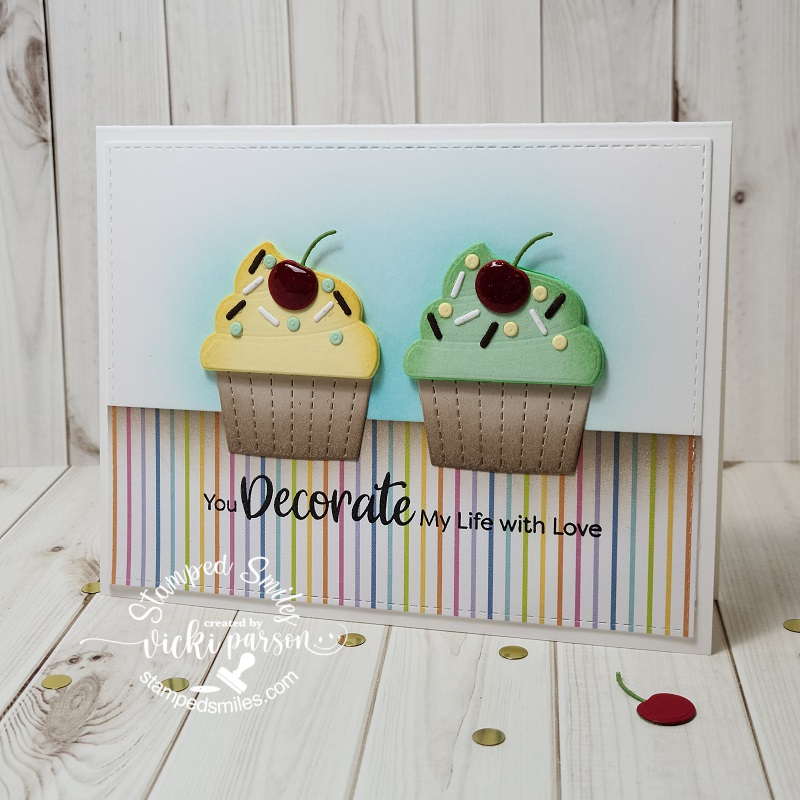
I was so excited about getting the My Favorite Things Cupcakes card kit, so I was determined that I was going to pull it out and use it for the rest of my Summer School cards! LOL!  It’s such a cute set with the dies and sentiment stamps!  I really had fun!

I used some papers from the kit and sponged ink around the edges of everything pretty much.  I just used the two cupcakes side by side for the symmetry class.  I just have opposite colors of sprinkles.  I added the red cherry on top, covered with the glitter brush pen and then some glossy accents.  (The glossy accents really got a work out!😮)

Vicki-MFTSummerSchool-Day4Ombre

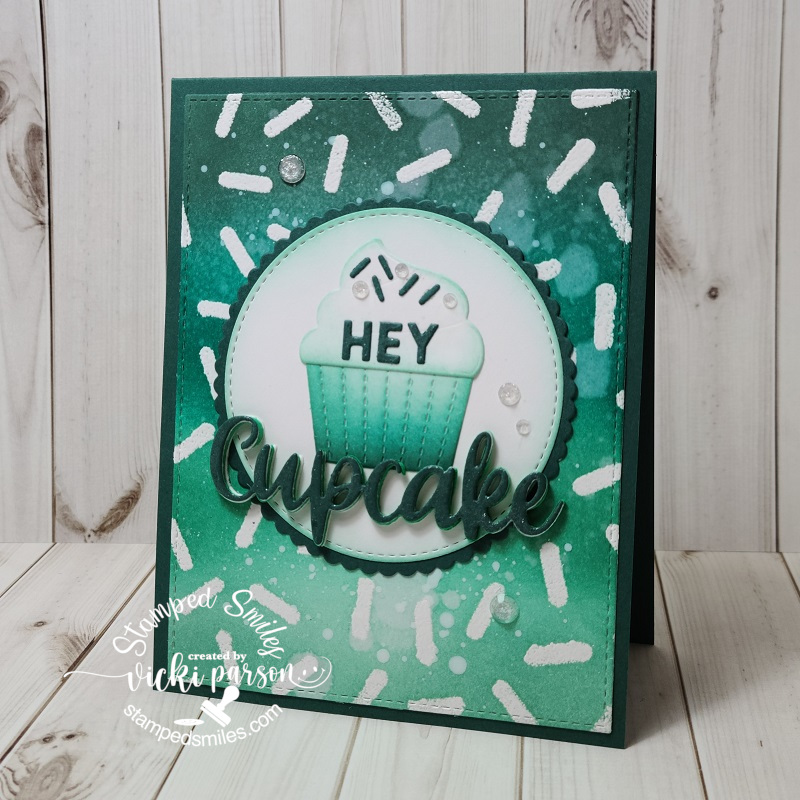
So Day 4 class was “ombre” and that pretty much called to me to use the stencil from the card kit (sprinkles in background) and then I just heat embossed white over white and then used inks for the emboss resist technique moving the colors from lightest to darkest to get that classical “ombre effect”.  I also added a die cut cupcake that I used the same ink effect over it.  I die cut the words from the kit with the dark papers I used for the base of the card.  I finished with some sparkly crystal accents to finish it off!

Vicki-MFTSummerSchool-Day5WhiteSpace

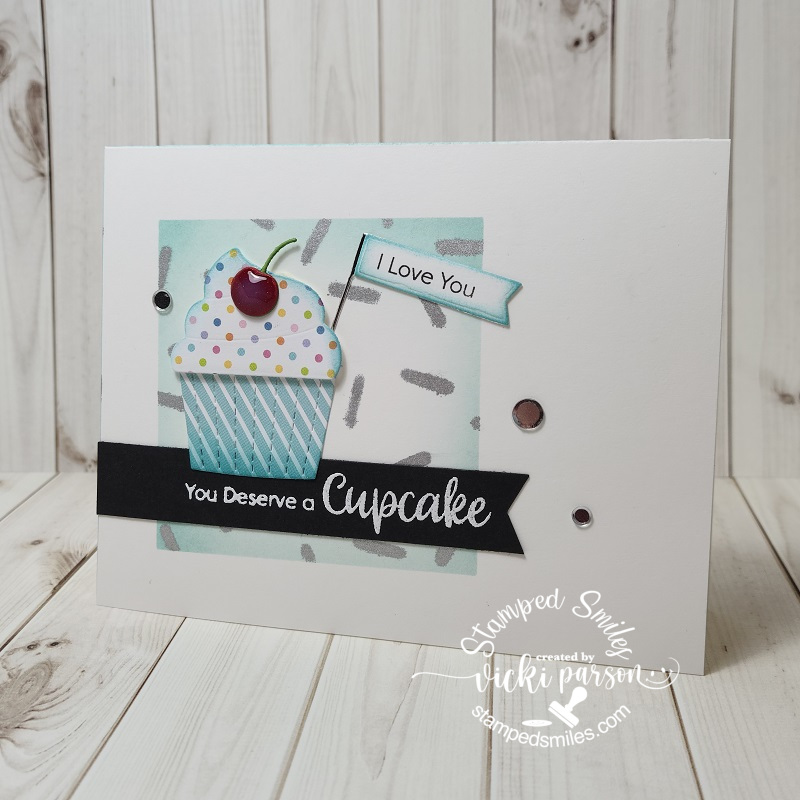
And last but certainly not least was Day 5 “White Space” class.  I don’t often make cards like this, but I honestly love those CAS style cards, but I always want to “teeter” on the fine line between CAS and not…so I always think I’m not doing CAS.  I’m just not comfortable with the “CAS” definition or “rules” of what is or isn’t CAS.  I just feel happiest doing whatever happens to work out in my plan for a design…that’s pretty much it!    Be happy and you’re good!

I used this class to also follow along with the MFT sketch challenge going on as it looked like it was a good sketch for making a “white space” design.

I started by masking off the square and sponging lightly around it, I white heat embossed the sentiment over a black strip and added some silver ink over the stencil again and then attached the cupcake over top with the papers…and added the cherry on top with glossy accents too!

I finished it off with another little flag die from the kit and some silver sequins!  I like how it turned out!  I think I deserve a cupcake after all the creations I made!!😋

I hope you’ve enjoyed my creations today and I really appreciate you stopping in to see what’s going today!  Have a fabulous weekend!

Challenges:

  1.  MFT Summer School– Day 3 Symmetry
  2. MFT Summer School – Day 4 Ombre
  3. MFT Summer School – Day 5 White Space
  4. My Favorite Things – Wednesday Sketch Challenge MFTWSC502 (my last card and I flipped the sketch on the side)
  5.  Crafty Creations – #412 August Anything Goes
  6. Craft Rocket – #73 Birthday
  7. Creative Fingers – #191 Anything Goes
  8. Arty Divas – Bonus Birthday Challenge
  9. Crafty Friends Anything Goes

Turtley Adorable!🐢

Hello friends!  I hope you’re having a great week so far!  Really hate it when technology doesn’t cooporate and I have to figure it out, but hopefully I can soon!  Sometimes it just needs to be done!🤔

Anyway, I was wanting to post some masculine cards I made for Father’s Day earlier this week, but I’ll have to post another time as this card was already done and is needed to enter a challenge that is ending soon:

Vicki-BRMturtle

I love that wee little baby turtle riding on the back with his tongue out!  The stamp was colored up with Copic markers, cut out with a circle die, along with another circle layer of Cabbage cardstock that I’ve also used for the A2 top folding card base, and another circle layer of vellum.

I was super excited to try out the brand new Ranger Distress line color “Speckled Egg”  products!  I’ve used the Distress Oxide ink to sponge over the image onto a piece of Sidewalk cardstock that was cut out with a stitched rectangle die.  I also took the Circle Tone stencil and added some Opal Chroma Glaze over it.  You can see how pretty the shimmer is on those dots!

For the banner along the side, I took another piece of sidewalk cardstock and cut my own banner with scissors.  I took my embossing ink pad and covered the banner piece with it and then heat embossed the Speckled Egg Distress Glaze EP over it…turned out so pretty!  I heat embossed the sentiment from the same turtle stamp set over a piece of vellum and wrapped it around the banner before attaching it to the card.

Lastly, I’ve added some metallic shimmer ribbon from my stash and some pretty sparkling sequins that remind me of bubbles.  The card was designed based upon a sketch, see details below post.

Vicki-BRMturtle-close

Here’s a better view of the cute image and coloring I’ve done.  I’ve added some dots with a white gel pen for their cheeks as well as their eyes and noses.  I’ve also used it for highlights on their shell.

You can also see a better view of that pretty shimmer from the Metallic Chroma Glaze that I used over a stencil.  Thought it was great for the circle theme going on.

Vicki-BRMturtle-flat

I hope you’ve enjoyed my card today and have been inspired in some way or has brought you a smile!  Thanks so much for dropping in and I’ll be seeing you again soon!

Challenges I’d like to enter this card for:

  1. Colour Crazy Craft – Anything Goes + coloring
  2. The Divas That Cut…Paper! – Summer Fun + dies
  3. Crafting Happiness – #154 Anything Goes optional: Under the Sea
  4. Lil Patch of Crafty Friends – Anything Goes
  5. Make My Monday Use Stencils
  6. The Sisterhood of Crafters – Stenciling

Foxy Skater Spinner Card in Action With Video Tutorial!

Hello friends!  Really feeling the cold air around here, so I’m still thinking in winter mode and have another interactive winter card to share with you again today!  (Please be sure to check out THIS POST to see another interactive winter card and video tutorial if you’ve missed my last posting!)

What’s a better way to embrace the cold than to create interactive cards in your nice warm crafty space, right?!  So sit back, have a warm sip and get creative with me today!

Vicki-DDS-Spinner Fox Card video

This cute little guy is so fun to watch him spin around doing his cool ice skating trick!  I’ve used the Foxy Skater image from Digi Doodle Studios for my card here along with the Winter Plaids N’ Patterns Digi Paper Pack and Snow Days Sentiments set as well!

I’ve used several dies from My Favorite Things for the front of the card!  I’ve cut out the plaid papers with the A2 Stiched Rectangle die and mounted it over an A2 sized side folding white card base.  The spinner “window” was cut out with a Circle die that was also used to cut the center for the Scallop Stitched Circle frame around the opening.  The sentiment was printed out and cut with the MFT Slanted Banners die (not finding link in store).  I’ve also used MFT dies for the snowflakes (also not shown in store), that was cut from some Brutus Monroe Fallen Snow Glitterstock.  I’ve added some silver Stickles to the centers of the snowflakes and dotted around the front of the card.

I’ve also used some snowflake papers for the inside area of the card from the Candy Land Paper Pack from MFT as well!

Check him out below as he spins around:

What’s different about this particular spinner card is how I’ve used a single digital image to create the front AND back of this Foxy Skater guy!

To see how I’ve put together this card for the spinner action, check it out in my video below or you can watch it on You Tube HERE:

I still have this card along with the other interactive card from my last post sitting here on my desk playing around with them! Not sure I can give them up quite yet as I’m having fun!! LOL!

Vicki-DDS-Spinner Fox Card video-close

Here’s a closer look at the cute “Foxy Skater” guy that twirls around on the card.  I was going for a bit of a textured look on his fur, so I also used a white gel pen to mix in some white fur on his cheeks, chest and tail areas. I’ve also used a gel pen for the cheeks and a metallic gel pen for his skate blades.   It was a little more time consuming to color in two fox images, but as you can see, it’s totally worth having both sides for this spinner action design! 🙂

To flip the image in the opposite direction, I used Word doc. on my computer, copied the original image so that it was the exact size, pasted him again and then used the “rotate” setting to flip him in the opposite direction.

Check out the video to see how I was able to fussy cut him down for my card design.

Vicki-DDS-Spinner Fox Card video-flat

I hope you’ve enjoyed my spinner card today and that the video is helpful for you to create your own fun version during the wintry cold months ahead of us!

Thanks so much for stopping in today my friend and I’ll be seeing you soon!

Challenges I’d like to enter this card for:

  1.  Shopping Our Stash – Winter blues
  2. Through the Craft Room Door – Anything Goes
  3. The Male Room – It’s Snowing!
  4. Creative Moments – Anything Goes
  5. Penny’s Paper-Crafty – Anything Goes #463
  6. CCEE Stampers– CCEE2004 “Ice, Ice Baby!
  7. Aud Sentiments – Anything Goes + sentiment

The Skiing Bandit Raccoon in Action with Video!

Hello friends!  I hope you’re having a great week!

As I mentioned in my last post, it’s really cold and snowy over my way so I thought I’d join in with the winter season and have a little interactive fun in my craft room!  (Where it’s much warmer inside! LOL!)

I have used some Digi Doodle Studios products to create this really fun interactive card design:

Vicki-DDS-Pull Tab Slider Racoon

This cute little critter is just having a blast! 🙂  This card was so fun to play with and I couldn’t put it down!  This cute critter is the Skiing Bandit Raccoon digital stamp from Digi Doodle Studios.

I’ve colored him up with my Copic markers and used a glitter silver gel pen to color up his skiing poles.  He was fussy cut out with scissors. You will notice that his scarf and mittens resemble the background papers too, which were paper pieced from the Digi Doodle Studios Winter Plaids N’ Patterns Digi Paper Pack.

To create the scene, I’ve die cut some ‘hill slopes’ with a die cut, but you could use just scissors to cut one yourself.  I die cut a set of trees for the background  and ended up inking up the edges of the snow hills along with the banner sentiment at the top.

What’s fun about this card is that when you grab that little arrow at the bottom left of the card, this little skiing bandit starts flying down the glittery snow hills!

If you’d like to see how this card moves along and how to create one for yourself, be sure to check out the video below or watch on You Tube HERE!

I thought that the invisible way he flies over the hills along with the idea of how to create your own slider mechanics with scraps is something fun that anyone can put together with items they have on hand!

Vicki-DDS-Pull Tab Slider Racoon-close

And of course here’s the view of him flying down the hill as the arrow slider tab gets pulled from the card!  The pull tab slider sentiment comes from the Digi Doodle Studios Snow Days Sentiments set, which is what I’ve also used at the top front of the card.

For the sentiment on the pull-tab slider, I’ve taken a marker and underlined part of the sentiment and added an explanation mark on the end.

I also decided to stamp a black arrow at the end of this slider so that when it’s tucked inside, you can see that arrow so the recipient knows what to do!  You could of course just use a pen to draw your own arrow as well.

Vicki-DDS-Pull Tab Slider Racoon-flat

I hope you’ve enjoyed my interactive slider card today!  I’m still having fun pulling that skiing raccoon over the snowy hills! LOL!  I think this would be a really fun card to send along to a friend for a smile during these cold months, don’t you?

Thanks so much for stopping in!  I’ll be seeing you again very soon!

Challenges I’d like to enter for this card:

  1.  Sparkles Monthly – Winter Blues
  2. QKR Stampede – #381 Anything Goes
  3. Allsorts – More Than a Single Word
  4. Crafty Friends – Anything Goes
  5. Lil’ Patch of Crafty Friends – Anything Goes
  6. Pammie’s Inky Pinkies – Anything Goes #2003
  7. The Paper Girls – Winter Color Palette

I’m Otterly In Love

Hello friends!  Happy Friday!  Do have any plans for the weekend?  I have plans to probably stay in and color since there’s snow predicted for us! Brr!

I wanted to share a card I’ve made with this “OTTERLY” adorable brand new Pairables digital set that has come out today from Digi Doodle Studios:

Vicki-DDSOtterlyLove-Jan10

Isn’t that the sweetest little face?!  This entire scene was digitally created on my computer using the Otterly Love Pairables set from Digi Doodle Studios!  If you’d like to take a look at what’s in the entire set, then check it out in the store link or see the bottom of this post!  I will have another card coming with this same set soon, so stay tuned!

*Tip*  The “thing” I love about creating scenes digitally as apposed to regular stamping is that there’s no masking involved!  Just create on the computer and you can resize and arrange/bring forward/bring back, etc all you want without the hassle and it’s easy to start over as it’s on your computer!  It’s easier than you think if you’ve never done it!

So as I mentioned, I arranged each image on my computer how I wanted the images to be and printed it out, colored it in and sponged in some distress ink along the edges so the whole panel has color over it.

I die cut it out with a stitched rectangle die and used the same die set to cut a larger piece in the brown cardstock that was layered over an A2 sized top folding white card base.

I used my Cricut to cut out the cattails along the right side.  I popped it up with some thin pieces of foam tape to add to my design.  Lastly, I finished out the card with some gold heart sequins around the sentiment.  (This is a nice flat design so it’s easily mailable too!)

Vicki-DDSOtterlylove-Jan10-close

Here’s a closer look at the coloring I’ve done on this cutie!  I’ve used my Copic markers to color most of the panel including all of the grass blades.

I took a white gel pen to give him extra highlight on his eyeballs and cheeks.  I also covered the pond water with a glitter brush pen for some shimmer.  Not sure you can see it, but of course it’s nice and glittery in person!

I’ve also used a sponge to lightly cover the cattails with white ink.

Vicki-DDSOtterlyLove-Jan10-flat

I hope you’ve enjoyed my card today using this darling new Pairables set from DDS!  I’m seriously looking forward to sharing more with it soon as I think this has easily become my favorite!

Thanks so much for stopping in today and I’ll see you soon!

Challenges:

  1.  Country View – Love
  2. The Paper Funday – Anything Goes with optional Friendship
  3. Crafts Galore Encore – Anything Goes
  4. Creative Knockouts – Anything Goes
  5. Let’s Craft and Create – Anything Goes with optional:  Love is in the Air
  6. Lil’ Patch of Crafty Friends – Anything Goes
  7. Pammie’s Inky Pinkies– PIP2001 Anything Goes

Snow One Like You for Whimsy Stamps

Hello friends!  I hope you’re having a wonderful week so far!

Today I have creation to share with you using this really sweet image from Whimsy Stamps:

Vicki-WSTawny-Nov12

I really adore this digital stamp that came out this month for Whimsy Stamps called Tawny.  It’s one that I picked to make something with as it was a bit personal to me.  That little owl with those big eyes is so sweet and really reminds me of my grandma who passed several years ago.  She was an owl lover….so she’s like a sweet little angel with me here!  There was SNOW one like her either!

To create my card, I started with some watercolor paper and Distress Oxide Inks in Seedless Preserves, Dusty Concord, Stormy Sky and Broken China (from bottom to top order.)  I spritzed it with a water bottle and soaked it up with a paper towel.  I then took some white paint watered down and splatter it with a fan brush over the panel.  I also took some shimmer spray and covered the entire panel.  You can see it better in the photo below.

I took a Lawn Fawn die to create the tree border with woodgrain paper and then die cut a snow border with glitter cardstock and glued it behind the frame.  I also took the sentiment from the Whimsy Stamps Snow Flurry clear stamp set and white heat embossed it over a strip of vellum that I’ve attached over top of these layers (with the inked background also) by using my Xyron Sticker machine.  These pieces were die cut with a stitched rectangle die, layered over a piece of white cardstock and then mounted onto a purple A2 sized top folding card base.

Lastly, I’ve added my image and some snowflakes that were cut out with some more glitter cardstock and each snowflake was dotted with some Nuvo White Blizzard Glitter drops.

Vicki-WSTawny-Nov12-close

Here’s a closer view of the image and how I’ve got her colored up with Copic markers.

If you take a good look at the top portion of the background, you can sort of see the shimmer from the spray.  It’s really sparkly in the light.

I accidentally got a piece of the “faux snow” photo prop on her skirt. LOL!  I covered the flower on her hat with a glitter brush pen and I’ve used some Nuvo Morning Dew Crystal Drops over the owl’s eyes, but it cracked.  I don’t like it as much as the glossy accents as it doesn’t crack so easily like this does.

She was fussy cut out and popped up over the snow border with foam dots.

Vicki-WSTawny-Nov12-flat

I really like how this one turned out with the colors and I hope you like it too!  The inked snowy backgrounds are really fun to play with!

Thanks so much for dropping into today and I’ll see you again soon!

Challenges:

  1.  Shopping Our Stash – Snowflakes
  2. Crafting By Designs – November Anything Goes
  3. Cardz 4 Galz – Let it Snow
  4. Moving Along With the Times – Snowflakes
  5. Creative Moments – Anything Goes with Optional:  “Baby it’s Cold Outside”
  6. Krafty Chicks – Winter
  7. QKR Stampede – #371 Anything Goes

Z-Fold Gift Card Holder with Digi Doodle Studios for Coffee Lovers Blog Hop + Video Tutorial

Good morning friends!  Aaah!  It sounds like a great morning for coffee, doesn’t it?!  Well it sure does to me anyway!  Today, my post is all about coffee…so grab yourself a cup, sit back and enjoy!

I’m so excited today to share my post with you because Digi Doodle Studios is a first-time sponsor for the Coffee Lovers Blog Hop!  There are lots of fun coffee themed products in the store and I’m thrilled to be sharing some with you today:

Vicki-DDS-CoffeeHop-ZfoldGiftCard

Isn’t she just adorable with coffee in hand?!  This image is called “Ginger” from Digi Doodle Studios and I’ve got her all-colored up front and center of my Z-Fold Gift Card Holder.

If you have ever made a Z-Fold card, then this is something with a little bit of extra added fun with a gift card holder pocket on the inside, plus you can see how the card nicely displays on the front which is perfect for popping into an envelope to mail out to your coffee loving friend!

The papers that I’ve used for this work perfectly with the theme today which are also from Digi Doodle Studios called Coffee Break Digi Papers.  (I love that I never have to worry about running out of my favorite pattern!!)  There are also several sentiments from Digi Doodle Studios used on my project called Coffee Anyone Sentiments.

*If you want to see a video with detailed instructions on how to make one of these Z-Fold Gift Card Holders along with a sharing of the full collection of the digital papers that I’ve used on my project, check out the video below or CLICK HERE to view it on You Tube:

This is such an easy and fun project to put together especially for the up-coming Holidays, but as you can see this is very neutral so that I could easily use it for most any time of the year.

Vicki-DDS-CoffeeHop-ZfoldGiftCard-close

Here’s a closer view of “Ginger” and how I’ve colored her up with Copic markers.  Of course, if you know me, I had to add a bit of sparkle somewhere.  I took a glitter brush pen and added some sparkle to her pink bow, the heart on her coat and the lid and flower on her coffee cup.

I die cut her out with a stitched rectangle die and then layered a piece of brown cardstock die cut with a scallop rectangle die.  For the around the edges of the image panel as well as the other sentiments I printed out, I sponged some Tea Stain Distress Ink around the edges.  The sentiment were cut out with a stitched circle die and then layered with a piece of brown cardstock cut with a scallop circle die.

To keep the image panel in place, a foam dot was used at the bottom panel so that when you pull up on the flap it opens up:

Vicki-DDS-CoffeeHop-ZfoldGiftCard-open

And this is what is so fun, is that when you flip up the front panel, you see how it opens up with the fun coffee sentiments inside and the surprise gift card holder at the top!

I have an urge to go to Starbucks now! LOL!

I hope you’ve enjoyed my fun Coffee themed project today as well as the video tutorial on how to make one yourself!  I’d love to see yours if you make one!  If you have any questions about anything, please let me know!

Now to sip on some more coffee and join in on all of the coffee inspiration today!  Thanks so much for stopping in and I’ll see you again soon!

Challenges:

  1.  Coffee Lovers Blog Hop – Anything Coffee/tea/cocoa/cider related.
  2. Watercooler Wednesday – WWC245 Anything Goes
  3. Simon Says Stamp Wednesday – Anything Goes
  4. As You Like It – Favorite Papers and Why? – Digital papers because I never have to worry about running out of my favorite pattern and I don’t have to worry about storage!

Triangle Corner Pop Up Card + video tutorial!

Today I’m sharing the Triangle Corner Pop Up Card.  I have actually received several messages and comments that people wanted to see a video tutorial on how to make one.  So I thought I would come up with a version that I could share to show the many different variations that you can come up with and the fun you can have with it!

Vcki-BMBeHappy-TriCornerPop-opened

This style is a much more elegant approach which is much different than a past creation I put together.  I love that you can change the look and have fun playing with different stamps and elements to fit inside the design!

For this one, I have taken the Rose and Butterfly stamp sets to stamp and Copic color.  I fussy cut out the images on my design.  I’ve used Jurassic 100# and White 100# cardstock.  The decorative paper is from the Rustic Florals paper pad.  I stenciled the bottom of the Jurassic panel with a stencil using some Unicorn Horn Glitter Glaze.  Both of the rose images along with the small heart circle on the easel card were popped up with some foam tape.

For the circle easel design, I’ve cut out a scallop circle with the white cardstock in the size that I thought would fit within the design.  Then cut the body of the card with other circle dies in the Jurassic cardstock and then the front with some more of that Rustic Florals paper that I’ve used in the background.  The sentiment below the butterfly and the hearts on the small circle were stamped from same stamp set.  All of the white panels (with the exception of the scallop circle) was ink foam blending with some grey distress ink.  To keep the card “locked” in this position, I’ve used the Mini Disc Magnets.

If you are interested in learning how to create one of these cards for yourself, then please be sure to check out my video below.  CLICK HERE to view on You Tube.

These cards can look really intimidating, but once you see the measurements of how to put one together, they’re really easy and fun to make!

Vicki-BMBeHappy-TriCornerPop-unfolded

Here’s what the card looks like completely opened up.  You can see on the left bottom panel that I’ve taken that rose from the stamp set again and stamped it in the corner with some grey ink after ink foam blending around the edges of it.  This will be the area that I’m leaving for a personal message.

To fold it down to a 4″ square card that’s close you will start by folding down on the top and then fold it over from the right side to the left.  This will completely close it up.

Vicki-BMBeHappy-TriCornerPop-front

Here you can see that the card is completely closed to a 4″ square size minus the rose leaves sticking out which I don’t mind.

I took another panel of the Jurassic cardstock for the front of the card and sponged around the edges of it with the white Ink and then also stamped the rose again in the corner of it.  Because I had several dimensional and extra layers on this card, I had to use a ribbon to tie it together to help it stay closed up.  You might need an envelope that is slightly larger than an A2 envelope, but if you use less layers and dimension, it should fit in an A2 size envelope.

Hope you’ve enjoyed my interactive card and tutorial today!  Thanks so much for dropping in with me! 

Challenges I’d like to enter this card for:

  1.  Cardz 4 Galz Wings
  2. Crafty Cardmakers – It’s a Bug’s Life
  3. Through the Craftroom Door – Anything Goes
  4. Try it On Tuesday – In my Garden there is….

Oceans of Love for Digi Doodle Studios

Hello again my friends!  I’m back to share this card I made using this adorable image from Digi Doodle Studios:

Vicki-DDSNixie-Aug20

Isn’t she adorable with her little underwater crab friend?!  This is the Nixie Mermaid digital stamp from the Digi Doodles Studios “Under the Sea” collection.  I thought she was so cute and I actually had her colored up before I ended up hurting myself and had to leave.  I finished out the card when I got better.

I have also used some fun digital papers and a sentiment that work well with this particular image.  The pretty pink patterned papers you see in the background come from the Digi Doodle Studios Summer Breeze Card Making Paper collection.  The sentiment came from the Digi Doodle Studios Mermaid Sentiments set.  I printed out the sentiment and cut it out with a ticket die, sponged around the edges with the turquoise ink color and layered it over the same turquoise colored cardstock I’ve used throughout my layout.

The layout idea came from a sketch challenge that I’m entering for below this post.  I have several layer panels including the fun turquoise sparkly paper that I’ve used that was cut with a wave border die and then sponged with some white ink.  I added some pearls to each corner of the image panel, wrapped some white organdy ribbon around the card front base, tied a bow and added a silver bow where I have attached some silver string and a starfish charm to it.  The entire card measures 5.5″ square.

Vicki-DDSNixie-Aug20-close

Here’s a closer view of the coloring that I’ve done on this mermaid image.  Mainly colored with Copic markers, but I’ve used a gel pen to color the sprigs next to the flower in her hair and the bracelets around her wrists.  I took a glitter brush pen and covered her entire fish body and the bubbles in the water with.  (Of course it looks so shimmery in person!)  I then took some glossy accents and covered the little crabs eyeballs with and then some liquid pearls to dab a dot over the pearl inside the oyster.  This mermaid image panel was popped up with foam tape over the card front.

Vicki-DDSNixie-Aug20-flat

I hope you’ve enjoyed my underwater mermaid card today!

Thanks so much for stopping in today!  I’ll be back tomorrow with something fun!

Challenges I’d like to enter this card for:

  1.  Cheerful Sketches – August Challenge
  2. The House That Stamps Built – A1419 Tic-Tac-Toe (I used first row down)
  3. Pammie’s Inky Pinkies – PIP1933 Anything Goes

Guest Designing for Digi Doodle!

Hello friends!  I’m back today to share some fun news with you!!!!

I’m very excited to finally be able to share with you that I’m guest designing for

Digi Doodle Stamps!

Today, I’m sharing my first card for them with this really adorable image:

Vicki-DDLovesMeNot-June7

I have used the Loves Me Loves Me Not digital stamp to create my card.

What I had in mind when making this card was all of that crazy rain we were having this past month and how it seemed to never end.  I also loved the flowers she was holding because my daisies came up in my back yard and they really make me happy seeing them bloom.  So I combined this image with some rainfall in the background and took away the petals from the image to make it appear as if she’s holding out her hand in the rain!  🙂  Hubby has been taking extra great care of me while all of this rain was happening around us and I think this would be a special card for someone who always seems to bring out that happy sunshine no matter the weather!  (His favorite color is blue!)  Wink wink

Vicki-DDLovesMeNot-June7-close

Here’s a closer view of the coloring I’ve done on her with Copics.  For the background, I’ve taken a white panel and stamped some rain drops from another stamp set in my stash.  I fussy cut out my colored image and attached her over top of that rain panel.  I took some Nuvo Glitter Drops and added them over the rain drops in the background behind her.  I also white heat embossed the sentiment (From MFT) and cut it out with a banner die and slipped that under her foot when placing it on my card.

It’s hard to tell in the photo, but I’ve covered her bow and top of her hair with a glitter pen to make it look like she’s been wet in the rain.

Vicki-DDLovesMeNot-June7-flat

For the rest of my card, I’ve added the raindrop background light blue stitched scallop card panel over a dark blue layer and attached some pink ribbon around them.  I’ve added the bow to the side and then attached a yellow enamel heart over that.  These panels were mounted over an A2 sized white top folding card base.

Lastly, I’ve added the image panel and mounted it over the yellow scalloped panel and another piece of dark blue cardstock that was attached with foam tape.

I hope that you’ve enjoyed my card today and it brought you a smile!  Thank you so much for stopping by with me today!  I will be having another really super fun post to share with you tomorrow, be sure to stop by!

Challenges:

  1.  Love to Scrap – Anything Goes
  2. Creative Craft Cottage – Eileen’s Anything Goes (Digi Doodle is sponsoring!)
  3. Pammie’s Inky Pinkies – PIP1922 Anything Goes
  4. The Paper Girls – Top 5 Faves (Coloring, sparkle, hearts, ribbon, flowers)
  5. Watercooler Wednesday – WWC224Anything Goes Feminine
  6. Crafting with an Attitude – Anything Goes