Hello friends and happy Friday! The weather has decided to cool down quite a bit over the last couple of days and it’s been very nice to have the windows open for a change! I think we’re supposed to have another spell of warm weather, but I’ll take the cool down for now!
Today is a new challenge over at the Alphabet Challenge Blog! Our next letter is “K”, and the hostess has chosen “K is for KEEP IT SIMPLE” (CAS style) *Please remember that this is a bi-weekly challenge, so you have two weeks to enter.* I hope you’ll join in the fun with us. Here’s the project I’ve made for this challenge:
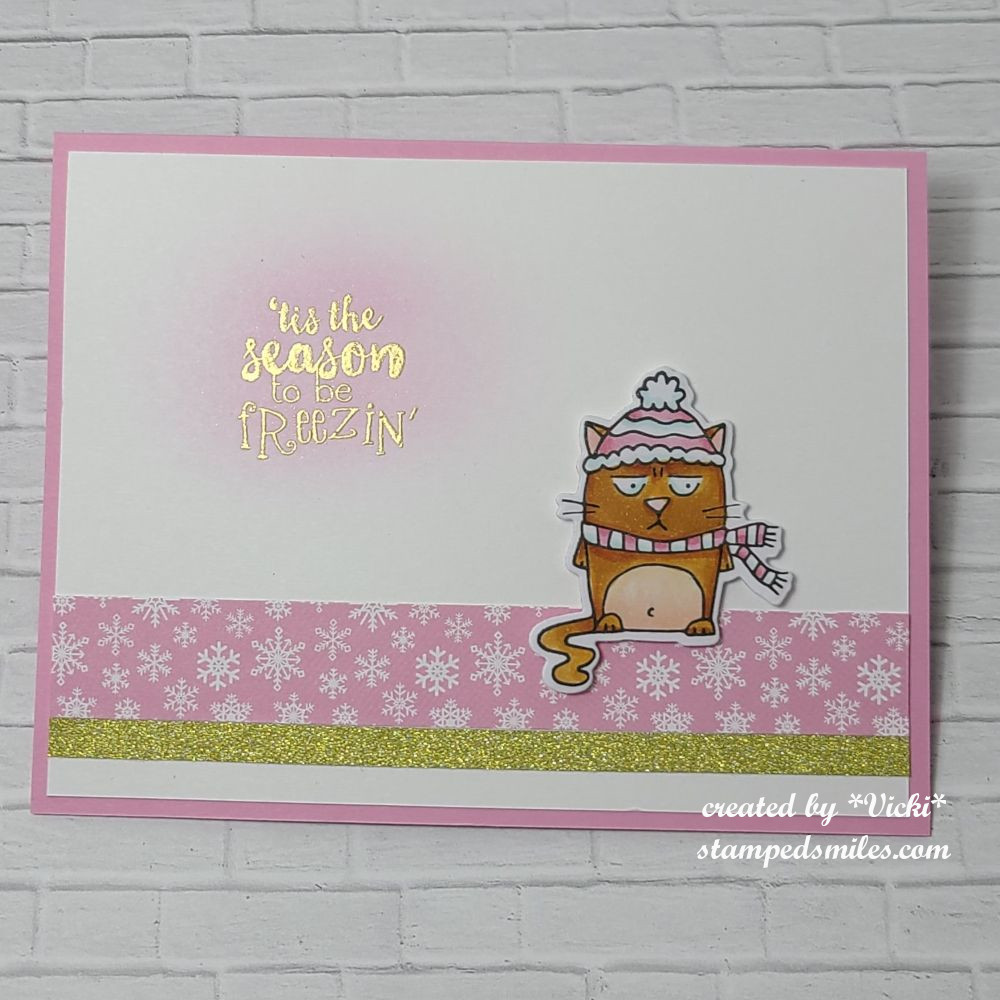
That cat is not a fan of winter! LOL I do love me some snark for the Holidays, so I thought this stamp set called “Holiday Grumplings” (retired stamp set) from Taylored Expressions would be great for a simple Holiday card.
I also think that CAS style cards are great for pulling out those left over scraps from your papers for little strips to create a simple layout, so that’s what I did here. I stamped, colored with Copics the kitty and popped him/her up with foam tape over the snowflake strip.
Lastly, I just added a light brush with pink ink to the left of the kitty and then gold heat embossed the sentiment over it. Placed the white panel over a pink A2 sized top folding card base and done.
I’m happy to report that I’ve spent some time going through my stash of cards and realized that I have several already finished and ready for sending out Christmas cards! So I’m basically DONE for Christmas cards! Yay! The first time ever that I’m ready ahead of time! NOW…hopefully I’ll send them out on time too! LOL
Hope you’ve enjoyed my card today and helped to inspire you to “KEEP YOUR CRAFTING SIMPLE” and join us for the challenge! Look forward to seeing what you make! Thanks so much for stopping in today!
Challenges:
Critter Crazy – #102 Anything Goes with Featured Critter
Hello and happy Friday! It’s not only “Good Friday”, but it’s Easter weekend here for us, so plans to enjoy the time we have together with food and laughter. At least that’s the plan anyway! I hope that whatever plans you have that you enjoy yourself.
Today starts up a new challenge over at the Alphabet Challenge Blog! We have finished up the entire alphabet round and starting back up again for the 14th round which began in 2011! WOW! So beginning with the alphabet, the hostess has chosen “A” is for Alphabet(choose your own letter of the alphabet and a theme that begins with that chosen letter.) *Remember that this is a bi-weekly challenge, so you have two weeks to enter* I hope you will find some time to join us in the gallery! Here’s what I’ve created:
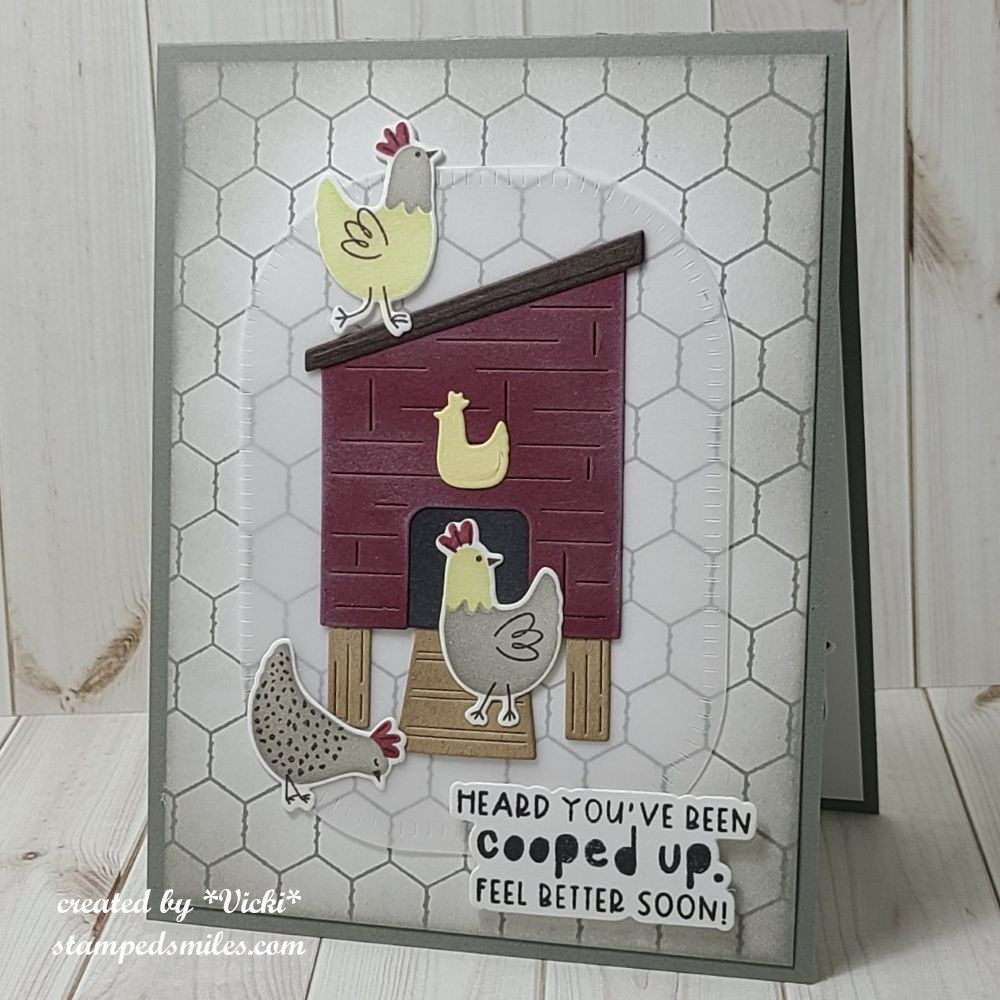
The quirky chickens and for an inside joke were sent to help cheer someone up not feeling well.
I started with a separate panel to stamp and stencil the chickens on. I cut them out from the stenciled panel. On another piece of cardstock, I stamped the Wire BG and ink blended around the edges. I placed this onto a top folding A2 sized gray panel. I wanted the area with the chickens to be the focus, so I took the TE Rounded Rectangle Stacklets and cut a piece of vellum that I used to create my scene on with the Yard House die set. I centered the “hen house” and then used the placement of that to adhere the vellum panel to the center of the card front.
Lastly, I added the other chickens to the scene and the stamped/die cut sentiment which was popped up with foam tape at the bottom right of card.
Thanks so much for stopping by today! I hope you’ve enjoyed my card and it gave you a smile! 😊 Have a wonderful Easter weekend my friends!
Hello friends! I hope that you’re enjoying your August so far! Recently, we’ve been experiencing much cooler temperatures than we normally have this time of year, so it’s been great to go out for a few walks.
I’m ALMOST caught up with things that I haven’t posted, with the exception of a few birthday cards that I’ll share later. For today, I’d like to share some projects that I’ve made at an event I attended back in April along with a class from Inky Stamper.
But first, here are a few projects I’ve made for their recent challenges:
This is a tag I’ve made for the Inky Stamper Inkspiration FB Group July challenge. The challenge was to make a tag and I thought I’d try out a fun idea of making a pocket for my tag that held another tag inside so that you could put a message and a gift card.
I’ve used some Limeade Dots/Stripe 12×12 Doodlebug paper to cut it out with and used a border die to help with the pocket decoration. I cut another tag to place inside the pocket for a special message and to include a gift card. At the top of the inside tag, I’ve made little “charms” with images from the Inky Stamper Margarita stamp set. I’ve also stamped the background of the inside tag. I don’t usually color with pencils, but this time I decided to pull them out.
To get the sentiment to fit around the pocket border, I had to curve the stamp a bit to make it work with the tag.
So the Inky Stamper Inkspiration FB Group challenge for August was to use a white pencil. This happens to be a favorite to use for Chelsea with her images and it does make for a nice quick highlight. So the images were just stamped on colored cardstock and I used the white pencil to highlight them with.
I decided to combine this with last week’s Craft Roulette Episode #226 with the parameters of – Project: “See-through” (I made a see-through shaker card) Colors: “Jungle” (I used greens and browns for my jungle) Element: “Teacher(s)” (The sentiment says it all!) Random: “Tangle” (There are a tangle of leaves inside shaker element.)
Back in April there was an Inky Stamper Inky Escape event that I attended and here are some projects that I made from the Make-n-Takes that were provided as well as some of the projects that I was working on using the new release that came out during the event:
(If you are on my website, click each photo to enlarge it and read the captions)
The tag was made my Chelsea that was attached to my “swag bag” and the box was a make-n-take project. There was a moon pie included with project, but when I came home, I added 4 Ghirardelli chocolate squares to show how many fit inside.This card uses the same stamp set as the tag above. The background is a scratch ‘N’ sniff made with Kool-Aid.This was a light up card using the Pear Blossom EZ Light.Cute make ‘N” take with a magnet on the back of the baby roo that fits inside the mama pouch slit!This was an extra make ‘N’ take using some ALL & Create Washi Tape! Cool!
There is actually another Inky Escape coming up in October that I’m attending and I’m sure it will be fun with Halloween and Christmas theme combined!
While I was there, I worked on some more of my own projects using some of the new sets:
I decided to take and use one 6×6 paper pack from my stash and it seemed to go really well with the outer space theme and I love the purple colors from this set. I’ve used the following Inky Stamper stamps sets: Astronaut, Big Words, & Alien.
Click on the photos below to see a close up look at each card:
Before the Inky Escape Event, there was also an on-line class from Inky Stamper that I took part in and that’s because I thought the projects were super cute! Here are the projects that were completed for this class:
These were both created with the Inky Stamper Hedgehog stamp set. The Journal Book , the Doodlebug DIY Snow globe and Doodlebug dimensional stickers/shaker balls were all provided with the class. I decided to add a few extra elements with mine. The tiny hedgehog on top of the snow globe was included in our box, but not apart of the projects…but I thought it would be fun to add it!
Speaking of Doodlebug, while I was at the Inky Escape Event, Chelsea had a few things on sale and I snagged a kit and special ordered the Doodlebug Frame with it. So when I got back home and the frame came in, I wanted to do my project right away:
I have this displayed in my stamp room and I love the rainbow of colors in it with the different crafty tools in smile faces! The size is 8in. x 8in. with a glass on the front. Although it’s not really that visible in the photo, it is actually quite dimensional.
I think it goes well with the black frame that matches my black frame with the crafty squares swap group I was in. (You can see that post here.)
Whew!😳 I’ve been really busy this year, but I don’t think you would’ve known this without my posting about it! I’m glad that I’ve gotten caught up with things that I’ve done and hopefully I won’t be doing posts like this in the future! It just seems like so much all at once!
Anyway, there we go and now I need to finish and send out a few birthday cards coming up, so I will catch up with that later as well! For now, thanks so much for stopping in and keeping tracks of my sporadic postings! I will be back to share a DT post for a challenge coming!
Hello friends! For those that celebrate the July 4th holiday, I hope you had/ having a great weekend! We usually do a cookout and later watch fireworks. It was a bit hot and humid so we didn’t stay outdoors very long and watched a movie instead.
WARNING: PHOTO HEAVY POST!!!!
I think I may have posted about this before, but last year I was introduced to Craft Roulette (a papercraft game show on You Tube) by Chelsea from Inky Stamperwhen she was a guest on there last year. I quickly became addicted to it and have been playing quite regularly. In fact, this is Chelsea’s third time as a guest on there and I wanted to share what I’ve made for episode #222 that aired on You Tube Friday July 5th, 2024.
The parameters this week are…
PROJECT – Dutch Door (create a card/project with dutch door)
COLORS – Gnomes (whatever inspires those colors to you)
ELEMENT – Movie
RANDOM – Building Blocks
If you’re interested in playing along, check out the Craft Roulette website on how to enter and watch the episode! You can watch/play along on You Tube with them every Friday evening. (Check what time zone you’re in compared to the Central US time zone used for Craft Roulette live shows.) You have until Sunday evening to play. If you enter the Craft Roulette #222 episode by then, you can also enter your card over at Inky Stamper Inkspiration Group on FB for a chance to win a prize from her as well. So check it out!
I think this one turned out cool using the Inky Stamper Alien stamp set! I have my alien (which is my “movie” element parameter) colored up with pencils and cut out with the die. I stamped the molecule (which is my “building blocks” random parameter in red ink over a piece of Doodlebug graph paper. I sponged the edges of this piece with some grey ink before attaching it to the bottom portion of the card. The sentiment also came from the same stamp set that was white heat embossed over black and cut out with a banner die and popped up with foam squares.
To create the “Dutch Door” card for the project parameter, I just used a black A2 card base and cut the front in half so that only the bottom portion of the card opens up. For the torn hole behind the alien, I used the Lisa Horton Torn Aperture 3D embossing folder and die. I used some silver mirror for the outer edges and black for the back along with a piece of white for the background details. I finished it off with some Pinkfresh Studio Ice clear drops.
Here’s the inside of my Dutch door card. I took a white piece of cardstock for the inside of the card along with the white piece from behind the torn aperture on the front and ink blended a galaxy background with reds, blues, greens, yellows and black which works with the “gnomes colors” for the colors parameter. I sprayed the background with water, let it dry and then I white heat embossed the sentiment from the alien stamp set and then I used silver watercolor to splatter over top of both pieces.
I attached the insert for the aperture back in with the silver frame and attached it to the front bottom portion with half of it sticking up above it. (As you can see in the photo above.) The alien was attached over the aperture with foam squares.
Had a lot of fun making this one and playing along using the parameters!
Obviously, I don’t post the cards I make every week for Craft Roulette on my blog, but I thought I’d share all the creations that I made last year since my very first contribution that I’ve done. I thought I’d save the cards for posting at the end of each year to look back on them. I started in January of last year and only skipped a couple of them. This card today will be my 72nd contribution!
So here’s a gallery of cards that I’ve contributed since I first discovered Craft Roulette in January of 2023 up to December 2023: (I will post the cards for this year in December!)
If you’re on my website, click on the photos to see enlarged
Wow! That was ALOT of cards! I placed the episode #s on each one for reference on what the parameters would’ve been. So this is what happens when I don’t post!
I have fun trying out the parameters each week and entering. I did win a prize one week from The Paper Insider which was a box of gorgeous papers. They’re all so gorgeous that I seem to be hoarding them and not used any of it!🙄 That will be a goal for one of these weeks for sure!
Hope you’ve been inspired with my post today and maybe I’ll see you over at Craft Roulette sometime! Thanks so much for stopping in today!
Hello friends! Happy weekend! Wow, it’s been very warm outside and I’ve been spending my time indoors. I hope to be sharing some more posts with lots of things very soon, so stay tuned in! Today starts another challenge over at the Sparkles Monthly Challenge blog!
This time was my turn to choose a theme and I thought with Father’s Day, masculine cards are a good way to use those “FUNNNY and/or a PUN” on our cards! To make someone laugh or at least smile, is the main reason why I love to make cards! If you feel like having a chuckle with your cards, make one and enter this month! I can’t wait to see what you come up with!
Here’s my card for the challenge:
Nothing better than a hot French fry, but a French fry with a smile and bow tie is too fun!😆 (This is an American term for this food, but I know they’re called “chips” in Britain…either way, delicious and fun!)
For this challenge, I knew I wanted to pull out a large card kit I had gotten back in 2018 from Simon Says Stamp partnered with Doodlebugto create the I Chews You kit. (Most of the items are not available any more other than the stamp set that I’ve linked.) I fell in love with all of the cute images and puns from the Doodlebug So Pun Friends collection! In this card kit, there was a die that cut out the box and fries. The sentiments came from some “Chit-Chat Clippings“.
I first took a piece of white cardstock for the front panel and cut it with a wonky stitched rectangle die and placed it over a side folded A2 red card base. I then took a wonky stitched circle die and cut a circle from the Doodlebug So Much Pun paper pad. I placed it in the lower right and cut off part of the edge of the circle sticking out past the white panel.
I took the die cut fry box and cut it out in red and white. I used the white strip to make the band at the top of the box. I cut out the fries and sponged around the edges and arranged them behind the box and attached it to the circle panel.
The sentiment bubble was inked around the edges and placed in the top left above the fries. I added a black layer behind the box sentiment strip and cut off the edge sticking out. Lastly, I thought it would be fun to add a smile face to the fry and then I stamped, colored and die cut a bow tie from my stash to add on the one fry. I finished it with some Doodlebug Heart Sprinkles.
I really had a great time putting this one together and I hope you’ve enjoyed it too! Hoping to pull out this card kit again and make several cards with it as there is still so many things in this kit that I never got a chance to play with! (I have so many things I need to do this with!)😉
Please be sure to check out the challenge blog to see the inspiration from the team and I hope you will take some time to have fun and play along with us!
Enjoy your weekend and thanks for stopping by! I’ll catch you soon!
As You Like It – With or Without Words and Why? (I feel like this is the main reason to send a card to someone that includes a sentiment. I especially like the fun and/or pun for sending smiles.)
Tic Tac Toe – TTTC249 (I used first row down: layers, die cut, pattern paper)
Hello friends! Hope you’re enjoying your week so far. We’ve been having some really hot and dry days lately, so I’m trying to get some motivation going and have some play time for crafting!
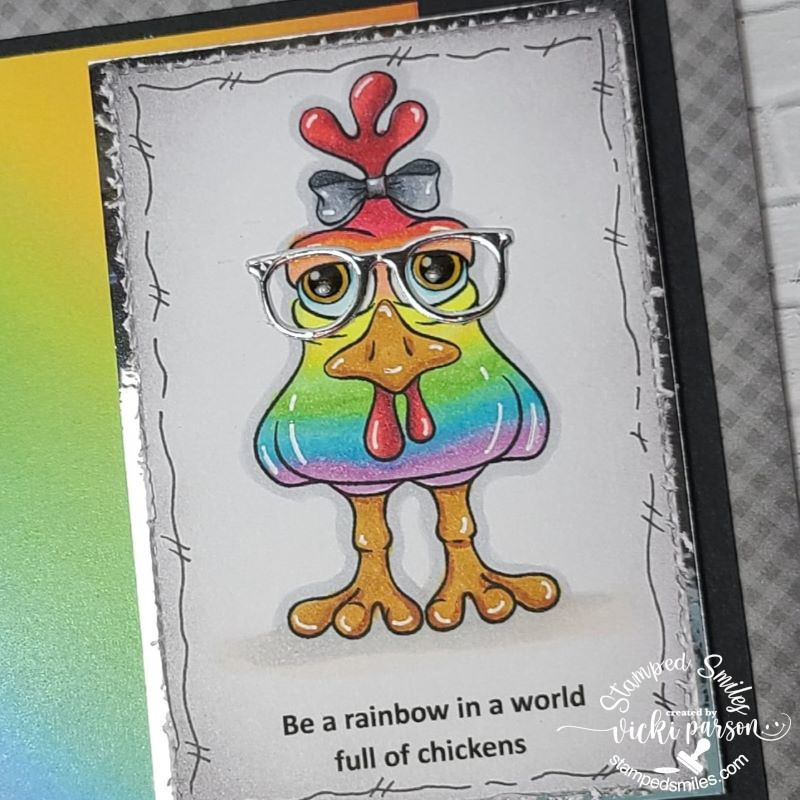
I have not played along before, but I decided to grab this fun digital freebie from the Beccy’s Place Challenge and have a go at it because it really made me laugh when I saw it!
Isn’t this such a fun image?! There was an option of different pre-colored images, but I decided to print out the lined image to color in. I colored the chicken in rainbow and then added a pair of die cut glasses in silver mirror cardstock that I had on hand. (I already had the glasses cut out from another card I made that was laying out on my desk, so when coloring this image, I thought it would be fun to add!)
The layout came from a sketch challenge that she’s also sponsoring. (see challenge list below) I thought that I was going to leave it as just black and white to make the rainbow chicken stand out, but I found some fun rainbow papers and decided to add one panel to go with the chicken. I came up with and typed out the sentiment underneath the image and printed them both together.
For another part of Beccy’s challenge, there is an optional theme she included which was “doodling”. So I took a white gel pen and added some lines for highlights on the chicken. I’ve also taken a black marker pen to make some squiggle lines around the image panel too. I blended some grey ink around the edges and then used a distress tool for the distressed edges.
After adding the glasses, I covered the eyeballs with some crystal effects for shine.
And this one has been sent off to hopefully make someone smile! I hope you like it too!
Thanks so much for dropping in and I’ll see you again on Saturday for another AJ page!
Hey there friends! Hope you’re having a wonderful week so far! We’re getting closer and closer to Halloween already!🎃 I haven’t made as many Halloween makes as I usually do, but as the day gets closer I’ve been more in the mood to pull out some things to have fun with my stash and my thoughts turned to “Grumpy”.
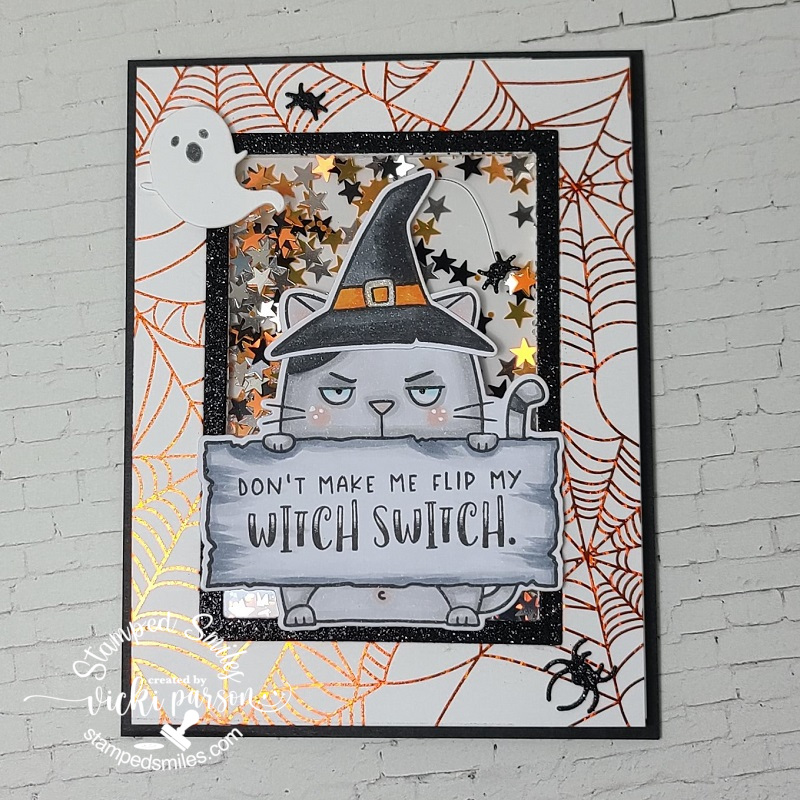
If you’re not familiar with “Grumpy”, this is the Big Grumpy Cat from Taylored Expressions. I absolutely love the “Grumpy” and “Grumplings” line and I don’t pull them out as much as I’d like to. Since it’s closer to Halloween, I’ve also pulled out the Big Grumpy-Halloween accessory set to go along with him too! (The only thing I used from this set was the witch hat and the sentiment.) I’ve stamped, colored and cut out each of these items for my card.
The #TEMakerChallenge has the theme this month of using Oreo & Sugar Cube with the option of adding any other pop of color. I’ve decided to pop in an orange color for mine. The theme was also “Sparkle & Shine” through foiling, heat-embossing, glitter paste or sparkly cardstock.
So, for the “Sparkle & Shine” I’ve taken a Foil-It Spiderweb panel and foiled some orange Deco Foil over it. I then took one of the Frame in Frame 3 dies to cut out the middle of this panel, added some acetate over the opening and made it into a shaker panel. I die cut the same frame as well as the Little Bits-Spiders die from some black Glitter Cardstock. I attached these pieces onto the web panel along with adding the Grumpy Cat with his hat string and extra spider attached to him over the acetate. I attached double-sided foam around the opening and added some “shaker stars” in the colors orange, black and silver. And lastly, I thought it would be fun to pop up a left-over ghost I had from a previous project at the top! (I think the ghost is in fear of the “witch switch”!) 😂
I also have another “grumpy” card to share…
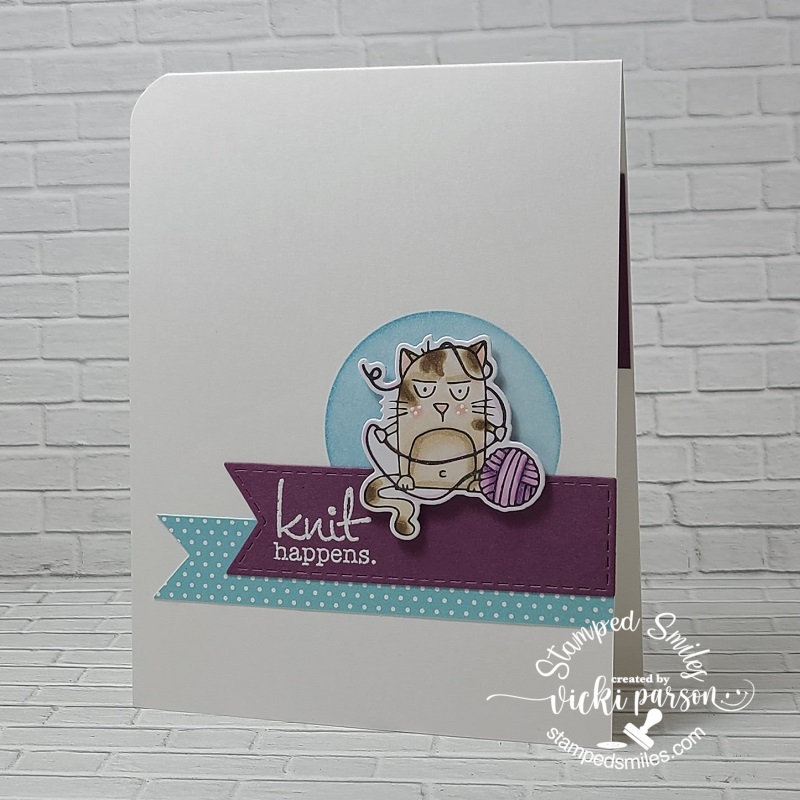
So this card was made to send a smile to a friend. I’ve used a cat for this one as well from the Taylored Expressions “Grouchy Grumplings” set which I don’t believe is available in the store any longer.
I kept it a simple card by stamping, coloring and cutting out the grumpy. I ink blended a circle that fit him with blue ink, white heat embossed the sentiment and cut it out from the TE Stitched Banner Stacklets. I popped grumpy with foam tape over the sentiment banner and circle. I also used some TE decorative papers from my stash and cut out a banner with it using my scissors. A corner chomper was used to round the top left corner of the card to finish it off.
I hope you’ve enjoyed my “Grumpy” projects today and have been inspired in some way! Really appreciate you stopping in!
Hello friends! Welcome to September! Really hope that you’ve had a wonderful Labor Day weekend and have had a great start to the month so far! I’m still trying to get my MOJO in gear as I really love this time of the year with all of the wonderful Autumn things happening both outside AND in the crafty world too! Really love when it starts up, but as it gets closer to the end of the year…I’m ready to skip right over it! LOL!
Today I have a fun post to share with some projects I made with several Inky Stamperproducts! They have a FB challenge to participate in every month and so I thought I’d share what I came up with. (Check it out and play along if you have any Inky Stamper stamps!) *Check out the store as well because there is a brand-new release that just came out!
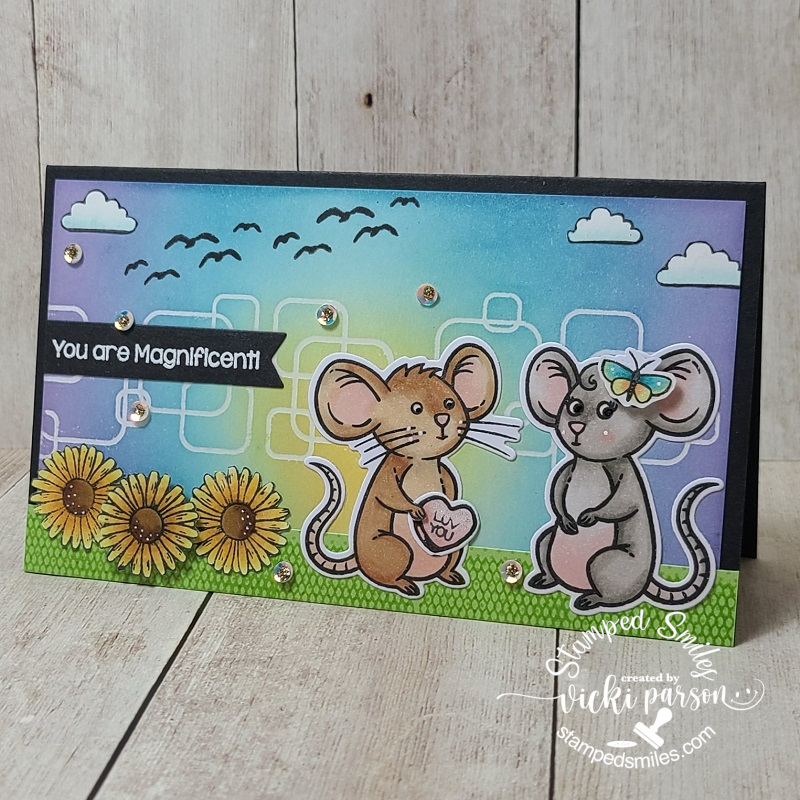
This was a fun little scene to create on a mini slimline card! So, the Inky Stamper Inkspiration FB Group challenge THIS month (Sept) is to use more than just one Inky Stamper stamp set on one design. I really liked this challenge because it got me thinking of what to use and pull out several different images and actually use them! Looking forward to seeing what other people come up with too! So, for my scene, I’ve actually pulled out EIGHT different stamp sets!!!😮
To start with the background, I pulled out the *Housefly set with the squares image to clear heat emboss the background and then ink blend over top for an “emboss resist” technique. I took the *Rainy Day set and stamped the rainbow/cloud image and fussy cut the clouds to add on the background sky. For the “flying birds” and the “pattern” at the bottom over the green strip, I’ve used the *Pelican set. Of course, the main characters are different sets from *Rosie Solo and *Ralph Solo. For Rosie’s “hair”, I stamped the butterfly from the *Bug Catcher set to color and fussy cut it out which was then popped up over the flower she originally has. I also used this same set to white heat emboss the sentiment. For Ralph, I pulled out the *Snail set to stamp and color a heart which he is holding. I just made a slit around Ralph’s “hand” to help him hold the heart. And lastly, I pulled out the *Bee set to stamp, color and fussy cut the flower image. I cut off the stem and just attached the flowers with one of them popped up with foam tape. Lastly, I’ve added some sparkle to the butterfly on Rosie and the heart with Ralph using my glitter brush pen. I then added some sequins from the Fall Flowers sequins mix and filled the centers with some Stickles.
So, did I, do it? Did you count out the eight different sets? I think this mouse couple is too cute…and no… they aren’t the “real” mice, these are the good ones to have! 😁
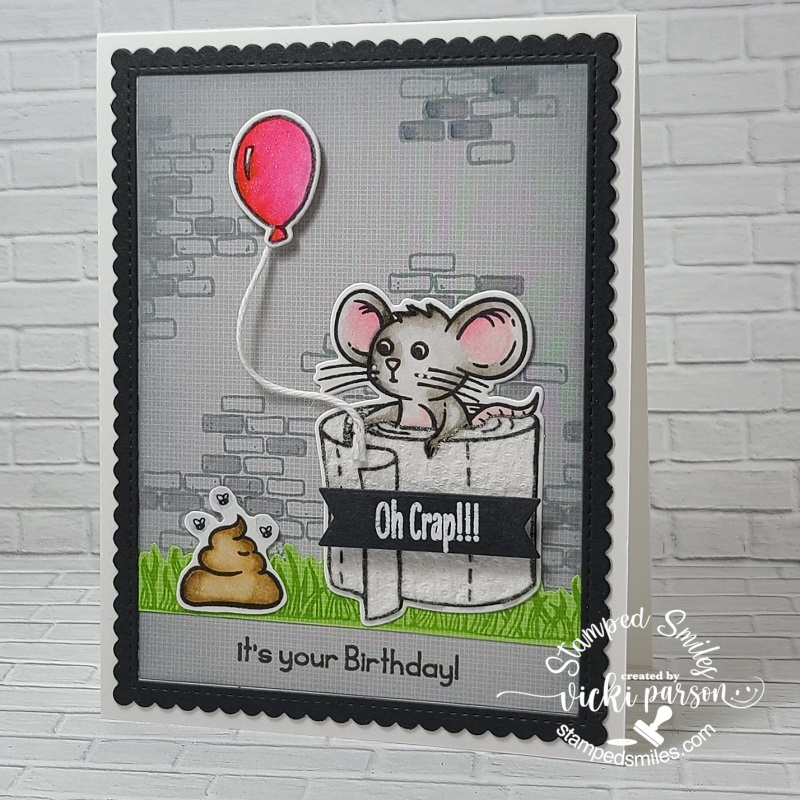
Ralph is showing up again! I needed to make a humorous birthday card for my son and I’m sure he’ll get a kick out it! 😂 This is actually the first card I made for this month’s Inky Stamper Inkspiration FB Group challenge, but I didn’t use eight different sets like I did on the one above, I only used four different sets. However, I used REAL TP!
The background was created using some of the Doodlebug Gingham/Linen paper which the “bricks” image was stamped over with grey ink from the *Goat set. I also used this same set to stamp the “grass” border towards the bottom with another strip of green from the same Doodlebug paper pack. I just fussy cut the top of the grass strip to attach over the grey brick background. Of course, the Ralph inside the TP roll came from the *TP set along with the “pile of poo”💩 and the “Oh Crap!!!” sentiment that was white heat embossed over a black banner and popped up with foam tape. The balloon image came from the *Bunny set. I decided to attach a piece of the white Doodlebug twine and pop up the balloon with foam tape. I attached the other end to Ralph’s “hand”. Lastly, the fourth set I used was the sentiment at the bottom from the *Iguana set. (For that sentiment, I only used a portion of it from the stamp.) So that makes FOUR sets used!
The images on this card were colored using my CC Real Brush markers, I stamped the Ralph image again over the TP… yep, stamped directly onto the TP and fussy cut it out to paper piece over the image. Gives it the REAL look and feel of TP! 😉 I have die cut a black scallop frame to go around the scene and lastly, I’ve added some sparkle to the balloon and the tiny flies around the “poo” with a glitter brush pen. I didn’t want to add too much as this is a masculine style birthday card.
And then I have one last project to share that I actually made for last month’s challenge that I “squeaked” in just in time too! (See what I did there?!😂) Ralph is just so popular today! I had a plastic bag sitting around on my table that I kept moving out of my way and it was frustrating me, so I made this “container” to hold some crafty things to sit on my table! It’s actually a REALLY old tutorial from Splitcoast Stampers using chipboard coasters! I have SO MANY of those coasters and I was happy to use some up. CHECK OUT THE TUTORIAL HERE (P.S. The tutorial is actually done up by Taylor from Taylored Expressions, before her store years! That’s how old it is!)
The challenge last month was to use primary colors on your project which are the red, blue and yellow colors. Not realizing what the challenge would be for THIS month, it would actually fit in with that too! I used THREE different sets for this project. Again, I’ve used the *Ralph Solo set that was colored up and fussy cut out as this was done before the new die came out for him! (see top card) I took out several of the different Doodlebug papers to cover my chipboard coaster panels being mindful of the Primary Color challenge. Rather than leave the papers as is, I decided to pull out the *Inky Greetings set to stamp the splatter image in the coordinating colors with the papers. I also decided Ralph needed to be holding a pencil, so I pulled out the *Owl set and stamped, colored and fussy cut the pencil image which was added to Ralph’s “hand” by making a small slit for him to hold it.
I was happy to pull out some of my old punches to create the backdrop for “pencil holding Ralph” as well as using up those old coasters and some more papers and ribbon from my stash! (I’m really hoping to be doing more of this often!)
I know this was a long-worded post, but hope you enjoyed the projects and got some smiles too! Thanks for catching up with me today! See you soon!
Happy August friends! This Summer has really flown right by me this year, how about you? Before you know it we’ll be getting ready for all things Fall…which is my favorite time of the year!🍂 I haven’t been feeling well for the last several days and haven’t done much crafting, but I do have some sets of cards that I’ve made sometime during these Summer months, but haven’t posted, so I’d like to share them with you today.
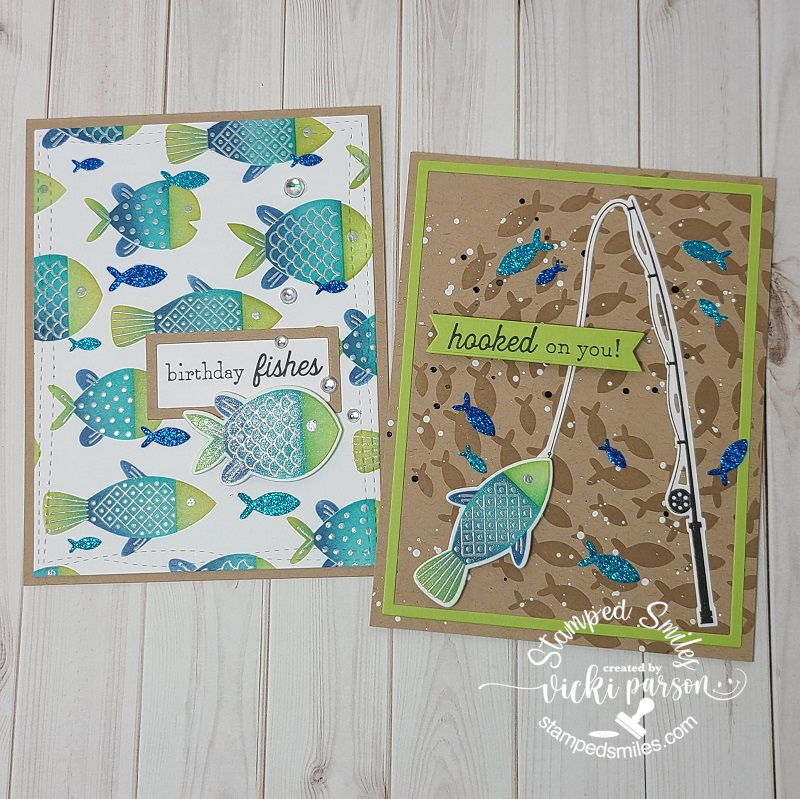
Taylored Expression had released an adorable collection of fish themed products this Summer that I thought would be so fun for several different occasions, and not just for those that like to fish, but for anyone for any occasion too!
The first white background card on the left was created with the TE Hook, Line & Sinker Stamp & Stencil Combo. The stencil is really nice to create different effects in an easy way without lots of coloring. I like that the TE Hook, Line & Sinker Dies cut out some of the mass-produced stenciled fish background too! (I saved one for the other card as well and still had a few more left over for another project.) After I created a couple of the stenciled fish backgrounds, I cut out a panel with a wonky stitched rectangle die and placed it over a Kraft A2 card base. I added some TE Drip Drops for the “bubbles” on the extra fish and you can see that I’ve covered the body of this fish with a glitter brush pen.
The second card on the right was created with the TE Just Keep Swimming Stencil with Toffee Ink color for a watermark look. I splattered some white and black paint over the background. The fishing pool as well as the sentiments for both cards came from the TE Reely Great Stamp & Die Combo. (It includes the fishing pool die cut with it.) You will also notice the tiny little sparkly fish on both of the cards which were cut from the TE Little Bits-Fish die with some blue and turquoise glitter cardstock. The ‘frame’ around the sentiment on the first card as well as the green frame for the second card were extra pieces in my stash previously cut out with the TE A2 Thin Frame Cutting Plate. (I save the extras to use for other projects.)
Of course, I didn’t “invent the wheel” on these as it was simple by following along with the TE “Hugs & Fishes Craft-a-Long Class” which I got for free with my stamp/combo purchase when it came out. I tweaked it slightly, but sometimes it’s nice to just create and follow along without having to think about what to do with it. 😁
This next set of cards was actually pretty fun and easy to put together:
Continuing on with more Taylored Expressions products, I’ve used the TE Create-in-Quads Hexagon Layering Stencil Set. Taylor had recently come with this series sometime last year I believe, and they seem to go over pretty well. (I think I had previously made Christmas cards and some Mother’s Day type of cards earlier this Spring with other “Create-in-Quads” sets.) It seems like a lot, but when you see how easy it is to knock out four cards at once…which I did with Christmas last year…it’s such a time saver with wonderful results!
All of these cards were finished off with the TE Oh No You Didn’t stamp set & dies (love this set)! A couple of the cards use the TE Simple Strips-Snarky stamp set that were white heat embossed and cut out. The other cards have sentiments that were foiled from the TE Simple Strips In Reverse-Everyday Occasions and die cut. And of course, I didn’t want to waste too much of the foiled panels, so I again took my TE A2 Thin Frame Cutting Plate to cut a couple of the frames with it. I also stamped out a couple of extra stars here and there from another TE stamp set, but I can’t remember which one I used. (I think it was from a previous card kit I have that’s no longer available…but any star will do!)
And again, no need to reinvent the wheel as I believe this was another class I received for free from a purchase. You can check out the Create-in-Quads Hexagon Craft-a-Long Class if you’re interested in it. I think I changed up the colors and details a bit for mine, but very similar in style.
**👀 Be on the look-out for another TE project set from me using another Create-in-Quads I recently got and can’t wait to use! I’m also going to have some things to give away too! STAY TUNED!!!
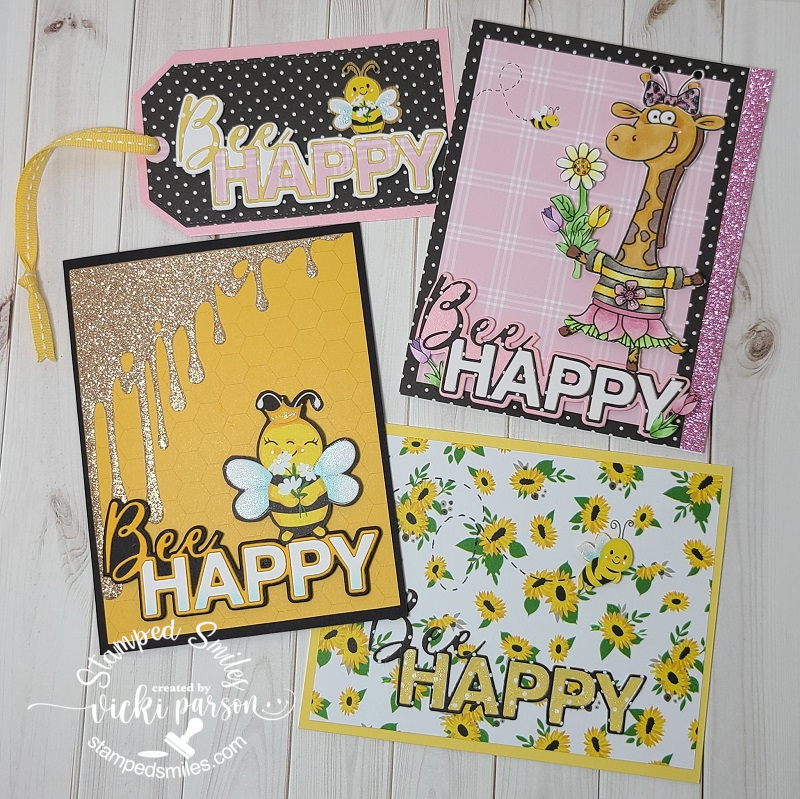
I had also attended a class from Riley and Company sometime this Summer as well:
I have loved that little Riley moose character for years, but Tanya (owner) does several of these on-line class events and she comes out with some really cute class kits. This kit had everything you need to make the projects and this one also included the sentiment die as well as a full 6×6 packet of papers in the coordinating theme.
For my projects, the giraffe was the only pre-cut image to color. All of the other bee images came from the papers that were included with the kit that you were to fussy cut from. Since the sentiment die was also included, I die cut all of those pieces for my card too. I decided to step-up my cards with some glitter cardstock along the edge of the giraffe card and then I die cut the “gold glitter honey drip” on that card from the Riley and Company Corner Goo Die. I also added little details like the “flying trail” of the bee with a marker and using a glitter brush pen on the bee wings.
Hope you’ve enjoyed my Summer Session Sets today and have been inspired or brought a smile! Thank you so kindly for your time to stop in and have a look! I really appreciate it!
Hello friends! Hope you’ve had a great Fourth of July weekend and staying cool through this really hot week too! I had planned on scheduling a post or two while I was gone last month, but time just didn’t let me get there and I’m a bit behind, but I wanted to share a couple of masculine cards I made for some men in my life for Father’s Day:
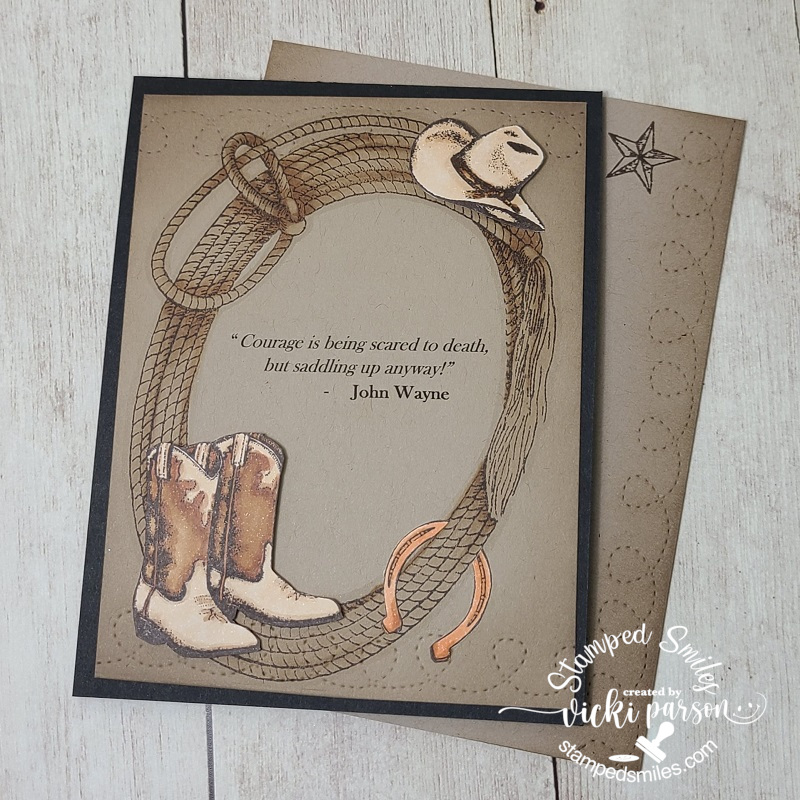
Up first is this card I made for my dad. He’s a huge John Wayne fan and so I thought it would be fun to print out one of his famous quotes for a card. After printing it out, I stamped the large rope lasso image around it from the Whimsy Stamps Cowpoke clear stamp set. I printed the quote over a piece of kraft cardstock and stamped with chocolate colored ink with the rope frame and colored it with Copics. I also cut the other images from the same stamp set over White Copic Blending Card and colored it with Copics. I just fussy cut them out with scissors and placed them over my card front with some foam squares. I cut a section of the horseshoe out so that it “appears” as if it’s hanging around the lasso and glued it over each side of the lasso.
I thought it would be fun to add some more details to mimic the boots by die cutting the loopy stitched borders from the Whimsy Stamps Straight Edger Die Set and then I ink blended around the edges with chocolate ink. I also did this with the envelope you see behind the card too.
He really liked this one! I remember as a child sitting with him sometimes and watching those really old “cowboy movies”. LOL
The next card I made was for my husband…
This card was PERFECT for him! Most of the time, the kids would always tell him that his jokes were NOT funny, but the fact that HE thought they were so funny is what made them laugh! 😂 And then he would claim that they were laughing or smiling, so he knew they liked them!😄
So, when I saw this Dad Jokes stamp set from Lawn Fawn, I knew it would be a good one to have on hand for cards with him. I kept this card a simple one with a grassy stitched border and then I used one of those woodgrain papers from Lawn Fawn and also die cut the LF Father’s Day Border using the same woodgrain paper for it.
I positioned the little chicks to the side with the *crickets* sentiment above them and then the other one laughing while the little chick with the tie is telling the “dad joke”. I popped up the speech bubbles with foam squares. You will also see that I’ve stamped another “dad joke” on the envelope with some ha ha ha next to it as well.
**Side note: My husband’s favorite “dad joke” from the stamp set was…”What’s brown and sticky?…A stick!“** He had to tell that one to the (adult)kids of course! 🙄
Hope you’ve enjoyed my masculine cards today or had a smile! Thanks for dropping in and I’ll see you soon!
Challenges:
The Male Room – Monochrome (Top card only with brown tones)
Alphabet – ‘G’ is for Giggle/humorous card (Second card only)