L is for Love Letter

Happy Friday friends!  I hope that you’re having a great week and looking forward to the weekend ahead of us!  We’re planning on being outside and have fun with family!  It’s still warm, but hopefully we can get away from the 90 degree (F) weather!

Today is a new challenge over at the Alphabet Challenge Blog!  Our next letter is “L”, and our hostess, Veronika, has chosen “L is for LOVE LETTER (include handwriting & hearts)   *Please remember that this is a bi-weekly challenge, so you have two weeks to enter.*  I hope you’ll join in the fun with us.  Here’s the project I’ve made for this challenge:

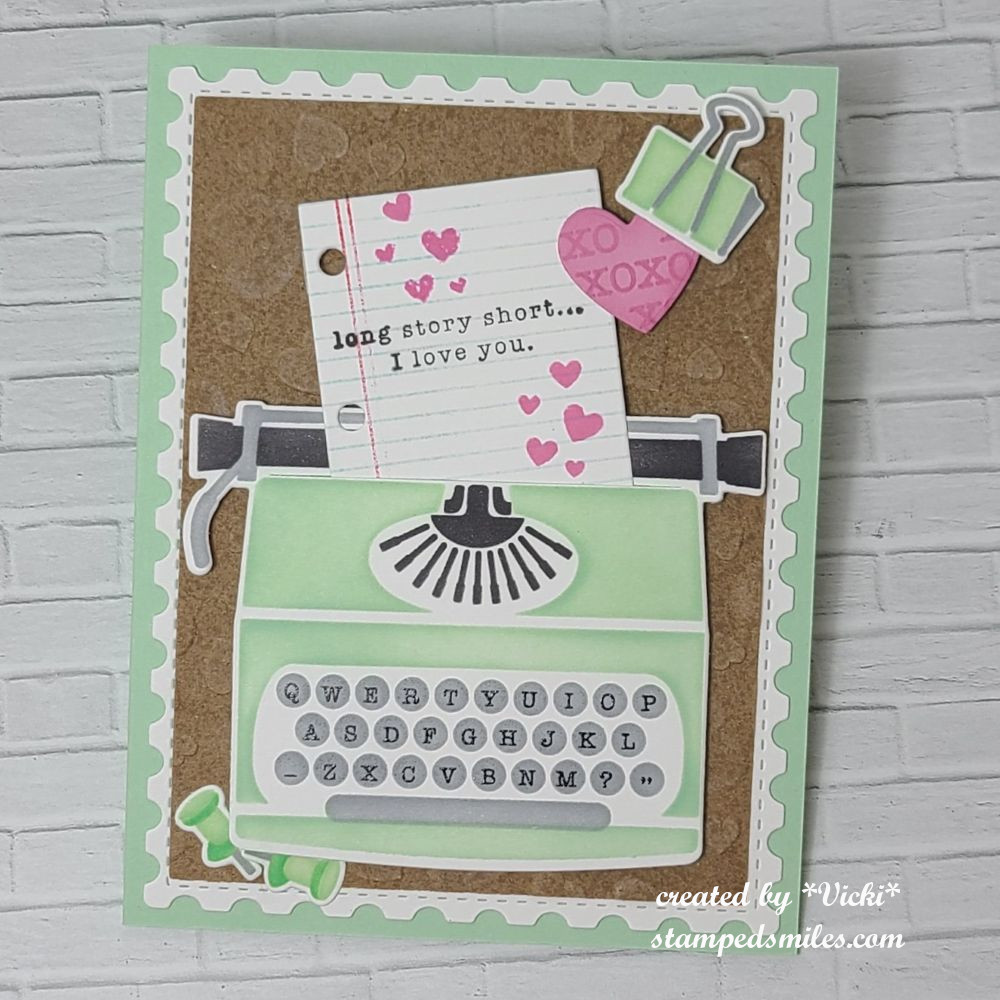
I always think of handwriting as the most sincere form of a love letter for sure, but I do not like my handwriting at all….so I prefer the typewritten style! LOL  I thought the  Just Write card kit I got from Taylored Expressions would work great for this challenge.

I fell in love with Lori Craig’s card including the colors of it, so I wanted to duplicate it!  I didn’t have everything she used in hers, but I like how it turned out!  The background was done with a 3D Lots of Love embossing folder over a stamped cork background.  I swiped white ink over the popped up hearts to try and bring them out a bit more.  The lined notebook paper inside the typewriter came from the TE Love Letters Clear Stamp & Die combo which is also where I got the “XOXO” to stamp on the heart at the top.  I also used the hearts from this set to stamp on the notebook paper.

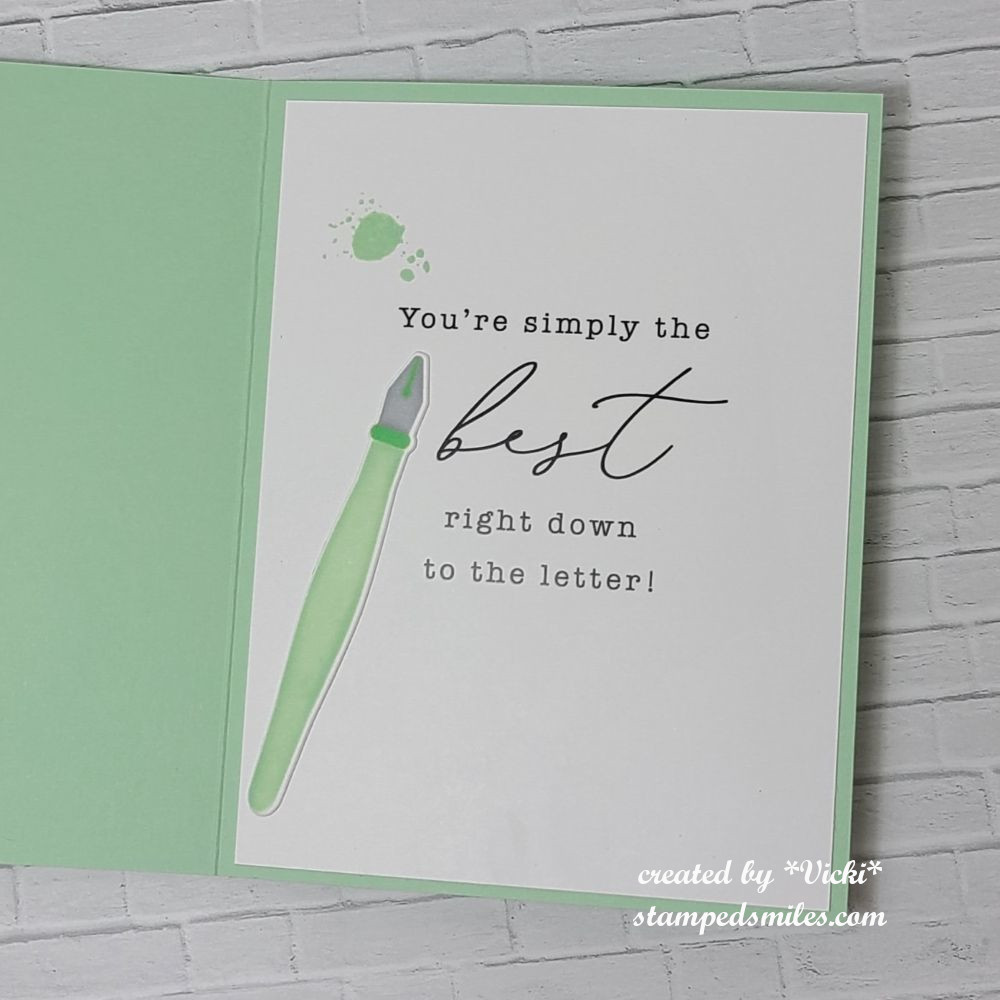
Here’s the inside of my card where I used one of the Just Write-Insiders panel for my card and included the stenciled pen and stamped an “ink spot” all included with the card kit.

I thought this would work for my “handwriting” portion of the challenge. *wink*  I could’ve signed it to be completely official, but I don’t know who will be receiving this card right now, but it will be ready to go when the time comes.

  • Hope you’ve enjoyed my card today and that you will be joining in the challenge with us!  Thank you so much for stopping in today!  Wishing you a wonderful weekend ahead!

Challenges:

  1. Pammie’s Inky Pinkies – PIP2537 Anything Goes
  2. Ally’s Angels Anything Goes
  3. The Creative Crafters Anything Goes
  4. Creative Knockouts Anything Goes

Z is for ZOOM!

Hello there friends and welcome to April already!  I do not know if this year seems to be flying by because I’ve been busy with life or it’s just flying by anyway!  Speaking of things flying by…

Today starts up a new challenge over at the Alphabet Challenge Blog!  We are on the last letter of the alphabet this time and the hostess has chosen “Z” is for ZOOM (anything that goes fast) for the theme.  *Remember that this is a bi-weekly challenge, so you have two weeks to enter*  I hope you will find some time to join us in the gallery!  Here’s what I’ve created:

How cute is that pup standing on the bike seat to look over his bird friend perched on the basket!  The name of these adorable animal friends are called “Gus & Gertie” which are a set of characters designed by Taylored Expressions. (If you click on the link, you can see the full line of them.)  The set I’ve chosen is called Gus & Gertie Best Buds.  I like these animals because they’re very easy to color!

I could’ve chosen the airplane from the set, but I kept thinking of those electric bikes & scooters you can rent from cities and they seem to go really fast when I see kids whizzing by on them! LOL

I kept my scene in a circle and added some clouds in the background that I stenciled in and then layered some hills/slopes and a grass border on the front.  I just popped the “ride or die” sentiment at the top and attached the die cut image with foam tape.  I layered the scene onto a black circle base that was attached to a red brick embossed background.  All was attached to a top folding A2 white card base.

That’s all for me today!  Thanks so much for checking in with me as I enjoy reading what you have to say!  Enjoy your weekend and I’ll see you soon!

Challenges:

  1. Critter Crazy Anything Goes with a Featured Creature
  2. Unicorn Use Dies
  3. Crafty Animals Anything Goes with Animal(s)
  4. Crafts Galore Encore Anything Goes
  5. Just Us Girls Die Week (no flowers)

X is for X’s and O’s

Hello friends and happy Friday!  The weekend starts and we’ve had some snow blowing around over our way with wind and colder weather, BUT next week it’s supposed to be warmer with Spring-like temps…but that’s the Midwestern climate!   It will level out later in the month.

Today is another new challenge over at the Alphabet Challenge Blog!  Our theme for the next two weeks is “X is for X’s and O’s (as in hugs & kisses)“.  We look forward to your entries!  I had some fun with this one:

I’ve had this Tic Tac Toe set for years and never even broke it out to use!  It was from the My Favorite Things “X’s and O’s card kit (obviously no longer available).  I also used those adorable My Favorite Things Bitty Bears (retired) to help with the hugs and kisses part.  I’m so happy to be using something from my stash and especially something that I haven’t used at all!

The card was pretty simple as the die cuts for the tic tac toe square were cut in different colors, found some polka dotted papers to match and also used those same papers to paper piece the heart on the top bear.  I stamped the sentiment from the kit, popped up the colored and die cut bears with foam tape and added a few purple gems.

Before attaching all of the elements, I applied the polka-dot striped paper to a white front card base that was cut with a double-stitched rectangle die also from MFT, and then attached to an A2 top folding white card base.

  • Thanks for stopping in today and I hope you’ll join in the X’s and O’s with us over on the challenge blog!  Have a great weekend and I’ll see you soon!

Challenges:

  1. Crafty Animals Anything Goes with animal(s)
  2. Critter Crazy Anything Goes with Featured Critter(s)
  3. The Divas That Cut…Paper! – Critters plus a die cut
  4. Pammie’s Inky Pinkies – PIP2509 Anything Goes
  5. The Neglected Stuff – Anything Goes with neglected item (my neglected item is that MFT X’s and O’s card kit that was never used circa 2017!) About time, huh?!
  6. Crafts Galore Encore Anything Goes

Mixing It Up With Layers!

Hello friends!  WOW!  That last month went by really fast!  I think it’s because I was busier than usual on my blog, but that’s great that all of the crafting got me through the cold month quickly!  I know it will still feel cold in March, but hopefully it will start warming up little by little!  Until then, I still need to wear some layers!

Speaking of LAYERS… That brings us to a new challenge over at the Mix It Up Challenge Blog.    The challenges always run for 6 weeks so there is plenty of time to enter.  The theme given this time around is: LAYERS or you can do the ‘Anything Goes” too.  Here’s the card that I came up with for the challenge using the theme:

Aren’t these hedgies cute!  I’ve had this stencil set for a while and haven’t had a chance to use it until now and I thought it would be fun to try out the Triple Time Stamping technique.  (If you don’t know what I’m referring to, check out this video on You Tube HERE.)  I thought this would be a great way to insure several layers on my card.

The cute hedgehogs come from the Taylored Expressions Hedgehugs Stamp & Stencil Combo.  I used the technique to layer the panels together and then stamped and stenciled the hedgehogs and then layered each panel with the Spearmint cardstock.  The smallest layer on top was popped up with foam tape.  (I added the white shimmer ribbon around the middle and front panels before attaching to the card.)

I used the coordinating die to cut out some extra hedgehogs and I popped them up with foam tape over a white metallic heart.  I also white heat embossed the sentiment from the TE To the Point stamp set and cut it out to pop up under the “kissing hedgehogs”.  I’ve also added a few more tiny die cut hearts from the white metallic paper.

I THINK I’ve got about 7 layers all together not including the card base.

  • I hope you’ve enjoyed my card today and will stop by the challenge blog to see all of the inspiration from the team over there!  I would love to see your creation in the gallery too!

Thanks for dropping in and I’ll see you soon!

Challenges:

  1. Gem of a challenge – Anything Goes
  2. Pammie’s Inky Pinkies – PIP2508 Anything Goes
  3. Little Red Wagon “Tiny Dancer” (tiny things)  I used tiny white hearts
  4. Penny’s Anything Goes Using Paper
  5. Simon Wednesday – Anything Goes
  6. Just Us Girls Stencil Week

For Someone You Love at Sparkles Monthly

Hello friends!  I hope that you had a great Valentine’s Day yesterday however you chose to celebrate it!  We chose to stay indoors where it’s warm and watch a movie!  

And speaking of love, this brings us to the February challenge over at Sparkles Monthly and for this month, our hostess is asking for a “Love Card (for anyone you love)” .  Be sure to stop by the blog to see what the rest of the design team has created for you.  Here’s my project for this challenge:

Aren’t these heart sweaters adorable?!  I had fun making a couple of cards to send to my kids (whom I love) for Valentine’s Day.  I was actually able to create two similar cards using a stencil set that allows you to make 4 sweaters at one time.

I love the Taylored Expressions Sweater Weather Stencil Set that you can ink blend up to four different sweaters at once.  This had previous come out for Christmas, but in December, they came out with a cute Valentine line to go with this stencil.  So I gold foiled a panel from the TE Foil It-Valentine Sweater Weather pack and then to decorate the sweaters, I used the TE Dinky Decorations Valentine die set.   I wanted more hearts, so I die cut a few extra to place around the background.

Speaking of the background, I used the TE Lots of Love 3D embossing folder and then sponged a bit of white over the hearts so they stood out a bit more.  I also die cut the A2 Thin Frame die for a gold mirror frame.  The sentiment came from the TE Love & Hugs stamp set

And here’s a closer look at the other card I made.  I know I could’ve used just one sweater for each card, but I thought these sweaters were too cute, so I decided to use all of them!  I’m thinking one of my sons would probably wear a sweater like one of these and the other would think it’s ridiculous! LOL  Regardless, at least they each know that they are loved by me!

I also had these fun TE Snarky Valentine Insiders panels that I gold foiled.  I have to share some snark with those I love too! LOL  (Click on the photos above to enlarge them if you’re on my website.)


I thought I’d share another card I had made for someone I love that was given to my husband for Valentine’s Day yesterday.  (Sometimes, I have to wait until he gets it before I share!):

This pup and his boing heart hat cracks me up!  Look at that face!  I actually made this last month during a Craft Roulette challenge.  I decided that I liked it so much that I put a Valentine greeting on it for my husband to give him on Valentine’s Day.

I used the Taylored Expressions Puppy Love (retired) stamp set and colored in this cute pup with Copic markers and die cut him out.  I stamped the TE Gingham Check BG Stamp in black ink over red cardstock.  I splattered some white Copic Opaque over top.

For the lace, I white heat embossed the border stamp from the TE Flip the Lace stamp/die (retired) over the Toffee cardstock and placed beneath the check background piece.  I added a black strip between the two and then popped the dog on it.  I stamped the “Seriously” from the pup stamp set and the Valentine greeting from the lace stamp set together and fussy cut them out to pop up with foam tape on the card.  I added a few white hearts around the pup.  The entire card is a mini slim from a pre-cut and scored Toffee card base.

  • Thanks so much for stopping by today and I hope that you enjoyed these “love” cards or have been inspired to make and send a card to someone you love too!  I look forward to seeing what you share in the gallery this month!  

HAVE A GREAT WEEKEND!

Challenges:

  1. Critter Crazy Anything Goes With a Featured Creature (Bottom card only)
  2. Crafty Animals Anything Goes + Animal (Bottom card only)
  3. Pearly Sparkles Love is in the Air
  4. Crafts Galore Encore – #132 Anything Goes
  5. Crafty Calendar – Hearts
  6. 613 Avenue Create – Anything Goes with optional: Lots of Love
  7. Crazy is Our Fame-Stencils Are Our Game – Pinks &/or Reds + stencil (sweater cards)
  8. Make My Monday – #245 Love (bottom pup card)
  9. Crafty Gals Corner – #264 Fill in the Blank:  “Pink________” (sweaters)

“V” is for Vintage

Hello friends and happy Friday!  Are you looking forward to a nice weekend?  I have some crafty time in store for me, but honestly, I need to be cleaning my craft room!

Today starts a new challenge over at the Alphabet Challenge blog!  Please be sure to check out the challenge blog to see how to play as we go through the alphabet letters every-other week (fortnight) for each new challenge.


For this challenge, we are at the letter “V” for Vintage and here’s what I’ve come up with:

I love the look of vintage style cards, but I don’t make them very often, so this was a great challenge to get me motivated in making one!

I fell in love with the Simon Hurley “In the Garden” stamp set (discontinued)  last year , but never got a chance to play with it until now.  I thought the images were perfect for a “vintage vibe”.  I got that along with these gorgeous papers from Scrapbook.com called “Vintage“, of course!  The imagery went well with the stamps in the set.

I started with cutting all of the different patterns from the paper pad into a card design.  I sponged around the edges with Hickory Smoke oxide ink.  I die cut the “graph paper” panel with Taylored Expressions A2 Postage Stamp Stacklets die.  On that panel, I stamped the wording from the SH stamp set with Hickory Smoke oxide as well as a few hearts in Tattered Rose oxide ink.  I also took a music score rub-on that I got from Scrapbook.com to add in the corner and then sponged around the edges with Hickory Smoke oxide.  I layered this panel onto a piece of grey cardstock.  The second layer was also layered onto another piece of grey cardstock and then layered over another piece of the Vintage pattern paper over an A2 top folding white card base.

For the stamped images, I stamped them in black pigment ink and then clear heat embossed them.  I used Shabby Shutters, Tattered Rose and Victorian Velvet oxide inks to watercolor by smooshing the ink pads onto a surface and using a water brush for coloring.  I fussy cut out the images and popped them up over the panel with foam tape.

Before attaching this panel onto the next panel, I added some grey seam binding ribbon tied in a bow on the side and then popped it up with foam tape.  I also die cut the lettering from the Tim Holtz Script Words set in black and attached onto the  graph panel.

  • I hope you’ve enjoyed my card for you today and that you’ll stop over to the blog to play along in the challenge with us!  Wishing you a happy and productive weekend!

Challenges:

  1. Sweet Stampin’ – LOVE! (must use stamp)
  2. Allsorts – #816 Romance and/or Music
  3. Stamping Sensations – Valentines, Weddings, Romance or Anything Goes + must have stamping
  4. Aud Sentiments Love/Anniversary/Wedding and/or Shimmer + sentiment
  5. Triple B – Birds/Butterflies/Blooms (must use at least one)
  6. Try it On Tuesday – Romance

Time to Send Love

Hello friends!  It’s getting closer to Valentine’s Day and Sending out love to others is a good reason to make cards!  I’ve joined a couple of challenges to play along with:

I have fallen in love with these card layout dies from Newton’s Nook called A2 Card Layout Die and was also able to use as part of a sketch for a challenge that worked with it.  The die made it very easy for the layout.  I’ve also used some Newton’s Nook papers as well as a new Valentine themed stamp set that came out in December.  

For the postage stamp on the card, I’ve taken the NN Postage Stamp Layout die and cut one in turquoise and then another in white.  One for the inside and one for the frame.  I cut it apart so that I had several postage stamps.  I stenciled clouds on the turquoise insert and added the heart balloons from the NN Valentine Postage Sampler set over it.  I stamped, colored and cut it out with the coordinating die.  I also white heat embossed the number at the bottom.

I took the same stamp set and stamped some random hearts on the center kraft cardstock panel.  The sentiment came from the NN Sending Hugs stamp set (retired) and was white heat embossed over the hearts.

For the die cut turquoise hearts, I’ve used the NN Charming Hearts Frame die.  It cut out three hearts that I could use for accents on this card.  I’ve attached the entire design over an A2 top folding kraft card base and finished it with some heart shaped sequins.

Thanks so much for joining me today!  I hope you’ve enjoyed my card or found some inspiration!

Challenges:

  1. Newton’s Nook Inky Paws Challenge – Cherry Red, Turquoise, Buttery Brown & White + Newton’s Nook products
  2. Sketch Saturday – #768 sketch with twist:  include a heart
  3. The Divas That Cut…Paper – Something New + die (new Newton’s Nook products!)
  4. Creative Fingers – #293 Anything Goes
  5. Pammie’s Inky Pinkies – #2504 Anything Goes

“U” is for Underwater

Hello friends!  It’s already closer to the end of our first month for 2025 and I hope you’re staying warm and/or cozy where you are!  

Today I’m excited to share that I’ve joined the Alphabet Challenge design team!  I’ve been playing along with the challenges for a few years, so this will be a fun one!  Please be sure to check out the challenge blog to see how to play as we go through the alphabet letters every-other week (fortnight) for each new challenge.

Blog Badge

For this challenge, we are at the letter “U” for Underwater and here’s what I’ve come up with:

Now how cute are these smiling underwater critters?!  It was hard to believe that going through my stash that I didn’t have much of any underwater critters besides mermaids, but last year I saw this adorable Doodlebug Sea Life stamp set on sale and decided to add it to my collection.  This is the first time I’ve used it.

For the background:  I’ve taken my Distress Oxide inks and ink blended the colors Salty Ocean, Mermaid Lagoon and Blueprint sketch over some Bristol Smooth watercolor paper.  I sprayed it with water and blotted it up with a paper towel.  I used a stitched wave die cut border at the top and another wavy landscape border die for the sand at the bottom with kraft cardstock.  I’ve used markers and gel pens to create “dots” for the sand and then attached it to the ink blended panel.  Once I had it all attached, I cut out the entire panel with a stitched rectangle die and then attached it to an A2 sized top folding kraft card base.

I stamped several of the images and colored them with Copic markers and die cut them out with each coordinating die.  The “seaweed” was part of the coordinating die set that I inked over in green Oxide inks and then attached all of the images to the underwater scene.

Lastly, I white heat embossed a sentiment from the stamp set (it says:  “with oceans & oceans of love”) in the top corner of the card base and stamped some blue solid hearts from the set for “bubbles”.  I couldn’t resist adding some googly eyes to the crab too.

I hope you’ve enjoyed my card today and hop on over to the challenge blog to play along with us!  I look forward to seeing your underwater creations in the gallery!

Thanks so much for dropping in and I’ll see you tomorrow for my monthly Art Journal Page!

Challenges:

  1. Allsorts – Close to Nature/Anything Goes
  2. Pammie’s Inky Pinkies – PIP2503 Anything Goes
  3. Little Red Wagon – #791 Can You Feel the Love Tonight (love theme)
  4. Critter Crazy Anything Goes with Featured Creature
  5. Crafty Animals – #90 Anything Goes with Animal(s)

Sending Love Using My Stash

Hello friends!  Just popping in with a quick post to share a card I’ve made for a few challenges.

This year, I’m going to try and “shop my stash” instead of buying and buying and buying all the things.  YES…I know it’s easier said than done, but I’ve joined a fellow crafter that I’ve known for a long time to join in her monthly challenge prompts in her group on FB  (This & That With Danni’s Dreams) to help keep me motivated in spending less.  I’m sure she’d love you to join her, so check it out.  Her monthly prompts are from her “Use Your Stash” challenges that she just started this year.

Her themes/prompts for January 2025:  gnome(s), embossing folder, border die/punch, heart(s) and 12×12 paper.  (You can choose one, several or all.)  Here’s the card that I’ve made “Using My Stash” with ALL of the prompts:

I think gnomes are cute and I happen to have several stamps, so it was no problem finding one of those!  I’ve used an older gnome set from Whimsy Stamps Gnome One Like You.  I colored him up with Copics, but I fussy cut out the gnome and the heart balloon to pop up over the image on the circle that I’ve stenciled some pink clouds on.

The background has an older Sizzix embossing folder not sure of the name, but it’s a 3D embossing folder with hearts piled up.  The embossing folder and hearts was another two of her prompts.  I splattered some gold watercolor over the background before placing it over an A2 sized top folding cream card base.  I also used a corner chomper to round the edges of the right two corners.

I’ve used some very old 12×12 papers from Stampin’ Up! called “Fan Fare”.  I hoarded it for a long time and even wrote the coordinating colors on the back of the package!  It’s high time to use some of it up…even if it’s a small strip!  I’ve also taken the Whimsy Stamps Basic Border dies (not available any more) to cut a mirror gold strip along the edge of the papers. (The remaining of her other prompts used.)

I gold heat embossed the sentiment from the stamp set over a piece of the cream cardstock.  I cut it out with a banner die and sponged some light pink ink around the edges.  Lastly, I covered the heart balloon with a glitter pen and added a couple of tiny sequin hearts around the gnome.

I had a great time pulling out items from my stash and it felt good to be using them!  I certainly plan on doing more of these every month!  So stay tuned for more posts to help “Use Your Stash”!  Thanks so much for dropping in!  See you again soon!

Challenges:

  1. Freshly Made Sketches – #FMS668
  2. Creative Friday – #376 altrosa (Old pink)
  3. Crafty Calendar – Add a Die Cut
  4. Stamping Sensations – Anything Goes optional:  hand colored image

Playing With Paper Blocks and Bunnies

Hello friends! Easter is coming for us for very soon and I’ve been enjoying all of the Spring that’s starting to come up outside with flowers and buds on the trees!  It’s still a little cool, but hopefully the weather will even out and stay warmer!

Since I’ve been trying to get motivated for Easter, I’ve pulled out some papers from my stash and have been inspired to CASE (copy & share everything) a friend that really inspires me to use things I have!  First, I’d like to share a fun Easter card that I’ve made for a sketch challenge that I was inspired by as well:

That sitting bunny is so cute!  (Thank you Carol…more on that later in post!)  If you check out the sketch from the Sketch Saturday challenge blog (see in challenge list below), you will see all of the fun angle strips in the sketch.  I thought it would be fun to pull out some Easter papers from my stash.  I wasn’t sure how to do the background until I saw that this sitting bunny worked perfect for a part of the paper pad that had this wheelbarrow image in it!  I cut it out from the paper and placed the bunny on it.

For the background of the card, I thought it would be fun to use my stencils to create a scene with grass and clouds.  The wheelbarrow bunny fit in the open area and then I used the angles from the sketch to cut pieces with the same Easter paper pad.  I just eyeballed everything by marking notches and lining those notches in my paper trimmer to get a straight cut.  Even the solid paper on the base layer came from the paper pad.  I just cut it A2 size to fit over an A2 top folding white card base.

The sentiment was stamped and cut out with the coordinating die.  I added some shadow under wheelbarrow with a green marker (not really the color I wanted, but it worked), and colored a bit of pink on the bunny too.  I added teal rhinestones next to the sentiment and done.


Next, I wanted to share something else that I was inspired by from my friend Carol at https://ourlittleinspirations.blogspot.com who sent me a very cool card and kind gift:

She always inspires me with her “snippet” creations and coming up with cards like this one to utilize those pattern papers we hoard so much!  The pattern is very pleasing to the eye and so I wanted to create one myself!  With all of the papers I have, I’m sure I could make a zillion cards! 😆  I also love how she used a monochromatic green theme with it…which I will need to try another one with this idea!  You should go check her blog out and be inspired too!

Also, she was very kind in sending me these die cut sitting bunnies & stools!  I do not know exactly where this bunny is from, but I’ve seen it around the craft world.  So cute!  Thank you so much for your kindness and inspiration my friend! 

So here’s the card that I created inspired by Carol.  I really love plaids and I thought it would be fun to re-create her design which I measured out her pieces and cut based on what I thought they were.  It was really fun and not as hard as it looks like it might be.  I wrote the measurements and cut from the same Easter paper pad as I used on the card above.  I started with a white base…that way if I messed up, it wouldn’t matter too much.  The sentiment piece was also from the same paper pad.  I just white heat embossed the sentiment and added some stitch details with a white gel pen.

I used one of the sitting bunnies that Carol provided me with, and tried to match up what I had from my stash the best I could to die cut some hearts along with the A2 side folding card base.

I brushed the hearts with a glitter brush pen and called it done.


I had so much fun playing with these paper blocks and bunnies!  I hope you’ve enjoyed my creations and inspiration today as well!  Thanks so much for stopping by!  C U SOON!

Challenges:

  1. Sketch Saturday – #746 optional twist: feature an animal (top card)
  2. Simply Create Too – Bunnies & Blooms #198 (top card)
  3. Make My Monday – Spring, Flowers, Weather, etc. #221 (top card)
  4. Fab ‘N Funky – Spring (top card)
  5. Daring Cardmakers – Spring is in the Air (top card)
  6. The Paper Funday – Anything Goes optional: dies #63 (top card)