Hello friends! I hope that you’re enjoying this month so far! The weather has really started to warm up now and it’s been nice and sunny to be outside. I have so many projects that I’m working on, so my blog has been a bit neglected lately. I will be able to share with you all of the things that I’ve been working on later…but for now, let’s talk about flowers!
Today starts a new challenge over at Sparkles Monthly and this time it’s my turn to pick a theme and I have chosen “FLOWER(S)” for this month. Flowers seem to work for so many occasions which is why I chose it. Here’s the project that I came up with:
I needed a card for Mother’s Day this last weekend, so I thought I’d pull out my stash of die cut flowers from Taylored Expressions and create several pieces in different colors to place inside my wheel barrow.
I’ve die cut several pieces from the Fresh Cut Flowers die set in pineapple, guava, dried fig, chocolate truffle (centers) and green tea (stems and leaves). I used the same color of ink to sponge a bit of dimension over the centers and then splattered some white Copic ink over just the flowers and the toffee background that was stamped in toffee ink with the Weathered Words Background stamp.
I arranged all of the die cut flowers and leaves behind the Farmhouse Wheelbarrow die cut from chocolate truffle, toffee and woodgrain textured cardstock. I also used the Building Blocks Happy Additions to white heat emboss over a piece of chocolate truffle and cut out with the coordinating die. The toffee background was placed over an A2 sized top folding white card base and then I added a white frame die cut from the A2 Thin Frame Cutting Plate for an “anchor/ground” for the wheelbarrow to sit on. The sentiment greeting was popped up with a foam strip and then I’ve added a few enamel dots including in the center of the wheel.
Thank you so much for stopping in today! Hope you’ve enjoyed my card and that you will stop by the challenge blog to see the rest of the inspiration from the team. I look forward to seeing what floral creations you share in the gallery with us!
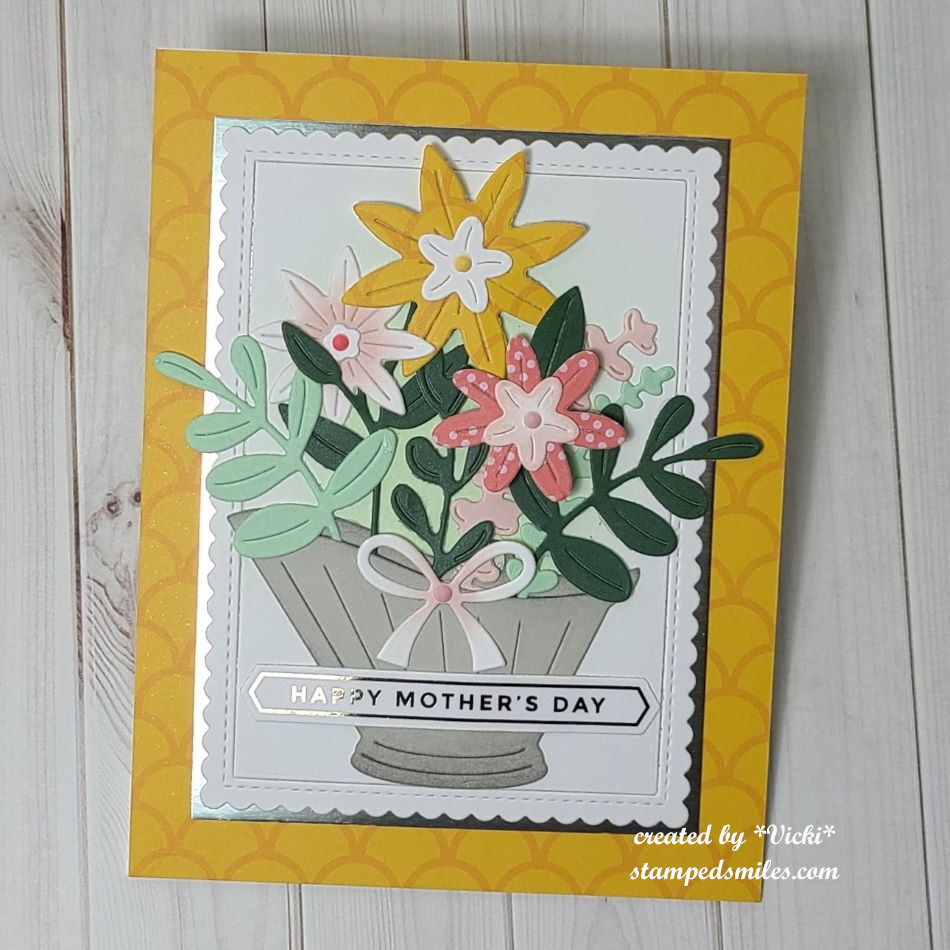
Hello friends! Sending a happy Mother’s Day to all of the celebrating moms this weekend! It’s a beautiful day out today and tomorrow will be too, so I’m going out to plant some flowers that I’ve been wanting to do! I hope that you’re having a nice weekend in whatever you’re doing.
I just wanted to share a card that I had made just for Mother’s Day:
I love how this turned out with all of those blooms bursting out from the antique pail! I’m in the middle of going back over some classes that I’m doing, and this was one of them that I’ve switched up to fit this occasion. The original card had carrots as a base and I didn’t have the flower dies they used, so I made my own version with what I had.
The antique pail, flowers, leaves, bow and foiled sentiment dies all came from Taylored Expressions. The scallop rectangle frame came from My Favorite Things and some of the design papers I’ve used came from Scrapbook.com.
The background papers and large flower came from the same pattern papers as a couple of other flowers and dark green leaves. I used some light pink ink to sponge some of the other flowers and center of bow. The center of the scallop frame has some light green blending, so that it wasn’t so stark white behind the flowers. I also sponged around the antique pail.
I arranged the flowers inside the pail and turned it over to attach with glue over the center of the scallop panel. I popped up the front flower and added some colored gem dots to the center of the flowers and bow. I attached some mirror cardstock to the back of the scallop frame panel to match the foiled sentiment. The sentiment was attached over the pail at the bottom.
It took a little bit of time to cut and arrange all of it, but it was fun to fiddle with.
Thanks for taking some time to stop by and I hope you’ve enjoyed this pail of flowers for Mother’s Day! Have a fabulous weekend whatever you do! 🌼🏵️
Hello friends! I hope that you are having a great week so far! After the little “heat wave” hit us, I’ve been enjoying some ‘nicer’ outdoor temperatures, finally. As you may have read in a previous post, I had been working on my son’s wedding invites as well as some thank you cards for them to send out afterwards. I will be sharing that later on, but today I have some other “mass production” that I’ve been working on in addition to those:
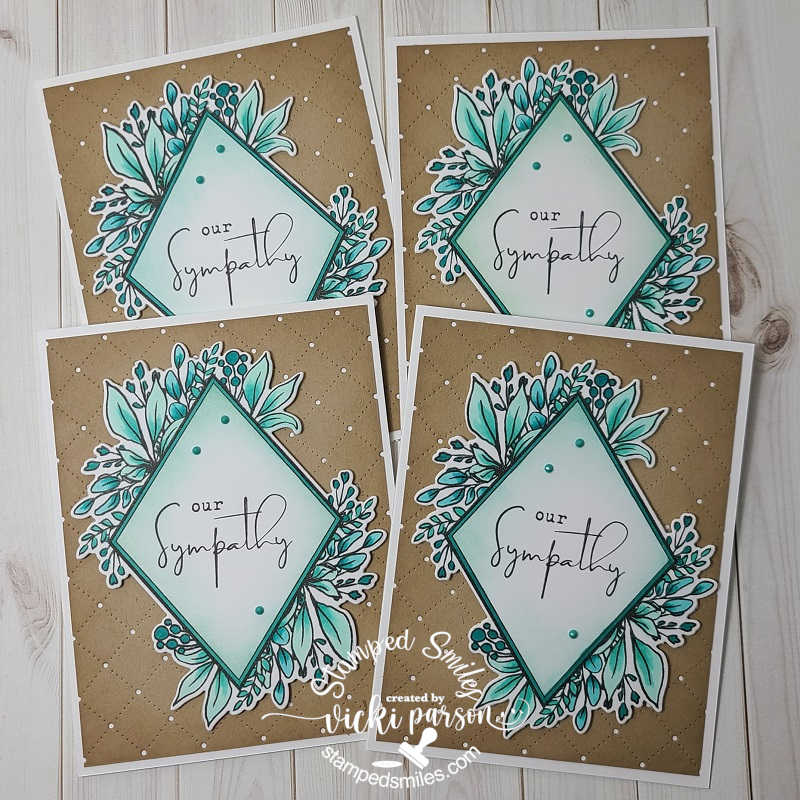
First up, I’d like to share a set of cards I’ve made for the Taylored Expressions Fans FB Group challenge for May which calls for “4-8 mass-produced cards. (similar or identical)” & the colors “Poblano Pepper with Confetti Cake“. I do not own the Poblano Pepper, but I do have a small cube of Confetti Cake ink.
I’ve been wanting to create several sympathy cards so that I had them on hand instead of making at the last minute for one, so I was happy to get these made. I decided it was just easier to make them identical so that I didn’t have to decide how to arrange or cut my papers, etc. I’ve used the Taylored Expressions Diamond Botanicals with dies as well as the TE Diamonds Masking Stencils for the main image. The background uses the TE Pierced Lattice Cutting Plate over a piece of Toffee cardstock.
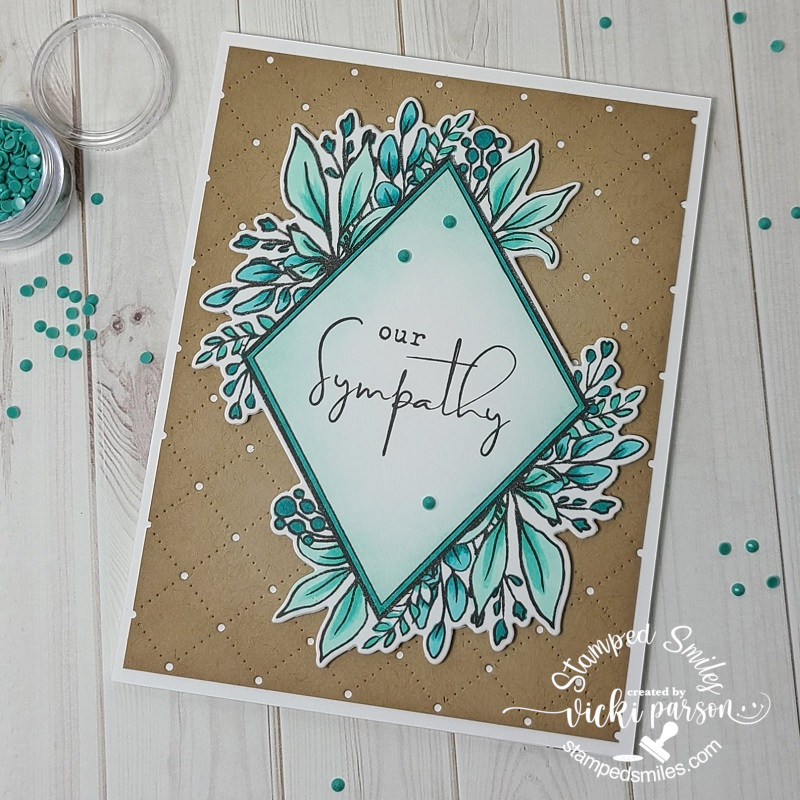
Here’s a close-up look at one of the cards. I stamped the floral image in black ink as well as the sentiment from the stamp set and then took one of the Diamonds masking stencils with some Confetti Cake Ink to softly blend around the edges of the sentiment area with it. I also used a blender brush to blend around the edges of the cut Toffee layer too.
Since I only had the Confetti Cake ink color, I matched up the coordinating colors with my Copic markers and colored in the image using only those color tones. I think it worked out great for sympathy cards. After I colored up the images, I used the coordinating die cut and popped it up over the Toffee cut panels with foam tape squares and then layered it over a side folding white A2 card base. I finished each one with some of those coordinating TE Pastel Tiny Diamonds. (Although the suggested listed coordinating colors on the website don’t have the Poblano Pepper or Confetti Cake, I thought it matched up rather nicely to this anyway.) I think these cards work out great for mailing too.
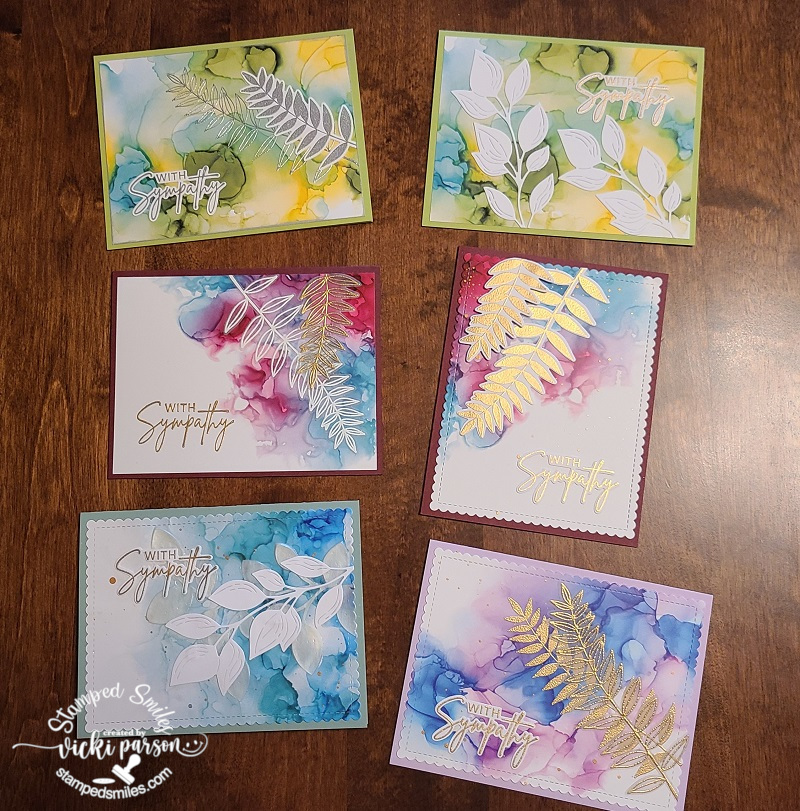
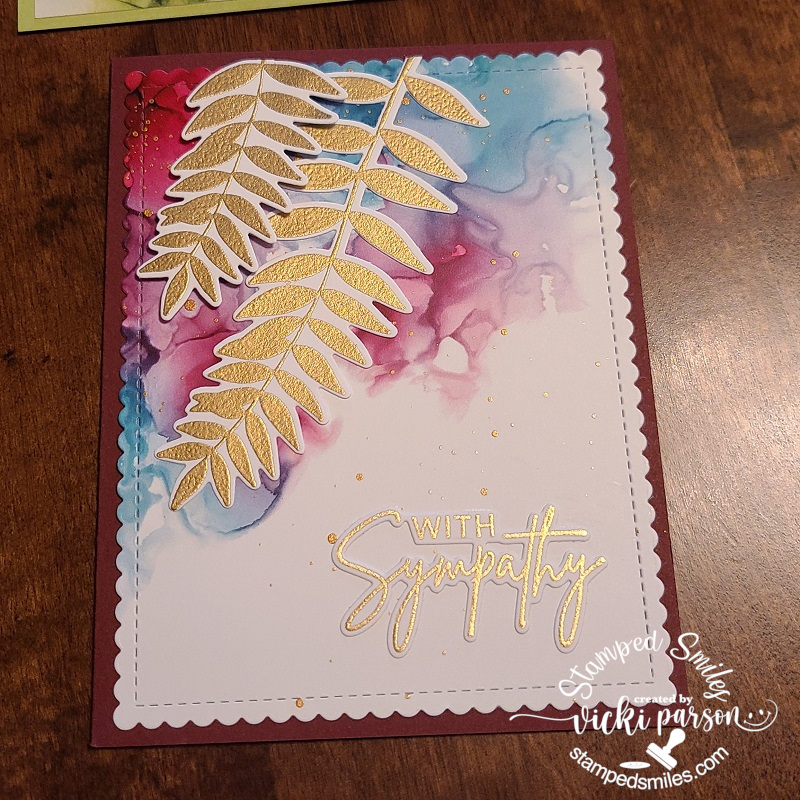
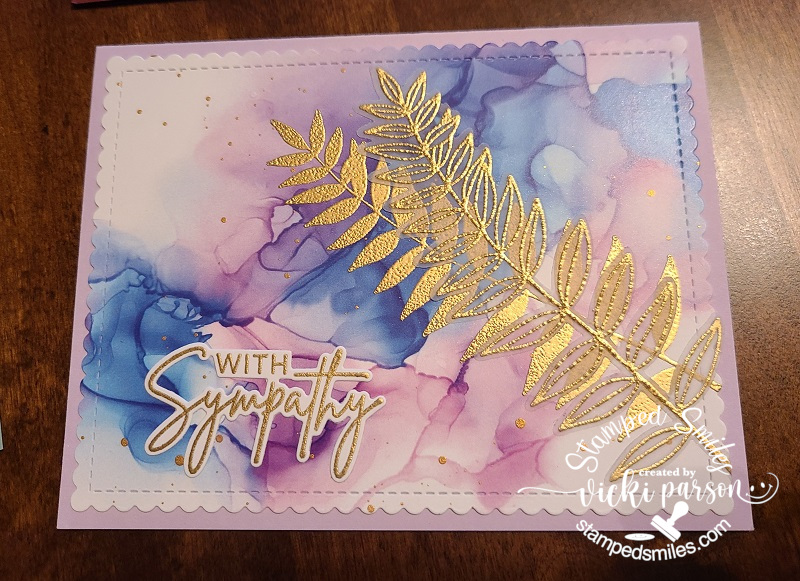
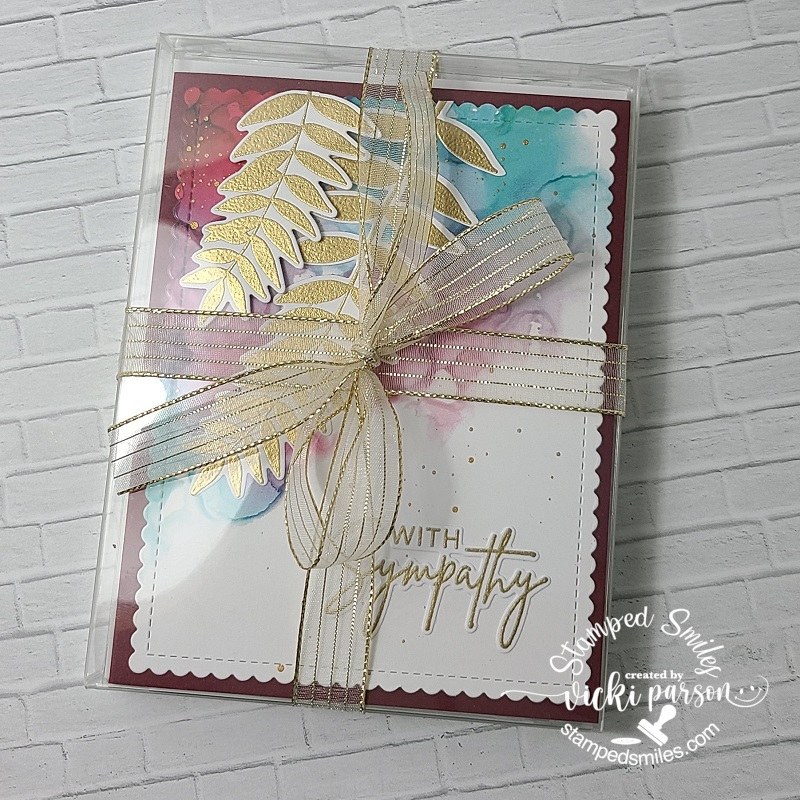
And speaking of sympathy cards and Taylored Expressions, I thought it would be great to create a nice gift set too:
If you remember one of my previous posts, you may remember where I created a greeting card gift set (CLICK HERE). I’ve went along with the same idea here and made them all sympathy related cards using my own acetate box and some Taylored Expressions products. These were all quick and easy to pull together using the Taylored Expressions Done for You Alcohol Ink Background Panels along with a previously released card kit stamp set/die.
I decided to heat emboss several of the fern images with white, gold and silver over a few of the panels, some over white and vellum and then cut out. I placed them along with the heat embossed sentiments cut out and arranged them over the panels. I matched up the cardstock that I had from my stash with the panels to create the completed cards.
Here’s a gallery of a few of the cards up close along with the finished gift box tied with a ribbon: (Just click on each photo from my website to see them enlarged.)
I think this will make a nice gift for someone as I always hear people saying they never have a sympathy card on hand when they need one or for those people that don’t make their own cards too.
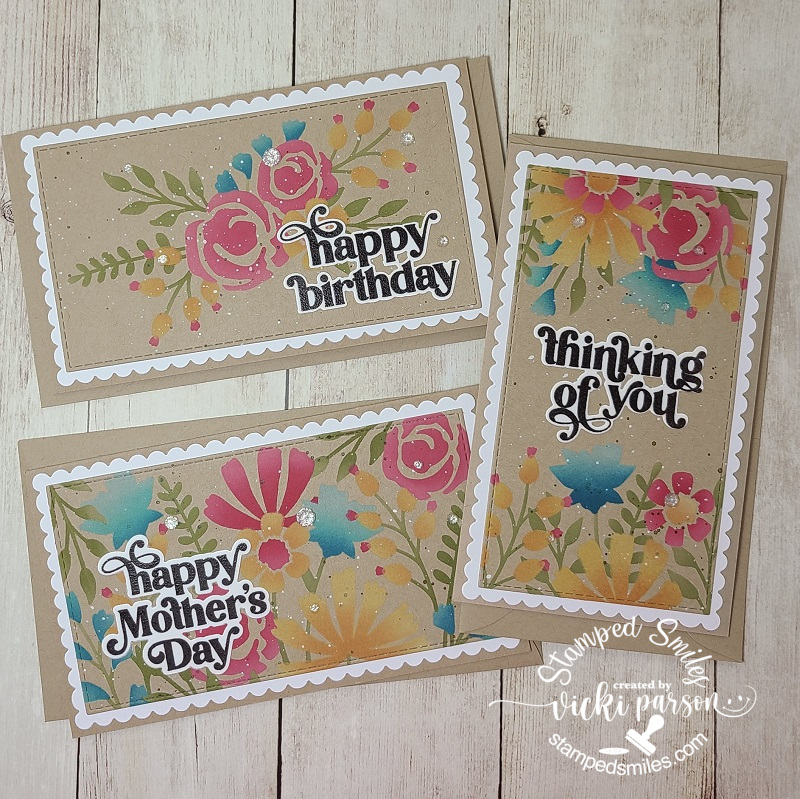
And lastly, I’ve made a couple sets of mini slimline style cards using the Taylored Expressions In the Garden-Triple Slim Layering Stencil:
I quickly fell in love with this quad type of stencils especially with these gorgeous florals! I love the way these floral panels are different from one another, and you can stencil them all up with the same color in one pass! I needed a couple of Mother’s Day cards, so making all of these at once sure came in handy for bonuses too!
Using the “craft-along” video from Taylor and Heather, I used the same, or similar colors that was used, added my black splatters and then used the TE On Occasion with dies as well as the TE Get the Word Out-Mother’s Day with dies for the sentiments where I white heat embossed over black cardstock and cut out. I just glued to the panels and attached each panel to a white mini slimline card base.
And then here’s another set of mini slimline cards using the same products as above except I used Toffee instead of the white cardstock for these. I also stamped the sentiment with dark brown ink over white cardstock and then cut them out to place over the stenciled panels.
I also used both dark brown and white paint to make the splatters over these. I also used the TE mini slimline stitched and scallop die cuts for these cards and then layered them over top of a Toffee mini slimline card base. I’ve also added a few TE white rhinestones for a bit of sparkle too.
I also think that these would make great greeting card gift sets as well! So, then it’s just a matter of which ones to keep and which ones to give away as a gift!?🤔
Hope you’ve enjoyed my mass production post today or have been inspired in some way. Thank you so much for taking the time to drop in and say hi as I enjoy hearing from you!
Challenges:
Creative Friday – No patterned paper (top set of cards only)
Colour Crazy Craft – Anything Goes with coloring (top set of cards only)
Hello friends! I hope you’re having a great week so far! Really hate it when technology doesn’t cooporate and I have to figure it out, but hopefully I can soon! Sometimes it just needs to be done!🤔
Anyway, I was wanting to post some masculine cards I made for Father’s Day earlier this week, but I’ll have to post another time as this card was already done and is needed to enter a challenge that is ending soon:
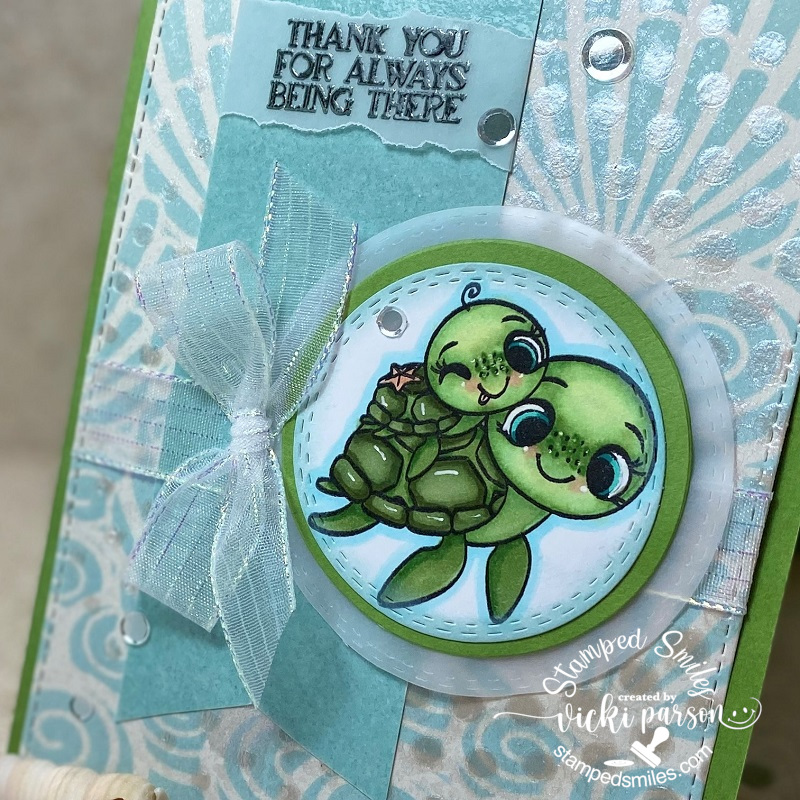
I love that wee little baby turtle riding on the back with his tongue out! The stamp was colored up with Copic markers, cut out with a circle die, along with another circle layer of Cabbage cardstock that I’ve also used for the A2 top folding card base, and another circle layer of vellum.
I was super excited to try out the brand new Ranger Distress line color “Speckled Egg” products! I’ve used the Distress Oxide ink to sponge over the image onto a piece of Sidewalk cardstock that was cut out with a stitched rectangle die. I also took the Circle Tone stencil and added some Opal Chroma Glaze over it. You can see how pretty the shimmer is on those dots!
For the banner along the side, I took another piece of sidewalk cardstock and cut my own banner with scissors. I took my embossing ink pad and covered the banner piece with it and then heat embossed the Speckled Egg Distress Glaze EP over it…turned out so pretty! I heat embossed the sentiment from the same turtle stamp set over a piece of vellum and wrapped it around the banner before attaching it to the card.
Lastly, I’ve added some metallic shimmer ribbon from my stash and some pretty sparkling sequins that remind me of bubbles. The card was designed based upon a sketch, see details below post.
Here’s a better view of the cute image and coloring I’ve done. I’ve added some dots with a white gel pen for their cheeks as well as their eyes and noses. I’ve also used it for highlights on their shell.
You can also see a better view of that pretty shimmer from the Metallic Chroma Glaze that I used over a stencil. Thought it was great for the circle theme going on.
I hope you’ve enjoyed my card today and have been inspired in some way or has brought you a smile! Thanks so much for dropping in and I’ll be seeing you again soon!
Hello friends! Hope you’re having a great week! I’m so glad you’ve joined me today as I have lots of fun creations to share with you!😀
This past weekend Whimsy Stamps held a “virtual craft retreat“, so I thought I’d tag along and join in on the fun! I’m glad I did because I made several cards:
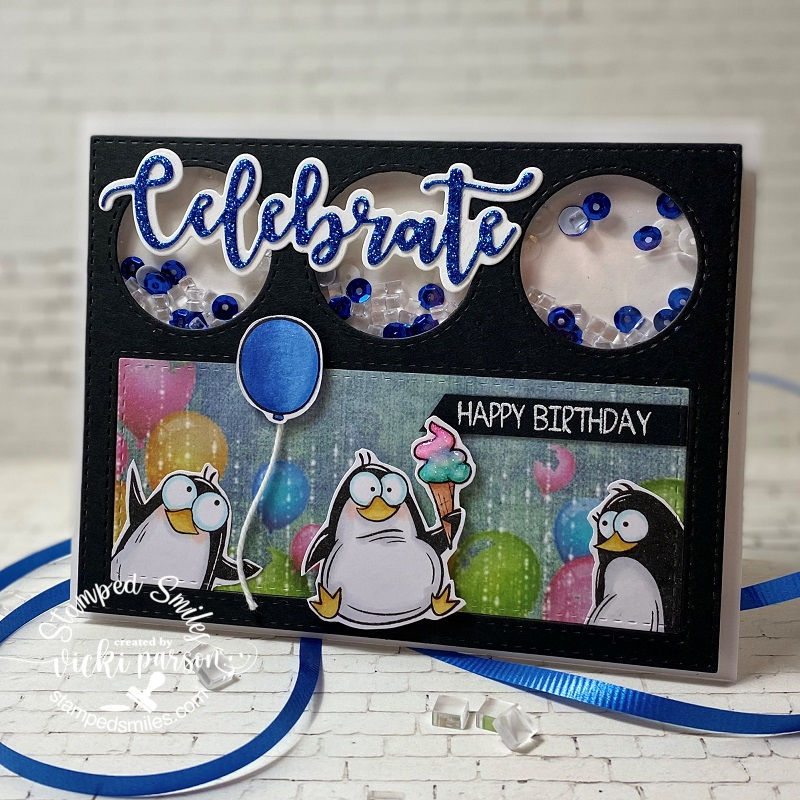
The first challenge given was a tic-tac-toe challenge. I did 3 down: birthday, heat embossing and circles for mine. Almost had 2 bingos…but didn’t quite work out! Aren’t those penguin eyeballs the best?! LOL! I needed to send out a birthday card to someone so this was great timing!
The background papers, cover die, sentiment die and the penguin stamps are all from Whimsy Stamps. I even put little ice cube confetti for my shaker card!
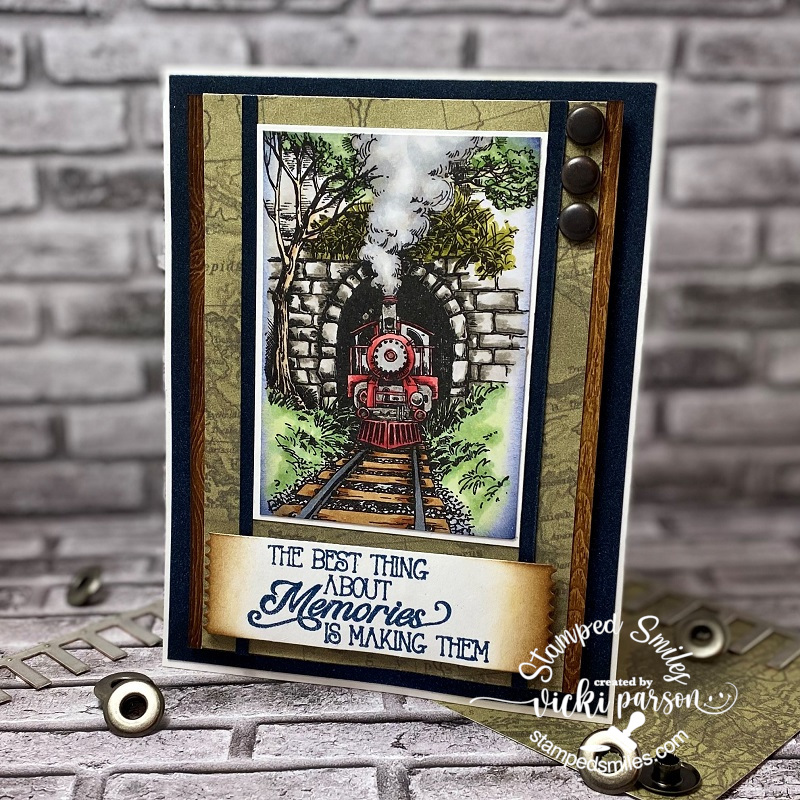
This card was made for the second challenge given during the event which was to use a sketch and a color palette using at least 2 of the colors given. This was my take on the sketch along with using blue, green and brown from the palette.
Most all of the items used on this design came from an older card kit from Whimsy Stamps. The stamp set is still available in the store called Enjoy the Journey. For the sentiment panel, I heat embossed a sentiment from this stamp set and then used the Slimline Postage die to cut along the edges of it.
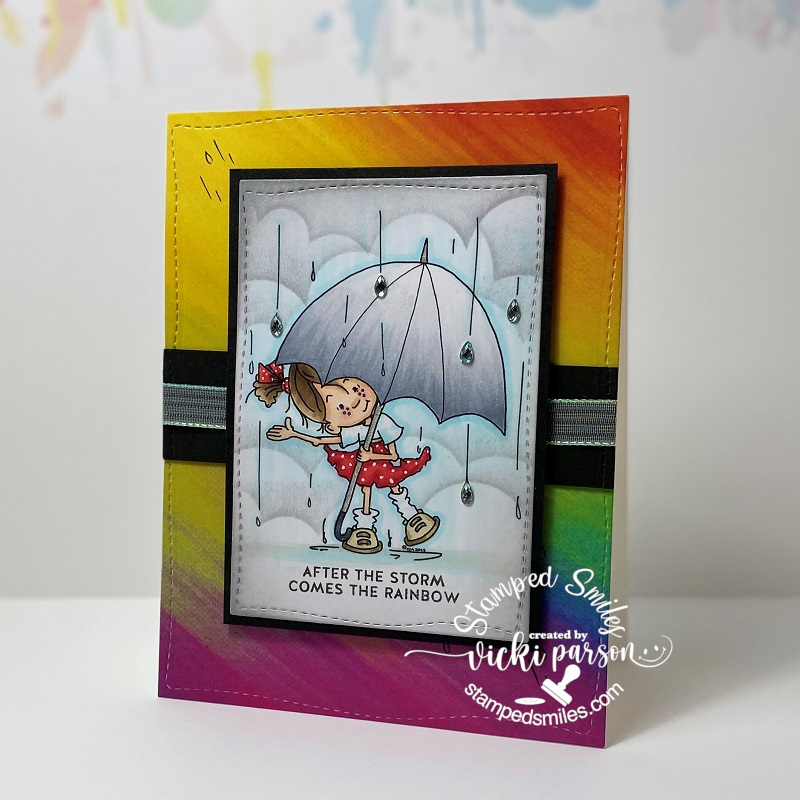
Tihs is the card that I created for the third challenge issued which was to follow a photo prompt with words: “When it rains, look for rainbows. When it’s dark, look for stars.” The first thing that came to my mind was these cool Rainbow Papers from Whimsy Stamps and so I’ve cut a panel out with an older Whimsy Stamps die along with the image panel.
This image is called Rainy Day Smiles by Sassy Cheryl’s which is what I had actually won as a prize from the event over the weekend for one of the games..so that was cool! I wanted to be sure to use it for one of my cards! I added some raindrop crystals on a few areas of the image too.
This card was made for the fourth challenge given which was simply to create a project with one of the digital freebie images that was given during the event.
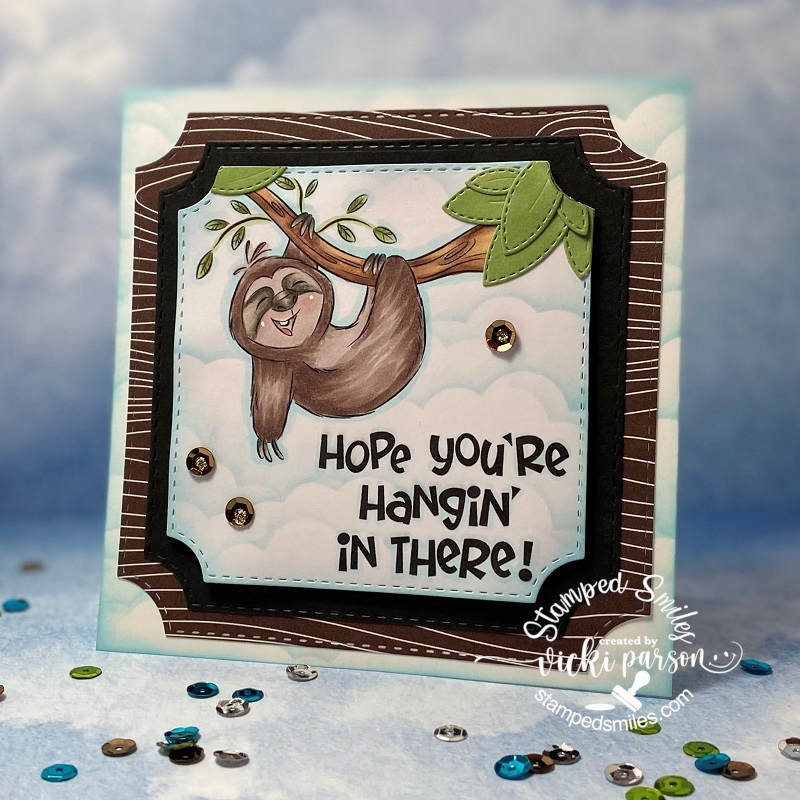
Facebook actually kicked me out of the event a few times for leaving too many comments! LOL! I was trying to participate in games and it told me that I was leaving too many comments! This was one of the cute freebie images that they gave at the event called Sloth. After all that happened…I felt that this little guy was laughing at me!🤣🤣🤣 So I wanted to laugh right along with him, and I printed him out, colored him with Copics and used the Whimsy Stamps Notched Square dies and layered him over some papers from my stash and attached to a 5″ square card base that I stenciled some clouds on along with the background of the image. I die cut some leaves from the Whimsy Stamps No-See All Seasons Tree die set to add to the top corners of the image panel.
Needless to say, I did “hang in there” right along with him!!😄
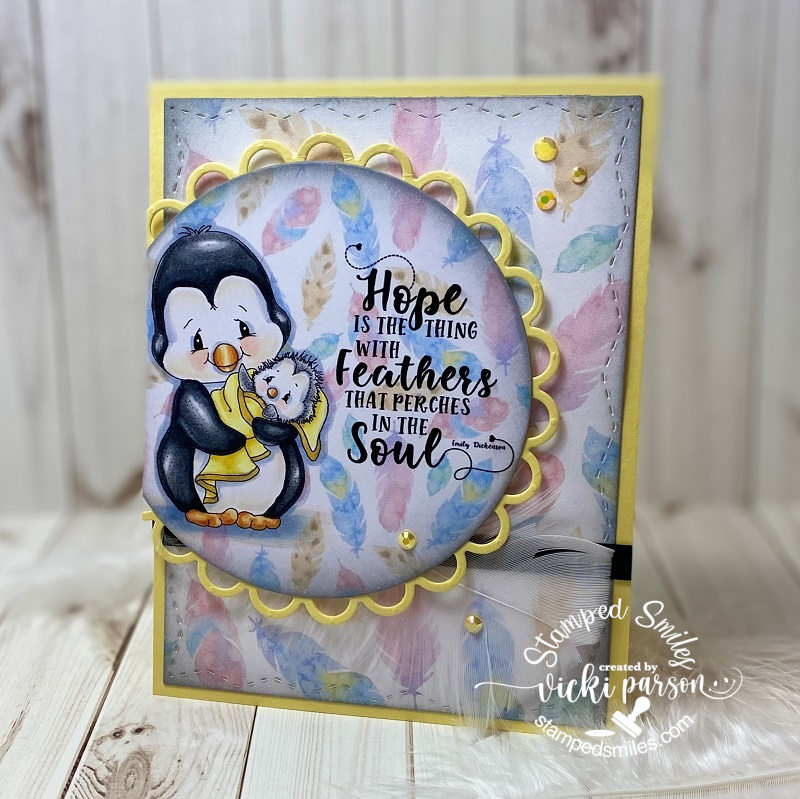
And last but not least, the fifth challenge was to make a project based on one of the video tutorials that was shown at the event. Of course, I’m always inspired by Crissy Armstrong and her coloring! This sweet little penguin called Penguin Momma was a freebie given during the event and I watched Crissy color this up and I tried my hand at her tips and tricks.
I printed out another piece of the feather background and cut it out with the Whimsy Stamps Zig Zag Stitched Rectangle dies and added my own white feather to the design. I sponged some grey ink around the edges of the printed papers and added some yellow crystals.
I had such fun creating these projects and pulling out my Whimsy Stamps stash for the challenges. And now I have a few cards for sending out to people that I already have in mind! Hope you’ve enjoyed my makes today and I’ll be seeing you again soon!! (The links in this post contain affiliate links if you want to purchase anything! Thank you!!)
Hello friends! Here we are at another Thursday already! Where does this time thing go?! I’m trying to embrace Spring for as long as possible.
Today starts a new challenge over at Cute Card Thursdayand this week we’d like to see your “Tie a Bow” creations! I am a huge fan of ribbon and have WAY too much that I could never possibly use it all in my life time! LOL! How about you? Do you have a big ribbon stash too?
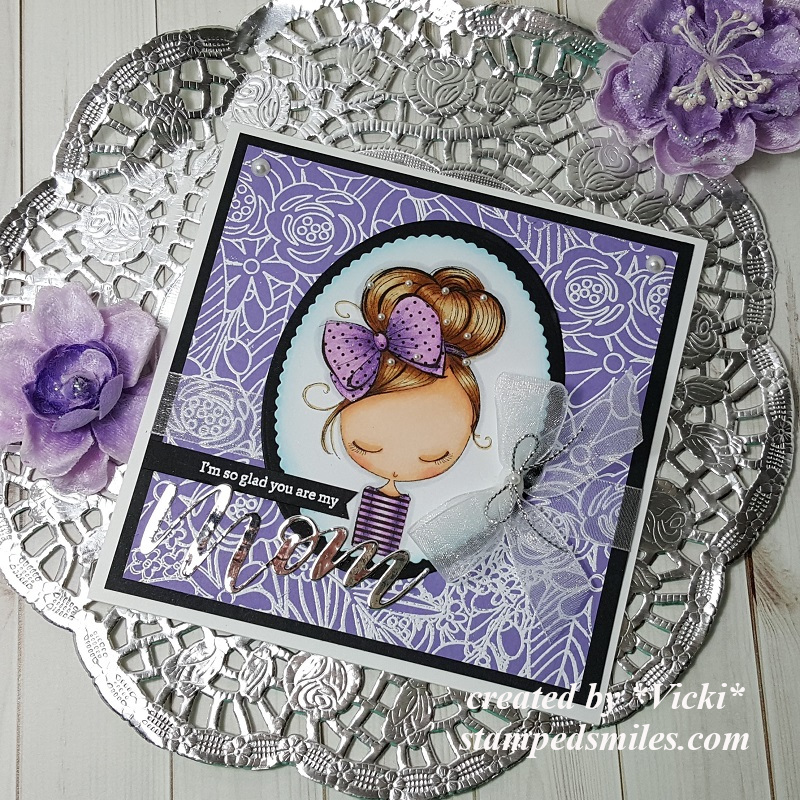
So does it feel like we are at the salon? She’s fashioning her “new do” which I think would be so fun to go have a spa day with mom or your favorite female person, right?!
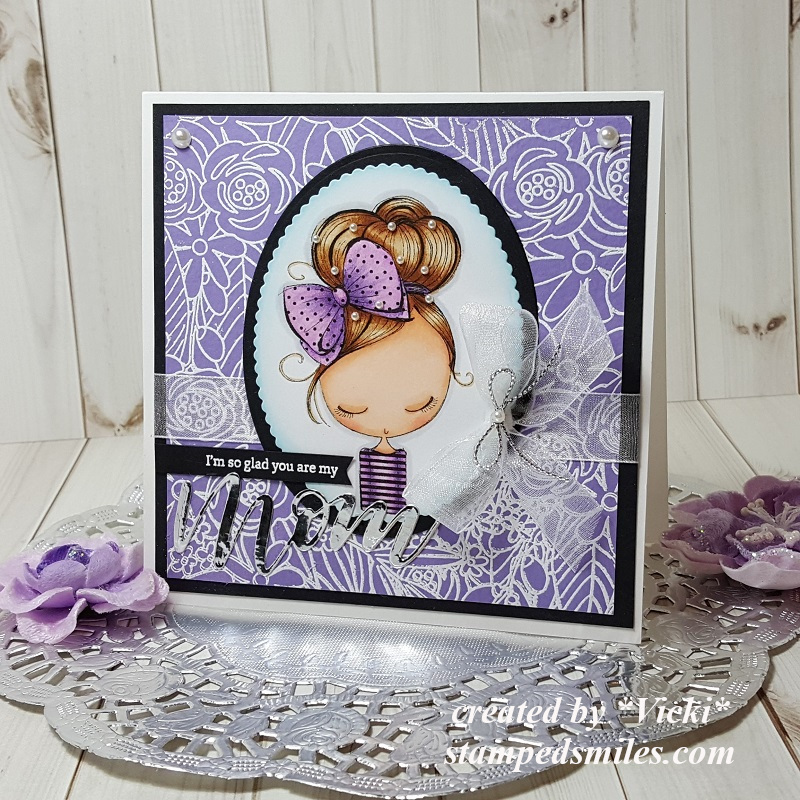
The sponsor for this week’s challenge over at Cute Card Thursday is All Dressed Up Stamps and I have used this cute image from the store called “New Hair Do” for my card today. Now although she does already have a bow tied to her hair, I thought this was a good opportunity for me to pull out some of my ribbon and actually tie a bow! I thought this image would make for a wonderful feminine/Mother’s Day card too.
I started out by white heat embossing a piece of purple cardstock with a Simon Says Stamp Background stamp called Flower Explosion. The sentiment on the black banner was also white heat embossed and placed over the design right above the “mom” sentiment that was die cut with silver mirror cardstock. I layered the purple embossed panel over a piece of black cardstock.
I ran a piece of white organdy ribbon around the two layers and then added the oval cut image panels onto the card front. I added the tied bow with the organdy ribbon off to the right side and then layered another bow I tied with some silver cord and then topped that with a pearl accent. All of these layered were attached to a 5″ square white top folding card base.
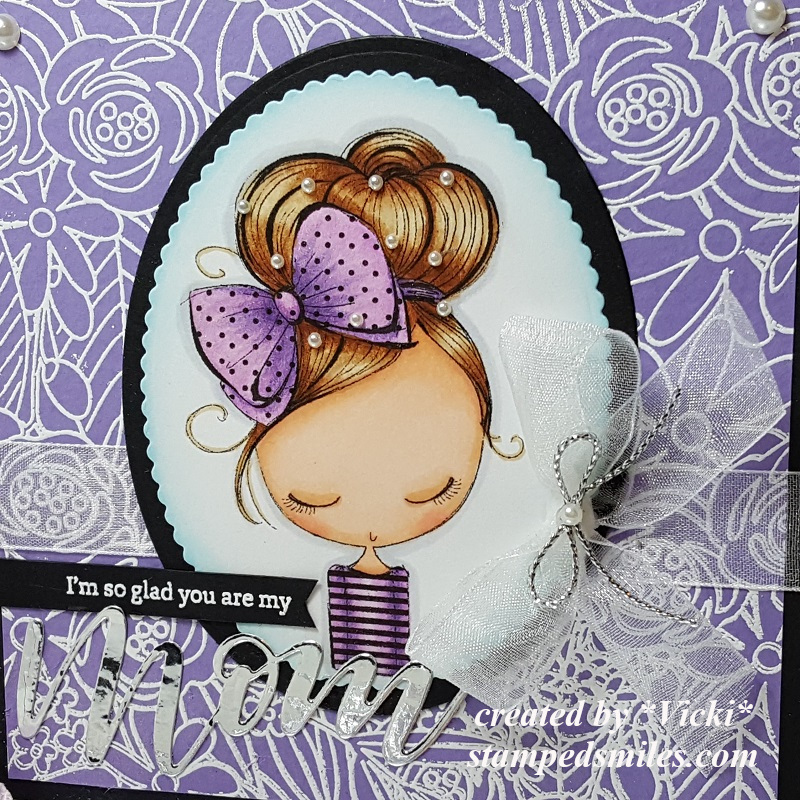
Here’s a closer look at the coloring of the image. I’ve used Copic markers to color her in with and brushed some Wink of Stella over her bow. (Which is hard to see of course!) I’ve also taken some tiny pearls and randomly added them to her hair.
The ovals were cut out with the Tonic Studios Basic Oval dies and then I also sponged some Tumbled Glass distress ink around the edges of the scallop image panel before attaching it to the black oval panel.
By the way, I have chosen the color theme purple for my card today as it’s my favorite color. I have actually used many of my favorite items for this card, so I hope you’ve enjoyed it too! (Purple, ribbon, metallic, heat embossing, die cut sentiment, Copic coloring, pearls, florals, background stamps…I have too many favorites! LOL!) Do you have lots of favorites too?
Hello friends! Hope you are having a great week so far!
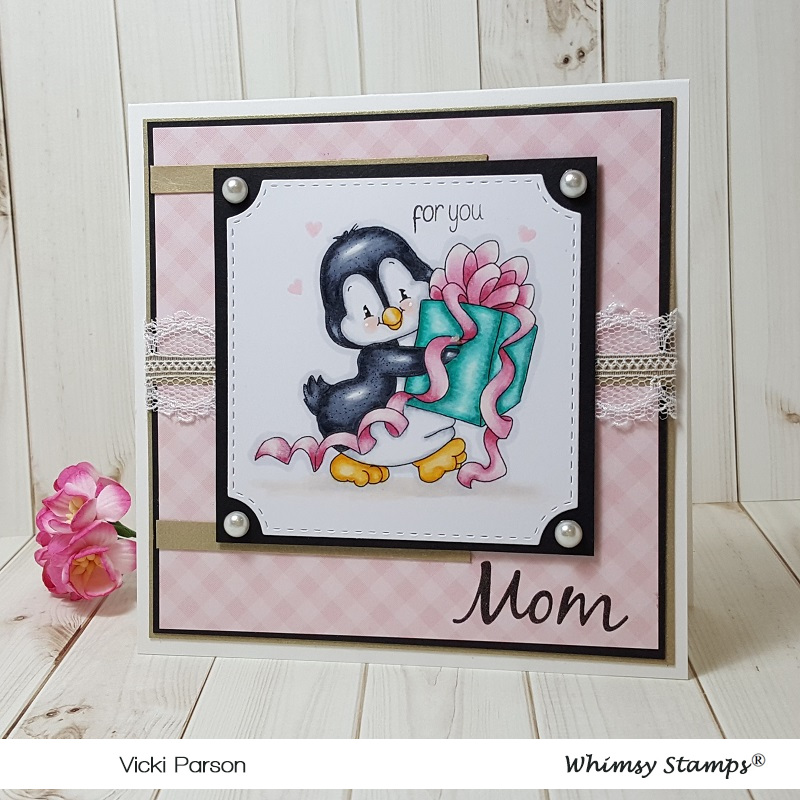
Today starts a brand new challenge over at Cute Card Thursday! The theme for our challenge this week is an easy peasy “Anything Goes” theme! Whimsy Stamps is also our sponsor this week and I have used one of the brand-new May digital releases for my card here:
This really SWEET penguin by Crissy Armstrong was previously released as a rubber stamp and now it’s available in digital format too! I’ve used the Penguin Prezzie digital stamp on my card here along with some other Whimsy Stamps products!
The image panel was cut out with the Whimsy Stamps Notched Squares Dies Set and mounted over a piece of black cardstock. I added some pearls in each corner. For the tiny hearts and the “mom” sentiment at the bottom, I have used the Whimsy Stamps Mom’s Layered Flowers clear stamp set. I stamped the tiny hearts around the penguin with some pink ink and the “mom” sentiment at the bottom over the pink gingham paper with black ink. I also stamped the sentiment ‘for you’ with black ink on the image panel from the Whimsy Stamps Everyday Mini Sentiments clear stamp set.
I found some soft pink gingham paper to use and mounted it over another piece of black cardstock and another piece of gold cardstock too. After adding the ‘mom’ sentiment, I took three strips of gold cardstock to add for accent pieces and then added some lace in the center strip that I wrapped around the card front panel. I attached these layers onto a white 5×5 top folding card base. The penguin image panel was popped up in the center with some foam tape.
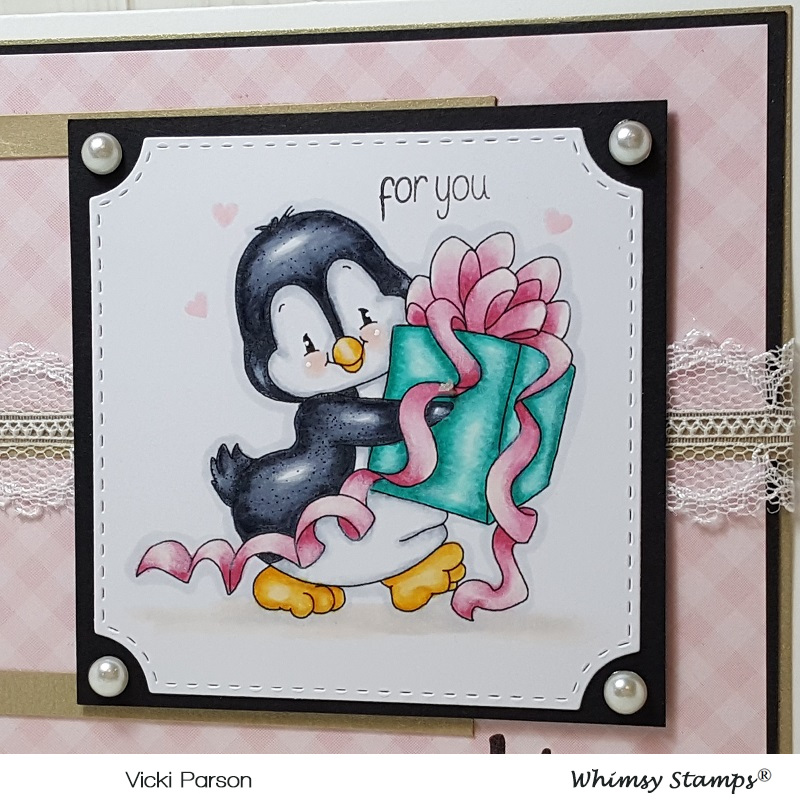
Here’s a closer view of the coloring I’ve done on this image. These penguins are so fun to color! I have used the following Copic markers on my image:
penguin – C8, C5, C3, C1, blender, YR24, Y15, Y11
present – BG45, BG13, BG10
bow – R85, R83, R81, R00
ground shading – C1, E0000
Although I think you could use this cute penguin image for a birthday or even Christmas, I thought since we are in the month of May, it would be a great card to send to mom! All you need is to make it with a few feminine colors along with lace and pearls for accents!
Thanks so much for stopping in today and I appreciate your kind comments so much!
First, I just want to say THANK YOU so much to everyone that has joined along with the “Purple Day” blog hop! I’m really thrilled that you have taken an interest in it and I can see from your comments that it’s working and bringing new awareness to some…really love that and appreciate your kind thoughts as well!
So today brings us to Thursday and that means it’s time for a new Cute Card Thursday challenge!! Yay! The theme for this week is “feminine”! This is a great opportunity to make a card for that special gal in your life, so I hope you will join along with us!
Here’s the card I made for the challenge:
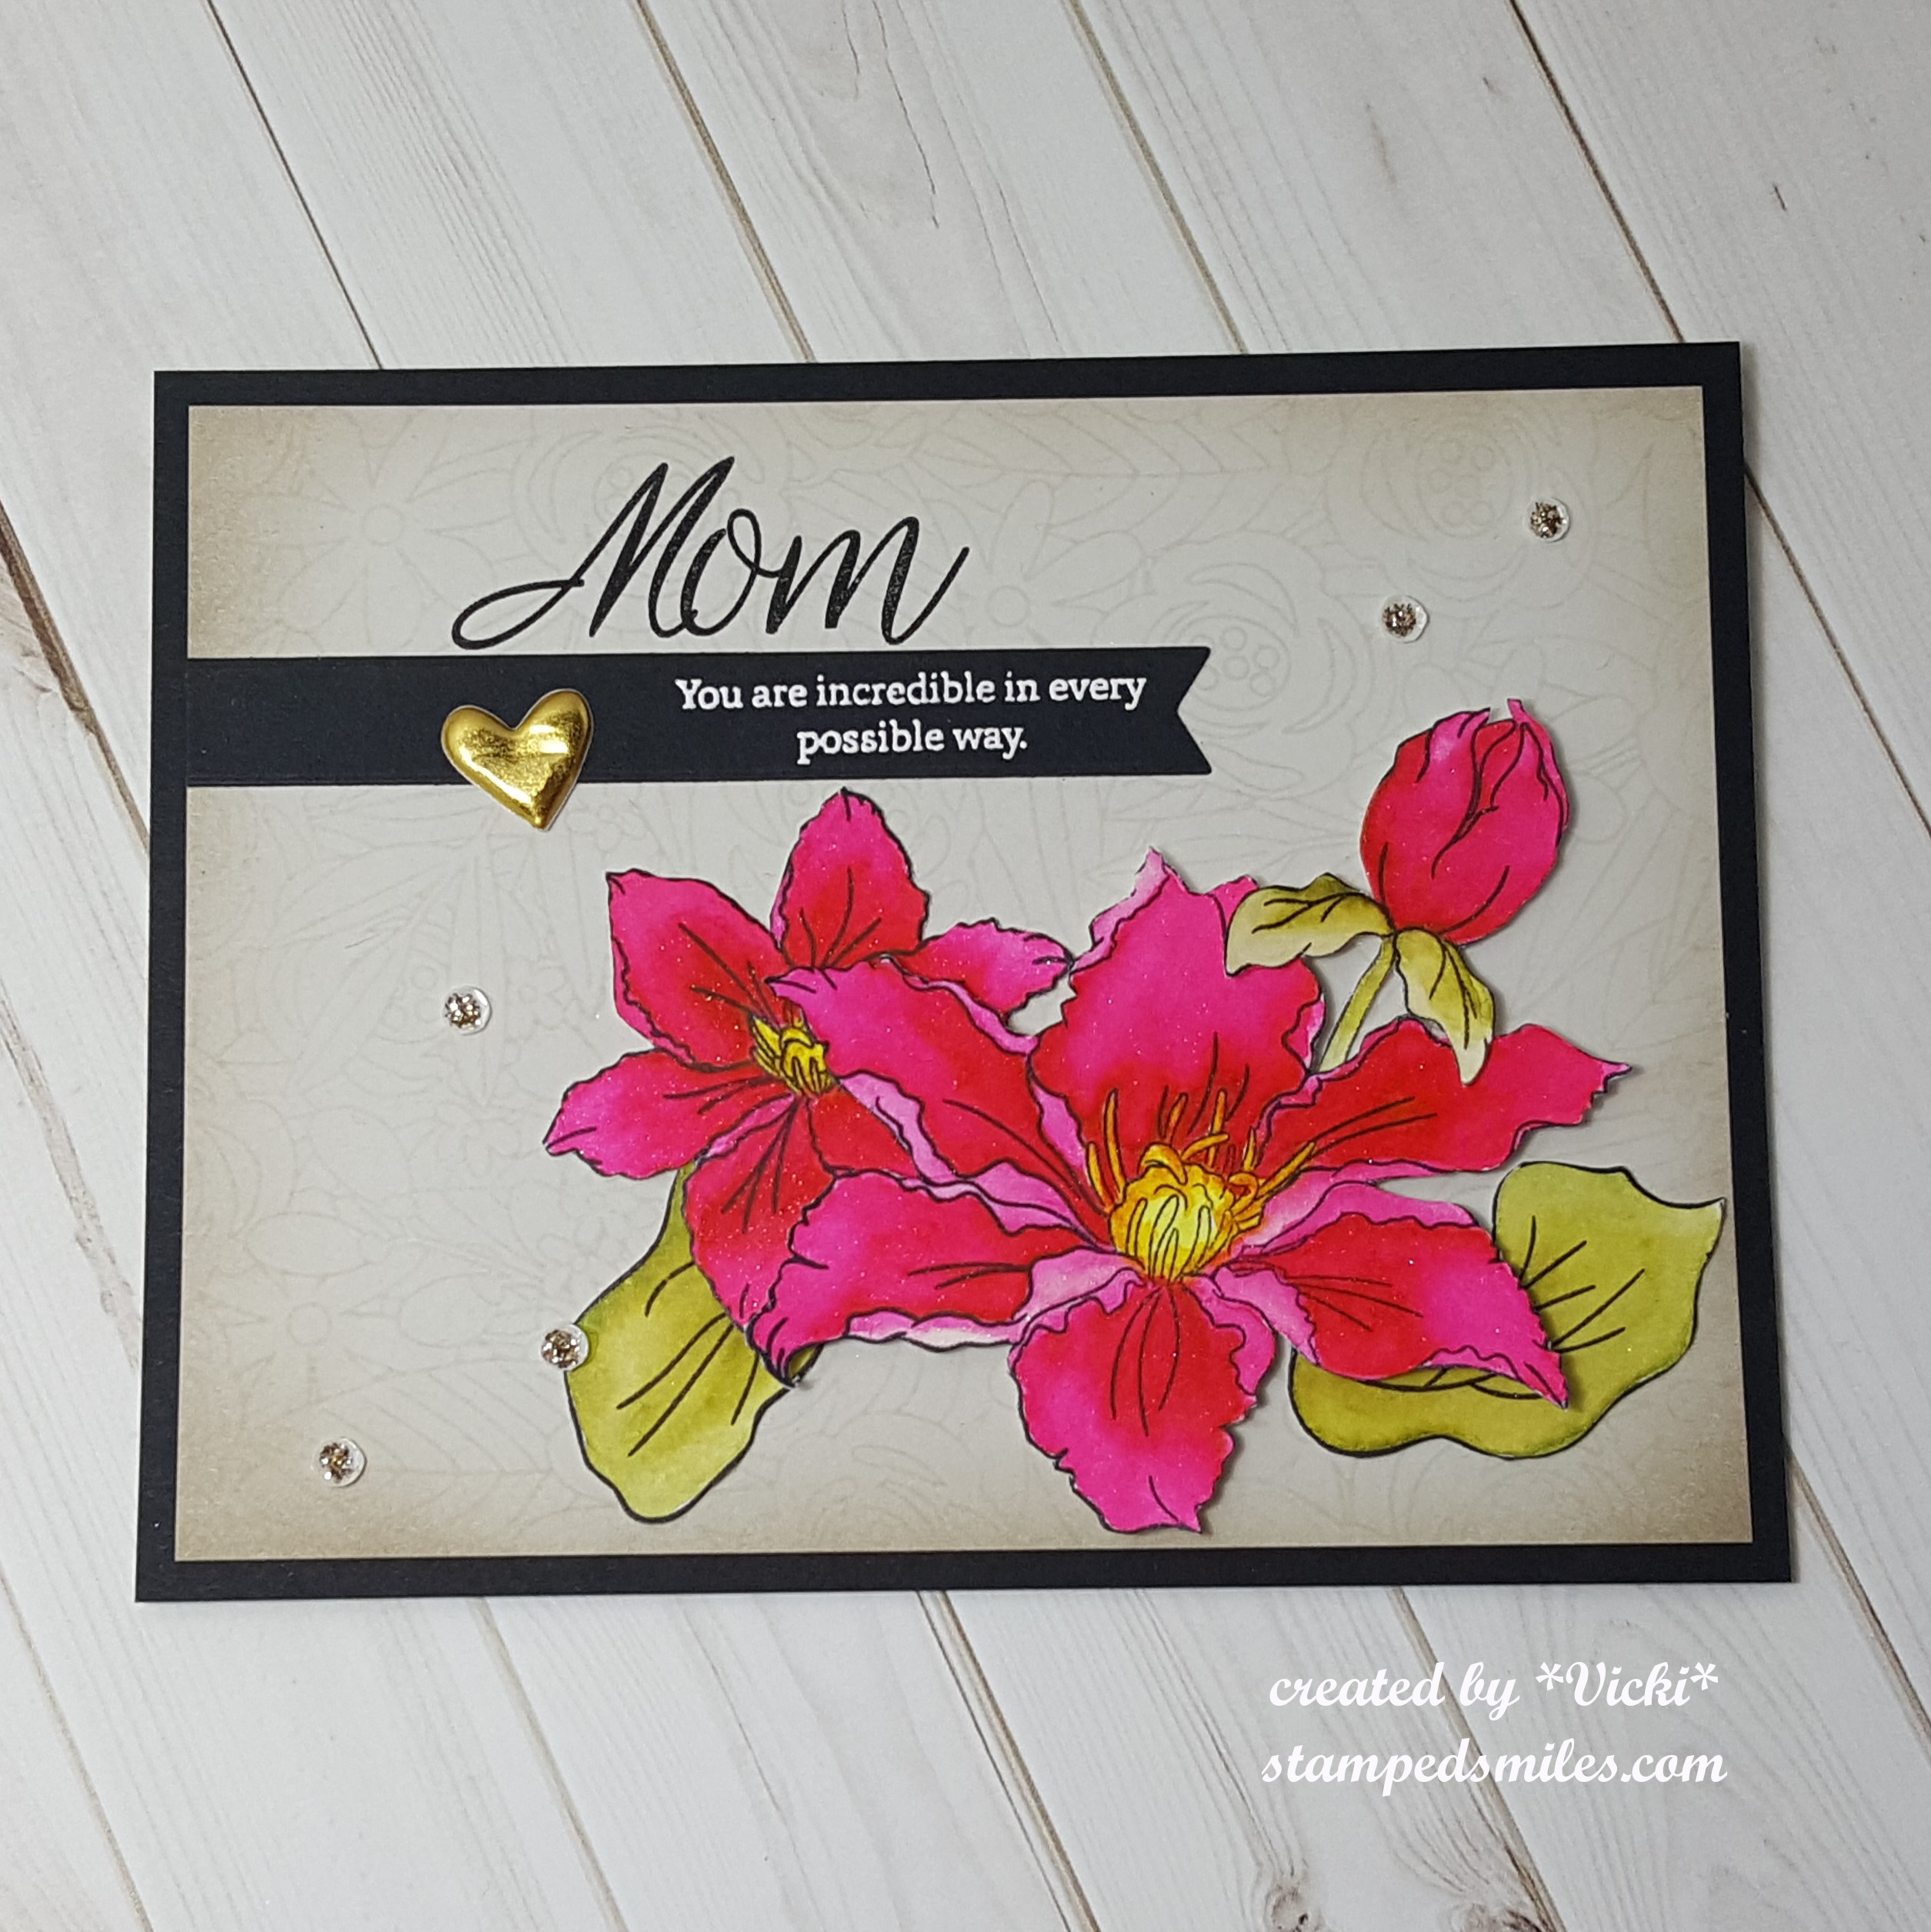
Well, I don’t know about you, but I have “collected” several card kits because…well…they ALL look amazing when they show them off!! ha! I have grown a wee little tired of all of the boxes/envelopes full of card kit product that I’m not doing anything with, and I tend to leave EVERYTHING in the box together and then forget about some of the products that are in there! {sigh} So I was thrilled to pull this one out to make a card!
Anyway, I have used the Simon Says Stamp April 2018 “Mother’s Day special edition” card kit for this. It came with a pretty floral background stamp called “Flower Explosion” that I’ve stamped with the same ink as cardstock in the background and then sponged around the edges. I stamped the “mom” from the stamp set in black and then made a banner by white heat embossing the other sentiment underneath.
A close up of the flowers here that I’ve stamped out from the SSS “Mom’s Clematis” stamp set over some Bristol watercolor paper. I’ve used the Zig Clean Color Brush markers and a water brush to color them in with and then fussy cut them out to arrange over the stamped card panel. As you can see in the photo, I have covered the flowers with a Spectrum Noir Glitter Brush Pen. (You have to get that just right in photo to show up!) I used some foam dots to pop up the bud and largest flower.
And then to embellish it up a bit, there were some pretty gold puffy stickers in that kit, so I took a heart and placed it next to the sentiment and then added some sequins from the kit and filled them with some gold Stickles. Everything was mounted over a piece of black cardstock which was then mounted over a top folding A2 sized card base the same color as the image panel.
Please do hop on over to the Cute Card Thursday Blog and check out the rest of the inspiration from the design team and play along with us!
Thanks so much for dropping by and I’ll see you soon!