Hello friends and happy Wednesday! Today starts a new challenge over at the Sparkles Monthly Challenge Blog and this time we would like to see your CAS (or “clean and simple”) creations! I hope you will hop on over to see the inspiration from the team and consider joining in the fun with us!
Here’s the DT creation that I’ve made for it:
Sometimes I feel that CAS can actually be even more difficult than regular cards and I struggle with thinking I’ve added too much, or it doesn’t look right. I think it’s more of me over-thinking something, though!
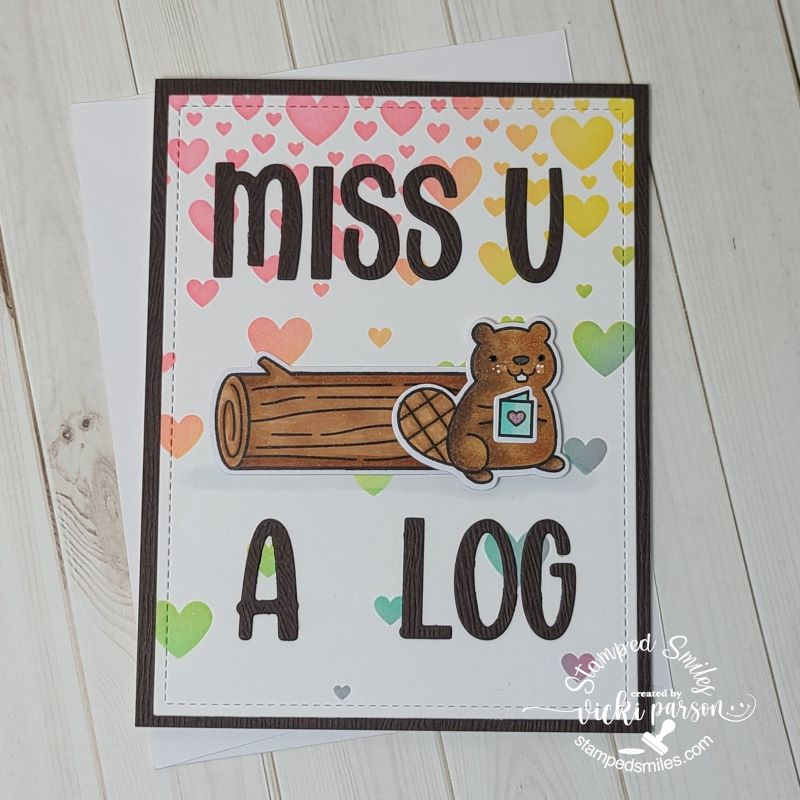
It was my son’s birthday yesterday and I thought this would be a great opportunity to make a card for him. He’s a postal carrier, so I thought this cute owl from the Lawn Fawn Special Delivery would work great for this. I started with the LF Stitched Cloud Backdrop and the LF Stitched Rectangle Frames dies to create the main focal panel. I lightly blended some blue ink in a circle before adding the Copic colored postal owl popped up with foam.
Over some red cardstock, I white heat embossed the sentiment. (I don’t remember which LF stamp set it came from) I die cut it with a banner die and popped it up over the cloud panel. I also had an extra die cut heart lying on my table, so I thought it would be great to add with the owl.
Thanks so much for stopping in today! Hope you’ve enjoyed my CAS card and have been inspired to join us this month with your take on the challenge too!
Hello friends! Welcome to March! Although it’s still cold and even some snow coming in our forecast, I know that warmer weather is coming soon along with those pretty flowers! I have a full weekend of crafting coming, so I’m prepared to get through this cold snap!
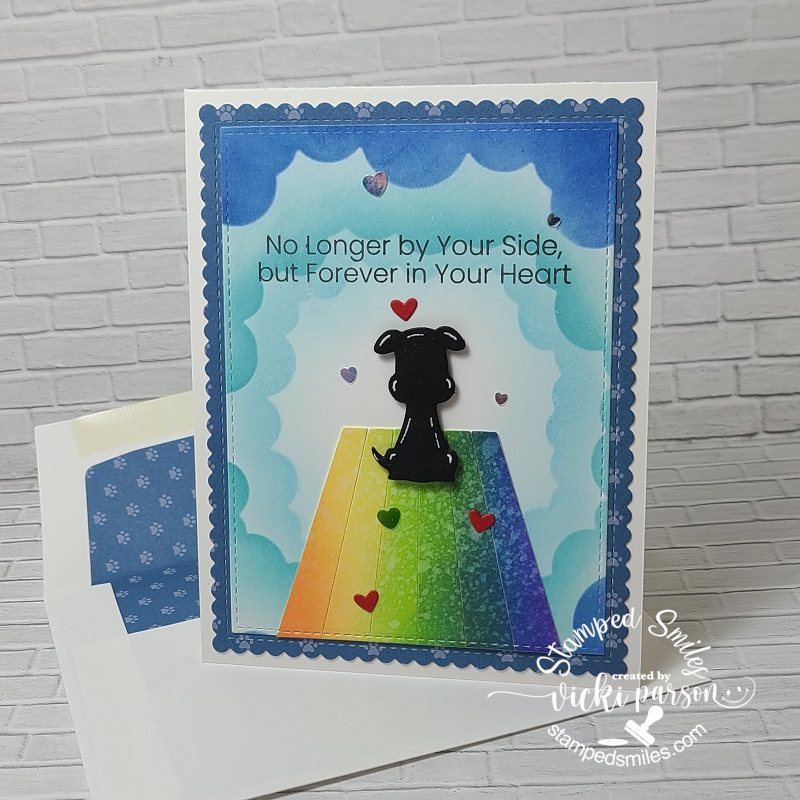
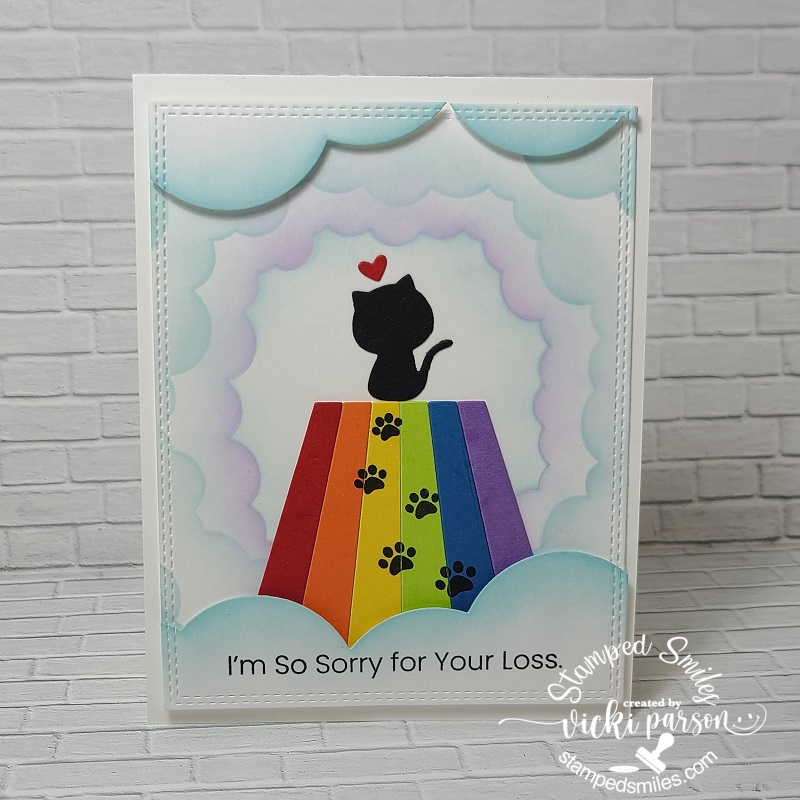
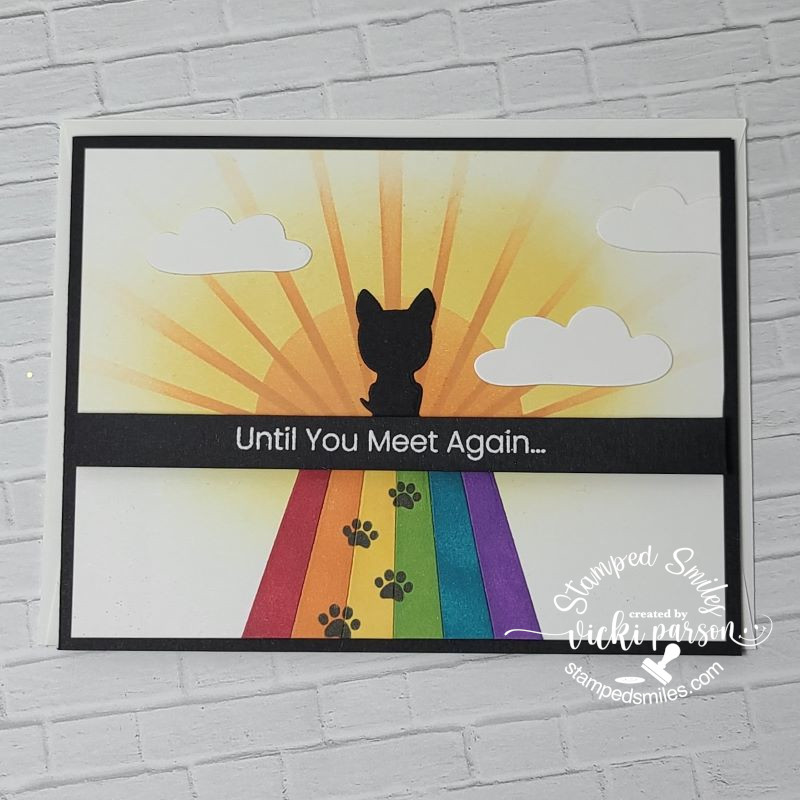
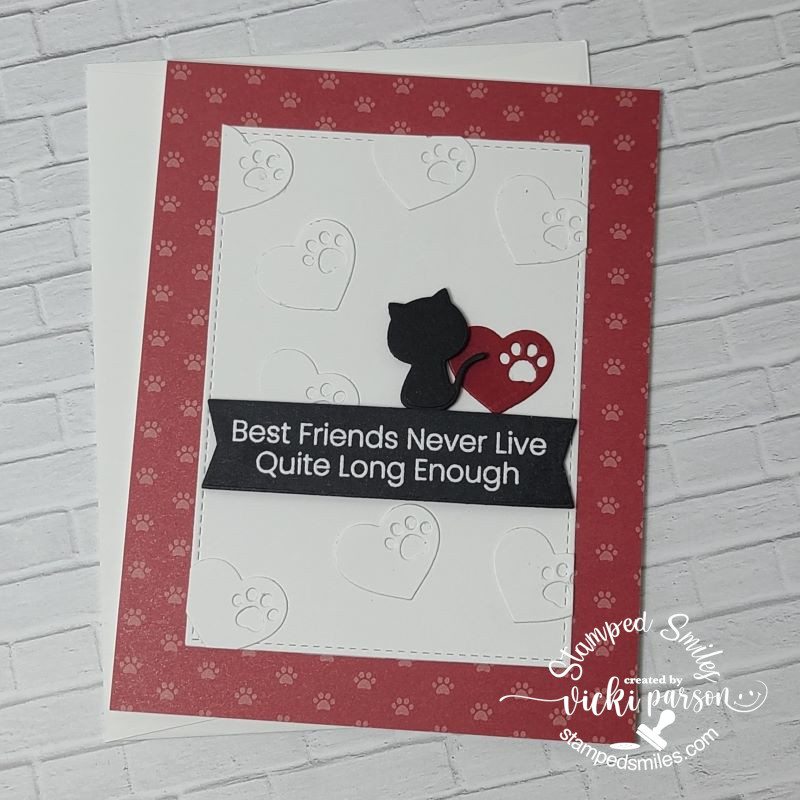
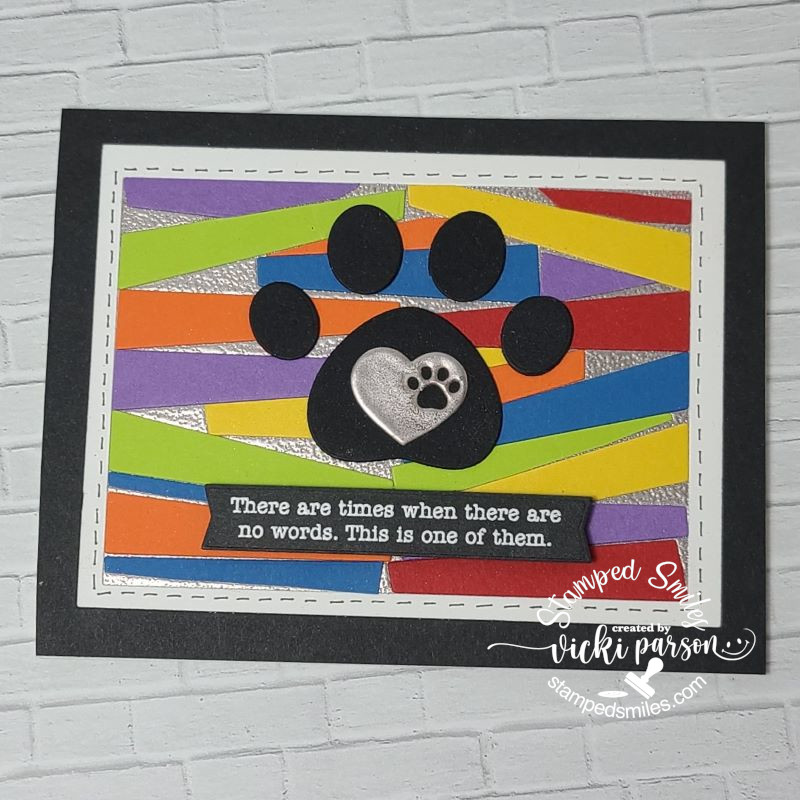
So, I have unfortunately had to make and send a couple of pet sympathy cards as I didn’t have any on hand. I decided that I needed to pull out a card kit from My Favorite Things called “Rainbow Bridge“, I think. It’s no longer available, but I know they have a few things in pet sympathy. I wanted to make sure that I still had some of these on hand when needed because I feel like these can be hard to make.
This card was made and sent out in January for someone who lost their precious fur friend. I thought the silhouette looked a similar shape to the photos I saw. I’ve used the stencil and dies that came with the kit along with some of the papers included in the kit with the paw prints. I’ve also used the same papers as a liner for the inside of the envelope that you can see in the photo.
I’ve ink blended some rainbow colors and then used the die set in the kit to make the rainbow bridge and added some hearts around the silhouette pup which was popped up over the rainbow bridge.
I also needed to make a kitty one and then just decided that I was going to use this card kit to make several of these different pet sympathy cards so that I had some on hand when needed. I thought that was a clever card kit and knew it would be very useful to create lots of pet sympathy cards with.
These are all in the gallery below, so if you’re on my website, just click on each photo to enlarge the size so you can see the details:
Sometimes it’s just good to sit down and craft to have some cards on hand that you know you’ll probably need at some point, but don’t want to hurry to try and put something together because you need it.
Hope you’ve gotten some inspiration in my post today or found some inspiration with it. Thanks so much for stopping in today!
Hello friends! Hope that you’ve had a wonderful Valentine’s Day and a great start to this new week in February!
I’m really excited to share that I’ve just been invited as a new design team member over at the Sparkles Monthly Challenge Blog! I really like the fact that it has fun monthly themes to get you thinking and also that I can use up my never-ending piles of my own craft stash! This fits perfectly well with me and something I can handle!😉 So I hope you’ll stop by and follow along to play with us each month! You can find a new one on the 15th of each month.
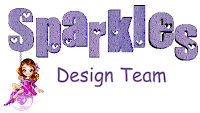
Today starts a new monthly challenge theme which is #161 “Men Only“…so anything masculine will do! With having sons in my family, I’m always in need of masculine style cards for sure! Here’s my card for this month’s challenge:
Oh yes…tools! This always seems to be a favorite in my craft supply when creating a masculine card for sure! I made this one for my husband who’s a very handy guy, and he likes the color blue. I always like to add lots of textures, distressing and layers when making a masculine card. This also helps for using more of those craft supplies!
I’ve had these stamps and dies from My Favorite Things for quite a while now and only used them a couple of times. I die cut the background panel in the pegboard cover die and stitched rectangle dies, plus, layered with a couple of different blue panels that were stapled together. A die cut circle in woodgrain and blue papers were attached and cut off at the edge before attaching to the top folding white A2 card base.
I’ve added the die cut tool elements over top of the circle using some silver mirror and blue colored cardstocks to cut them out. I added some sponged ink over some places and topped it with a ripped strip of silver embossed screw heads, a strip of dark blue and the stamped sentiment stapled together and placed it over top with a piece of “messy” thread. Lastly, I added the dark blue die cut hearts and covered them with a glitter brush pen.
I hope that you will stop by the Sparkles Monthly Challenge Blog to check out the challenge and inspiration from the creative design team! I look forward to seeing what everyone creates!
Thanks so much for stopping in and I’ll see you soon!
Happy weekend friends! It’s almost time for Valentine’s Day which means we share our appreciation to those that we love! I like to make cards that are great for any time of year and hearts are versatile enough to do this without being specifically Valentines. Here are a few cards that I’ve made with this in mind:
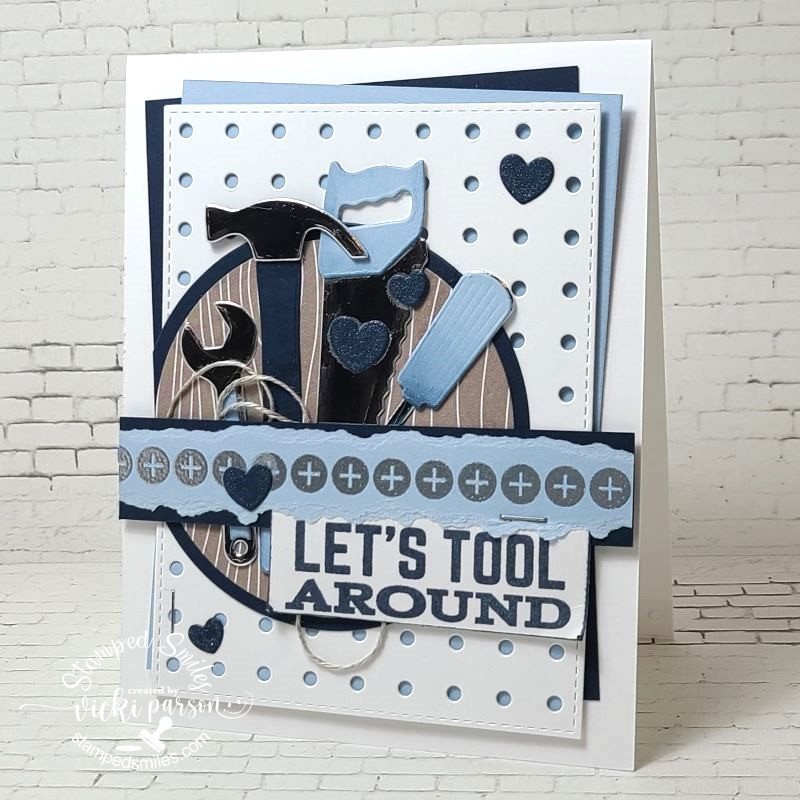
I actually participated in last week’s Craft Roulette #149 and the perimeters were: 1. tissue/vellum 2. collage 3. far away 4. three pops of red. So…while watching, I had decided that I was going for the Tim Holtz Postale Tissue Wrap that was already collaged with images. I decided because of the collage images, that I was going to find an airplane image to use with it and my thoughts turned to an older Simon Says Stamp card kit I had with the “Home Sweet Home” stamp set. I white heat embossed the airplane, the long building strip and the sentiment over black cardstock. It seemed to lend itself to a slimline card design, so that’s what I went with and used collage medium to attach the tissue to the background. Once it dried, I glued the die cut buildings strip and went around it with a Big Brush marker that I smudged to create the shadow effect.
I made a banner with the sentiment and attached a white string to the back and tied a bow with it to the airplane and popped up the plane with foam tape. The collage background panel was layered over a black piece that was attached to a standard slimline top folding card base.
Here’s a closer view of the details so that you can see them a bit better. My “three pops of red” came from 3 hearts that I cut out with red cardstock. The die was from the coordinating set with the stamps. I attached them around the airplane and covered them with a glitter brush pen.
If you’re interested in seeing what the Craft Roulette is all about, you can check them out live every Friday night around 6:00 pm CST. I will be doing this tonight as well! It’s just something fun to get your crafting thinking and I love that I can pull out my stash and use it up!
And of course I couldn’t help but follow along with the Lawn Fawn Create With Us “Wood You Be Mine?” class! There’s a little inside joke about Woodchucks chuckin’ wood with my son and I couldn’t resist sending him one of these cards. (CLICK ON THE PHOTOS ABOVE TO SEE THEM LARGER IF YOU’RE ON MY WEBSITE)
I just pretty much followed along with the same design as they shared in class with the exception of the background stencil. I didn’t have the same one they used, so I pulled out one from Taylored Expressions that is no longer available. but if you’d like to follow along with the class, you can check it out here.
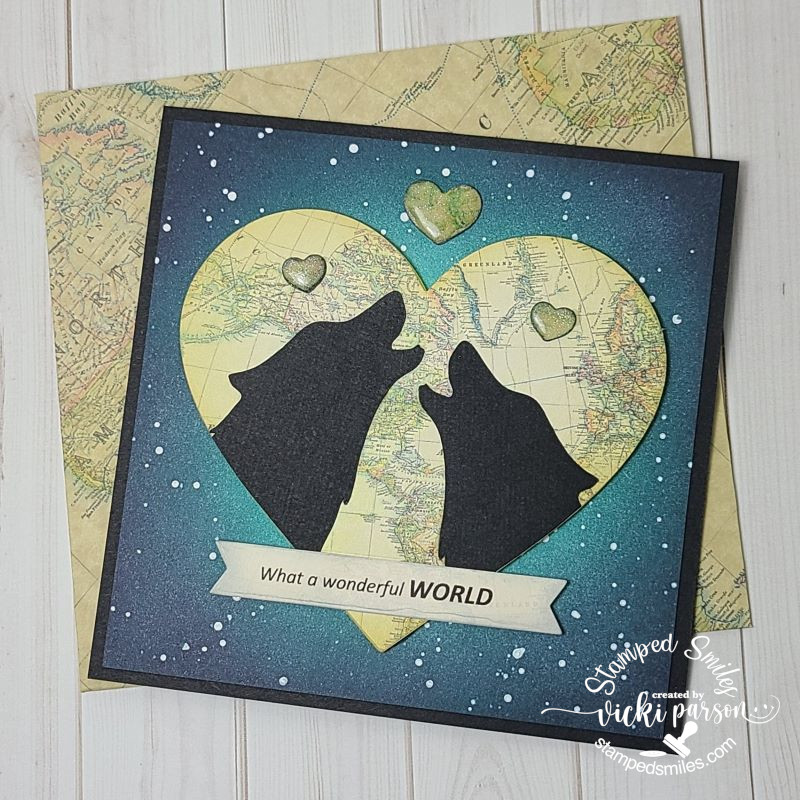
And lastly, I wanted to share a commissioned card that I made for someone that requested a card to give to their partner. Not really too specific other than they liked wolves and the “What a Wonderful World” by Louis Armstrong lyrics somewhere displayed on the design. So here’s what I came up with:
I did not own any stamps with wolves on them, so I turned to my Cricut machine to cut out a silhouette wolf and then I flipped it to cut another one so that they faced each other. I wanted to give the appearance of the wolf couple howling together. LOL I also had some digital map paper that I could print out to use for the hearts as well as making an envelope with it too.
The background was ink blended with the center being lighter toned in blue and then I splattered some white over top for a night sky or an “outer space” looking sky…however you’d like to interpret it, I suppose. I cut a large heart with the map paper and arranged the two wolves over it so that, although it’s the same image flipped, I can make them look like different wolves and then cut off the bottom portions. I popped up the large heart with foam. I also used the same papers to cut smaller hearts above them and added some glitter and covered them with crystal effects to make them shinny. I printed out the lyrics on my computer and cut it out in a banner shape to attach below the wolves.
Hope you’ve enjoyed my “love” creations today and have been inspired in some way! Thanks for stopping by!
Hello friends! Hope your week is getting off to a great start. I can’t believe that January is over and we’re starting a new winter month already, but at the same time I’m already feeling like this cold weather can move along faster to Spring!
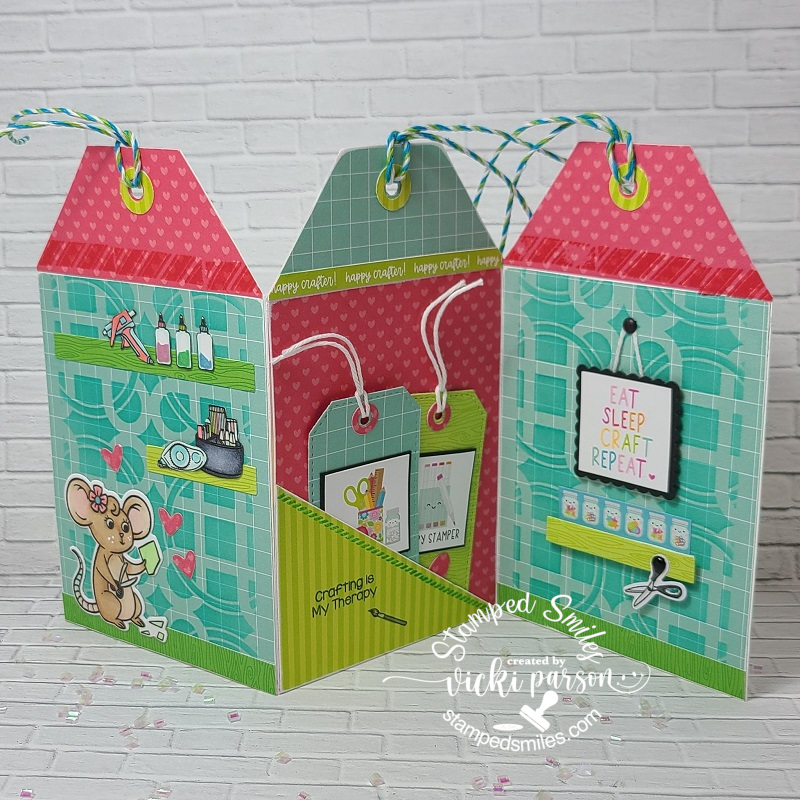
Today I have a couple of creations that I’ve made using those Inky Stamper products and playing a little “Craft Roulette” too! Chelsea was on Craft Roulette and if you’ve never seen it play out in action, take a look at the You Tube channel to see what it’s about! She was on episode #146 and here’s my card that I’ve made with her perimeters:
I had so much fun with this and I’ve never made a tag shaped accordion card before, but it was stuck in my head to give it a try and pull out the Inky Stamper Craft Room set to create it. The “Roulette Wheel” spun on: Double Tags, shelf/shelves, 2 shades of green and something in the background.
The two shades of green were easy with using the Doodlebug Paper Packs and adding in a few other greens to the coloring. I’ve also made two tags and placed them inside the pocket area in the middle of the accordion design. I used a stencil in the background of the other two panels and of course I added some crafty goodies to the shelves in Rosie’s craft room! The accordion card was easier than I had anticipated and just made a mini slim line size design by cutting off the edges to create the tag shape. The hole and reinforcers were made using punches and dies. You can see that I’ve colored up, cut out “Rosie” in her craft room where she is cutting her design going through her creative head!
When it’s all folded up and closed, this is what the card looks like. I could always add a sentiment on the back, but I thought this would be fun to send to a fellow crafter for sure! I just wish my shelves looked this organized! And I always try to use another thing from my stash as I pulled out lots of twine that gets thrown in a bin, so it was nice to use for the tops of each tag area. (Maybe on the back of the card, the crafter can add items to use up on their next project and display it! LOL)
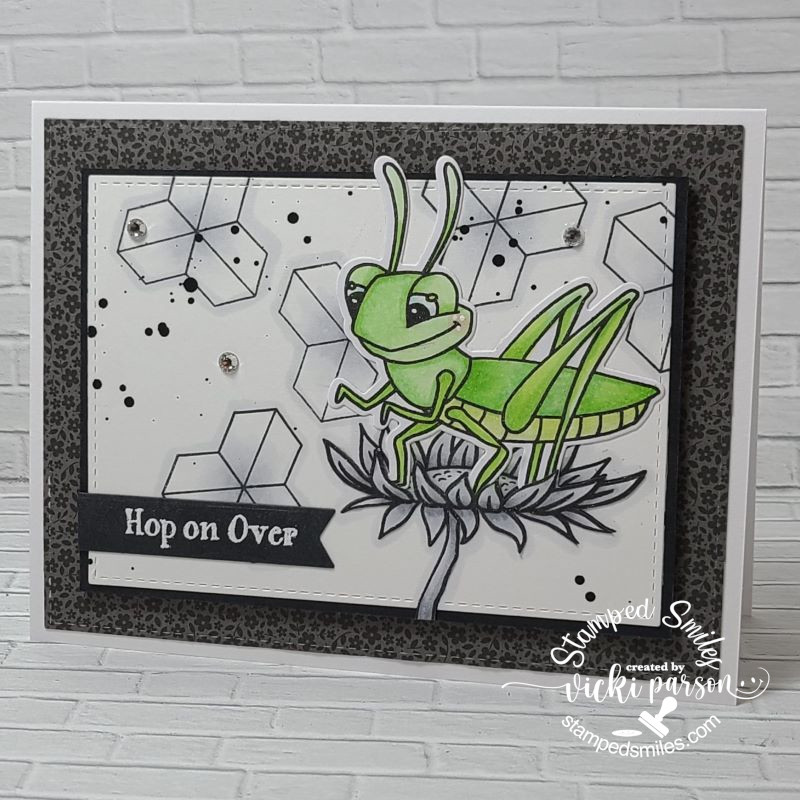
And here’s another card that I’ve done for the January challenge on the Inky Stamper Inkspiration FB Group which was to use: Black, white plus one other color:
I decided to pull out the Grasshopper set and make everything in the background black and white, but just color the grasshopper in green. All of the elements including the sentiment came from the same stamp set. I splattered some black paint over the background and the images were colored with some cool gray Copic markers. I white heat embossed the sentiment over black and cut it out with a banner die.
Behind the white panel, I took a piece of the black floral paper from the Doodlebug Floral & Graph Paper Pad and attached that to a white top folding A2 card base. It was a fun and easy card to put together!
Thanks so much for “hopping” over here today! Hope you’ve been inspired or smiled!😊
We’ve made it to 2023!🎉 Congratulations and a huge welcome! I’m so thrilled to have you with me for another crafty year and honored to be apart of your creative journey in some way.
Towards the end of last year…which was a few months ago…I was asked to create a set of those calendar cards that I had made last January which you can view in my previous post HERE. If you look at the calendars at the bottom of the post, it explains the details. In sharing those, someone asked me to create a set with a particular theme in mind for giving as Christmas gifts.
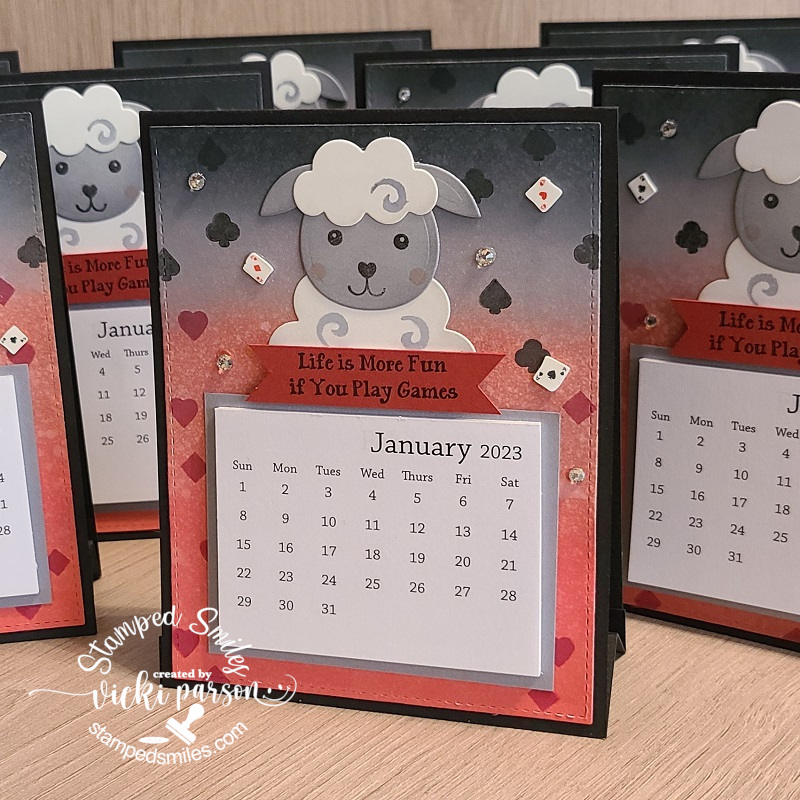
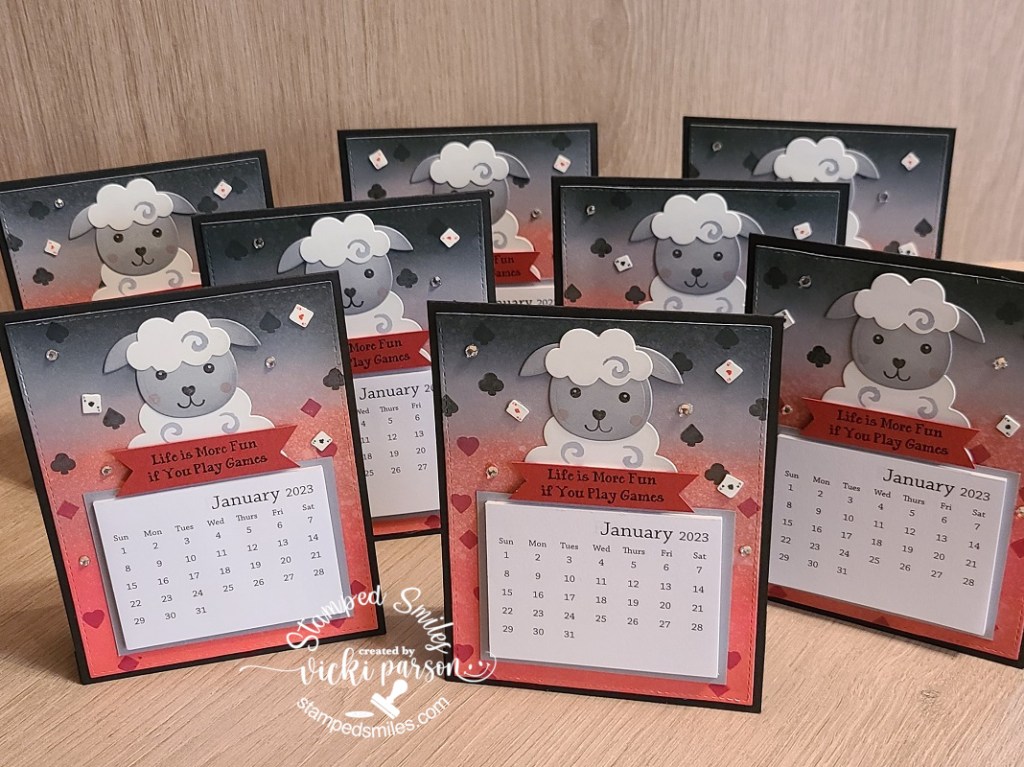
I was given instructions to use a sheep image for their card/game group that call themselves “Sheeples”. 😄 The first one that came to my mind was this adorable little die cut set from Taylored Expressions called Spring Squad Die & Clear Stamp Combo. I love the added stamp set to create the details of the characters! And of course, I’ve also used the TE Mini Tear-Off Calendars.
For the background, I wanted to incorporate some game theme items with this cutie, so I pulled out the fun stamp set from Inky Stamper called Game Night, of course! I ink blended the background panel with some reds and black/gray Oxide Ink colors and spritzed it with water for some texture. Once dried, I added the different “suit” images in the corresponding colors of the suits. I also stamped a sentiment from this same stamp set and die cut a banner with it to pop up under the sheep. Lastly, I’ve added a few Playing Card Shaker Elements and rhinestones.
In total, I needed to create 8 of these calendars and I think they turned out really cute and fun! I didn’t know if there were any masculine members of the group, so I wanted to keep it for use either way and I’m glad I did as it was needed. So, these are each A2 size that can fold flat and fit inside A2 envelopes for mailing if you needed. Then the recipient can stand them up to remind them of their next game night fun throughout the year! She seemed pretty pleased with them, so that was great too! And of course, she received them in plenty of time for Christmas giving, but I’m just now getting them posted.
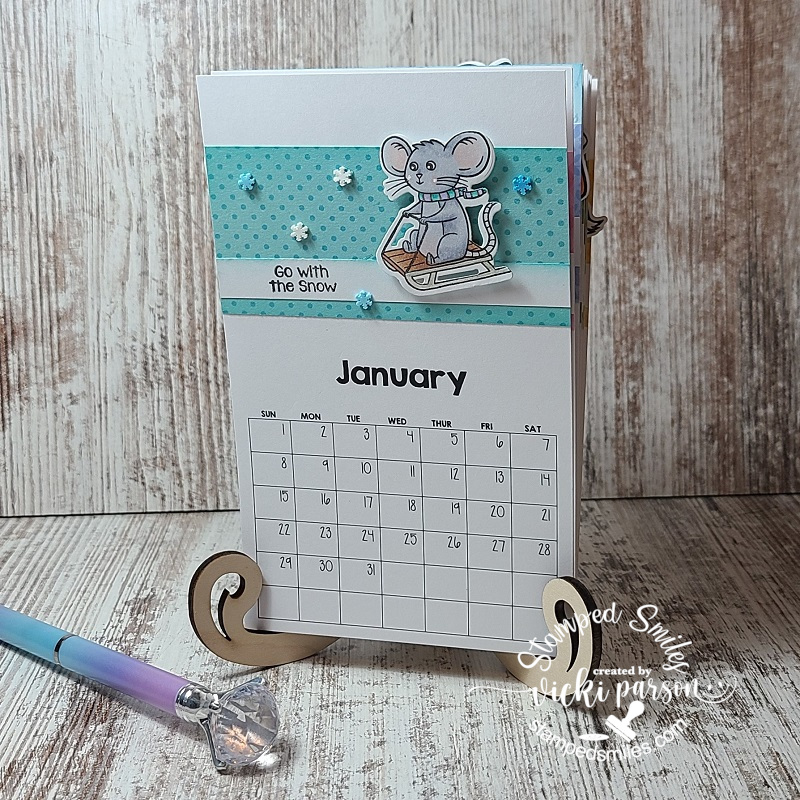
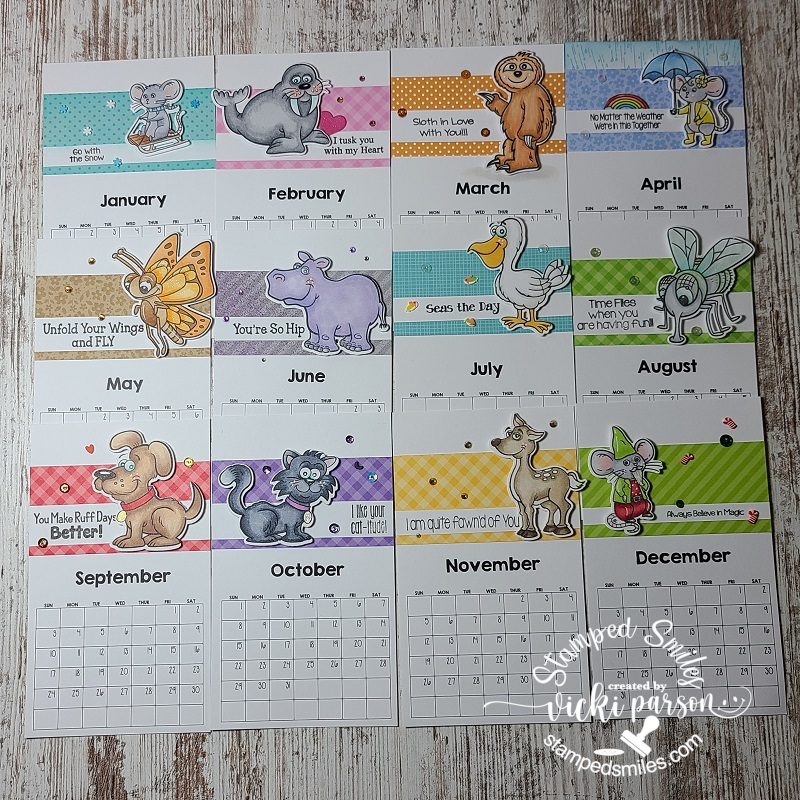
I enjoy creating a new calendar for my craft room every year and there is a fun 2023 Calendar Kit from Inky Stamper that I completed.
Every year Inky Stamper comes out with these calendars that comes with all of the calendar month cards plus pre-stamped and cut images along with a sentiment strip and papers for each month. It also includes some sort of stand to display them on. (I like to use the previous year calendar to make cards with too!)
I was able to get them all colored and assembled for this year and have it displayed on a shelf next to my computer so that I can flip through each month and enjoy. I enjoy taking the time to sit and color especially with it being cold and snowy again over my way.
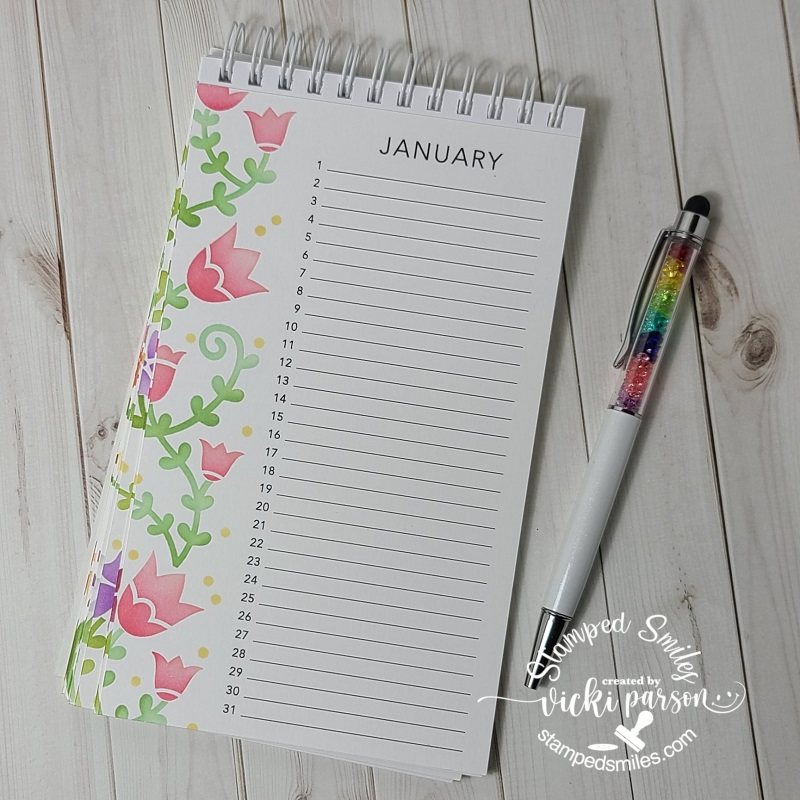
And since this post is all about calendars, I thought I’d take the time to complete TWOPerpetual Occasions Calendars from Taylored Expressions that I had gotten sometime last year for gifts and never got around to finishing them up.
I’ve just turned it to January to show, but you can see the other pages of the calendar on the bottom corner that were all stenciled up similarly. The link above takes you to the class kit which includes the TE Perpetual Occasions Calendar, the TE Calendar Coil plus the video class instructions from Taylor on how to put everything together. You can also get the TE Floral Vines Layering Stencils that work with this calendar which I’ve used with these that I made.
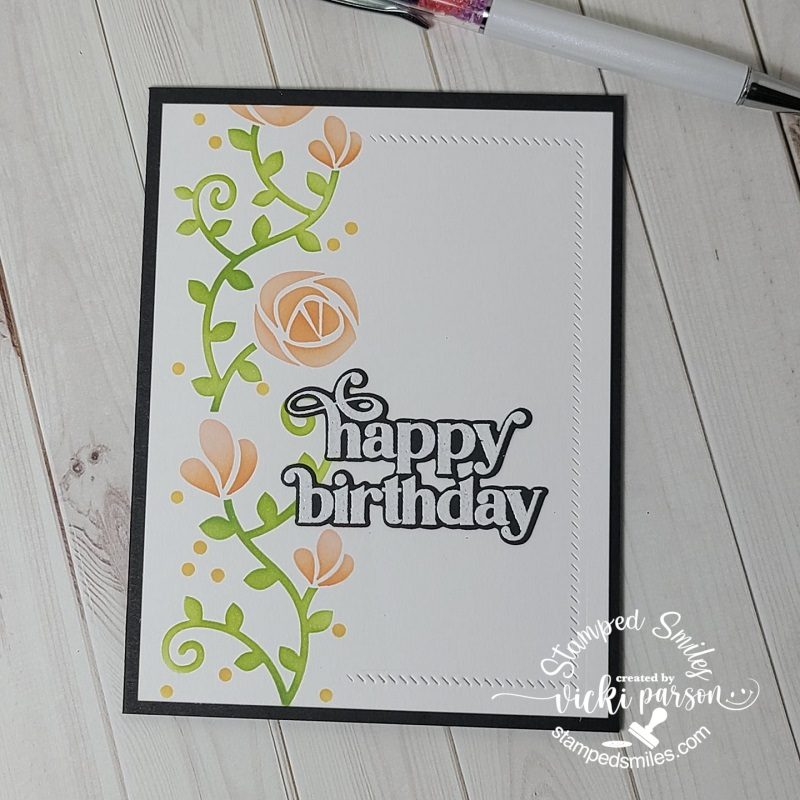
And of course, you can also use these same stencils to make a pretty card too! I’ve taken the same stencils that I’ve used on my calendar and made a birthday card. I took the instruction from Taylor’s class and applied it similar to my own card using the TE Diagonal Stitch Rectangle die to partially cut one side of the stenciled panel. I also pulled out the TE On Occasion stamps & dies to white heat emboss over black and cut out over the front of the card.
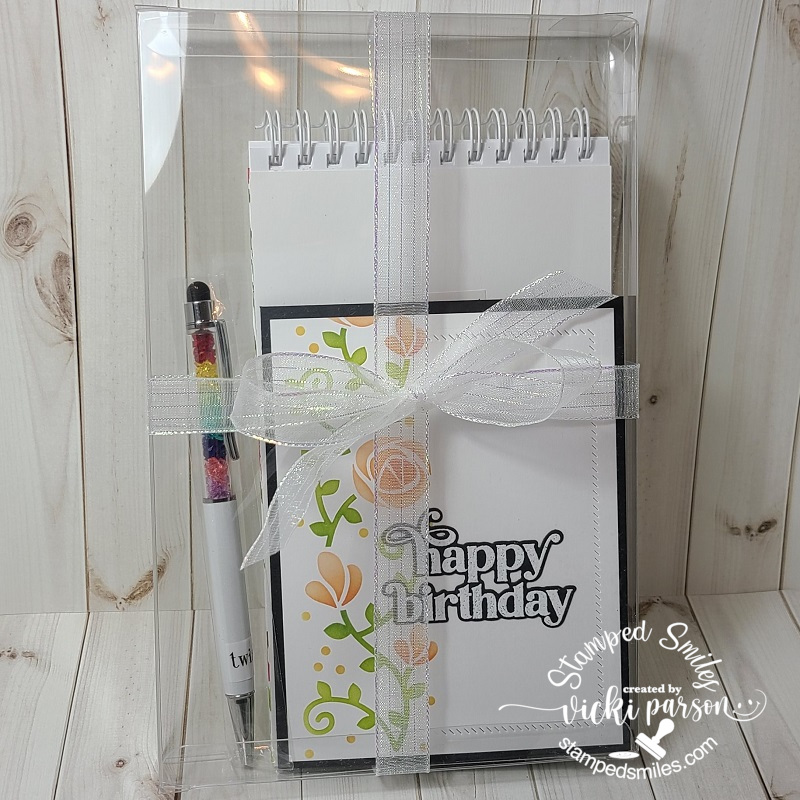
And then after creating two sets of the perpetual calendars and birthday cards to match, I’ve added a rainbow pen that I had previously purchased from Taylored Expressions (no longer in the store) and placed them all inside these TE 5×8 Clear Calendar Boxes. I pulled out some ribbon in my stash and wrapped it around the boxes. I now have two completed birthday gifts with cards this year! Yay! I feel like I’ve accomplished something ahead of time for a change!
I hope you’ve enjoyed my New Year calendar post today and have been inspired to start getting crafty! Thanks so much for stopping in and I’ll see you soon!
Challenges:
Creatalicious – Anything Goes optional something new (new calendar kit for 2023)
Hello friends! Hope that you had a wonderful Thanksgiving with grateful hearts and full tummies! Today is another tradition after Thanksgiving which is the “Black Friday” deals! So, I wanted to share something fun with you today and I strongly encourage you to head on over to the Inky Stamper Storeto see all of the wonderful Black Friday deals that are going on!
In honor of Black Friday, I have some inspiration using this NEW Freddy Solo:
And of course, what’s better than a good “Black Friday” deal than a black frog to go with it?!! It was proposed to have Freddy Solo the Frog colored up in black, so I took on the challenge and made a fun monochromatic card with him. I think he turned out cute!
I found a sketch (linked in challenges below post) and used that for inspiration in creating my card with him. I’ve used several different patterns for my papers from the Doodlebug Buffalo Check/Woodgrain and Gingham/Linen paper pads which are also sold in the store as well. I’ve used some for the card front panel that was layered onto an A2 black top folding card base. I’ve layered some silver foil papers with the pattern papers for the image panel that was lightly sponged with black ink. I wrapped some silver cord around the image panel, white heat embossed the sentiment with Freddy over a piece of the pattern paper, popped up Freddy with foam squares and finished off the design with some Picket Fence Day and Night Gems.
Here’s a closer look at the Black Friday Freddy and how I’ve colored him up using Copic markers in the cool grey tones. I’ve also added a highlight on his eyeballs with a white gel pen and then I emphasized the “dots” on him with a black gel pen. You can see it looks a tad bit shinny and raised on the dots.
Really hope you’ve enjoyed my Black Friday card today and are able to take advantage of the fun deals this weekend! So hop hop hop on over there and shop! Have a great weekend and I’ll see you soon!
Hello friends! I’m really excited to be sharing some more inspiration today as a guest designer this month using some brand-new Inky Stamper stamp sets that were just released! Stop by the store and check them out…they’re so cute!
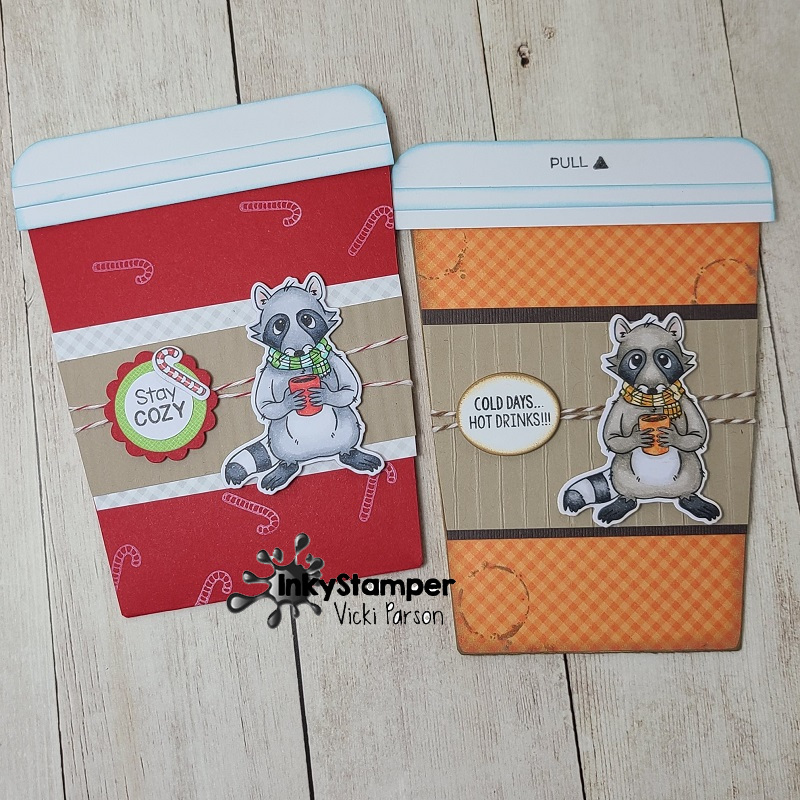
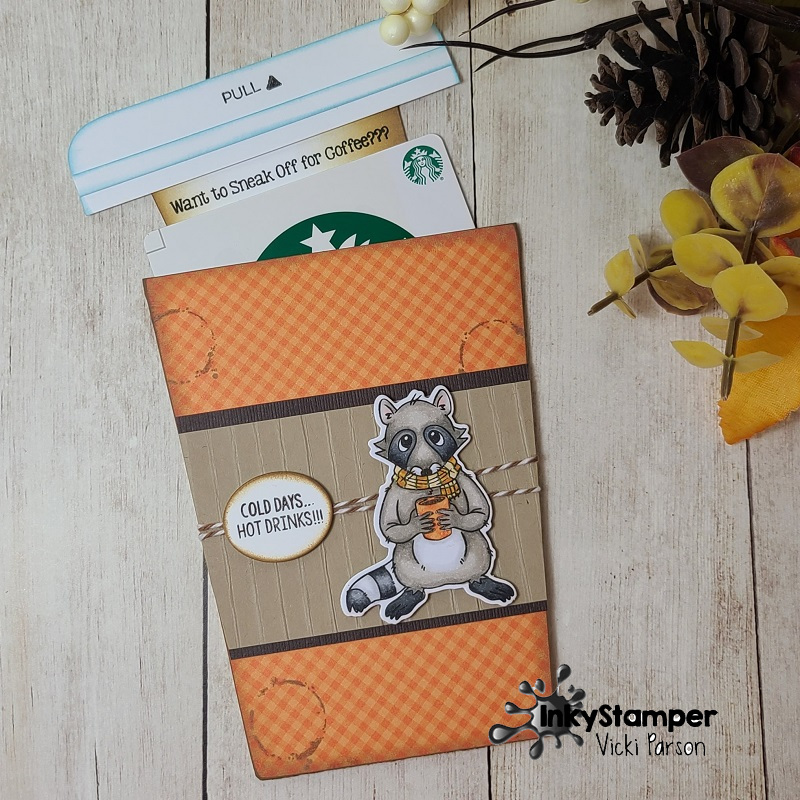
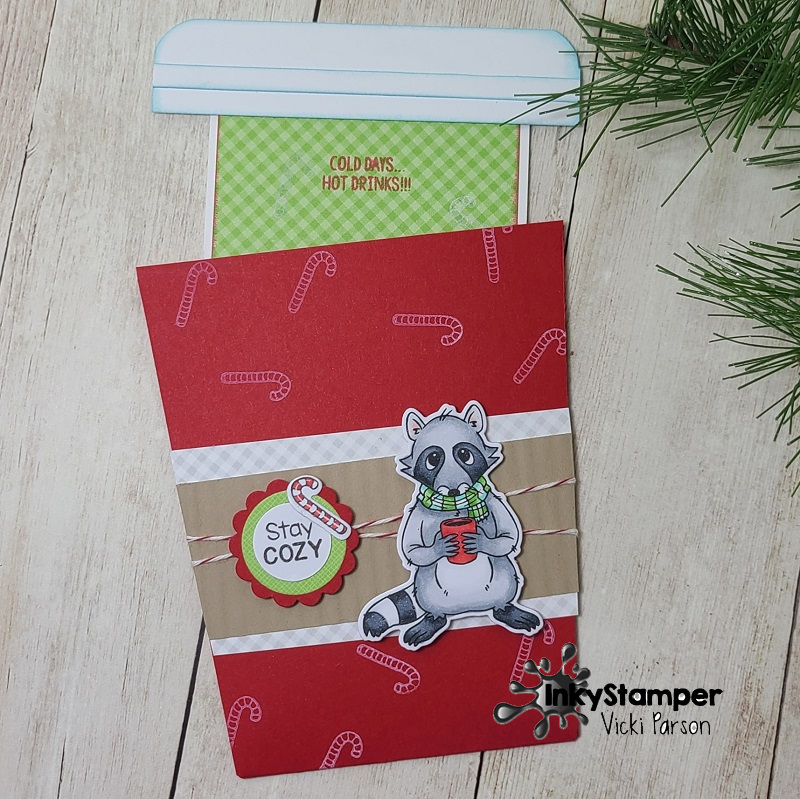
First, I have a couple of shaped interactive cards for those warm drinks as the temperatures start to cool down. I made one for Autumn and shared it in the Inky Stamper FB Group and was asked how it I made it, so I thought I’d share that one along with another Christmas style version that I made too:
Aren’t these so cute with that little raccoon from the Inky Stamper Warm Beverages stamp set?! The one on the right is the one I made with Fall colors covering the front of the cup with the Doodlebug Gingham/Linen paper pad. I also used the Doodlebug Bon Bon Twine around the cup sleeve.
The cup on the left is more Christmas themed and I’ve used pretty much the same products, but just changed up the colors a little bit. This cup is slightly different because it’s about 1/4″ shorter so that it would properly fit inside an A2 envelope. The Autumn card was a bit snug, so I tweaked the size a bit more on the Christmas to make it fit nicely.
When you pull the lid off the top of the coffee cup, there is an insert with a greeting and/or a place where you can add a gift certificate. These were so fun to create and easy to do! Mass production could be possible for sure!
All that is needed are some measurements and a few tips along the way to get you started. I thought it would be easier to understand with a video, so check that out below or watch on You Tube HERE.
I also had a birthday card that I needed to make for someone, so I thought I’d pull out the new Inky Stamper Hippo stamp set and have some fun with it!
Aren’t these party animals so cute?! I thought this one would be fun to turn into a polaroid style, so I pulled out a square die to create my own polaroid frame with it! I also cut another one in black cardstock so that I had a bit of dimension with it. I stamped the sentiment from the set at the bottom of the frame.
The background behind the Hippo was created by white heat embossing the music note image from the stamp set over some Inky Stamper Watercolor Panelsand then using some watercolors for an emboss resist background. I colored up the Hippo, bird and party hat and cut them out to arrange over the background. I added a couple of pieces of the Doodlebug Grey Swiss Dot Washi Tape over top of the Doodlebug Gingham/Linen Paper that was cut out with a wonky stitched die and attached to a white top folding A2 card base. I found a couple of sequins from the Picket Fence Rubber Duckies mix and then filling the centers of them with yellow Stickles.
So many different things going on in this post, but I hope that you’ve enjoyed it and have been inspired to create something too! Thank you so much for stopping in today!
Hello friends and happy November! Really excited to share that I’ve been asked to a be guest designer this month for one of my favorite companies which is Inky Stamper! Yay!🎉 If you follow along with me, then you’ve probably already seen some of my creations using their products. Please be sure to click the badge below to be taken to the store! (The characters are so cute!) I will be adding this badge to the sidebar of my blog here so you can find it if you want to come back to it later.
For my first project this month, I actually pulled out an older stamp set which I think is perfect for this time of year especially when you want to give “thanks” to those special people in your life.
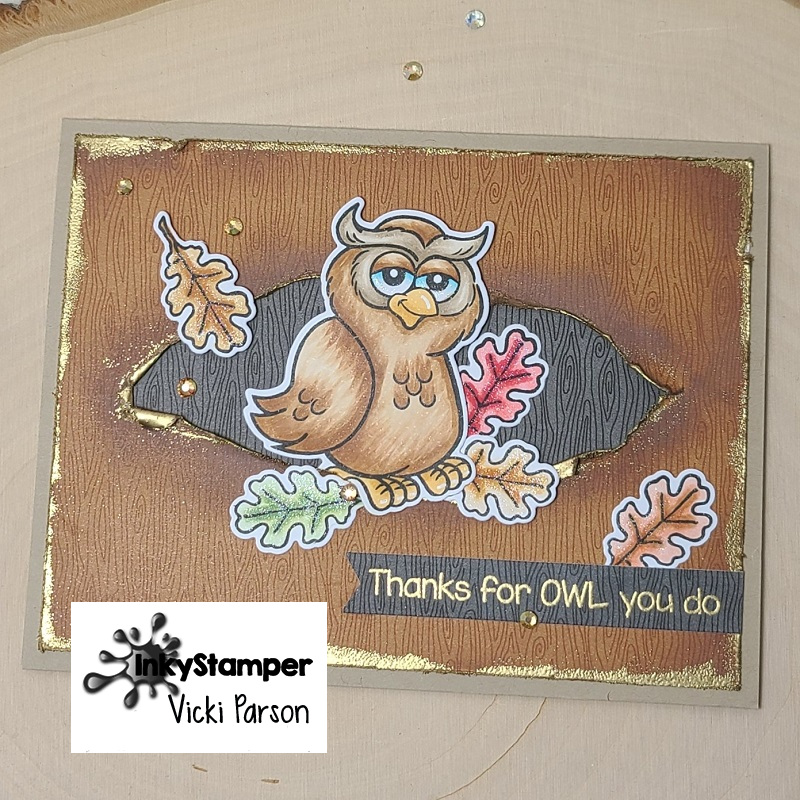
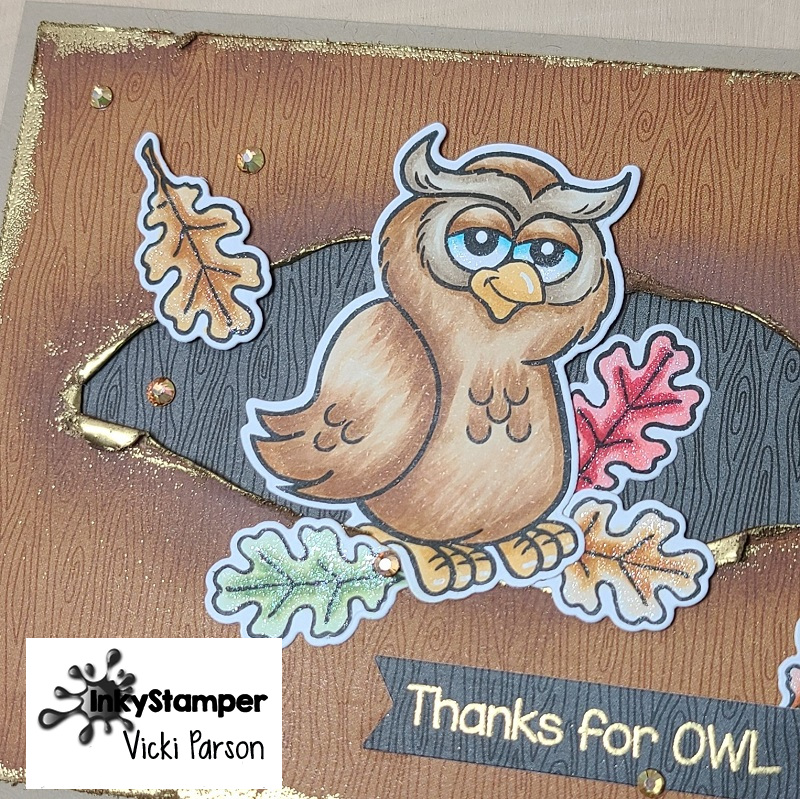
Isn’t this guy with his quirky face adorable?! I’ve used this fun Inky Stamper Owl stamp set with dies for this card. The punny sentiments that are always with these stamp sets make perfect options!
Have you seen the “Torn Window Card” technique around social media? I think you could probably find it just about anywhere and not sure where exactly it originated from, but I wanted to try it and give it my own spin by creating a torn hole with a slightly pulled around opening. Which I thought was a perfect “tree hole” for my quirky owl to pop out of! What’s fun is that you don’t need any special tools or die to do this…just rip it!
For my papers, I’ve used the Doodlebug Buffalo Check & Woodgrain 6×6 paper pad from Inky Stamper with the brown color for the outside “tree trunk” portion that I ripped the hole in the center for and then another piece of the woodgrain in black for behind the hole which makes it look like the inside of the “tree trunk”. Plus, I think it makes the owl stand out more. To rip the hole, I just cut through it with scissors and gauged what size to rip based on the owl image. I used some brown ink to sponge around the edges including around the “hole”. I then distressed the edges of the paper as well as lifted/curled the torn edges of the “hole” area. When I did that, it exposed the buffalo check pattern on the other side of the paper, so then I took my VersaMark ink pad to rub around the edges and gold heat embossed all the distressed edging. I also gold heat embossed the sentiment from the stamp set over some of the black woodgrain for the banner at the bottom.
Here’s a closer look at the owl all colored up with Copic markers. I added a few white gel pen marks to his beak and feet. I also colored up several of the leaves with this set and die cut all the pieces to attach to the card. I glued the leaves around the owl and then for the owl, I glued the bottom of him over the leaves and then popped up his head with foam tape. I also used foam tape for the leaf to the left of the owl.
For a little extra sparkle, I painted on (using a brush) some Liquid Pixie Dust for the leaves and the owl’s eye whites. To finish it off, I added some Picket Fence Sands of Time-Gems. (These are a couple of my personal favorite extras!)
I hope you’ve enjoyed my ripped hole owl card today and have been inspired to doing some ripping of your own!
Thanks so much for stopping in and I’ll see you soon!
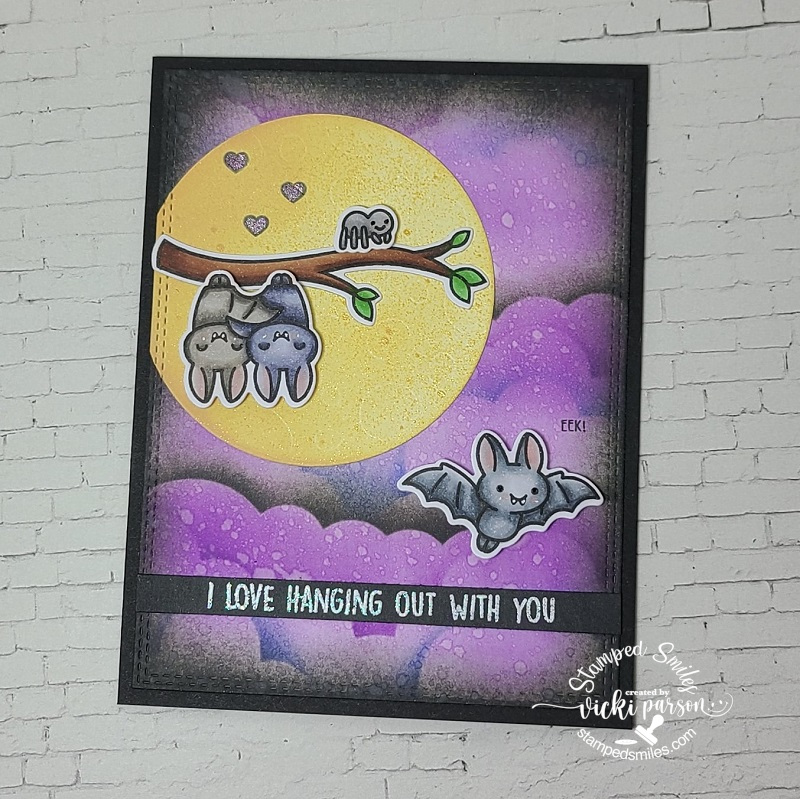
Hello friends! I wanted to share the anniversary card I made for hubby this year. Now that I’m posting this (without him knowing), I think I made a bat style card last year too! It just happens to fit with this time of the year and we got married close to Halloween…so it works, right?!😉 I’m just thankful that we BOTH like Halloween!
So, I fell in love with these cute cuddly bats (Yep, I said that!) from Lawn Fawn called Fangtastic Friends. I stamped, colored and die cut out the images that I wanted before I started to work on the background.
For the background, I pulled out a cloud stenciled and mixed purple, black and blue oxide inks to blend in a night sky. I spritzed it with water for the water droplets. I then die cut the full moon from the LF Full Moon die set and then used some Distress Mica Stain Harvest Moon and sprayed over it, so it has a bit of a shimmer to it. I placed it where I wanted to go over my sky background and then cut them both out with a double-stitched rectangle die and attached the panel to a side folding A2 black card base. (The sentiment strip was added before attaching)
The sentiment was heat embossed over a black strip of cardstock using some white glitter embossing powder.
I attached this strip at the bottom of the sky panel and cut off each end. I added the rest of the elements and images to my scene and stamped the “eek!” by the bat on the right and a couple of hearts on the moon above the hanging couple. I added some shimmer to the hearts with a purple glitter gel pen.
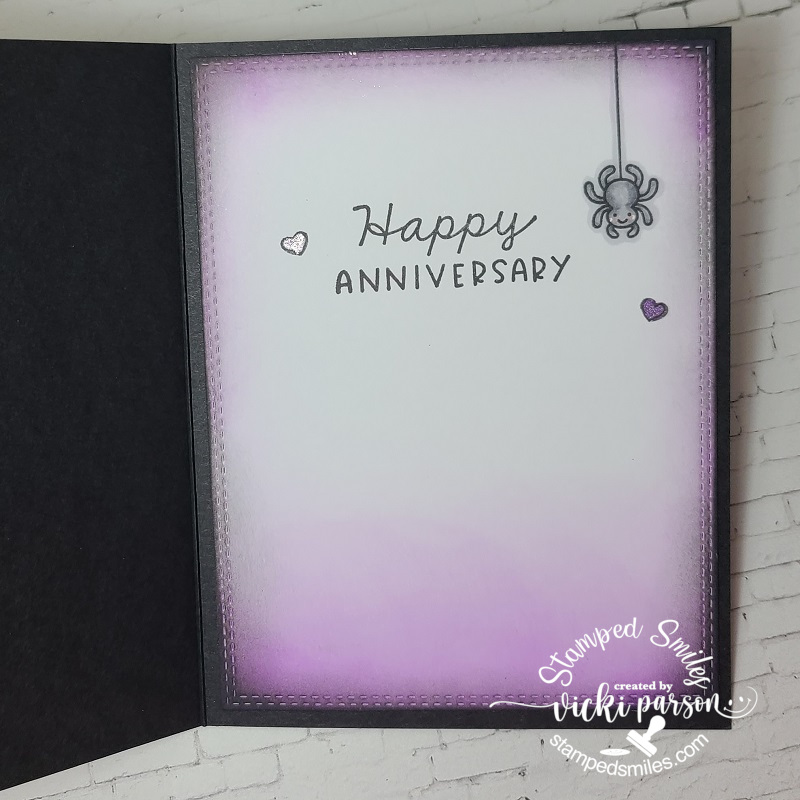
I thought I would share the inside of the card with the stamped hanging spider, the sentiment and the hearts I stamped around it with some more of the purple glitter gel pen coloring. I also used some purple and black distress oxide inks to blend around the edges of my white inside panel which was also cut out with the double-stitched rectangle die.
I certainly do love hanging out with my husband, but hopefully not in the manner on the card!😅
We’re enjoying time together right now as this has been scheduled to post, so I hope you enjoy and thanks for dropping in! I’ll see you soon!