Dir-Tea Birthday Bunny Coffee Card🐰

Hello friends!  I’m back again today with another fun card that I wanted to enter before the time runs out!  So check it out:

Vicki-TSDir-teaBunnyCup

This adorable smiling bunny is so fun and I really loved creating this coffee themed cup shaped card using some products from Trinity Stamps.  I’ve used the Dir-Tea Bunny stamp set along with the coordinating dies that also cut out his hands so you can stick stuff between them like I did with the coffee cup and balloon!  The coffee cup came with the stamp set and I added that sentiment to it!  The balloon is a die set from MFT.  I cut out the balloon with vellum and used my Copic marker to color it in.

I used the Trinity Stamps Coffee Mug Card die set in white cardstock and then took the Slimline Stripes stencil to sponge over it.  I completely sponged over the handle of the cup and then I sponged the center of the cup in grey colored ink for the bunny to be on top.  I also stamped a few coffee beans from the stamp set with the same sponged ink.  I took some Glitterstock to cut the die cut piece for the top of the coffee cup and for the inside of the card is where I added my gift card holder which comes with this die…which is pretty cool!  It’s already to go for my coffee loving birthday person now!!

I did not have a Trinity Stamps birthday sentiment, so I pulled out one from my stash and white heat embossed it over a strip of cardstock that is the same color of ink from my cup.  The banner was actually cut out with the Trinity Stamps Slimline Scalloped Card Panels and Banners die set.  (I just shortened it as needed.)  I used foam squares to pop up the die cut bunny to sit on top of the banner.

Vicki-TSDir-teaBunnyCup-close

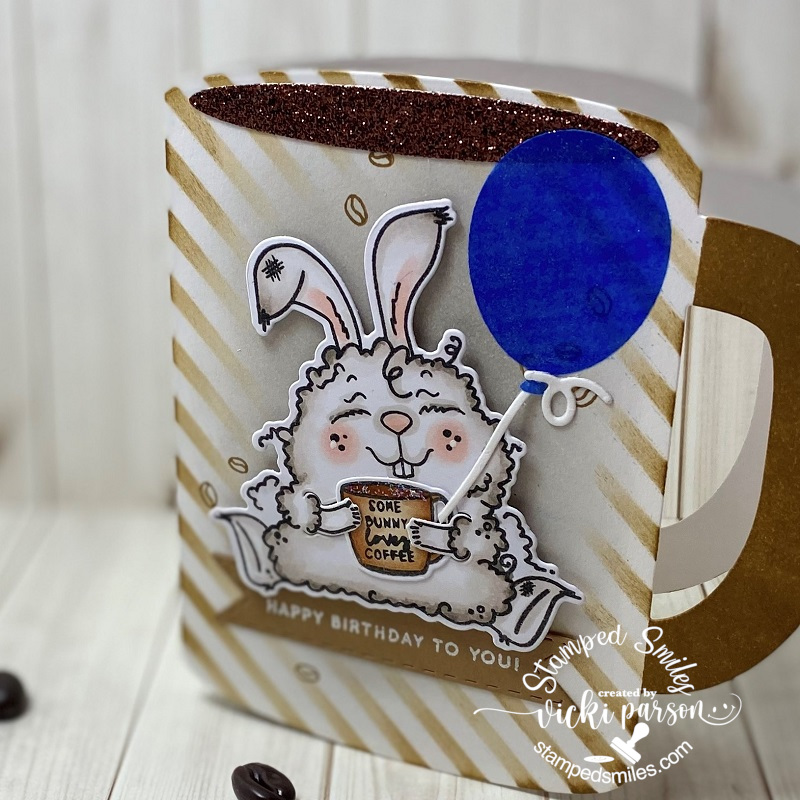
Here’s a close up view of the details on the card.  I’ve used Copic markers to color in the bunny and added dots to his cheeks with a white gel pen.  I’ve also took some glitter and added it to the inside of his coffee cup to make it look as glittery as the larger cup!

Hard to tell in the photos, but the blue vellum balloon was also covered with a Spectrum Noir glitter brush pen for a bit of shimmer.  To attach the vellum balloon, I ran it through my Xyron Machine so you couldn’t “see” any glue marks.

(I love how he can hold different items!) 😀🎈

Vicki-TSDir-teaBunnyCup-flat

Wished I remembered to take a photo of the inside of the card, but it just has a coffee gift card holder on the inside along with a greeting and more stamped coffee beans.

Hope you’ve enjoyed my funny bunny shaped coffee cup card today!  I sure appreciate you stopping in and I’ll be seeing you again soon!!

Challenges:

  1.  Trinity Stamps Crafty Troop – #4 Birthdays + Trinity Stamps products
  2. Pammies Inky Pinkies – PIP2025 – Anything Goes
  3. Dream Valley – #228 All Occasions
  4. Always Fun – #168 Anything Goes
  5. The Male Room – #139 Use Die Cuts
  6. The House That Stamps Built – J2420 Anything Goes
  7. Watercooler Wednesday– WWC277 All About Occasions

Turtley Adorable!🐢

Hello friends!  I hope you’re having a great week so far!  Really hate it when technology doesn’t cooporate and I have to figure it out, but hopefully I can soon!  Sometimes it just needs to be done!🤔

Anyway, I was wanting to post some masculine cards I made for Father’s Day earlier this week, but I’ll have to post another time as this card was already done and is needed to enter a challenge that is ending soon:

Vicki-BRMturtle

I love that wee little baby turtle riding on the back with his tongue out!  The stamp was colored up with Copic markers, cut out with a circle die, along with another circle layer of Cabbage cardstock that I’ve also used for the A2 top folding card base, and another circle layer of vellum.

I was super excited to try out the brand new Ranger Distress line color “Speckled Egg”  products!  I’ve used the Distress Oxide ink to sponge over the image onto a piece of Sidewalk cardstock that was cut out with a stitched rectangle die.  I also took the Circle Tone stencil and added some Opal Chroma Glaze over it.  You can see how pretty the shimmer is on those dots!

For the banner along the side, I took another piece of sidewalk cardstock and cut my own banner with scissors.  I took my embossing ink pad and covered the banner piece with it and then heat embossed the Speckled Egg Distress Glaze EP over it…turned out so pretty!  I heat embossed the sentiment from the same turtle stamp set over a piece of vellum and wrapped it around the banner before attaching it to the card.

Lastly, I’ve added some metallic shimmer ribbon from my stash and some pretty sparkling sequins that remind me of bubbles.  The card was designed based upon a sketch, see details below post.

Vicki-BRMturtle-close

Here’s a better view of the cute image and coloring I’ve done.  I’ve added some dots with a white gel pen for their cheeks as well as their eyes and noses.  I’ve also used it for highlights on their shell.

You can also see a better view of that pretty shimmer from the Metallic Chroma Glaze that I used over a stencil.  Thought it was great for the circle theme going on.

Vicki-BRMturtle-flat

I hope you’ve enjoyed my card today and have been inspired in some way or has brought you a smile!  Thanks so much for dropping in and I’ll be seeing you again soon!

Challenges I’d like to enter this card for:

  1. Colour Crazy Craft – Anything Goes + coloring
  2. The Divas That Cut…Paper! – Summer Fun + dies
  3. Crafting Happiness – #154 Anything Goes optional: Under the Sea
  4. Lil Patch of Crafty Friends – Anything Goes
  5. Make My Monday – #125 Use Stencils
  6. The Sisterhood of Crafters – Stenciling

It’s Graduation Time!👩‍🎓

Hello friends!  It’s started to really warm up over my way, so now it’s time to stay indoors and have some crafty play in the cool air! I will be trying out some new goodies too! Yay!

A few weeks ago or so, I was commissioned to create some graduation cards using certain school themed colors for a few local grads in my area so I wanted to share what I came up with.

I made a set of 3 graduation cards each one of a different style/design and I was told the color theme for each school/college to use along with the instruction of adding a pocket or place holder to fit a gift card inside.  So I pulled out what graduation themed stamps I had in my stash and came up with a few different designs you can see below…

Vicki-Gradcards-custom-Gown

I dubbed this card “hassle with the tassel”!🤣

The colors were to be purple and gold.  I just used my paper trimmer to trim out my cardstock to make the “V” line to mimic a grad gown and then I created the grad cap with a square piece of cardstock.  The tassel was made with some gold metallic thread which was so very slippery that I went through like 4 “globs” of it to create a final tassel that looked decent enough to attach to the cap!  Oh my goodness!🤨

I used gold mirror cardstock for the accent layers and I had a greeting for the sentiment from an older Stampin’ Up! set in my stash…(hadn’t pulled these out since my youngest graduated back in 2015!)  I added the year along the neckline.

Vicki-Gradcards-custom-Gown1

And then to add pockets, as instructed, I took the Lawn Fawn Diagonal Gift Card Pocket die for the inside corner of the card along with stamping a sentiment for the grad.  (All of these cards were made for females graduating, so I knew this would work!)

Vicki-Gradcards-custom-Spring

For my next card, my colors were blue and yellow.  Being limited on my grad stamps, I’ve used the same greeting as the card above, but this one was used in a slightly different way.

I wanted to have this card look like the “appearance” of a graduation cap flying in the air.  So I took this “Spring Card” idea to make it so that although it lays flat to place in a regular A2 sized envelope, it springs up like this for display.  I added some stamped clouds in the background along with the year and greeting at the bottom.

Vicki-Gradcards-custom-Spring1

When you turn the card over on the back, you can see that I’ve stamped a greeting along with leaving a blank spot for a message or to sign a name.

You can also see the little area at the top where the thumb hole spot is to place a gift card inside the pocket that I created.  Thought that was a fun little card display for the grad!

Vicki-Gradcards-custom-Twist

And for this last card, the colors were the same purple and gold colors to work with.  I still wanted to work with the grad cap scheme as my supplies were somewhat limited and I wanted to come up with some different and unique designs for each.

So this is my take on a “Twist Turn Card”.  This was so fun to do and actually super simple!  I took parts of an older stamp image I had and used it for the stamping on this design.  I die cut some numbers for the year and of course the design of the card mimics the square grad cap.  The tassel actually came from a Stampin’ Up! balloon die set and fit nicely with this.

Vicki-Gradcards-custom-Twist1

So when you open up this card, this is what it looks like on the inside with a nice little gift card slot at the top along with a stamped sentiment on the inside and space to write a personal message too.

Thanks so much for dropping in today!  I hope you’ve enjoyed my graduation themed cards and were inspired!  If you’d like to know how to make any of these cards, just let me know and I can show you!😉

I have some fun things coming…so I’ll see you soon!!

Challenges:

  1.  Creative Fingers – #188 Anything Goes
  2. Sweet Stampin’ – Diecuts/Punches (Used both on all of them!!)
  3. Pammie’s Inky Pinkies – PIP2024 Anything Goes
  4. A Bit More Time to Craft – #118 Anything Goes
  5. Papercraft – Geometric (Squares, diamonds, circles, triangles)
  6. Creatalicious– #189 Anything Goes optional: no design paper

4 Cards Using One Sheet Wonder Template✂

Hello friends! I hope you’ve enjoyed your weekend! We’ve had such beautiful weather and it was nice to be out in it! Warm temps are soon to follow, so I know I’ll be crafting indoors then!

Today, I’m sharing something I did for a challenge a couple of months ago and really enjoyed the process of just creating using a single sheet of pretty floral papers in my stash. Have you ever heard of or tried the “One Sheet Wonder” method?

I only have this ‘overhead shot’ of all the cards I made because I wasn’t blogging at this time, but if you notice in each one of these cards, I have used the same floral pattern in each one. I’ve pulled out a single 6×6 piece of decorative paper from the Farmhouse Floral Paper Pad.

For the top and bottom left cards, you can see that I’ve used the diagonal pieces from the *”One Sheet Wonder” template. For the top one, I’ve just used an image and sentiment from the Farmhouse Friends stamp set. For the bottom card, I actually cut out a floral image from another piece of the same paper pad I’ve used for the template as the focal for my design. (It’s a great way to use up more of the scraps you may have!)

(*See the diagram below for how I cut out a template from the 6×6 sheet to use on my cards.)

For the top and bottom right cards, I’ve taken a couple of the strips cut from the *”One Sheet Wonder” template and then made it my own by cutting it up for a banner and then just separating in half to make a unique design on my card. The top one uses the Eggcellent Gnomes stamp set and the bottom one uses the Take Flight stamp set.

Basically, all I needed to do was sit with my pattern paper and match up the colors to create cards with. It was a great thing to have as a starting point with just a piece of pattern paper in my hand. So if you’re struggling a bit, this is great way to get going! Give it a try!

Here’s the template that I used of the cut out pieces from the one 6×6 sheet of pattern paper. Please feel free to use this as an idea for yourself to get started.

Another idea that I used for this one is that this floral pattern has several different colors in it to work from, so I was able to choose a different color for each of my cards. I believe I could’ve gotten even more than just the 4 cards too!

Hope you’ve enjoyed my post today sharing a little tip for you when you might be struggling! I’ve learned that just getting started can be half the battle sometimes!🤔 Thanks for dropping in and I’ll see you again soon!!

Boardwalk Slimline Cards🎡

Hello friends! I’m back again today to share some “experimenting” I’ve been doing with different products and style of card design! Won’t you share the ride with me?….

It seems that these “Slimline” cards have become very popular lately and there have been many products from companies that have come out with some really cool things to help with your designs! I remember several years back making some cards that were called “tall and skinny”, but they didn’t fit into a standard sized business envelope like this particular size does…so this is actually a “new to me” design to try out. These measure 8.5″ x 7″ folded in half on the 7″ side at 3.5″.

RIGHT CARD: I had purchased some Slimline dies from Trinity Stamps and wanted to try them out with my cards. I was looking at this Boardwalk Dreams stencil and thought it would be cool to divide up the sections like a film strip to place on my cards. I used some Kraft cardstock and blended some different Oxide Inks over it for the colors. I used the slimline dies for layering and took a thin strip of black cardstock to separate each square. I added some Spring Acrylic Bubbles along with a black sequin for the middle of the Ferris wheel and dotted areas with some Silver glitter drops. I stamped the sentiment with black Ink over Kraft cardstock and cut it out with a banner die to attach at the bottom of the panel.

LEFT CARD: I tried the same style of design with the stencil, but realized that the ink didn’t show up very well over the black cardstock, so I then took some of the Velveteen Glazes and went over each section with a different color with a palette knife. The Bananna Split on the top square still had some of the ink left on it and it mixed with the glaze! I heat embossed some of the images from the Boardwalk stamp set with black EP over vellum and fussy cut them out and ran it through my Xyron machine to attach over top. I added a gold glitter brad in the center of the ferris wheel and then added some gold glitter drops in areas. The panel was layered over another die cut piece using some Gold Glitterstock.

I wasn’t sure about the black design, but then it got me thinking what a cool eerie design it was and how fun it would be to add like a spooky/scary clown to it! I know some may not be into that, but I happen to really like those scary horror type movies. Halloween has always been my favorite holiday…just ask my kids! LOL!

Have you tried those Slimline cards? What do you think of them?

Thanks so much for dropping in today! I’ll be seeing you again soon!

Challenges:

  1. 613 Avenue Create – Anything Goes optional twist: blended background
  2. The Corrosive – Anything Goes
  3. Pammie’s Inky Pinkies – PIP2023 Anything Goes
  4. Make My Monday – Summer Activities
  5. Sweet Stampers – Something with ‘B’ (boardwalk, beach, blending, banner, bubbles)
  6. Aud Sentiments – Anything Goes + sentiment

Whimsy Retreat Crafty Fun Results

Hello friends! Hope you’re having a great week! I’m so glad you’ve joined me today as I have lots of fun creations to share with you!😀

This past weekend Whimsy Stamps held a “virtual craft retreat“, so I thought I’d tag along and join in on the fun! I’m glad I did because I made several cards:

The first challenge given was a tic-tac-toe challenge. I did 3 down: birthday, heat embossing and circles for mine. Almost had 2 bingos…but didn’t quite work out! Aren’t those penguin eyeballs the best?! LOL! I needed to send out a birthday card to someone so this was great timing!

The background papers, cover die, sentiment die and the penguin stamps are all from Whimsy Stamps. I even put little ice cube confetti for my shaker card!

This card was made for the second challenge given during the event which was to use a sketch and a color palette using at least 2 of the colors given. This was my take on the sketch along with using blue, green and brown from the palette.

Most all of the items used on this design came from an older card kit from Whimsy Stamps. The stamp set is still available in the store called Enjoy the Journey. For the sentiment panel, I heat embossed a sentiment from this stamp set and then used the Slimline Postage die to cut along the edges of it.

Tihs is the card that I created for the third challenge issued which was to follow a photo prompt with words: “When it rains, look for rainbows. When it’s dark, look for stars.” The first thing that came to my mind was these cool Rainbow Papers from Whimsy Stamps and so I’ve cut a panel out with an older Whimsy Stamps die along with the image panel.

This image is called Rainy Day Smiles by Sassy Cheryl’s which is what I had actually won as a prize from the event over the weekend for one of the games..so that was cool! I wanted to be sure to use it for one of my cards! I added some raindrop crystals on a few areas of the image too.

This card was made for the fourth challenge given which was simply to create a project with one of the digital freebie images that was given during the event.

Facebook actually kicked me out of the event a few times for leaving too many comments! LOL! I was trying to participate in games and it told me that I was leaving too many comments! This was one of the cute freebie images that they gave at the event called Sloth. After all that happened…I felt that this little guy was laughing at me!🤣🤣🤣 So I wanted to laugh right along with him, and I printed him out, colored him with Copics and used the Whimsy Stamps Notched Square dies and layered him over some papers from my stash and attached to a 5″ square card base that I stenciled some clouds on along with the background of the image. I die cut some leaves from the Whimsy Stamps No-See All Seasons Tree die set to add to the top corners of the image panel.

Needless to say, I did “hang in there” right along with him!!😄

And last but not least, the fifth challenge was to make a project based on one of the video tutorials that was shown at the event. Of course, I’m always inspired by Crissy Armstrong and her coloring! This sweet little penguin called Penguin Momma was a freebie given during the event and I watched Crissy color this up and I tried my hand at her tips and tricks.

I printed out another piece of the feather background and cut it out with the Whimsy Stamps Zig Zag Stitched Rectangle dies and added my own white feather to the design. I sponged some grey ink around the edges of the printed papers and added some yellow crystals.

  • I had such fun creating these projects and pulling out my Whimsy Stamps stash for the challenges. And now I have a few cards for sending out to people that I already have in mind! Hope you’ve enjoyed my makes today and I’ll be seeing you again soon!! (The links in this post contain affiliate links if you want to purchase anything! Thank you!!)

Challenges:

  1. Creatialicious – Anything Goes optional birthdays
  2. A Bit More Time to Craft – Anything Goes
  3. Love to Craft – Anything Goes
  4. Crafty Creations – Anything Goes
  5. Colour Crazy Craft – Anything Goes + colouring
  6. Crafty Friends – Anything Goes
  7. Creative Craft Cottage – Anything Goes
  8. Creative Moments – Anything Goes
  9. Lil’ Patch of Crafty Friends – Anything Goes

Don’t Be Crabby!🦀

Hello friends! Are you enjoying your month of June so far? Wow, did it get warm the last few days over my way! Thought it would be a good time to cool down and not “be crabby”! LOL!

How cute is this smiling little guy/gal?! This is Crabby and I’ve colored it up with Copics and fussy cut it out with my scissors.

I’ve decided to make a fun underwater scene with him using the Tangled Waves stencil and going over it with some sparkly Glitter Glaze. I stenciled this over some of the Sea cardstock. For the bottom portion of the ocean floor, I’ve die cut a wavy border strip and covered it with some “Sand Paste” which is very textured and thick. I think it took almost 2 days to dry completely, but I really put it on thick. I think it makes such an amazing texture and it’s flexible too!

I’ve attached it over the glitter glaze background, white heat embossed the sentiment from the crab set with the White EP over a piece of Midnight cardstock which is what I also used for the card base and cut a banner with it to glue over the sand.

I attached the crab over the sand and also some seashell sequins and tropical fish cut outs from a past card kit to help finish the underwater scene.

Here’s a closer look at the stenciled background with the glitter glaze over it as well as the sequins I added above the fish to give the appearance of “bubbles”. I used some Dazzling Blue Nuvo Glitter Drops in the center of each one and I’ve also covered the crab’s eyeballs with some Glossy Accents.

It was such a fun and simple design to create, it only required some patience for a little drying time is all. Plus, this really makes me smile anyway!😉 Hopefully the recipient will think so too!

Thanks so much for dropping by today and I hope you’ve enjoyed my card or been inspired in some way! I’ll SEA you again soon!!

Challenges:

  1. A Perfect Time to Craft – June Anything Goes
  2. Crafting Happiness – #52 Anything Goes optional: beach
  3. 2 Crafty Critter Crazies – Anything Goes + animal
  4. Pammie’s Inky Pinkies – PIP2023 – Anytihng Goes
  5. Crafty Animals – June Anything Goes + animal
  6. Crafts Galore Encore – #76 June Anything Goes
  7. As You Like It – Scenes or Not? Why? (I love making scenes because you can place different images together how you want to arrange them and create depth or personalize it to make it unique!)
  8. Craft Rocket – #71 embossing wet/dry (heat and paste)

Essential Worker Chef

Hello friends! I hope that your week is finding you in a good place right now. Sometimes I feel a bit overwhelmed with things that are going on in the world, but I am so thankful that I have the crafty time to keep my mind creative and music to help alongside to keep on keeping on. This is one way that I know I can express myself in a postitive way and hopefully inspire someone too.

In my previous post, I had made several healthcare worker cards and I had made one for my son who is a mail carrier, but I was having a hard time finding an image for a food service worker. (check out that post HERE.) I asked if anyone knew of any images. Someone had reached out to me and shared a few images that were just too adorable and I couldn’t pass up on nabbing one for my other essential worker son:

Isn’t he just as cute as can be?! I’ve used the LOTV Pancake Day digi stamp for my card. It actually reminds me of my son making crepes for a restaurant that he used to work for. I was treated with a delicious pumpkin pecan cream crepe by him a few years back on my birthday! It was yummy!

As you can see, I’ve altered the image a bit to fit with the current covid-19 restrictions by giving him a make-shift face mask as well as coloring some plastic-style gloves on his hands. To make it even more personal, I decided to give him a couple of colored tattoos on his arms as my son has tattoos on his arms and dark brown hair.😁

For the card, I’ve used some Sidewalk cardstock from Brutus Monroe and used a Stampin’ Up! brick embossing folder over it and then sponged some distress ink around the edges. It was cut out with a stitched rectangle die. I added a strip of Prism paper and some silver metallic ribbon over it before attaching it to a top folding A2 sized black card base. I finished it off with some silver Glossy Dots from Pink and Main.

I colored the image with Copic markers and as mentioned above added the special coloring for the tattos and gloves for his hands. I’ve also covered the pan with a glitter brush pen.

To make the face mask, I took a Copic liner to draw in the lines for the cord around his ear and then I took a tiny piece of thin tissue style paper that was used between the packages of acetate sheets you buy. I wanted it because it was thin and I was able to create tiny folds and wrinkles in it…I just glued it over the area on his face and manipulated it before it completely dried.

I stamped the sentiment from a Lawn Fawn stamp set with black ink next to the image and then I used a stencil that was cut out by my mom, thanks mom, on her Cricut machine and inked it up with some red ink using a foam brush tool. I wasn’t very accurate with not covering the image, but thankfully the sand eraser helped out! I finished coloring up the “ground” area and sponged around the stitched square cut out of the image. I layered it onto another piece of black cardstock and popped it up over the card with craft foam.

I think this card turned out so cute and it’s on the way to him now! I think he’ll get a kick out of it and he’ll probably notice the extra personalized details I’ve added to it too!😂

I hope you have enjoyed my special essential worker card today and brought you a smile! Thank you so kindly for stopping in and I’ll see you again soon!✌

Challenges:

  1. Pearly Sparkles – #52 For the Boys/Men
  2. Love to Scrap – LTSCB134 For the Boys
  3. QKR Stampede – #400 Anything Goes
  4. Digi Choosday – Anything Goes + colored image
  5. Arty Divas – #23 Anything Goes
  6. The Paper Funday – #18 Anything Goes with twist: make it masculine
  7. Simon Say Stamp Wednesday – Masculine
  8. Unicorn – Masculine

Pink Floral Sympathy

Hello friends! Welcome to June! We’ve certainly started off our June with hot temps! Trying to stay cool in the air condition and have some crafty time! How about you?

Unfortunately, it was time again that I needed another sympathy card and I don’t have any in my stash, so I’ve come up with one to send to the family of my GREAT aunt! She was always so great about sending me cards on my birthday even as she got older and it always made me smile!

So this is my final tribute to Aunt Rosella…RIP sweet lady.

I saw a couple of challenges going on and they actually inspired me to pull out an older stamp set that I’ve had and hadn’t used it but a couple of times and I think it’s really pretty. I’ve used the Beautiful Blossoms stamp set from Newton’s Nook for my card here.

I’ve used a sketch challenge to help me with the placement of the images and how I was going to layout the design. I’ve used a vanilla top folding A2 sized card base, die cut a scallop rectangle and then layered over another vanilla piece that was cut with a stitched rectangle die. I took a strip of pink cardstock and stamped the floral images over it with VersaMark ink and attached that along with the two square panels layered with some scalloped die cut square in black. Those vanilla panels were sponged along the edges with pink ink.

I took the floral images, stamped them over another piece of vanilla cardstock with some alcohol marker friendly ink and colored them in with my Copics. They were cut out with the coordinating die cut set. I used some foam tape to pop them up over the squares.

Upon closer view, you can see how I’ve done the sentiment here by heat embossing it over a piece of vellum with some Raven Sparkle EP and then fussy cutting it out. I used my Xyron matchine to make a sticker out of it and then I took the “sympathy” stamp from the Newton’s Nook “Super Sentimental” (No longer available) and inked it with the black ink under the vellum sentiment.

Of course it’s hard to see the shimmer over the flowers, but I’ve covered them some Spectrum Noir glitter brush pen and then lastly, I’ve added some clear sparkling sequins.

I hope you’ve enjoyed my sympathy card today and a reminder to all of us card makers to remember to build a small stash of these type of cards to have on hand. It’s something that I really need to do and always forget about doing it ahead of time.

I have more things that I’ve been working on coming soon, so I hope you’ll stop by again! Have a great day!😊

Challenges I’d like to enter this card for:

  1. Newton’s Nook Inky Paws Challenge – Flowers

2. {Cupcake Inspirations} – CIC494 Color Challenge: Pink, Black and Cream

3. Sunday Stamps – SSC232 Sketch “Getting Squared”

4. The Paper Players – PP493 Tic-Tac-Toe challenge: I used flowers, die cut and embossing

Caffeinated Changito☕

Hello there friends! Really hope that you have enjoyed your long Memorial weekend! The weather finally turned warm and once it turned warm, it REALLY turned warm and humid over my way! So we were able to plant some flowers in our garden pots outside and enjoy some cookout time too!

I noticed that the “Spring/Summer Coffee Lovers Blog Hop” had started up this weekend and I thought it would be a great opportunity to pull out some old stamps and have some fun with it while making a masculine card for the up-coming Father’s Day holiday too:

Does anyone remember these cute little “Changito” stamps back in the day?! I have used the Changito Coffee stamp (only found this one online) and the sentiment to go with it too! I actually bought these wood mounted rubber stamps years ago at a convention I had went to and have kept them hoarded like my other old stamps. LOL!

I stamped the image on Copic blending card and then again on some blue gingham background paper for paper piecing his PJs in! For the sentiment, I heat embossed it over my background with some appropriately named “Coffee” EP which has a metallic copper with some brown speckling in it…very cool. the store is no longer active that it came from.

For the background of this card, I had some fun playing with my Oxide Distress Inks in Vintage Photo, Broken China, Scattered Straw and touches of Espresso. I sprayed and dried layers as I went. I even took the bottom of a jar I had laying on my table to ink up some Espresso ink to make the “ring” marks over the background. I also took some more of that “Coffee” EP and sprinkled some over the background for even more distressing.

I wrapped some twine around it and attached it to an A2 sized white card base that I sponged around the edges with some Vintage Photo ink.

Here you can see a better look at the image and how I’ve got him colored up with Copic markers. You can barely see the gingham pattern in his paper pieced PJs, but I thought it was cute! I also took a black Copic liner and drew lettering on the coffee cups. I added just a hint of sparkle over the coffee inside the cups with a Spectrum Noir glitter brush pen. I also took a black gel pen to dot his eyeballs, the buttons on his PJs as well as dot the bunny slipper eyes. I think that little detail really makes his pop more with a bit of character.

The image was cut out with a stitched circle die and then I also cut out an additional circle to mat behind him, which I took a VersaMark ink pad and then used the “Coffee” EP to heat set along the edges of it so it has the same look and texture as the background and sentiment. This was attached over the background with twine.

Lastly, I’ve taken some brown colored sequins from my stash and attached them to the background and filled the centers with some Nuvo Honey Gold Glitter Drops.

Hope you’ve enjoyed my masculine and quirky card for today! Thanks so much for dropping in and I’ll be seeing you again soon!!😉

Challenges:

  1. Spring/Summer 2020 Coffee Lovers Blog Hop – Coffee/Tea/Cocoa Related Project

2. Addicted to Stamps and More – #391 Anything Goes

3. Cute Card Thursday – #635 Critters

4. Creative Knockouts – #351 Embossing Delight (wet or dry)

5. QKR Stampede – #399 Anything Goes

6. Simon Says Stamp Monday – “Going Around in Circles”

7. Pammie’s Inky Pinkies – PIP2021 Anything Goes

8. Die Cut Divas – Make it a Beverage + die cut/embossing folder