Hello friends! So now that we have celebrated the Holidays and have started the year, it’s time to look at all things “new”, right?! I have some new things to share with you today using Digi Doodle Studios products!
To me, there’s nothing better to celebrate “new” than new crafty items to play with as well as a new baby theme:
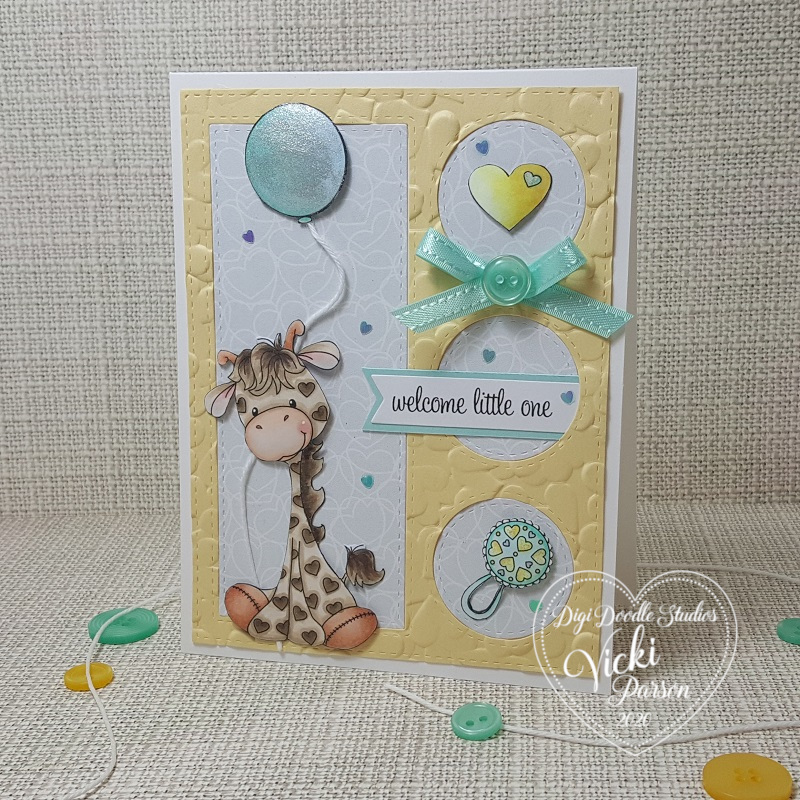
I hope you just said “Awe!” right along with me here! Absolutely fell in love with this precious digital Pairables set that’s BRAND NEW at Digi Doodle Studios called “Little Ones“!
I started by printing out the images and coloring them up. I colored the giraffe, balloon, heart and baby rattle and then fussy cut them out for my card design. There is a very soft interlocking heart grey background papers from the Digi Doodle Studios Baby Boy digital paper pack that I’ve used for the background with the frame layout.
The frame was cut out using the Whimsy Stamps Peekaboo Window 3 die from some yellow cardstock. I then took a brand new textured embossing folder from Sizzix that I got over the Holidays and embossed it. Love the texture of the hearts!
I used some pop dots to lift the images up a bit and added some white twine to the balloon and giraffe. The sentiment was printed out (also from the same Pairables set) and cut out with a banner die. Lastly, I’ve added the ribbon bow, button and some tiny heart sequins in random areas.
Here’s a closer look at the coloring I’ve done on this sweet little giraffe. I’ve used Copics to color all the images. You can see how pretty that texture from the embossing is! Lots of little hearts going on here! (Including on the giraffe in case you didn’t see that!) 🙂
You can see where I’ve added some shimmer to the balloon, tiny hearts on rattle and the tiny heart inside the yellow heart with a glitter brush pen.
I hope you’ve enjoyed my “NEW” creation for you today! Please be sure to stop in the store and check it out along with all of the other new items available!
*I wanted to take a moment to first wish all of my friends and blog readers here an extremely Happy New Year and best wishes for the most amazing 2020 you can have! I have REALLY appreciated each and every one of you for your friendship, support and comments throughout this last year…it really means so much to me! I hope to continue to inspire and spread smiles with you in the comng year as well! HUGS*
Today is obviously the first which means it’s time to start a brand new challenge over at 2 Crafty Critter Crazies! So remember that you have the entire month to play along and It’s ALWAYS an “Anything Goes + a critter” on your crafty project! Easy peasy!
Here’s the creation I made for this month:
He’s such a cutie and I think he would be a fun little guy to celebrate with especially since it looks like he’s handing out cupcakes! LOL!!
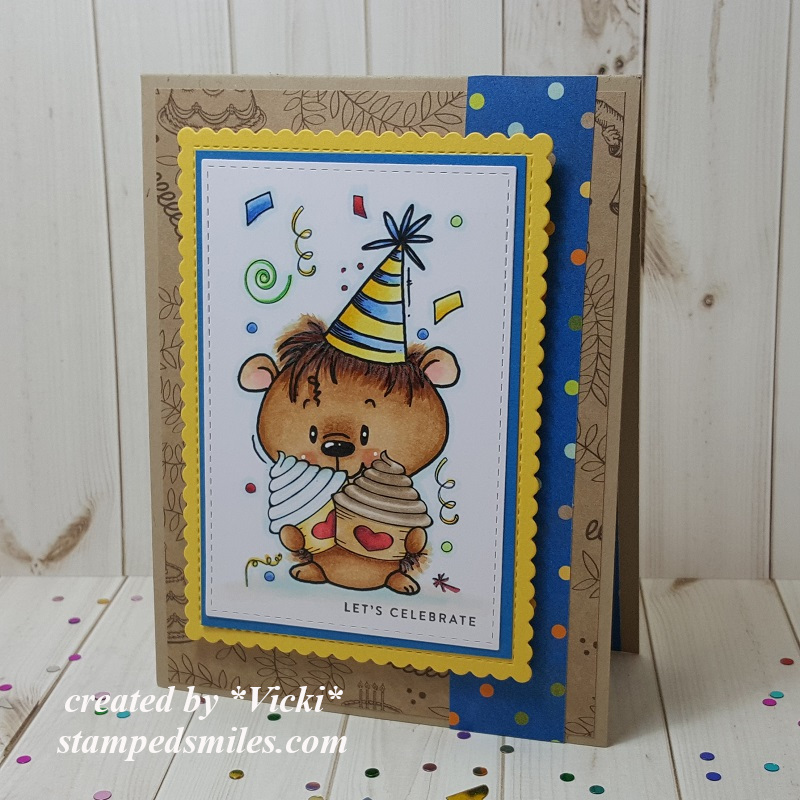
The sponsor for our challenge this month is Bugaboo Stamps and the team were given some images to play with, so I have used this adorable Birthday Hedgie 02 digital stamp on my card today!
After coloring him up with Copic markers, I used a stitched rectangle die to cut him out with and then layered him onto a blue layer of cardstock along with another yellow layer that was cut from a stitched scallop rectangle die. I used some craft foam to pop him up over the card front design.
For the card base, I took a top folding A2 sized kraft card base and found some fun birthday papers in similar colors slightly cut down to go over top. I also found a matching blue dotted strip of paper to place from top to bottom of the card base design. the sentiment was stamped in black ink at the bottom of the image panel. This is a new set I got from Simon Says Stamp called Tiny Words.
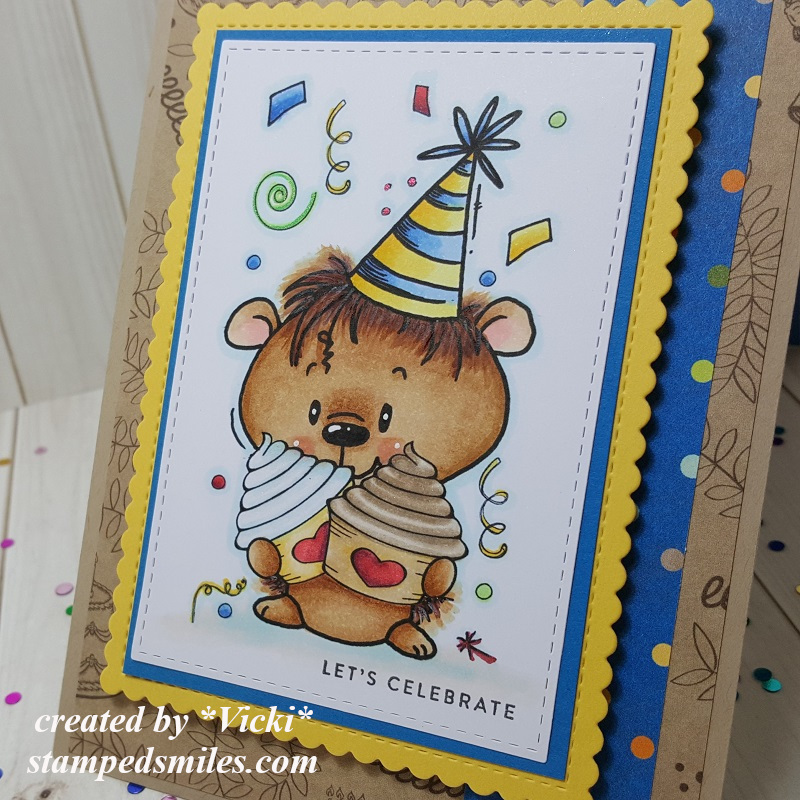
Here’s a closer look at the coloring I’ve done on this cute little guy! His “hair” actually got a bit more “fuzzy” than what I was going for, but I didn’t want to keep going over him or he might look like he partied a bit too much! LOL!
Of course it’s very hard to see unless you see it person, but I’ve added some shimmer with my glitter brush pen over the cupcakes and little hearts. I also used some colored gel pens to go over some of the confetti pieces around him. I also used a white gel pen for his cheeks and I thought he needed some eyeballs and I made those too!
I hope you’ve enjoyed my card today!
P.S. Just for fun, please share with me if you have any crafty or non-crafty “New Year’s resolutions/goals” for this year! My goal is to COMPLETELY finish each card I make this year with sentiment/decorated inside, with the envelope and signed on back! I hope it holds up! I started with this card!
Challenges:
Make My Monday – Female Birthday (Thought it could be used for anyone!)
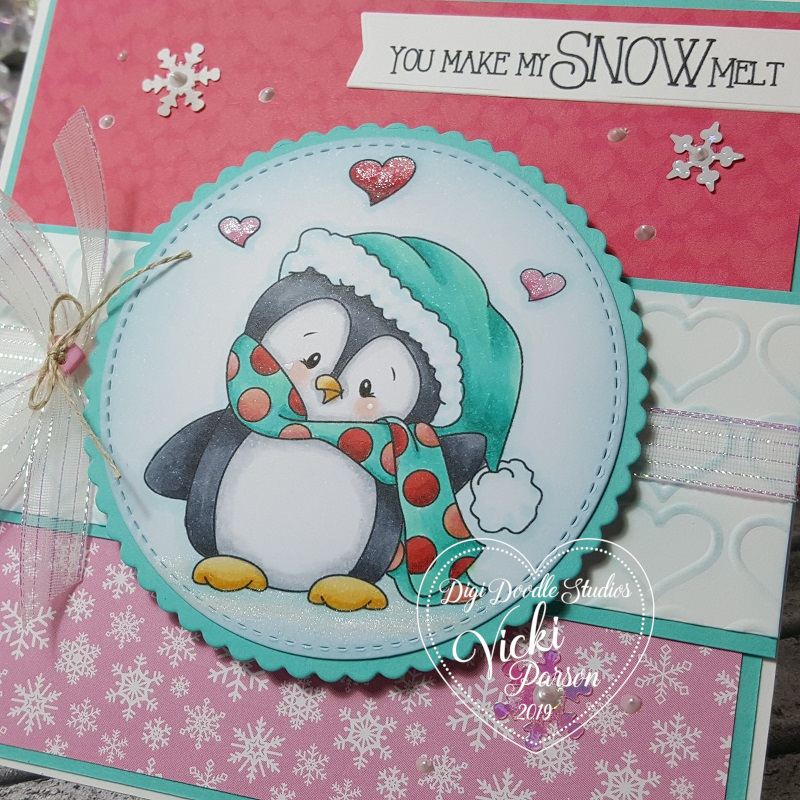
Hello friends! We are now past Christmas and getting ready for a New Year, but soon the feeling of love will be in the air! So I thought I’d start that off with something that I personally love, which you might know, are those cute penguins!
And of course you’ve already seen me use this super fun Wintertime Penguins Pairables set from Digi Doodle Studios in a couple of different ways, but this time I’ve added the hearts above his head and sentiment from the same set to make this a “lovey dovey” style card!
I kept the colors in pink and red to go with Valentine’s Day, but you could easily make this a wonderful anniversary or “any day” card for your favorite love penguin as well! LOL!
So I grabbed some fun papers from my stash with both pink snowflakes and red/pinkish hearts paper for my 5″ top folding white base card that I layered the turquoise colored cardstock over and then applied the papers to. I embossed some hearts on the middle strip with a piece of white cardstock and then rubbed some turquoise colored ink lightly over them. I layered that strip onto a piece of turquoise cardstock again and then wrapped some white/clear metallic ribbon with a bow over it before attaching it down.
The sentiment was printed out from this cute set with the penguin and then I just used a banner die to cut it out with and attach to the front of the card.
I added the penguin image that was die cut and layered with some stitched and scallop circle dies. I’ve used some craft foam to pop it up over the center, then added a heart button with twine in the center of the bow. Lastly, I’ve added a couple of snowflake sequins and some liquid pearl “dots” randomly over the card.
Here’s a closer look at this cutie and how I’ve got him colored up with my Copic markers. I’ve used a white gel pen to dot his cheeks and then I took a glitter brush pen (Spectrum Noir) and covered the hearts above his head as well as the “snowy” ground under his feet for a bit of shimmer.
I hope you’ve enjoyed my “lovey dovey” card today and have been inspired in some way! Thanks so much for joining me on my blog today!
I can’t believe that the New Year is just about to start!! I will most definitely be seeing you in 2020 my friends!
LOL! Hey friends! Did I grab your attention with my title today?!
Today starts a brand new challenge over at Cute Card Thursday and it’s an easy ‘ANYTHING GOES!’ Since it’s the first Thursday of the month, we are being sponsored by Whimsy Stamps! Yay! So please be sure to remember to add whatever creation you’re working on over in our gallery this week!
*News update: This will be my last challenge as a design team member for Cute Card Thursday. I have really loved being apart of the team and the wonderful ladies over there for over a year and a half. I wish them all well. I’m sure I’ll be playing along in future challenges of course!*
Here’s the card I made with products from our sponsor:
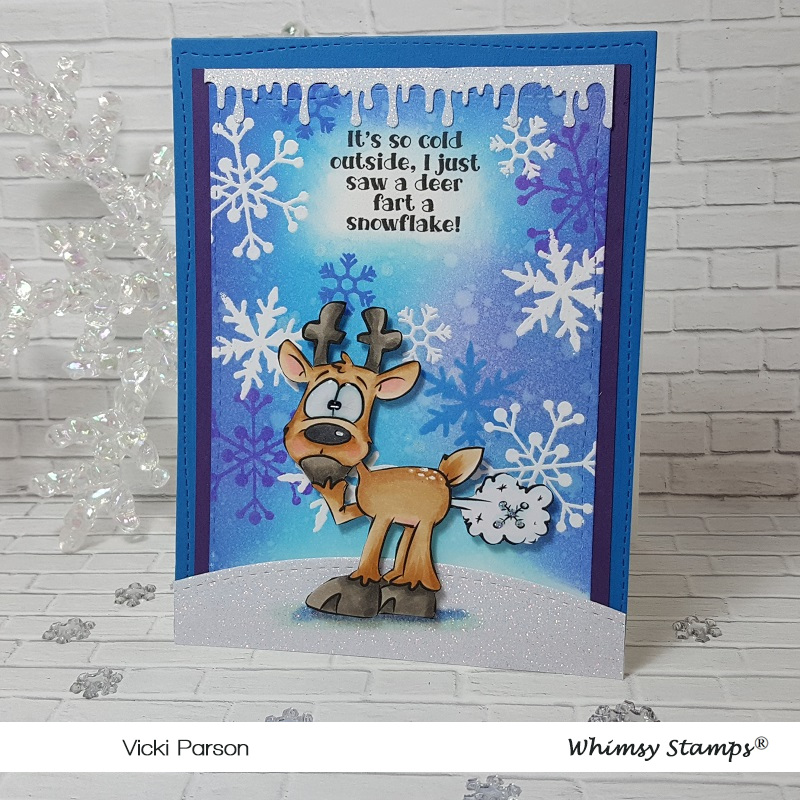
BWHAA!! HA! HA! Yep, I’m most positive it’s probably been that cold out over my way! LOL! It’s supposed to get down to the teens next week! Brr!
This hilarious digital image is called Reindeer Farts by Dustin Pike from Whimsy Stamps. It comes with the sentiment which I wouldn’t want it without that! LOL! This image was released back in October, but with all of the Halloween going on, it sort of didn’t get a good “spotlight” on it, so I thought now would be a good time to pull it out and perhaps send it out to my brother for Christmas…which he’ll get a kick out of! 🙂
I started out with a white cardstock panel cut with a stitched rectangle die with the printed out sentiment at the top of it. I pulled out the Whimsy Stamps Snow Flurry clear stamp set and white heat embossed some snowflakes in the background. I ink blended some Distress Oxide Inks over top of them in the colors: Salty Ocean, Wilted Violet, Mermaid Lagoon and Blueprint Sketch. I spritzed some water over it, dapped it with a paper towel and once completely dry, I stamped out some more snowflakes in a few of the Distress Oxide Inks over that to give it a little depth. The ink marks left over the white snowflakes were easily wiped away because the heat embossing resists the inks. I covered this entire panel with a Shimmer Spray. (You can see it in the photo below!)
I layered this piece onto a purple cardstock base and then layered it over a blue piece of cardstock cut from a stitched A2 sized rectangle die which was then mounted over a top folding A2 sized white card base.
I’ve used some White Glitterstock and cut a “snow hill” for the deer with a stitched hillside border die and glued that to cover the entire bottom of the card. I also took another strip of that Glitterstock and used my MS goo border punch to create the small border above the sentiment, which generates a more “cold feeling” to the card.
I’ve printed out the deer image with Copic Blending Card, colored it up with Copics and then fussy cut it out…including the “fart cloud” and popped it up over the snowy hill with some foam tape.
Before attaching it to the glittery snow hill, I took a couple of Copic markers to create a bit of shading for the deer standing on the snow. I also took a white gel pen and added some dot markings on the back of the deer.
You can also see where I’ve added some glossy accents to his eyeballs and I even took some Star dust glitter and added it to the snowflake in the “fart cloud”.
Well I hope you got a giggle from my card today! LOL! This will be a fun one to send along!
Thanks so much for stopping in today and I’ll see you soon!
Challenges:
Creatalicious – #176 Anything Goes with optional Winter
Hello friends! Wow! We are getting so close to Thanksgiving now within a few days! I know that most people have been full steam ahead with making Christmas and I have really been quite festive myself with my own creations! Today, I wanted to suspend the ‘Merry Making’ for just a moment….
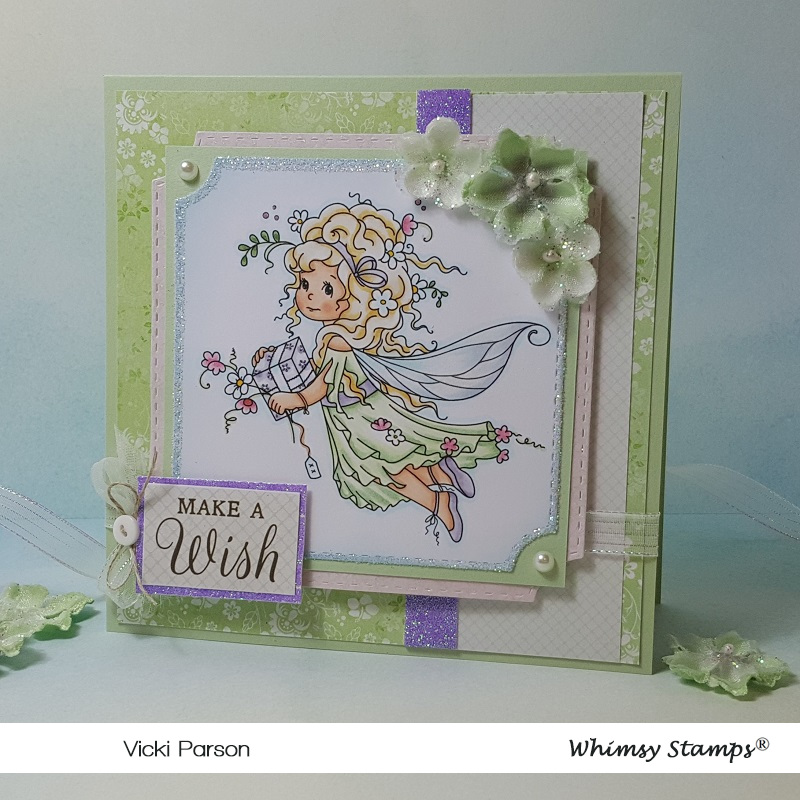
This little cutie digital stamp is appropriately named Precious Present from Whimsy Stamps and she’s another adorable fairy image by Sylvia Zet. You could certainly change up the colors to make her more festive, but I just felt like taking a “wee” break (LOL..Wee Stamps…see what I did there?!) and make something soft and light.
After coloring her up, I used the Whimsy Stamps Notched Square Dies to cut her out with and then layer with more panels behind her. I also took a glue pen and went along the edges of the image panel then covered with some clear glitter. I did the same with the purple strip in the background and the layer behind the sentiment panel, but just used some pretty sparkly purple glitter.
The background papers including the sentiment panel came from a pretty paper pad called “Fairy Garden” by Kaisercraft that I had purchased earlier this past Spring. Love how soft and light the colors and patterns are in it. I also found the perfect Stampin’ Up! cardstock color for my card base and one of the image layers called “Certainly Celery”. It’s an oldie but a goodie for sure! I finished it off with some more of that clear metallic ribbon (my fave) with a bow at the edge of the sentiment panel along with some twine and a button. I also added some flowers by Prima and a couple of pearls in the corners of the green layer behind the image.
Here’s a closer view of the coloring I’ve done for this image using Copic markers. I kept things really soft and simple for this. I did add some shimmer over her wings with a Spectrum Noir glitter brush pen and I used a pink metallic gel pen to color the “dots” above her head.
The layers were popped up with foam tape and I’ve also popped up the sentiment layer with foam tape over that as well. (You can see the glitter in the pink layer that was die cut too! This came from that paper pad I mentioned above.)
I hope you’ve enjoyed my non-Christmas card today! I think you could turn it into something festive and I thought about doing that, but then decided I wanted to use soft and light colors and turn it into maybe a birthday type card. Besides, I love soft subtle colors and lots of sparkle…so it was fun to put together! 🙂
It already has me longing for Spring and winter hasn’t even really started over my way yet! LOL!! I do have TONS of creations going on in my craft room and haven’t really been sharing them on my blog, but I hope to be getting to that very soon as we are approaching the December month and there will be so much to share! I’m excited to be sharing things with you soon!
Thanks so much for stopping in and have a wonderful day!
Hello friends! I hope you’re having a wonderful week so far!
Today I have creation to share with you using this really sweet image from Whimsy Stamps:
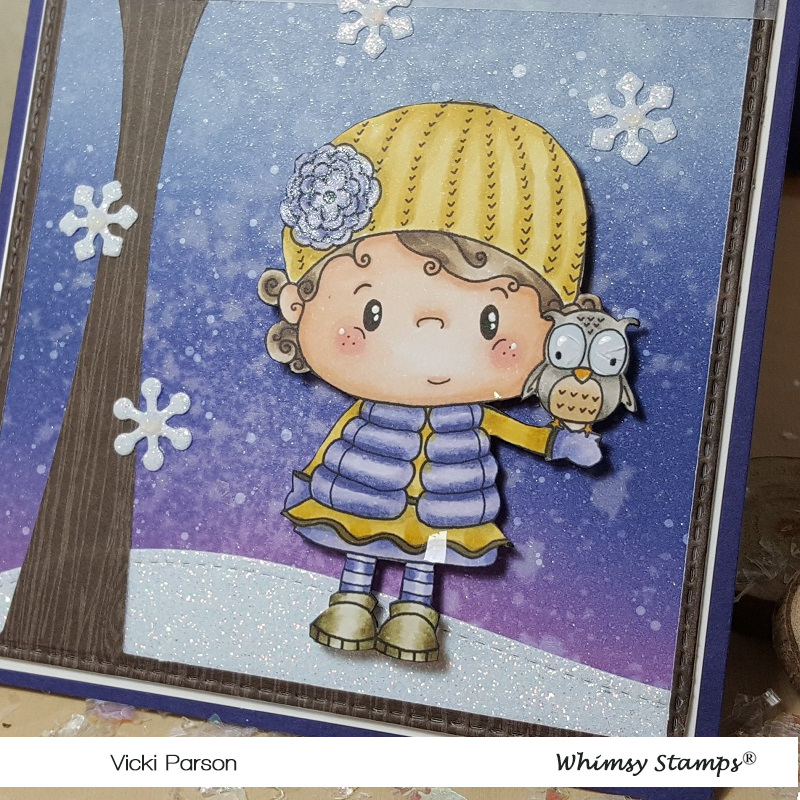
I really adore this digital stamp that came out this month for Whimsy Stamps called Tawny. It’s one that I picked to make something with as it was a bit personal to me. That little owl with those big eyes is so sweet and really reminds me of my grandma who passed several years ago. She was an owl lover….so she’s like a sweet little angel with me here! There was SNOW one like her either!
To create my card, I started with some watercolor paper and Distress Oxide Inks in Seedless Preserves, Dusty Concord, Stormy Sky and Broken China (from bottom to top order.) I spritzed it with a water bottle and soaked it up with a paper towel. I then took some white paint watered down and splatter it with a fan brush over the panel. I also took some shimmer spray and covered the entire panel. You can see it better in the photo below.
I took a Lawn Fawn die to create the tree border with woodgrain paper and then die cut a snow border with glitter cardstock and glued it behind the frame. I also took the sentiment from the Whimsy Stamps Snow Flurry clear stamp set and white heat embossed it over a strip of vellum that I’ve attached over top of these layers (with the inked background also) by using my Xyron Sticker machine. These pieces were die cut with a stitched rectangle die, layered over a piece of white cardstock and then mounted onto a purple A2 sized top folding card base.
Lastly, I’ve added my image and some snowflakes that were cut out with some more glitter cardstock and each snowflake was dotted with some Nuvo White Blizzard Glitter drops.
Here’s a closer view of the image and how I’ve got her colored up with Copic markers.
If you take a good look at the top portion of the background, you can sort of see the shimmer from the spray. It’s really sparkly in the light.
I accidentally got a piece of the “faux snow” photo prop on her skirt. LOL! I covered the flower on her hat with a glitter brush pen and I’ve used some Nuvo Morning Dew Crystal Drops over the owl’s eyes, but it cracked. I don’t like it as much as the glossy accents as it doesn’t crack so easily like this does.
She was fussy cut out and popped up over the snow border with foam dots.
I really like how this one turned out with the colors and I hope you like it too! The inked snowy backgrounds are really fun to play with!
Thanks so much for dropping into today and I’ll see you again soon!
Hello friends! With this not cooler, but COLDER weather we’ve been having, it looks like it may be a hard winter ahead and I’m already feeling it in my body unfortunately. So with the heating pad and warm slippers, I’m still crafting!
Today I’d like to share some cards that I have made for my hubby using some of the adorable stamps from Lawn Fawn …which I love:
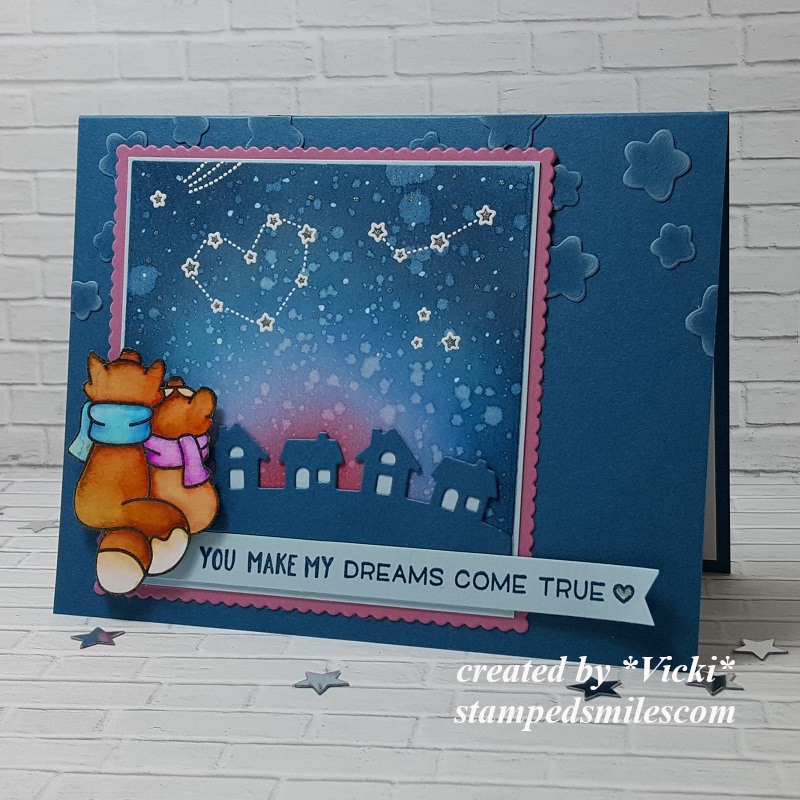
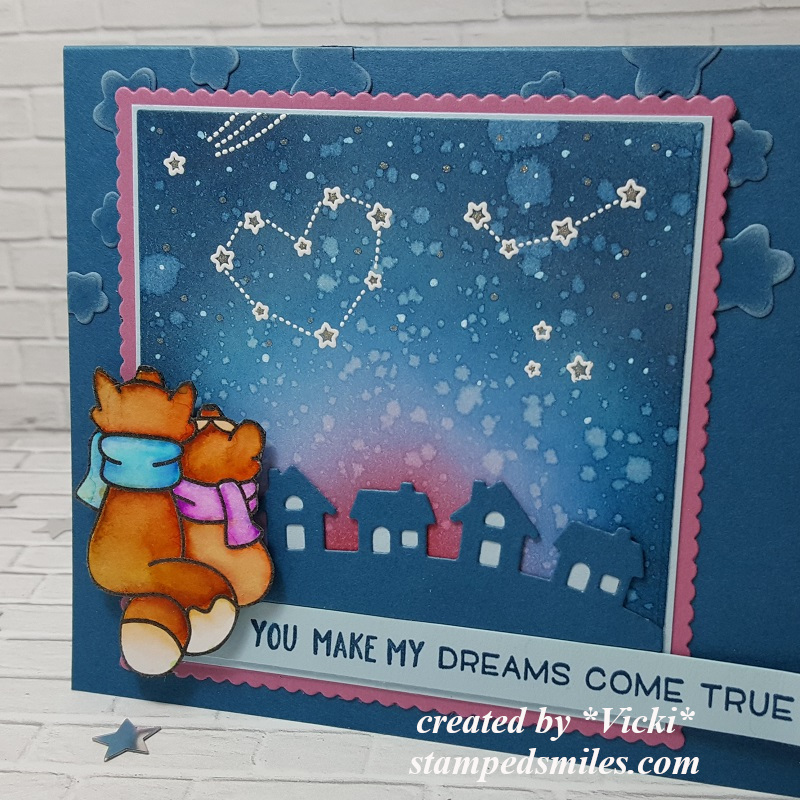
At the end of October hubby and I celebrated our 20-year anniversary, and I made this card for him to let him know how I feel about him after all these years. This would be something that we would certainly do where we live! We always enjoy looking at the night sky together.
I started with some watercolor paper and blended some distress inks for the background and spritzed it with water. I then made sure it was completely dry before white heat embossing the stars that I colored in the centers with a gel pen. I then took a white gel pen and added more “dots” in the sky.
I’ve used Upon a Star and the Winter Skies stamp sets for both the images and sentiment. I took the Little Town border die to add over top of the starry sky and layered it onto a navy card base that has some more die cut stars (from Upon a star coordinating dies) at the top sponged with white ink.
For the sentiment, I had to piece together a couple of words from different sets to get it to say what I wanted it to. I cut it out with a long banner die from My Favorite Things.
Here’s a closer view of the sky and the images. For the fox couple, I black heat embossed it and then used my Zig Clean Color Real Brush markers to color them with and then popped them up over the corner of the scene with foam dots.
I actually used a color palette and sketch from a challenge blog, but missed the deadline to post it, but I think it turned out great and hubby enjoyed it. He said, “Yes, this is something we would do!” He also likes the color blue.
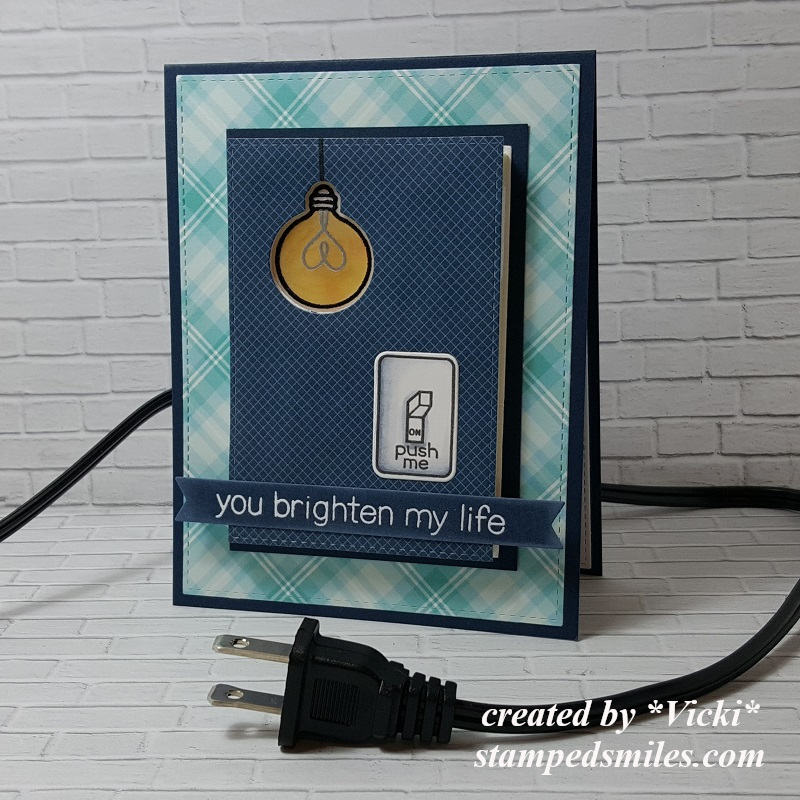
Here’s another card I made for hubby as his birthday was this last Friday:
Although this one is a bit simple, it has a really fun interactive element to it! If you’ve known me for a while, then you may know that my husband is an electrician, so this card was very fitting for him!
I have used the Lawn Fawn Turn Me On stamp set and coordinating dies along with the Life is Good stamp set for the sentiment and the Push Here stamp set to make this card. I also have a large stash of Lawn Fawn papers that I’ve used for this which I don’t think are available any longer.
I used vellum for the light bulb that was heat embossed over it and then I colored it yellow on the backside of the vellum to place behind the die cut opening from the blue panel. That was die cut with the coordinating dies. I stamped and colored the light switch as well and also die cut it out over the blue panel. I then white heat embossed the sentiment and cut it out with a sentiment banner die from MFT. It was sponged with white ink and glued over the blue panel.
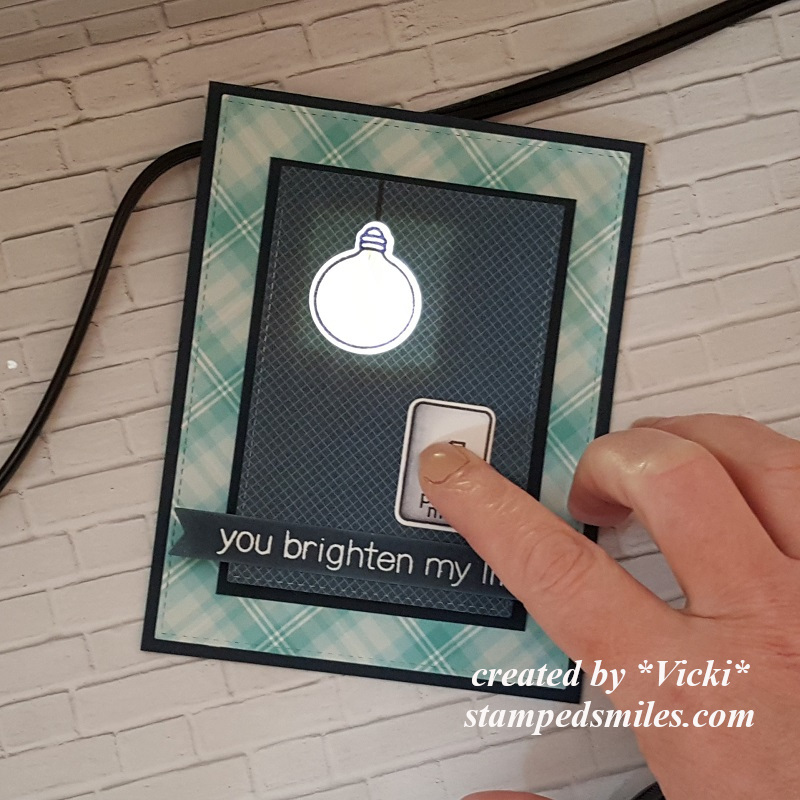
The best part of this design is that when you push on the light switch, the light bulb turns on! I’ve used the Chibitronics to create this feature.
You can see here what it looks like when you push on the light switch!
You can also check out this quick few second video to see it in action below: (CLICK HERE if you want to see it on You Tube.)
Although this looks like a pretty simple card, mechanically it had its difficulties with the light up interior portion of it and it was met with some challenges and patience as I had to keep testing it to make sure it worked right! At one point I had to tear it apart because the battery accidentally flipped over! I also had to use like 4 layers of foam tape so that the light wouldn’t continuously be on all the time! LOL!
It was all worth it though as it was for the love of my life, and he really did appreciate the efforts that went into making it as he even took it to work with him so that he could show it to his fellow co-workers! LOL! They seemed to be pretty impressed with it and even offered some advice on how much to charge for something like this! LOL
The card was thick due to the amount of foam on it, so it didn’t fit into a regular envelope. Since it went to hubby, I just hand delivered it to him! 🙂
Hope you’ve enjoyed my share of creations today that I made for hubby! I will be seeing you again soon! Thanks for dropping in friends…I will be visiting soon!
Good morning friends! Aaah! It sounds like a great morning for coffee, doesn’t it?! Well it sure does to me anyway! Today, my post is all about coffee…so grab yourself a cup, sit back and enjoy!
I’m so excited today to share my post with you because Digi Doodle Studios is a first-time sponsor for the Coffee Lovers Blog Hop! There are lots of fun coffee themed products in the store and I’m thrilled to be sharing some with you today:
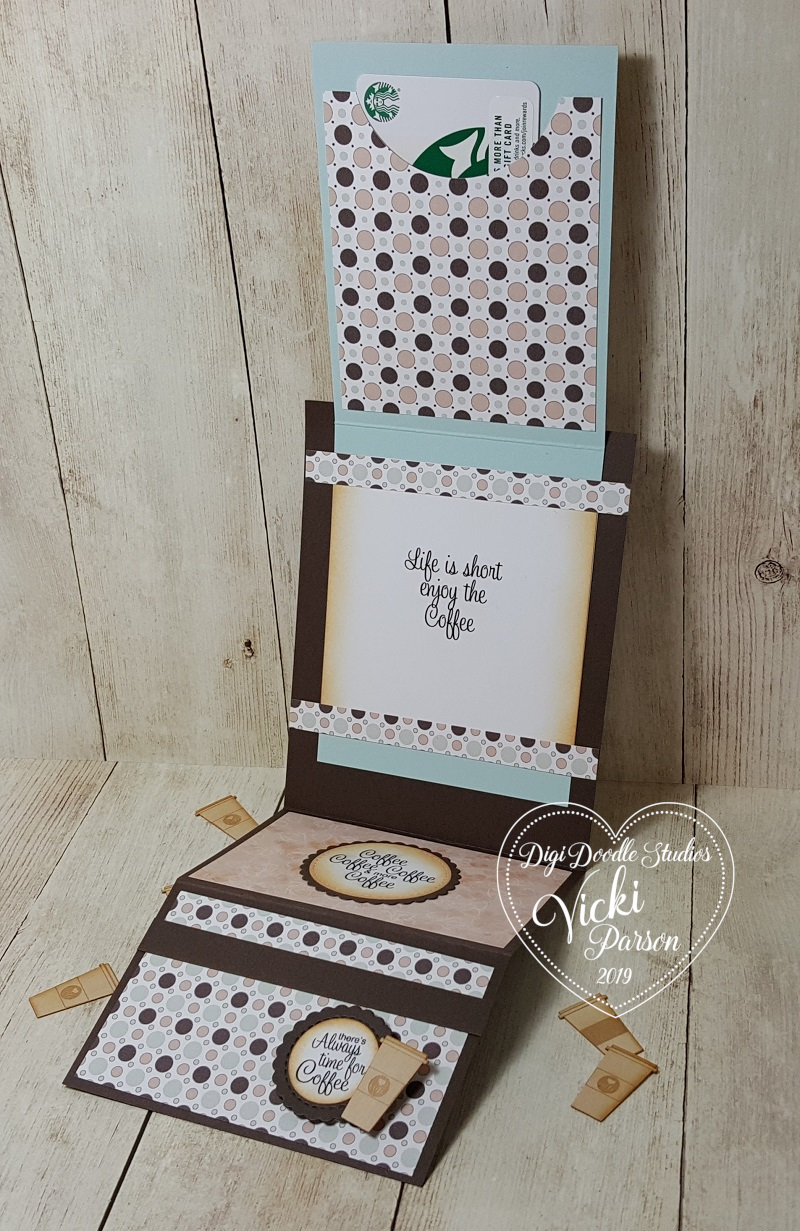
Isn’t she just adorable with coffee in hand?! This image is called “Ginger” from Digi Doodle Studios and I’ve got her all-colored up front and center of my Z-Fold Gift Card Holder.
If you have ever made a Z-Fold card, then this is something with a little bit of extra added fun with a gift card holder pocket on the inside, plus you can see how the card nicely displays on the front which is perfect for popping into an envelope to mail out to your coffee loving friend!
The papers that I’ve used for this work perfectly with the theme today which are also from Digi Doodle Studios called Coffee Break Digi Papers. (I love that I never have to worry about running out of my favorite pattern!!) There are also several sentiments from Digi Doodle Studios used on my project called Coffee Anyone Sentiments.
*If you want to see a video with detailed instructions on how to make one of these Z-Fold Gift Card Holders along with a sharing of the full collection of the digital papers that I’ve used on my project, check out the video below or CLICK HERE to view it on You Tube:
This is such an easy and fun project to put together especially for the up-coming Holidays, but as you can see this is very neutral so that I could easily use it for most any time of the year.
Here’s a closer view of “Ginger” and how I’ve colored her up with Copic markers. Of course, if you know me, I had to add a bit of sparkle somewhere. I took a glitter brush pen and added some sparkle to her pink bow, the heart on her coat and the lid and flower on her coffee cup.
I die cut her out with a stitched rectangle die and then layered a piece of brown cardstock die cut with a scallop rectangle die. For the around the edges of the image panel as well as the other sentiments I printed out, I sponged some Tea Stain Distress Ink around the edges. The sentiment were cut out with a stitched circle die and then layered with a piece of brown cardstock cut with a scallop circle die.
To keep the image panel in place, a foam dot was used at the bottom panel so that when you pull up on the flap it opens up:
And this is what is so fun, is that when you flip up the front panel, you see how it opens up with the fun coffee sentiments inside and the surprise gift card holder at the top!
I have an urge to go to Starbucks now! LOL!
I hope you’ve enjoyed my fun Coffee themed project today as well as the video tutorial on how to make one yourself! I’d love to see yours if you make one! If you have any questions about anything, please let me know!
Now to sip on some more coffee and join in on all of the coffee inspiration today! Thanks so much for stopping in and I’ll see you again soon!
As You Like It – Favorite Papers and Why? – Digital papers because I never have to worry about running out of my favorite pattern and I don’t have to worry about storage!
Hello friends! Today starts a new challenge for Cute Card Thursday! The theme for this week’s challenge is “Sparkles“. Usually when I think of sparkles, I usually think of Christmas or snow, but this time I went in a different direction for a reason…
Unfortunately, I needed a sympathy type of card this last weekend and it seems that I’m always making one as I need them instead of making several up at one time so that they’re ready and on hand when the time comes.
This is an older stamp set from Stampin’ Up! that I got a few years back during their Sale-a-bration time and it was a free set called “Heartfelt Blooms“. I actually really love the floral image and how detailed the image is so that you don’t have to color it if you don’t want to. It has been my “go-to” lately when I need something quickly.
I made it monochromatic green with the Old Olive color and Vanilla cardstock. The “sparkle” is that beautiful glitter paper behind the strip and sentiment. The sentiment was cut from oval dies and popped up with foam tape.
Hope you’ve enjoyed my simple card with sparkles today!
Thanks for dropping in and I’ll see you soon my friends!
Hello friends! I hope that you’ve enjoyed the weekend and having a great start to your week so far! Right now the weather guy is saying that we could reach freezing temps on Halloween night! About 3 weeks ago we were still in hot temps and then ran right into this cold weather! I wish I could’ve had a couple of days to open windows and it doesn’t look like I’m going to get that! I’m trying to hang onto the Fall Season for as long as I possibly can!
Speaking of Fall, I have this really sweet image from Whimsy Stamps to share with you today! He’s literally hanging on a tree limb for Fall!
This adorable image is one from Syliva Zet for Whimsy Stamps called Oak Tree Boy and I have him and his little bird friend all colored up in Autumn colors!
I knew I wanted to grab the papers from the Whimsy Stamps Rustic Wood and Brick digital paper collection, so I grabbed some more plaid papers from my stash and layered it with some gold mirror cardstock that I’ve also used for the scalloped circle layer behind the image. I attached some seam binding ribbon around these layers and added them to a 5″ square kraft card base.
I took some sparkly Prima leaves from my stash and glued them on before adding the circle image panel with some craft foam behind it. I glued on the seam binding bow and then I took the sentiment from the Whimsy Stamps Everyday Mini Sentiments and white heat embossed it over a piece of grey cardstock. I then cut it out with the Whimsy Stamps Quick Strips die set and attached it over top of the image panel.
Lastly, I added a few sequins and filled the centers with some Nuvo Glitter Drops.
Here’s a closer view of the image and how I’ve colored him in! For the “bells” on his hat and the little bird’s hat, I colored them, but then they were covered with a glue pen and some clear loose glitter. I took my Copic colors and did little “dots” (pointillism technique) around the image. I did this with a gold gel pen as well.
You can view the Copic markers that I’ve used on my creation below: