Birthday Wishes for Digi Doodle Studios

Hello friends!  🙂   Happy Labor Day!  I hope you’ve enjoyed your weekend and I hope you get a nice relaxing Labor Day Monday included with it!  I’m enjoying a nice relaxing long weekend hanging out with hubby.

I have a very sweet card to share with you today using an adorable image from Digi Doodle Studios:

Vicki-DDDS-PupParty-Sept2

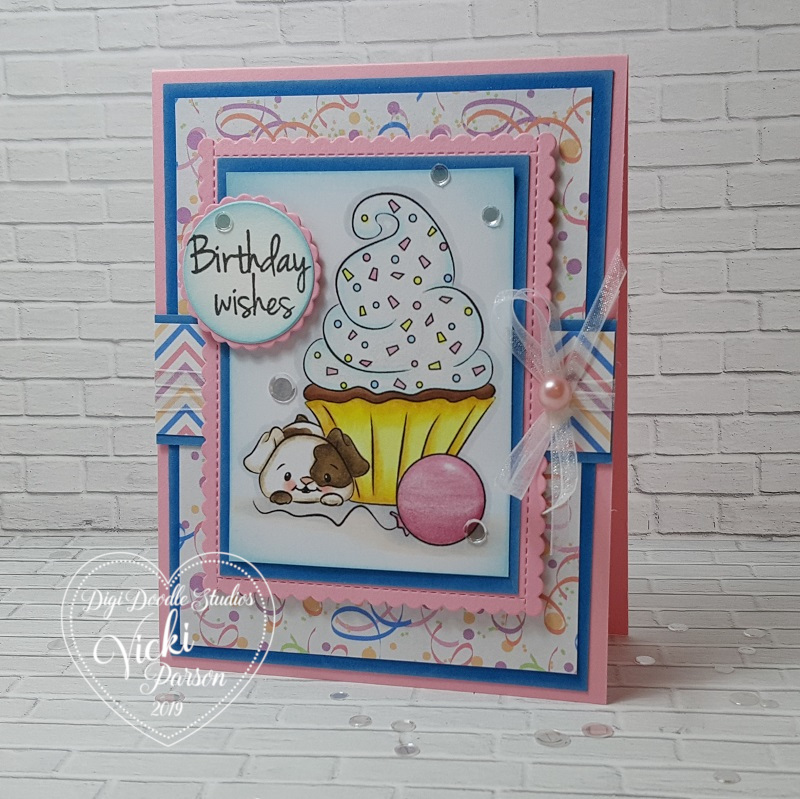
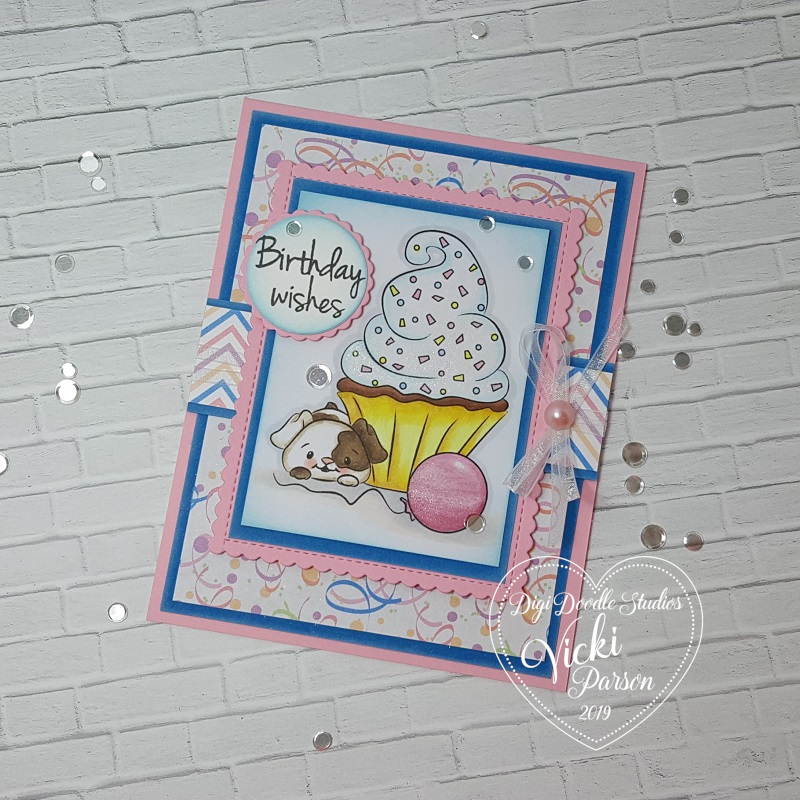
Awe!  Such a cute pup, isn’t it?!  I love how sweet this one turned out with the colors which I thought would be great for a little one’s birthday.  I have used this adorable image called Jasper’s Cupcake for my card plus some really fun digital papers from the Let’s Celebrate Digital Background Paper Collection!

I based my card around the colors of those papers and I just love the little pops of blue in them, so I found some cardstock to match up with them and started to put together my card design.

I layered the “Birthday Streamers” paper over a piece of blue cardstock and then sprayed it with some “Shimmer Craft Spray” (Which I’ll be sharing in an up-coming video so stay tuned!)  Then I mounted these layers onto a pink A2 sized top folding card base.

I then took a strip of the “Birthday Chevron” paper and wrapped some white organdy ribbon around it and attached it to the front of the card base.  I added my colored image panel onto a piece of blue cardstock and then mounted this over a piece of pink cardstock that was cut out with a stitched scallop rectangle die.  Lastly I added a sentiment and punched it out with a circle punch and added a punched out scallop circle in pink behind it and popped it up with foam tape over the design.  As you can see both of the image panel and the circle sentiment was sponged around the edges very lightly with some blue ink too.  (I almost forgot that I took some white ink and sponged around the blue edges of the cardstock too!)

I then added my ribbon bow to the right side of the card and glued a pink pearl in the center of it and added on the sequins randomly over the card.  I really like how that blue frames this design and picks up the blues from the papers too.

Vicki-DDDS-PupParty-Sept2-close

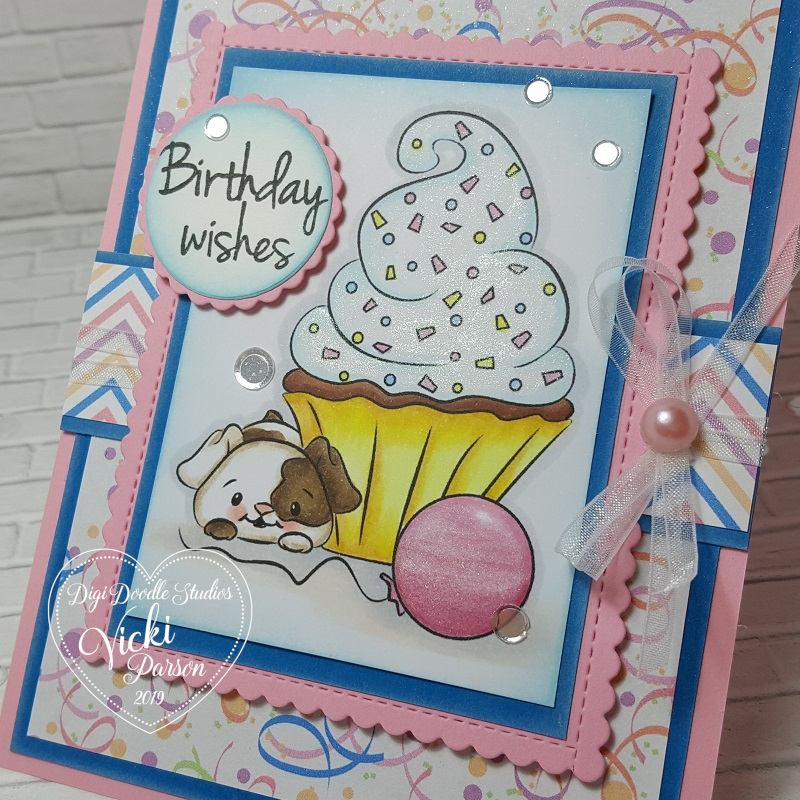
Here’s a closer view of the image and how I’ve colored it in!  I just adore that pup and it looked like he needed a few extra “spots”, so I added one on his back and then gave him a darker colored tail and a different colored paw too!

After coloring this up, I took a glitter pen and covered the pink balloon as well as the frosting on the cupcake for a bit of shimmer.  You’ve got to make that frosting look sugary right?!  I wish you can see the shimmer more in the background because it looks really cool!  You can sort of see it at the top of the photo.  However, if you check out my up-coming video, I’m hoping the camera will do it justice!

Vicki-DDDS-PupParty-Sept2-flat

I hope you’ve enjoyed my little party pup card here today!

Thanks for checking out my post today!  I appreciate ALL of your kind thoughts!  I’ll see you again soon!

Challenges I’d like to enter:

  1.  {Cupcake Inspirations} – CIC477 Food and Drink
  2. Little Red Wagon – Foodie
  3. Watercooler Wednesday – WWC236 All About Occasions
  4. Crafty Animals – #30 Anything Goes + animal
  5. Pearly Sparkles – Add a Ribbon and/or Bow
  6. Sheepski Designs – Die Cuts and/or Punches

Fussy Cut Falling Flowers for Fall

Hello friends!  Happy weekend!  I’m actually excited about it being the weekend!  This weekend is a nice long holiday weekend so I can spend time with hubby!  Yay!  However, I won’t be resting on my blog as there are lots of fun things going on since it’s the start of a new month!  So be sure to keep stopping by to see what’s going on!  🙂

Today I took out some flowers and fussy cut them and colored them in happy Fall like colors.

Vicki-BM-InkedFallFlowers

I’ve taken this Flowers stamp set and settled on about 3 different sized floral images to work with along with a couple of leaves.  I’ve colored them with Copic markers and then cut them out with my scissors…I set them aside.

I took a piece of white cardstock along with some masking paper and began working in the flowers for the background with Black Ink.  I made a mask for them as a went along and worked my way up.  After I was done, I took an ink foam blending tool and some soft blue Ink to sponge around the top and side of the panel.  I attached the flowers on with glue and some foam tape.  (I used thicker foam tape for the largest flower.)

For the banner, I heat embossed the sentiment from a Sentiment stamp set  over some Black cardstock with white EP and cut it into a banner and attached it to the card.  Lastly, I attached the sequins and then added some gold glitter to the centers.

I attached the white floral panel over a piece of yellow cardstock and then mounted that over an A2 sized top folding black cardstock base.

Vicki-BM-InkedFallFlowers-close

Here’s closer look at the flowers and how I’ve colored them in.

You can better see the sequins that I’ve used.  I actually had one of them laying on my table while I was assembling this card and thought the color matched up nicely with it.  Otherwise, I would’ve never thought to get those out to use on this particular card!  You never know what could be lurking on your table un-used! LOL!

Vicki-BM-InkedFallFlowers-flat

I hope you’ve enjoyed my card today!  🙂

Enjoy your weekend and I’ll see you tomorrow!!

Challenges I’d like to enter this card for:

  1.  Inkspirational – photo challenge
  2. Addicted to Stamps and More – Anything Goes
  3. The House That Stamps Built – A2819 Anything Goes
  4. Simon Says Stamp Wednesday – Anything Goes
  5. Creative Knockouts – Something To Say

Floral Watercolor Foiled Hello

Hello friends!

Here’s what I made for today:

Vicki-BMhop-Aug28ATG

I’ve been wanting to do some coloring… so I got out several of my Aqua Pigments and Watercolor Brushes and went to town with one of these floral panels!  What I love about these card panels is not only are they all gorgeous, but I love that the lines on the images are a bit raised as if embossed which helps with the watercolor process.

Vicki-BMhop-Aug28-panels

As you can see, I’ve only used half of my card panel cut diagonally on my card.  So after coloring up the panel, I thought it was a nice way to cut the panel in half and then still have another panel left over to create another card with later!    So there’s a tip for extended more life out of your card panels!

Vicki-BMhop-Aug28-ATG-close

Here’s a closer view of my watercolor and the pretty shimmer from the Aqua Pigments!  So as you can see, I also did some foiling!  I wasn’t sure if these panels would foil correctly or not, but as you can see only a portion of the image foiled.  I was fine with that as it still adds a pretty sparkle to my card.

I did take the “hello” die and cut that from cardstock and then added some glue over it with the Deco Foil adhesive pen and then foiled over it in my laminator with some Deco Foil Rose Gold Transfer Sheets.  Love the look of the foiling and how it turned out!

Vicki-BMhop-Aug28ATG-flat

For my card, I attached the watercolor cut panel over a piece of black cardstock that I also cut diagonally with the panel and then attached it over a piece of very heavyweight white cardstock.  Then I attached my foil die cut sentiment across the card and added some Acrylic Bubbles randomly over the card. I finished it with some Nuvo Dew Drop accents as well.

I hope you’ve enjoyed my card today!  I appreciate you stopping by!

Challenges for my card:

  1.  Simon Says Stamp Wednesday – Clean and Simple
  2. Allsorts – Feminine
  3. Pammie’s Inky Pinkies – PIP1934 Anything Goes

Triangle Corner Pop Up Card + video tutorial!

Today I’m sharing the Triangle Corner Pop Up Card.  I have actually received several messages and comments that people wanted to see a video tutorial on how to make one.  So I thought I would come up with a version that I could share to show the many different variations that you can come up with and the fun you can have with it!

Vcki-BMBeHappy-TriCornerPop-opened

This style is a much more elegant approach which is much different than a past creation I put together.  I love that you can change the look and have fun playing with different stamps and elements to fit inside the design!

For this one, I have taken the Rose and Butterfly stamp sets to stamp and Copic color.  I fussy cut out the images on my design.  I’ve used Jurassic 100# and White 100# cardstock.  The decorative paper is from the Rustic Florals paper pad.  I stenciled the bottom of the Jurassic panel with a stencil using some Unicorn Horn Glitter Glaze.  Both of the rose images along with the small heart circle on the easel card were popped up with some foam tape.

For the circle easel design, I’ve cut out a scallop circle with the white cardstock in the size that I thought would fit within the design.  Then cut the body of the card with other circle dies in the Jurassic cardstock and then the front with some more of that Rustic Florals paper that I’ve used in the background.  The sentiment below the butterfly and the hearts on the small circle were stamped from same stamp set.  All of the white panels (with the exception of the scallop circle) was ink foam blending with some grey distress ink.  To keep the card “locked” in this position, I’ve used the Mini Disc Magnets.

If you are interested in learning how to create one of these cards for yourself, then please be sure to check out my video below.  CLICK HERE to view on You Tube.

These cards can look really intimidating, but once you see the measurements of how to put one together, they’re really easy and fun to make!

Vicki-BMBeHappy-TriCornerPop-unfolded

Here’s what the card looks like completely opened up.  You can see on the left bottom panel that I’ve taken that rose from the stamp set again and stamped it in the corner with some grey ink after ink foam blending around the edges of it.  This will be the area that I’m leaving for a personal message.

To fold it down to a 4″ square card that’s close you will start by folding down on the top and then fold it over from the right side to the left.  This will completely close it up.

Vicki-BMBeHappy-TriCornerPop-front

Here you can see that the card is completely closed to a 4″ square size minus the rose leaves sticking out which I don’t mind.

I took another panel of the Jurassic cardstock for the front of the card and sponged around the edges of it with the white Ink and then also stamped the rose again in the corner of it.  Because I had several dimensional and extra layers on this card, I had to use a ribbon to tie it together to help it stay closed up.  You might need an envelope that is slightly larger than an A2 envelope, but if you use less layers and dimension, it should fit in an A2 size envelope.

Hope you’ve enjoyed my interactive card and tutorial today!  Thanks so much for dropping in with me! 

Challenges I’d like to enter this card for:

  1.  Cardz 4 Galz – #103 Wings
  2. Crafty Cardmakers – It’s a Bug’s Life
  3. Through the Craftroom Door – Anything Goes
  4. Try it On Tuesday – In my Garden there is….

Oceans of Love for Digi Doodle Studios

Hello again my friends!  I’m back to share this card I made using this adorable image from Digi Doodle Studios:

Vicki-DDSNixie-Aug20

Isn’t she adorable with her little underwater crab friend?!  This is the Nixie Mermaid digital stamp from the Digi Doodles Studios “Under the Sea” collection.  I thought she was so cute and I actually had her colored up before I ended up hurting myself and had to leave.  I finished out the card when I got better.

I have also used some fun digital papers and a sentiment that work well with this particular image.  The pretty pink patterned papers you see in the background come from the Digi Doodle Studios Summer Breeze Card Making Paper collection.  The sentiment came from the Digi Doodle Studios Mermaid Sentiments set.  I printed out the sentiment and cut it out with a ticket die, sponged around the edges with the turquoise ink color and layered it over the same turquoise colored cardstock I’ve used throughout my layout.

The layout idea came from a sketch challenge that I’m entering for below this post.  I have several layer panels including the fun turquoise sparkly paper that I’ve used that was cut with a wave border die and then sponged with some white ink.  I added some pearls to each corner of the image panel, wrapped some white organdy ribbon around the card front base, tied a bow and added a silver bow where I have attached some silver string and a starfish charm to it.  The entire card measures 5.5″ square.

Vicki-DDSNixie-Aug20-close

Here’s a closer view of the coloring that I’ve done on this mermaid image.  Mainly colored with Copic markers, but I’ve used a gel pen to color the sprigs next to the flower in her hair and the bracelets around her wrists.  I took a glitter brush pen and covered her entire fish body and the bubbles in the water with.  (Of course it looks so shimmery in person!)  I then took some glossy accents and covered the little crabs eyeballs with and then some liquid pearls to dab a dot over the pearl inside the oyster.  This mermaid image panel was popped up with foam tape over the card front.

Vicki-DDSNixie-Aug20-flat

I hope you’ve enjoyed my underwater mermaid card today!

Thanks so much for stopping in today!  I’ll be back tomorrow with something fun!

Challenges I’d like to enter this card for:

  1.  Cheerful Sketches – August Challenge
  2. The House That Stamps Built – A1419 Tic-Tac-Toe (I used first row down)
  3. Pammie’s Inky Pinkies – PIP1933 Anything Goes

Never Fear, Super Penguin is Here!

Hello friends!  You ever have that certain someone in your life whenever you feel that things are falling apart, that there’s one individual that makes you feel everything is going to be alright?  It’s nice to know that you can always depend on that person to come when you call, right?  They deserve special recognition like a hand-made card that I’ve made today:

Vicki-PenguinSH-Aug20

Isn’t he adorable?!  This is the Penguin Superhero digital stamp released this month (previously released in red rubber) from Whimsy Stamps.  I have combined some older (retired) stamps from Whimsy Stamps along with some fun ink blending and coloring to come up with this design.

I’ve used some kraft colored ink to stamp the buildings on the panel behind penguin and then used some ink blending and distress inks for the little “sidewalk strip” the penguin is standing on along with the city scape sky.  I took a stencil to go over top of the the sky background.  I popped the  fussy cut penguin over top of that with some foam tape.  This was mounted over a black cardstock layer that was mounted over the card front base and popped up with foam tape.

To make the card front, I randomly stamped some images with white ink over a kraft colored card base that I matted onto a white layer which was then mounted over a black A2 sized top folding card base.  I took a strip of red cardstock and made my own banner with it using scissors.  I did the same for the sentiment banner in black cardstock that I white heat embossed over it.  Lastly, I took some silver stars and glued them on the design.

Vicki-PenguinSH-Aug20-close

Here’s a good close look at the coloring that I’ve done on this cutie.  Something different that I’ve done here is to color with both Copics and pencils on this one.  Basically the reasoning for doing this was because a couple of my Copic markers are running out of ink and it was hard to get the blend that I wanted…so I finished it off with Prisma colored pencils.  (I’m waiting for refills to arrive! LOL)  Here are the Copics that I used on my coloring:

  •  Penguin body – C8, C5, C3, C1, C0, R00, YR27, YR24, Y21
  • Cape, letters – R39, R37, R35, R32
  • Shirt – B39, B37, B34
  • Letter outline – Y38, Y35
  • blended with Prisma colored pencils on penguin body, cape and shirt

The penguin was fussy cut with scissors and popped up over the scene with foam tape.  I also gave the penguin’s shirt initials a bit of shimmer with the Wink of Stella Glitter Brush Pen.

Vicki-PenguinSH-Aug20-flat

I hope you’ve enjoyed my card with this sweet Whimsy Stamps Penguin!

Thanks so much for stopping in and I’ll be posting again shortly…stay tuned!

Challenges I’d like to enter this card for:

  1.  Krafty Chicks –  #468 masculine
  2. The Creative Crafters – Anything Goes
  3. Sheepski Designs – Animal Madness
  4. QKR Stampede – #359 Anything Goes

Steampunk Style

Hello friends!  Welcome to the weekend!  Hope you’re all doing well and have some fun plans!  I have some happy craft time planned while hubby works overtime!  🙂

I am SO excited as yesterday afternoon I had time to play and I couldn’t wait to make something to share today with you:

Vicki-BM-SteampunkBox

This was something a bit different for me as I don’t believe that I have ever gone in a “steampunk” direction before with my cardmaking, but I had so much fun putting the different metallic, sparkle and shimmer on this!

I started out with a white cardstock base A2 sized and top folding.  I took a piece of masking paper and used a circle die to cut out an area.  I used the negative of that piece to go over the entire front of the card base.  I then took a Stencil along with the sample size glitter glaze from the kit and spread it over the circle opening on the card base.  (Set it aside to dry.)

I then took some paper from the kit and used the embossing folder from the kit to get the texture and then sponged one some white Ink to bring out the texture.  I also used a circle die cut a bit larger than the circle on the card base to make a frame with it.  I attached the silver ribbon from the kit around the bottom of it and then attached the panel over the white card base.

Lastly, I colored the hot air balloon image from the stamp set with not only the Aqua Pigment, but also some other metallic Aqua Pigments like Penny and Brass!  The roses were colored as well.  There is a cut file for this stamp set, but I decided to just fussy cut around it this time.  I popped it up over the card with foam tape.  I then took some of the sequins from the kit and attached it randomly to the design.

The photo doesn’t do the sparkle and shimmer justice.

Vicki-BM-SteampunkBox-close

Here’s a closer look at the hot air balloon image along with the pretty sparkle from the Glitter Glaze.  I like the different color metallic to play with!

Vicki-BM-SteampunkBox-flat

I hope you’ve enjoyed my card today.  I had lots of fun playing around with it and I know that I’m not done yet!  I have more ideas floating around in my head that I’d like to try, so stay tuned!

Thanks so much for dropping in today!  I appreciate each of  you very much and I’ll see you soon!

Challenges I’d like to enter this card for:

  1.  Always Fun – Circles
  2. Crafty Creations – Anything Goes
  3. Creative Knockouts – Sparkle & Shine
  4. Creatalicious – Anything Goes with optional:  add some sparkle
  5. A Bit More Time to Craft – Anything Goes

Add a Quote For Cute Card Thursday

Hello friends!  It’s Thursday and time again for a new challenge over at the Cute Card Thursday Blog!  The theme for this week’s challenge is to “Add a Quote” to your project!  I happen to love quotes and find them very inspirational to help lift my spirits and I think it’s a wonderful type of card to send to someone who might need a little lift.  So here’s the card I created for the challenge:

Vicki-CCT595-BMQuote

There’s always something magical about a night sky especially with some soft glowing lights hanging up in your backyard!

Starting with the background, I took some watercolor paper and the Night Shift Aqua Pigments along with some sprayed water and some acetate to move around the watercolor and mix them together to create the “night” look I wanted for the background.  I then took some circle stencils that I made myself with some circle dies and white Ink with a sponge to create the “bokeh effect” over the background in the upper portion of the design.  Then I white heat embossed with white EP using an image from the stamp set.  I also heat set the quote at the bottom.  I also added some “splatter” at the top of the card with some watered down Pearl Aqua Pigment and a brush.  I then colored in some of the open stars with it. I’ve used some Brown Aqua Pigment to color in the branch too.  I used some yellow chalk to make the “lights” around the branch glow and then covered them some glitter.  Then I took some TINY star confetti and glued them around the branch area for more sparkle.

It’s hard to photograph all of that shimmer from the Night Shift Aqua Pigments and sparkle that’s all over this card, so I thought I would share it in motion:

I want to keep replaying so that I can see that shimmer in the background!

Vicki-CCT595-BMQuote-close

Here’s a closer look at the quote I’ve used in case you couldn’t read it.   “It is important to remember that we all have magic inside of us.” – JK Rowling  … Love that!

Vicki-CCT595-BMQuote-flat

You might be able to see a little bit of that shimmer on the background here if you look at the left lower portion of the card.

I hope you’ve enjoyed my card today and I appreciate you stopping in!

Challenges I’d like to enter:

  1.  CCEE Stampers – Embossing wet/dry CCEE1932
  2. Crazy 4 Challenges – C4C497 Inspiration from a Book (Harry Potter)
  3. Allsorts – Sun, Moon and/or Stars OR something for Baby (stars)
  4. Through the Craftroom Door – Anything Goes

Faux Metal Technique + video

Hello friends!!  I’m so excited to share with you this fun technique that’s not new, but a cool look to try with your embossing powders!

Vicki-BMHOP-subscriptions

I really love how this one tuned out!  I have used the “Faux Metal” technique on my card along with the “emboss resist” technique.

In order to share the steps of this card, I’ve made video so you can see how I incorporated these techniques into my design.  CLICK HERE to watch on You Tube or check it out below:

Vicki-BMHOP-subscriptions-close

Here’s a closer view of the impressed flower into the embossed panel.  It’s fun to run your fingers over the flower.  I happened to have found the perfect accent for the center of the flower too!  I think it really picks up the pretty colors in the card.

Vicki-BMHOP-subscriptions-flat

I hope you’ve enjoyed my card today!  Thanks for dropping by!

Challenges I’d like to enter this card for:

  1.  Rainbow Card – Passion for Purple
  2. Crafty Friends – Lace/Ribbon

Windy Day Cinnamon For Whimsy Stamps

Hello friends!  Can you feel it in the air?  Autumn is on the way along with the crisp cool air and blowing leaves!  I know that some of you had said you’re not looking forward to Fall when I asked, but I absolutely love everything about it including the sweater weather season & flavors like pumpkin spice and cinnamon!  Speaking of which, I have a fun Autumn color inspired card o share with you today:

Vicki-WSWindyDayCin-Aug13

This cute image is called Windy Day Cinnamon from Whimsy Stamps.  I thought she looked as happy about Fall coming as I do, so I went with those colors in mind when creating this card.  After coloring her in with my Copics, I cut her out with a banner shaped die and went around the edges of it with tea dye distress ink and layered her onto another banner layer and set it aside.

For my card base, I took some orange colored plaid pattern paper and die cut it out with a wonky stitched rectangle die.  I took a double layer of twine and wrapped it around this piece and tied a bow towards the bottom thirds of the piece and then attached it down to the brown A2 sized top folding card base.

I took the image banner panel and added a piece of craft foam to pop her up over the card base.  I took a chipboard sentiment from my stash and added some foam tape to one side of it and glued the other side to the image panel.  I added a flower to the center of the twine bow along with a few others along the side.

Vicki-WSWindyDayCin-Aug13-close

Here’s a closer view of how I’ve colored Cinnamon with Copic markers:

  • Coat, Hat:  YG61, YG63, YG67
  • Shoes, Purse & Coat Buttons:  E31, E33, E35, E37
  • Scarf, Mittens, Hat Flower:  YR12, YR14, YR18
  • Hair:  YR30, Y32, E43
  • Skin:  E000, E00, E11, E21, R20, R00
  • Shadows:  E41, E42, E0000
  • Used a gel pen for the center of the flower on her hat and the purse closure button

Vicki-WSWindyDayCin-Aug13-flat

I hope you’ve enjoyed my Autumn color inspired card today!

Thank you so much for dropping by and I’ll see you again soon!

Challenges I’d like to enter this card for:

  1.  Creative Inspirations – Something Seasonal
  2. QKR Stampede – Anything Goes #358
  3. Pammies Inky Pinkies – PIP1932 Anything Goes