Winnie the Pooh Baby Shower

Hello friends!  Last month was a very busy month for me and I know that I had mentioned a couple of times that I had some things that I was working on “behind the scenes”, so I thought I’d share what I’ve been doing.

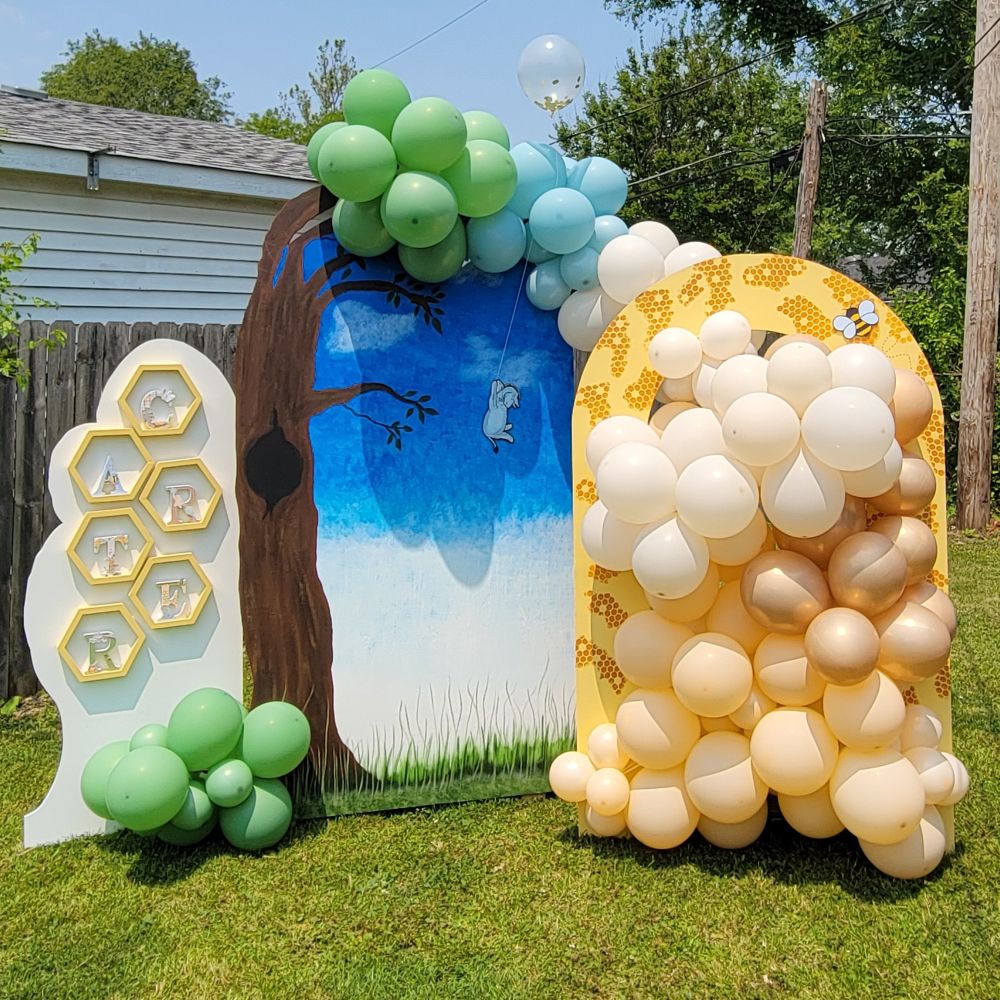
At the end of last year, my son surprised us with the news of a new grandchild coming!  A few months ago, I was asked to help with some decorations for their baby shower and of course I wanted to help!  Here’s a photo of the soon-to-be parents in front of a back drop that my husband cut out and I hand painted.  My husband and I also put together the balloons around it:

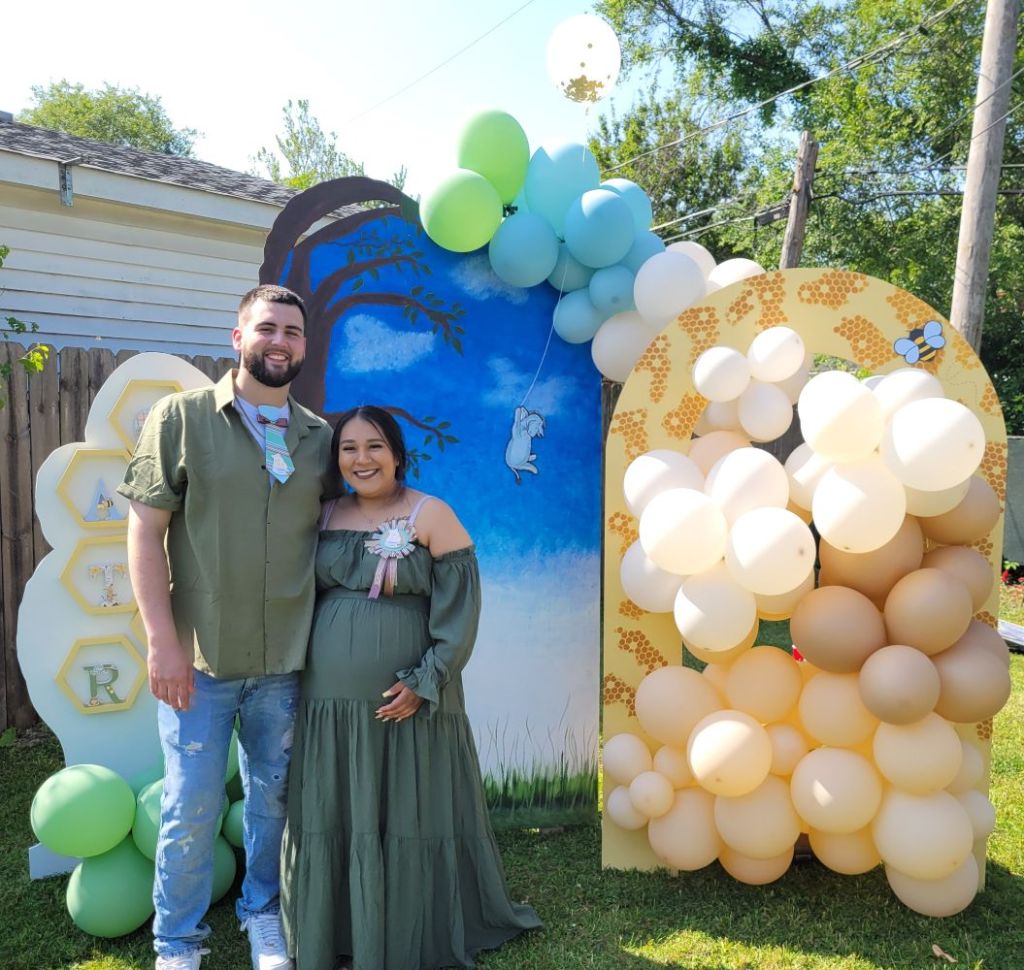
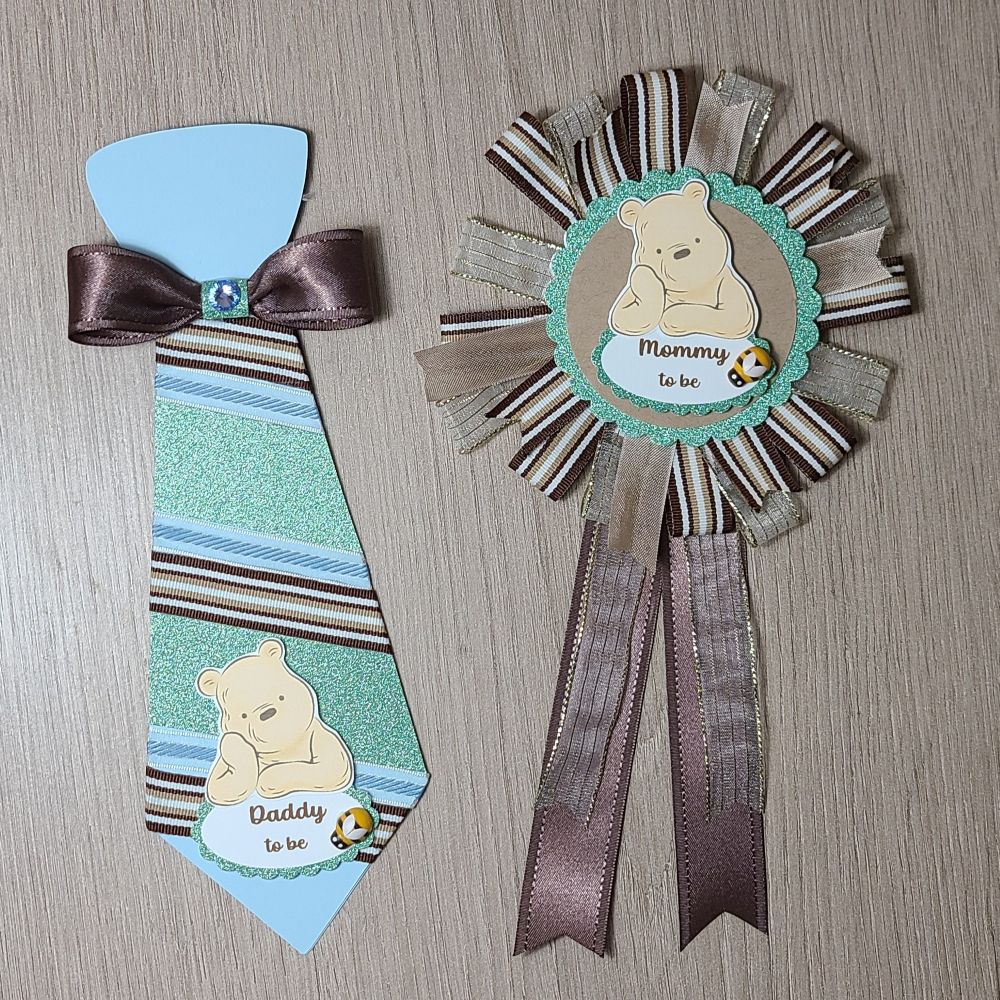
You may also notice, on the couple, they’re wearing a corsage that I made for each of them to wear.  My son wasn’t too thrilled about wearing it, but he humored his mom.  LOL

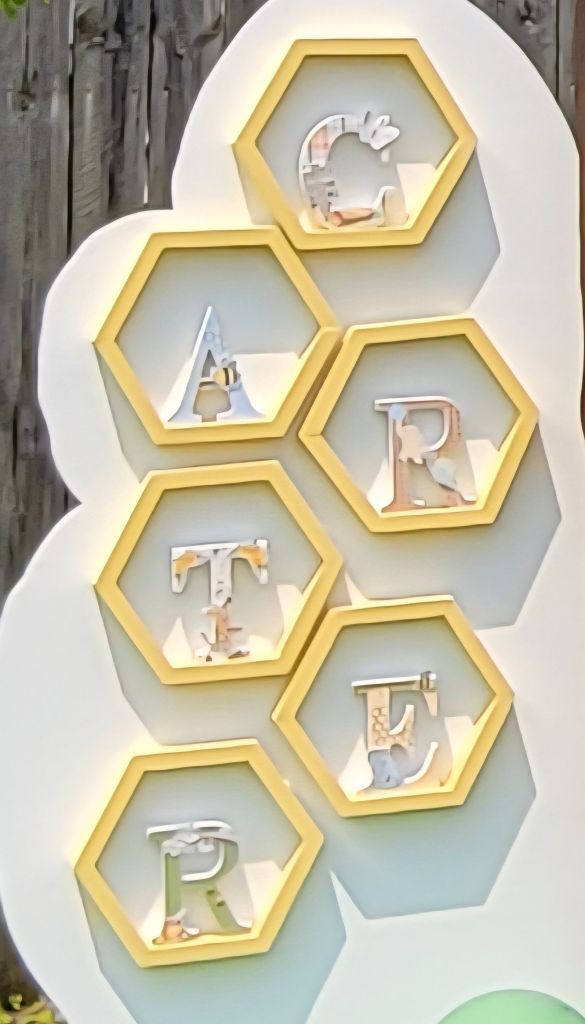
On the left white panel, There are hexagon shelves that my husband put together and there are wooden letters of the baby’s name.  I decorated each of the letters with Winnie the Pooh papers and characters.  I wish I had taken a better photo of them, but I tried to zoom in a photo with the gallery below.

You can see how tall each of the panels are.  My son is over 6 foot tall.  I don’t paint much, so painting something this large was a big undertaking, but I enjoyed the labor of love doing all of these things for them.

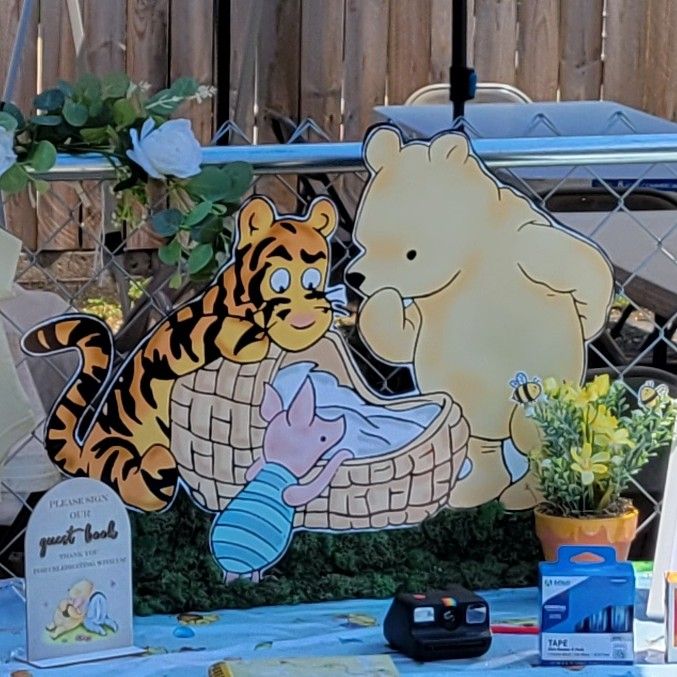
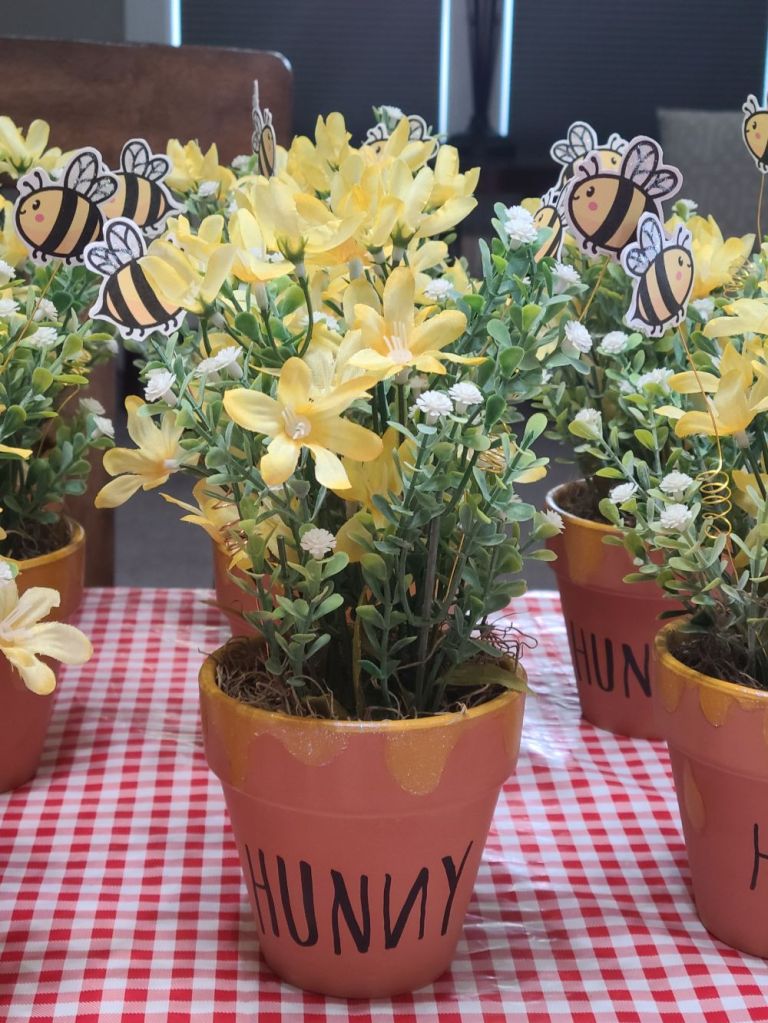
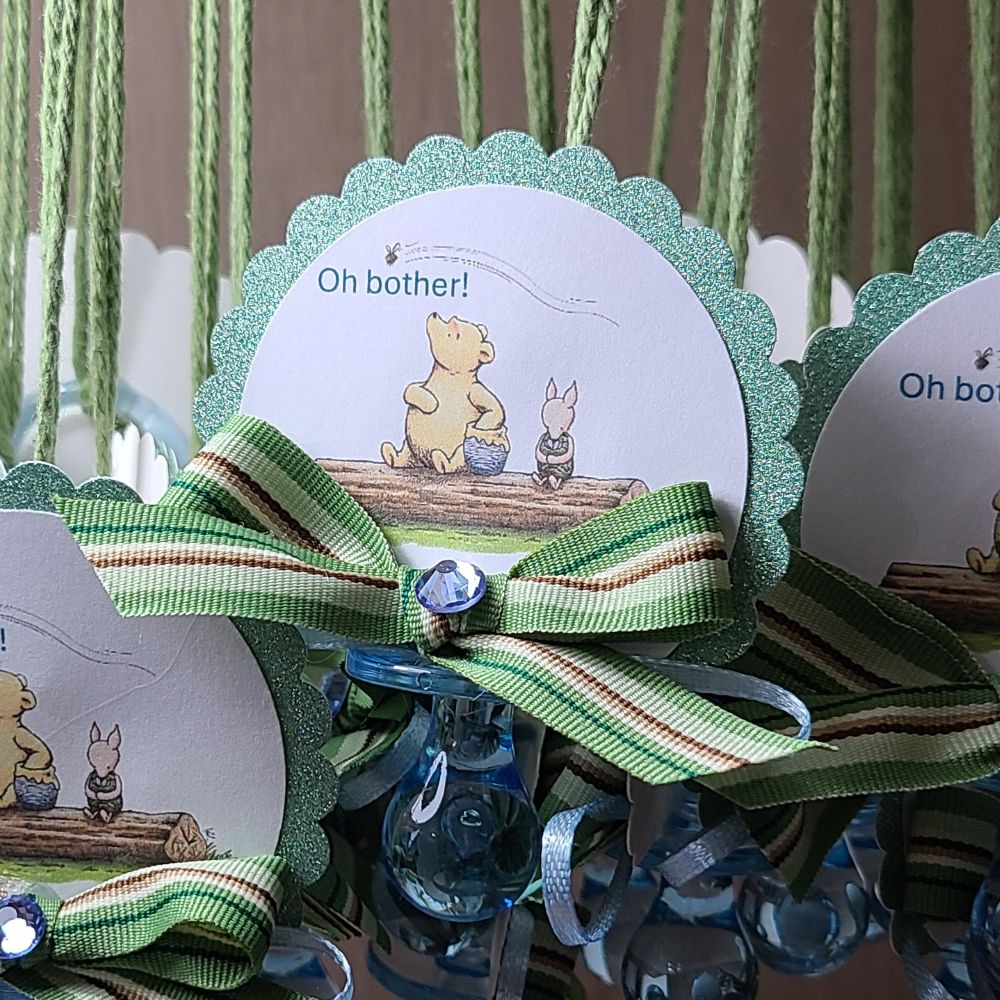
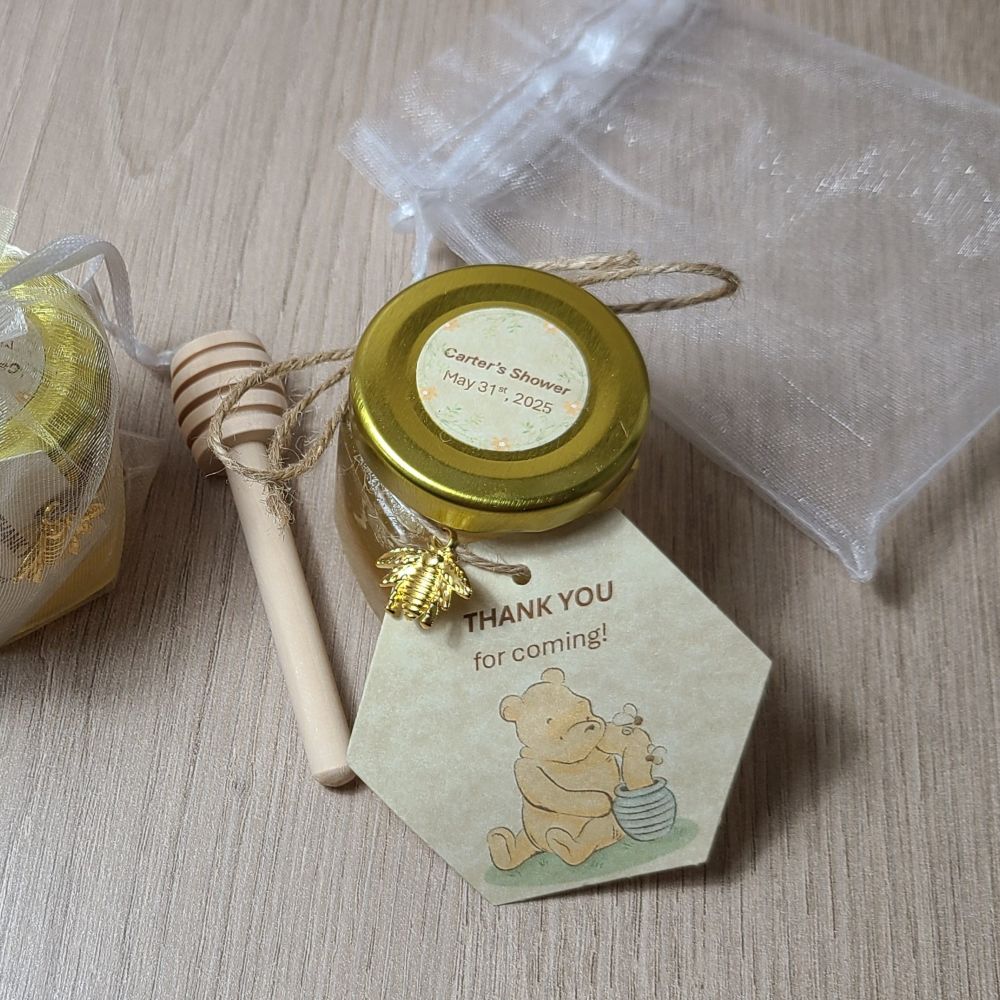
  • Below you can see all of things that I’ve made for the baby shower and there is a brief description with each photo explaining what it is.  If you are on my website, please click on each photo to enlarge it and scroll just beneath it to read the description:

They put in so much work having this baby shower with lots of food, yummy desserts and drinks.  I know with all of the set up and cleaning up they were wore out!  We were also wore out when it was finished up.  LOL  Now it’s just the waiting to meet the newest member of the family by the end of this month.  We are certainly looking forward to it!

Hope you’ve enjoyed my post today…and now you can see why I’ve had “BEEs” on my mind lately! LOL  Thanks so much for stopping by!

Penny’s Guest-UnFROGettable

Hello friends!  Welcome to June!  The “lazy days” of Summer are here!  I’m hoping I can be lazy this Summer, but not sure about that! LOL

I’m very happy to share my project with you today as a guest design spot I won from challenge at Penny’s Paper-Crafty Challenge Blog!  This is a fortnight (bi-weekly) challenge starting today and the theme is always Anything Goes Using Paper!  Hope you will stop by the blog to see the team’s inspiration and play along!  Here’s the project I made for the challenge:

They gave me this super cute image called “Frogtini” by Pattie’s Creations to use, so I colored him up with Copics and added some stenciled waves at the bottom along with some blending of yellows and blues above him to create this relaxing scene.  I cut him out with a stitched circle die and layered him onto a silver mirror scalloped die cut circle.

I used a fun card sketch I found along with pulling some papers and a sentiment out from an older card kit I had in my stash to complete the card.  For the A2 sized top folding card base, I used a corner chomper to round the edges and then I used some more of the yellow ink over the background where the circle image was going to be for a bit of softness and color.

I embossed a strip of the silver mirror cardstock with a 3D embossing folder and rounded the edges of that strip along with the green paper strip to create my layout.  I popped up the circle image with foam tape over top.

Lastly, I white heat embossed the “unfrogettable” sentiment and cut it out with a coordinating die and placed it at the bottom of the circle with foam strips behind it.  I used the other part of the sentiment and stamped it directly above the frog’s head.

For some more finishing touches, I attached some green sequins, used a glitter brush pen for the frog’s sunglasses and covered the martini glass with Stardust Stickles along with some green Stickles for the centers of the green sequins.

  • Hope you’ve enjoyed my card today!  I had fun coloring him up!  Thanks so much for stopping in and I wish you a very hoppy and relaxing day!🐸

Challenges:

  1. Hand Stamped Sentiments Sketch
  2. As You Like It – Favorite Type of Embossing & why? (I really like both, but my all time favorite is the heat embossing because it’s so magical!)
  3. Crafty Catz Anything Goes with twist: “make us smile”
  4. Creative Fingers Anything Goes
  5. Daring Card Makers – Tic Tac Toe (I used across middle row)
  6. Cut It Up Anything Goes with a die cut (used two circle and coordinating sentiment dies)
  7. Gem of a Craft Anything Goes Cardmaking/Papercrafts

Who Let the Dogs Out?

Hello friends!  Hope that you’re doing well and enjoying the month of May so far!  As I’ve mentioned in my previous post, I’ve been very busy working on projects “behind the scenes” that I will be sharing at a later date.  The next couple of posts are scheduled as I will be away until next week.  But I need to catch you up on the new challenge for now…

Today starts a new challenge over at the Alphabet Challenge Blog!   We are now onto the letter “D” and the hostess has chosen “D” is for Dogs  *Remember that this is a bi-weekly challenge, so you have two weeks to enter*  I hope you will find some time to play along!  Here’s what I’ve created:

I’ve pulled out this adorable stamp from my stash by Newton’s Nook called Birthday Barks and I’ve colored the stack of dogs along with a few extra balloon and gift images with Copic markers and cut them all out with the coordinating dies. (I’ve used a white gel pen for highlights and a silver gel pen for the bottom dog’s collar.)  Some of the balloons and gift images were glued on the blue background, but the stack of dogs and a few of the other images were popped up with foam tape.

I’ve used some papers from the Newton’s Nook Birthday Woofs Paper Pad and the blue background was made using a solid balloon image from my stash and stamping it with white ink.  I’ve black heat embossed the sentiment from the Birthday Barks stamp set and added a few clear sequins to the background.

This will make a great birthday card for a guy or girl!  (I’m sure I’ve probably missed someone’s birthday somewhere! LOL)  Hope you’ve enjoyed my card today and will stop by the challenge blog to see what the rest of the team has come up with.  Pull out those dog stamps and come join in the fun!

Thanks so much for stopping in today and I’ll be back with another post tomorrow!

Challenges:

  1. Allsorts Anything Goes (Happy Birthday!)
  2. Pammie’s Inky Pinkies – PIP2521 Anything Goes
  3. Passion for Markers 4 legged Friends (colored with Copics)
  4. Simon Says Stamp Wednesday – Anything Goes
  5. Krafty Chicks Anything Goes

HEY! “C” is for Circles!

Hello and happy Friday my friends!  After things got heated up the last couple of days, I think I’m ready for a couple of days of cooler weather!  I don’t want to skip Spring by going straight into a hot Summer!  Hope you have some great things planned this weekend!

Today starts a new challenge over at the Alphabet Challenge Blog!   We are now onto the letter “C” and the hostess has chosen “C” is for Circles  *Remember that this is a bi-weekly challenge, so you have two weeks to enter*  I hope you will find some time to play along!  Here’s what I’ve created:

I do love me some circles and I thought I would just use them all over the place for this challenge!  I pulled out my Taylored Expressions “Talking in Circles card kit” that came out earlier in the year and no longer available.  However, the panel that I’ve used to create this design are still available in the store called “Talking in Circles A2 Sugar Cube Maps“.  They make it easy to follow where placements need to be and lined up.

I used the TE A2 Thin Frame Cutting Plate for the black frame around the circles.  I thought I would try and use another cutting plate, but the design pretty much covered it up.  I layered this whole panel over a top folding A2 white card base.

For the sentiment in the center, I used another circle die from the TE, but I don’t think it’s in the store any longer.  I cut the “HEY” circle out from black cardstock and layered some vellum behind it.  I white heat embossed the “You are awesome” sentiment over black and cut that out with a Simply Strip die.  This was popped up with a foam strip over the design.

Thanks so much for stopping over today!  I hope you’ve enjoyed my card and you will take a hop on over to the challenge blog to see what the rest of the team has come up with.  

See you soon!  In case you need to know…you are awesome!

Challenges:

  1. Love to Scrap Anything Goes
  2. Allsorts Paper Piecing or Anything Goes (Not sure if this is considered paper piecing)
  3. Ally’s Angels Anything Goes
  4. CRAFT Anything Goes
  5. The Creative Crafters Anything Goes
  6. Crafter’s Cafe Anything Goes optional: no squares

Flowers for Sparkles Monthly!

Hello friends!  I hope that you’re enjoying this month so far!  The weather has really started to warm up now and it’s been nice and sunny to be outside.  I have so many projects that I’m working on, so my blog has been a bit neglected lately.  I will be able to share with you all of the things that I’ve been working on later…but for now, let’s talk about flowers!

Today starts a new challenge over at Sparkles Monthly and this time it’s my turn to pick a theme and I have chosen “FLOWER(S)  for this month.  Flowers seem to work for so many occasions which is why I chose it.  Here’s the project that I came up with:

I needed a card for Mother’s Day this last weekend, so I thought I’d pull out my stash of die cut flowers from Taylored Expressions and create several pieces in different colors to place inside my wheel barrow.

I’ve die cut several pieces from the Fresh Cut Flowers die set in pineapple, guava, dried fig, chocolate truffle (centers) and green tea (stems and leaves).  I used the same color of ink to sponge a bit of dimension over the centers and then splattered some white Copic ink over just the flowers and the toffee background that was stamped in toffee ink with the Weathered Words Background stamp.  

I arranged all of the die cut flowers and leaves behind the Farmhouse Wheelbarrow die cut from chocolate truffle, toffee and woodgrain textured cardstock.  I also used the Building Blocks Happy Additions to white heat emboss over a piece of chocolate truffle and cut out with the coordinating die.  The toffee background was placed over an A2 sized top folding white card base and then I added a white frame die cut from the A2 Thin Frame Cutting Plate for an “anchor/ground” for the wheelbarrow to sit on.  The sentiment greeting was popped up with a foam strip and then I’ve added a few enamel dots including in the center of the wheel.

  • Thank you so much for stopping in today!  Hope you’ve enjoyed my card and that you will stop by the challenge blog to see the rest of the inspiration from the team.  I look forward to seeing what floral creations you share in the gallery with us!

Challenges:

  1. Craft Rocket Flowers
  2. 613 Avenue Create – Anything Goes with optional: Floral Delight
  3. Creative Friday Spring
  4. Pammie’s Inky Pinkies – PIP2519 Anything goes
  5. Simply Create Too Anything for a Woman
  6. Little Red Wagon ‘D’ is for diecut

B is for Butterflies!

Happy Friday my friends!  Are you ready for the weekend?  I know that I don’t have a regularly scheduled workday every day, but I can still always feel a weekend ahead! LOL  Hopefully I can enjoy some time doing some fun projects that I’ve been wanting to get to and go outdoors!  

Today starts up a new challenge over at the Alphabet Challenge Blog!   We are now onto the letter “B” and the hostess has chosen “B” is for Butterflies (use more than TWO of them.)  *Remember that this is a bi-weekly challenge, so you have two weeks to enter*  I hope you will find some time to join us in the gallery!  Here’s what I’ve created:

I do love me some butterflies!  I love using soft pastel colors for the Spring months too!  I have used this set before, but I have gotten it back out again for my mini slimline card today.  I’ve used the Taylored Expressions Beautiful Butterfly Wings & Coordinating dies to complete this.

I white heat embossed the three wings onto vellum and die cut them out.  I also used the die cut to cut out the colored cardstock butterflies for each one along with their center antennas.  Glued them together and set aside to work on the layout.

The base of the card is mini slim size of 3.5″ x 6″ side folded.  I die cut a white layer with the TE Pettie Scallop Mini Slim dies and then layered another white piece using the Stitched Mini Slim dies.  Before I attached it, I splattered some black paint over it.

I then attached each assembled butterfly to the layout design and added the white heat embossed sentiments between them with foam tape.  The sentiment came from the TE Fluttering By Mini Strips & a coordinating strip die.  I finished by added a rhinestone in the center of each butterfly.

**Just a special attention to the tab pages I’ve added at the top of my blog that shows I now have information about purchasing a handmade card from me as well as another page of craft supplies I have available for purchase if interested.  I will regularly update so check back often to see what’s there!**

  • Thank you for taking the time to stop in and share your support!  It really means a lot and I enjoy hearing from you!  Whatever your weekend brings, I hope there’s some good in there somewhere!

Challenges:

  1. Simon Says Stamp Wednesday – Anything Goes
  2. Krafty Chicks Birthday
  3. AAA Birthday – Anything Birthday Goes (Happy 6th birthday!)
  4. Crafts Galore Encore Anything Goes
  5. As You Like It – Soft or Bold Colors? Why? (I prefer soft tones with calm colors as they seem more pleasing to me)
  6. Love to Craft Anything Goes

Mix It Up with Paper Piecing!

This is my second post for today, please scroll down to see the Pearly Sparkles Guest Challenge details or click HERE.


Hello again my friends and Happy May Day to you!  I think I’m so ready for May so that I can start being outside with hopefully better weather than what April gave us!  

Today also brings us to a new challenge over at the Mix It Up Challenge Blog.    The challenges always run for 6 weeks so there is plenty of time to enter.  The theme given for us this time is: Paper Piecing or you can always do the ‘Anything Goes” too.  Here’s the card that I came up with for the challenge using the theme:

Look at this darling little gnome holding on tight to his balloons!  I got this adorable stamp from Ink ‘n’ Splatter a while back, but this is the first time I’m using it.  He’s called Party Gnome Celebration.  *Today is also the start of this company merging back up again with Digi Doodle Studios!  Dina has some cute artwork with her digital and clear stamps both!  You can see some past creations I made on my blog here under the category:  Digi Doodle Studios.* 

I’ve stamped the party gnome, colored him and then used some pattern paper from my stash to paper piece onto the balloons.  I just stamped the same image over different pattern papers, fussy cut each balloon out and glued each balloon in place.

For the background, I thought it would be fun to use some more of the pattern papers to create inchie squares and make a layout with them.  I attached the squares to the card front and then I embossed over top of it with a very old “Dotted Cuttlebug” embossing folder.  (If you’ve been a crafter for a while, then you know it’s old! LOL)  I black heat embossed the sentiment from the Party Gnome stamp set and cut it out with the same wonky stitched rectangle die set I’ve used for the front panel and popped that and the gnome up with foam tape.  I also stamped a few of the confetti image around the sentiment and then topped the card off with sequins.

I hope you’ve enjoyed my card today and I hope you find some time to create for our Mix It Up Challenge as well!  Hop on over to the see the inspiration!  Thanks for dropping in!

Challenges:

  1. Tic Tac Toe ( I used straight across middle row)
  2. Can You Handle the Pressure? – Anything Goes with embossing folder with optional: weather twist 
  3. Pammie’s Inky Pinkies – PIP2517 Anything Goes
  4. Penny’s Paper-Crafty Anything Goes Using Paper

Pearly Sparkles Guest

Hello friends again!  I have two posts going up for today, so please see my post for the Mix It Up Challenge details in the above post when it goes live or click HERE.


I’m so excited to have been asked to be a guest for this month’s Pearly Sparkles Challenge!  I always love playing along in challenges and supporting them when I can as I always find inspiration in using my supplies when I play!

So for May’s Challenge, they would like to see:  BLACK, WHITE PLUS ONE OTHER COLOR in your project(s).  Here’s the card I made for this theme to inspire you:

I wasn’t sure what I wanted to do for this, but I thought you couldn’t go wrong with some flowers.  I pulled out a long forgotten stamp set from Taylored Expressions called “Picked Posies” (no longer available) and black heat embossed the images over watercolor paper and used one pink watercolor brushed over the petals.  I die cut each flower with the coordinating die.

I made the rest of the card layout with all black and white elements.  I stamped the TE Checking In Background stamp in black ink over a white panel, placed this over an A2 sized top folding black card base.  I also used the TE More Easy Edgers die to cut an additional piece of white cardstock and placed it over the stamped checkered background.  I also used some more of the elements from the flower stamp set and stamped some more black images on that background before I attached the watercolor flowers on it.  I centered each flower with a black rhinestone.

For the sentiment, I white heat embossed over black cardstock using the TE Hello Friend Stamp & Die set.

  • Thanks so much for stopping in today and I hope you’ll check out this challenge to see what the rest of the team has to inspire you with so you can play along too!

See you again tomorrow!

Challenges:

  1. Creative Fingers – Anything Goes
  2. 613 Avenue Create – Anything Goes with optional: splash of color
  3. Lil’ Patch of Crafty Friends – Anything Goes
  4. Ally’s Angels – Anything Goes
  5. Crafter’s Cafe – Anything Goes optional: Female
  6. Double D – Springtime Flowers

A is for Alphabet

Hello and happy Friday!  It’s not only “Good Friday”, but it’s Easter weekend here for us, so plans to enjoy the time we have together with food and laughter.  At least that’s the plan anyway!  I hope that whatever plans you have that you enjoy yourself.

Today starts up a new challenge over at the Alphabet Challenge Blog!  We have finished up the entire alphabet round and starting back up again for the 14th round which began in 2011! WOW! So beginning with the alphabet, the hostess has chosen “A” is for Alphabet (choose your own letter of the alphabet and a theme that begins with that chosen letter.)  *Remember that this is a bi-weekly challenge, so you have two weeks to enter*  I hope you will find some time to join us in the gallery!  Here’s what I’ve created:

The alphabet letter that I have chosen is “C” is for Chickens!  I needed a card for someone and so I thought of these Spring Chickens Stencil from Taylored Expressions.  I used that, plus the coordinating die to cut out the chickens. Along with that, I used the Yard House die set, Chicken Wire BG and the Just Chicken In sentiment set.

The quirky chickens and for an inside joke were sent to help cheer someone up not feeling well.

I started with a separate panel to stamp and stencil the chickens on.  I cut them out from the stenciled panel.  On another piece of cardstock, I stamped the Wire BG and ink blended around the edges.  I placed this onto a top folding A2 sized gray panel.  I wanted the area with the chickens to be the focus, so I took the TE Rounded Rectangle Stacklets and cut a piece of vellum that I used to create my scene on with the Yard House die set.  I centered the “hen house” and then used the placement of that to adhere the vellum panel to the center of the card front.

Lastly, I added the other chickens to the scene and the stamped/die cut sentiment which was popped up with foam tape at the bottom right of card.

Thanks so much for stopping by today!  I hope you’ve enjoyed my card and it gave you a smile! 😊  Have a wonderful Easter weekend my friends!

Challenges:

  1. Creative Friday Humorous 
  2. Allsorts Stencils & Masks/AG (chicken stencils/die cut bundle)
  3. Pammie’s Inky Pinkies – PIP2515 Anything Goes
  4. Ally’s Angels Anything Goes
  5. The Creative Crafters Anything Goes
  6. Dragonfly Dreams – Animals

Weather Related at Sparkles Monthly

Hello friends!  When I read about the weather from other areas, it always amazes me how different and even to extremes the weather gets especially during this time of the year!  I hear everything from rain, sun, snow, tornadoes, flooding, cold, warm, hot, etc.  So where do you find your own weather to be at right now?  In my area, we have reached past the snow, but it’s still pretty cool at night…so I know that Spring and the rain is here for us with a bright spot of flowers/sprouts starting to come out in the Midwest U.S.

With this in mind, we have a new challenge over at Sparkles Monthly and we have a very fitting theme of “Weather Related  (rain, wind, sun, etc.) this month.  Would love to see lots of different varieties of weather related projects, so I hope you’ll join us.  Here’s what I came up with:

I was so happy to finally get a chance to use this adorable set by Lawn Fawn called Beary Rainy Day as I’ve had it for a while, but never used it until now.  

I started with a kraft A2 sized top folding card base and stenciled some white clouds over it.  I then splattered some navy watercolor paint over it.

While that was drying, I worked on my scene.  For the background, I took some blue oxide inks in Blueprint Sketch and Salty Ocean and ink blended them on the stitched die cut panel.  I used some water to spritz over it for a watermark look.  While that was drying, I took another stitched panel and ink blended some Mowed Lawn and Rustic Wilderness Oxide inks for the grass area and die cut a hill to place at the bottom.  Before I attached it, I also die cut a white picket fence to go behind it.  I placed this scene onto a piece of navy cardstock and attached to the card base.

To complete the scene, I’ve stamped, colored with Copics and die cut the critters, rain puddles and clouds.  I used the coordinating raindrop die with the set and just die cut a few raindrops in silver glitter paper to add to the scene.  Lastly, I white heat embossed part of the sentiment on navy cardstock, cut out with a banner die and then just stamped the sentiment at the bottom in navy ink.  Also hard to see in the photo, but I’ve added some shimmer to the puddles with a glitter brush pen.

  • That’s all from me today!  Hope you’ll stop by the Sparkles Monthly blog is see what the team has come up with using this theme and join us in the challenge!  Thanks so much for stopping in as I love to read your comments!

Challenges:

  1. Craft Rocket Layer it Up 
  2. Addicted to Stamps & More Die cuts and/or stencils (clouds stenciled and variety of die cuts used)
  3. Penny’s Paper-crafty Anything Goes Using Paper
  4. Crafty Gals Corner Fill in the Blank:  “Adorable puddle jumping!”
  5. Time Out Pick 2 from list:  I picked Stencil & Water + Spots ( I was inspired to stencil some clouds and add some spots (splatter) to go with the colors/clouds of my scene and I was inspired by the water with the rain, puddles and watermark for ink blending)
  • Thank you to all the challenge blogs for keeping us all inspired to create and play along with our supplies!  I try to play along as much as I can.