Anything Goes for Cute Card Thursday!

Hello friends!  It’s time for an easy peasy “ANYTHING GOES” challenge over at Cute Card Thursday this week!!  Our monthly sponsor Whimsy Stamps will be joining us this week and I’m thrilled to share some of those products on my card today:

Vicki-WS-PenguinLovesBunny-March7

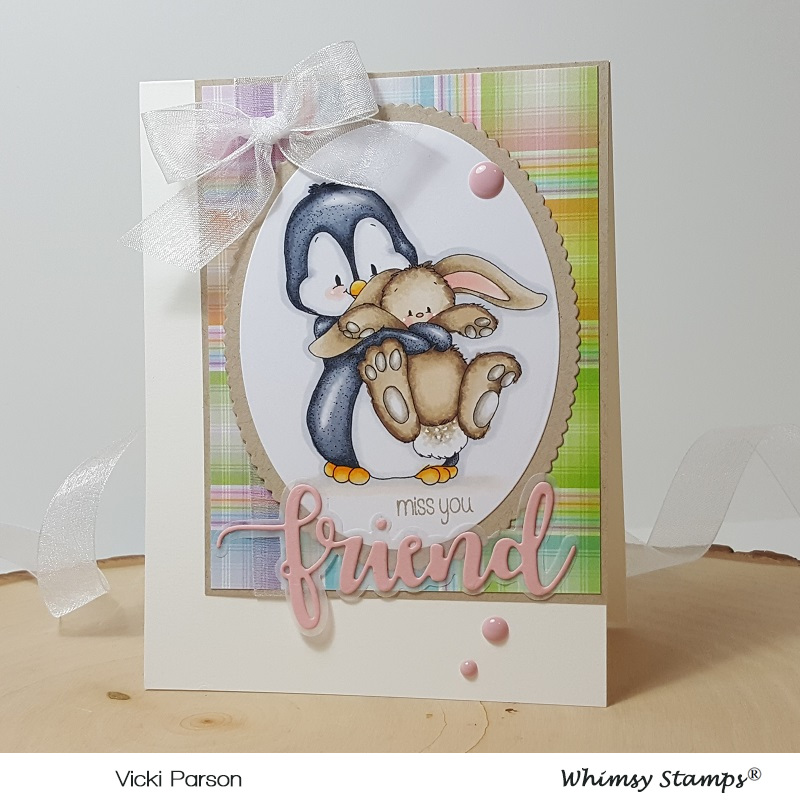
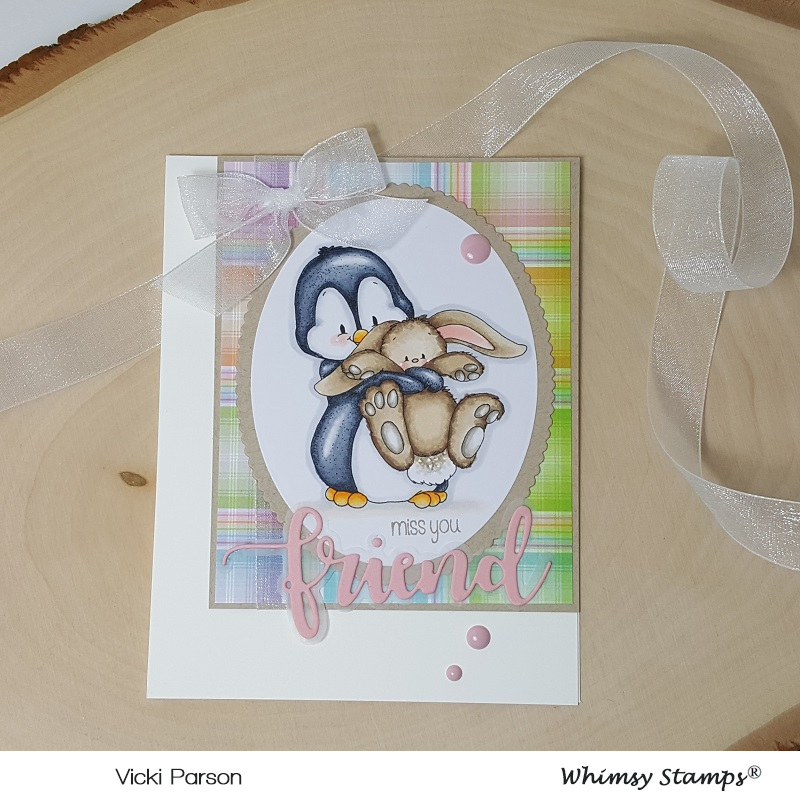
I have used this really sweet digital stamp on my card called “Penguin Loves Bunny“!  He is holding him ever so tightly and not wanting to let go!! 🙂

As I’m trying to get back into the swing of things here, I wanted to be sure to join some challenges and so I’ve picked out a nice sketch to start my card with here.  (See the details below the post for all challenges.)  I’ve been wanting to get out these yummy plaid papers that I’ve had for a couple of years.  This seemed like the perfect image for that too!

So I took the panel of plaid papers and layered it with some kraft cardstock.  I took some white organdy ribbon and wrapped a piece around the left side of it and tied on a bow at the top before attaching it to the upper right of my A2 sized top folding white card base.  I’ve cut out the image with an oval die and then layered another oval piece that was cut out with the kraft cardstock.  This oval panel was layered over the plaid.

I took a sentiment from the Whimsy Stamps Everyday Mini Sentiment clear stamp set and stamped the “miss you” underneath the image.  I also used the Whimsy Stamps Friend Word & Shadow die set to cut a piece of vellum with the shadow and then cut the word out with some pink cardstock and then attached them right underneath the stamped “miss you” sentiment.  Lastly, I’ve added some of the pink enamel dots from the Whimsy Stamps It’s a Party enamel dots set.

Vicki-WS-PenguinLovesBunny-March7-close

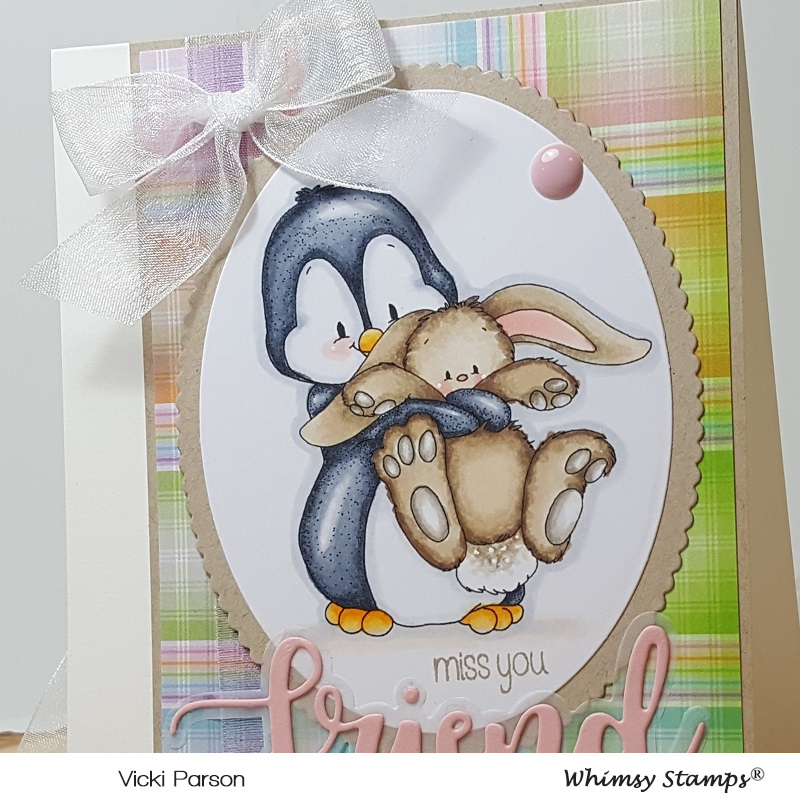
Here’s a closer look at the coloring of this image.  I’ve colored it in with Copic markers in the following colors:

  • Penguin:  C8, C5, C3, C1, Y38, Y35, Y32, R00
  • Bunny:  E47, E44, E42, E41, W5, W3, W1, R20, R11, R00

I also used a blender 0 and a white gel pen for cheeks and bunny tail.

Vicki-WS-PenguinLovesBunny-March7-flat

I thought this image would be so fun for Easter too!!  I can see it used in so many different ways!

Hope you’ve enjoyed my card today!!  Thanks so much for dropping in!!  See you soon!

Challenges I’d like to enter my card for:

  1.  Tuesday Morning Sketches – #493
  2. Crafty Animals – Anything Goes + related to animals
  3. Creative with Stamps – Friends
  4. {Cupcake Inspirations} – Plaid CIC465
  5. QKR Stampede – Anything Goes #337

Imagine…You’re Home!

Hello friends!  I have to say that I’m very happy that we’ve started the month of March and I really look forward to seeing the bit of green and growth soon to come!

Today, I have a card using this new stamp set:

Vicki-SNSCottage

Today, my card features this really fun Lil Garden Cottage rubber stamp set.  I have colored it up with my Copic markers and I’ve used the packaging from the stamp set to help with color suggestions.  (I really like that when stamp sets have a colored version on their product labels!)

Since last year I’ve been noticing lots of “fairy garden” projects, and I am amazed at how many “tiny” items that are available to purchase so that you can create your own little garden!  This image sort of reminds me of that!  I think I like creating my own little “fairy garden” on paper! 🙂  Do any of you like to make Fairy Gardens?

For the base of my card, I’ve used an A2 sized top folding kraft card base.  I took my VersaMark ink to stamp the tiny mushroom images from the set along the bottom edge of the base.  I also took another piece of kraft cardstock and heat embossed part of the sentiment with the White EP and then cut it out from a circle die.  I set these pieces aside while working on the rest of my card.

Vicki-SNSCottage3

After coloring in the image, I also took the other portion of the sentiment “Imagine…” and stamped it next to the cottage image, but then heat set that one with the Coffee EP.  I also took an additional piece of white cardstock to layer behind the image panel.  For that piece, I took my VersaMark ink pad and sponged along the edges of it and also heat set that with the same Coffee EP as well.  You can also see at the top of the image panel that I’ve lightly blended in some distress ink to soften up the white a bit.

For the sparkly twine at the top, I created it by taking the 1/4″ Tear Tape and twisting it on itself and then I ran it through some Shamrock Glitter.  I took a piece of it to make a bow and then glued it over my design.

I took some craft foam to pop up this image panel a bit before attaching it to the kraft card base.  I also took some more craft foam to pop up the side of the circle sentiment panel as well.

Vicki-SNSCottage2

To add a bit of detail to my image and make it my own, I stamped, colored and fussy cut out each of the mushrooms as well as the snail and then attached them where I wanted them to show up on my image panel.

I used the Nuvo Precision Glue Pen to “color in” the areas where I wanted it to be green and then sprinkled some of that Shamrock Glitter over those areas.  I took the Nuvo White Crystal Drops to add a few “dots” over the red mushroom.  I then took the Nuvo Morning Dew Crystal Drops (dries clear) and filled in the “window” on the cottage as well as the “snail shell” to add some shine to it.

Vicki-SNSCottage4

I hope you’ve enjoyed my card today and that you’ve been inspired!

Thanks so much for dropping in today!!  I’m so hoping that I can get back into catching up with you and getting caught up on entering challenges!  I do miss all of this!

Wishing you a happy day!

Whimsy Stamps March New Release!

Hello friends!  I don’t think I ever remember being so sick before! WOW!  I was literally stuck in the bed for a couple of days there!  I’ve been taking some meds from doctor and starting to feel a bit better now, just regular cold and not so much the fever and chills any more.  Thank you SO MUCH for the very kind get well thoughts as I truly appreciate that!  So glad that’s over with now!

Have you checked out the new release over at Whimsy Stamps yet?  There are lots of really adorable digital stamps this month and I’m excited to be sharing one of those with you today:

Vicki-WSBunny-NewRelease

I have used this sweet little image by C.C. Designs for Whimsy Stamps called Bunny.  (And that little bunny is too cute wrapped up in the garden hose!!)

I have also used some fun new digital papers for the background on my card here too!  I’ve printed out a piece from the Whimsy Stamps Rustic Wood and Brick Papers digital collection and used it on the background of my green card panel.

I also used some die cuts to add some fun elements to my design as well as wrap some ribbon at the top and add a white flower with a rhinestone in the center of it.  I heat embossed a sentiment in white EP over a piece of the green cardstock and cut it out with a stitched die cut banner.

Vicki-WSBunny-NewR2

I have it all colored up with my Copic markers and then I’ve used some metallic gel pens for the dots and for the water sprinkling from the hose.

Here you can better see how I’ve colored in the image and the details of sparkle with the gel pens.  I’ve used some craft foam behind the image panel for a bit of dimension too.

Vicki-WSBunny-NewRflat

I hope you’ve enjoyed my card for today and have been inspired to go check out the rest of the new release at Whimsy Stamps!

I’ll be back again tomorrow for some more inspiration!  Thanks so much for dropping in!!  Have a great day!

Brightening A Rainy Day

Hello friends!  Are you longing for that rainy Springtime showers with lots of flowers because you’re tired of snow?  I know that I’ve been wanting Spring to get here very soon!  I thought I’d bring some of that feeling into my blog post this morning:

Vicki-SNSMayShowersBundle-Feb20-card3

I started out with my images from these stamp sets that were released as a bundle set called May Showers Spring Bundle.

I wanted to incorporate both of these rubber stamp sets into my design, so I heat embossed the parasol image from the Showers of Tulips set and the bows from the May Showers set with White EP over some Bristol Smooth Watercolor paper.  I colored them in with my Zig Clean Color Real Brush markers and fussy cut them out with my scissors and set them aside.

Vicki-SNSMayShowersBundle-Feb20-card3-close

For the background panel, I took another piece of watercolor paper and spritzed it with water to get it good and wet before sprinkling on some Nuvo Blue Blitz Shimmer Powder.  I spritzed it again to really get the water moving around and manipulated the panel so that I could get the water drips going down the panel.  Once this dried, I cut it out with the Tonic Basics Scalloped Square Dies.

Using my cut-out parasol image for placement, I heat embossed the sentiment from the May Showers stamp set with the Coffee EP where I wanted it over the watercolor panel.  I then took the raindrops image from the same stamp set and stamped it with VersaMark ink repeatedly over the background and heat embossed it with that Magic Speckle EP.  I’ve also added some Nuvo Morning Dew Crystal Drops to the center of each drop for more dimension and shine to get a nice wet water look to it!  This was set aside to dry for a bit.

I took another piece of cardstock (slightly larger than the watercolor panel) and rubbed my VersaMark Ink pad along the edges to heat emboss it with the Coffee EP.  I attached these layers together and then glued some craft foam behind it for dimension.

Vicki-SNSMayShowersBundle-Feb20-card3-flat

I’ve used a blue 5″ square top folding card base for my design and took a piece of white doily I had from my stash and glued it on with some Dimensional Glue.  I then added a strip of white cardstock covered with a piece of 1/2″ Tear Tape going diagonally across the card base and burnished some Sunny Daze glitter over it.

Finally, I added the watercolor and embossed layers over top of the card base and then took my fussy cut images and added them to the design with some foam dots.

I hope you’ve enjoyed my Spring Showers card today and it’s inspired you in some way!  I thank you SO MUCH for dropping in!  I appreciate all of the kind comments and a big welcome to my new followers…love meeting fellow crafty friends!!

Challenges I’d like to enter this card for:

  1.  Cardz 4 Galz – Weather (any condition)
  2. Moving Along With the Times – Little Bit ‘Shabby Chic’
  3. The Flower Challenge – Use Latest Stamp/Dies + flowers (SNS stamps)
  4. Pammie’s Inky Pinkies – (PIP1907) – Anything Goes
  5. Try it On Tuesday – “Powder Your……..” (Shimmer powder, Embossing powder)

Cute Card Thursday Has Wings!

Hello friends!  It’s Thursday already which means it’s time for a brand new challenge over at Cute Card Thursday!  This is a really fun one to play with!  This week we’d like to see your “Wings” things!  Can’t wait to see what everyone makes!!

This week we are being sponsored by All Dressed Up Stamps and I have used one of their lovely images for my card today:

Vicki-CCT569-ADUWings

Isn’t she the sweetest little thing?  I have used the Fairy Magic image that was kindly donated from our sponsor, and I have colored her up using Copic markers.  I’ve also sponged some light blue ink around the image panel before matting it onto a green sparkly layer cut with a scallop square die.  I also used some craft foam to pop up the image panel over my card for a bit of dimension.

I have just bought these gorgeous Fairy Garden papers from Kaiser Craft and used them on the background panel of my card.  I also used some gorgeous shimmery light green cardstock to go with it!  I’ve taken a thin strip of the glitter cardstock and attached it up against the butterfly papers and then attached some lace over it.  I then mounted this entire panel over a white top folding 5″ x5″ card base.

Vicki-CCT569-ADUWings-close

Here’s a closer view of the coloring and the little sparkly details I’ve added to her.   For the wings, I’ve taken a glitter brush pen over them and then used some metallic colored gel pens to add some dots to her wings as well as the butterfly wings along with some gold dots around her ribbons and the sentiment.

Here you can also see the wood veneer butterfly accent that I’ve added at the top.  I painted it with white gesso and then painted over it with some pretty pearl shimmer paint before attaching it to the card.

Vicki-CCT569-ADUWings-flat

Lastly, I’ve added three pearls at the bottom left corner of the card.  In this photo you can see the pretty shimmer on the light green background cardstock.  It was hard to capture in the photos, but the butterfly papers are sparkle embossed as well.

Thanks so much for dropping in today!

Challenges I’d like to enter this card:

  1.  All Dressed Up Challenge – #89 Anything Goes + ADU image
  2. Not Just Cards – Anything Goes
  3. Crafty Creations – Anything Goes

Fistful of Flowers From Whimsy Stamps

Hello friends!  Hope that you are having a great week so far!  There is plenty of ice and snow over my way for the next several days, so I thought I would bring a little ‘happy’ today with a “Fistful of Flowers” from Whimsy Stamps!

Vicki-WSFistfulofFlowers-Feb12

Isn’t she the cutest?!  This was originally released as a rubber stamp from Crissy Armstrong, but this month it has been released in digital format now as well!

I have to be honest and say that after I had colored in the image, I was struggling with the colors of cardstock I wanted to use, and it seemed that anything I picked out wasn’t quite working.  (You ever have this problem?)  My hubby came in to visit me and I told him I was struggling, so he took me over to my paper and picked out these colors and I liked it, so I went with it!  Did he do good? 🙂

I have cut a piece of yellow cardstock out and then took the WS Mom’s Layered Flowers clear stamp set and white heat embossed the background with one of the daisy images.  I wrapped a piece of white ribbon around the yellow embossed piece that was also mounted onto a white 4.25 x 5.5 card front piece.  After wrapping the ribbon around both pieces, I added a bow and this panel was then mounted onto a white top folding A2 sized card base.

The colored image panel was layered with a blue cardstock which I’ve also cut a piece for a fishtail banner and added some daisy accent flowers to it.

Vicki-WSFistfulofFlowers-Feb12-close

                    This cutie has been colored up with the following Copics:

  • Jeans & Bow tie on shirt – B97, B95, B93, B34
  • Shirt & Hair Bows – R85, R83, R81
  • Flower Petals & White Band on Shirt – BG000 (also around image)
  • Flowers – center:  Y17 – Leaves/Stems: YG67, YG63, YG61
  • Grass – G24, G21, G20
  • Hair – YR30, E41, E43, E44, V95
  • Skin – E21, E11, E00, E000, R20

I took a glue pen and added some clear glitter over the edge of the flower petals for a bit of sparkle.  You can see that the daisy accents also have some light touches of glitter on the edges as well.

Vicki-WSFistfulofFlowers-Feb12-flat

So I hope you’ve enjoyed my card today and thanks for dropping by!

Challenges I’d like to enter this card for:

  1.  Crafting With an Attitude – Anything Goes
  2. Creative Fingers – Anything Goes
  3. QKR Stampede – #334 Anything Goes
  4. Crafty Friends – Anything Goes
  5. Pammie’s Inky Pinkies – PIP1906 Anything Goes
  6. Shopping Our Stash – Make Your Mark (colored with markers)

Whimsy Stamps New Digital Release – Willow

Hello friends!  So are you having a Super Bowl party today?  It’s always been sort of a little “thing” at our house each year since my kids were little….they were in it for the snacks of course!  LOL!

Today I want to share with you a card I made with one of the brand new February digital releases from Whimsy Stamps!

Vicki-WS-Willow-Feb3

I have used this darling little Willow girl on my card today!  Oh, those eyes are so catching on her!  (Had to make them a pretty blue!)  I have colored her up with the following Copic markers:

  1.  Dress, hair bows, shoe bows – R85, R83, R81, R00
  2. Flowers – Y17, Y15, Y11, V17, V12, YG63, YG61
  3. Shoes, Socks – E84, E81, BG000
  4. Hair – E27, E25, E23, E21
  5. Skin, Eyes – E21, E11, E00, E000, R20, R00, BG49, BG45
  6. Around image – C1 (white gel dots on cheeks and eyes)

First, I took the Whimsy Stamps Notched Rectangles die set and cut out the colored image.  Then I thought those yellow flowers she’s holding needed to be brought out a bit so I took the smaller flower image from the Whimsy Stamps Mom’s Layered Flowers clear stamp set and stamped it with yellow ink around the edges and die cut a scalloped rectangle layer with a suede brown cardstock to layer behind it.  I sponged around the edges with some Brushed Corduroy distress ink and ink foam blending tool.  I did the same to the left edge of the white A2 sized top folding card base.

For the right side of the card base, I took some of the Oh Boy digital papers from last month’s release and attached it.  Then I took the sentiment from the same floral clear stamp set as mentioned above and stamped it with some brown ink at the bottom right corner of the card.

Vicki-WS-Willow-Feb3-close

Here’s a closer view of the coloring on my image.  You can see the yellow glittered hearts and those piercing blue eyes!

I then took the layered image panel and attached it to some craft foam and added it to the center of the card design.  Lastly, I stamped a couple of hearts from the same stamp set mentioned above and filled them with some yellow glitter and added pearls to the corners.

Vicki-WS-Willow-Feb3-flat

Please be sure to stop by the Whimsy Stamps store to check out all of the brand-new February release.

Challenges:

  1.  City Crafter – Floral Background
  2. Addicted to Stamps & More – Anything Goes
  3. Watercooler Wednesday – WWC206 Anything Goes
  4. CCEE Stampers – CCEE1905 National ‘Thank You’ month
  5. Creative Knockouts – Flower Power

“It’s a Girl Thing” TSA Inaugural Blog Hop!

Hello friends!  So happy you are here!
Welcome to the “It’s A Girl Thing” Turner Syndrome Awareness Inaugural Blog Hop!   Before I share my project with you, here is some important information regarding what this special blog hop is all about:
Turner Syndrome is a genetic disorder where a female is born with only one X chromosome, instead of two, leaving her with life-long medical issues and learning disabilities. This condition occurs one in 2,500 female births worldwide but is more common among pregnancies that do not survive to full term. That is why Turner Syndrome Females are considered MIRACLES!

Turner Syndrome and the Butterfly

The butterfly has become the symbol for “Turner Girls”. Just like a butterfly, they are considered fragile and beautiful miracles. Turner Syndrome may also cause a myriad of health complications, such as heart defects, learning disabilities and infertility, according to the Mayo Clinic. Sept 14, 2013.

Because it represents femininity, strength, and uniqueness, the butterfly was designated by TSSUS to become the Turner Syndrome symbol. “Butterflies fly on their own which is our hope for our girls.”

Vicki-TSAbloghop-ribbonsoflove

I have used this digital stamp set called “Ribbons of Love” I think it’s awesome that you can choose to use the pre-colored versions from the set which I have for my card here.  It’s a perfect set to have on hand in multiple-colored ribbons that can be used for any cause you like to support!  It also has some fantastic sentiments to go with it too!  The butterfly was perfect to use for this particular cause!

vicki-tsabloghop-ribbonsoflove-close

I have used some papers from my stash for the background and the colors all chosen from the TS color palette!  I printed out the image and sentiment together and die cut it with a stitched circle die.  For the circle glitter layer behind it, I cut out another cardstock circle layer with some Super Adhesive Sheets over it, peeled off the backing and sprinkled some Gecko MF glitter and burnished it in.  Added some blue ribbon with a bow over the papers, attached the circle layers, flowers and pearls.  I then took a clear glitter pen and went over the butterfly with it for more shimmer.  This was all mounted over a SU! Pacific Point 5×5″ top folding card base.

I hope you’ve enjoyed my card and it has inspired you in some way!  Thanks so much for dropping by and taking part in this blog hop with us!

I am happy to be donating this card along with a few others to Lori so that she can use them to help raise funds for this cause as well.

Challenges I’d like to support with this card:

  1.  Creative Fingers – #156 Anything Goes
  2. Pammies Inky Pinkies – PIP1904 – Anything Goes
  3. Tuesday Throwdown – Anything Goes

2 Crafty Critter Crazies February Challenge is Here!

Hello friends!  Today starts our new February challenge over at 2 Crafty Critter Crazies!  Remember that this is an always ANYTHING GOES challenge, but you must include a critter somewhere on your project to enter!

Here’s what I’ve created for the challenge:

vicki-ribbonsoflove-glittercard-project4

I have used this digital stamp set called Ribbons of Love.

For this card, I’ve used the uncolored images and placed the images together how I wanted them to appear in a Word doc and then printed it out.  I printed out an extra butterfly so that I could cut it out and pop it up over the design for dimension.  All of the butterflies were colored with Copics.

For the background of my card, I took some Lace and placed it over top of a piece of cardstock that I’ve covered with a Super Adhesive Sheet.  I then sprinkled some Caspia Sea glitter and burnished it over the lace layer.  (Sometimes I use the backing from the adhesive sheet to help burnish it in.)  After I felt it was burnished in, I removed the lace layer and sprinkled on some Lemonade glitter over the rest which gave me the unique glittery lace background!  As you can see, I’ve also taken a small strip of it to add to my design.  I have layered that piece with a strip of black fishtail banner and tied a white ribbon bow to attach over it.  The butterfly image panel was cut, layered with black cardstock and attached over the middle of the glittery background which as also layered with black cardstock and attached to an A2 sized white top folding card base.

vicki-ribbonsoflove1

Looking more closely at the card, you can better see the glittery background along with the coloring on the butterflies.  The two butterflies at the top were brushed with some Glue and then I sprinkled some Diamond Dust glitter over top of their wings for a bit more sparkle.  I glued the center of the yellow butterfly down and popped up the wings with my finger for a bit of dimension.

Thanks for stopping in… stay tuned in for my next special post!!

Sweet Anniversary Wishes

Hello friends!  Hope you’re having a great week so far!  It is really cold in our area right now as we are experiencing a “Polar vortex” with a high of -11 degrees F and low of -23 degrees F without wind chill for tomorrow.  Brr!  Many schools in the area as well as city workers are taking the day off due to the severe cold weather.   Please stay warm and safe wherever you are!

Not sure if you saw that Whimsy Stamps has started carrying this new adorable line of digital stamps from CC Designs in their store.  Here’s the card I’ve made today using one of those images:

vicki-pcaimeevalentino-jan29

I’ve used this super cute image called Aimee & Valentino for a special anniversary card.

I decided to print it out twice so that I could cut out the balloons and pop them up over the image.  I have used the following Copic markers to color it in:

  1.  reds on outfits, boots, hair clip and balloon – R37, R35, R32
  2. Pink on outfit and balloon – R85, R83, R81 (girl stripes on dress – E53, E51, E50)
  3. Boy’s outfit, boots and hair – C8, C5, C3, C1, C0, C00 (stripes on shirt – BG000)
  4. Girl’s hair – E27, E25, E23, E21
  5. Skin tones – E21, E11, E00, E000 (cheeks – R20)
  6. Grass/shadows – G24, G21, G20, E0000 (around image – BG000)
  7. I used metallic gel pens to color in the middle of hair clip, buttons and cheeks

I cut this image out with a stitched square die cut and then used a cloud stencil with Tumbled Glass distress ink and ink foam blending tool to add clouds behind the couple.

As mentioned above, I cut out the heart balloons on the second print out of the image and heat embossed the stamped numbers on them.  I used a stylist tool on the back of them to curve them in a bit and popped them up over the image with some foam dimensional dots.  I then added some shimmer over top of them with a Wink of Stella glitter brush pen.

vicki-pcaimeevalentino-jan29-upclose

Here’s a closer look at the coloring on the image.  You can see a bit of the shimmer over the balloons and where I’ve added some metallic color on the heart hair clip.  I took this image panel and layered it over a piece of gold mirror cardstock.

vicki-pcaimeevalentino-jan29-flat

I thought that the January released Hearts a Flutter digital papers were the perfect backdrop for this cute couple, so I printed the pink with white hearts one out and cut a piece out using the Whimsy Stamps Hand Stitched Nested Rectangle dies for that.  I found some coordinating card stock and gold heat embossed the sentiment from the WS Everyday Mini Sentiments clear stamp set and cut it out with a banner strip die.  I also placed it where I wanted it to go and used the Hand Stitched rectangle die again to create the stitch marks over it.

I took some gold ribbon and wrapped it around the heart design paper card front, placed the image panel over top and then layered on the sentiment banner with foam tape.  This was mounted over an A2 top folding white card base.  Lastly I added a gold bow and some gold sequins filled with some Stickles Tinsel glitter glue.

I hope that you’ve enjoyed my card! 🙂  Thanks so much for dropping by today!  See you soon!

Here’s some challenges I’d like to enter this card for:

  1.  CCEE Stampers – CCEE1904 Gold
  2. Aud Sentiments – Anything Goes + sentiment
  3. CRAFT – Love/Valentines (it fits with this theme as it’s about love!)
  4. Crafty Catz – Anything Goes with optional twist:  ribbon/lace
  5. My Time to Craft – All You Need is Love