Hello Cute Chicks!

Hello friends!  Err…should I say “Cute Chicks”!  🙂

I have some more Whimsy Stamps inspiration to share with you today using this sweet image by Crissy Armstrong called Penguin’s Cute Chicks.  Now it may look familiar to you and that’s because it was originally made as a rubber stamp, but starting with this month’s release it has been released in digital format!  So it’s great to now have both options available to you!

vicki-ws-penguincutechicks-jan22

I am a huge penguin fan and Crissy’s penguins are so fun to color!  I have colored this image with the following Copics:

  1.  Penguin Body, Beak, Feet, Cheeks:  C8, C5, C3, C1, C0 – YR18, YR15, YR12 – R00, R000
  2.  Penguin hat & scarf:  E89, E87, E84, E81
  3.  Chicks:  Y38, Y17, Y15, Y11 – Cheeks:  R00
  4. Chick blue & purple ribbons:  B39, B37, B34 – purple:  V17, V15, V12
  5. Egg shell and around image:  BG000
  6. Grass:  YG67, YG63, YG61

(More up-close details below!)

I have also used some fun digital papers from the January digital release called “Oh Boy” digital papers collection.  (You may remember the “Crateful of Kittens” card that I had previously done which was using these same papers.  I’ve used both the striped and solid papers for my card here.  At the top of the striped papers, I used the Whimsy Stamps Pierced Border Trio dies to cut a curvy border.  I cut another piece like that in black cardstock to layer behind it.

I took the WS Painted Sayings clear stamp set and stamped the greeting in the upper left corner of the image panel and I also used the splatter images from the set and stamped some black splatters over the solid colored digital papers.  Before attaching the striped panel to the solid background, I added some white ribbon with a bow and a black button with a bow twine through it.  I attached this to the solid panel and then attached all layers to a white 5″ square top folding card base.

vicki-ws-penguincutechicks-close

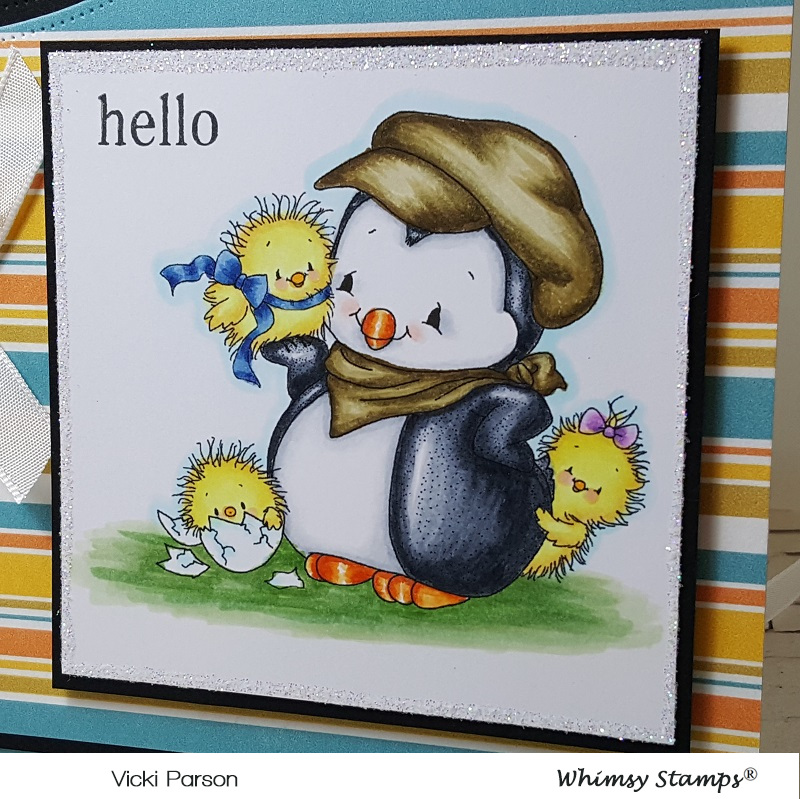
Here’s a closer view of the image with my coloring.  For around the edges of the image panel, I took a glue pen and sprinkled on some clear glitter for a bit of a sparkly touch around the design.  I layered this onto a black piece of cardstock and then added some craft foam behind it for a slight dimension and attached it to the card front.

Hope you’ve enjoyed my card today!  Thanks for stopping by!!  I’ll see you back again tomorrow for another really fun project I made!

Challenges I’d like to enter this card for:

  1.  As You Like It – Pearls or Buttons? (I love to add buttons in the center of bows and with different colors it can work on any style you’re designing.)
  2. Crafting From the Heart – #235 Anything Goes

Sympathy & Banish the Blues

Hello friends!  Hope you have enjoyed a nice weekend.  Unfortunately, I needed to make up a sympathy card and didn’t realize that I had run out of them, so I will need to make some up in the future so I can have them on hand and not have to worry about it when the time comes again.  I had a friend who recently passed and needed a card for her family, so I pulled out a set that I hadn’t used before until now:

vicki-su blue sympathy

This is an older set from last year’s Sale-a-Bration at Stampin’ Up! called “Heartfelt Blooms”.  I think it’s so pretty and since the lady who passed was a happy crafter, I felt good about making this tribute for her.  I will miss seeing you at lunches Penny, rest in peace my friend.

I stamped the floral image several times with a Copic friendly navy color ink over some cream colored cardstock and then colored in the images with my Copic markers.  I also went around the images with some markers and blended it all out around the design.

I then took some distress ink and the foam ink blending tool to soften the edges a bit and make it look a bit more Vintage.  I also stamped the sentiment with navy ink and die cut it along with some navy cardstock with a banner die.  I sponged around the edges of this as well.  I wrapped some linen thread several times around this panel and tied it off with a bow next to the banner.  I then attached it over an A2 sized top folding navy card base.

I created a matching envelope by stamping the image in navy ink over it as well.  Lastly finished off the design with some clear sequins.

vicki-su blue sympathy-close

Here’s a closer view of the coloring on the floral image I did as well as the sponged around the front panel and banner.  I thought all of the blue colors turned out really pretty and made a nice Vintage feel.

Challenges I’d like to enter for the above card:

  1.  A Bit More Time to Craft – #84 Anything Goes
  2. The Creative Crafters – Anything Goes
  3. Crafty Catz – Anything Goes with optional:  Blue, Green plus one other color (cream)

So on another {positive} note, I’d also like to remind you that there are still a couple of days left to play along with us over at the Cute Card Thursday Challenge this week!  The theme for this challenge is “Banish the Blues” which I felt like doing in my craft room and so I decided to make this “Fun-Loving” card:

vicki-bm-lovebugs

Now how happy do these cute honey bees look?!  They almost look like they’re dancing in the air!!  I’ve used items from a February card kit for this card.

I’ve heat embossed the bees and colored them in with some Aqua Pigments. I’ve used the paper from the kit and stamped the background and the edges of the bee panel with some SU! ink that happened to match up with it.  I then white heat embossed the sentiment from the same stamp set above the bee panel.  I sponged around the edges of this red panel with white ink and attached it to a side folding A2 sized card base.

vicki-bm-lovebugs-close

Here’s a closer look at the bees and how I’ve colored them.  Some of the Aqua Pigments are shimmery and I’ve used a couple of those colors too!  I’ve added some white dots on their cheeks as well as a few around the hearts.  I topped off their eye-balls with some glossy accents.  I’ve also stamped some more “xoxo”s on each end of this image border and layered it over a piece of black cardstock.  I took two strips of glitter washi tape from the kit and added it above and below the image panel area and then attached the bees over top but between the strips.  Lastly I’ve added a heart shaped sequins to the center of the white embossed heart “O” in the sentiment and the rest of the sequins from the kit randomly placed on the card.  I topped off the circle sequins with some Nuvo White Blizzard Glitter Drops.

Hope this helped to end my post on a happier note with a smile.

Thanks so much for checking in with me today!  I’ll see you again tomorrow for more crafty inspiration!!

Here’s some challenges I’d like to enter the above “Bee card” for:

  1.  Shopping Our Stash – #SOS386 Hearts On Fire
  2. Moving Along With the Times – #89 Have a Heart
  3. QKR Stampede – #331 Anything Goes
  4. Pammie’s Inky Pinkies – #PIP1903 Anything Goes
  5. Paper Girls – #168 Sparkle and Shine
  6. Double Trouble:  #20 Thing 1 Trouble Maker – “Love is in the Air” (honey bees!), Thing 2 Double Dare – Entered the Paper Girls Challenge #168, Thing 3 Twisted Sister – “Sparkling and Shining” (I used metallic watercolor, sequins, glitter drops and glitter washi tape)

Enjoy the Changes Life Brings

Hello friends!  Back with you today to share a card I’ve made using the January release stamp set called Early Spring Nest!

vicki-earlyspringnest-cardep-project2

I had so much fun playing with this pretty Spring image and playing with some new embossing powders on this one!

To get the background, I’ve taken a piece of watercolor paper and sprinkled it with some Nuvo Blue Blitz Shimmer Powder and spritzed it with water to also move it around the paper until I got the look I was wanting for it.  I set it aside to work on the rest of my card until it was COMPLETELY dry.  After it dried, I took my Static Free Bag to rub over the area and prep for heat embossing.  I stamped the Crackle Background stamp (Really love the versatility of this image!) with VersaMark and heat set the image with the Robin’s Egg embossing powder.  (Sounded like the perfect product to use for my card!)  I also used my corner chomper to round the corners on this panel.

For the scallop layer behind this panel as well as the layer behind the sentiment, I took my VersaMark ink pad and smeared on a layer around the edges and heat embossed them with the Coffee embossing powder.  I also used this for the sentiment as well as the nest image, so this also works for a nice, detailed embossing powder!   I made the fishtail banner layer before I did the embossing with my Tim Holtz 5″ scissors.  I took some craft foam and attached the front base panel to the embossed scalloped layer which was mounted onto a white A2 sized top folding card base.

Here’s a closer look at the stamped Crackle background with the Robin’s Egg heat embossing over the watercolor background.  I just love the shimmer it has in it!  You can also see the Coffee heat embossed layers.  I love the pretty Copper sheen it has as well as the dark brown flecks in it!  You can also see how well it embossed the fine detailed stamped images too.

There are so many different things going on with the embossing powder on this design that you really need to capture all the different angles throughout the design to see it!

vicki-earlyspringnest1

For the coloring of the image, I just used some Clean Color Real Brush markers for it.  I like to heat emboss the images when I do this sort of coloring as it helps to keep the water coloring inside the lines and acts as sort of a “well” so that the colors stay where you want them.

For the eggs inside the nest, I took a VersaMarker pen and colored them in with it.  Then I took the same Robin’s Egg embossing powder and heat set the eggs with it.  It really creates a fun and unique look with the blue tint and speckle flakes in it, plus it gives it a nice embossed shine for an “egg like” appearance!

After coloring in the image, I used my scissors to fussy cut it out and then added a couple of feathers from my stash and attached this image over the card front panel with some foam tape.  I finished off my design by adding a few random drops with some Nuvo Dazzling Blue Glitter Drops.

I hope that you’ve enjoyed my card today and thank you so much for stopping in!

Challenges I’d like to enter:

  1.  Fab ‘N’ Funky – New Beginnings  MISS IT!!!
  2. Not Just Cards – Jan Anything Goes
  3. Crafty Friends – New Beginnings
  4. Stamps & Fun = Creativity – #338 Anything Goes
  5. Pammies Inky Pinkies – PIP1902 Anything Goes

Cuddle Bunny at Whimsy Stamps

Hello friends!  Hope you’ve had a great weekend!  The last time I posted I mentioned it was so nice that we could cook out on the grill, well this week it’s snow conditions and very cold!  With life in the Midwest, you never know what you’re going to get.

I thought it would be nice to turn that warm weather feeling to the inside of my craft room and create with this January released digital image from Whimsy Stamps:

vicki-wscuddlebunny-jan15

Fell in love with this darling image by Crissy Armstrong called Cuddle Bunny.  This had been a previous rubber stamp that is now available in digital format!  I think there are many advantages to getting a digital version:  1) It NEVER runs out of stock in the store because it’s a digital file, PLUS, you don’t have to wait for it to come in the mail!  2) You can size the image(s) whatever size you want it to be!  3) You can easily combine other images with it and arrange them as you’d like before printing it out.  4) You can color with Copic markers without worrying about anything getting smeared and lastly:  5) You can still feel like you’re “getting your hands crafty” by coloring and finishing out your creation with other products!  So, if you haven’t jumped on the “digital wagon”, an image like this would be a great one to try out!

vicki-wscuddlebunny-flat

For my card, I have colored my image with Copic markers, see the detail list below and then sponged some Tumbled Glass distress ink with an ink blending foam tool and a cloud stencil.  I then cut it out with the Whimsy Stamps Notched Rectangle dies and added a yellow layer behind it that I’ve notched out by hand.

For the background I’ve taken a piece of blue watercolor paper panel and lined the top and bottom of it with a strip of flower borders from my old stash.  I used a glue pen for the centers of the flowers and attached some glitter over top.  I added a strip of sheer white ribbon across it and attached it to a piece of shimmer luster paper which was mounted onto a 5″ square yellow card base.

Lastly, I used some craft foam behind the image panel and attached it over my card and then added the ribbon bow with a chipboard flower in the center.

vicki-wscuddlebunny-close

Here’s a closer look at the image where you can see how I’ve colored it.  Hard to capture in the photo, but I’ve also taken some Nuvo White Blizzard Glitter Drops and added a tiny dot in the centers of the white flowers.  I have also used the Wink of Stella Clear Glitter Brush and went over the butterfly.

I hope you’ve enjoyed my creation today and I thank you so much for stopping in!  I look forward to sharing another project with you tomorrow!  See you soon!

Here’s the list of Copic markers I’ve used:

  1.  Dress, Hair Bow & White Flowers:  Y17, Y15, Y13, Y11, B00, B000
  2. Shoes:  E87, E84, E81
  3. Hair & Skin:  E49, E47, E44, E42, E21, E11, E00, E000, R20
  4. Bunny:  C3, C1, R00
  5. Butterfly & Flowers:  V15, V12
  6. Grass & White Flower Stems/Leaves:  G24, G21, G20, YG67, YG63, YG61

Challenges I’d like to enter this card for:

  1.  Crafty Creations – Anything Goes
  2. Crafty Animals – Anything Goes #22
  3. Creative Knockouts – Anything Goes
  4. QKR Stampede – Anything Goes #330
  5. Use Your Stuff – Furry Friends

What’s New at Cute Card Thursday

Hello friends!  It’s Thursday time again and we have a new challenge for you over at Cute Card Thursday today!  The challenge for this week is…..”What’s New?

And remember these challenge themes are always your own interpretation!  Here’s what I’ve created for it:

vicki-cct564-adu-new

I thought this image was so TWEET!! 🙂  It is a “new to me” image from our sponsor this week by All Dressed Up Stamps called Home Sweet Home.  I thought this would be such a nice card for someone with a “new home”.

It was also nice to be able to use some older items from my stash as well!  I have colored up the image and used a heart die to cut it out with.  I’ve also sponged some color around the edges and added some stitching details with a marker.  For the patterned papers in the background, I’ve used a paper piercer tool and made stitch marks over the holes with a white gel pen.  I layered it onto a piece of white cardstock which I then layered onto a piece of 5″x5″ Sahara Sand top folding card base.  BEFORE attaching my white layer onto the base, I’ve added some twine around it.

I cut out a smaller heart from the die set I’ve used from some craft foam and attached it to the image heart panel and placed it over the twine on the front.  Lastly, I’ve added the wood veneer bird cage and flowers and twine bow.

vicki-cct564-adu-close

Taking a closer look at the image, you can see that I’ve used various colors of Copics to color it in with.  I went around the images with a W0 which matched up nicely with the colors of the main card panel.  You can also see places where I’ve added a bit of sparkle from some colored gel pens and extra “dots” around the image with a white gel pen.  It was actually a really simple and fun image to color!

vicki-cct564-adu-flat

Thanks so much for stopping by today and I wish you a wonderful day!

Challenges I’d like to enter for this card:

  1.  CRAFT – New (year/job/baby, etc.) – for me:  new home and new stash
  2. All Dressed Up Stamps challenge – Anything Goes + ADU image
  3. Cardz 4 Galz – New Year/New Stash (image and hearts dies)
  4. Alphabet Challenge – ‘U’ is for ‘Use Some Stitching:  faux or real’
  5. Crafting From the Heart – Anything Goes
  6. Try it On Tuesday – Something old/something new (new image/wood veneer, new home and old papers, old flowers, old tools!)
  7. Words 2 Craft By – HOPE (W2CB61):  “Hope is the thing with feathers that perches in the soul & sings the tunes without the words & never stops at all.” ~ Emily Dickenson                     Absolutely LOVE that!!

Whimsy Stamps + Anything Goes at Cute Card Thursday!

Hello friends! I’m not only here to share my creation for the new release at Whimsy Stamps, but also another new challenge for Cute Card Thursday which is also being sponsored by Whimsy Stamps this week!  The new challenge for Cute Card Thursday this week is another “Anything Goes“!  We look forward to seeing your creations, plus if you enter this week, you put your name into a draw for a win from our sponsor!  Don’t miss out!

Vicki-Cratefulkittens-Jan3

Now how adorable are these little cuties?!!  This is the newly released digital stamp called Crateful of Kittens from Whimsy Stamps.  I have also paired it with the newly released Oh Boy – Digital Papers.  I thought that the solid yellow and gingham would work nicely with this image to give it a happy feel!  For the sentiment I’ve used the Whimsy Stamps Bold Statements clear stamp set to stamp over some of the yellow solid paper and made my own fishtail banner with it.

I’ve added some white ribbon with a bow to go around the yellow papers and then attached it to an A2 sized white top folding card base.  For the banner, I’ve added a white daisy flower and placed a rhinestone in the center that I’ve colored yellow with a Y17 Copic Marker.

Vicki-CratefulKittens-close

Here’s a closer look for you on how I’ve colored up this image!  I’ve used a stitched square die to cut the image out with and additional die to layer some of the solid yellow digital papers behind it.  For the background of the image panel, I’ve used a cloud stencil and very lightly inked some clouds in the background.  I added some sparkle to the center of the flowers on the image with a glue pen and clear loose glitter.  I’ve also added some dots to their cheeks with a white gel pen.

Here are the Copics I’ve used to color with:

  1.  wooden crate:  E23, E25, E27, 0-blender
  2. Flowers, leaves, grass:  Y11, Y15, Y17, YG61, YG63, YG67, G20, G21, G24
  3. Kitties:  C1, C3, C5, E41, E43, E44, R20 (cheeks), W1, W3, W5

Hope you’ve enjoyed my creation today and see you soon!

Challenges:

  1.  My Time to Craft – Something NEW (New image, new papers and new friends!)
  2. Always Fun – Something NEW (ditto above!)
  3. A Bit More Time to Craft – Anything Goes
  4. Classic DT Challenge – open (Anything Goes)
  5. The Crafty Addicts – Anything Goes with optional:  “It’s a purrfect day!”
  6. Little Red Wagon – Hey Newbie! (new image, new papers and new friends!)

Celebrating at 2 Crafty Critter Crazies With a New Challenge For 2019!

Hello friends!!  Happy New Year to you!!  I hope you’ve enjoyed the celebrating with your family and friends!  Are you excited about a brand new 2019?!  I sure am!  I’ve got lots in store to share with you this year!  Hope you’re looking forward to it as much as I am!!

Let’s start this year off with a brand-new challenge over at 2 Crafty Critter Crazies, shall we?  Every first of the month there’s a brand new “Anything Goes” challenge…BUT you must use a critter somewhere on your project is all!

Vicki-2CCC22-Bugaboo

Isn’t this guy adorable?!  I have used one of our sponsor’s image for my card today from Bugaboo.  This is the Critter Balloons – elephant digital stamp.  I have actually cut him out twice and colored him in, but I cut just his head and the balloon to pop them up with some foam tape for a little dimension.

I’ve made a Center Step Card for my design today.  I kept the dimensions at an A2 standard size when it lays flat so that it will still fit inside an A2 envelope for mailing.

I’ve used some fun birthday style papers from my old stash and then I’ve used a sentiment from My Favorite Things More Essential Sentiments and white heat embossed it over a piece of black cardstock that I cut out with the Die-namics Essential Fishtail Sentiment Strips.  Lastly, I added some silver ribbon above that.

Vicki-2CCC22-Bugaboo-close

Here’s a bit of a close-up to see the dimension over the image.  I’ve also taken a glue pen over the balloon image and added some clear sparkly glitter over it.

Hope that you’ve enjoyed my card today and I’ll be back very quickly with a second post today!

Challenges:

  1.  QKR Stampede – Anything Goes #328
  2. A Perfect Time to Craft – Anything Goes

Celebrating 10 Years of Whimsy Stamps!

Today kicks off a weekend of fun to celebrate Whimsy Stamps 10th birthday! Yay!!!  If you’ve been following along with me for a while, then you know that I have been a design team member at a few different times throughout the 10 years and I’m honored to be a part of the team again to help celebrate their 10th birthday!

I also wanted to share my birthday card inspiration:

Vicki-WS-IGhop-DoggieIcecream

So what could be more fun than this little Doggie Ice Cream digital stamp to help celebrate with!  I have printed him out twice (I’ll explain below) and colored him up in the following Copic markers:

  1.  Doggie body:  E27, E25, E23, E21, R20 (cheeks) and white gel pen
  2. Doggie bib:  BG78, BG75, BG72
  3. Ice Cream bowl:  C8, C5, C3 (Used C3 for ground shadow under image)
  4. Ice Cream/bottom scoop:  R85, R83, R81
  5. Ice Cream/top scoop:  E53, E51
  6. Cherry on top:  R39, R37, R35

I have taken some older Whimsy Stamps paper packs (this one no longer available called “It’s a Party”) to use for the background of my card design…he has to have a party scene after all, right?!

I then took a thin strip of black card stock to go along the edge of the paper to give it a nice finishing touch.  I also took another piece of black cardstock and white heat embossed the fun sentiment from the Whimsy Stamps Bold Statements clear stamp set and then cut a banner and attached it alongside the black strip.  Lastly, I’ve added some fun matching Whimsy Stamps “It’s a Party” enamel dots to finish off the design.

A closer look at my image, you can see that I’ve added some glossy accents to the cherry on top of the ice cream as well as the pup’s nose.  I’ve used a Spectrum Noir glitter brush pen to over the ice cream scoops and then I took a liquid glue pen and sprinkled some more glitter under the pup image before attaching him to the paper.

The reason I printed out this pup twice is because I wanted to add some dimension to it.  I colored and fussy cut out the entire image and attached him over the glitter ground.  I took the second image and only colored his head/bib and the ice cream images.  I fussy cut those out, then turned them over to rub a tool over which make it curl around the edges a bit.  I used some foam tape to attach them directly over the image and it gives a nice dimension to it.

Vicki-WS-IGHop-Doggieicecream-dimension

Here’s a peek of what that dimension looks like underneath.  Because the edges curl, you don’t see much sticking out, but it gives a nice dimension to your image.

Vicki-WS-IGhop-DoggieIcecream-flat

Hope you’ve enjoyed my card today and I hope you take part in the celebration with us at Whimsy Stamps in any way you can!   I also wanted to thank each of you for the kind support you’ve given me with my Whimsy Stamps creations, it means so much!

Enjoy your celebration weekend and I’ll see you soon!

Challenges I’d like to enter this card for:

  1.  Addicted to Stamps & More – Make Your Mark
  2. Crafty Creations – Anything Goes
  3. Tuesday Throwdown – Anything Goes
  4. Watercooler Wednesday (WWC200) – Occasions
  5. CRAFT – Anything Goes

Embossing at Cute Card Thursday

Hello friends!  It’s time for another Cute Card Thursday challenge this week!  We would like to see some “embossing” on your creations this week!  You can make it heat embossed, dry embossed or I would say embossing paste would work too!  Or you could challenge yourself and try to combine more than one kind! 🙂

We are sponsored this week by All Dressed Up Stamps, so be sure to enter the gallery for your chance to win a prize!!  Here’s what I’ve created for this week’s challenge:

Vicki-CCT560-ADU-embossing

This is such a cute and fun image!    I thought it would make a really fun “New Year’s” type of card, so I created with that in mind.  This image from All Dressed Up is called Season to Sparkle.  I colored her up with Copic markers and then used a gold gel pen to color in her crown.  I’ve also taken the Spectrum Noir clear glitter brush pen and colored her dress with it.  The sparkle on her wings are liquid glue and loose glitter.

I’ve cut the image out with a Zig Zag circle die and then layered a piece of gold mirror cardstock cut with a circle behind it.  I attached the circle image panel over a dry embossed black card front panel that I’ve also wrapped some gold ribbon around and attached the bow to the front.

I also heat embossed the sentiment with some gold EP and cut out a banner strip to pop up over the circle image panel.  I cut the tail end to match the card front.  This card front panel was layered onto an A2 sized white top folding card base.

Vicki-CCT560-ADU-embossing-close

Here I wanted to show you a closer look at the image panel and the close-up details of the frantage embossing powder over it.  (This is such a fun embossing powder to play with!  You have to heat it up from underneath.)  You can also see the gold embossed sentiment too.  I did take some gold tinsel Stickles and added a few drops around the image for more sparkle.

Vicki-CCT560-ADU-embossing-sec

I hope you’ve enjoyed my card today and thanks so much for stopping by and I’ll see you soon!

Challenges I’d like to enter this card for:

  1.  All Dressed Up – Anything Goes + All Dressed Up image
  2. Creative Fingers – Anything Goes
  3. Pammie’s Inky Pinkes – Anything Goes (PIP1849)
  4. Crafting From the Heart – Anything Goes (232)
  5. Little Red Wagon – Black & White + one additional color (GOLD)

Kitty Celebrates Up in the Air!

Hello friends! I’m excited to start with this cute one for today:

Vicki-SnS-Kitty clouds

Tee hee!  Kitty got a little “carried away” with celebrating, I think!  I have used the NEW Kitty Celebrates rubber stamp set for my card.  I’ve stamped him over Copic Blending Card paper and colored him in with Copic markers and then fussy cut him out.

So before attaching him to my card, I thought it would be fun to add some Nuvo Crystal Drops in Morning Dew (Gloss-dries clear) and apply a layer over my balloons to give them a shiny balloon look!  I then set kitty aside while I worked on the rest of the card.

For the background of my card, I made a nice “blue sky” by taking some Watercolor Paper and sprinkling some Nuvo Blue Blitz Shimmer Powder over it and then spritzing some water over it and letting it run all over the panel until I achieved the look I was going for.  (LOVE the subtle shimmer over it too!) and then set it aside to let it dry.

The next thing for me to do was to create some “fluffy clouds” for the kitty to be among:

So, I took some cloud dies from my stash and cut them out with some Sticker Paper.

These sheets are sticky on one side, so I carefully peeled the release paper and handled them with some tweezers and applied some of the Twinkling Clouds Flocking over top of the sticky side, rubbed them with my finger to secure and tapped off the excess.  I now have some really cool soft and fuzzy clouds to attach to my blue sky!

So now all I have left to do is assemble everything for my card!  I started by taking the clouds and adhering them to my background with some dimensional Glue.   I then cut down the watercolor blue-sky panel with a rectangle stitched die that fit the size of my card.   Then I needed to add my sentiment, so I took the sentiment from the same stamp set and stamped it with a black pigment ink and added some Sparkle EP and heat embossed it.  I layered this die cut sky panel over a piece of black cardstock which was then layered over an A2 sized top folding white card base.  Lastly, I’ve added the fussy cut kitty over top of the sky background panel with some foam dots and then randomly added some drops with the Nuvo White Blizzard Glitter Drops over the sky panel.

Vicki-SnS-Kitty Clouds5

I think this turned out really cute and I sure had fun making it!  Here I’ve laid it down so the light catches the details of the sparkle in the clouds, the sentiment and the glitter drops in the background as well as the shine over the balloons too!

Hope you’ve enjoyed my card for you today!  Thanks for dropping in!

Here’s some challenges I’d like to enter this card for:

  1. Simon Says Stamp Monday – ‘B’ is for:  Balloons, Blue Sky, “Best Day ever”
  2. Tuesday Throwdown – Anything Goes
  3. Addicted to Stamps & More – Anything Goes
  4. The Male Room – Celebrate
  5. Little Red Wagon – House Pets