Hello there friends and welcome to April already! I do not know if this year seems to be flying by because I’ve been busy with life or it’s just flying by anyway! Speaking of things flying by…
Today starts up a new challenge over at the Alphabet Challenge Blog! We are on the last letter of the alphabet this time and the hostess has chosen “Z” is for ZOOM(anything that goes fast) for the theme. *Remember that this is a bi-weekly challenge, so you have two weeks to enter* I hope you will find some time to join us in the gallery! Here’s what I’ve created:
How cute is that pup standing on the bike seat to look over his bird friend perched on the basket! The name of these adorable animal friends are called “Gus & Gertie” which are a set of characters designed by Taylored Expressions. (If you click on the link, you can see the full line of them.) The set I’ve chosen is called Gus & Gertie Best Buds. I like these animals because they’re very easy to color!
I could’ve chosen the airplane from the set, but I kept thinking of those electric bikes & scooters you can rent from cities and they seem to go really fast when I see kids whizzing by on them! LOL
I kept my scene in a circle and added some clouds in the background that I stenciled in and then layered some hills/slopes and a grass border on the front. I just popped the “ride or die” sentiment at the top and attached the die cut image with foam tape. I layered the scene onto a black circle base that was attached to a red brick embossed background. All was attached to a top folding A2 white card base.
That’s all for me today! Thanks so much for checking in with me as I enjoy reading what you have to say! Enjoy your weekend and I’ll see you soon!
Challenges:
Critter Crazy – #97 Anything Goes with a Featured Creature
Hello and happy Spring! Hope you’re having a great March so far. We just received about an inch of snow on Spring day, so I hope it starts getting warmed up from here! I’m ready for warmer weather so I can cook out on the grill….YUM! Speaking of that….
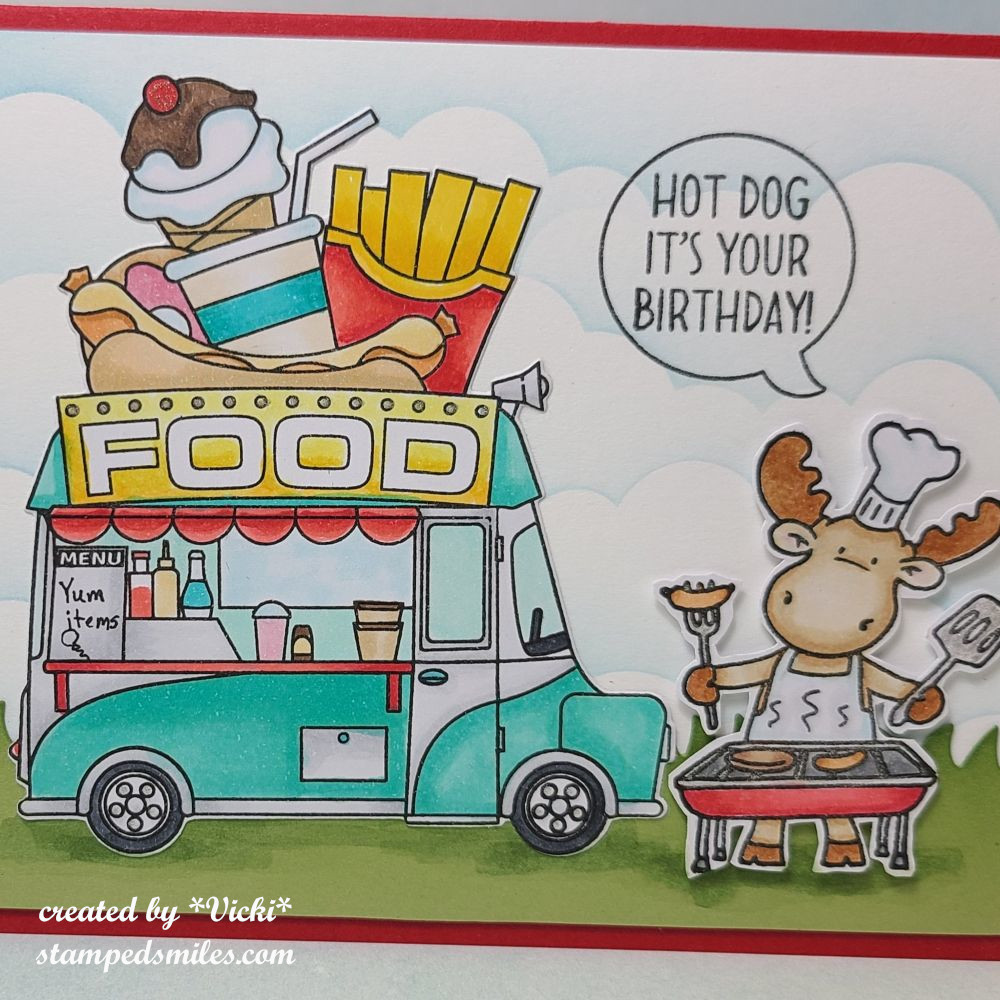
Today starts a new letter over at the Alphabet Challenge Blog and our lovely hostess would like to use “Y” is for YUMMY as the theme this time. How fun is that! Remember you have two weeks to join in the gallery to play with us. Here’s my creation for this challenge:
I couldn’t resist getting out this fun “Food Truck” set from Riley and Company to color up! I also paired it with the BBQ Rileyto complete the scene full of yummy goodies! The images were both stamped and colored up with Copics. I used the coordinating die to cut out the Food Truck and I just fussy cut with scissors for the BBQ Riley.
Before attaching the images, I used a cloud stencil and blended the background and then took a piece of green cardstock to cut out a grass border for the bottom. I ink blended the edges of the blades and then used a green Copic marker to add some shadowing for the stamped images before placing them down on the scene. BBQ Riley was popped up with foam tape.
Here’s a closer view of the images. I used a liner pen to draw “yum items” under the menu board on the truck with a drawing of a balloon. I also used a silver gel pen to color in parts of the truck, the lights above the “food” word along with the utensils on BBQ Riley and parts of the grill.
I found a speech bubble and sentiment from my stash that I thought would be perfect for this card and stamped it above Riley’s head as he’s holding up a hot dog.
Do you like to stop and eat at food trucks? What’s your favorite? Last summer we went to a small town festival and they served some lemon shake ups at one place along with some BBQ shredded pork and it was so yummy! We also like to grab some kettle corn to take home too.
Did I make you hungry now?! Hope you’ve enjoyed my card today and I hope you’ll stop by the Alphabet Challenge Blog to come play along too! We’d love to see your yummy creations! Thanks so much for taking the time to stop by! I enjoy reading your thoughts! Have a great weekend!
Hello friends and happy Friday! The weekend starts and we’ve had some snow blowing around over our way with wind and colder weather, BUT next week it’s supposed to be warmer with Spring-like temps…but that’s the Midwestern climate! It will level out later in the month.
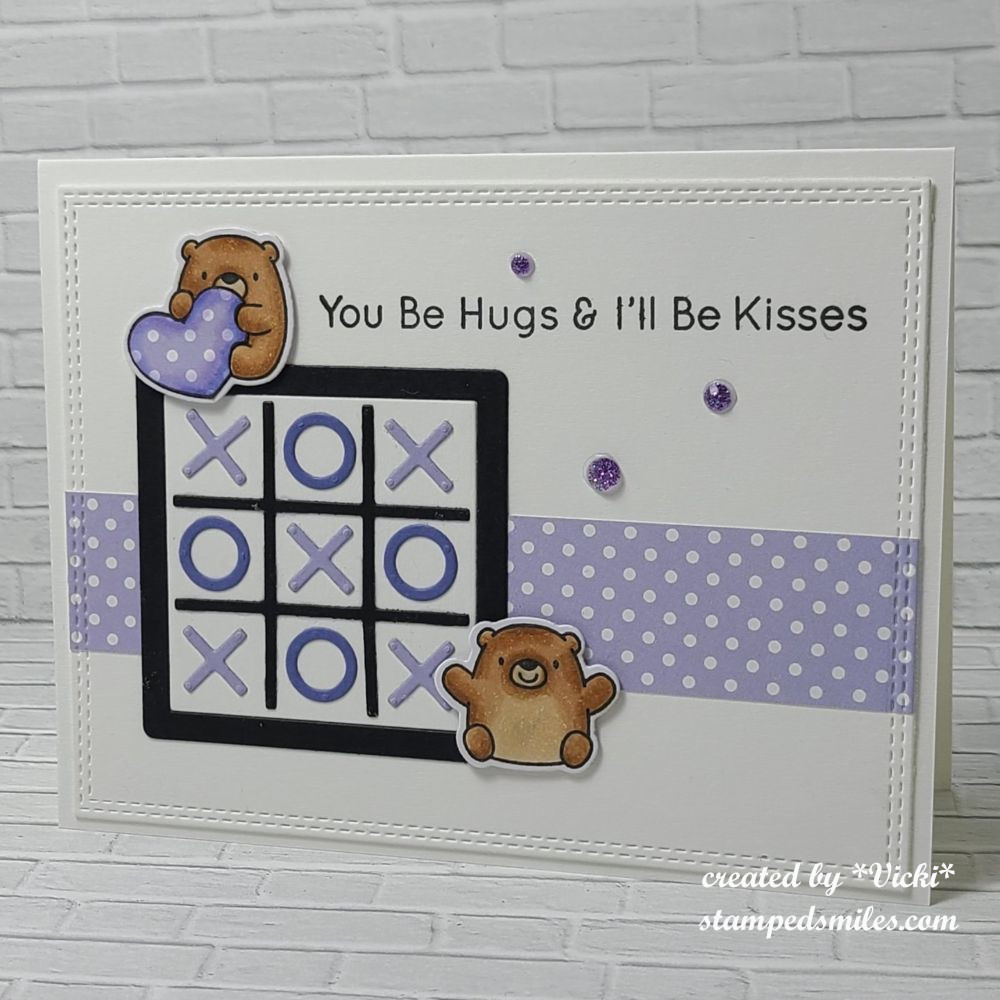
Today is another new challenge over at the Alphabet Challenge Blog! Our theme for the next two weeks is “X is for X’s and O’s (as in hugs & kisses)“. We look forward to your entries! I had some fun with this one:
I’ve had this Tic Tac Toe set for years and never even broke it out to use! It was from the My Favorite Things“X’s and O’s card kit (obviously no longer available). I also used those adorable My Favorite Things Bitty Bears(retired) to help with the hugs and kisses part. I’m so happy to be using something from my stash and especially something that I haven’t used at all!
The card was pretty simple as the die cuts for the tic tac toe square were cut in different colors, found some polka dotted papers to match and also used those same papers to paper piece the heart on the top bear. I stamped the sentiment from the kit, popped up the colored and die cut bears with foam tape and added a few purple gems.
Before attaching all of the elements, I applied the polka-dot striped paper to a white front card base that was cut with a double-stitched rectangle die also from MFT, and then attached to an A2 top folding white card base.
Thanks for stopping in today and I hope you’ll join in the X’s and O’s with us over on the challenge blog! Have a great weekend and I’ll see you soon!
The Neglected Stuff – Anything Goes with neglected item (my neglected item is that MFT X’s and O’s card kit that was never used circa 2017!) About time, huh?!
Hello friends! WOW! That last month went by really fast! I think it’s because I was busier than usual on my blog, but that’s great that all of the crafting got me through the cold month quickly! I know it will still feel cold in March, but hopefully it will start warming up little by little! Until then, I still need to wear some layers!
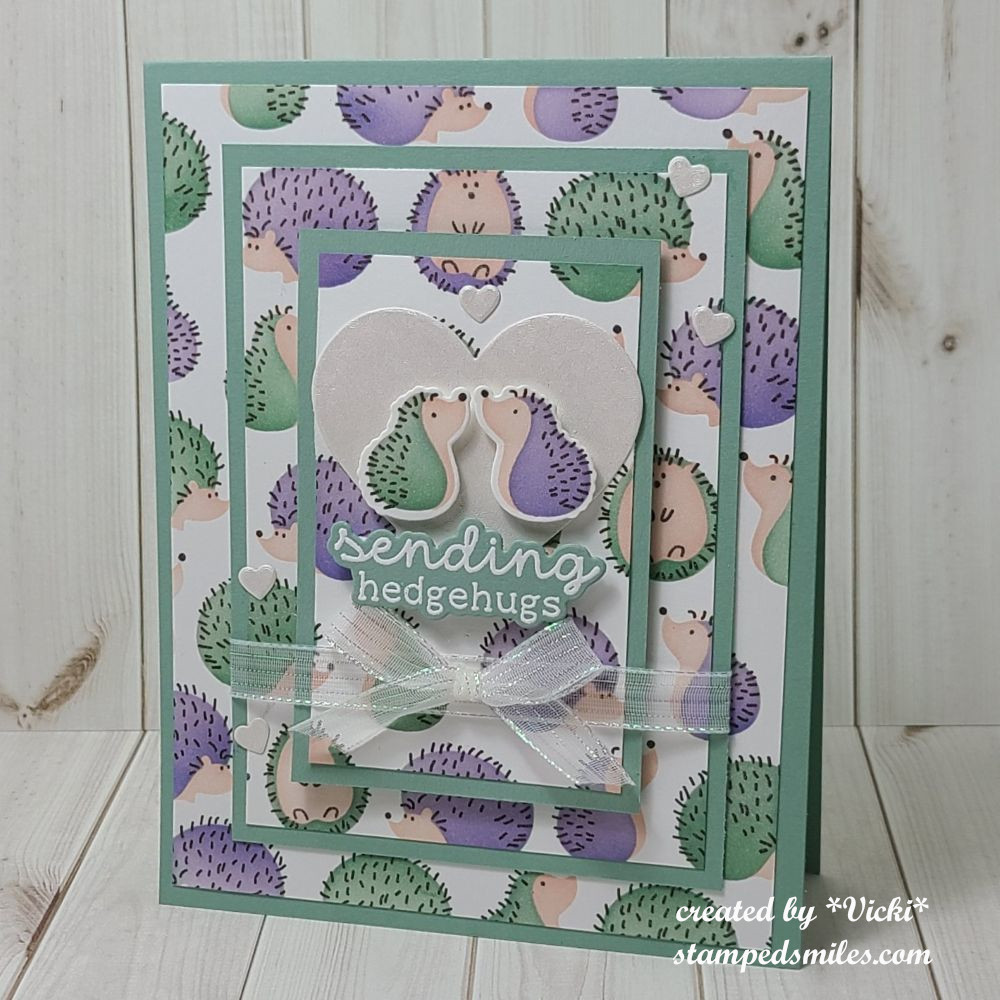
Speaking of LAYERS… That brings us to a new challenge over at the Mix It Up Challenge Blog. The challenges always run for 6 weeks so there is plenty of time to enter. The theme given this time around is: LAYERS or you can do the ‘Anything Goes” too. Here’s the card that I came up with for the challenge using the theme:
Aren’t these hedgies cute! I’ve had this stencil set for a while and haven’t had a chance to use it until now and I thought it would be fun to try out the Triple Time Stamping technique. (If you don’t know what I’m referring to, check out this video on You Tube HERE.) I thought this would be a great way to insure several layers on my card.
The cute hedgehogs come from the Taylored Expressions Hedgehugs Stamp & Stencil Combo. I used the technique to layer the panels together and then stamped and stenciled the hedgehogs and then layered each panel with the Spearmint cardstock. The smallest layer on top was popped up with foam tape. (I added the white shimmer ribbon around the middle and front panels before attaching to the card.)
I used the coordinating die to cut out some extra hedgehogs and I popped them up with foam tape over a white metallic heart. I also white heat embossed the sentiment from the TE To the Point stamp set and cut it out to pop up under the “kissing hedgehogs”. I’ve also added a few more tiny die cut hearts from the white metallic paper.
I THINK I’ve got about 7 layers all together not including the card base.
I hope you’ve enjoyed my card today and will stop by the challenge blog to see all of the inspiration from the team over there! I would love to see your creation in the gallery too!
Hello friends and happy Friday! It has been very cold over our way and I’m staying indoors as much as I can which means some crafting time is happening! I do like looking from my window and seeing the chickadee birds along with the squirrels in the feeders! I enjoy seeing those bright red cardinals, but I don’t get to see those as often.
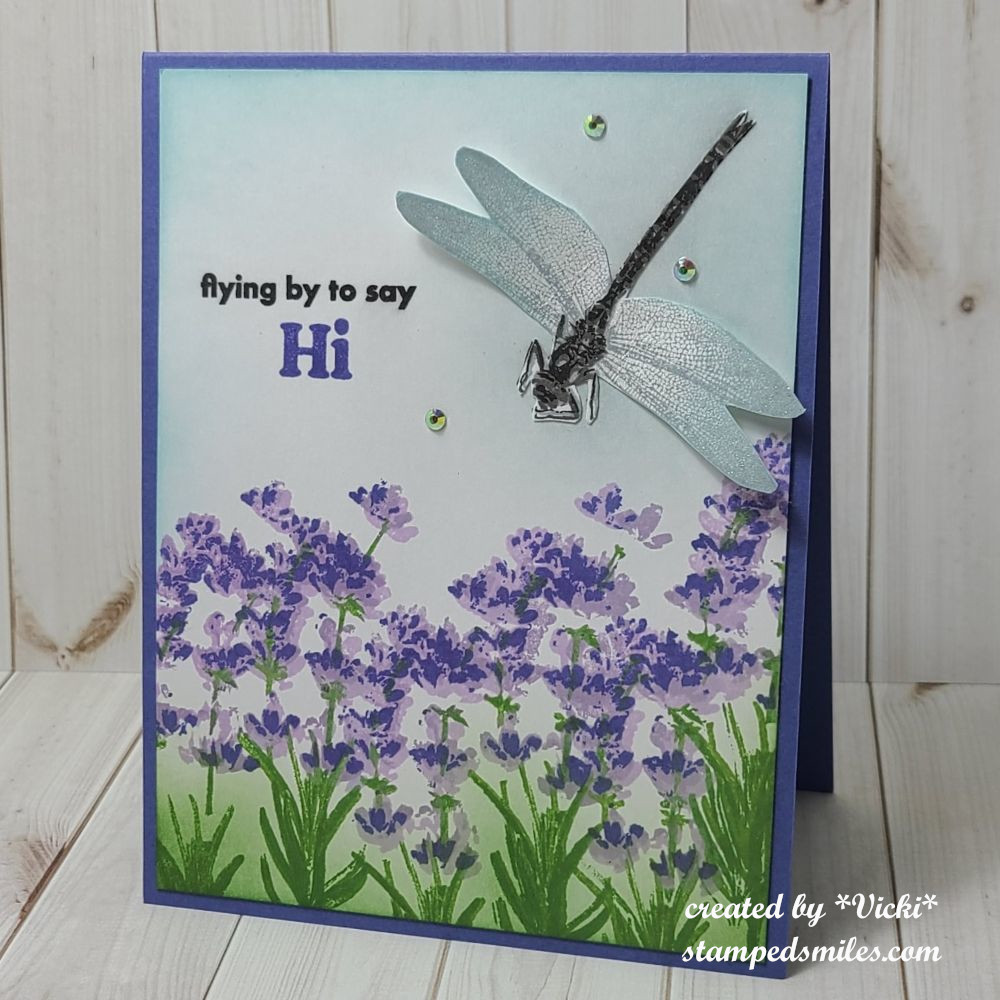
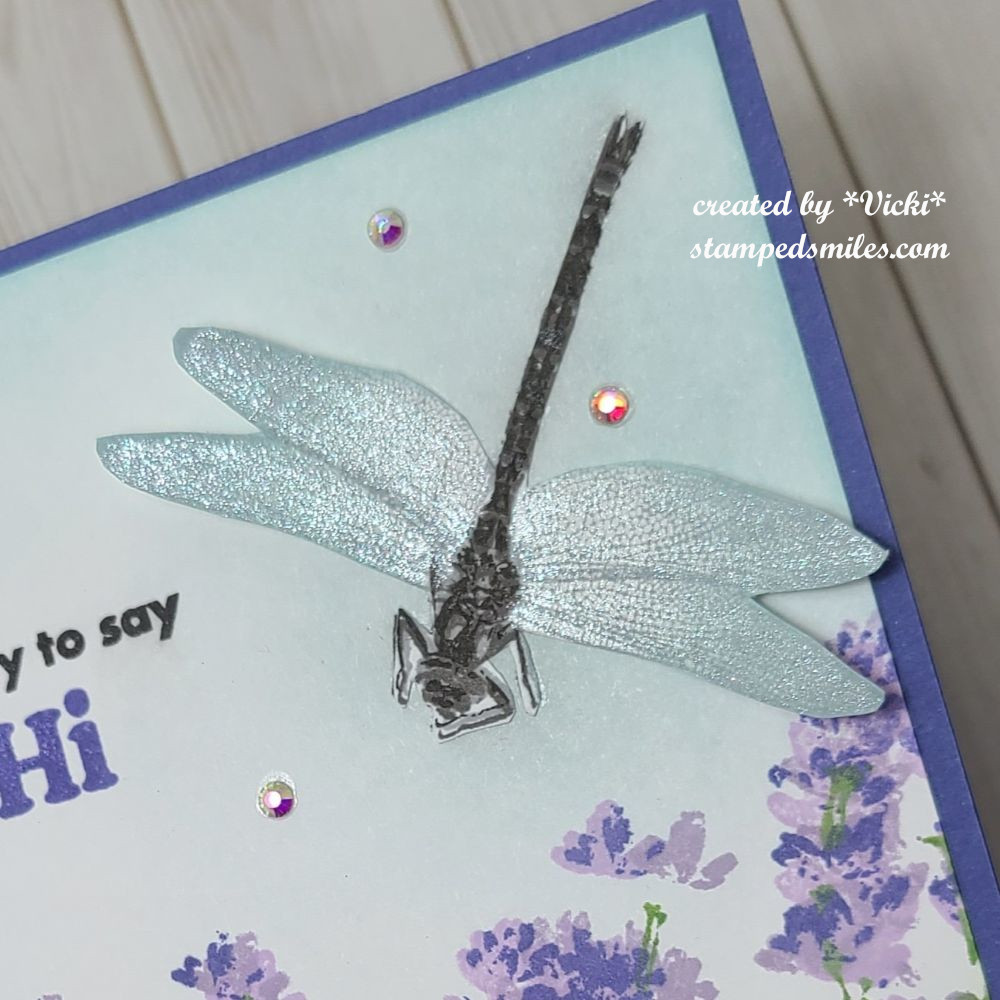
Today is a new challenge over at the Alphabet Challenge and we are on the letter “W”. The hostess has went with the theme “W is for “WINGS“. You will have 2 weeks to join us, so I hope to see your creations in the gallery! Here’s my card using this theme:
Since it’s so cold out, I decided to skip on over through winter and go straight to warm spring/summer with a dragonfly! We usually don’t see dragonflies over my way until it gets pretty warmed up. (It has to be above 60 degrees Fahrenheit, on average, for them to come out.) I also was happy to finally pull out a stamp set that I got from STAMPtember of last year created by Kitchen Sink Stamps. Unfortunately, this company is no longer operating. There are a couple of stamp sets available for purchase on the Simon Says Stamp website I see. But this particular stamp set called “All Aflutter” was only available during the STAMPtember event. I’m happy to get it even though I didn’t make it in time to grab the die set before it sold out, but it’s a beautiful set. It’s actually the only Kitchen Sink Stamps I own.
I started out with the green flower stems at the bottom. This is a layering stamp set, so they very cleverly put the numbers in order to stamp. I then added three purple colors for the flowers to go on top of the green stems. I stamped the sentiment from the set with the “Hi” done in purple ink. I ink blended like colors around the card panel.
I stamped the dragonfly body onto the card panel BEFORE stamping the sentiment for the placement of the design. I attached the card front to a purple A2 top folding card base.
Dragonflies have to have that shimmer on their wings! It’s so hard to take a photo of the shimmer from the glitter pen and I wanted that to come through for my dragonfly wings!
The dragonfly was stamped in the corresponding layers for his body and wings on a separate piece of cardstock. The lightest grey was the wings. I used my scissors to fussy cut him out and blended some light blue ink around his wings. I glued the middle section of him only so that I could pop up the wings a bit.
Lastly, I added some shimmer to his wings with the glitter pen and attached some gems.
I hope you’ve enjoyed my card today and you’ve been inspired to join in the challenge with us! Be sure to check out the rest of the inspiration from the team!
Thanks for stopping in and I’ll be back tomorrow with my AJ collaboration with Carol!
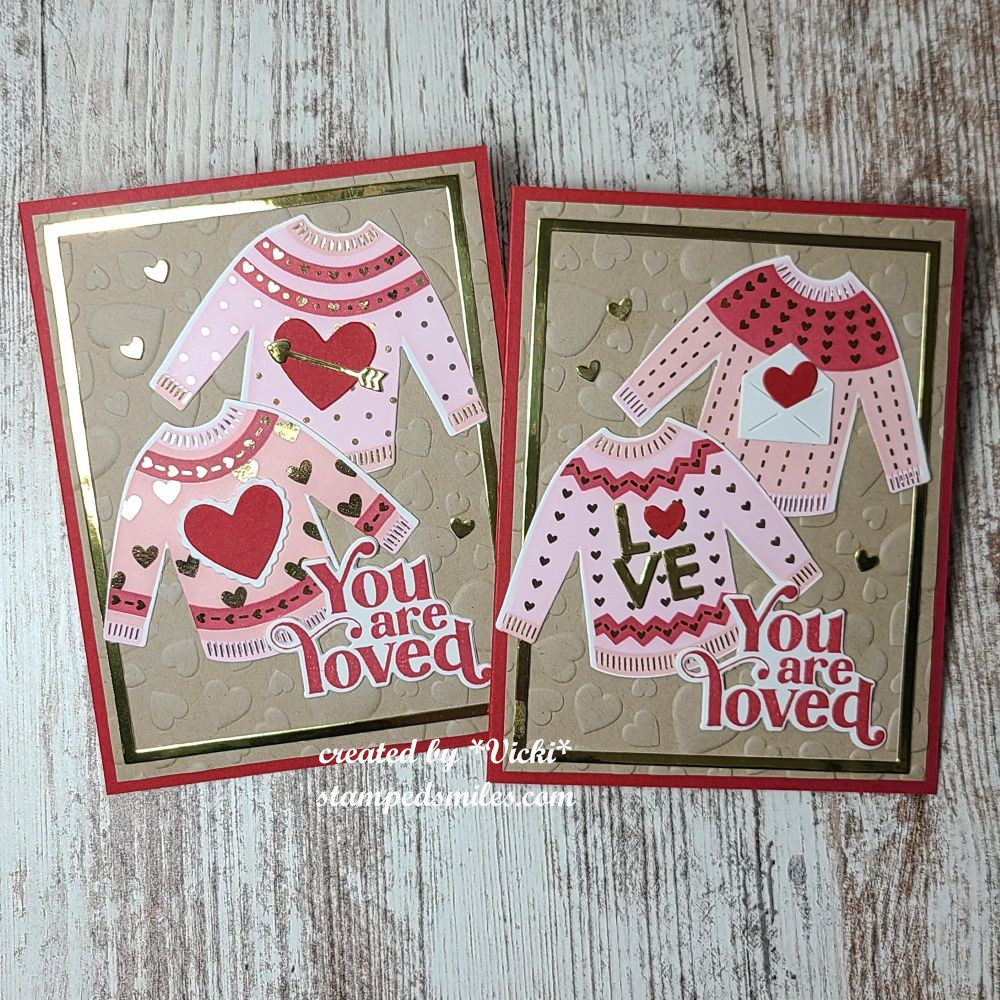
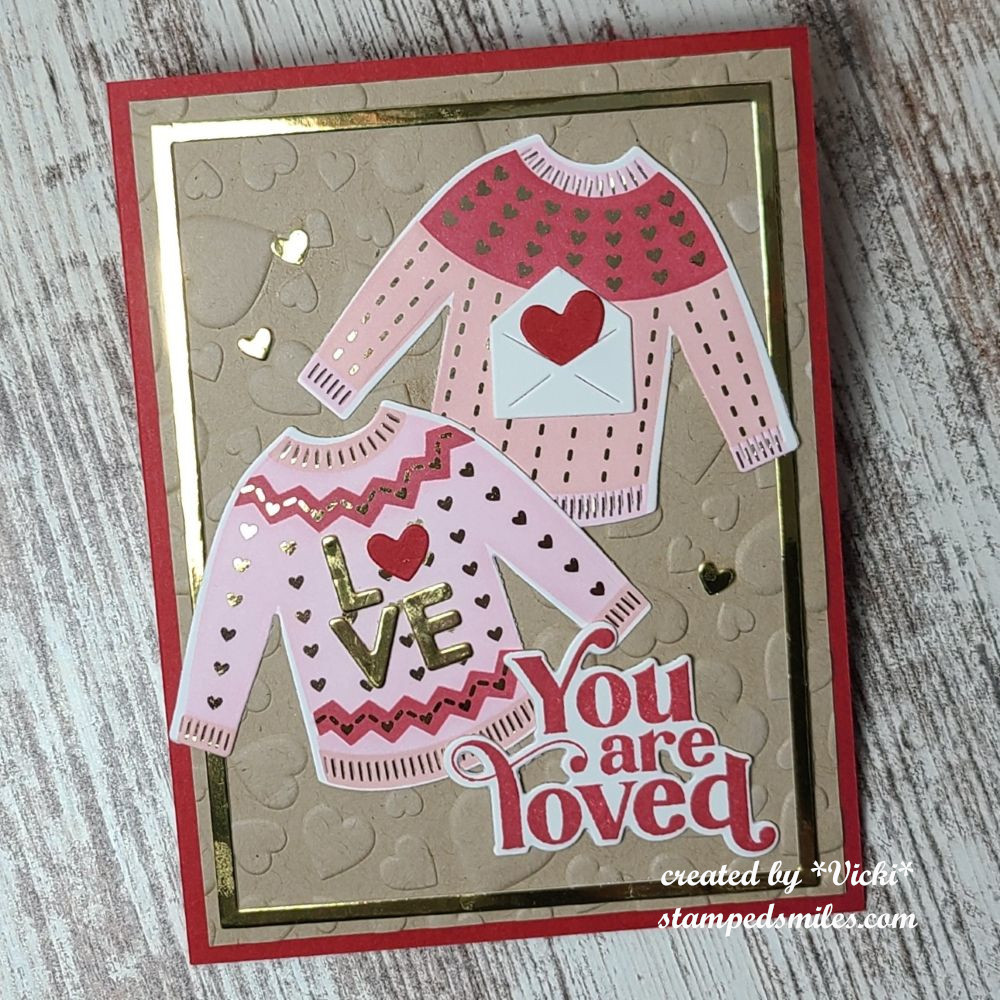
Hello friends! I hope that you had a great Valentine’s Day yesterday however you chose to celebrate it! We chose to stay indoors where it’s warm and watch a movie!
And speaking of love, this brings us to the February challenge over at Sparkles Monthlyand for this month, our hostess is asking for a “Love Card (for anyone you love)” . Be sure to stop by the blog to see what the rest of the design team has created for you. Here’s my project for this challenge:
Aren’t these heart sweaters adorable?! I had fun making a couple of cards to send to my kids (whom I love) for Valentine’s Day. I was actually able to create two similar cards using a stencil set that allows you to make 4 sweaters at one time.
And here’s a closer look at the other card I made. I know I could’ve used just one sweater for each card, but I thought these sweaters were too cute, so I decided to use all of them! I’m thinking one of my sons would probably wear a sweater like one of these and the other would think it’s ridiculous! LOL Regardless, at least they each know that they are loved by me!
I also had these fun TE Snarky Valentine Insiders panels that I gold foiled. I have to share some snark with those I love too! LOL (Click on the photos above to enlarge them if you’re on my website.)
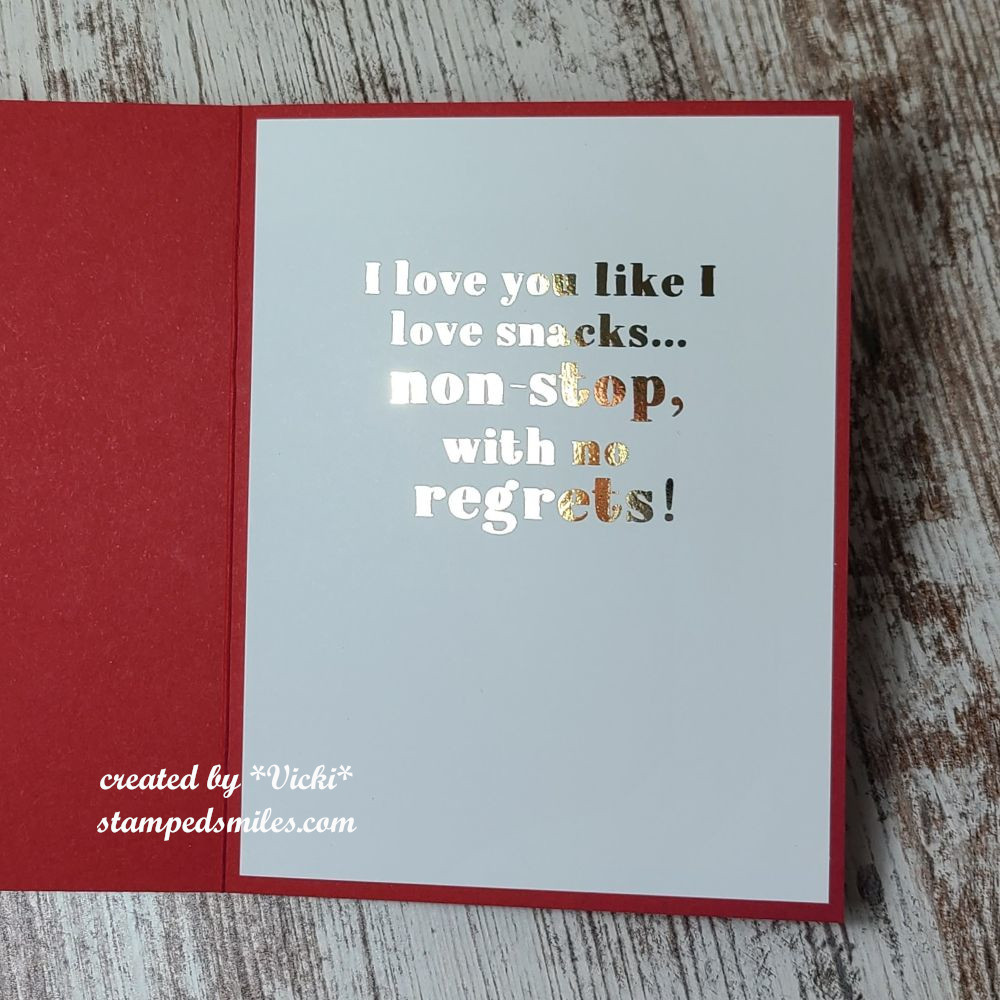
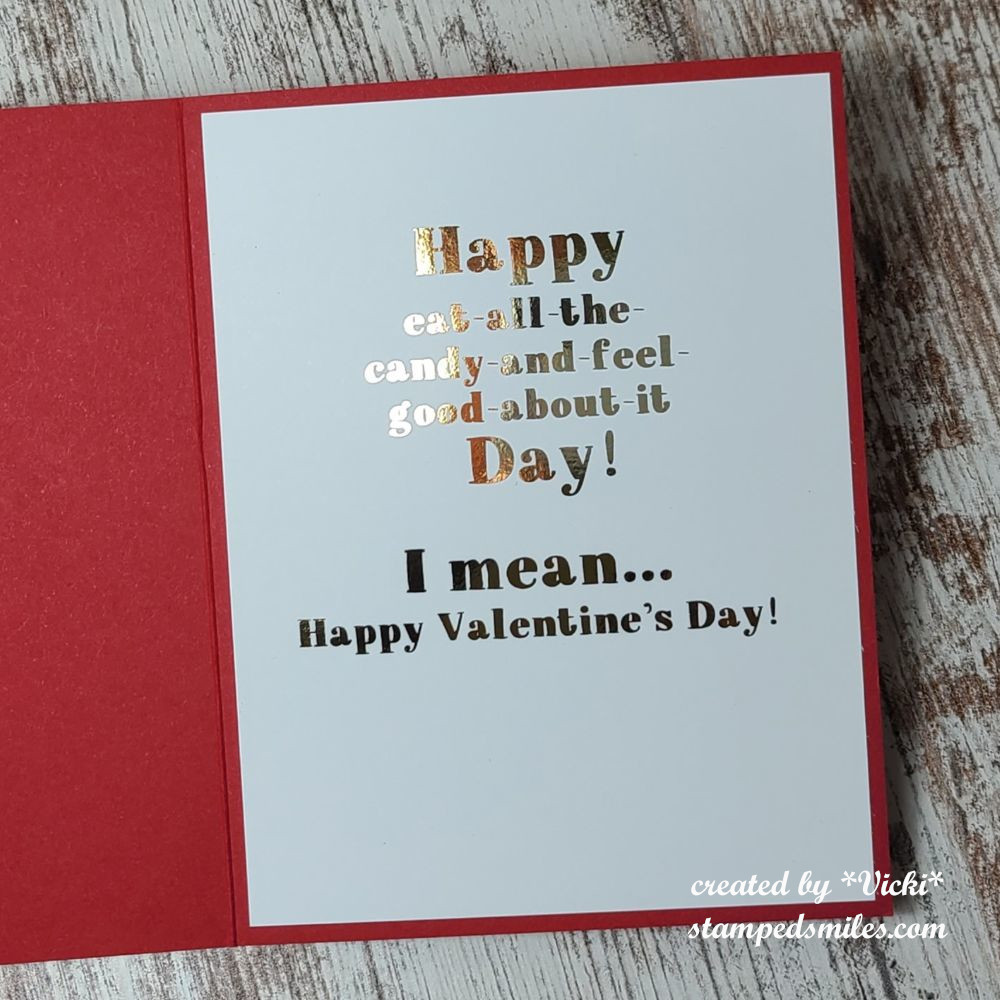
I thought I’d share another card I had made for someone I love that was given to my husband for Valentine’s Day yesterday. (Sometimes, I have to wait until he gets it before I share!):
This pup and his boing heart hat cracks me up! Look at that face! I actually made this last month during a Craft Roulette challenge. I decided that I liked it so much that I put a Valentine greeting on it for my husband to give him on Valentine’s Day.
I used the Taylored Expressions Puppy Love (retired) stamp setand colored in this cute pup with Copic markers and die cut him out. I stamped the TE Gingham Check BG Stamp in black ink over red cardstock. I splattered some white Copic Opaque over top.
For the lace, I white heat embossed the border stamp from the TE Flip the Lace stamp/die (retired) over the Toffee cardstock and placed beneath the check background piece. I added a black strip between the two and then popped the dog on it. I stamped the “Seriously” from the pup stamp set and the Valentine greeting from the lace stamp set together and fussy cut them out to pop up with foam tape on the card. I added a few white hearts around the pup. The entire card is a mini slim from a pre-cut and scored Toffee card base.
Thanks so much for stopping by today and I hope that you enjoyed these “love” cards or have been inspired to make and send a card to someone you love too! I look forward to seeing what you share in the gallery this month!
HAVE A GREAT WEEKEND!
Challenges:
Critter Crazy – #95 Anything Goes With a Featured Creature (Bottom card only)
Hello friends and happy Friday! Are you looking forward to a nice weekend? I have some crafty time in store for me, but honestly, I need to be cleaning my craft room!
Today starts a new challenge over at the Alphabet Challenge blog! Please be sure to check out the challenge blog to see how to play as we go through the alphabet letters every-other week (fortnight) for each new challenge.
For this challenge, we are at the letter “V” for Vintage and here’s what I’ve come up with:
I love the look of vintage style cards, but I don’t make them very often, so this was a great challenge to get me motivated in making one!
I fell in love with the Simon Hurley “In the Garden” stamp set (discontinued) last year , but never got a chance to play with it until now. I thought the images were perfect for a “vintage vibe”. I got that along with these gorgeous papers from Scrapbook.com called “Vintage“, of course! The imagery went well with the stamps in the set.
I started with cutting all of the different patterns from the paper pad into a card design. I sponged around the edges with Hickory Smoke oxide ink. I die cut the “graph paper” panel with Taylored Expressions A2 Postage Stamp Stacklets die. On that panel, I stamped the wording from the SH stamp set with Hickory Smoke oxide as well as a few hearts in Tattered Rose oxide ink. I also took a music score rub-on that I got from Scrapbook.com to add in the corner and then sponged around the edges with Hickory Smoke oxide. I layered this panel onto a piece of grey cardstock. The second layer was also layered onto another piece of grey cardstock and then layered over another piece of the Vintage pattern paper over an A2 top folding white card base.
For the stamped images, I stamped them in black pigment ink and then clear heat embossed them. I used Shabby Shutters, Tattered Rose and Victorian Velvet oxide inks to watercolor by smooshing the ink pads onto a surface and using a water brush for coloring. I fussy cut out the images and popped them up over the panel with foam tape.
Before attaching this panel onto the next panel, I added some grey seam binding ribbon tied in a bow on the side and then popped it up with foam tape. I also die cut the lettering from the Tim Holtz Script Words set in black and attached onto the graph panel.
I hope you’ve enjoyed my card for you today and that you’ll stop over to the blog to play along in the challenge with us! Wishing you a happy and productive weekend!
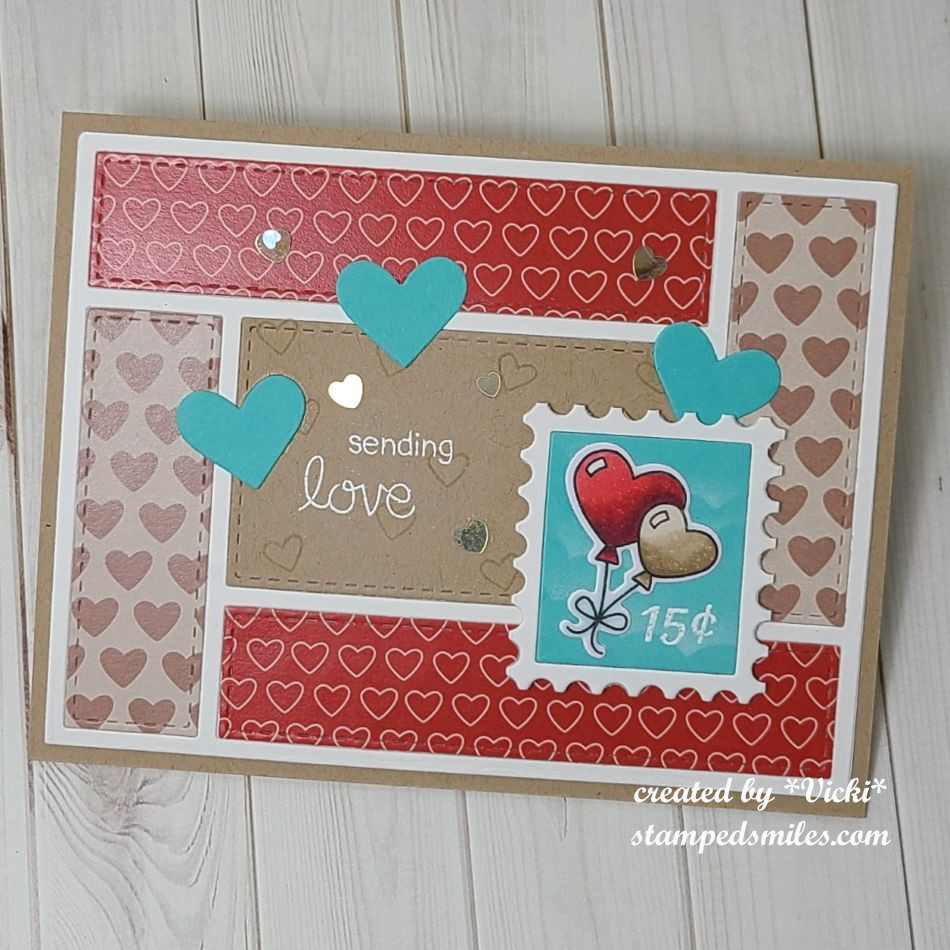
Hello friends! It’s getting closer to Valentine’s Day and Sending out love to others is a good reason to make cards! I’ve joined a couple of challenges to play along with:
I have fallen in love with these card layout dies from Newton’s Nook called A2 Card Layout Die and was also able to use as part of a sketch for a challenge that worked with it. The die made it very easy for the layout. I’ve also used some Newton’s Nook papers as well as a new Valentine themed stamp set that came out in December.
For the postage stamp on the card, I’ve taken the NN Postage Stamp Layout die and cut one in turquoise and then another in white. One for the inside and one for the frame. I cut it apart so that I had several postage stamps. I stenciled clouds on the turquoise insert and added the heart balloons from the NN Valentine Postage Samplerset over it. I stamped, colored and cut it out with the coordinating die. I also white heat embossed the number at the bottom.
I took the same stamp set and stamped some random hearts on the center kraft cardstock panel. The sentiment came from the NN Sending Hugs stamp set (retired) and was white heat embossed over the hearts.
For the die cut turquoise hearts, I’ve used the NN Charming Hearts Frame die. It cut out three hearts that I could use for accents on this card. I’ve attached the entire design over an A2 top folding kraft card base and finished it with some heart shaped sequins.
Thanks so much for joining me today! I hope you’ve enjoyed my card or found some inspiration!
Hello friends! It’s already closer to the end of our first month for 2025 and I hope you’re staying warm and/or cozy where you are!
Today I’m excited to share that I’ve joined the Alphabet Challenge design team! I’ve been playing along with the challenges for a few years, so this will be a fun one! Please be sure to check out the challenge blog to see how to play as we go through the alphabet letters every-other week (fortnight) for each new challenge.
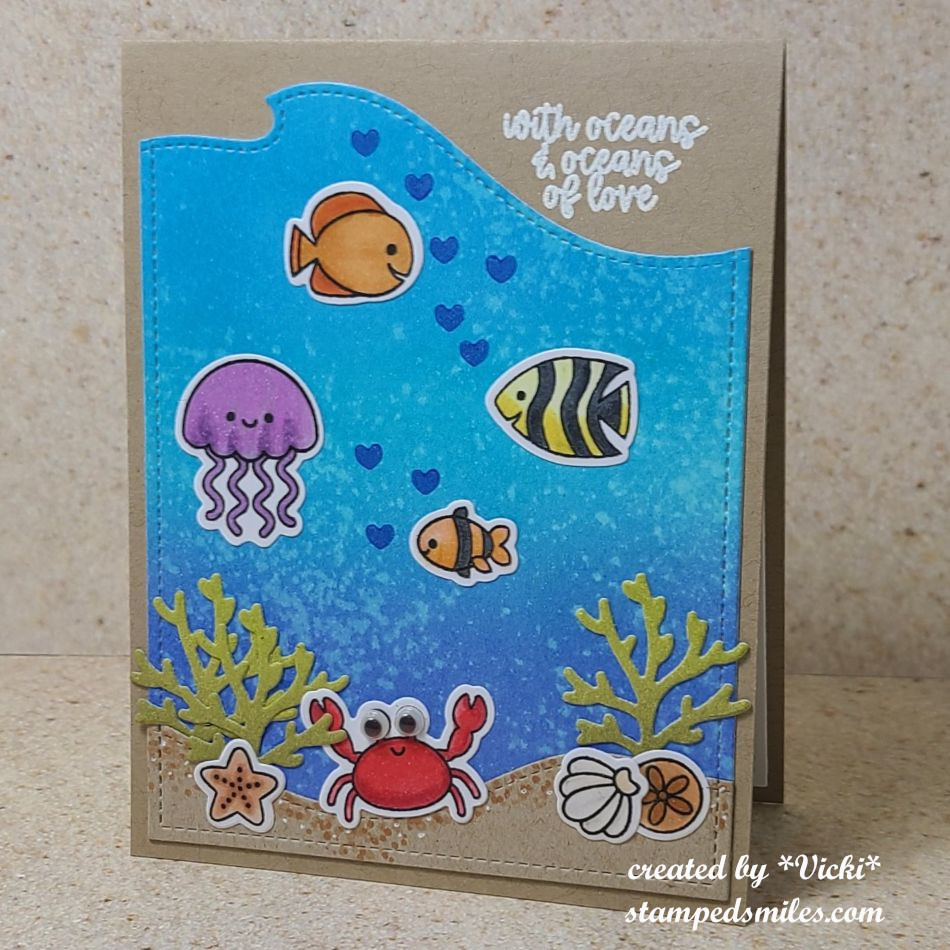
For this challenge, we are at the letter “U” for Underwater and here’s what I’ve come up with:
Now how cute are these smiling underwater critters?! It was hard to believe that going through my stash that I didn’t have much of any underwater critters besides mermaids, but last year I saw this adorable Doodlebug Sea Life stamp set on sale and decided to add it to my collection. This is the first time I’ve used it.
For the background: I’ve taken my Distress Oxide inks and ink blended the colors Salty Ocean, Mermaid Lagoon and Blueprint sketch over some Bristol Smooth watercolor paper. I sprayed it with water and blotted it up with a paper towel. I used a stitched wave die cut border at the top and another wavy landscape border die for the sand at the bottom with kraft cardstock. I’ve used markers and gel pens to create “dots” for the sand and then attached it to the ink blended panel. Once I had it all attached, I cut out the entire panel with a stitched rectangle die and then attached it to an A2 sized top folding kraft card base.
I stamped several of the images and colored them with Copic markers and die cut them out with each coordinating die. The “seaweed” was part of the coordinating die set that I inked over in green Oxide inks and then attached all of the images to the underwater scene.
Lastly, I white heat embossed a sentiment from the stamp set (it says: “with oceans & oceans of love”) in the top corner of the card base and stamped some blue solid hearts from the set for “bubbles”. I couldn’t resist adding some googly eyes to the crab too.
I hope you’ve enjoyed my card today and hop on over to the challenge blog to play along with us! I look forward to seeing your underwater creations in the gallery!
Thanks so much for dropping in and I’ll see you tomorrow for my monthly Art Journal Page!
Hello friends! For those of us that experience the cold weather season for January, I hope you’re finding ways to keep warm. I have been wrapping myself in blankets with fluffy slippers around the house…and yes, I have the heat up too! LOL I think I seem to feel the cold more as I get older in age! This week will be really cold for us here. So I suppose that’s why they say “January Blues”?🥶
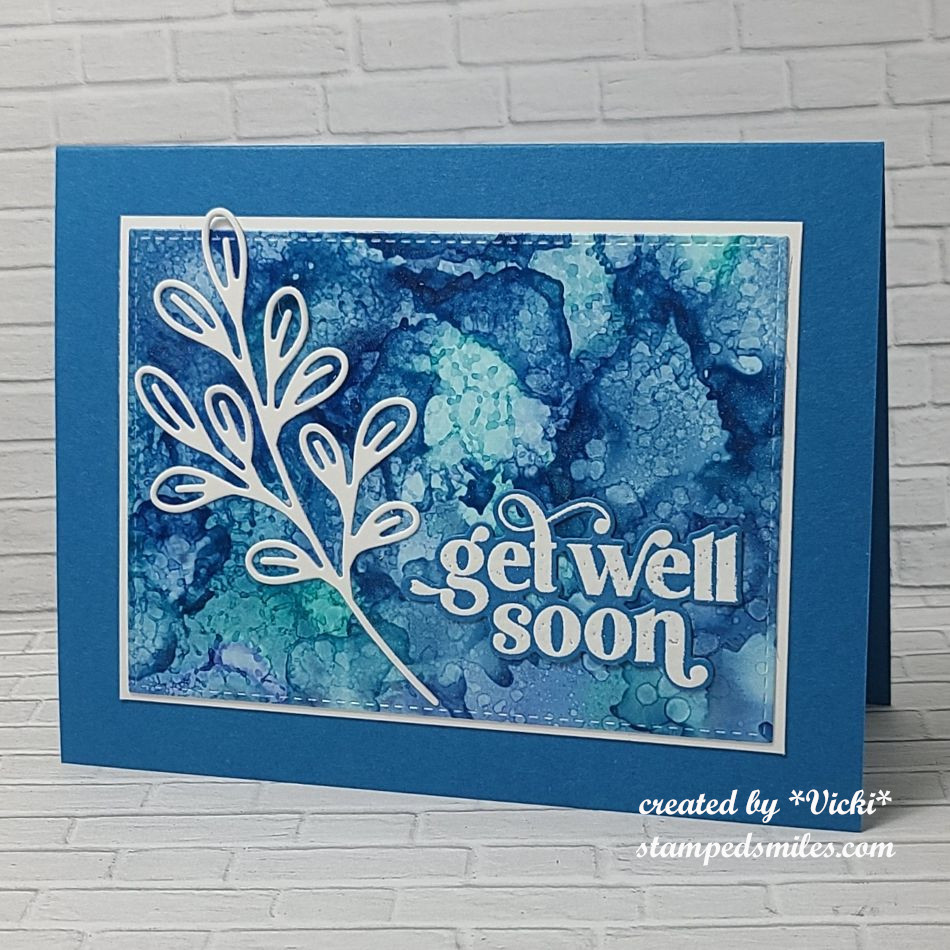
Anyway, that brings me to the January challenge over at Sparkles Monthlyand for this month, our hostess is asking for “January Blues” (monochromatic blue) on your project. Be sure to stop by the blog to see what the rest of the design team has created for you. Here’s my project for this challenge:
Usually, when I think of blues, especially in January, I tend to think of snowflakes. I wanted to do something a bit different and decided to pull out my blue tone alcohol inks and make a background. It was really fun to play around with, and of course, you make a panel and make more than one to save for other cards! Blue makes for such a great masculine card too.
I found some cardstock to match up with the background and die cut the alcohol panel with a stitched rectangle die, layered it over a piece of white to attach to an A2 sized top folding blue card base. (I’m glad that I’m using some older items from my stash as I think this is old Stampin’ Up! paper that needs to be used! I THINK it’s Pacific Point?)
I pulled out a leaf die from Taylored Expressions called Subtle Sprigs and cut one in white to place over top the alcohol background. I also used the TE On Occasion stamp set by white heat embossing over blue cardstock, cutting it out with the die and placing it over the background with the sprig.
It’s a very simple card, but I wanted the alcohol background to take the stage on this one.
I hope you’ve been inspired today to play along with us this month for the challenge at Sparkles Monthly! (P.S. This will also work with the Monochrome challenge at Mix It Up this month too!) Thanks so much for stopping in today with your kind support! I really appreciate it! See you soon!