Reveal of Inky Escape! (Craft Retreat)

Hello friends!  November has come with the pretty leaves on the trees and the coolness in the winds.  I always turn to comforting “things” this time of the year and it always gives me a sense of peace before the year comes to an end.  A warm fuzzy blanket, socks/slippers, sweaters, etc.  is what I usually turn to.   What is your comfort “thing”?

I promised to share with you the fun things we did over at the “Inky Escape” event that I recently attended and it was wonderful to see all of my crafty friends again for laughs and fun together.  I think I miss them already!

I lifted this fun photo from the Inky Stamper FB page as I don’t have any photos other than seeing what others took.  There were a total of 18 of us this time:

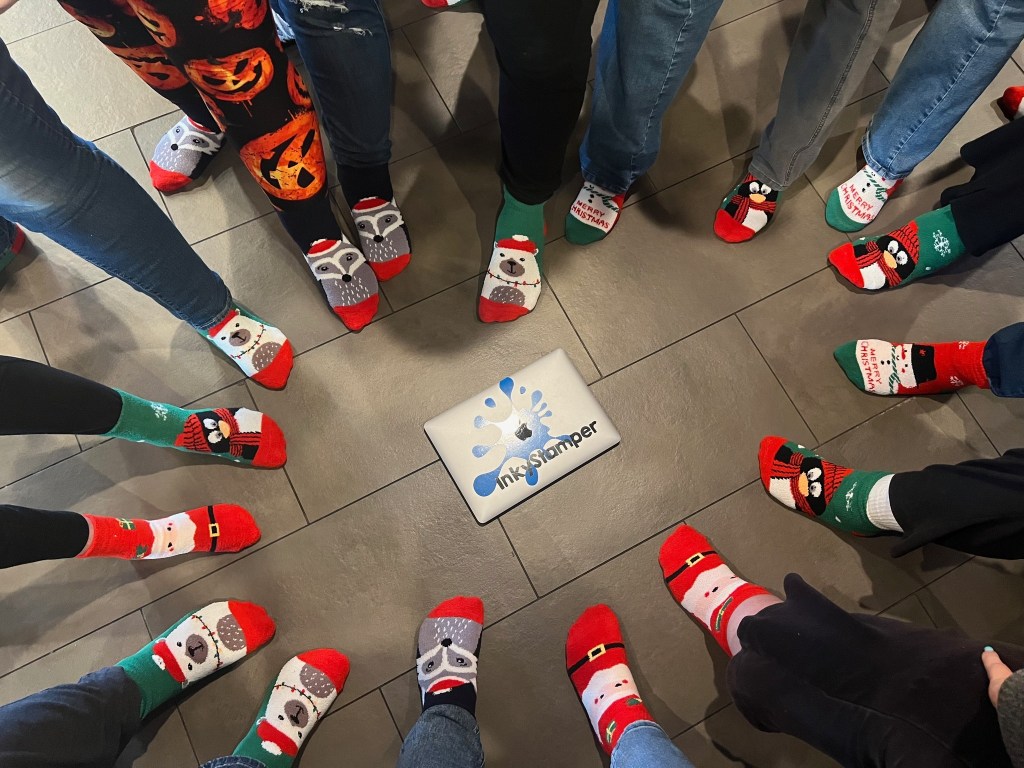
Everyone received a “swag bag”…but the case this time was a Christmas stocking full of fun goodies and one of them was that everyone received cute fluffy socks. I’m not exactly sure which one is me in that photo, but I did have a polar bear sock! LOL We each placed one foot in the circle and Chelsea took the photo.

And speaking of the “swag bag”/Christmas stocking…here’s what we each received:

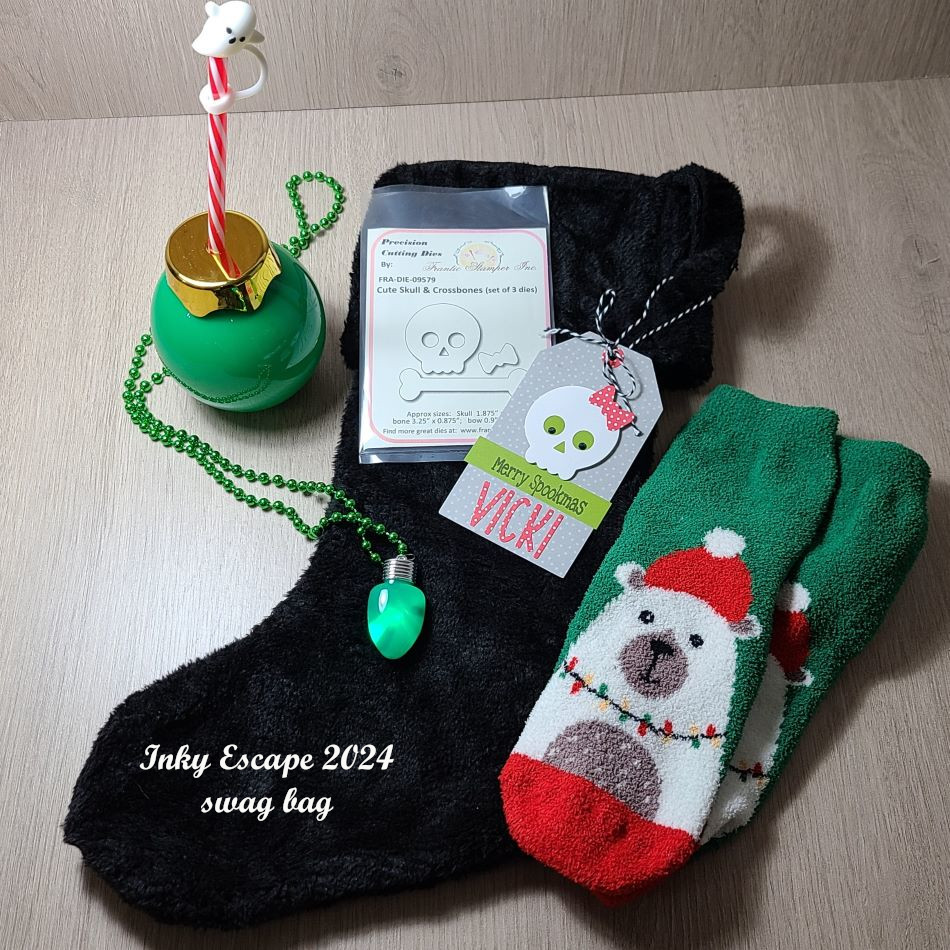
When I got to the event, there was this black stocking on my table with the cute tag attached to it with my name.  Each person received a personalized tag on the swag bag, plus the “skull” dies that were used to create the tag which was inside the stocking!  There are my polar bear fuzzy socks (I’ve already washed them up by hand so the colors wouldn’t bleed in the wash…and they’re so warm and fuzzy!)  I also received the cute “Christmas bulb” drink holder with a candy cane straw and a little ghost stopper for the top!  We used these containers to hold the “Jingle Juice” that we drank at some point!  And then I received a light up Christmas bulb necklace that has different settings when you push the button the back.  The theme for this event was called “Merry Spookmas” which you can see the greeting for that on my personalized tag.  So fun!

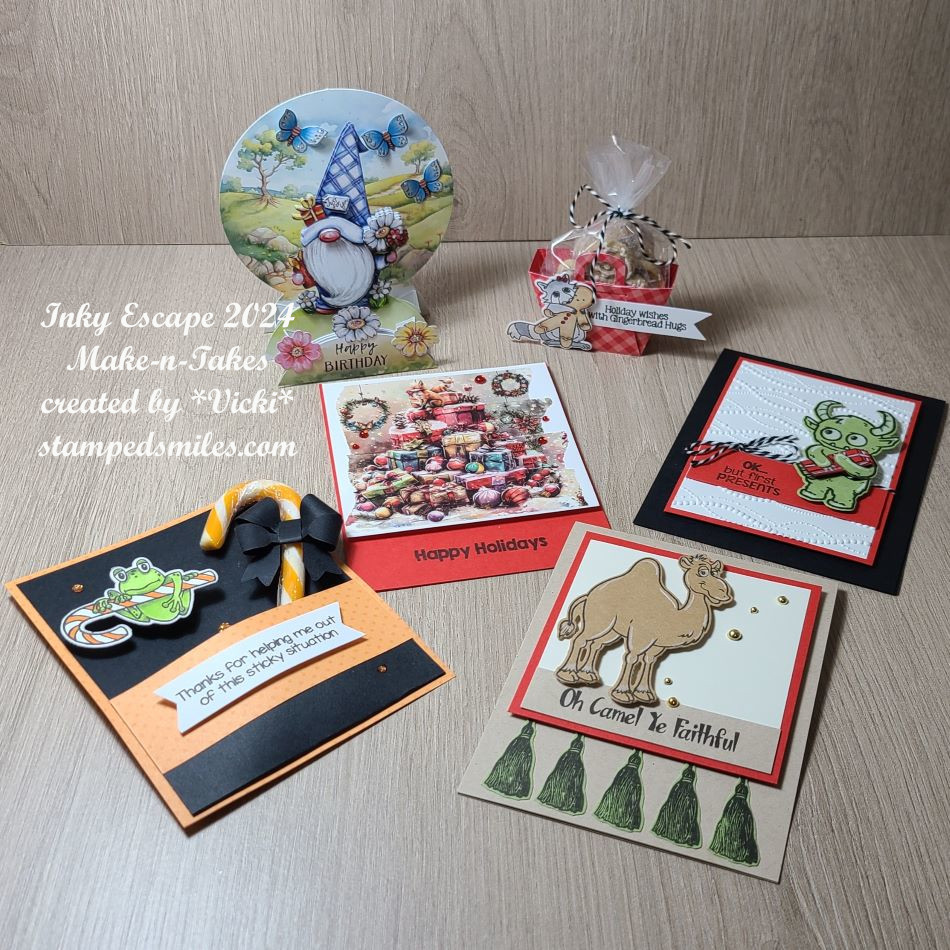
And speaking of fun…here are all of the Make-n-Takes that we created during the event.  We sat and made 4 projects and then two of those projects were “bonus” makes using some other special items.  (There is a “story” about one of them, but you can check out each project up close in the gallery below.)

*If you are on my website, just click on each photo to enlarge and scroll downward to see more information about each photo while it’s enlarged.*

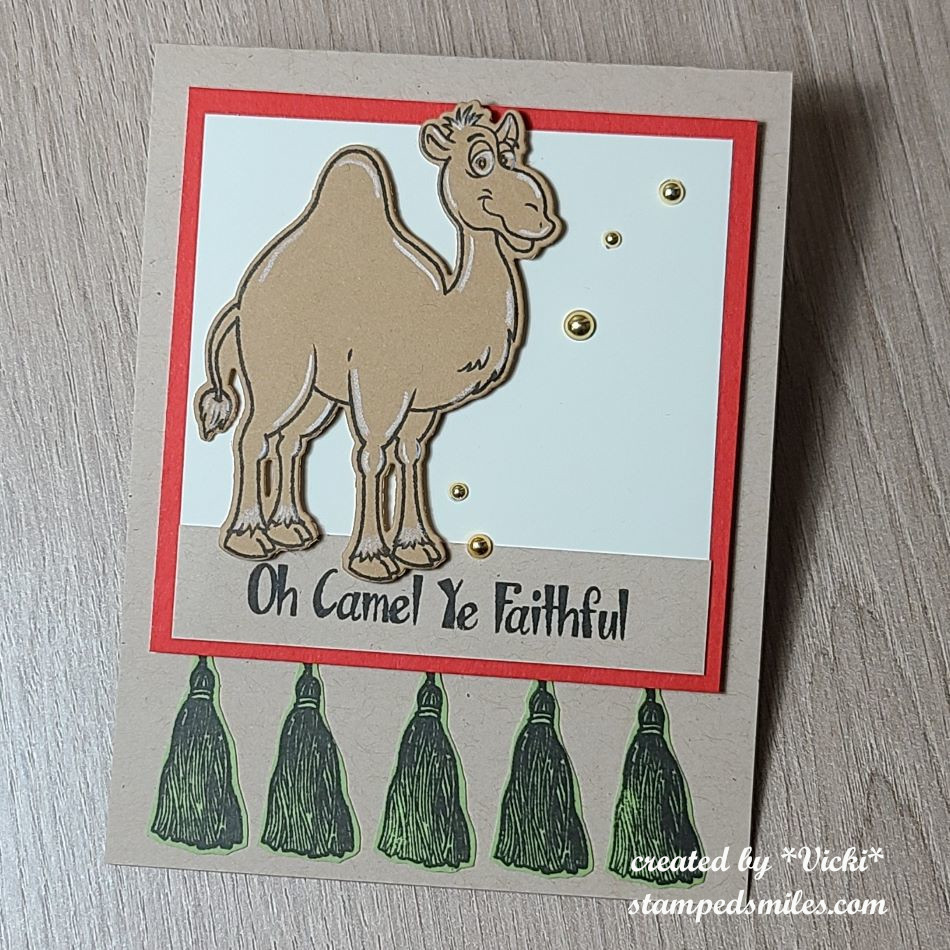
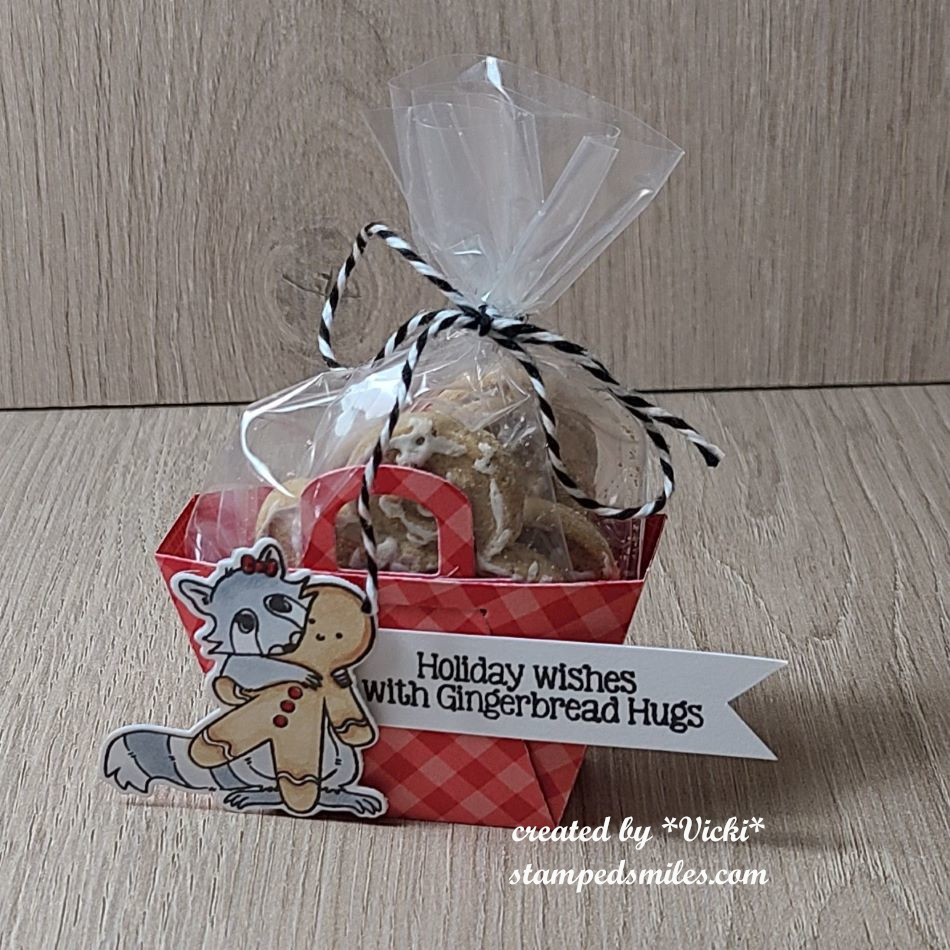
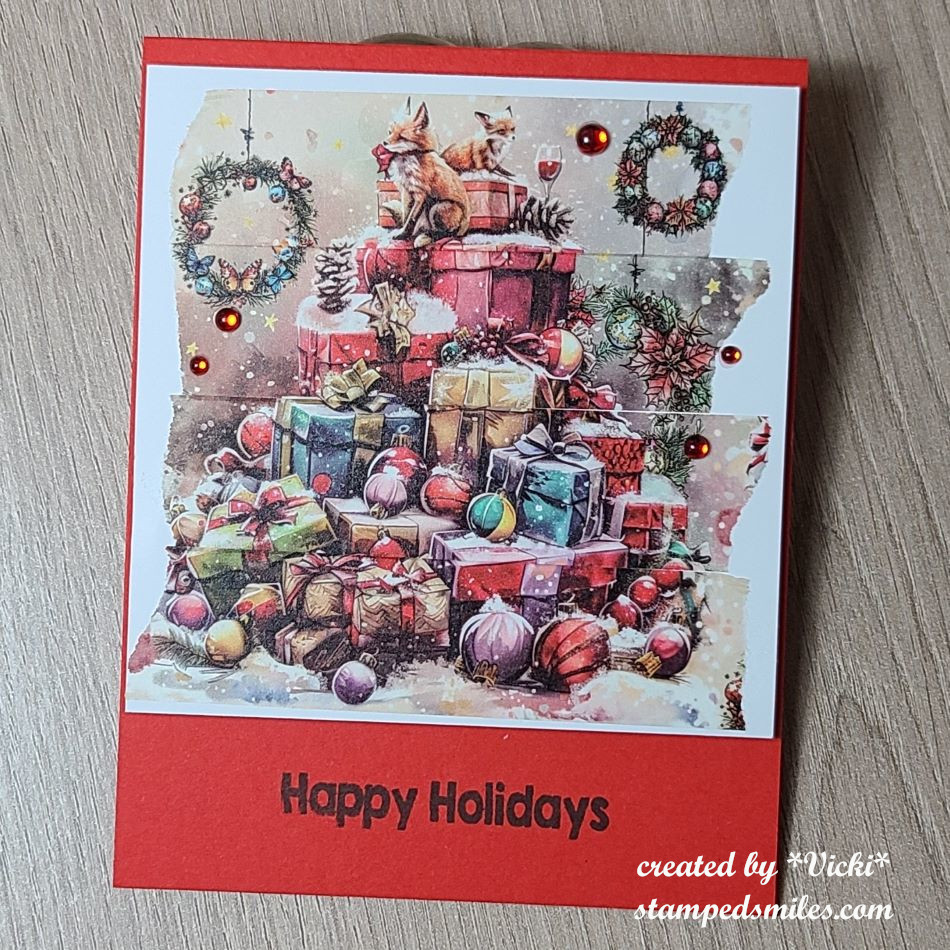
The first four make-n-takes were made using the brand new Inky Stamper release that came out during this event!  You should go check them out now on the website! (They’re all shown on the home page under “Featured Products”.)  My favorite is that darling “Gifter” stamp set!  I’m sure you’ll be seeing something from that set soon from me! *wink*


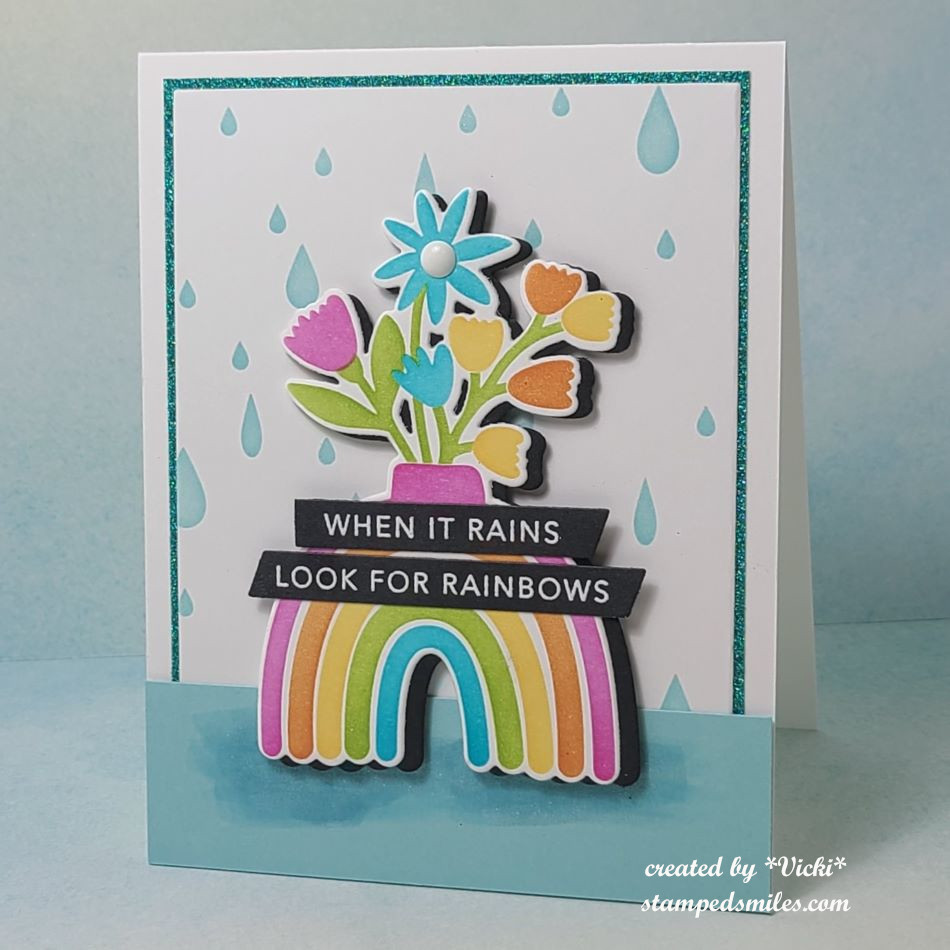
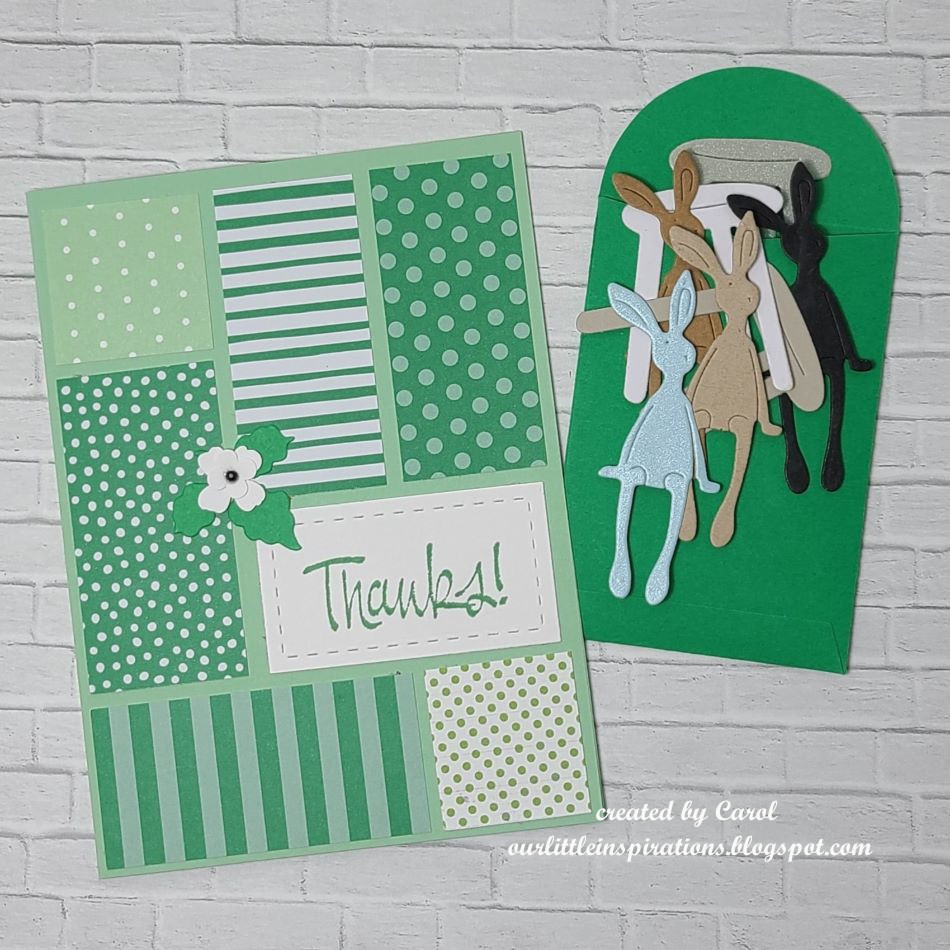
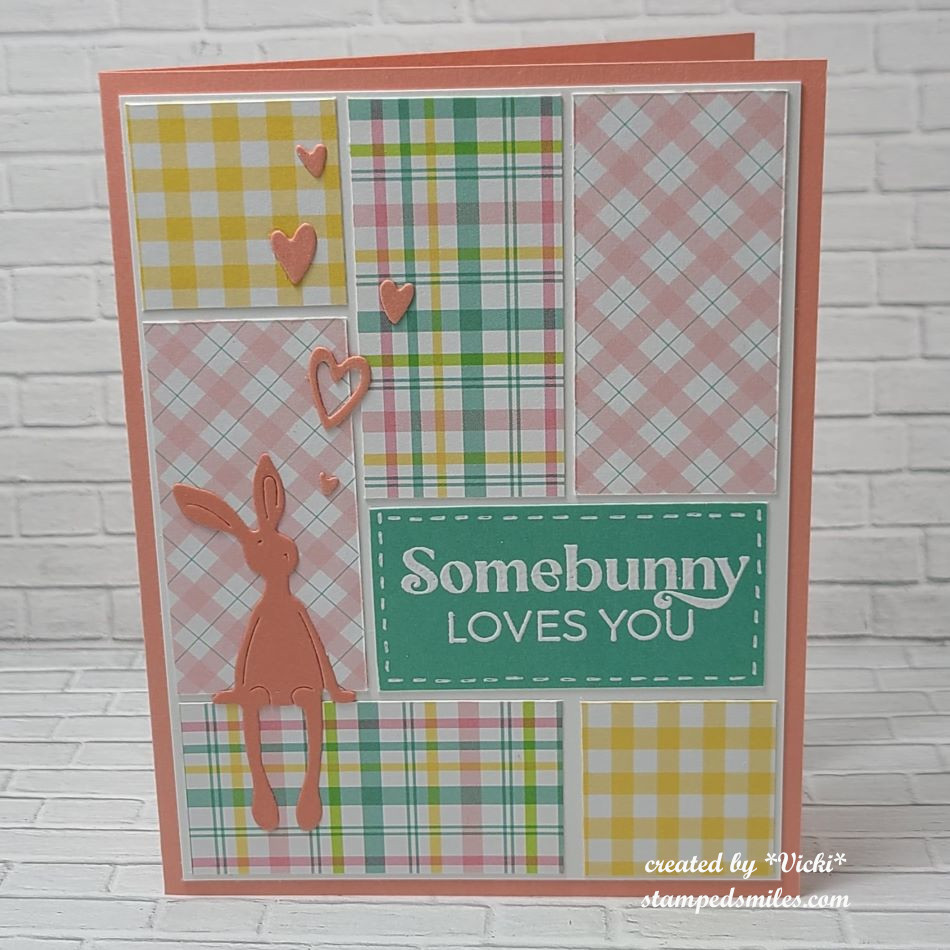
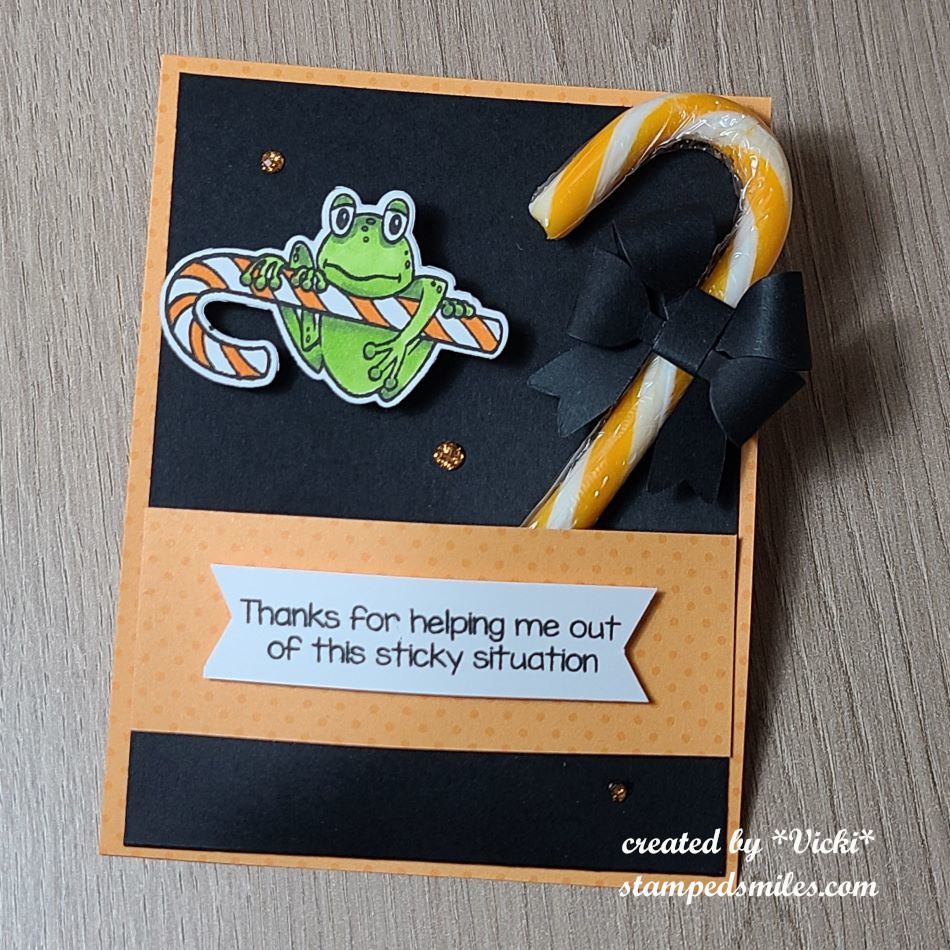
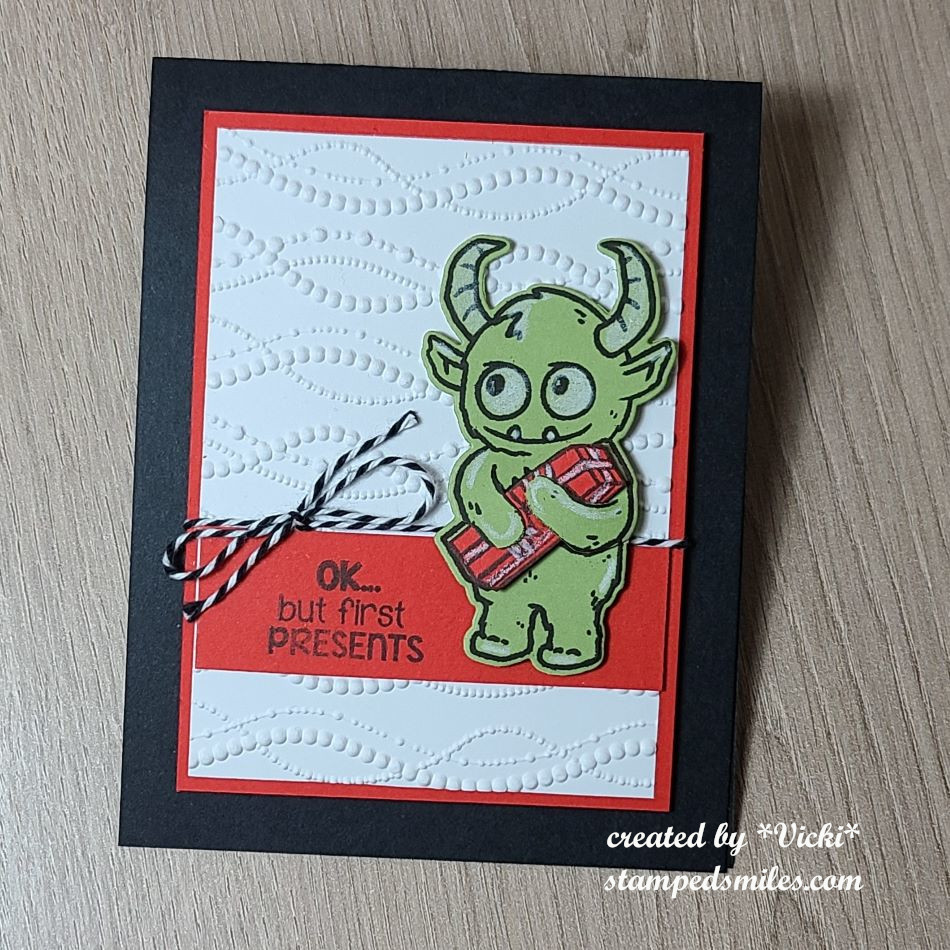
And since I was there to “crop” (as they say), I brought some things to work on that I really wanted to get done.  So I decided to pull out some more Inky Stamper images to color and make a “Sheetload of Cards” using the September Sheetload of Cards Template by Crafty Al.  If you’re not familiar with her, check out her You Tube Channel and look for all of her “Sheetload of Cards” videos to see how you can find instructions for each month. #SUYSSep2024 #ShowUsYourSheetLoad

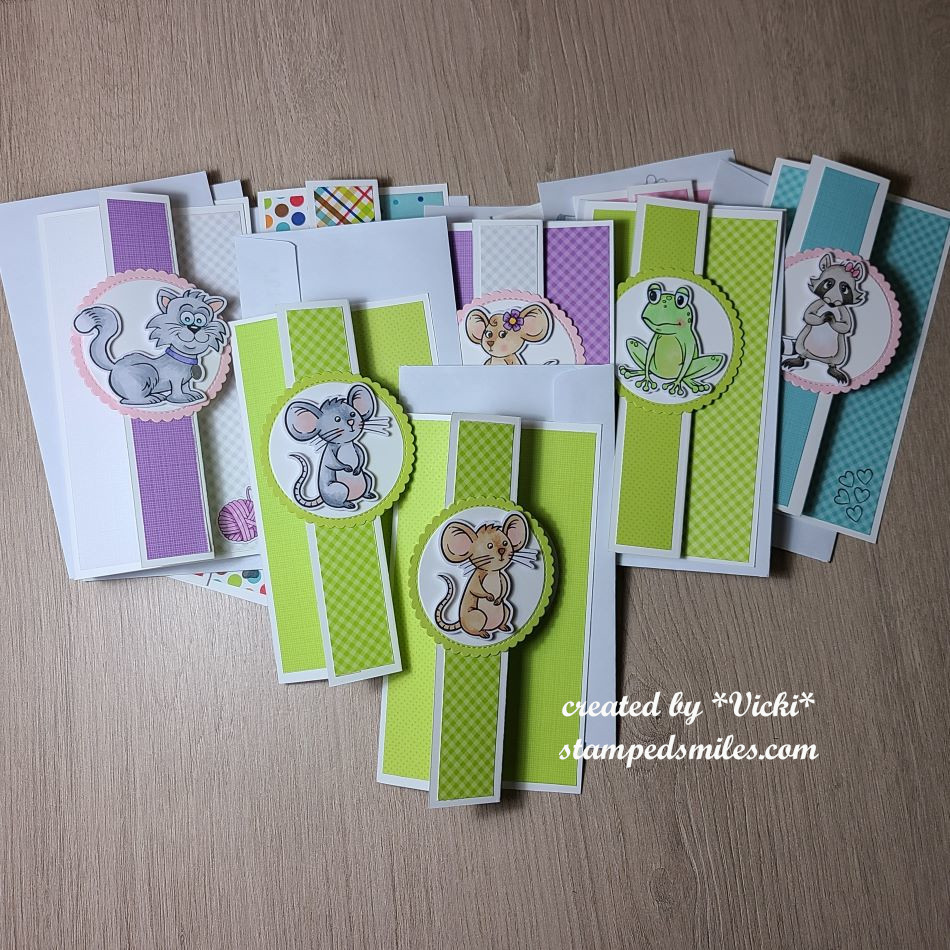
I utilized her template to create the full 12 cards as demonstrated.  The dimensions of the finished card design is 3.5″ x 6.25″ which I really liked as it helped to use up the full 6″x6″ size of those paper pads!  Also, you don’t have to create envelopes for these as they fit perfectly inside those envelopes (3-5/8″ x 6.5″) that you can find at any office supply area of a store.

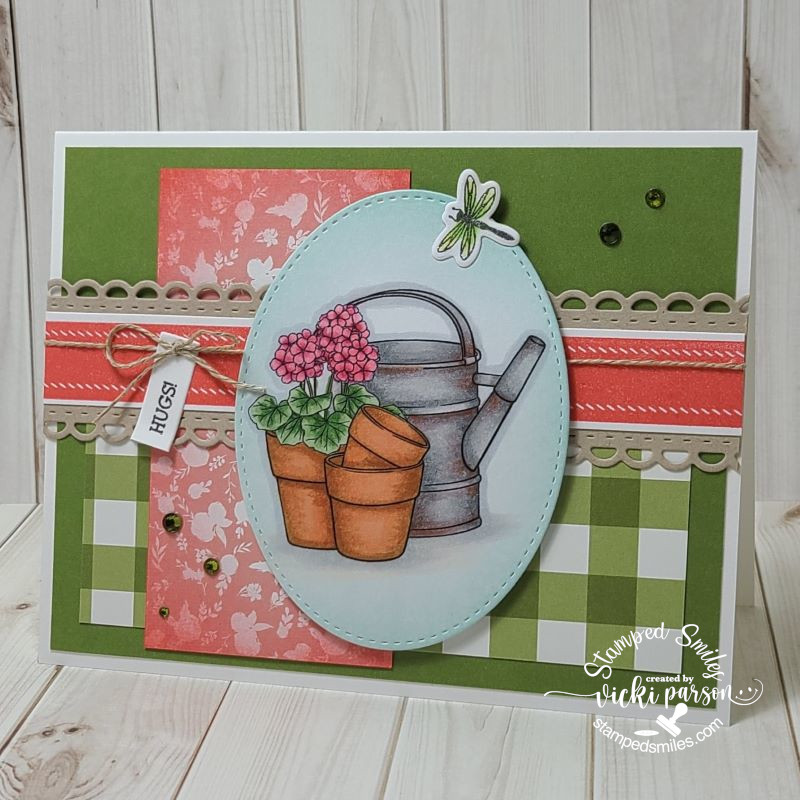
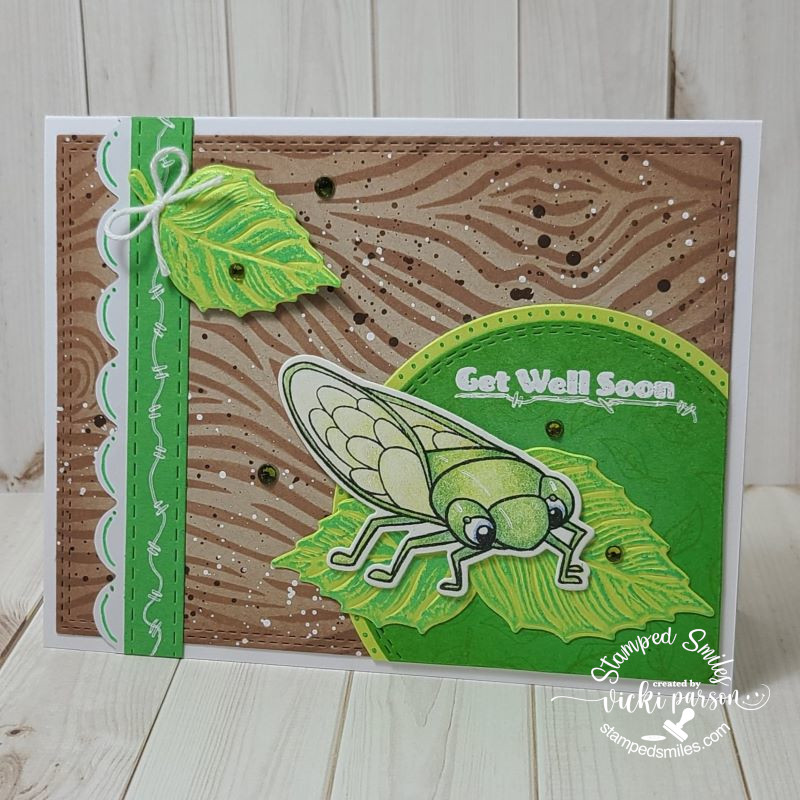
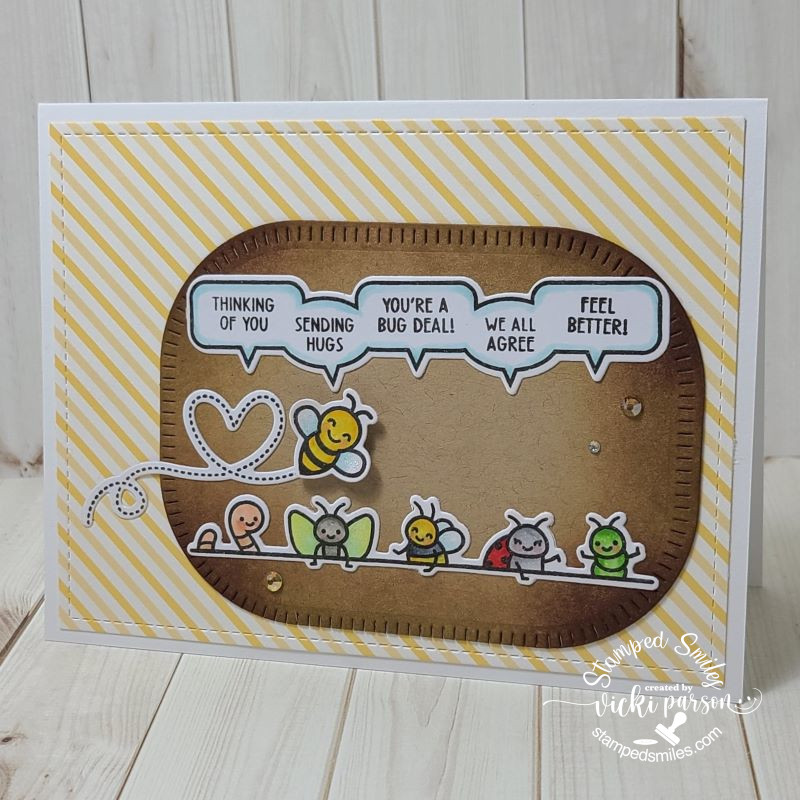
As you can see, I used a variety of images that I stamped, colored and cut out for each design.  I matched up my design papers to coordinate with the images.  All of the images I used are from Inky Stamper.  All papers come from a variety of Doodlebug Design papers.

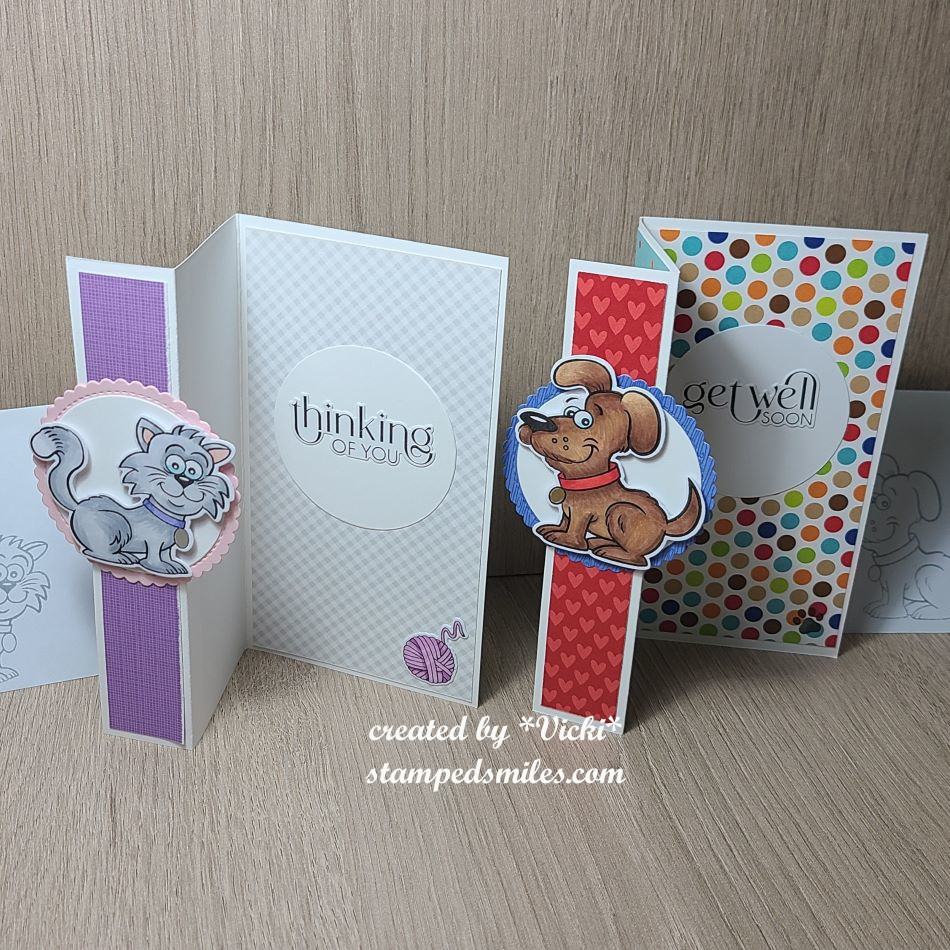
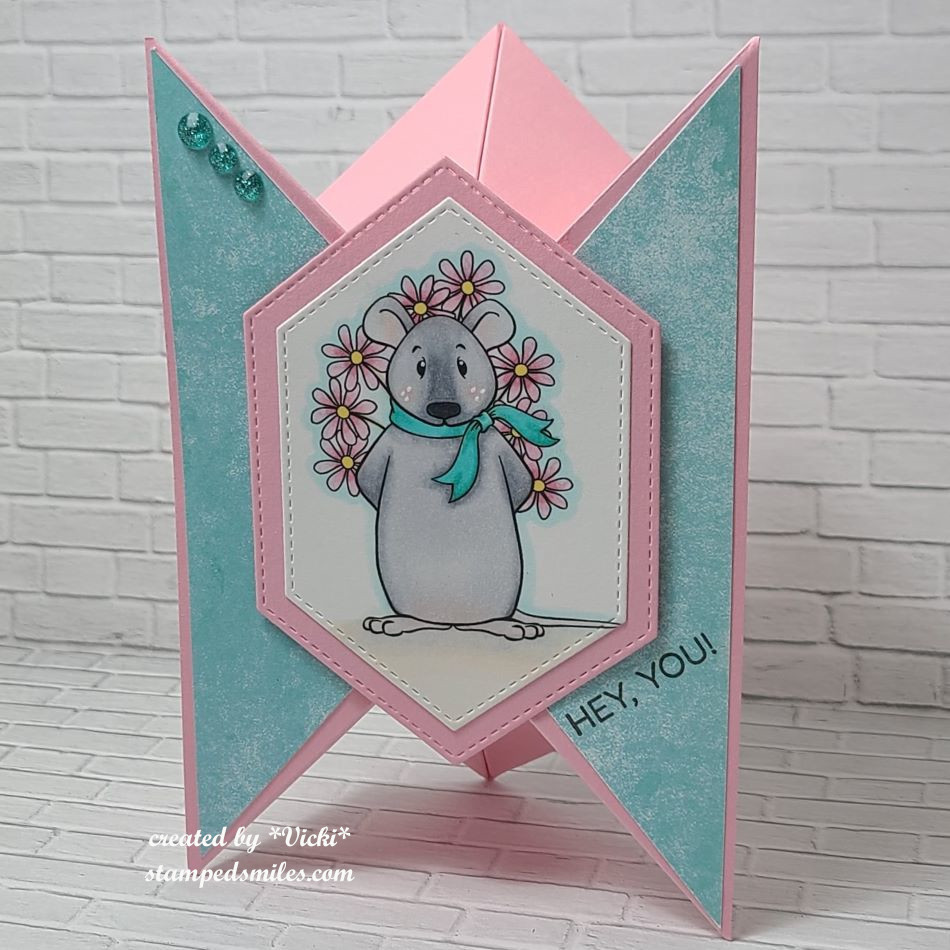
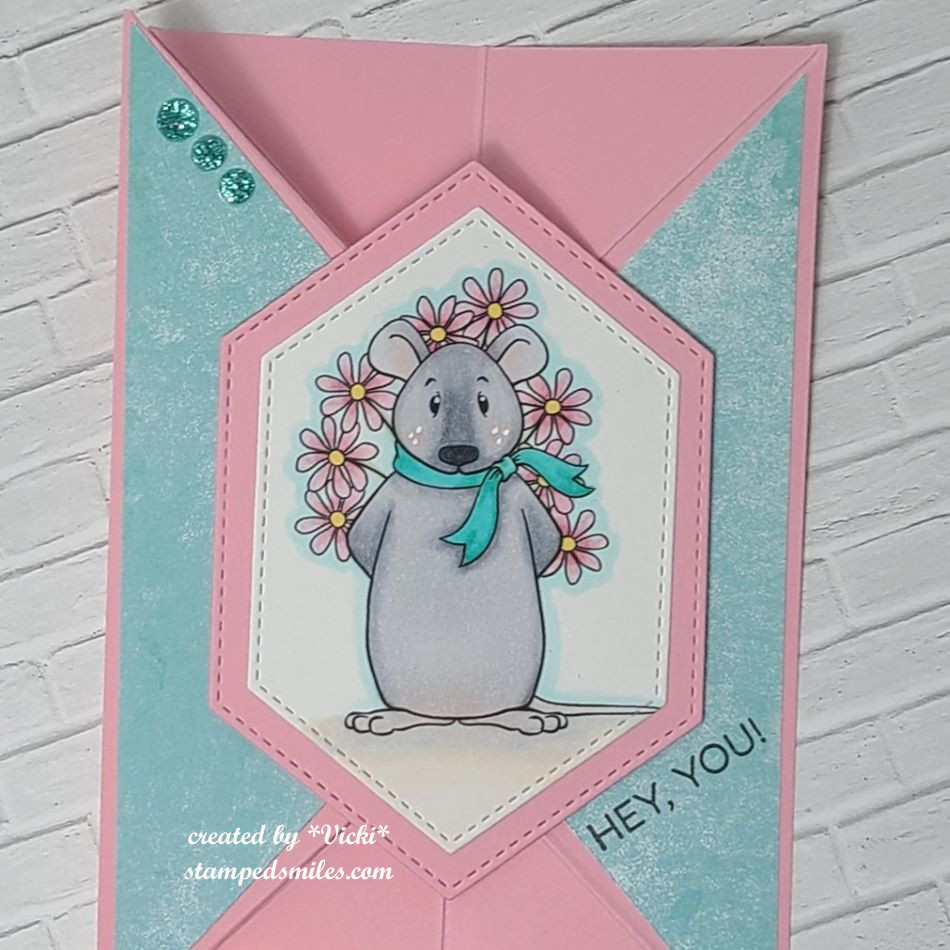
Here’s a closer look at two of the cards I made from the set so that you can see how the card opens up and the greetings on the inside of each card. (Sentiments come from Taylored Expressions.)  You can also see the coordinating envelopes next to them with the matching critter stamped in grey ink.

These cards are on the way for a special charity for ill children patients to help lift spirts and I hope each one will!

I know there were so many things going on during the event that I was even surprised that I got all of these finished.  They were mostly finished with the exception of the greeting which I added when I got home.  I had plenty to do while I was there and also enjoyed all the activities too!

I hope you’ve enjoyed my post today as well!  I thank you so much for stopping in!

Sheetload of Cards With Flashback Card Kit

Hello friends!  I hope you’ve had a good week and looking forward to a great weekend ahead!  The weather has been unseasonably cool for this time of the year and I’m able to get my windows open the last few days and enjoying it!  Unfortunately, it’s going to warm up again, so I know that the air will come back on.

Today I’m sharing something that is a bit different and new to me, but I think it will come in very handy for the future as my “goal for next year” is to use up those old card kits that have been stored in my stash for WAY too long!  I’m hoping to start this on my blog next year each month and focus on a card kit each month so I can clear things out from my stash!  Stay tuned!

I found a fellow crafter Call Me Crafty Al and I decided to give her Sheetload of Cards a try for this month and see how it goes!  It would probably have been much easier to do it the way she did, but I challenged myself to use my card kit items instead:

Here’s the set of all eight cards using the same sketch from Crafty Al’s Sheetload for this month.  You may not recognize the card kit that I’ve used as it’s an old one from Simon Says Stamp.  The box had November 2015 written on it, and the paper inside had “Here’s Looking at You” card kit on it.  I know that I have pulled it out and used a few things out of it, but there was still plenty to use!

I was looking to make some uplifting/inspirational cards so this all worked out great.

Click on the photos above if you’re on my website so you can get a closer view of them.

I’ve used all of the cardstock except one sheet of kraft, all of the 6×6 papers were used except two sheets and I’ve also used up some of the journaling cards that were included as well as the stamp set and thread.  The reason why some of the edges are rounded is because the journaling card inside the kit had rounded edges.  I just decided to incorporate that into the design and I think it worked out okay.

Honestly, I don’t know weather to be proud of myself for using up my extremely old card kit or feel embarrassed for having such an old card kit still in my stash!😂

Regardless, I hope you’ve enjoyed my play with the “Sheetload of Cards” for August 2024 utilizing a very old card kit!  How about you?  Do you still have some card kits or stashes of something from 2015…er older?  Would you like to use them up too?  Follow along with me next year each month as I attempt to use up those old old old stash items and have a session of “Crafting to the Oldies“!  This is me holding myself accountable!  Let’s do this!

  • Thanks so much for dropping in today and have a great weekend!❤️

Butterflies at Sparkles Monthly

Hello friends!  Hope that your week has been a good one for you!  Thank you to everyone for stopping by and taking your time to spend with me as I appreciate your kindness.

Today starts the August challenge over at Sparkles Monthly and for this month, our hostess is asking to see a butterfly or butterflies on your projects.  I love butterflies and look forward viewing the gallery on this one.  Be sure to stop by the blog to see what the rest of the team has created for you.  Here’s my project for this challenge:

I like how this one came together!  I’ve used several butterfly items from Taylored Expressions.  I started with the background by taking the Fluttering Friends Layering Stencil and stencil the colors Sour Gummy, Spearmint & Peaches ‘N’ Cream over a white card base.  Once the stenciling was finished, I used the Fluttering Friends 3D embossing folder over it which also impresses the bodies and antenna on them.  I layered this over a top folding A2 Spearmint card base.  (I also cut out a frame with the same colored cardstock using the Frame in Frame 3 Cutting Plate).

For the butterfly focal, I white heat embossed a butterfly from the Beautiful Butterfly Wings stamp set and cut it out along with the layered wings and body from the Beautiful Butterflies die set.  I layered it onto a piece of vellum cut out with the Petite Scallop Circle Stacklets die.  I also white heat embossed the sentiment from the Mini Strips-Fluttering By stamp set over Sour Gummy cardstock cut from the Mini Strips die.   I used foam strips to pop it up and I also added some rhinestones on the butterfly wings.

I hope you like my inspiration for the challenge and that you’ll take some time this month to create something with butterflies too.  

Thank you for stopping in and have a great day!

Challenges:

  1. Cut It Up – #310 ‘Thinking of You’ + use of die cut
  2. The Divas That Cut…Paper! – Wet/Dry Embossing (I did both)
  3. Crafty Gals Corner – #258 Anything Goes optional: Embossing Folder
  4. Lil’ Patch of Crafty Friends – Anything Goes
  5. Can You Handle the Pressure? – Anything Goes using Embossing Folder optional: wheels
  6. Stencil Fun – Anything Goes using Stencil optional: Summertime
  7. Triple B – Butterflies/Birds/Blooms (I used butterflies)

Mix It Up With Veggie Stamping!

Hello friends!  Happy July!  I can’t believe that June is gone and the 4th of July Holiday is gearing up now!  I’m looking forward to some happy times ahead through the Summer and I hope you are too!

Today begins a new challenge over at the Mix It Up Challenge Blog and it’s always “Anything Goes with an optional theme“.  For the optional theme this time, we’d like to see some “Veggie Stamping“! (In other words:  use vegetables as your source for stamping with!)  I’ve never done it before, but I gave it a try!  Here’s what I came up with:

Now I’ve heard of people carving food as art, but I don’t think I’ve ever really seen anybody actually use vegetables/food as a stamp!  Have you ever tried this?  I encourage you to give it a try and join in the challenge with it because it was so much fun to play!

For my vegetable stamping, I didn’t want to use ink pads in fear of contaminating/ruining it, so I decided to use some acrylic paints instead.  I grabbed some veggies from the fridge along with a plate to hold the paints and cut the veggies to dip into the paint piles.  My husband decided to come around and snap a photo of what I was doing, so I thought I’d share my mess:

I was actually in the process of cutting out the “veggie flowers” when he took the photo, but I started with some acrylic paper because I was using paints and cut the paper large so I had plenty of room to play around.  It was a bit of trial to figure out how each veggie would look.  I thought it worked best to dry out the veggies as much as possible on a paper towel.  The coral large flower came from the red pepper.  I found that using a paint brush to apply it to the veggie was a better look.  Then I dipped the celery end to make the purple flowers.  The shallot was used to create the teal flower (the shallot was applied the same as the pepper) and I used the end of the carrot for the center of the flowers with yellow paint and then I used a broccoli to dab on the center of the flowers as well with some dark grey paint.

I then tried to arrange the flower bouquet how I wanted on my card base after cutting out the flowers.  I took a paint brush with (no kidding) celery green colored paint and painted the stems coming from each flower.  For the “leaves”, I used the same paint and dabbed the celery end around the stems.

I finished out my card by stenciling the brick background before attaching the cut out flowers.  I popped some of the flowers up with foam tape and then I white heat embossed a sentiment over dark grey cardstock and popped that up over the bottom of the bouquet.  This was attached to another panel of grey cardstock that I attached to a top folding white A2 card base.  I topped it off with a few gems.

  • So what do you think?  First time trying it out and just playing around having fun is all!  A little abstract for sure, but hopefully they do look like flowers on here🏵️!  I’m really looking forward to seeing what everyone does with this!  Hope you can play along too! (Remember you have 6 weeks to enter!  So plenty of time to play!)

THANKS SO MUCH FOR POPPING BY TODAY!  HAVE A GOOD ONE & I’LL SEE  YOU SOON!

Challenges:

  1. Addicted to Stamps & More – #471 Make Your Mark(I used paint)
  2. Little Red Wagon – #762 Layer It Up (I cut out flowers to layer on top)
  3. Simon Says Stamp Wednesday – Anything Goes (Used a MFT stencil)
  4. CRAFT – Anything Goes
  5. Just Us Girls – #733 Stencil Week(Brick stencil)
  6. Creative Fingers – #281 Anything Goes

Try It On Tuesday GDT-Book Pages

Hello friends!  Happy June!  Hope you’ve been enjoying your month so far!  It’s going to start warming up at the end of this week which means I’ll probably start spending more time indoors with the air conditioning and hopefully have some time crafting!  Yay!

save guest tiot 24

I’m super excited to share my post with you today as I’ve been asked to be a guest designer for this challenge at Try It On Tuesday!  Always happy to be apart of the challenges and support them as much as I can as they help to inspire creativity!  

I’m loving the challenge theme for this one which is “BOOK PAGES”!  There are several different ways to go with it, but here’s my take with the challenge:

I am an avid reader and I do love turning the pages of a good book, but sometimes you can come across an old book that is in bad shape or even a book that has no meaning to you and that you might normally throw away.  I don’t do that, but I keep it instead for purposes of using in my crafts!  I do the same with magazines, etc.  Sometimes I use the illustrations for art journaling, etc.  I’ve even kept some for the purpose of gift wrapping.  How about you?  Do you keep things like this for anything?  If you do, then this challenge would be a great for using it up!  I’ve even seen some decorative papers that have a “book page look” which would be suitable, I think, for the challenge as well!

For my card:  I’ve used a cover plate die (unknown) and cut the pieces from a book page and then cut it again in black cardstock so that I could use the frames.   I took some brown ink to sponge around the edges and in the center randomly, so that it wasn’t so stark white.  I then splattered it with both black and white paints, wrapped some twine with a bow around and placed it on a side folding A2 black card base.

The flower image:  I took another book page and stamped/heat embossed the Bursting Blooms stamp from Taylored Expressions(retired/not in store) and cut it out with the coordinating die.  I had some fun watercoloring the image with some Daniel Smith watercolor samples and than I sponged around the edges with some more of the brown ink before attaching to the card with thin foam squares. (I also cut an additional piece of white cardstock for added thickness as some book pages can be thin.)

To Finish:  I’ve taken the Taylored Expressions Sundry Sentiments and white heat embossed the sentiment over black cardstock and cut it out with the coordinating die.  I attached it to the card along with some black rhinestones.

I love how this one turned out and I hope you do too!  Please be sure to pop on over to the challenge blog and check out all of the inspiration from the team!  I look forward to seeing your creation in the gallery as well!

Thank you for stopping in today and I’ll be sharing more with you soon!

Challenges:

  1. Allsorts – #784 Flowers Galore or Anything Goes
  2. Creative Fingers – #279 Anything Goes
  3. Alphabet – ‘E’ is for embossing wet or dry (heat embossed flower and sentiment)
  4. Krafty Chicks – #719 Stamps
  5. Time Out Inspired by a Quote from Henri Matisse: “There are always flowers for those who want to see them.”

April Showers Bring May Flowers at Sparkles Monthly

Hello friends!  I’m so very happy to see April come as well as the warmer weather it has brought our way!  I’ve actually been taking sometime outside to see some blooms with daffodils, tulips and other buds popping out everywhere!  We are expected to get some rain tomorrow, but that is exactly what April is all about…and then the May flowers to follow!

This is exactly what it’s all about for this month’s challenge over at Sparkles Monthly too!  We hope you can share your “April Showers-May Flowers” projects with us this month!  Here’s what I’ve chosen to make:

I always love a good Spring rain with a little bit of sunshine peeking through that causes rainbows!  I never get a good photo of one, so I just enjoy it while it lasts! 

I’ve used a fairly new product from Taylored Expressions with my card today called “Create-in-quads ROYGBV” which creates 4 different card panels at one layered stencil session.  (I now have 3 other panels to make cards with too.)  I used the “Create-in-quads ROYGBV vase die” to cut it out and then another one in black cardstock for a slightly off shadow effect behind it.

For the background card panel, I had a DCWV rain drops stencil (that I’ve had for a long time) and blended some blue ink over it.  I’ve also cut a piece of blue/teal colored glitter paper for a thin border behind it to attach over an A2 white top folding card base.  I then took another piece of blue cardstock strip to make a “landing/grounding” for the vase to sit on.  Before popping up the ROYGBV vase, I took a marker to create a blue shadow underneath where the vase would be positioned.  I was going for a “rain puddle” look.  Popped it up with foam tape and added a white enamel dot in the center of one of the flowers.  I also took a glitter pen to cover over the raindrops and “rain puddle” under the ROYGBV vase.

The sentiment came from the Taylored Expressions Mini Strips-Rainbow stamp that I’ve white heat embossed over black cardstock and cut it out with the Mini Strips-Asymmetrical die and chose the ones that I wanted to use for this card to attach over top of the vase.  (I also have extra sentiments to use on other projects.)

Hope you’ve enjoyed my card today!  I also hope that you will take some time to stop in and join in the challenge with us this month!  I have several projects finished that I’d like to share, but I find it so hard to come and sit at a computer when the sunshine and happy weather is calling my name!  Maybe when it rains tomorrow, I will post more things! 

Have a great day and thanks for stopping by!

Challenges:

  1. Just Us Girls – Word Week: RAIN
  2. A Place to Start – One or More Flowers
  3. Crafts Galore Encore Anything Goes
  4. Try it On Tuesday – Rainbow Colors
  5. Addicted to Stamps & More – #465 Die Cut and/or Stencil
  6. Crafting Happiness – #170 Rainy Weather

Tricorn Fold Cuteness

Hello friends!  I hope that you’re having a wonderful week so far!  We have officially started Spring over my way and now I’m just waiting for the weather to warm up to match it.  I’m looking forward to being outside with the flowers!

Speaking of flowers, I saw this really cute image over at Beccy’s Place and wanted to play along, so I printed it out and colored it, but didn’t quite know what I wanted to do with it until I saw Beccy’s tutorial – Tricorn Fold Card: (click name for her tutorial)

Isn’t this so fun!?  I thought it was such a unique design that stands up, but also folds flat for a 4×6 card size.  I usually make an A2 (5.5″x4.25″) card size, but I can also easily create my own envelope for any size too.  It was a bit tricky at first and I messed it up because I put the scores going in the opposite direction, so I had to start over.  I wasn’t confident enough to figure out the mat layers of all the angles, so I just added some pattern papers to the largest two panels and then placed blank white on the back of the card for a message.

I also found a stitched hexagon layering die in my stash that worked out for the design which is what I used to cut out my colored mouse and layer behind him.  I found a sentiment that worked well for the space I had on my card and then finished it with a couple of teal rhinestones I had laying on my table.  It was fun to create, and it will also be great to send out too!

Here’s a closer view of the colored image that I’ve done using Copic markers.  I did add a few white dots to his cheeks with a white gel pen as well as the center of his eyes.

I have my card lying flat so you can see that it will fit inside an envelope for mailing.  It does spring back up, but I think that’s what will be great for a recipient to pull out of the envelope to see that the card stands up by itself.

Thanks for dropping in today and I hope you’ve enjoyed my card!

Challenges:

  1. Beccy’s Place – March Monthly Challenge optional Bingo (Not sure if the flowers in the image qualify, but if it does then I used the center across row)
  2. Crafty Catz – Anything Goes #667
  3. Crafty Animals – Anything Goes + animal #81
  4. Critter Crazy – Anything Goes featuring animal #84
  5. Creative Creases – Anything Goes with Fun Fold #78
  6. Creative Inspirations – Anything Goes
  7. The Crafty Addicts – Anything Goes
  8. Lil’ Patch of Crafty Friends – Anything Goes #226
  9. Crafty Calendar – More Than One Fold

Playing With Paper Blocks and Bunnies

Hello friends! Easter is coming for us for very soon and I’ve been enjoying all of the Spring that’s starting to come up outside with flowers and buds on the trees!  It’s still a little cool, but hopefully the weather will even out and stay warmer!

Since I’ve been trying to get motivated for Easter, I’ve pulled out some papers from my stash and have been inspired to CASE (copy & share everything) a friend that really inspires me to use things I have!  First, I’d like to share a fun Easter card that I’ve made for a sketch challenge that I was inspired by as well:

That sitting bunny is so cute!  (Thank you Carol…more on that later in post!)  If you check out the sketch from the Sketch Saturday challenge blog (see in challenge list below), you will see all of the fun angle strips in the sketch.  I thought it would be fun to pull out some Easter papers from my stash.  I wasn’t sure how to do the background until I saw that this sitting bunny worked perfect for a part of the paper pad that had this wheelbarrow image in it!  I cut it out from the paper and placed the bunny on it.

For the background of the card, I thought it would be fun to use my stencils to create a scene with grass and clouds.  The wheelbarrow bunny fit in the open area and then I used the angles from the sketch to cut pieces with the same Easter paper pad.  I just eyeballed everything by marking notches and lining those notches in my paper trimmer to get a straight cut.  Even the solid paper on the base layer came from the paper pad.  I just cut it A2 size to fit over an A2 top folding white card base.

The sentiment was stamped and cut out with the coordinating die.  I added some shadow under wheelbarrow with a green marker (not really the color I wanted, but it worked), and colored a bit of pink on the bunny too.  I added teal rhinestones next to the sentiment and done.


Next, I wanted to share something else that I was inspired by from my friend Carol at https://ourlittleinspirations.blogspot.com who sent me a very cool card and kind gift:

She always inspires me with her “snippet” creations and coming up with cards like this one to utilize those pattern papers we hoard so much!  The pattern is very pleasing to the eye and so I wanted to create one myself!  With all of the papers I have, I’m sure I could make a zillion cards! 😆  I also love how she used a monochromatic green theme with it…which I will need to try another one with this idea!  You should go check her blog out and be inspired too!

Also, she was very kind in sending me these die cut sitting bunnies & stools!  I do not know exactly where this bunny is from, but I’ve seen it around the craft world.  So cute!  Thank you so much for your kindness and inspiration my friend! 

So here’s the card that I created inspired by Carol.  I really love plaids and I thought it would be fun to re-create her design which I measured out her pieces and cut based on what I thought they were.  It was really fun and not as hard as it looks like it might be.  I wrote the measurements and cut from the same Easter paper pad as I used on the card above.  I started with a white base…that way if I messed up, it wouldn’t matter too much.  The sentiment piece was also from the same paper pad.  I just white heat embossed the sentiment and added some stitch details with a white gel pen.

I used one of the sitting bunnies that Carol provided me with, and tried to match up what I had from my stash the best I could to die cut some hearts along with the A2 side folding card base.

I brushed the hearts with a glitter brush pen and called it done.


I had so much fun playing with these paper blocks and bunnies!  I hope you’ve enjoyed my creations and inspiration today as well!  Thanks so much for stopping by!  C U SOON!

Challenges:

  1. Sketch Saturday – #746 optional twist: feature an animal (top card)
  2. Simply Create Too – Bunnies & Blooms #198 (top card)
  3. Make My Monday – Spring, Flowers, Weather, etc. #221 (top card)
  4. Fab ‘N Funky – Spring (top card)
  5. Daring Cardmakers – Spring is in the Air (top card)
  6. The Paper Funday – Anything Goes optional: dies #63 (top card)

Occasional Blooms

Hello friends!  I hope that you’re having a wonderful week!  I’m excited about the changes I’m seeing outside with the weather!  Looking forward to that cooler temperature and pretty colors!

  • I wanted to do a bit of “house keeping” regarding my blog.  I apologize if you’re having problems trying to leave a comment.  I’ve had a few people contact me about this and I noticed that when I cleared the “cookies/cache” from my end…it somehow changed the appearance of my blog comment area…I don’t know why!?  I did find out that if you start typing in the comment box, buttons above the box will appear in which you can choose how to login.  I suggest that if you don’t have a WordPress/Gravatar account, to choose the envelope button to leave your name and e-mail address that way. (The Facebook login does not work.)  Then you can hit the reply button below the box to publish it.  I tried letting the commenter leave an anonymous reply (without having to type in name and e-mail), but then I’ll have NO idea who it is unless a name is given within the comment, so I had to re-engage that again.  I have also contacted a support person to help me navigate what’s going on and maybe I can get it back the way it was before.  I do apologize if it’s giving you a problem.  You can also go to gravatar.com to create an account which will work with ANY WordPress platform blog….but you don’t have to unless you want to do that!  You should still be able to leave a comment regardless.  Thank you for taking the time to care enough to share your support with me…I deeply appreciate it!

So now to get on with some crafting projects!  I’ve had to change gears on the seasonal makes and create some cards that I needed to send out to some people and they all happen to be in blooms:

First up is a “thinking of you” card creating for a friend using several Lisa Horton products.  These particular LH products all came from Inky Stamper.

I started with the craft background and embossed it with the LH Variegated Leaf 3D embossing folder and went over the texture with white ink.  I then used the LH Hydrangea Stencil/Die/Embossing Folder to create the blooms…love how it turned out!  I took some gold ink on the last layer of the stencil to go over the centers of the flowers.  I popped the bloom up over the embossed craft background and white heat embossed the sentiment from the IS Pig Cause stamp set and cut it out in a banner to place over the blooms.  I finished it with some gold gems.

My next card is a sympathy card needed for a craft friend who lost a loved one.  This person likes to cross-stitch and quilt, so I thought this MFT stitched quilt die (this one retired) would be fun to do over some pretty floral papers.  I had to die cut several white frames with it and lay the centers of the paper cut pieces on the first frame and then I layered two more of the white frames over top with the last pattern paper over that to give it that 3D look.  (Not sure where the paper came from other my stash!)

I cut the sentiment from the Whimsy Stamps Sympathy/Heartfelt/Condolences die set and layered it in the same way I did the quilt frame die.  I also white heat embossed the sentiment from the WS Deepest Sympathy stamp set and cut it out from a banner to attach right underneath the “p” in the die cut word.  I finished this one off with some clear gems.

And on a happier note, I’ve made another bloom card to wish someone turning 75 years young a happy birthday!  This is the first chance I’ve had to use this fun die set from Taylored Expressions!  The bottom container came from the TE Antique Pails die set.   I stamped the TE Burlap Background over it with the same color ink as the cardstock as well as Butter Cream ink to give it some texture.  The flower arrangement was cut out from the TE Garden Variety die set in various colors.  I also brushed some of the same colors in the centers of the flowers.  The centers of the flowers have a silver metallic enamel dot.

For the frame, I’ve used the TE Diagonal Stitch Rectangle die that only leaves the marks but doesn’t cut anything out.  The sentiment was stamped and cut out with the TE All Together-Occasions 2 set/die and popped up with foam squares over the panel.

I think the most fun was arranging the flowers in the container!

I hope you’ve enjoyed my cards today and you’ve been inspired!  Thank you so much for stopping by!  I appreciate you!  Have a wonderful weekend!

Challenges:

  1. Addicted to Stamps & More – Any Occasion
  2. The Sisterhood of Crafters – Die Cuts/Anything Goes
  3. Lil’ Patch of Crafty Friends – Anything Goes
  4. Pammie’s Inky Pinkies – Anything Goes
  5. Cardz 4 Galz – Use a Stencil, a Sentiment, an Image (top card only)
  6. Crafts Galore Encore – Anything Goes
  7. 613 Avenue Create – Anything Goes no twist
  8. The Corrosive – Anything Goes

Bugging Out With Sketches

Hello friends!  I hope you’re having a good week so far and staying safe wherever you are in the world.  Sending hugs to all experiencing a troubled time.  I hope that my post can bring a smile to you today.

I needed to create some get well type of cards and so I thought I’d try to incorporate some challenges while working on them which helps me to concentrate more in what I’m doing and maybe think outside the box a bit.

My first card is made with the Beccy’s Place Challenge freebie this month and she also challenged us with a sketch which I’ve decided to use for my card. (see sketch below)  I was really happy to use up some more pattern papers with it and I also decided to add a tiny dragonfly at the top to enter another challenge and to adhere to my “bug” theme today!

I printed the image in black and white and colored with Copics.  The dragonfly and the center pink strip were stamps that I cut out and added to the design.  The rest is pattern paper from my stash except the scalloped kraft border in the center that I cut out with a die.  I stamped the sentiment and cut it out to go with my twine around it. *You will notice in ALL of these cards that I’ve used some sparkly gems.  I wasn’t aware until posting them!  I must be on a kick of wanting to use them!*

Challenges for 1st card:

  1. Beccy’s Place – August challenge + sketch
  2. Paper Dragonfly Creative – Anything Flies (Goes) or Party
  3. Kreativ-Tanten – Anything Goes
  4. The Crafty Addicts – Anything Goes
  5. Crafty Calendar – Anything Goes
  6. Dragonfly Dreams – Dragonflies

And for this next card, I’ve played with a large bug:

Around my area this time of year, you can hear the sound of these cicada bugs with their distinct noise throughout the trees.  My husband likes the sound when a bird catches one! EEW!  This bug is a cute one from Inky Stamper called Cicada and I’ve colored it up with pencils this time.  Hard to see, but I’ve also added some shimmer with a glitter pen on his wings.

I’ve used the Picket Fence Tree Bark stencil over kraft on the background and then splattered it with brown and white paint. The leaves under the bug and the accent came from the Lisa Horton Variegated Leaf EF+die that I cut over light green cardstock.  I used some metallic green wax to go over the details in them.  I also used some gel pens to make some doodles around the strip, the circle and under the sentiment along with following a sketch. (details below) You will also notice more sparkly gems!  I’m also entering this in the Inky Stamper FB challenge this month which is using an IS bug image.

Challenges for card

  1. Sketch Saturday – #732 sketch + twist: add a doodle
  2. Creative Knockouts – #501 Anything Goes
  3. We Love Stamping – Masculine
  4. Lil’ Patch of Crafty Friends – Anything Goes
  5. Pammie’s Inky Pinkies – Anything Goes
  6. A Place to Start – Anything Goes optional: leaves/trees
  7. The Corrosive – Anything Goes

For my last card I decided to keep this one simple’ish’:

So, I know these aren’t real bugs because I’m not squealing, but these guys are too cute! They’re popping up out of the dirt for a special greeting!  I mixed in both a new and older stamp set from Lawn Fawn on this one. I’ve used another sketch for this one and decided to keep it very simple.  The hardest part of this was the coloring which honestly wasn’t all that difficult either because they’re small images.  I’ve also added some shimmer with a glitter pen on the wings and of course, there’s those sparkly gems again!

Challenges for card

  1. Sunday Stamps – SSC316 in the corner sketch
  2. The Paper Players – CAS using any Bug
  3. Simon Says Stamp Wednesday – Clean and Simple
  4. Krafty Chicks – CAS (Clean and Simple)

Thanks so much for stopping by today!  I appreciate your time and thoughts!  I’ll be seeing you again on Saturday with another AJ page!