4 Cards Using One Sheet Wonder Template✂

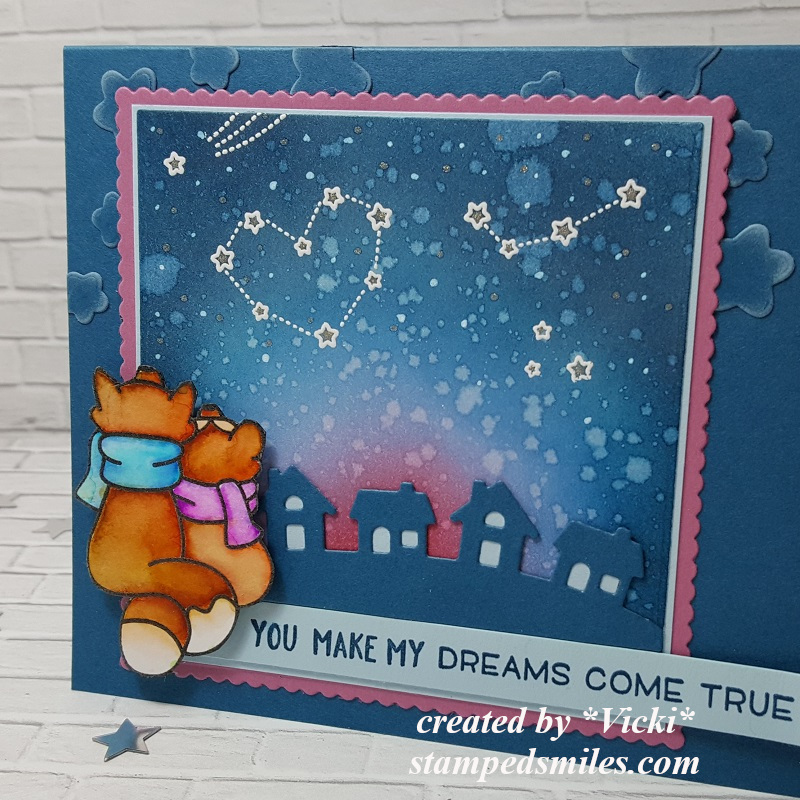
Hello friends! I hope you’ve enjoyed your weekend! We’ve had such beautiful weather and it was nice to be out in it! Warm temps are soon to follow, so I know I’ll be crafting indoors then!

Today, I’m sharing something I did for a challenge a couple of months ago and really enjoyed the process of just creating using a single sheet of pretty floral papers in my stash. Have you ever heard of or tried the “One Sheet Wonder” method?

I only have this ‘overhead shot’ of all the cards I made because I wasn’t blogging at this time, but if you notice in each one of these cards, I have used the same floral pattern in each one. I’ve pulled out a single 6×6 piece of decorative paper from the Farmhouse Floral Paper Pad.

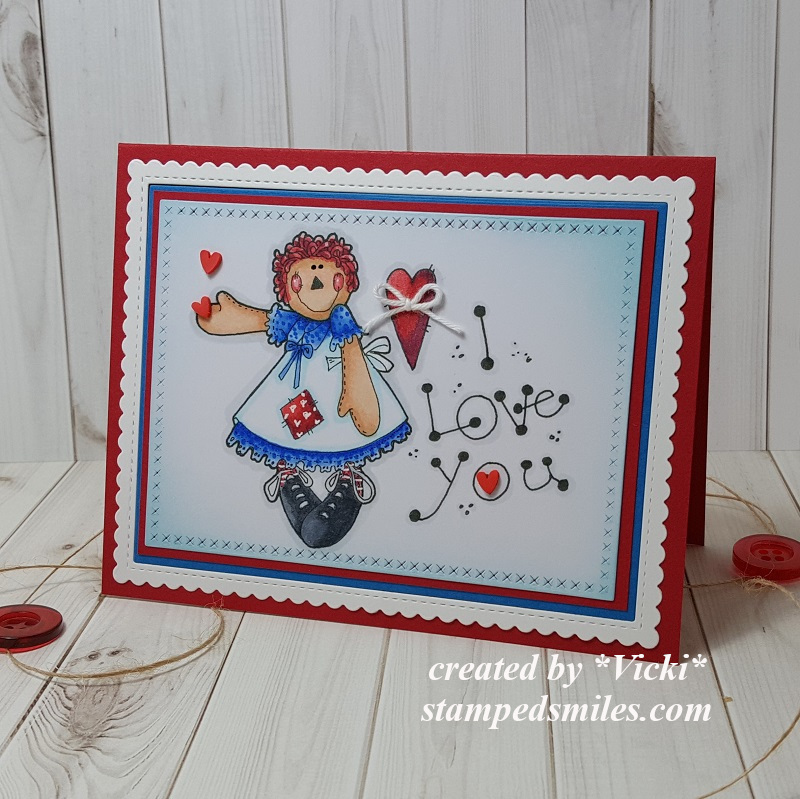
For the top and bottom left cards, you can see that I’ve used the diagonal pieces from the *”One Sheet Wonder” template. For the top one, I’ve just used an image and sentiment from the Farmhouse Friends stamp set. For the bottom card, I actually cut out a floral image from another piece of the same paper pad I’ve used for the template as the focal for my design. (It’s a great way to use up more of the scraps you may have!)

(*See the diagram below for how I cut out a template from the 6×6 sheet to use on my cards.)

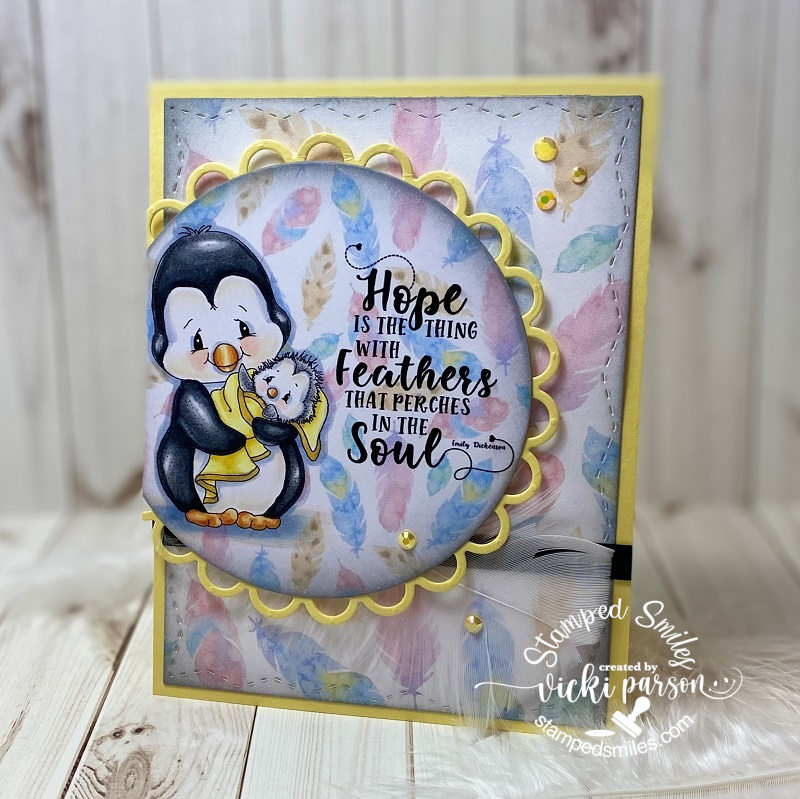
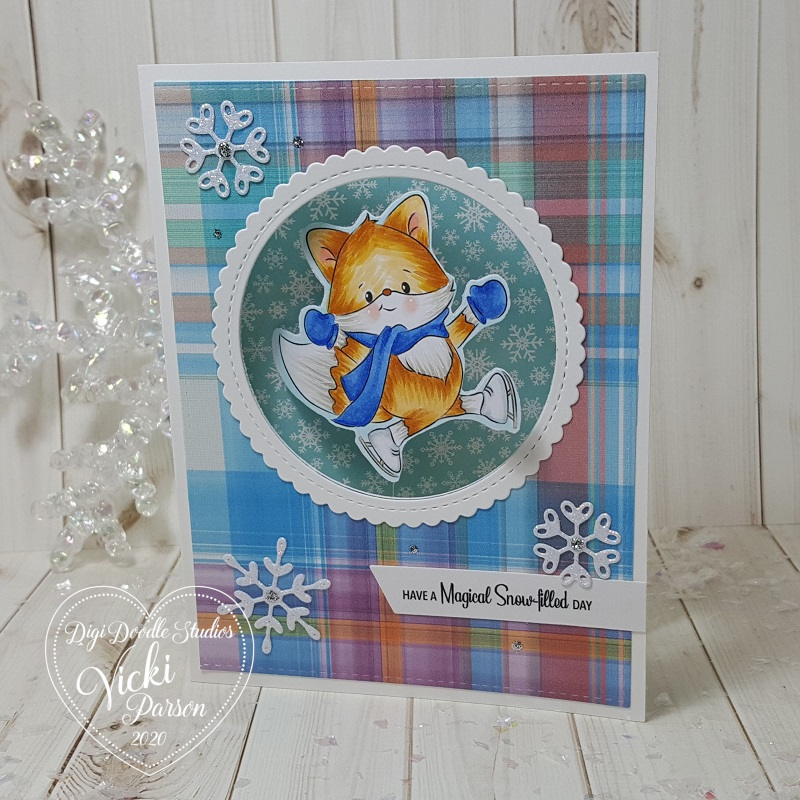
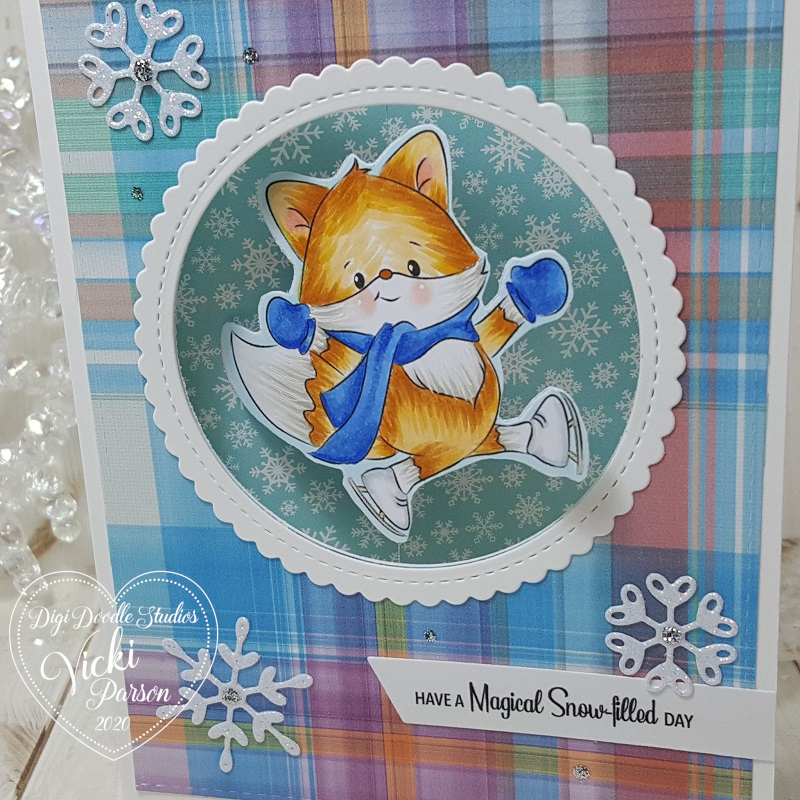
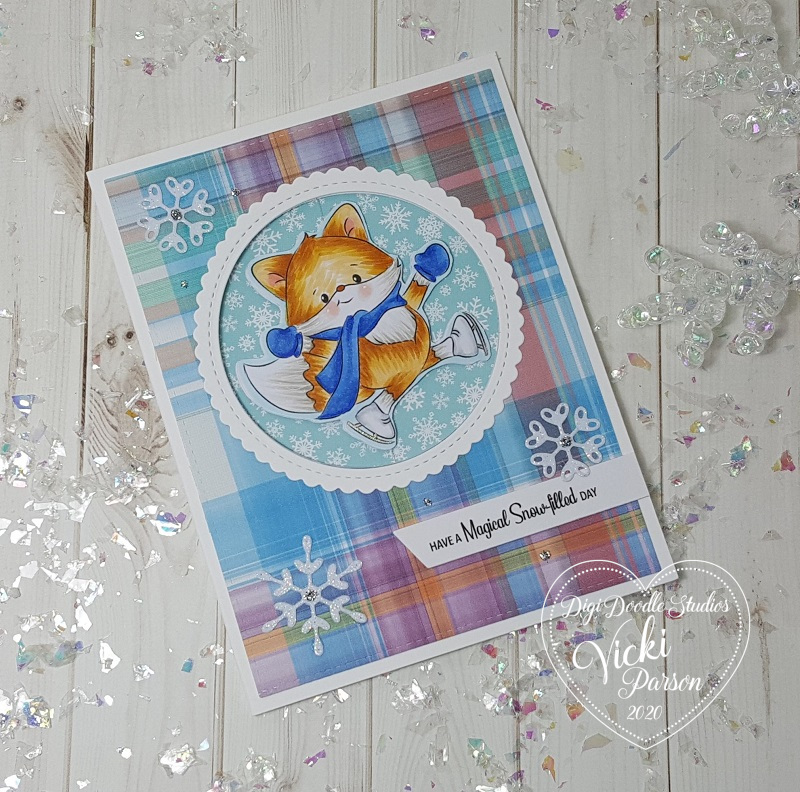
For the top and bottom right cards, I’ve taken a couple of the strips cut from the *”One Sheet Wonder” template and then made it my own by cutting it up for a banner and then just separating in half to make a unique design on my card. The top one uses the Eggcellent Gnomes stamp set and the bottom one uses the Take Flight stamp set.

Basically, all I needed to do was sit with my pattern paper and match up the colors to create cards with. It was a great thing to have as a starting point with just a piece of pattern paper in my hand. So if you’re struggling a bit, this is great way to get going! Give it a try!

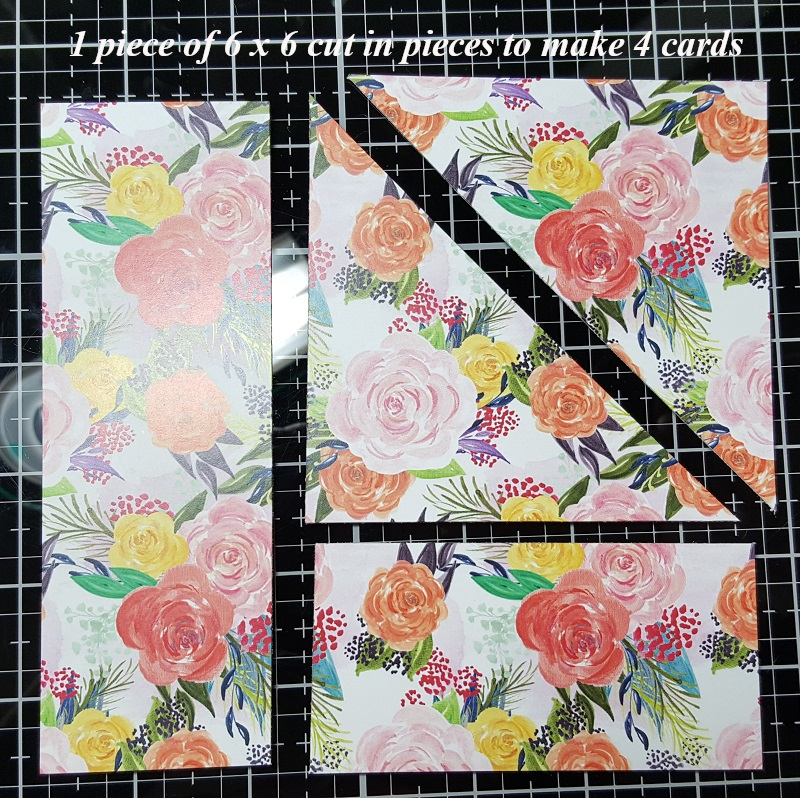
Here’s the template that I used of the cut out pieces from the one 6×6 sheet of pattern paper. Please feel free to use this as an idea for yourself to get started.

Another idea that I used for this one is that this floral pattern has several different colors in it to work from, so I was able to choose a different color for each of my cards. I believe I could’ve gotten even more than just the 4 cards too!

Hope you’ve enjoyed my post today sharing a little tip for you when you might be struggling! I’ve learned that just getting started can be half the battle sometimes!🤔 Thanks for dropping in and I’ll see you again soon!!

Whimsy Retreat Crafty Fun Results

Hello friends! Hope you’re having a great week! I’m so glad you’ve joined me today as I have lots of fun creations to share with you!😀

This past weekend Whimsy Stamps held a “virtual craft retreat“, so I thought I’d tag along and join in on the fun! I’m glad I did because I made several cards:

The first challenge given was a tic-tac-toe challenge. I did 3 down: birthday, heat embossing and circles for mine. Almost had 2 bingos…but didn’t quite work out! Aren’t those penguin eyeballs the best?! LOL! I needed to send out a birthday card to someone so this was great timing!

The background papers, cover die, sentiment die and the penguin stamps are all from Whimsy Stamps. I even put little ice cube confetti for my shaker card!

This card was made for the second challenge given during the event which was to use a sketch and a color palette using at least 2 of the colors given. This was my take on the sketch along with using blue, green and brown from the palette.

Most all of the items used on this design came from an older card kit from Whimsy Stamps. The stamp set is still available in the store called Enjoy the Journey. For the sentiment panel, I heat embossed a sentiment from this stamp set and then used the Slimline Postage die to cut along the edges of it.

Tihs is the card that I created for the third challenge issued which was to follow a photo prompt with words: “When it rains, look for rainbows. When it’s dark, look for stars.” The first thing that came to my mind was these cool Rainbow Papers from Whimsy Stamps and so I’ve cut a panel out with an older Whimsy Stamps die along with the image panel.

This image is called Rainy Day Smiles by Sassy Cheryl’s which is what I had actually won as a prize from the event over the weekend for one of the games..so that was cool! I wanted to be sure to use it for one of my cards! I added some raindrop crystals on a few areas of the image too.

This card was made for the fourth challenge given which was simply to create a project with one of the digital freebie images that was given during the event.

Facebook actually kicked me out of the event a few times for leaving too many comments! LOL! I was trying to participate in games and it told me that I was leaving too many comments! This was one of the cute freebie images that they gave at the event called Sloth. After all that happened…I felt that this little guy was laughing at me!🤣🤣🤣 So I wanted to laugh right along with him, and I printed him out, colored him with Copics and used the Whimsy Stamps Notched Square dies and layered him over some papers from my stash and attached to a 5″ square card base that I stenciled some clouds on along with the background of the image. I die cut some leaves from the Whimsy Stamps No-See All Seasons Tree die set to add to the top corners of the image panel.

Needless to say, I did “hang in there” right along with him!!😄

And last but not least, the fifth challenge was to make a project based on one of the video tutorials that was shown at the event. Of course, I’m always inspired by Crissy Armstrong and her coloring! This sweet little penguin called Penguin Momma was a freebie given during the event and I watched Crissy color this up and I tried my hand at her tips and tricks.

I printed out another piece of the feather background and cut it out with the Whimsy Stamps Zig Zag Stitched Rectangle dies and added my own white feather to the design. I sponged some grey ink around the edges of the printed papers and added some yellow crystals.

  • I had such fun creating these projects and pulling out my Whimsy Stamps stash for the challenges. And now I have a few cards for sending out to people that I already have in mind! Hope you’ve enjoyed my makes today and I’ll be seeing you again soon!! (The links in this post contain affiliate links if you want to purchase anything! Thank you!!)

Challenges:

  1. Creatialicious – Anything Goes optional birthdays
  2. A Bit More Time to Craft – Anything Goes
  3. Love to Craft – Anything Goes
  4. Crafty Creations – Anything Goes
  5. Colour Crazy Craft – Anything Goes + colouring
  6. Crafty Friends – Anything Goes
  7. Creative Craft Cottage – Anything Goes
  8. Creative Moments – Anything Goes
  9. Lil’ Patch of Crafty Friends – Anything Goes

Purple Day Blog Hop For Epilepsy Awareness

Hello my friends!  Today starts the annual “Purple Day” blog hop and I have joined with my friend Fiki to help bring awareness about epilepsy.

Please take a moment and read important information about this special day:

Purple Day is a global grassroots event formed with the intention to increase worldwide awareness of epilepsy, and to dispel common myths and fears of this neurological disorder. Further intentions of this movement are to reduce the social stigmas commonly endured by many individuals afflicted with the condition; to provide assurance and advocacy to those living with epilepsy that they are not alone in their ongoing endurance; and to initiate individuals living with the condition to take action in their communities to achieve these aims.

The day occurs annually on March 26.  To read more about epilepsy or how you can help in the U.S., check out the Epilepsy Foundation’s website.

My card inspiration:

Vicki-DDS-purplebloghop

Isn’t she just the sweetest little girl with her big heart?!  So delighted, of course, to have been provided this darling image from Digi Doodle Studios which is one of the sponsors for our blog hop today!  This image is called Sweet Carlina and I’ve got her colored up in purples and pinks.  She has a little white heart tucked in her jacket pocket to go with the white hearts on my design.

I found some pretty purplish decorative papers from a recent card kit I had and then I just followed along with a sketch to complete my design. (See challenges below.)  After coloring her out, I’ve cut her out with a MFT Wonky Stitch rectangle die and then layered with a purple cardstock layer cut out with a MFT Scallop Stitch rectangle die.  I popped it up with craft foam over strips of lace, twine and accents I’ve created with the papers.  I’ve used a LF scallop border die to cut accents to go with my heart paper strips.  Extra hearts left over were used in the top corner.  I also added a purple flower button with twine to finish it off.

Vicki-DDSpurplebloghop-close

Here’s a closer view of the coloring I’ve done on her with my Copic markers.  I’ve used white gel pen to dot her checks and color the heart in her pocket.  You can barely see the shimmer that I’ve done over the heart she’s holding with a glitter brush pen.

You’ll also notice that I’ve printed out this image twice, fussy cut out just the portion of the heart she’s holding along with her hands and popped it out over the colored image to give it some depth.

Vicki-DDSpurplebloghop-flat

I hope you’ve enjoyed my inspiration for the blog hop!  I sure enjoyed creating it and helping to give support to my friend along with creating awareness for epilepsy!

Challenges:

  1. Time OutPurple (helping to support epilepsy awareness with us!)
  2.  Sketch Saturday – sketch #602
  3. Pammie’s Inky Pinkies – PIP2012 Anything Goes
  4. Arty Divas – #18 Anything Goes
  5. Through the Craft Room Door – Anything Goes
  6. Simon Says Stamp Wednesday – Anything Goes
  7. The House That Stamps Built – M2520

Raggedy Love

Happy Valentine’s Day my friends!!  Hope that you’re “feeling the love” and have a wonderful day today!

I wanted to share a card I made for Valentine’s Day.

Vicki-RaggedyLove

This really cute images is from Stamp On It called “Love You” digital stamp by QKR Stampede.  I wanted to try and keep to the “original” Raggedy Ann style of colors as I could, so I ended up Google searching for photos so that I could use that as a basis for my coloring.  I also thought that the rectangle die cut panels would go great for cutting her out with.

I sponged around the edges of the image panel with some blue distress ink, added some heart confetti pieces along with a white twine bow to the center of the heart.

Vicki-RaggedyLove-close

Taking a closer look at the image, you can see how dimensional those confetti hearts are.  There is actually a heart that prints out in the center of the “o” in the sentiment, but I decided to place one of those confetti hearts over it.

There is also some shimmer you can see in the heart with the bow that I’ve covered with a glitter brush pen.  And in coloring her in, I’ve added some extra “dots” on her blue dress and then I took a white gel pen to add a pattern on her red patch on the apron and then also to add some “stripes” to her socks and “dots” to her cheeks.

If you look at her eyes, I’ve taken a black gel pen which gives them a slight dimension and makes them stand out a bit more.

Vicki-RaggedyLove-flat

I really hope you’ve enjoyed my “Raggedy Love” card today and that you have a wonderful Valentine’s Day today!

Thanks so much for stopping in and I’ll see you again very soon!

Challenges to enter this card for:

  1.  QKR Stampede – #385 Anything Goes
  2. Pearly Sparkles – Include some red
  3. Lil Patch of Crafty Friends – #125 Anything Goes
  4. Make My Monday – #115 I Heart You
  5. Try It On Tuesday – Share the Love
  6. Double D – Hearts
  7. The House That Stamps Built – DCC F520 Hearts
  8. Aud Sentiments – Love/Valentine Sentiment

Foxy Skater Spinner Card in Action With Video Tutorial!

Hello friends!  Really feeling the cold air around here, so I’m still thinking in winter mode and have another interactive winter card to share with you again today!  (Please be sure to check out THIS POST to see another interactive winter card and video tutorial if you’ve missed my last posting!)

What’s a better way to embrace the cold than to create interactive cards in your nice warm crafty space, right?!  So sit back, have a warm sip and get creative with me today!

Vicki-DDS-Spinner Fox Card video

This cute little guy is so fun to watch him spin around doing his cool ice skating trick!  I’ve used the Foxy Skater image from Digi Doodle Studios for my card here along with the Winter Plaids N’ Patterns Digi Paper Pack and Snow Days Sentiments set as well!

I’ve used several dies from My Favorite Things for the front of the card!  I’ve cut out the plaid papers with the A2 Stiched Rectangle die and mounted it over an A2 sized side folding white card base.  The spinner “window” was cut out with a Circle die that was also used to cut the center for the Scallop Stitched Circle frame around the opening.  The sentiment was printed out and cut with the MFT Slanted Banners die (not finding link in store).  I’ve also used MFT dies for the snowflakes (also not shown in store), that was cut from some Brutus Monroe Fallen Snow Glitterstock.  I’ve added some silver Stickles to the centers of the snowflakes and dotted around the front of the card.

I’ve also used some snowflake papers for the inside area of the card from the Candy Land Paper Pack from MFT as well!

Check him out below as he spins around:

What’s different about this particular spinner card is how I’ve used a single digital image to create the front AND back of this Foxy Skater guy!

To see how I’ve put together this card for the spinner action, check it out in my video below or you can watch it on You Tube HERE:

I still have this card along with the other interactive card from my last post sitting here on my desk playing around with them! Not sure I can give them up quite yet as I’m having fun!! LOL!

Vicki-DDS-Spinner Fox Card video-close

Here’s a closer look at the cute “Foxy Skater” guy that twirls around on the card.  I was going for a bit of a textured look on his fur, so I also used a white gel pen to mix in some white fur on his cheeks, chest and tail areas. I’ve also used a gel pen for the cheeks and a metallic gel pen for his skate blades.   It was a little more time consuming to color in two fox images, but as you can see, it’s totally worth having both sides for this spinner action design! 🙂

To flip the image in the opposite direction, I used Word doc. on my computer, copied the original image so that it was the exact size, pasted him again and then used the “rotate” setting to flip him in the opposite direction.

Check out the video to see how I was able to fussy cut him down for my card design.

Vicki-DDS-Spinner Fox Card video-flat

I hope you’ve enjoyed my spinner card today and that the video is helpful for you to create your own fun version during the wintry cold months ahead of us!

Thanks so much for stopping in today my friend and I’ll be seeing you soon!

Challenges I’d like to enter this card for:

  1.  Shopping Our Stash – Winter blues
  2. Through the Craft Room Door – Anything Goes
  3. The Male Room – It’s Snowing!
  4. Creative Moments – Anything Goes
  5. Penny’s Paper-Crafty – Anything Goes #463
  6. CCEE Stampers– CCEE2004 “Ice, Ice Baby!
  7. Aud Sentiments – Anything Goes + sentiment

Otterly Missing You!

Hello friends!  I wanted to say thank you for adding your comments from my last post about the card kits! LOL!  I see that I’m not alone!  You’ve all actually really inspired me to get them pulled out and use them despite how old/new they are!  Loved the idea about making several cards and sending them along to charities too!  Always love reading your feedback! 🙂

Today I wanted to share with you another card I made with the oh so adorable Digi Doodle Studios “Otterly Love” Pairables set that you may remember my card from last week that I’ve posted HERE.  I’ve used it again for my card below:

Vicki-DDSOtterlyLove-Jan16

His sweet little face gets me every time! 🙂   As in the previous card I made with this set, I’ve arranged the digital images from the set how I wanted them to look on my design and then just printed it out.

After coloring up my image panel, I die cut it out with a cross-stitch rectangle die and set it aside.  I cut a white A2 sized top folding card base and then layered a white heart embossed (folder from Stampin’ Up!) card front panel that was also cut with the cross-stich rectangle die.  I used some watered down ink (Strawberry Slush from Stampin’ Up!) and a fan brush to splatter some color over it.  I also CAREFULLY took the image panel and splattered some more over that panel as well.

I then arranged the rectangle layers including the gray colored cardstock (Smokey Slate from Stampin’ Up!)  panel and attached them to the embossed card front panel.  I tied some of that triple stitched ribbon (from Stampin’ Up!) around all of these layers and added a bow with it before attaching it all to the card base.  Lastly, I’ve added some clear sequins.

Vicki-DDSOtterlyLove-Jan-close

Here’s a closer view of the Copic coloring I’ve done on this cute critter posing on his little rock.  (I thought he needed a bit of ‘water’ around him.)

You can see the hearts and along the bottom of his feet where I’ve added some shimmer with a clear glitter brush pen.  I’ve also used a white gel pen for his cheeks and eyes.

Vicki-DDSOtterlyLove-Jan-flat

It’s a super simple card, but oh so much fun to color him up!  I thought it was a nice card to send for a ‘miss you’ to someone you love!

Thanks so much for joining me here today friends and I’ll be seeing you soon!

Challenges I’d like to enter this card for:

  1. Creative Fingers – Anything Goes #177
  2. QKR Stampede – Anything Goes #380
  3. Not Just Cards – Jan. Anything Goes
  4. Lil’ Patch of Crafty Friends – Anything Goes (Happy 5th!)
  5. The Cutie Pie– Cute, Clean and Simple
  6. Pammie’s Inky Pinkies – Anything Goes PIP2002
  7. Crafty Cardmakers – Anything Goes #248

I’m Otterly In Love

Hello friends!  Happy Friday!  Do have any plans for the weekend?  I have plans to probably stay in and color since there’s snow predicted for us! Brr!

I wanted to share a card I’ve made with this “OTTERLY” adorable brand new Pairables digital set that has come out today from Digi Doodle Studios:

Vicki-DDSOtterlyLove-Jan10

Isn’t that the sweetest little face?!  This entire scene was digitally created on my computer using the Otterly Love Pairables set from Digi Doodle Studios!  If you’d like to take a look at what’s in the entire set, then check it out in the store link or see the bottom of this post!  I will have another card coming with this same set soon, so stay tuned!

*Tip*  The “thing” I love about creating scenes digitally as apposed to regular stamping is that there’s no masking involved!  Just create on the computer and you can resize and arrange/bring forward/bring back, etc all you want without the hassle and it’s easy to start over as it’s on your computer!  It’s easier than you think if you’ve never done it!

So as I mentioned, I arranged each image on my computer how I wanted the images to be and printed it out, colored it in and sponged in some distress ink along the edges so the whole panel has color over it.

I die cut it out with a stitched rectangle die and used the same die set to cut a larger piece in the brown cardstock that was layered over an A2 sized top folding white card base.

I used my Cricut to cut out the cattails along the right side.  I popped it up with some thin pieces of foam tape to add to my design.  Lastly, I finished out the card with some gold heart sequins around the sentiment.  (This is a nice flat design so it’s easily mailable too!)

Vicki-DDSOtterlylove-Jan10-close

Here’s a closer look at the coloring I’ve done on this cutie!  I’ve used my Copic markers to color most of the panel including all of the grass blades.

I took a white gel pen to give him extra highlight on his eyeballs and cheeks.  I also covered the pond water with a glitter brush pen for some shimmer.  Not sure you can see it, but of course it’s nice and glittery in person!

I’ve also used a sponge to lightly cover the cattails with white ink.

Vicki-DDSOtterlyLove-Jan10-flat

I hope you’ve enjoyed my card today using this darling new Pairables set from DDS!  I’m seriously looking forward to sharing more with it soon as I think this has easily become my favorite!

Thanks so much for stopping in today and I’ll see you soon!

Challenges:

  1.  Country View – Love
  2. The Paper Funday – Anything Goes with optional Friendship
  3. Crafts Galore Encore – Anything Goes #71
  4. Creative Knockouts – Anything Goes
  5. Let’s Craft and Create – Anything Goes with optional:  Love is in the Air
  6. Lil’ Patch of Crafty Friends – Anything Goes
  7. Pammie’s Inky Pinkies– PIP2001 Anything Goes

Working in a Winter Kit!

Hello friends!  If you live around my area, then you know that it’s in full swing Winter Weather time!  We do have snowflakes in the forecast for tomorrow, but hopefully it’s not too bad!

So while we’re thinking of snow, I thought this would be a great time to share with you all of the winter style cards I’ve made using a brand new subscription card kit that I’ve got going from Pink and Main.  So grab a cup of your favorite beverage and enjoy some crafty winter inspiration!

So my first card kit from Pink and Main was the December 2019 Winter Wonderland Crafty Courtyard Box which is no longer available, but they have this month’s box out which I will I get soon!  Here’s what I’ve made for the December box:

Vicki-PMCCboxDec2019-set

Yeah, I know!  That’s a lot of cards, right?!  I was surprised myself how many cards I was creating from this kit and I could’ve just kept going as I still have plenty of supplies left!  I needed to make a few more cards to send out after Christmas for the ones I missed and send out thank yous…so this came in handy actually!

P.S.  Every single one of these cards were completed with an envelope too!  (So far so good on my New Year’s Resolution! Yay!)

Vicki-PMCCboxDec2019-card6

My first card here is a “see through” design using acetate for the center of the design.  I have used a Bold Snowflake die from Pink and Main NOT included in the kit, but overlayed it with another foam snowflake and button that WAS included in the kit.

I stamped snowflakes from the stamp set in the kit and added some “dots” with Stickles over the design too.

Vicki-PMCCboxDec2019-card2

This card was pretty simple, but I love it!  I’ve used the sentiment die that was included in the kit and die cut it with the sparkle cardstock from the kit as well as the pretty snowflake papers.  All I did was stamp 3 snowflakes and added another dot of Stickles to the centers.  I chomped the corners at the bottom and done!

Vicki-PMCCboxDec2019-card1

For this particular card, I’ve decided to make a ‘Z-fold’ card design and if you’d like to know the measurements and/or how to see one put together, then please check out my video tutorial on it here – “Coffee Style Z-fold Gift Card Holder“.

Vicki-PMCCboxDec2019-card1A

This is how the card folds closed.  It folds down to an A2 size.  I love how the colors look on this one!  Everything on this card except for the greeting on the inside was from the kit.

Vicki-PMCCboxDec2019-card4

So I wanted to use lots of those papers from the paper pad included with the kit and they were double sided so I had even more choices to deal with! LOL!  I decided to make square panels for my layout and use those sparkly silver snowflakes from the kit to place over top.  I heat embossed the sentiment from the stamp set at the bottom.

Vicki-PMCCboxDec2019-card7

This card was just destined to be a square design.  I wanted to use my Reverse Scallop Square dies from Pink and Main for this one.  I’ve also used papers from the kit as well as the silver sparkle paper and snowflake.  I took a snowflake embossing folder fort he background.  I used sequins from the kit and filled the centers with more of that silver Stickles.  (I got a bit of the prop  over my sentiment there.  LOL!)

Vicki-PMCCboxDec2019-card3

I wasn’t finished using that “Reverse Scallop Square” die set, so I took it to die cut some embossed snowflakes and layer them over some of the papers from the kit.  The middle of the card has a strip of the awesome translucent tape included in the kit.  I covered the middle of the snowflakes with a rhinestone and pop up the embossed sentiment with foam tape over the tape.

Vicki-PMCCboxDec2019-card5

And this last one was hubby’s favorite. I took the largest image from the stamp set in the kit and heat embossed it over a watercolor panel.   Then I took some Distress Oxide ink spritzed with water over a glass mat and brushed them over it and splattered some with with a brush as well.  I die cut the sentiment from the die included in the kit with the sparkle paper in the kit and finished the design with more sequins filled with Silver Stickles.

I had “SNOW” much fun with this kit and creating these cards!  I hope you’ve enjoyed it as well and have been inspired in some way!!

Thanks so much for stopping in and I enjoy seeing what you have say!  I loved reading all of your New Year’s resolutions and NOT resolutions too! LOL!!

I’ll see you again soon my friends! 🙂

Challenges:

  1.  Cardz 4 Guyz – Blue is the Color
  2. Arty Divas – #12 Anything Goes
  3. Classic Design– Anything Goes
  4. Creative Inspiration – Something New or Something Old
  5. Challenge Up Your Life– Anything Goes
  6. A Bit More Time to Craft – Anything Goes
  7. Simon Says Stamp Work It Wednesday – Snowflakes!

Snow One Like You for Whimsy Stamps

Hello friends!  I hope you’re having a wonderful week so far!

Today I have creation to share with you using this really sweet image from Whimsy Stamps:

Vicki-WSTawny-Nov12

I really adore this digital stamp that came out this month for Whimsy Stamps called Tawny.  It’s one that I picked to make something with as it was a bit personal to me.  That little owl with those big eyes is so sweet and really reminds me of my grandma who passed several years ago.  She was an owl lover….so she’s like a sweet little angel with me here!  There was SNOW one like her either!

To create my card, I started with some watercolor paper and Distress Oxide Inks in Seedless Preserves, Dusty Concord, Stormy Sky and Broken China (from bottom to top order.)  I spritzed it with a water bottle and soaked it up with a paper towel.  I then took some white paint watered down and splatter it with a fan brush over the panel.  I also took some shimmer spray and covered the entire panel.  You can see it better in the photo below.

I took a Lawn Fawn die to create the tree border with woodgrain paper and then die cut a snow border with glitter cardstock and glued it behind the frame.  I also took the sentiment from the Whimsy Stamps Snow Flurry clear stamp set and white heat embossed it over a strip of vellum that I’ve attached over top of these layers (with the inked background also) by using my Xyron Sticker machine.  These pieces were die cut with a stitched rectangle die, layered over a piece of white cardstock and then mounted onto a purple A2 sized top folding card base.

Lastly, I’ve added my image and some snowflakes that were cut out with some more glitter cardstock and each snowflake was dotted with some Nuvo White Blizzard Glitter drops.

Vicki-WSTawny-Nov12-close

Here’s a closer view of the image and how I’ve got her colored up with Copic markers.

If you take a good look at the top portion of the background, you can sort of see the shimmer from the spray.  It’s really sparkly in the light.

I accidentally got a piece of the “faux snow” photo prop on her skirt. LOL!  I covered the flower on her hat with a glitter brush pen and I’ve used some Nuvo Morning Dew Crystal Drops over the owl’s eyes, but it cracked.  I don’t like it as much as the glossy accents as it doesn’t crack so easily like this does.

She was fussy cut out and popped up over the snow border with foam dots.

Vicki-WSTawny-Nov12-flat

I really like how this one turned out with the colors and I hope you like it too!  The inked snowy backgrounds are really fun to play with!

Thanks so much for dropping into today and I’ll see you again soon!

Challenges:

  1.  Shopping Our Stash – Snowflakes
  2. Crafting By Designs – November Anything Goes
  3. Cardz 4 Galz – Let it Snow
  4. Moving Along With the Times – Snowflakes
  5. Creative Moments – Anything Goes with Optional:  “Baby it’s Cold Outside”
  6. Krafty Chicks – Winter
  7. QKR Stampede – #371 Anything Goes

Cards From My Heart

Hello friends!  With this not cooler, but COLDER weather we’ve been having, it looks like it may be a hard winter ahead and I’m already feeling it in my body unfortunately.  So with the heating pad and warm slippers,  I’m still crafting!

Today I’d like to share some cards that I have made for my hubby using some of the adorable stamps from Lawn Fawn …which I love:

Vicki-LF-Anniversary

At the end of October hubby and I celebrated our 20-year anniversary, and I made this card for him to let him know how I feel about him after all these years.  This would be something that we would certainly do where we live!  We always enjoy looking at the night sky together.

I started with some watercolor paper and blended some distress inks for the background and spritzed it with water.  I then made sure it was completely dry before white heat embossing the stars that I colored in the centers with a gel pen.  I then took a white gel pen and added more “dots” in the sky.

I’ve used Upon a Star and the Winter Skies stamp sets for both the images and sentiment. I took the Little Town border die to add over top of the starry sky and layered it onto a navy card base that has some more die cut stars (from Upon a star coordinating dies) at the top sponged with white ink.

For the sentiment, I had to piece together a couple of words from different sets to get it to say what I wanted it to.  I cut it out with a long banner die from My Favorite Things.

Vicki-LF-Anniversary-close

Here’s a closer view of the sky and the images.  For the fox couple, I black heat embossed it and then used my Zig Clean Color Real Brush markers to color them with and then popped them up over the corner of the scene with foam dots.

I actually used a color palette and sketch from a challenge blog, but missed the deadline to post it, but I think it turned out great and hubby enjoyed it.  He said, “Yes, this is something we would do!”  He also likes the color blue.

Here’s another card I made for hubby as his birthday was this last Friday:

Vicki-LF-LightUpCard

Although this one is a bit simple, it has a really fun interactive element to it!  If you’ve known me for a while, then you may know that my husband is an electrician, so this card was very fitting for him!

I have used the Lawn Fawn Turn Me On stamp set and coordinating dies along with the Life is Good stamp set for the sentiment and the Push Here stamp set to make this card.  I also have a large stash of Lawn Fawn papers that I’ve used for this which I don’t think are available any longer.

I used vellum for the light bulb that was heat embossed over it and then I colored it yellow on the backside of the vellum to place behind the die cut opening from the blue panel.  That was die cut with the coordinating dies.  I stamped and colored the light switch as well and also die cut it out over the blue panel.  I then white heat embossed the sentiment and cut it out with a sentiment banner die from MFT.  It was sponged with white ink and glued over the blue panel.

Vicki-LF-LightUpCard-alight

The best part of this design is that when you push on the light switch, the light bulb turns on!  I’ve used the Chibitronics to create this feature.

You can see here what it looks like when you push on the light switch!

You can also check out this quick few second video to see it in action below:  (CLICK HERE if you want to see it on You Tube.)

Although this looks like a pretty simple card, mechanically it had its difficulties with the light up interior portion of it and it was met with some challenges and patience as I had to keep testing it to make sure it worked right!  At one point I had to tear it apart because the battery accidentally flipped over!  I also had to use like 4 layers of foam tape so that the light wouldn’t continuously be on all the time! LOL!

Vicki-LF-LightUpCard-flat

It was all worth it though as it was for the love of my life, and he really did appreciate the efforts that went into making it as he even took it to work with him so that he could show it to his fellow co-workers!  LOL!  They seemed to be pretty impressed with it and even offered some advice on how much to charge for something like this!  LOL

The card was thick due to the amount of foam on it, so it didn’t fit into a regular envelope. Since it went to hubby, I just hand delivered it to him! 🙂

Hope you’ve enjoyed my share of creations today that I made for hubby!  I will be seeing you again soon!  Thanks for dropping in friends…I will be visiting soon!

Challenges:

  1.  Lawn Fawnatics – Cards for Guys
  2. Creatalicious – Anything Goes with optional:  For a Man
  3. Crafty Friends – Anything Goes
  4. Cardz 4 Guyz – All Wrapped Up (top card with scarves)
  5.  Get Creative – Anything Goes
  6. Through the Craft Room Door – Anything Goes
  7. Retro Rubber – Anything Goes + stamps older than 1 year (ALL listed are at least 1 year or older!)