Another Pot O’ Gold!

Hi there friends!  I guess I am really feeling the luck of the Irish this week!  I have another fun St. Patrick’s Day themed card to share today:

Vicki-SNSPotOGold

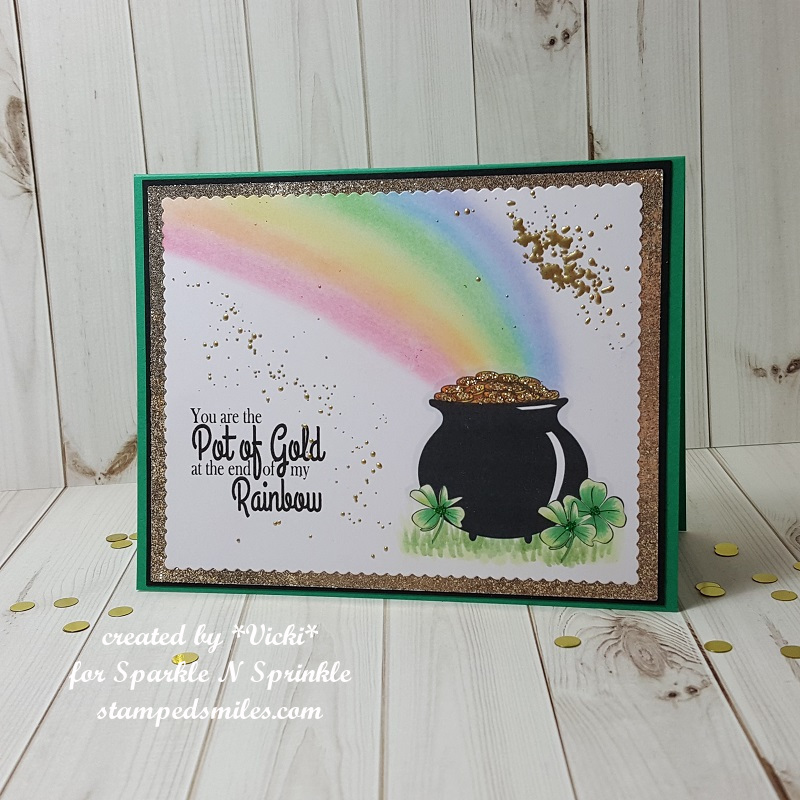
My card here may seem a bit simple, but it has a few really fun added extras to really make it shinny and glittery!  I have used Lil Leprechaun (Digital only stamp set).   I took the pre-colored versions of the set and arranged them in a blank Word.doc for how I wanted it to appear on my card front.  I used the clover images and resized them to fit around the bottom of the pot of gold area and then placed the sentiment where I wanted it off to the side.

I then printed it out and then cut it out with the Nuvo Basics Rectangle dies.

I used a couple of Copic green markers to make the “blades of grass” next to the pot of gold and clovers.  I also used some colored chalk to sponge in some colors for the rainbow behind the pot of gold.

Vicki-SNSPotOGold2

Here you can also see on the panel where I’ve taken some Super Thick Gold EP and sprinkled some in the corners of my image panel and then heat set it from underneath.

I also took a Nuvo Precision Glue Pen to add some “dots” in the center of the clovers and then of course used the Shamrock Glitter to go over them!  I also covered the coins in the pot with the glue and sprinkled some Champagne Glitter over them for some sparkle!

With the same Champagne Glitter that I used on the coins in the pot, I also took some Sticker Paper and covered an entire panel with it and burnished it in!  The shimmer and glitz on this are stunning in person and really sets off the card!  I’ve also used the Glitter Brush to take away the excess glitter particles and it’s a must have for clean up too!  (Instead of clinging to the brush, it repels it away!)  These sheets are somewhat thin, so I made sure that I’ve added some layers of cardstock in between this glitter panel for stability to the card.  (Keep this in mind if you are using the sticker paper for this idea.)

Vicki-SNSPotOGold-flat

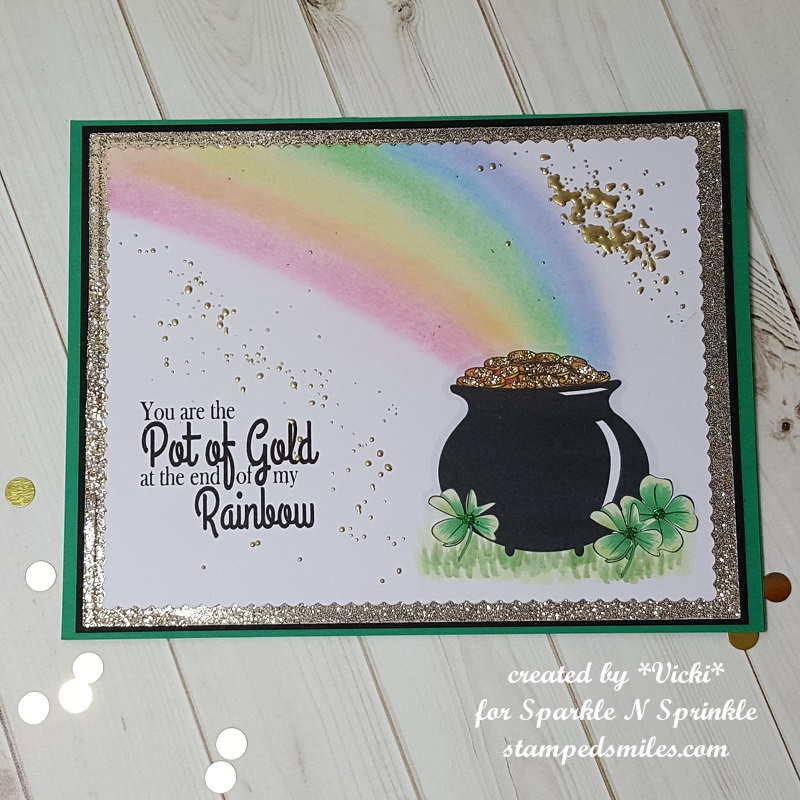
I tried to capture some of the sparkle in the photo, but it really looks brilliant when you are holding it in person! 🙂

I hope you’ve enjoyed my card today and I really appreciate you stopping in!

Challenges I’d like to enter this card for:

  1.  Crafting With an Attitude – Anything Goes
  2. Creative Moments – Anything Goes
  3. QKR Stampede – Anything Goes #338
  4. Creative Fingers – Anything Goes
  5. Pammies Inky Pinkes – Anything Goes PIP1910
  6. Not Just Cards – Anything Goes

Anything Goes for Cute Card Thursday!

Hello friends!  It’s time for an easy peasy “ANYTHING GOES” challenge over at Cute Card Thursday this week!!  Our monthly sponsor Whimsy Stamps will be joining us this week and I’m thrilled to share some of those products on my card today:

Vicki-WS-PenguinLovesBunny-March7

I have used this really sweet digital stamp on my card called “Penguin Loves Bunny“!  He is holding him ever so tightly and not wanting to let go!! 🙂

As I’m trying to get back into the swing of things here, I wanted to be sure to join some challenges and so I’ve picked out a nice sketch to start my card with here.  (See the details below the post for all challenges.)  I’ve been wanting to get out these yummy plaid papers that I’ve had for a couple of years.  This seemed like the perfect image for that too!

So I took the panel of plaid papers and layered it with some kraft cardstock.  I took some white organdy ribbon and wrapped a piece around the left side of it and tied on a bow at the top before attaching it to the upper right of my A2 sized top folding white card base.  I’ve cut out the image with an oval die and then layered another oval piece that was cut out with the kraft cardstock.  This oval panel was layered over the plaid.

I took a sentiment from the Whimsy Stamps Everyday Mini Sentiment clear stamp set and stamped the “miss you” underneath the image.  I also used the Whimsy Stamps Friend Word & Shadow die set to cut a piece of vellum with the shadow and then cut the word out with some pink cardstock and then attached them right underneath the stamped “miss you” sentiment.  Lastly, I’ve added some of the pink enamel dots from the Whimsy Stamps It’s a Party enamel dots set.

Vicki-WS-PenguinLovesBunny-March7-close

Here’s a closer look at the coloring of this image.  I’ve colored it in with Copic markers in the following colors:

  • Penguin:  C8, C5, C3, C1, Y38, Y35, Y32, R00
  • Bunny:  E47, E44, E42, E41, W5, W3, W1, R20, R11, R00

I also used a blender 0 and a white gel pen for cheeks and bunny tail.

Vicki-WS-PenguinLovesBunny-March7-flat

I thought this image would be so fun for Easter too!!  I can see it used in so many different ways!

Hope you’ve enjoyed my card today!!  Thanks so much for dropping in!!  See you soon!

Challenges I’d like to enter my card for:

  1.  Tuesday Morning Sketches – #493
  2. Crafty Animals – Anything Goes + related to animals
  3. Creative with Stamps – Friends
  4. {Cupcake Inspirations} – Plaid CIC465
  5. QKR Stampede – Anything Goes #337

Fistful of Flowers From Whimsy Stamps

Hello friends!  Hope that you are having a great week so far!  There is plenty of ice and snow over my way for the next several days, so I thought I would bring a little ‘happy’ today with a “Fistful of Flowers” from Whimsy Stamps!

Vicki-WSFistfulofFlowers-Feb12

Isn’t she the cutest?!  This was originally released as a rubber stamp from Crissy Armstrong, but this month it has been released in digital format now as well!

I have to be honest and say that after I had colored in the image, I was struggling with the colors of cardstock I wanted to use, and it seemed that anything I picked out wasn’t quite working.  (You ever have this problem?)  My hubby came in to visit me and I told him I was struggling, so he took me over to my paper and picked out these colors and I liked it, so I went with it!  Did he do good? 🙂

I have cut a piece of yellow cardstock out and then took the WS Mom’s Layered Flowers clear stamp set and white heat embossed the background with one of the daisy images.  I wrapped a piece of white ribbon around the yellow embossed piece that was also mounted onto a white 4.25 x 5.5 card front piece.  After wrapping the ribbon around both pieces, I added a bow and this panel was then mounted onto a white top folding A2 sized card base.

The colored image panel was layered with a blue cardstock which I’ve also cut a piece for a fishtail banner and added some daisy accent flowers to it.

Vicki-WSFistfulofFlowers-Feb12-close

                    This cutie has been colored up with the following Copics:

  • Jeans & Bow tie on shirt – B97, B95, B93, B34
  • Shirt & Hair Bows – R85, R83, R81
  • Flower Petals & White Band on Shirt – BG000 (also around image)
  • Flowers – center:  Y17 – Leaves/Stems: YG67, YG63, YG61
  • Grass – G24, G21, G20
  • Hair – YR30, E41, E43, E44, V95
  • Skin – E21, E11, E00, E000, R20

I took a glue pen and added some clear glitter over the edge of the flower petals for a bit of sparkle.  You can see that the daisy accents also have some light touches of glitter on the edges as well.

Vicki-WSFistfulofFlowers-Feb12-flat

So I hope you’ve enjoyed my card today and thanks for dropping by!

Challenges I’d like to enter this card for:

  1.  Crafting With an Attitude – Anything Goes
  2. Creative Fingers – Anything Goes
  3. QKR Stampede – #334 Anything Goes
  4. Crafty Friends – Anything Goes
  5. Pammie’s Inky Pinkies – PIP1906 Anything Goes
  6. Shopping Our Stash – Make Your Mark (colored with markers)

2 Crafty Critter Crazies February Challenge is Here!

Hello friends!  Today starts our new February challenge over at 2 Crafty Critter Crazies!  Remember that this is an always ANYTHING GOES challenge, but you must include a critter somewhere on your project to enter!

Here’s what I’ve created for the challenge:

vicki-ribbonsoflove-glittercard-project4

I have used this digital stamp set called Ribbons of Love.

For this card, I’ve used the uncolored images and placed the images together how I wanted them to appear in a Word doc and then printed it out.  I printed out an extra butterfly so that I could cut it out and pop it up over the design for dimension.  All of the butterflies were colored with Copics.

For the background of my card, I took some Lace and placed it over top of a piece of cardstock that I’ve covered with a Super Adhesive Sheet.  I then sprinkled some Caspia Sea glitter and burnished it over the lace layer.  (Sometimes I use the backing from the adhesive sheet to help burnish it in.)  After I felt it was burnished in, I removed the lace layer and sprinkled on some Lemonade glitter over the rest which gave me the unique glittery lace background!  As you can see, I’ve also taken a small strip of it to add to my design.  I have layered that piece with a strip of black fishtail banner and tied a white ribbon bow to attach over it.  The butterfly image panel was cut, layered with black cardstock and attached over the middle of the glittery background which as also layered with black cardstock and attached to an A2 sized white top folding card base.

vicki-ribbonsoflove1

Looking more closely at the card, you can better see the glittery background along with the coloring on the butterflies.  The two butterflies at the top were brushed with some Glue and then I sprinkled some Diamond Dust glitter over top of their wings for a bit more sparkle.  I glued the center of the yellow butterfly down and popped up the wings with my finger for a bit of dimension.

Thanks for stopping in… stay tuned in for my next special post!!

Sympathy & Banish the Blues

Hello friends!  Hope you have enjoyed a nice weekend.  Unfortunately, I needed to make up a sympathy card and didn’t realize that I had run out of them, so I will need to make some up in the future so I can have them on hand and not have to worry about it when the time comes again.  I had a friend who recently passed and needed a card for her family, so I pulled out a set that I hadn’t used before until now:

vicki-su blue sympathy

This is an older set from last year’s Sale-a-Bration at Stampin’ Up! called “Heartfelt Blooms”.  I think it’s so pretty and since the lady who passed was a happy crafter, I felt good about making this tribute for her.  I will miss seeing you at lunches Penny, rest in peace my friend.

I stamped the floral image several times with a Copic friendly navy color ink over some cream colored cardstock and then colored in the images with my Copic markers.  I also went around the images with some markers and blended it all out around the design.

I then took some distress ink and the foam ink blending tool to soften the edges a bit and make it look a bit more Vintage.  I also stamped the sentiment with navy ink and die cut it along with some navy cardstock with a banner die.  I sponged around the edges of this as well.  I wrapped some linen thread several times around this panel and tied it off with a bow next to the banner.  I then attached it over an A2 sized top folding navy card base.

I created a matching envelope by stamping the image in navy ink over it as well.  Lastly finished off the design with some clear sequins.

vicki-su blue sympathy-close

Here’s a closer view of the coloring on the floral image I did as well as the sponged around the front panel and banner.  I thought all of the blue colors turned out really pretty and made a nice Vintage feel.

Challenges I’d like to enter for the above card:

  1.  A Bit More Time to Craft – #84 Anything Goes
  2. The Creative Crafters – Anything Goes
  3. Crafty Catz – Anything Goes with optional:  Blue, Green plus one other color (cream)

So on another {positive} note, I’d also like to remind you that there are still a couple of days left to play along with us over at the Cute Card Thursday Challenge this week!  The theme for this challenge is “Banish the Blues” which I felt like doing in my craft room and so I decided to make this “Fun-Loving” card:

vicki-bm-lovebugs

Now how happy do these cute honey bees look?!  They almost look like they’re dancing in the air!!  I’ve used items from a February card kit for this card.

I’ve heat embossed the bees and colored them in with some Aqua Pigments. I’ve used the paper from the kit and stamped the background and the edges of the bee panel with some SU! ink that happened to match up with it.  I then white heat embossed the sentiment from the same stamp set above the bee panel.  I sponged around the edges of this red panel with white ink and attached it to a side folding A2 sized card base.

vicki-bm-lovebugs-close

Here’s a closer look at the bees and how I’ve colored them.  Some of the Aqua Pigments are shimmery and I’ve used a couple of those colors too!  I’ve added some white dots on their cheeks as well as a few around the hearts.  I topped off their eye-balls with some glossy accents.  I’ve also stamped some more “xoxo”s on each end of this image border and layered it over a piece of black cardstock.  I took two strips of glitter washi tape from the kit and added it above and below the image panel area and then attached the bees over top but between the strips.  Lastly I’ve added a heart shaped sequins to the center of the white embossed heart “O” in the sentiment and the rest of the sequins from the kit randomly placed on the card.  I topped off the circle sequins with some Nuvo White Blizzard Glitter Drops.

Hope this helped to end my post on a happier note with a smile.

Thanks so much for checking in with me today!  I’ll see you again tomorrow for more crafty inspiration!!

Here’s some challenges I’d like to enter the above “Bee card” for:

  1.  Shopping Our Stash – #SOS386 Hearts On Fire
  2. Moving Along With the Times – #89 Have a Heart
  3. QKR Stampede – #331 Anything Goes
  4. Pammie’s Inky Pinkies – #PIP1903 Anything Goes
  5. Paper Girls – #168 Sparkle and Shine
  6. Double Trouble:  #20 Thing 1 Trouble Maker – “Love is in the Air” (honey bees!), Thing 2 Double Dare – Entered the Paper Girls Challenge #168, Thing 3 Twisted Sister – “Sparkling and Shining” (I used metallic watercolor, sequins, glitter drops and glitter washi tape)

Grateful We Are Friends

Hello friends!  Stopping in today to share my card using the Koi Pond Friends rubber stamp set.

Vicki-SnSNov-KoiPondFriends

I started out with a piece of watercolor paper and sprinkled three different colors of Nuvo Shimmer Powders on it:  Atlantis Burst, Green Parade and Blue Blitz.  I sprinkled all the colors at once before applying any water to it.  I sprinkled VERY little and just added a bit more here and there as I spritzed it with water.  I saturated the paper and moved it around until it was covered how I wanted it to look.  I dabbed it up with a paper towel and used a heat gun to dry it up a bit.  I just love the beautiful shimmer on this background!

Vicki-SnSNov-KoiPondFriends2

Also, for the background, I took the bubbles image from the same stamp set and stamped them in VersaMark ink around the right corner and bottom over the watercolor piece.  I heat embossed the bubbles with some Frosted Juniper and Sparkle (Semi-transparent) embossing powders.  I then mounted this watercolor background panel onto the top edge of a black A2 Sized top folding card base.

With the close-up view of the fish, I heat embossed them with the Copper Embossing Powder over some Bristol paper.  For the flower image, I just stamped it with black waterproof ink in the same Bristol paper.  Below I will share how I went about coloring both the fish and the flower.

After heat embossing the fish and stamping the flower, I took the Nuvo Glitter Markers in the following colors:  Midnight Shadows, Ember Glow and Urban Graphite and pressed the pens down onto my Tim Holtz Glass Media Mat to get a “pool” of it and then used my Water brush to blend and color the images. It leaves a beautiful shimmer and blends the colors together so nicely!

Vicki-SnSNov-KoiPondFriends3

Here’s a closer view of the colored flower with the shimmer.  I fussy cut all the colored images and glued them on the card base with glue.  For the flower image, I decided to off-set it and trim off the edges with scissors.

For the greeting, using the same rubber stamp set, I stamped it with a black pigment ink and then sprinkled it with some Sparkle (semi-transparent) and heat embossed it to give it a nice sparkly look!

Vicki-SnSNov-KoiPondFriends1

For the bottom portion of my card, I cut out a strip of cardstock the width that I wanted to go across the bottom and underneath the watercolor panel.  I covered the entire strip with Glue and then covered that up with these stunning Bronze Mica Flakes and let it dry.  After it was dried, I pressed and burnished them into the strip with my finger and bone folder.  The extra pieces will come off the sides as you rub it around or you could also trim it off if you prefer, but I found it to not be necessary.  You can see how big the flakes are in the photo as I scattered a few of them around my card in the photos.  This was by far my favorite thing to play with on my card! 🙂

I hope you’ve enjoyed my creation today and I thank you so much for stopping in!

Caring Thoughts Wreath

Hello friends! Sorry to be throwing so many posts out to you at once, but as you can see there are so many exciting things going on the first of the month and I’m happy to be sharing it with you!

I have come up with an easel card design that I’ve created using the digital set called Memory in Our Hearts:

Vicki-SnS-MemoryinOurHearts-OctGDT

The great advantage to using a digital set is that they come with pre-colored images as well as outlined images to create many different looks you’re wanting.  In addition to that, you can also manipulate the size and structure of your image as I have done with my card here.  (This is a great way to come up with a unique design too!)

I have taken some of the pre-colored “sprigs” in the fall theme color and sized and moved them around in a Word doc. to create my own Fall wreath with it!  I then added the beautiful sentiment to the center and placed where I wanted it and then printed it out along with a couple more sprigs that you see on the inside of this design.

Vicki-SnS-MemoryinOurHearts-OctGDT1

To step things up a notch, I’ve used a protractor to draw a circle around my wreath image as well as a larger circle for a mat behind it and fussy cut them out. (I didn’t have a circle die large enough to accommodate my wreath image.)  I took my ink blending tool and some Tea Dye and Vintage Photo distress inks to add some color around the edges.  Since I made a Fall wreath design, I wanted to add some glitter to the leaves.  So, I took the Nuvo Precision glue pen and added some glitter over them.  For the “berries”, I took some Ripened Pumpkin Nuvo Crystal Drops in random areas around the leaves.  I made a bow with some natural twine and added it to the top of the wreath.  (I did this same process for the smaller “sprigs” on the inside of the card as well.)

Vicki-SnS-MemoryinOurHearts-OctGDT2

For my card design, I have made an “easel style” card (more on that below).  My card size is a 5 1/2″ square.  I have used the same cardstock color that I’ve used to print out my wreath image and separated it in two panels to fit on the front of my card base.  I took an embossing folder from my stash to add some texture to my design and also used the distress inks again to add some color around the edges.  I used glue to add some “dots” in the corners and then sprinkled some “Autumn Medley” glitter over them and let it dry.  I have also taken some 1/4″ Tear Tape to the middle edges of the card base and burnished some of this same “Autumn Medley” glitter to that.  I think it really brings in that pretty Fall color theme with some added sparkle!

Vicki-SnS-MemoryinOurHearts-OctGDT3

And for the inside of my card, you can see that those extra “sprigs” that I’ve printed and cut out create an easel style “stopper/display” function for my card design.  It’s easy to create this look with a score mark made in the center of the card front base as you can see with the circle wreath shown fully.

I have used some of the same-colored cardstock as the printed-out wreath for the inside of my card with some more distress inks along the edges as well as another strip of 1/4″ Tear Tape along the bottom edge burnished with some more of that “Autumn Medley” glitter.  I’ve used some foam tape to pop up the “sprig” cut out images so that they create the “stopper” for the front card base to rest while being displayed.

I hope that you’ve enjoyed my interactive card today and I look forward to sharing many more projects with you during my guest design spot!

Thanks so much for stopping in today my friends!  Please be sure to check out my earlier posts from today!  See you soon!

challenges:

  1.  {Cupcake Inspirations} CIC457 – Fall
  2. Try It On Tuesday – Thankful

I’ve Been Schooled!

Hello friends!  Hope you are doing well and are having a great week!

I took some time over the last few days to try and follow along with all of the videos and classes going on over the My Favorite Things blog as they are doing “Session 2 of their MFT Summer School“.  I don’t know about you, but I find that there is always something new to learn and different things to try with crafting and I enjoy learning about it so that I can continue to improve in what I already enjoy doing.  Sometimes that self-doubt creeps into the skull to tell you that “you’re not good enough” and “give up”, etc.    The way for me to try and stomp out those feelings is to take classes and try something new.  I just want to enjoy the process and learning can help bring on more positive feelings.

Since there are SO MANY creations in this post, I won’t go into too many details other than share the links to the MFT Summer School links that I made each card for.  I hope you enjoy having a look at them:

Day 1 – Monochromatic (CAS)

Vicki-MFTcamp-monochromatic CAS

I used several colors of MFT purple (of course!) cardstock and stamped a background stamp with VersaMark over it.  I think the die I’ve used is from something retired.

Day 2 – Focal Point

Vicki-MFTcamp-FocalPoint

Really had fun with this sweet little bear! 🙂  I loved the layout so much from class and decided to follow that for my card here.  The balloon and die cut sentiment actually have shimmer over them which doesn’t show in the photo very well.

Day 3 – Visual Triangle

Vicki-MFTcamp-VisualTriangle

This one took me quite a bit to put together.  I think maybe part of it was all of the coloring, but I was struggling a bit with the concept…I’m hoping this was how she was going with it.  3 long strips at the bottom, 3 images at the bottom and 3 images at the top.  The purple in the background was a watercolor wash like she showed in the video, but I didn’t heat emboss any image like she did.

Day 4 – Rainbow

Vicki-MFTcamp-rainbows

I have done this before, and I really like how you can use up your paper scraps in a colorful way.  I used the same frame die here in a similar manner as I did the card above this one.  I cut the sentiment several times before laying down the top one and then I slightly off centered it to show the white slightly behind it.

Day 5 – Ombre

Vicki-MFTcamp-Ombre

And here I go with another purple card! LOL!  I actually remembered a fantastic video that I created this card based on a tutorial from Jennifer McGuire.

If you have any questions about these, please feel free to contact me or simply leave a comment below and I will be happy to reply.

Thanks so much for stopping by and I will see you again on Thursday for a new challenge! 🙂

Dare to Get Dirty Challenge Results Finale

Hello friends!  Are you glad it’s Friday?  Sometimes I think where did the week go and other times, it seems forever before we get to the weekend!  I know that although I am a homemaker, there is still something about the weekend getting here.  Hubby still works so perhaps that the reason, I’m not sure.  None-the-less TGIF!  🙂

I know you had gotten used to seeing (lots of you really enjoyed looking at them each week too!) the Friday results of ICAD, but now that it’s over, I still have a different kind of results to share with you.  As in this last Monday’s post, the following creations that I’m showing on my blog here are from the Splitcoaststampers “Dare to Get Dirty” challenges.

And as I mentioned in Monday’s post also, I am not able to reveal the full details of how I went about making these creations.  But, if you are a fan club member on Splitcoaststampers, then you will know exactly what I’m talking about here! 🙂

The first card here was made for Anita’s challenge:

Vicki-DTGD18snietje

It was hubby’s idea to add the Starbucks gift card on the inside! LOL!  Good one Hunny!  (He wanted me to give him credit for that!)  Let’s just say that I had a BLAST creating this one! 🙂

challenges for the above card:

  1.  4 Crafty Chicks – Out of This World/Space
  2. Creative Knockouts – Fancy Fold
  3. Simon Says Stamp Wednesday – Distress It (distressed edges)
  4. Sweet Stampin’ – Travel

Vicki-DTGD18ohmypaper!

This card was so fun!  It seems to be a creation that was commented on over in the gallery quite a bit.  This was made for Angie’s challenge, and I really like how this one turned out too.  The little piggy, sentiment and sentiment die all came from My Favorite Things.  I paper pieced the heart for the little piggy. 🙂

challenges for the above piggy card:

  1.  Stamping Sensations (August) – ‘current’ favorite stamp (OMG this pig!)
  2. Happy Little Stampers Anything Goes with Dies – August
  3. Try It On Tuesday – Inspired by Song (‘Total Eclipse of the Heart’ by Bonnie Tyler & ‘Smile’ by Uncle Kracker)

Vicki-DTGD18stampersandee

This was for Sandee’s challenge.  I’m getting ready to be in need of some masculine cards coming up in the next few months or so, so I’m trying to get ahead of the game by having them on hand!  Let’s see how that goes!   Do you remember the cool Stamp On It products that I purchased from my Stamp Convention trip in THIS POST?  I’ve used it again on this card.

Vicki-DTGD18KelliJoB-CrayonPopArt

This is a challenge that is released today at the “Dare to Get Dirty” event for Kelli Jo’s second challenge.  I think it turned out pretty cool and can I just say that I wish I had this hair?!  LOL!  The sentiment was white heat embossed from My Favorite Things More Essential Sentiments and then I added some heart sequins.  And that’s all I can say about it.

I hope you’ve enjoyed seeing my creations even if you don’t understand how I’ve arrived at the completed design. 🙂    Looking back at these now, I can see how they could each fit into a masculine style category which is pretty cool!

Thank you so much for stopping through my blog and having a look!  Hope you will consider becoming a subscriber or check on updates in your favorite reader with me…I have much more to share!

Enjoy your weekend!

Masked Floral Eclipse and ICAD Week 4

Hello friends!  Posting a bit later than what I had wanted today, but sometimes I get caught up in other things going on and just keep crafting when I have totally forgotten that I need to post something…especially if you can’t remember if you’ve posted or not! LOL!  Does that make sense?  I hope so!

I just love all the beautiful blooms that are coming up around the house as we continue with Summer!  It is a bit hot outside and I’m only out for a brief time watering and that’s about it right now.  So I decided to take the idea of flowers indoors with a card!

Vicki-LawnFawn-Floral Eclipse

I created a floral bouquet and then used the “Eclipse technique” (click link for a tutorial on Splitcoaststampers.com) for my design using all Lawn Fawn products on my card!

I started off with the Fab Flowers stamp set and made several masks from Post-It Notes and cut them out as needed to create the bouquet on white cardstock.  I’ve used several colors of Stampin’ Up! inks pads which is what I have the most of in any ink pads I own.  I masked off the flowers that I needed so that I can put the ones that I wanted to show up in the front.  I’ve also used a white gel pen to create “dots” all around the flowers.

After completing my masked floral bouquet, I used the LF Scripty Hello die and cut it right in the center of the bouquet.  When I first tried this technique, it freaked me out, but it’s pretty cool how it turns out!  I also cut this out several times with black cardstock to stack them up and place behind the stamped bouquet on the front.

I finished the card by cutting out the panel with the LF Stitched Rectangle Stackable and the LF Fancy Scalloped Rectangle Stackable in black which I mounted onto a top folding A2 white card base.  I then added some clear sparkling sequins filled with Clear Nuvo Crystal Drops in the centers.

Vicki-LawnFawn-Floral Eclipse1

Here’s a closer look at what the technique looks like on the card.  It shows up best when you put dark cardstock behind it.  it takes a bit of planning and maneuvering, but it’s totally worth it when you’ve done.

Hope you’ve enjoyed my Friday floral bouquet!

And now of course I have the Week 4 ICAD 2018 index cards to share with you!

Vicki-ICAD2018-week4

I have noticed that as I go along, some days I just don’t want to put much effort into it and others I find spending a great deal of time putting one together.  LOL!  I guess some days you just “feel it” and other days you don’t!  These may seem a bit weird, but if I was able to share the prompts and ideas behind each one, they would totally make sense…. but for now, I’m just enjoying the process and being able to get out and play with all the different media that I either don’t use or want to learn more about.

I hope you are enjoying seeing the results each week.  I know I enjoy looking back at them each week rather than seeing each one for the day it’s done.  It gives a different perspective and makes me feel proud for completing one every day despite what’s going on around me!

Thanks so much for dropping in and I wish you a fantastic weekend!  Stay cool!

Challenges I’d like to enter my floral card in:

  1.  Lawn Fawnatics – Flowers, Floral and Foliage
  2. Crafty Creations – Anything Goes (#369)
  3. Simon Says Stamp Wednesday – Anything Goes