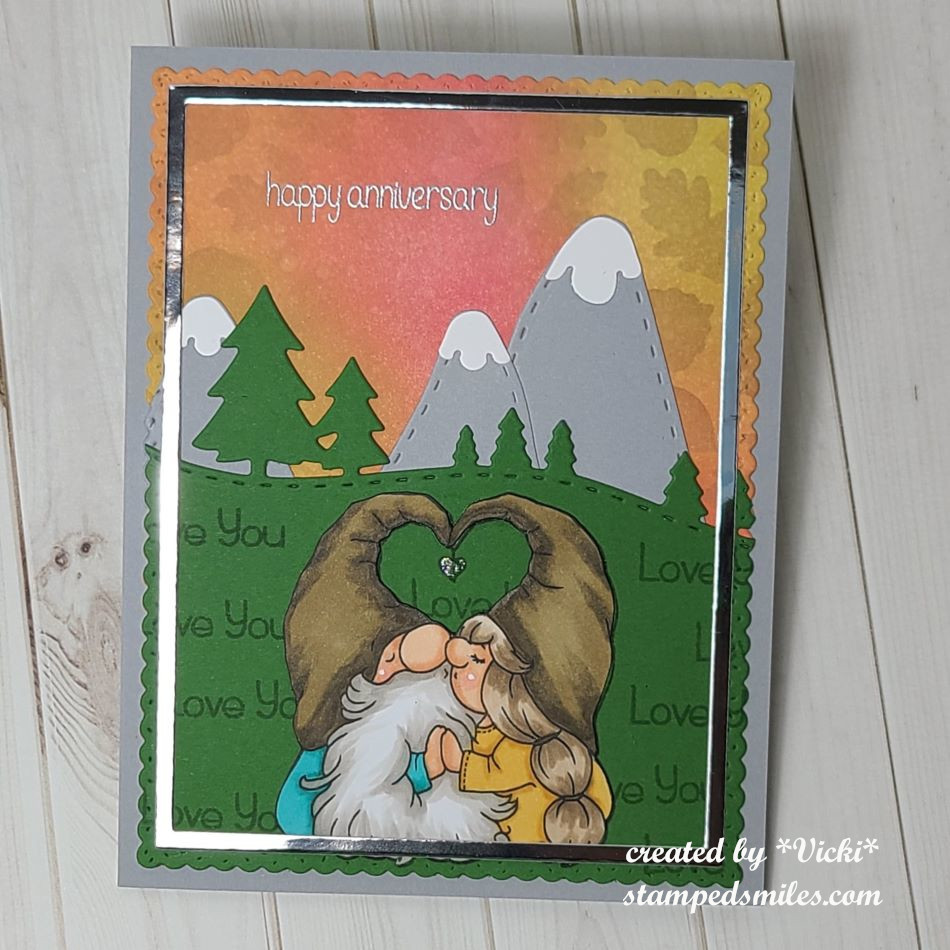
Hello friends! I hope you’re having a great start to your week! I’m just popping in to share the card I made my husband for our 25th wedding anniversary…he’ll be getting it this morning and then we’re off to a date night (afternoon as we’ve gotten older)!😆
I think this turned out pretty cute! I dug into my Whimsy Stamps stash and colored up these cute gnomes and fussy cut them by hand to add to the scene. I cut off the string and heart in the center of their hats and stamped the image over the green cardstock with the cut out image layered over top of it.
For the background: I blended some Autumn colored inks in various places and then stenciled in the leaves with a light brown ink. I die cut the mountains and attached them to the background by sizing it up with the green die cut tree border for placement. I stamped the “love you” sentiment all over the green background and then layered the colored image over top of the other. I added some silver sparkle on the heart in the center of the hats.
I also took a die cut silver cardstock frame to go around it and then I silver heat embossed the “happy anniversary” sentiment at the top of the scene.
All the layers were cut with a scallop rectangle die and placed over a side folding A2 grey card base.
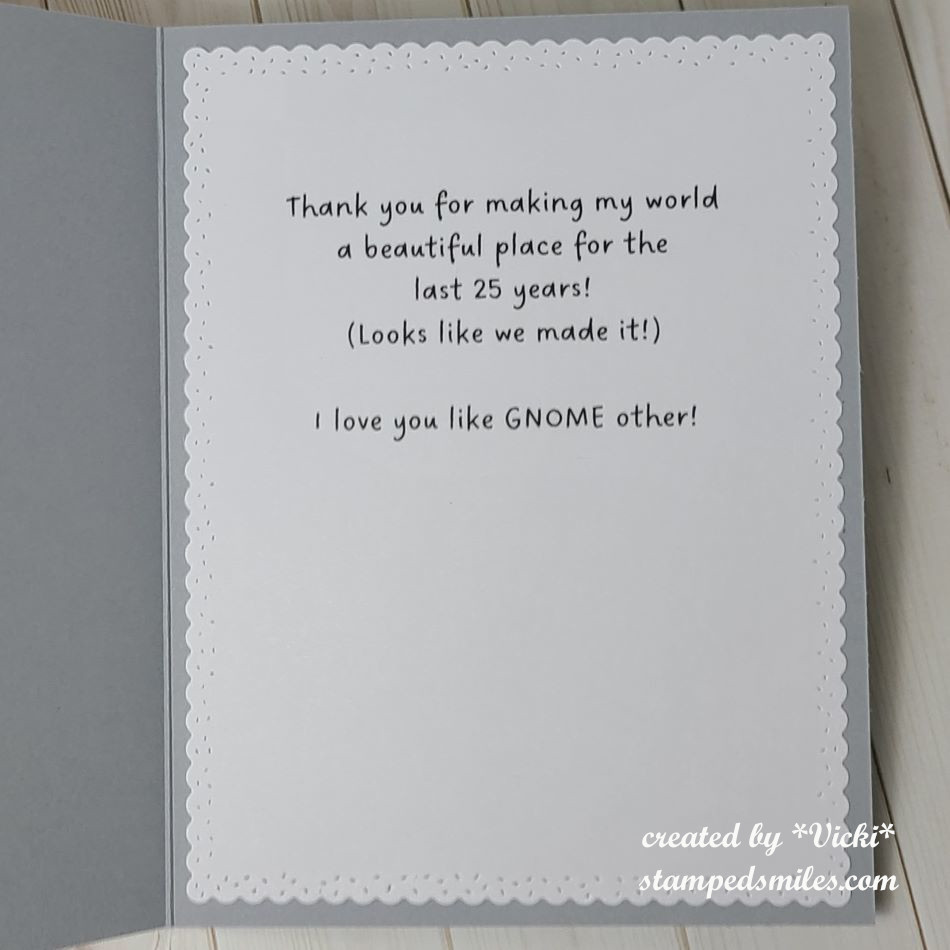
And here’s what I put on the inside of the card. I thought it up myself and printed it out on the computer. It was cut out with the same scalloped rectangle die and attached. I still need to sign it as I’m typing this up!
Here’s the inspiration that I used to help me create this card:
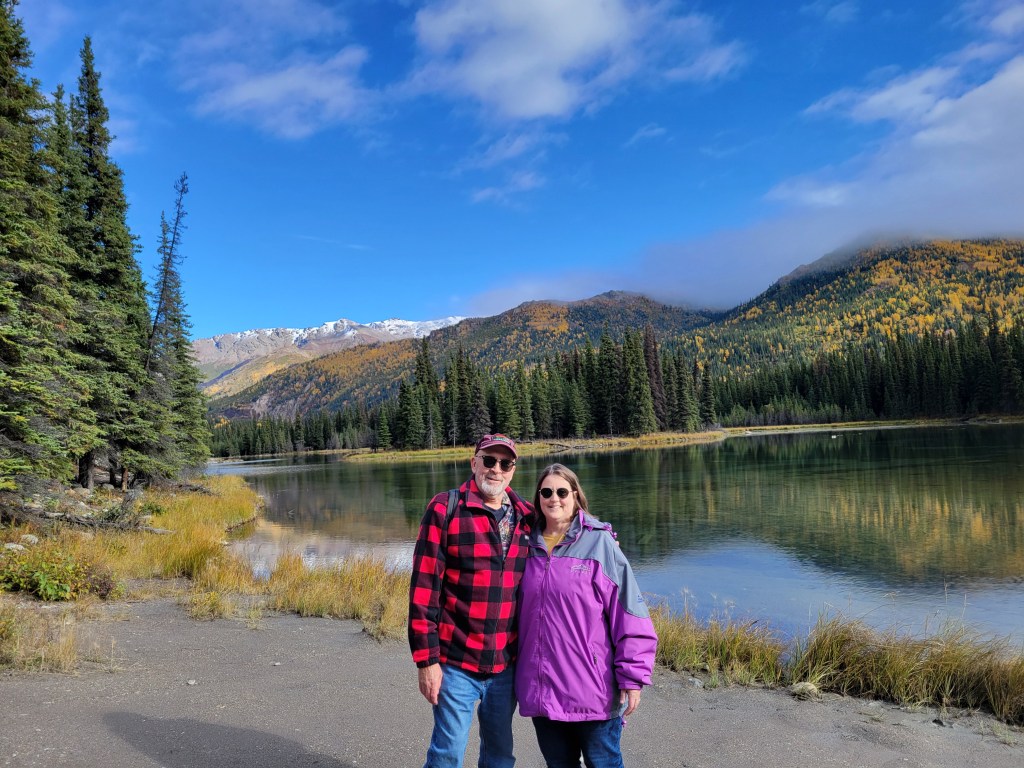
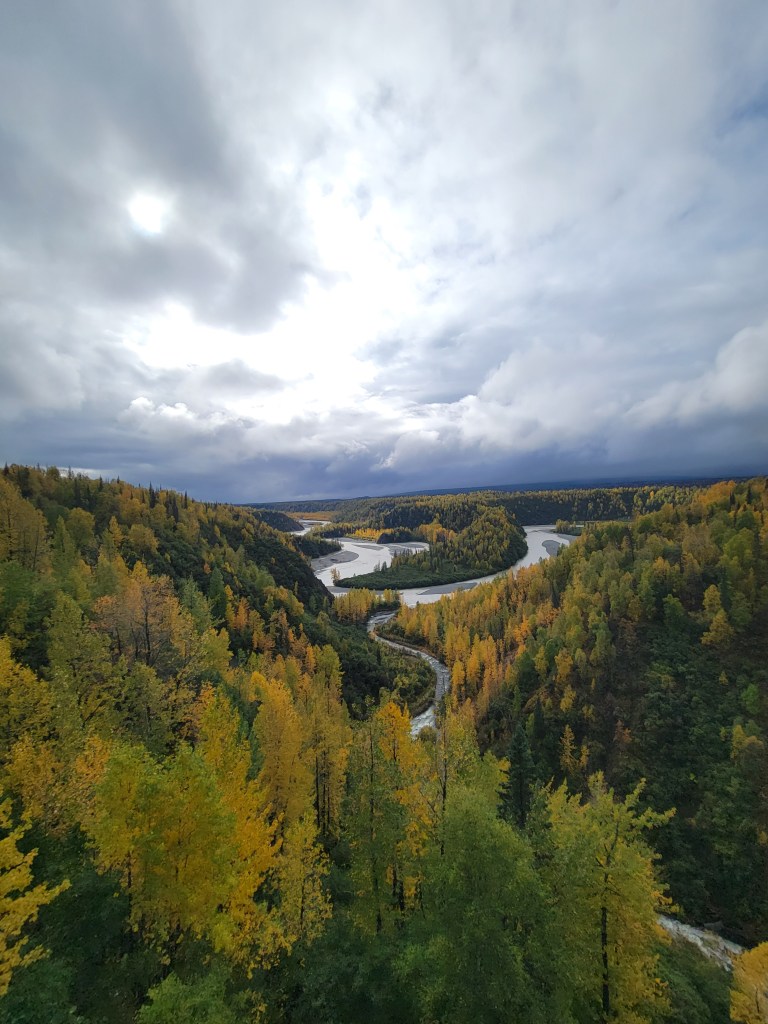
These are some more photos that we took while we were in Alaska last month. After our cruise, we took a land tour and went on a train ride that took us up to Denali Park. We had a good day to take a 3 mile hike one day and ran into someone that took our photo and we took their photo too!
I will be back later to share some photos of the stamp retreat I just came back from! Always lots of fun and great to see my crafty friends! Thanks for stopping by today!
Challenges:
Retro Rubber – #rrcb242 Fall by the Lake (all products are at least 3 yrs old)
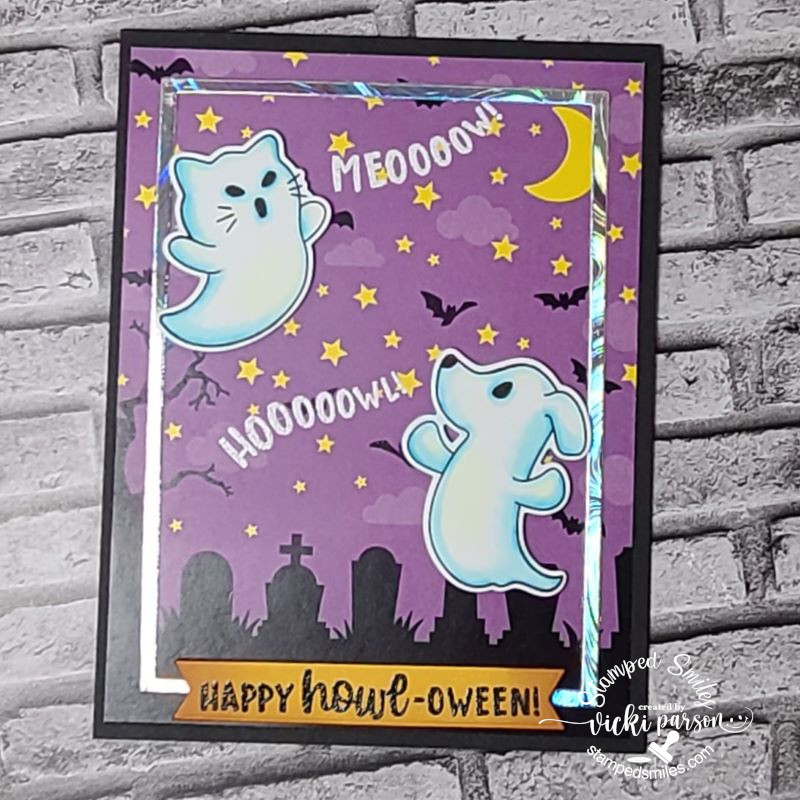
Hello friends! Tomorrow is Halloween and so I thought I’d share some cards that I’ve made that were sent out to people.
The dog and cat ghosts are too cute from Newton’s Nook! I love their “howling”! Not much to color and I’ve used the dies to cut them out and pop over the background with the paper pad from NN as well. I heat embossed the sentiment over a die cut banner and then added a frame around the edges with some holographic paper.
I made this for someone who loves Halloween almost as much as I do and also has both a dog and cat. The cat’s name is Spooky! LOL
And here’s another card I’ve made using some Taylored Expressions products. I first ink blended the background in a couple of blue tones with dark blue around the edges and then splattered some silver watercolor for the stars. I used a layered moon stencil to the moon effect and then die cut the witch in glitter black cardstock. The sentiment was white heat embossed and cut out with a banner die. I’ve also used another frame of the holographic cardstock.
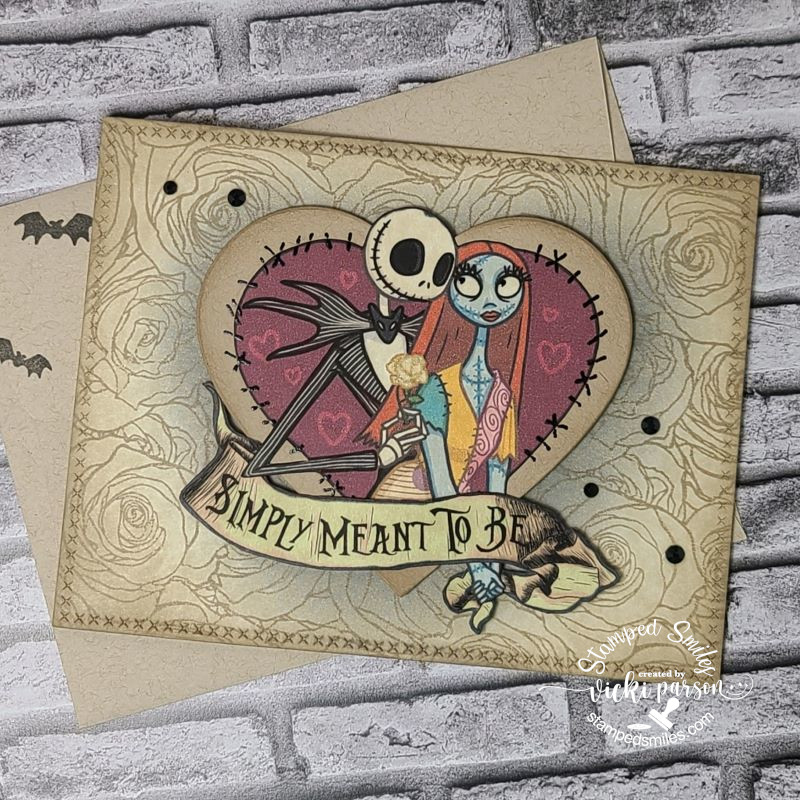
And last but not least, I’ve made this card and not necessarily for Halloween, but this was made for my husband’s anniversary card. We’ve been married 24 years and we both feel the same about Halloween/spooky things! LOL I found these fun digital images from Etsy to print out and then I fussy cut part of one to add to another. I stamped the background with a background stamp I had covered with roses and blended some inks around the heart. I also added some black gems around it and covered the rose “Jack” is holding with a glitter pen.
Hope you’ve enjoyed my post today! Thanks for dropping in and I hope you all have a wonderfully fun and spooky Halloween!👻
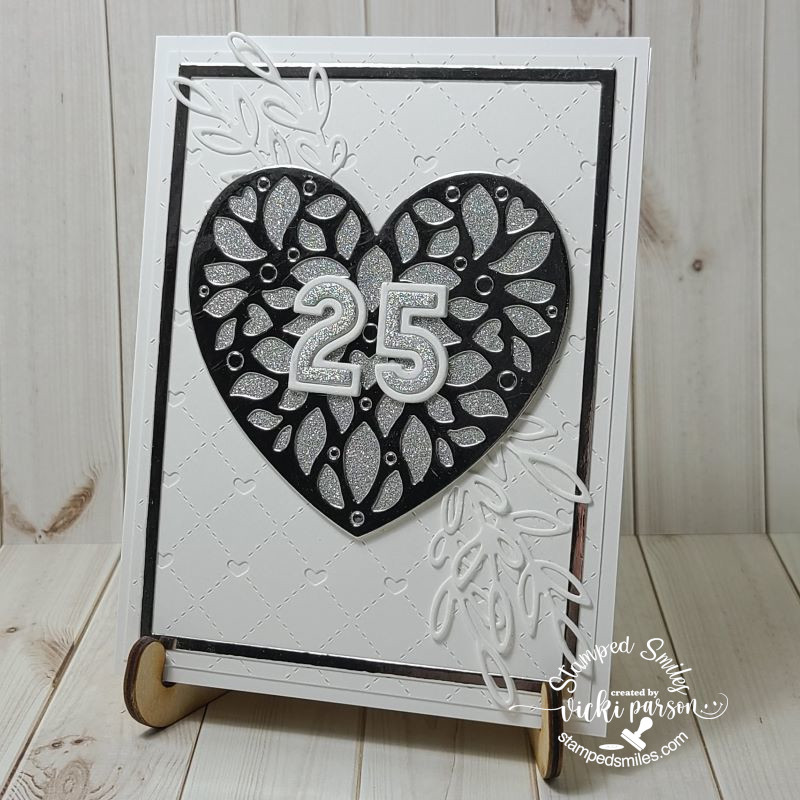
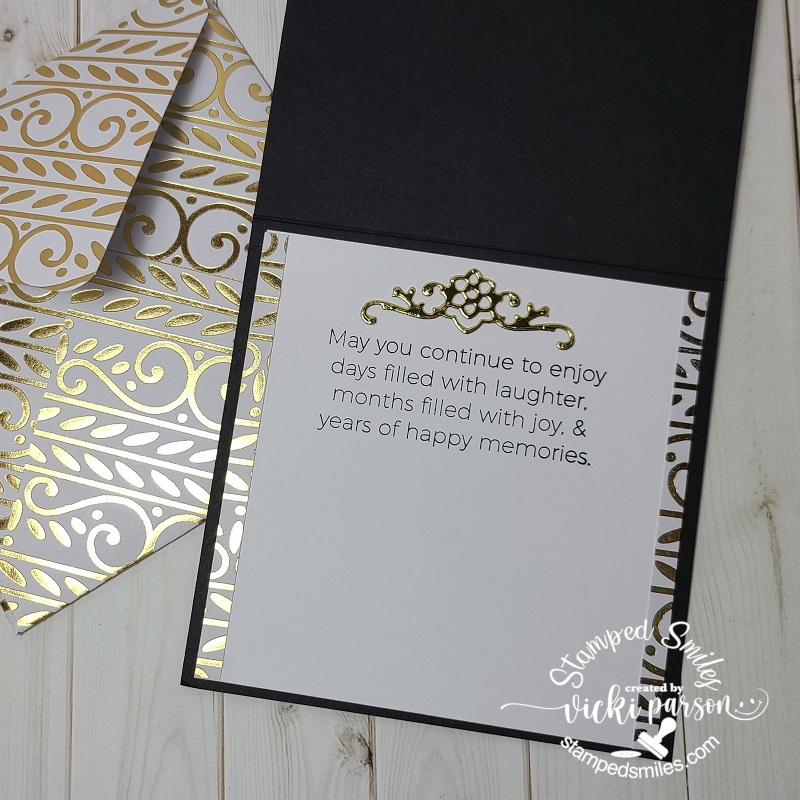
Hello friends! Hope you’re having a great week so far! Now that I’m back from a very short break, I wanted to share a special anniversary card that I made for a couple celebrating their 25th:
I always think these are so fun to make with die-cutting and layers. There was no stamping involved except for the inside you can see in the photo below.
All products I’ve used are from Taylored Expressions. The gorgeous heart came from the Forever Love Die Set cut out with both glitter and mirror silver cardstock. I left those circle dots inside the heart because I liked them better intact. The number were cut from the TE Cap It Off Numbers die set in white and silver glitter. (I just attached them over the heart.) Underneath the heart layers, I’ve cut out white sprigs from the TE Subtle Sprigs die set and tucked them underneath.
For the background layers: I’ve cut out a panel that went through the TE Stitched with Love Cutting Plateand layered that over an A2 side folding white card base. To help bring out the silver, I’ve also cut a frame piece from the TE A2 Thin Frame Cutting Plate in the size I wanted to add detail to the design.
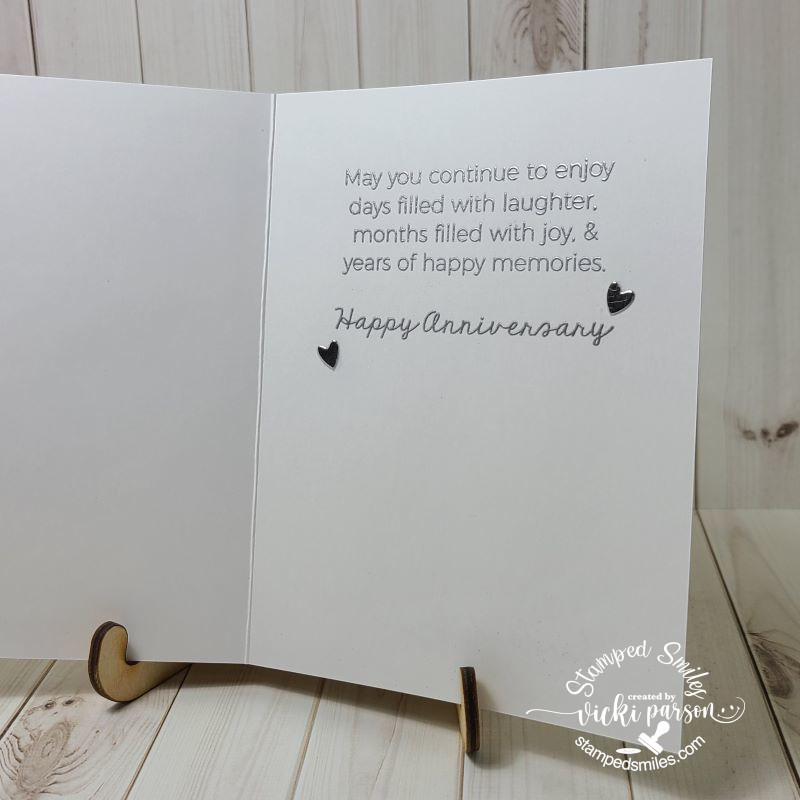
This is the inside of the card where I have silver heat embossed the sentiment from the TE The Inside Scoop-Anniversary stamp set. I took a couple of the silver mirror hearts that were cut from the larger heart on the front of the card and attached them to the inside.
Hope that you’ve enjoyed my card today or been inspired! Thanks so much for stopping by!
Hello friends! Hope that you’ve had a wonderful Valentine’s Day and a great start to this new week in February!
I’m really excited to share that I’ve just been invited as a new design team member over at the Sparkles Monthly Challenge Blog! I really like the fact that it has fun monthly themes to get you thinking and also that I can use up my never-ending piles of my own craft stash! This fits perfectly well with me and something I can handle!😉 So I hope you’ll stop by and follow along to play with us each month! You can find a new one on the 15th of each month.
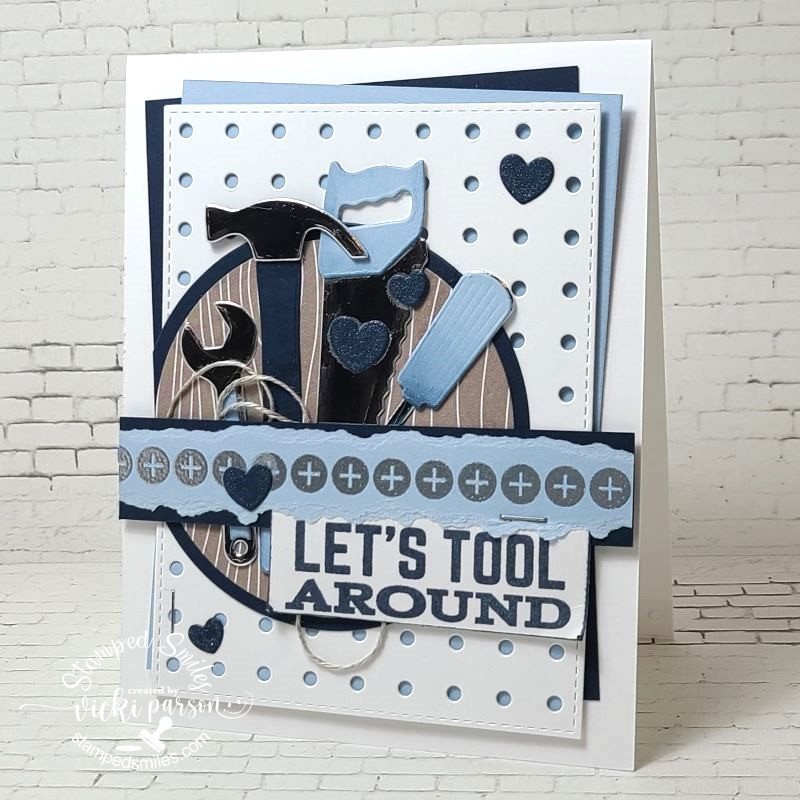
Today starts a new monthly challenge theme which is #161 “Men Only“…so anything masculine will do! With having sons in my family, I’m always in need of masculine style cards for sure! Here’s my card for this month’s challenge:
Oh yes…tools! This always seems to be a favorite in my craft supply when creating a masculine card for sure! I made this one for my husband who’s a very handy guy, and he likes the color blue. I always like to add lots of textures, distressing and layers when making a masculine card. This also helps for using more of those craft supplies!
I’ve had these stamps and dies from My Favorite Things for quite a while now and only used them a couple of times. I die cut the background panel in the pegboard cover die and stitched rectangle dies, plus, layered with a couple of different blue panels that were stapled together. A die cut circle in woodgrain and blue papers were attached and cut off at the edge before attaching to the top folding white A2 card base.
I’ve added the die cut tool elements over top of the circle using some silver mirror and blue colored cardstocks to cut them out. I added some sponged ink over some places and topped it with a ripped strip of silver embossed screw heads, a strip of dark blue and the stamped sentiment stapled together and placed it over top with a piece of “messy” thread. Lastly, I added the dark blue die cut hearts and covered them with a glitter brush pen.
I hope that you will stop by the Sparkles Monthly Challenge Blog to check out the challenge and inspiration from the creative design team! I look forward to seeing what everyone creates!
Thanks so much for stopping in and I’ll see you soon!
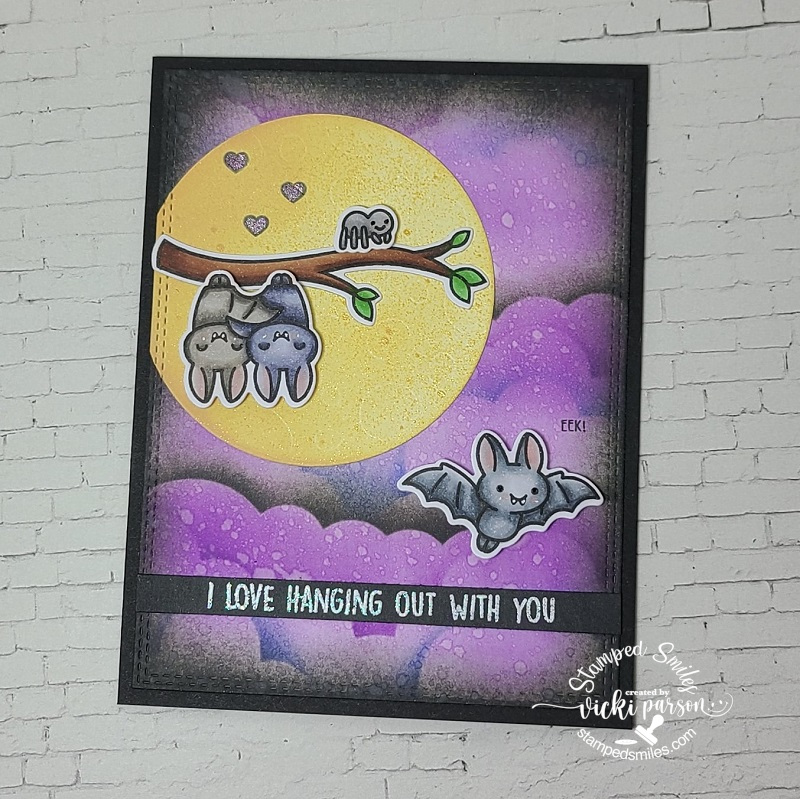
Hello friends! I wanted to share the anniversary card I made for hubby this year. Now that I’m posting this (without him knowing), I think I made a bat style card last year too! It just happens to fit with this time of the year and we got married close to Halloween…so it works, right?!😉 I’m just thankful that we BOTH like Halloween!
So, I fell in love with these cute cuddly bats (Yep, I said that!) from Lawn Fawn called Fangtastic Friends. I stamped, colored and die cut out the images that I wanted before I started to work on the background.
For the background, I pulled out a cloud stenciled and mixed purple, black and blue oxide inks to blend in a night sky. I spritzed it with water for the water droplets. I then die cut the full moon from the LF Full Moon die set and then used some Distress Mica Stain Harvest Moon and sprayed over it, so it has a bit of a shimmer to it. I placed it where I wanted to go over my sky background and then cut them both out with a double-stitched rectangle die and attached the panel to a side folding A2 black card base. (The sentiment strip was added before attaching)
The sentiment was heat embossed over a black strip of cardstock using some white glitter embossing powder.
I attached this strip at the bottom of the sky panel and cut off each end. I added the rest of the elements and images to my scene and stamped the “eek!” by the bat on the right and a couple of hearts on the moon above the hanging couple. I added some shimmer to the hearts with a purple glitter gel pen.
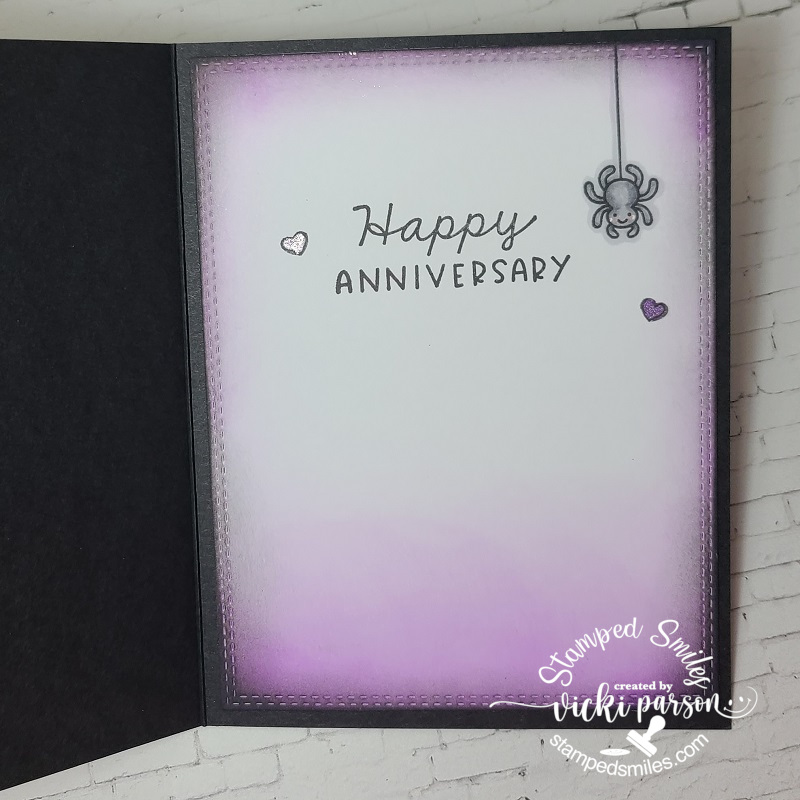
I thought I would share the inside of the card with the stamped hanging spider, the sentiment and the hearts I stamped around it with some more of the purple glitter gel pen coloring. I also used some purple and black distress oxide inks to blend around the edges of my white inside panel which was also cut out with the double-stitched rectangle die.
I certainly do love hanging out with my husband, but hopefully not in the manner on the card!😅
We’re enjoying time together right now as this has been scheduled to post, so I hope you enjoy and thanks for dropping in! I’ll see you soon!
Hello friends! I hope you’re having a great week! We got a tiny break from the hot weather, so I had to spend the last few days enjoying it and was happy to get away from being indoors! Now as the temps climb back up, it’s time to get busy and craft some more!😃
As promised, I’m catching up with my postings to share the wedding invites, thank you cards and special wedding card I made from my son’s June wedding. I made them a few months back, obviously, but I thought it would be nice to condense it altogether here in one posting.
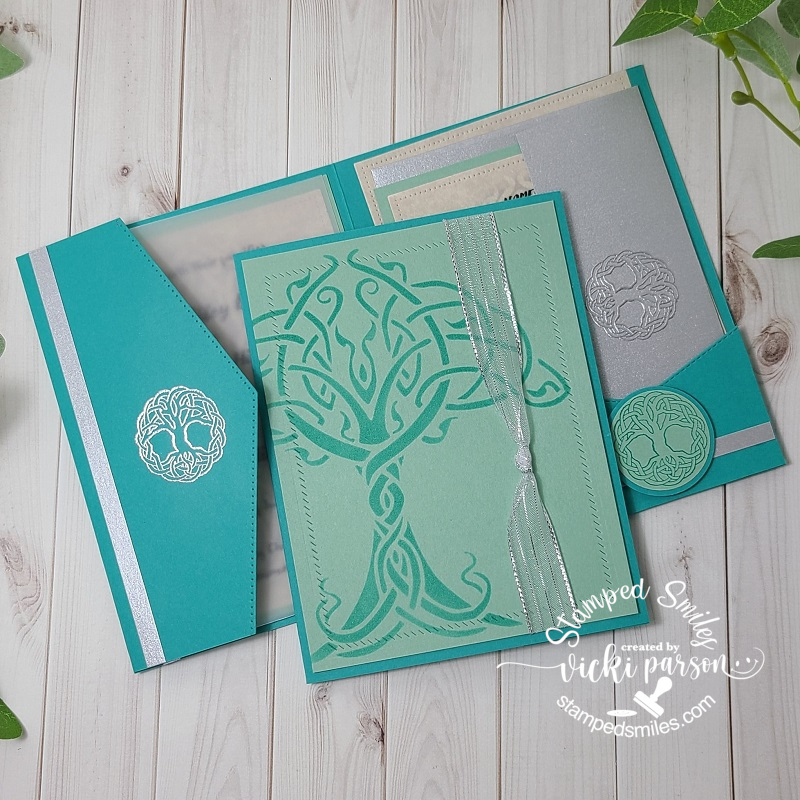
The couple had asked for me to make their invites for them and of course it was a great honor to be able to do that for them. I was given a photo of an image and was educated about the “Tree of Life” to incorporate that into a design as well as a sample of some color shades. Making a total of 50, here’s what I came up with:
I was able to find some similar Stampin’ Up! colors that closely resembled the samples given and come up with Bermuda Bay and Mint Macaron for the design. I wanted both the ink and cardstock colors and worked it out from there.
For the base of the design, I’ve used the darker Bermuda Bay and on the front panel, I used a piece of Mint Macaron with a stenciled “tree of life” over top of it with Bermuda Bay ink. I actually found a fairly inexpensive stencil on Amazon and thought it looked very similar to the image I was given and thought it would be perfect for the front with a partial side off the edge. I never inked up 50 panels before, but this stencil certainly got a workout! I was thinking it needed a bit more to it than just the stenciling, but I didn’t want to do too much with having 50 to make! I took the Taylored Expressions Diagonal Stitched Rectangle die to impress a design around the edge, wrapped silver ribbon around the front with the knot and layered it over the front of the invite.
So being happy with that, the hardest task was to figure out the inside details….
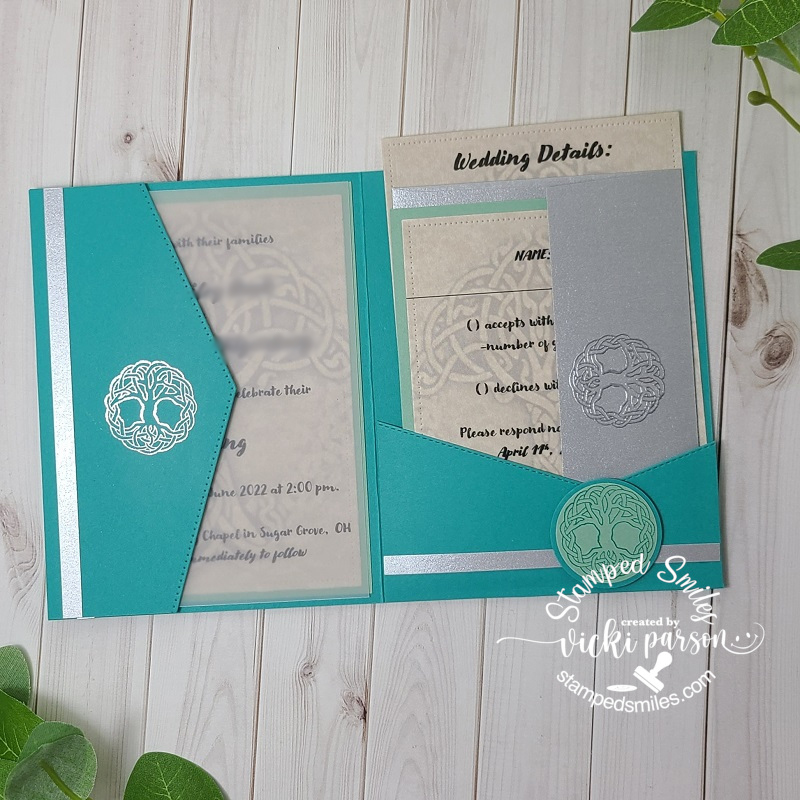
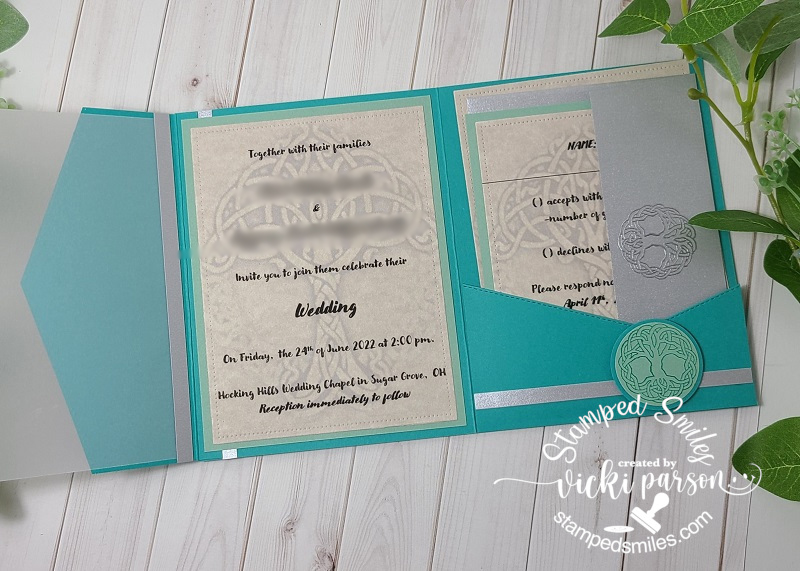
I wanted to make the inside a portfolio style with a pocket containing the wedding details as well as the RSVP/envelope inside and then the actual “announcement” on the other side. As I was piecing it together, I thought a decorative flap with some vellum would be pretty over the announcement too.
I’ve used the Stampin’ Up! Basic Borders die set to die cut the pocket front as well as the vellum flap on the left side. I had to adhere two Bermuda Bay card panels together and cut out the areas I didn’t need. (I ended up using the left over pieces to punch out a circle layer. To add a bit more of a decorative detail, I cut strips of silver cardstock as well as silver heat emboss the “tree of life” circle stamp. (I was happy to also find this really inexpensive rubber stamp image for a couple of dollars to use for this too!) For the image on the pocket area, it was stamped with Bermuda Bay over the Mint Macaron cardstock, layered with that left over Bermuda Bay circle punched pieces and popped up with foam squares over the silver strip. I was happy with how the portfolio design was working.
And now once you open up the vellum flap on the left side, you will see the announcement portion. The silver strips were strategically placed to cover up where all of the layers are glued/attached together, but still looks like it “belongs” there. The image that was given to me via digital photo was used at the “back drop” behind the wording. It was a very bright image that I altered on my computer and muted it down so that it was faded in the background, but yet still clearly visible on the design. I thought it worked out nicely and still coordinated with the stenciled area on the front.
Because this invite was so thick in nature, I didn’t want to add more layers of cardstock, so I used a thinner parchment style copy paper as everything was printed out from the computer anyway. The parchment made it feel a bit more professional I thought. I die cut ALL of the printed parchment pieces with a Lawn Fawn RETIRED Small Dotted Rectangle dies. (I thought the “small dots” went with the SU! edges I used on the flaps.) I placed the announcement over a piece of Mint Macaron and then layered it inside the card. I layered the RSVP card over a piece of Mint Macaron and the “wedding details” card was left on its own.
Finally, you can see that on the silver envelope flaps, I silver heat embossed the image. This was also done for the larger silver envelopes for the whole invite to fit in as well. I even used the “Tree of Life” computer generated image to create some address sticker labels for them and give them extras ones to use.
Of course, after the wedding, you need to send out the thank you cards, so I also made 50 of those….
I really didn’t want to event a new wheel with it, so I had plenty of cardstock colors and just repeated the same design on the front as I did with the invites except for this one, I used the Taylored Expressions On Occasion stamps. I stamped them out with the Bermuda Bay over the Mint Macaron cardstock, cut it out with the coordinating dies and popped it up with foam tape over the silver ribbon. Stenciling another 50 panels with this same stencil gave it another work out yet!
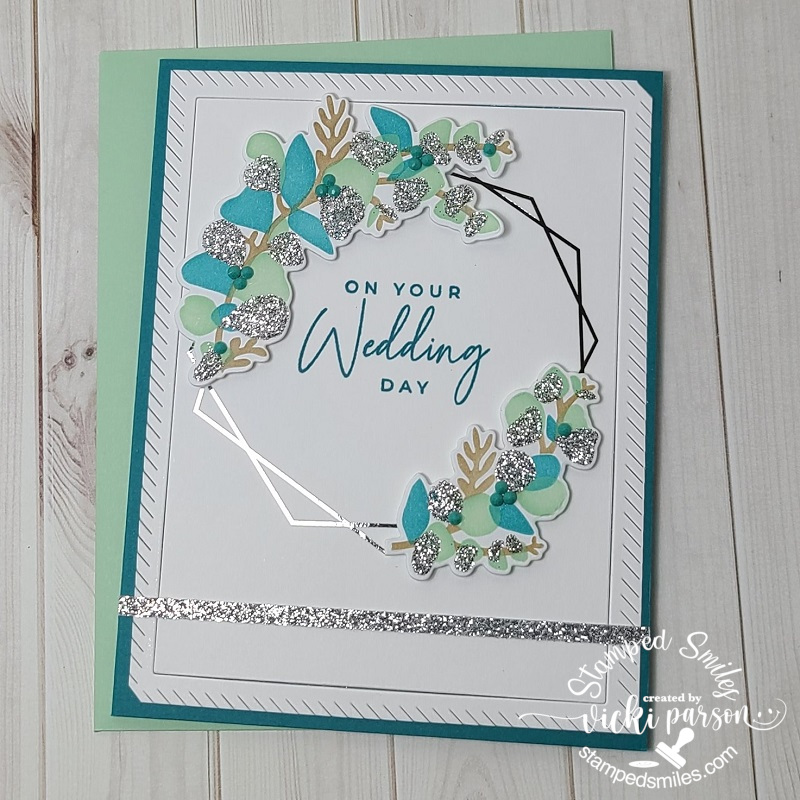
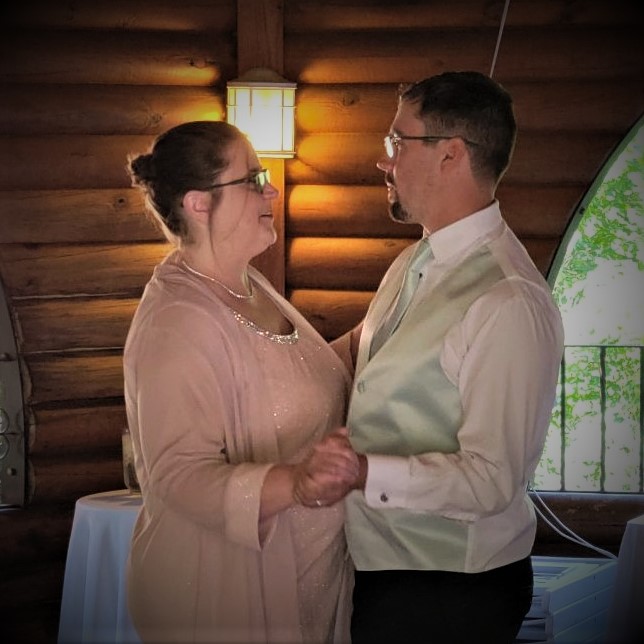
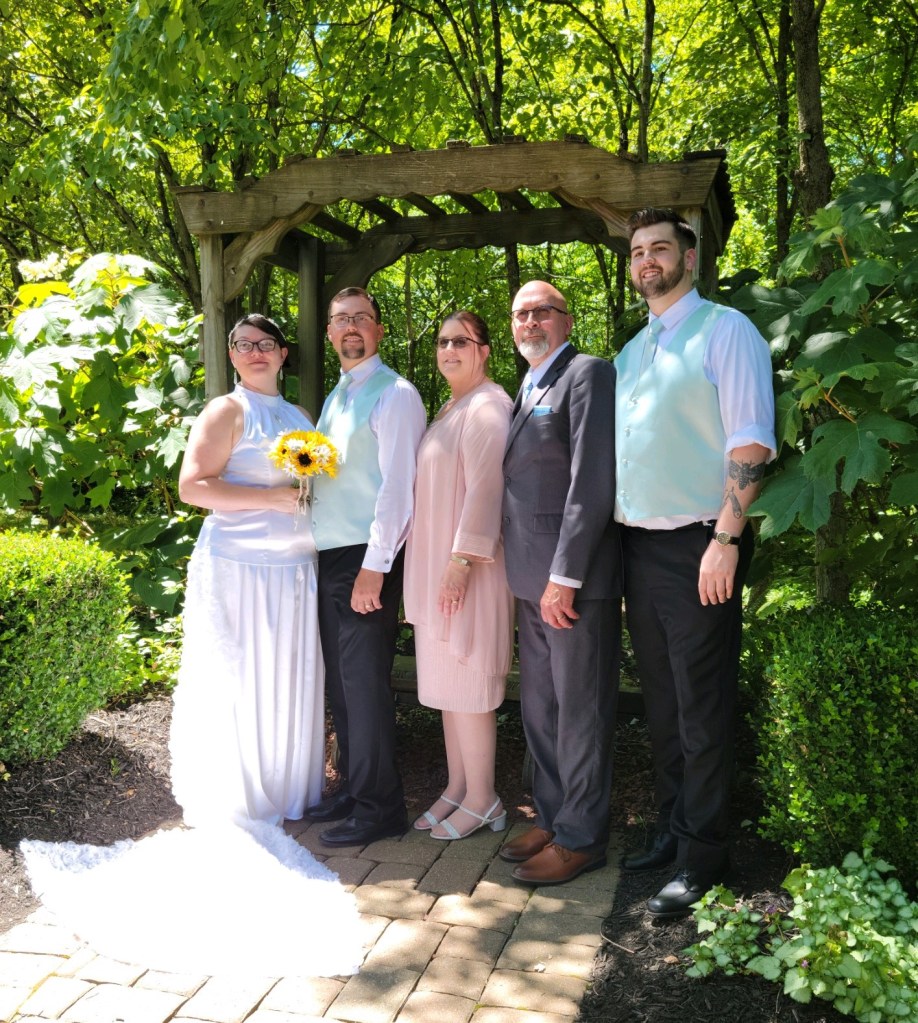
So, for the actual day of their wedding, this is the card I made FOR the couple. I was able to get a little more “intense” with this one as it was only ONE card!
I was so excited when I saw this stunning card kit come out from Taylored Expressions called “Modern Eucalyptus” (no longer available) and I thought it was the perfect colors to create something with for their wedding. The white panel was silver foiled and then I stenciled the colors of the wreath pieces, stenciled some silver paste, die cut them out and popped them up over the foiled wreath. I stamped the sentiment in the center, added some TE Tiny Diamonds to some areas and cut a strip of silver glitter cardstock to go across the bottom.
Around the edge of the panel, I used a free gift that I got with purchasing items and tried it out and on my panel without realizing that it cut the center. I went ahead and attached it down anyway as I liked the decorative look to it. I had a matching envelope and off we went to the wedding!!!!!
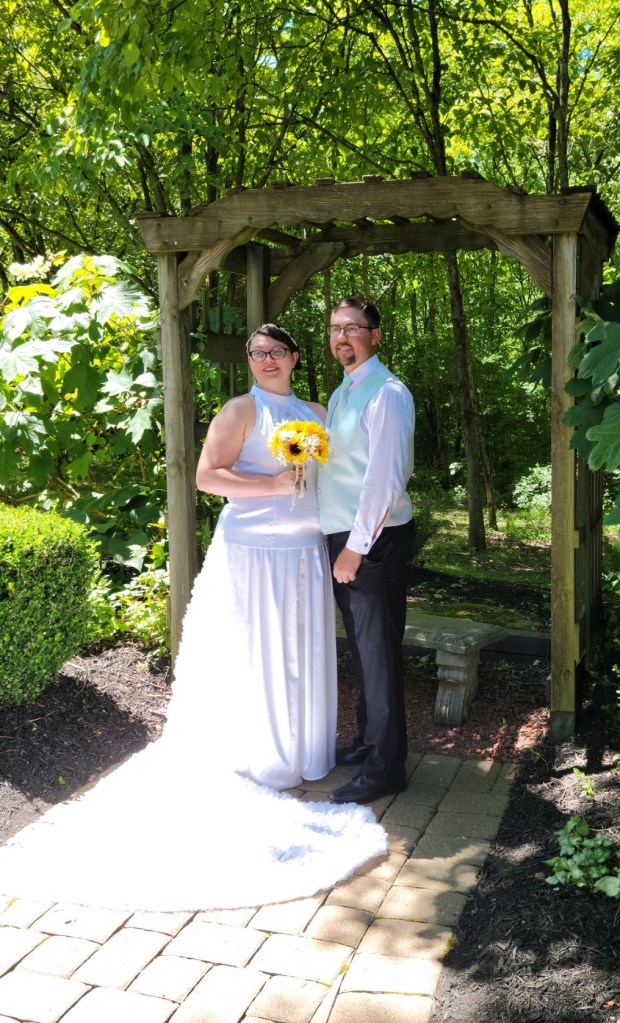
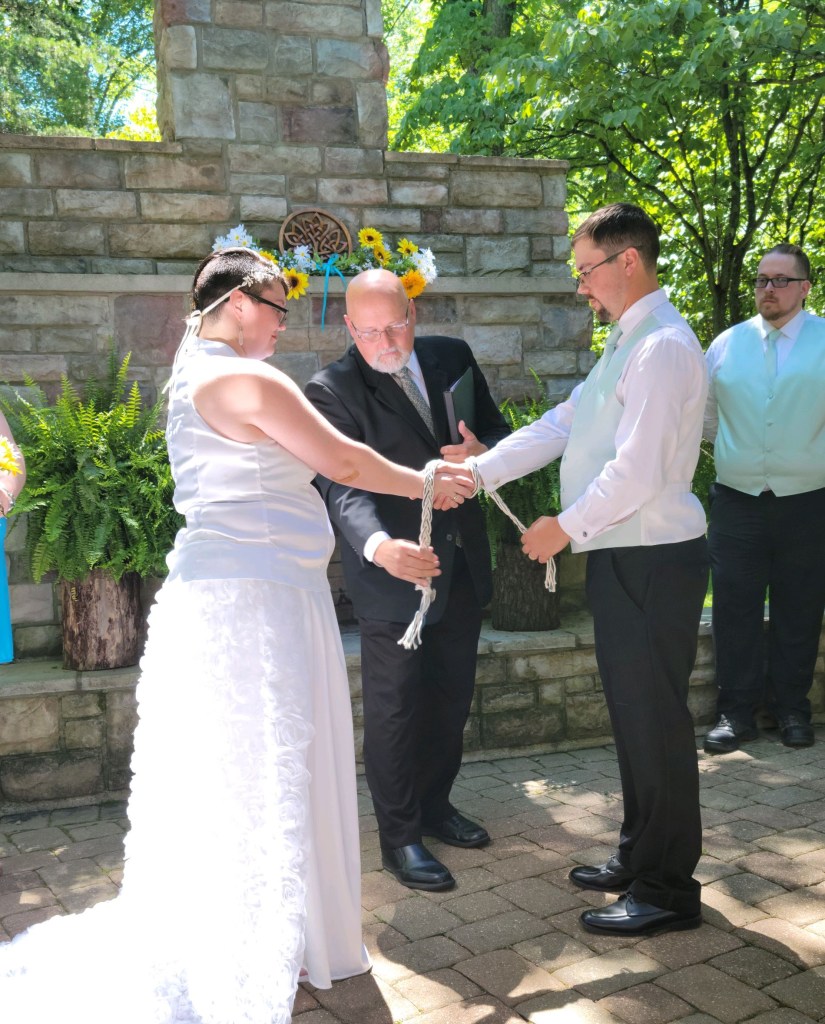
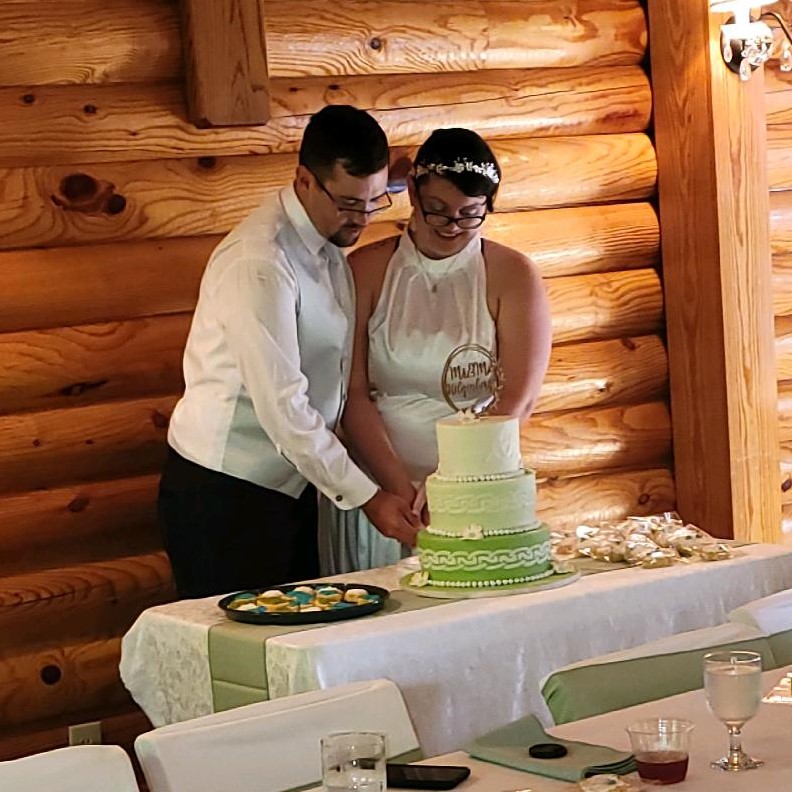
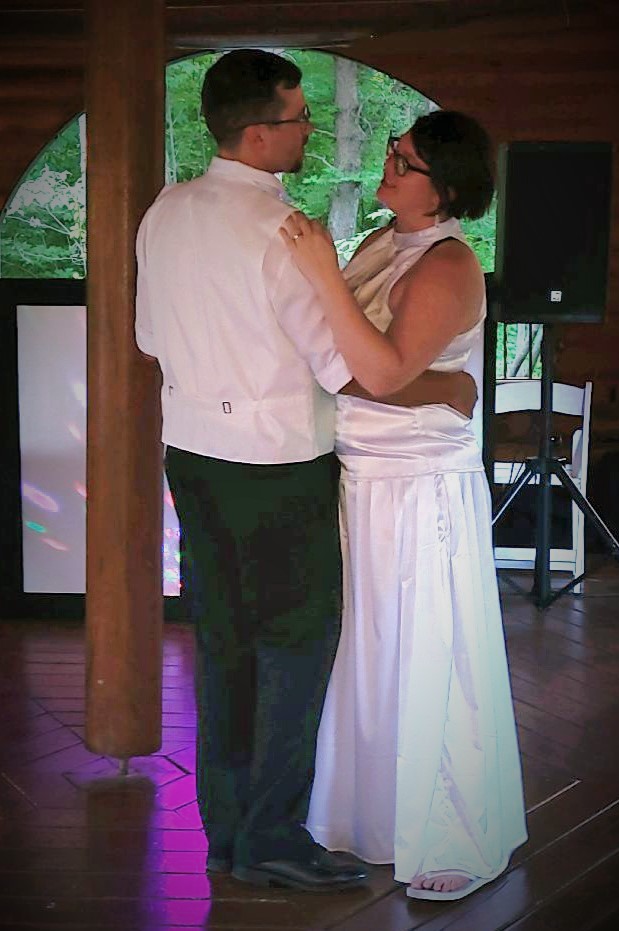
The couple was married in Hocking Hills (Ohio State Park area) and it was absolutely beautiful over there! The venue they used only had a certain capacity limit and so this is why there were only 50 invitations that went out. It was a very nice private wedding with everything done and organized for them. I do not have any professional photos of the wedding as of yet, but I had to rely on my husband for taking a few photos on his phone and then handing the phone to someone for photos as well…my dress didn’t allow me for handy phone carrying. LOL But here a just a few photos (not professional) of the wedding.
As being a first time “mom of the groom”, it is quite an experience and very emotional especially when my son picks out a song for our dance with a song I used to sing to him as a baby in my belly! We both had tears!! LOL It was such a joyous occasion and I’m thrilled to welcome our new family into our lives for years to come! May they always feel the joy and love together for ever after!
Hope you’ve enjoyed my wedding post today and have been inspired in some way to brighten your day. I thank you so much for taking the time to stop in and say hello! It means so much to me! See you soon!
Challenges:
Crafty Friends – Embossing Wet/Dry (heat embossed on invites)
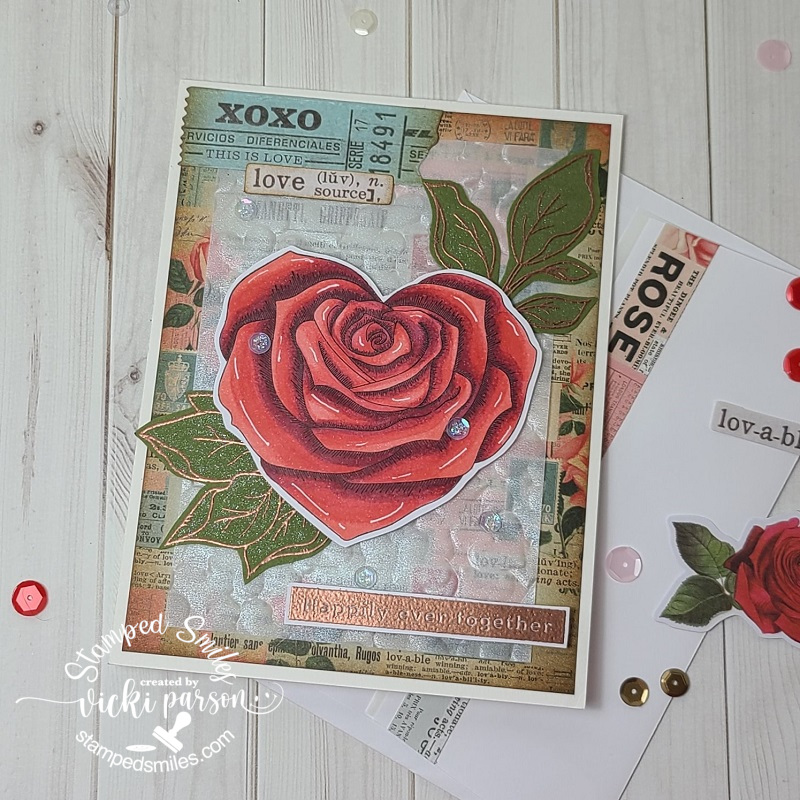
Hello friends and happy February! I feel like we just started a new year and it’s already into the second month! I will need to get going on a couple of Valentine cards really soon! Today, I wanted to share a card I had made for my parent’s 57th wedding anniversary along with a few other anniversary cards I was commissioned to make that I had forgotten to share until I made my parent’s card! LOL!
I really like how this one turned out! If this looks familiar to you, then you may recognize it from a past Simon Says Stamp card kit. (This one came from a Valentine 2020 kit.) I thought that the papers in the kit looked “Vintage” and I really liked that, so I thought I’d try to go for that style in my card.
I used the heart rose stamp image from the kit and colored it with Copics and fussy cut it out. I also copper heat embossed the leaves from the stamp set included in the kit over some green cardstock and fussy cut those out as well. The sentiment was also from the same set as the leaves, and I copper heat embossed that for the bottom right corner of the card. It’s hard to see from the shine, but it says: “Happily ever together” and was fussy cut as well.
I started with the Vintage looking papers and cut a piece down to size and inked up along the edges with Vintage Photo distress ink and layered it over a side folding A2 white card base. I pulled out a piece of shimmer vellum that I ran through a Sizzix 3D heart embossing folder and layered it over top of the background. I also took some of the ephemera from the kit and added those to parts of the background after sponging the edges of that too. (See the “ticket” in the top left.)
Finally, I arranged the heat embossed leaves along with the heart shaped rose over top. I glued the leaves and then popped up the rose with foam tape along with the heat embossed sentiment. I added some shimmer to the leaves with a shimmer brush pen and then took some sequins from the kit to attach over the card and filled with Stickles glitter.
I think this would be a special Valentine card as well for someone! 😉
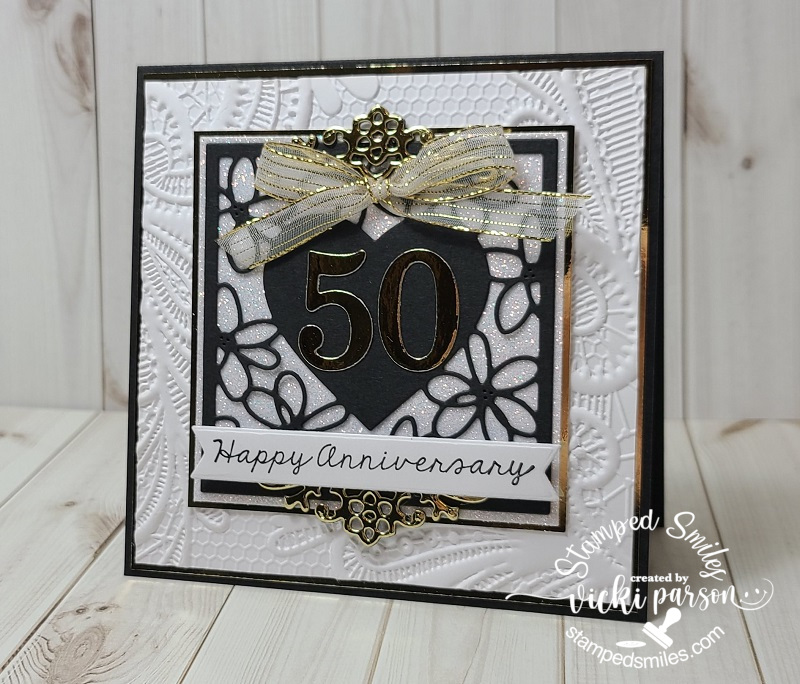
At the end of last year, I was also commissioned to make a 50th wedding anniversary card for someone. I was just given the detail that the wedding photos were shown with the colors black and white…so I based my card using that idea.
I always think that wedding/anniversary style cards look especially elegant with die cuts and embossing, so I dig through my die cut and embossing folder stash. I’m sure you can imagine me sitting on the floor with things everywhere! LOL!! Do you do this too when you’re not sure what you want to do and/or what all you have?
So I found this really pretty Memory Box die cut with the heart in the center that I wanted to use and thought some glitter paper behind it would be so pretty. This is why my card is a square shaped design. Since it was celebrating 50 years, I thought it would be appropriate to add some gold in there too and die cut the numbers for the center of the heart as well at the border pieces on the top and bottom of the heart. (Not sure where that die came from as it’s old. The number dies are really old too!)
I layered this onto the glitter paper and gold foil paper. I stamped a sentiment (Taylored Expressions-The Inside Scoop Anniversary used both inside and out of card.) and die cut it out with a banner die and popped it up under the heart with foam tape. I layered this onto a white 3D embossed background that was layered over a black top folding square card base. I attached a gold ribbon bow over top.
I stamped a sentiment for the inside of the card and you can see that I’ve decorated the inside of the card using the same die cut border with gold foil cardstock. The papers I’ve used for the borders on the inside were also used to create a custom envelope for this card. Sometimes if I don’t have the envelope on hand, I make my own envelope. Sometimes I prefer to do this for special cards anyway.
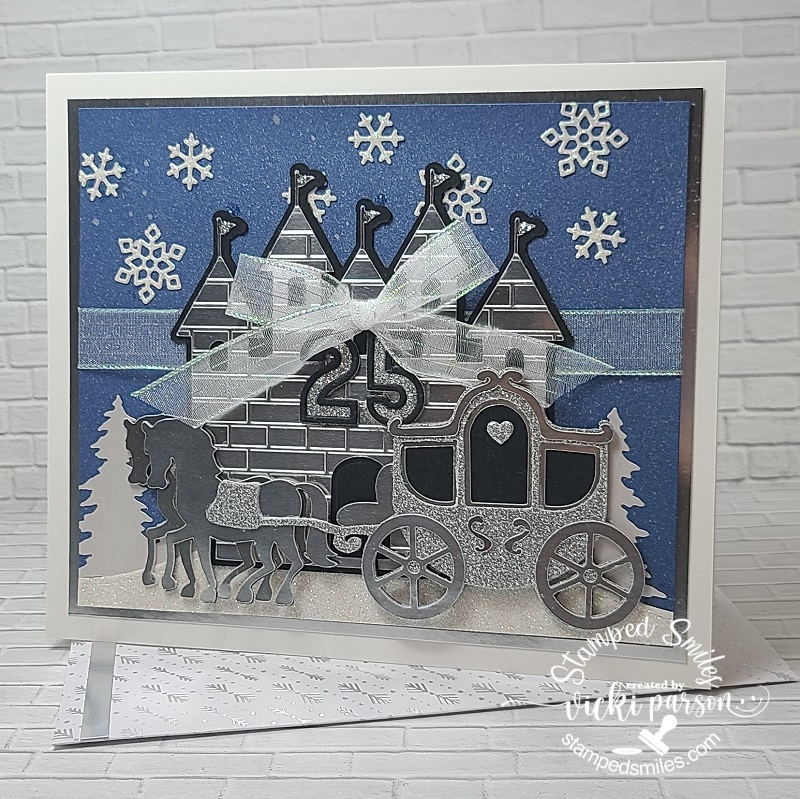
And this is another card that I had been commissioned to do for someone that wanted a card for an anniversary on Christmas Eve. I was given the detail about them spending time at Disney World and seem to be a fan of Disney along with it being their 25th anniversary…so my card was based on those details.
I have no Disney character type stamps/products at all. My thought was to create something with a “winter/Fairytale” theme which is why I turned to my Cricut machine for help. I was lucky enough to find the carriage and horse image that I cut out using brushed metallic silver and silver glitter cardstock for the different pieces. I also found a castle image that I cut from the brushed metallic silver as well. I used black cardstock for the base and insides of the cut-out images. After I cut out the castle, I ran it through a brick embossing folder to give it that brick castle look. I also die cut the numbers from Taylored Expressions Cap It Off Numbers dies. I attached the numbers in the center of the castle and attached a silver ribbon bow over top of the numbers.
Since I had my main cut out images for my card, I was able to create my scene and size based on those. My finished card measures approx. 7″ x 5″ which is not a regular size for me, but I thought it was fitting given the type of card it was along with the cut-out images. I started with a piece of blue cardstock and generously sprayed it with some Pearlescent Cosmic Shimmer previously received from a class I took. It gives a really stunning look, and the shimmer doesn’t show very well from the photo either. Once dried, I die cut both the snowflakes and snow border at the bottom from some white glitter cardstock. Both dies used for them come from Lawn Fawn. The trees behind the bottom snow border were cut from some pearl white paper with an older Stampin’ Up! die set in my stash.
I attached the sprayed blue background over a piece of silver metallic cardstock after wrapping a silver ribbon around the center. I then attached the trees and added the snow border at the bottom. I added the castle and snowflakes next being careful that everything was showing the way I wanted and then I popped up the carriage with foam tape.
This whole scene was placed over a white 7 x 5 top folding card base. I also took some silver glitter to add to the little flag ends on the castle. I thought with all of the glitter and shimmer it didn’t need any more embellishment! I was happy with how it turned out because I wasn’t quite sure it would!
There was a custom envelope that was also made for this card using some pretty silver pattern paper from my stash.
Everyone seemed to be pretty pleased with how the cards turned out for them and I was very happy to have had the privilege of being a part of someone’s special day too!
Speaking of wedding anniversaries, I’ve been given the honor to create wedding invites for my son’s wedding coming up this Summer and I know I’ll be getting really busy putting those together as well! So that will be coming up really fast and I hope I can keep up with things! LOL
Thanks so much for stopping in today! I hope that you’ve enjoyed my creations or been inspired in some way! See you soon!
Happy Friday friends! We’re now upon Halloween weekend!🎃 Are you ready?! Lots of candy on hand to give out and some to enjoy for yourself…check. Scary movies at the ready…check. Ready for lots of fun before the weekend ends!
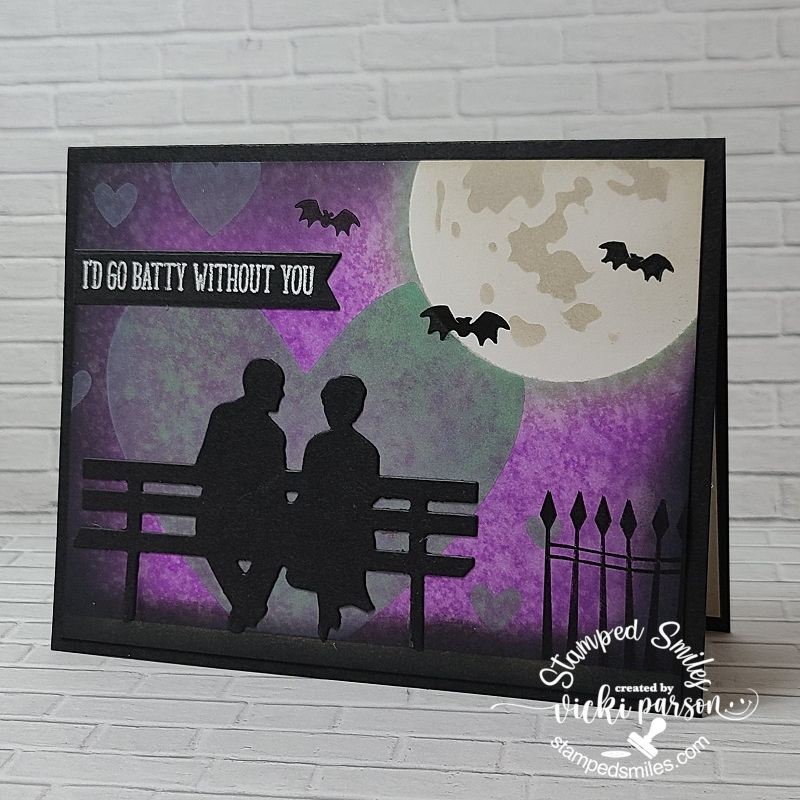
Not really sure exactly where my love for Halloween comes from, but I love it so much that even my wedding anniversary comes real close too! So today is our 22nd year anniversary and I couldn’t have made it in this crazy life without my “Boo”! I’ve made a card to let him know how I feel:
And yes, this is probably something we would certainly be doing under that moon as we’ve done before including watching bats fly around in the sky! We do weird and wonderful things which is just ONE of the gazillion reasons why I love him so! I’ve made a card with a bit of a “love/Halloween” theme. I’m not sure I’ve ever really made a Halloween style card for him before, but I know this will make total sense for him and he’ll get a kick out it.
Started with the background using some Oxide ink blending keeping careful with leaving the “moon” area clean. I sprayed water over top of the purplish/black background for that texture and then took a Taylored Expressions heart stencil over the background and introduced another color of oxide ink. I ink blended the edges and bottom with black. I have a Tim Holtz “Moon Mask” to create the moon with…which makes it super easy! I stamped the fence at the bottom right and the bats with black ink. The couple on the bench (TE “Love Story” die) was die cut from black cardstock and glued in the center of the large heart. Lastly, I white heat embossed the sentiment over another piece of black cardstock and cut it out with a sentiment banner attached to the top left edge.
It’s really a simple card, but I loved creating the background with a “spooky love” feel that I know he’ll like too!
And since we’re going “all batty” here, I thought I’d share my creation that I’ve made for this months’ Inky Stamper challenge using a recycled item! I thought this might be a good opportunity to create a fun treat! I took an empty paper towel holder to cut a 2″ tall container with a handle and covered it with some Doodlebug papers. I layered some trim and ribbon around it and added a punched-out circle for the bottom.
I’ve used the Inky Stamper Bat stamp set for the bat that I’ve stamped, colored and die cut for the front of my treat holder. I’ve cut out a stamped sentiment banner to tie onto the handle. Really easy and fun to create! You could get about 5 containers per empty roll which I thought was a lot!
I sure hope you’ve enjoyed my “BATTY” makes today and I wish you a very frightfully FUN weekend!
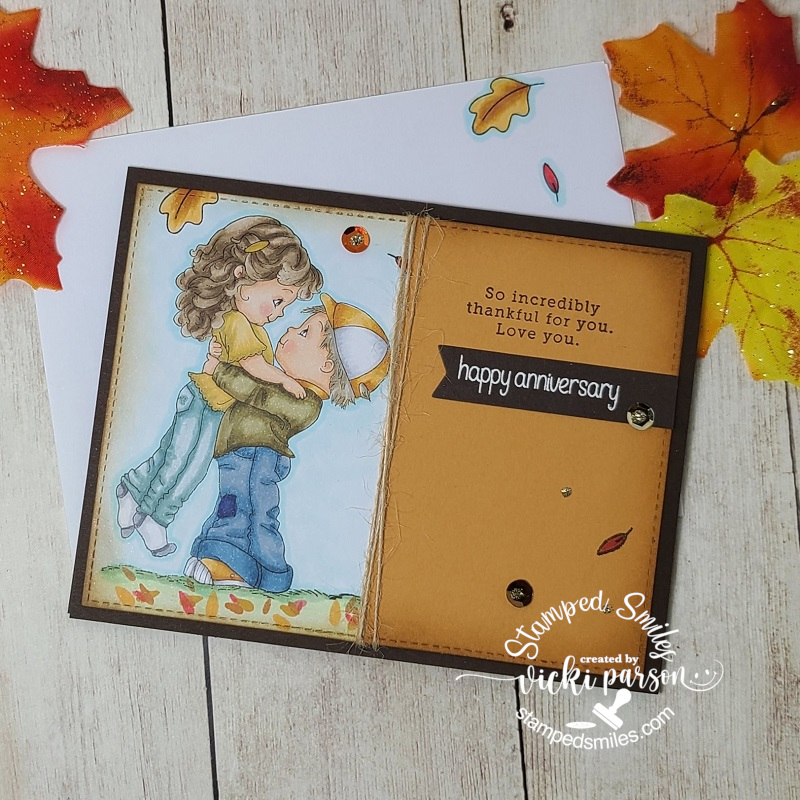
Hello friends! It’s been so cold over my way and even snowed the other day which is a tad bit early for this time of the year. I’m still trying to hold onto to Fall a bit longer as I know that the Holiday/Winter Season will be approaching us very quickly now! It seems that Autumn never gets it’s due justice and goes by so fast!🍂
I’m popping in today to share a card I’ve made for hubby to help celebrate our special day of 21 years together🥰:
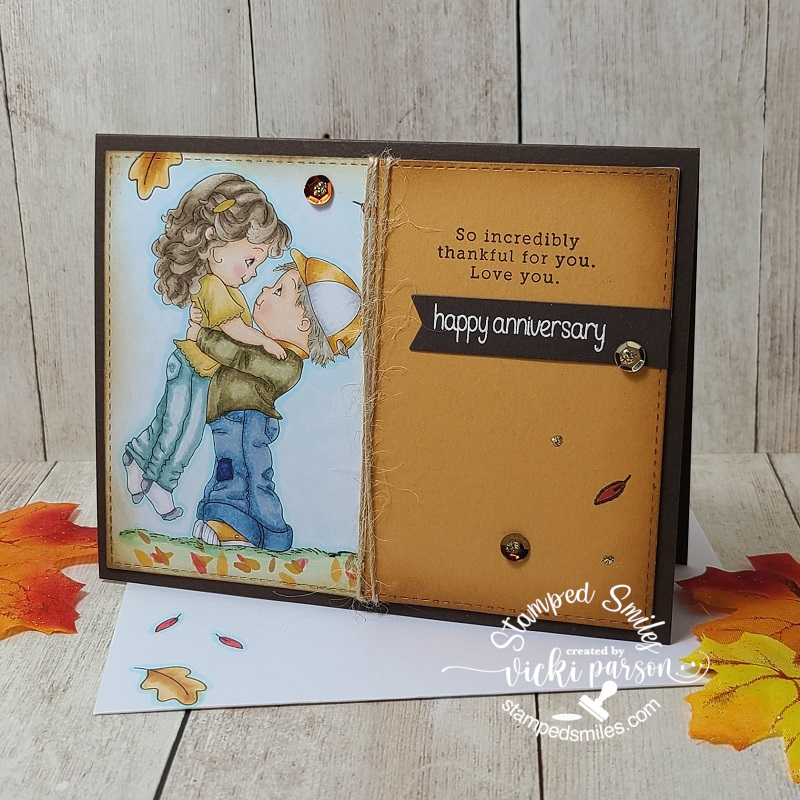
I adore this sweet image by Crissy Armstrong for Whimsy Stamps called “Your Love Lifts Me” as I thought it was a great representation of how I feel about hubby and how I wanted it to reflect on my card for him. He will have already received this card by the time this posts…so it’s OK if he sees this!😉
I’ve stamped the image over a panel of Copic Blending Card off to one side of it and then cut it out with a stitched rectangle die. I took a piece of orange colored cardstock and used the same die to cut it with, but I cut this piece in half, stamped the sentiment over it and sponged around the edges of it with some Vintage Photo Distress ink. I also took the Whimsy Stamps Everyday Mini Sentiments set and white heat embossed it over a piece of brown cardstock that was cut out with the Whimsy Stamps Quick Strips die setand attached underneath the sentiment and cut off at the edge.
The few leaves over the design was stamped from an older Simon Says Stamp set and colored with Copics. I then added some more Vintage Photo sponged around the image panel and attached the orange sentiment panel over top of the colored image panel and wrapped some twine around the center of it. I layered this panel over top of an A2 sized top folding brown card base. I’ve added some sequins filled with gold Stickles in the center along with a few more dots.
Here’s a closer look at the Copic coloring I’ve done over the image. I’ve kept it pretty simple and decided I didn’t want to add white dots to their cheeks like I usually do. I don’t know why there are times I do and times I don’t. This time it just seemed to call for none.
I used a light blue marker to color in the background and then with the same colors that I’ve used to color in the leaves, I took the markers and made my own leaves on the ground surrounding the couple. I even stamped some more of the leaves on the inside of the card as well as the envelope and colored them.
I hope you’ve enjoyed my Autumn Anniversary card today as I sure had fun colored this sweet image.
I’m very lucky to have such a wonderful person to share my life with in the past 21 years and look forward to our times together in the future. Thank you for stopping in today friends! See you soon!
Hello friends! I hope that you and your loved ones are healthy. I also hope that you are having some inspirational crafty fun during this time. Crafting is a great way to create and send some smiles to someone as well! Let’s keep those smiles going!!
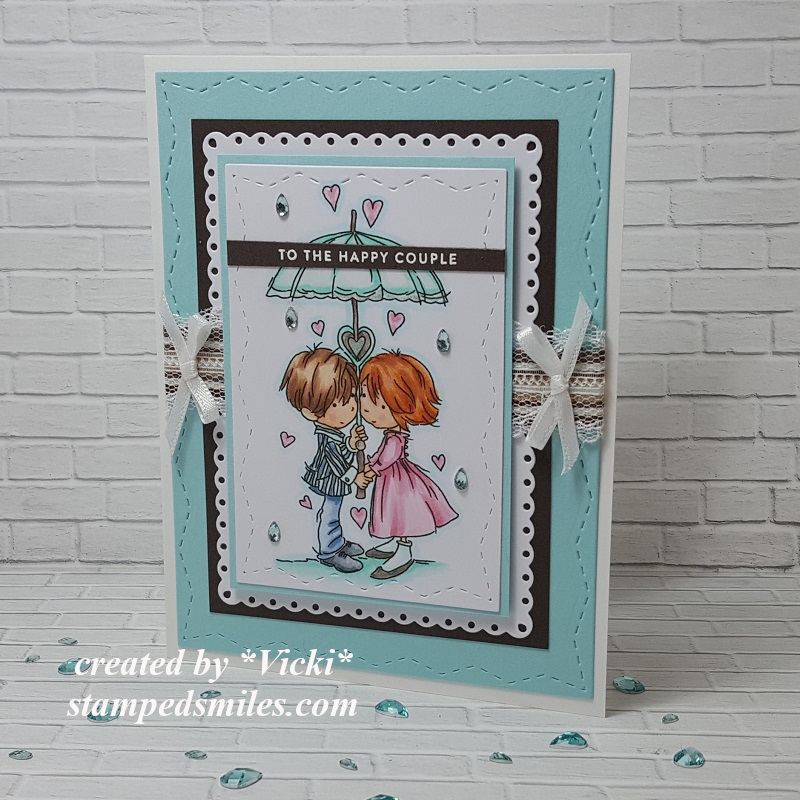
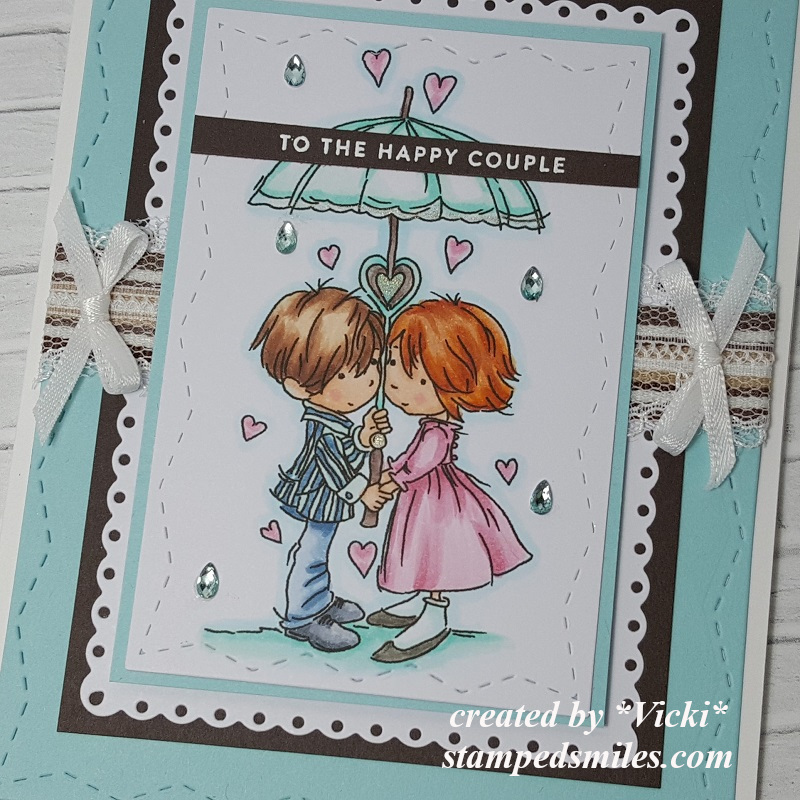
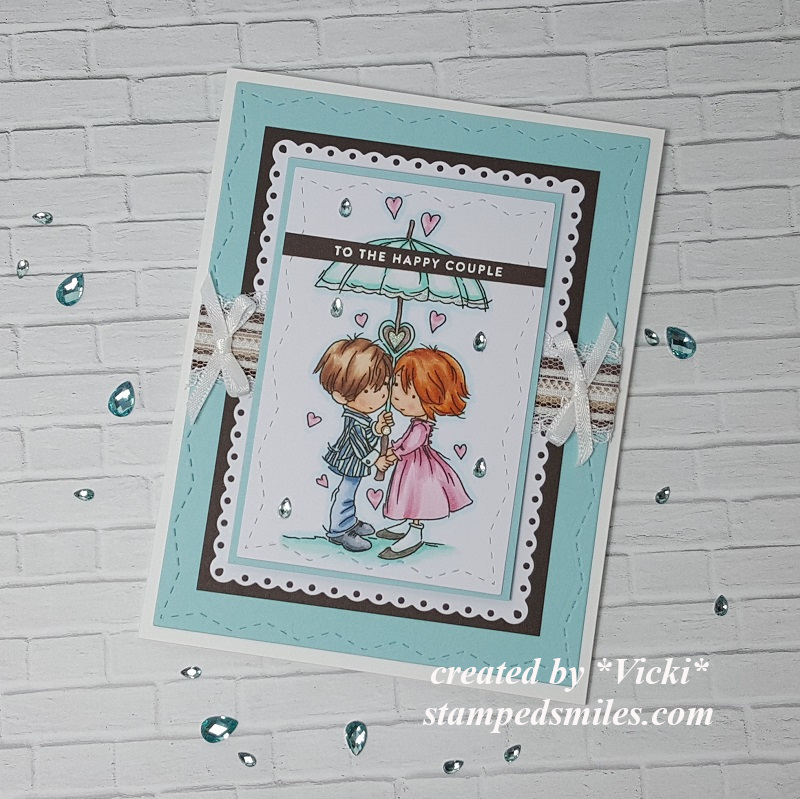
Today I have another card that I made for the same son that had his birthday from my last post. He was also recently engaged and I’m so happy for them both! Here’s the card that I sent to them:
I had seen this image came out from Lilly of the Valley last month and just fell in love with it! I knew it would be perfect to use for this occasion! It’s called Showered With Love and I’ve printed it out, colored with Copic markers and then cut it out using the Whimsy Stamps Zig Zag Stitched Rectangles Die set and then layered it over some light blue card stock.
I popped up this image panel with craft foam over a piece of white cardstock that was die cut from a Lawn Fawn Fancy Scalloped Rectangle die and then layered over a piece of dark brown card stock. I then attached these layers over another piece of light blue cardstock with the same Whimsy Stamps Zig Zag Stitched Rectangles Die set.
Before attaching the image layer onto the light blue panel, I took a sentiment from the Simon Says Stamp Tiny Words and white heat embossed it over a dark brown strip. I also added some ribbon and lace around the light blue card front panel before attaching the popped up image panel. Lastly, I’ve added some Nuvo rhinestone water droplets.
Here’s a closer look at the coloring I’ve done on this couple. I’ve tried to keep the hair color likeness to the real life individuals. Hard to see in the photo of course, but I’ve covered the hearts with a glitter pen for shimmer and the trim on the umbrella as well as the center of the heart on the umbrella and part of the handle were colored in with a clear glitter pen which also gives a bit more shimmer to it.
For the inside of the card, I’ve added a computer generated sentiment that said “Congratulations! Wishing you a love together that can outlast any type of weather.” and also created a pocket that held a gift card inside.
I hope you’ve enjoyed my card today and have been inspired in some way! Thanks so much for dropping in today! I appreciate you being here with me! See you soon!