Facing Fear With Art Journaling

Happy weekend!  Hope you’re weekend is going great!  I’ve been wanting to start doing some art journaling again because I used to do lots of it years ago on a previous blog I had before this one.  The only one I had recently done was in 2020 on THIS POST.  For me, creating AJ pages gives the freedom to “explore” different media, use more of my stash or even TRY things that I would never do otherwise.  I’m always inspired with other people’s AJ pages, but just need to start doing it again!  It’s nothing that I would ever give away, it’s just something for me personally to create.  I find it’s a HUGE stress reliever too!

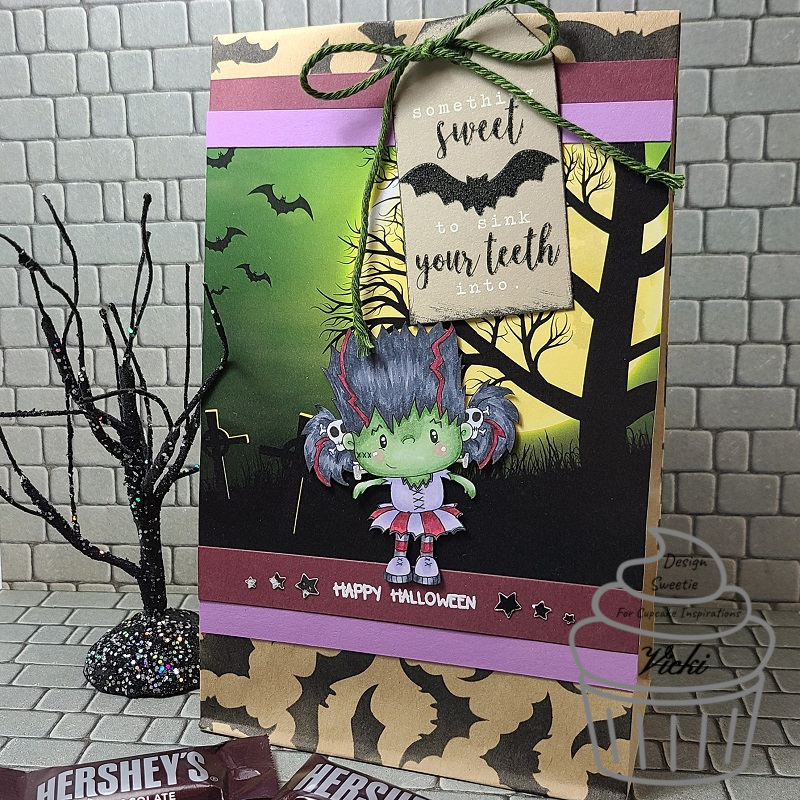
I’ve decided to play along with a couple of challenges.  (shown below post) One was about “adding a face” to your AJ page and something that I decided to do was to actually trace half of a face over some vellum paper. (I used a micro pen for tracing) I don’t draw anything at all…which is why I love stamps!  So, I had a go at “facing fear” to start this year with an AJ page!

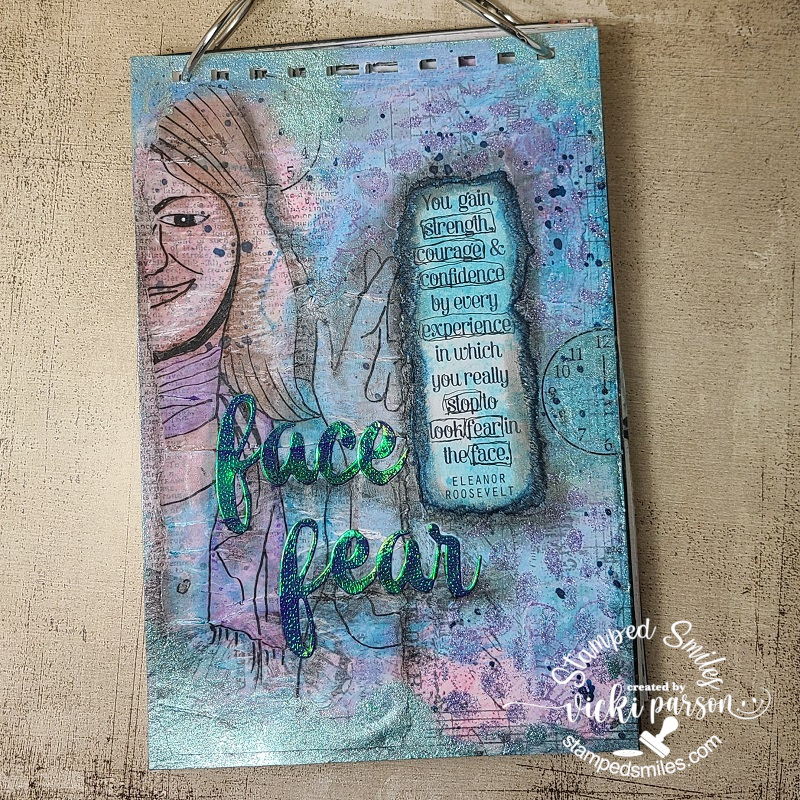
As you can see, I’m making my own AJ book and there are actually 7 other finished pages underneath this one. These are the pages I had previously done and hadn’t kept up on my book.  The size is 6″ x 9″, and I always punch the holes at the top before I get started putting anything on it. (I’ve used heavy weight watercolor paper) I wanted the face tracing to “show through” what was underneath, so I took ripped up strips from left over collage pieces I had previously made, I also added some text print and acrylic paint colors over it.  I’ve used DecoArt media fluid acrylics to blend colors and DecoArt media shimmer mister for some splatters.  I’ve also taken a stencil with some Taylored Expressions purple glitter Happy Medium gel paste in certain areas.  Once I’ve gotten the background build up a bit, I layered over the face tracing.  I wasn’t really happy with the crackling of the vellum, but it added some fun texture.

I also took one of those ripped collage pieces and stamped the quote from Eleanor Roosevelt with Archival Black ink and layered next to the vellum face with matte medium.  And since I’ve used matte medium to attach all of my elements, I took out my Faber-Castell Pitt big brush markers to add some color to the vellum tracing, around the edges of it and around the edges of the ripped stamped sentiment.  I took some foiled cardstock and die cut the “face fear” letters from an Altenew die set I had in my stash.  I also added some shading with my markers under the letters too.

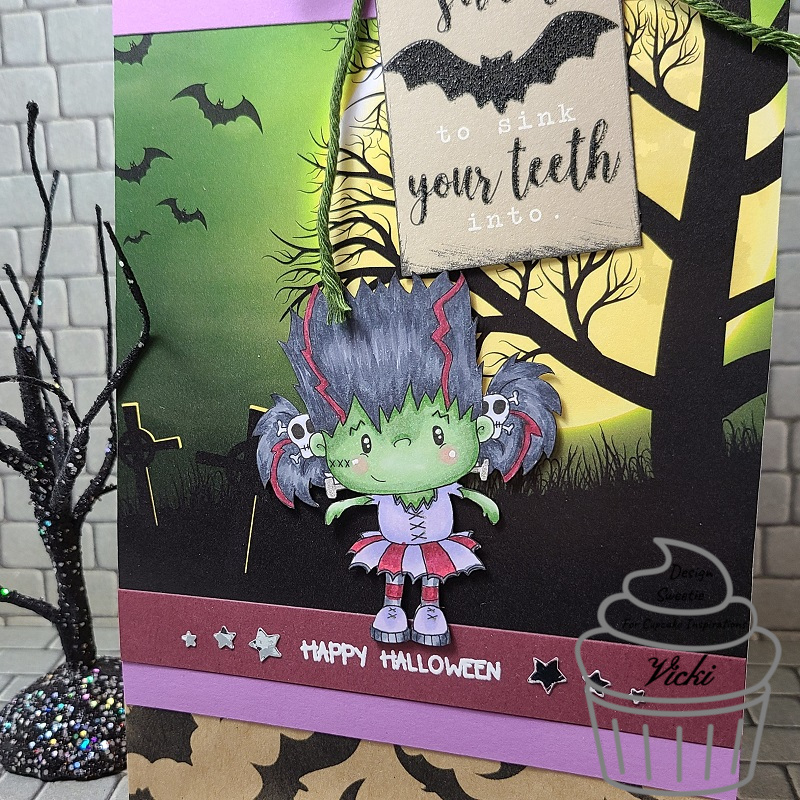
In the close-up photo, you can see the bits of sparkle and shimmer on it a bit more!

Some of the words in the quote were doodled around using a micro pen.  I had a rub-on clock face in my stash, so I rubbed half of it on one place, moved it and rubbed the other half in another spot so as not to waste it.  I thought I needed to add a bit more shimmer, so I took some Art Alchemy Sparks acrylic paint and brushed it on randomly in places.  I love the pretty shimmer of this paint!  (You can really see it around the edges in the top photo)

Something a bit different from me today, but hope you’ve enjoyed it or been inspired in some way!  I’m hoping to try to create a page each month.  Thanks so much for stopping by and have a great rest of your weekend!

Challenges:

  1. *Art Journal Journey – Let’s Face It!
  2. Country View – A Year to Sparkle & Shine
  3. Mixed Media Lovers – Anything Goes Mixed Media
  4. Try it On Tuesday – Add a Quote

Creating Calendars…Do You Need One?

Hello friends!  How are you dealing with the 2022 year so far?  I hope that you have a fantastic start and look forward to a brilliant and crafty future ahead of you!  Speaking of starting a New Year, I realized that I needed to start my crafty calendars…which really should’ve been started sooner!🙄  I actually enjoy putting them together, especially the coloring as it’s very relaxing for me.

I’ve had this set of calendar cards along with this stand since this last Spring from Taylored Expressions and of course I’ve waited until recently to get them finished up!  I’m glad I did though as I think these will be so fun to look at and chuckle to change out each month:

Tee hee!  What got me interested in Taylored Expressions from the start were these adorable and funny Grumpy characters that she has in one of her product lines!  (You may have seen a “Grumpy” calendar I’ve made in the past on THIS POST.)  She has LOTS of different types of calendars and accessories to choose from, but this is a set that had come out this past year.  I thought this would be a fun way to help motivate me this year for creative inspiration!😁

I’ve taken a white piece of cardstock cut to size my calendar stand that would accommodate the tear-off calendar pad and hold the “snarky cards” in place with the gold clip.  I’ve used some TE inks and blender brushes to blend over top of the white piece.  I then used the TE Striped Squares stencil to go over it using the same colors and then mounted this piece over a black cardstock layer.  (This piece and the changeable cards are held to the stand with the gold clip.)

Here are all of the completed cards in the set that I can change out each month or whenever I want.  I’ve used the TE Clipboard Calendar Cards-Snarky for my own personal calendar that I’ve colored up with Copic markers.  The frames were colored with coordinating colors that matched up with the rainbow stenciled background for my calendar front.  Really enjoyed coloring and giggling while making this set!

I also wanted to show you the back side of this TE Walnut Wood Clipboard Stand so that you can see how I store all of the extra cards on my calendar when I need to change one out.  You can choose to add a package of the TE Calendar Storage Sleeves with the stand if you get one, but I thought this whole system was a nice and sturdy option of creating a calendar that you can personalize for yourself or for a gift.  I ended up creating a calendar last year for Mother’s Day and gave it as a gift. I used the TE Clipboard Calendar Cards-Sweet for that one and did some foiling on them.  (Just don’t forget to purchase the next year’s tear-off calendars to replenish the recipient for next year!)


And I also wanted another calendar for my computer area which also brings a smile to me each month!  I bought a calendar set last year from Inky Stamper and really enjoyed flipping the cute characters each month as the year went on.  Happily, she came out with another new calendar set for this year and I happily purchased it BEFORE it ran out! (So sadly, it sold out quickly!)

With these calendar kits, the stand, the monthly calendar cards as well as all of the pattern paper strips, stamped and die cut characters and sentiment strips ALL come with this kit!  I think it’s a pretty good bargain for all that was included with it.  Of course, you have to color and put together each card…but THAT’S what the fun is about!  

And here’s a look at the entire set of calendar cards that I colored and put together.  There were instructions for each card along with the Copic markers used in the examples.  For some of the cards, I already owned the stamp set, so I added a few extra details to some of them and I also added a few of my Inky Stamper Gems and Sequins mixes to some of them.  Square dots and a strip of gold enamel dots were also included to decorate with.

So, I had an awesome time putting this one together as well!  I look forward to seeing every single month throughout the entire year!


Since I had a couple of left over Taylored Expressions 2022 Tear-Off calendars, I thought it would be fun to just create a “calendar card stand” for crafters and give them out to whoever wants one!

EDITED UPDATE:  All of the calendars have been claimed!  Sorry if you’re looking to get one as I have no more left.  Hope everyone enjoys their calendar all crafty year!

So, I had 5 of these calendars left over and I knew I wasn’t going to use them, but of course I didn’t want to just throw them out either!  So, I took the TE Big Grumpy Bear and the TE Big Grumpy Cat sets to help motivate a fellow craft friend throughout the year! TEE HEE!  I’ve made a rainbow-colored background for these by taking the TE Art From the Heart background stamp and stamping it with black over a white piece of cardstock.  I used some TE ink and blender brushes to blend in the rainbow colors.  I stamped an extra background image to color in some of the images and fussy cut them out for accents.

I attached the “Grumpies” over the background and layered the calendar with a black layered piece behind it to go over top of the “Grumpies” with their “feet” underneath so you can see them.  I then added the fussy cut out images that I colored in a corner of each one.

I made a “stand” for this by creating a valley fold piece to attach in between the top folding A2 black card base.  This will make for a permanent stand to display your calendar through the year! (And hopefully motivate someone’s crafty process throughout the year) I receive so much inspiration from many of you crafty friends, so it would be nice if I could possibly reciprocate that in some way!

Check out each one of these calendars I’ve made below in detail!  Just click on the photos to enlarge them if you’re on my website:


So now that we’ve got the year started and in place, let’s hope for a really creative and productive one ahead!

I have some more craft projects that I’ve been working on as well as a really BIG craft project that I’m taking on for the love and excitement of it all!  I look forward to sharing with you soon!

Thanks for stopping in and I wish you a happy, healthy and productive rest of your week!

Challenges:

  1. Sweet Stampin’ – NEW (stamped New Year calendars with new products!)
  2. Critter Crazy – Anything Goes + critter
  3. Creative Inspirations – Anything Goes
  4. River of Creativity – Anything Goes
  5. Penny’s Paper-Crafty – Anything Goes using paper
  6. CRAFT – New (New Year calendars with new products!)
  7. Creative Fingers – Anything Goes
  8. Colour Crazy Craft – Anything Goes + coloring

What? It’s Christmas Already?!

Hey there friends!  Wow, so my last post was Thanksgiving and I pretty much missed the entire month of December it seems like, right?!  It has been a very crazy month with lots of different things (including personal) going on so pardon me for going MIA!

I HAVE been working on some projects here and there and I would be happy to share those, but for right now, let’s focus on the Christmas projects that I’ve been working on getting ready for the up-coming Holiday next week! 

I have already sent out my Christmas cards, thank goodness, as I wasn’t even sure that was going to happen either!  I was very impressed with the new Taylored Expressions Create-in-Quads Mistletoe Layering Stencil and how quickly I was able to knock out 4 card panels at a time, which was a huge time saver to get my Christmas cards finished up!  There is actually a set of 4 designs here (like shown below), but I was in the middle of addressing the cards and forgot to photograph some before shoving into envelopes! LOL This set was using the white cardstock with the green and red colors which turned out very pretty.  I also used the red glitter paste for the highlights on the berries.

And here is the other set of four cards that I made using the Toffee colored cardstock with green and white inks for the stenciling.  I’ve also splattered these with brown and white paint.  The sentiments were white heat embossed over some TE Chocolate Truffle cardstock and cut out with some MFT dies.  Before attaching to the pre-made white A2 card bases, I also wrapped some twine around some of the panels or added a bow with it. (I love the homespun look of the white mistletoe!)

These all turned out great because they were pretty much flat and fairly easy to mail off.  I think I was short just a few which is where I’m glad that I still have a few extra cards that I had made throughout this year and I have previously given out some “extra special” Christmas cards earlier in the year as well.  I think you may have already seen them from a previous post…I will have to take a look and see under my “Christmas” section!

If you’re looking for a last-minute Christmas gift/tag, these wood slice things are so quick easy and fun to create!  I’ve had a huge box of these wood slices for a long time, so I pulled one out to make a project for the Inky Stamper December challenge on FB.  I had hubby drill out a hole for me at the top before decorating so as I knew where to put everything.

I’ve used the Inky Stamper Christmas Bauble stamp set for the stamping on the wood and colored in with pencils and gamsol.  I’ve added details with a glitter brush pen on the ornament and added some snowflakes with Nuvo White Crystal Drops.  I had to mask the frog to stamp the Santa hat on him.  I’ve used some silver twine for the hanging portion and then I glued a silver bow with some silver ribbon from my stash under the hole.

And lastly, I’ve also been working on some commissioned cards as well!  Last year, I had a request from someone to create a special Christmas card for his cleaning lady.  I had him pick out an image and asked about the colors…you may remember it as I had posted it last year.

a few months back, someone had asked me to re-create the same design for them with pretty much the exact design with the exception of the sentiment which I changed out for this person.  This one went to another country and I was concerned about the shipping costs, but it was not a problem.  The package had taken an unexpected journey because of the crazy mailing system going on at this time, but it arrived eventually and was in “perfect condition” as reported to me, so I was so thrilled with that and they seemed very pleased with it.

With the square size of the design (5″ x 5″), I’ve handmade the envelope for this one as well.  I found the exact papers used in the designs for these cards, but I don’t think I have any more left after completing this one.

Here’s how I’ve decorated the inside of the card and left blank as requested for their own personal use.

So now, I just want to take this time to say THANKS SO MUCH for hanging in there and stopping in today!  I don’t have too much time on my hands right now as I’m getting ready to make some Christmas treats and the Holidays will soon be over.  I hope you are all doing well and I wish each and every one of you a very safe, happy and healthy Holiday Season!

See you again in the New Year 2022 friends!!

It’s a Spooky Kind of Love

Happy Friday friends!  We’re now upon Halloween weekend!🎃  Are you ready?!  Lots of candy on hand to give out and some to enjoy for yourself…check.  Scary movies at the ready…check.  Ready for lots of fun before the weekend ends!

Not really sure exactly where my love for Halloween comes from, but I love it so much that even my wedding anniversary comes real close too!  So today is our 22nd year anniversary and I couldn’t have made it in this crazy life without my “Boo”!  I’ve made a card to let him know how I feel:

And yes, this is probably something we would certainly be doing under that moon as we’ve done before including watching bats fly around in the sky!  We do weird and wonderful things which is just ONE of the gazillion reasons why I love him so!  I’ve made a card with a bit of a “love/Halloween” theme.  I’m not sure I’ve ever really made a Halloween style card for him before, but I know this will make total sense for him and he’ll get a kick out it.

Started with the background using some Oxide ink blending keeping careful with leaving the “moon” area clean.  I sprayed water over top of the purplish/black background for that texture and then took a Taylored Expressions heart stencil over the background and introduced another color of oxide ink.  I ink blended the edges and bottom with black.  I have a Tim Holtz “Moon Mask” to create the moon with…which makes it super easy!  I stamped the fence at the bottom right and the bats with black ink.  The couple on the bench (TE “Love Story” die) was die cut from black cardstock and glued in the center of the large heart.  Lastly, I white heat embossed the sentiment over another piece of black cardstock and cut it out with a sentiment banner attached to the top left edge.

It’s really a simple card, but I loved creating the background with a “spooky love” feel that I know he’ll like too!

And since we’re going “all batty” here, I thought I’d share my creation that I’ve made for this months’ Inky Stamper challenge using a recycled item!  I thought this might be a good opportunity to create a fun treat!  I took an empty paper towel holder to cut a 2″ tall container with a handle and covered it with some Doodlebug papers.  I layered some trim and ribbon around it and added a punched-out circle for the bottom.

I’ve used the Inky Stamper Bat stamp set for the bat that I’ve stamped, colored and die cut for the front of my treat holder.  I’ve cut out a stamped sentiment banner to tie onto the handle.  Really easy and fun to create!  You could get about 5 containers per empty roll which I thought was a lot!

I sure hope you’ve enjoyed my “BATTY” makes today and I wish you a very frightfully FUN weekend!

HAPPY HALLOWEEN!!!!!!

Challenges:

  1. Creative Knockouts – Anything Goes
  2. Alphabet – ‘O’ is for Outdoors
  3. Sweet Stampin’ – All Hallows Eve
  4. Pammie’s Inky Pinkies – Anything Goes
  5. Make My Monday – (E)scape it (scene)
  6. Little Red Wagon – Outside (outdoors)
  7. Simon Says Stamp Wednesday – Anything Goes
  8. CCEE Stampers – Create a Scene
  9. Stamping Sensations – Animals, Birds & Bugs

It’s the Handmade For Holidays Release at Taylored Expressions🎄

Hello friends!  I’m so excited to share the “Handmade for the Holidays” release at Taylored Expressions today!  You can go check out all the things right now in the store!  I’m extra excited that I get to be a part of this special release with them as a guest designer too!  (This was for my win during the TE 13th birthday celebration challenges I had entered from last month! 🎉 Yay!)  There will also be a huge post about it on the Taylored Expressions Blog too!  I really hope that you enjoy the projects I’ve made to share with you and if you stop by the store, please let Taylor know that I sent you! 

For my first set of projects, I’ve made a fun Christmas décor item that you can gift for the Holidays, use as a center piece for your table setting, etc.  I’ve taken the Taylored Expressions (new) Accordion Tree die and used it to make a trio of trees with the “poinsettia style” attached to the accompanying TE Tree Stumps (sold separately) to go with this die and another two trees without the stumps.  For the trio of trees, I’ve used the Merry Blooms Stamps, Stencil & Clear Combo set to create a background over a Toffee cardstock base inking and blending with Sweet Basil, Cherry Pop and Mulled Wine inks.  I’ve also used the same products to make the tag as well.  I’ve gold heat embossed the centers for the poinsettias in the background.  I’ve also taken the TE (new) Itty Bitty Sentiments Holiday stamp set and used the tiny images from the set to create backgrounds for the other two trees.  I’ve splattered the tree backgrounds as well as the tag background with acrylic white and gold paints. These die cut trees were glued back-to-back with the score line in the center as a guide which makes them 3D looking.  I’ll explain each item below:

This was such a fun 3D project to create!  I wanted all the trees together in one piece, so I thought it would be fun to grab one of these wood slices I’ve been hoarding forever and glue the trees to this base.  There is an accordion star that comes with the accordion tree die, but I thought it would be fun to take the TE Perfect Poinsettia die and cut out several of the smallest bloom to make that the “star topper” for the poinsettia tree.  I’ve used the coordinating stamps to stamp the “veins” and gold heat embossed the centers for them.  I folded them in half and glued it to the top of the tree.  I also attached some TE Gold Drip Drops for the “ornaments” over the tree (TE Drip Drops make perfect “ornaments” for these trees!) and added some gold twine bows front and back.  I’ve ink blended the edges of the poinsettia tree with Toffee ink and gold paint sponged on the poinsettia topper.

This is what the other side (back) of this piece looks like…so it’s visible from all angles.  Here you can better see the other two trees and how the backgrounds were made.  I’ve also added some thick white paint to the edges of them to make it look more like “snowed over” trees especially since they were splattered with white paint.  For the wood slice that the trees are attached to, I’ve used some Ranger Mica Flakes for a bit of sparkle attaching it with Multi-Medium Matte glue.

For the tag, I’ve die cut the background explained above with the TE Stacklets 2 die and wrapped some gold twine around it with the TE (new) Itty Bitty Sentiments & Tags Holiday set for the little tree with the gold heat embossed sentiment over it.  I’ve also gold heat embossed the large sentiment from the Joyful Season stamp set & dies that I’ve popped with my favorite product TE Sticky Strips.  I’ve cut out another layering piece behind the tag with Sweet Basil cardstock, punched a hole and added more gold twine.

And how stinkin’ CUTE are these guys?!  This is my second set of projects for this release using the NEW TE Snow Squad Dies & Clear Stamp Combo set.  As you can see, the cute die cut critters are made to perfectly fit the Tag Stacklet dies!  I’ve the Tag Stacklet 2 die set for my sweet penguin!  The critters are so easy to cut out and decorate them as you like!  I like that the clear stamp set comes with it to stamp in the eyes as those tiny dots can be so hard to deal with and loose!  You get a penguin, a polar bear and a snowman with this die set!

Again, I thought it would be fun to create a background for my card and tag set, so this time, I’ve taken the TE Let It Snow Layering Stencil set for a snowy background.  I’ve started with a Mint Julep cardstock base, blended the same color ink for the first layer, Sugar Cube ink for the second layer and for the third layer, I’ve used some TE Glitter Grab and immediately covered it with some TE Silver Glitter.  Love how it turned out with the subtle color! 

Starting with my card details, I’ve decided to give the snow squad critters soft colors with their scarves.  The clear stamp set with the dies also come with a two-line image for adding details to the scarf, so I silver heat embossed those and then added some matching TE Tiny Diamonds Pastel in between those lines.  They matched up perfectly!  I inked around the edges of each die cut piece for the critters and stamped the face images including the cheeks which I off-stamped first to keep them light.  I used a white gel pen for highlight details.

I thought it would be fun to have these Snow Squad critters pop out from a snow drift, so I took some TE Sugar Cube Glitter Cardstock and cut out a “snow drift” with a piece of the their scarves over it and popped them up over the snowy background I’ve created using a TE Diagonal Stitch Rectangle Stacklets for the stitching details behind them which was layered over an A2 sized Sugar Cube top folding card base.  For the sentiment, I silver heat embossed it from the TE Winter Wishes clear stamp set over a Mint Julep cardstock that was cut out using the TE Stitched Banner Stacklets die

And of course, I had to use the penguin again for my coordinating tag!  I’ve used part of the same background I’ve made for the card and cut it out using the TE Tag Stacklets 2 die set with another Sugar Cube cut out for the layering base.

I did the same thing for this tag that I did for the card above with the snow drift, but I also added a tiny tag that he’s holding with some Doodlebug Gray Twine.  The tag was created with the same TE (new) Itty Bitty Sentiments & Tag Holiday sets.  I’ve stamped the row of tiny trees from the set with the Mint Julep ink and then silver heat embossed the sentiment above it.  I’ve also used more of the TE Tiny Diamonds Pastel for the center of the bow on the present along with the penguin’s scarf.  I’ve punched a hole at the top and added more of the same twine at the top.

So how about you?!  Are you ready for the up-coming Holiday Season?  I sure hope that I was able to bring you some inspiration with your handmade projects for the Holidays!  Again, you can check out all of the brand new Taylored Expressions products in the store as it’s now been released!  Be sure to check out all of the wonderful inspiration on her blog too!

Thanks so much for stopping in today!  I appreciate all of your kind support friends!  Have a great day!

Challenges:

  1. Happy Little Stampers – OCT Anything Goes with Dies (all projects are using dies!)
  2. Simon Says Stamps Wednesday – NOT a card
  3. Penny’s Paper-Crafty – Anything Goes using paper
  4. Krafty Chicks – Christmas
  5. Creative Knockouts – Embossing (I used heat embossing)
  6. The Crafter’s Cafe – Use a Stencil (used on all projects)
  7. Creative Fingers – #217 Anything Goes
  8. Lil Patch of Crafty Friends – Anything Goes

Christmas Cards, Projects and Cookies…ready for Santa!🎅

Hello friends!  We’re here!  We made it to Christmas Eve!😀  My cards have been sent out, my cookies are done and delivered as well as my other little gifts.  This is quite a long post, so grab your hot cocoa or whatever your favorite beverage is and a Christmas cookie or treat and let’s see what I’ve been doing this past week:

So, starting with my Christmas cards, I usually make around 40ish cards each year give-or-take and I only like to make a handful of them at a time for not only boredom of the same design, but for product depletion as well.

So back in July, I purchased this really adorable card kit from Taylored Expressions (included was the Frosty Background Cling and Clear Combo set + more.) that came with coordinated colored envelopes as well as the seals.  So, I made a set of four different colored designs in two of each one.  The snowmen were popped up with foam squares over the backgrounds and I added some fun Snowflake bits that were included with the kit as well.

Next up is another set of cards I made using some more gorgeous products from Taylored Expressions.  I’ve used the Seasonal Sprig stamp and die combo along with the stencil to color them in with.  Some of these I ink blended the backgrounds, so I just used cardstock with a watermark effect and a white heat embossed sentiment.  I used the die to cut an extra frame behind the stamped one for added stability.  I made 4 of each design shown here for a total of 16.

I then made another set of four using the same products, but for these I gold heat embossed the image and sentiment and then used some watercolor for coloring it in with.  I also got some of these coordinating envelope seals to use on about 10 of the 16 cards.  (No longer available in store.)  I’ve also partially ink blended the background behind the frame on these as well.

Here are some cards that I’ve actually made a total of 8 similar designs using the large wording background dies from My Favorite Things.  I’ve used the “Sending Christmas Joy” and “I Really Miss You” dies for all eight of these, but only after I stamped the backgrounds.  I used the MFT Knitted Sweater BG stamp and the Alley Cat BG stamp for a couple of backgrounds before I die cut them.  Then I used the die cut letters to place into the other backgrounds on the cards to get that look.  So it was like creating 2 cards with one cut and filling it all in.  (For the Alley Cat background stamp, I ink blended the background and stamped it as a watermark effect over it and then took the “left over” ink from that to stamp it again to create an additional BG.) I then cut out each of the panels with the MFT Wonky Stitched Rectangle die and placed over a white A2 sized side folding card base.  The penguin image is from the MFT Holiday Penguins set and the bird on the other one is from the MFT “Tweet Holidays” (Not found in store.)

And then of course you don’t want to waste any backgrounds you’ve made, so you make more cards!  I’ve used a couple more images to personalize the design for people too.  I combined the sets Newton’s Nook Whispering Pines and the Lawn Fawn Winter Skies.  I think I took a set from them to create a sentiment to fit my cards as well. (not sure from which set.)

For the other card, I took this cute image from the Whimsy Stamps Gnome for Christmas stamp set, colored him up with my copics and cut him out with the coordinating die to pop him up over my card.

And then for these set of 4 cards, I’ve just die cut a snowflake from some glitter paper and glued in the center of the “O” on each design and popped up a sentiment over that with foam tape stamped and die cut from the Taylored Expressions Mini Strips – Holiday and Mini Strips die.

And as you remember in a previous post those “recycled Crystal Light containers” that I make, I made another set of three of them here.  This time, I’ve used this snowman stamp.  I just used my scissors to fussy cut those cute snowmen out as they were pretty simple to do and then I popped them up over an ink blended tag using the stencil over them.  I used coordinating cardstock and silver heat embossed the sentiment strip at the bottom and of course added my “snowman soup” poem on the back of the containers.  I’ve also added a layer of silver mirror cardstock behind the tags.

And I made a couple of these darling ornaments from a fairly “new to me” company that I was actually introduced to with product during my time as a {Cupcake Inspirations} sweetie DT when they sponsored a challenge a while back.  P.S.  There are a few more days left to enter their current challenge of “SNOWFLAKES” if you want to pop on over to join us too!!

But I was so taken with this darling image and kit from Inky Stampers from this Snow Much Fun Kit.  You get the snowflake ornament (with string), the stamp set and die, papers, wobbler, along with glitter to complete it too!  Well, I wanted to make more than one, so I grabbed another set of Snowflake Ornaments from the store and just added my own papers and glitter from my stash to make it.  

Whew!  I’m ready for that “Looong winter’s nap” now!!🥱 I hope you’ve enjoyed my post today and it has brought you some inspiration and/or a smile somehow!  I have received some beautiful Christmas cards and I so appreciate them and have them all displayed by being pinned around my garland in our pass-through in the living room/dining area.  I think after a bit of rest, I need to finish up my projects for the “Bugaboo Christmas Chaos” that I halted in the middle for to finish up Christmas projects….so I’ll be back soon with that.

In the meantime, I wish a MERRY CHRISTMAS TO ALL AND TO ALL A GOOD NIGHT!!🎅

“tis the Season for Holiday Chaos and Update on Christmas Cards for Danny🎅

Hello friends!  This is my second post for today, so please scroll down to see it or CLICK HERE for the {Cupcake Inspirations} Reminder post.

I have several creations to share with you today because while I’m working on trying to get some last-minute Christmas projects finished, I thought that I would join in the fun weeklong “Holiday Chaos” challenges over at the Catch the Bug Blog for Bugaboo Stamps.  I’ve caught up with all of the challenges up to today and then hopefully later this week I’ll be able to post the remainder of them:

This card is for the Day 1 challenge of “Reindeer Games”, so I had this really cute Bugaboo image called Little Penguin Reindeer and colored him up for my card.  I had these fun reindeer papers in my stash to pair with him and then found this fun sentiment strip to add with it as well.😂

I’ve used some gold glitter paper and added some gold glitter enamel dots in the corner.  The bells on the penguin’s waist were covered with a gold glitter pen and then I added some faux snowflakes along the circle image border too.

This next card was created for Day 2 Challenge of a sketch.  I’ve colored up this adorable Bugaboo image called Christmas Teddy 2 Ornaments all in blue colors!  Hard to tell in the photo, but I’ve used glitter gel pens to color in the stripe of the ornament and the silver tops.

I have been itching to pull out my Martha Stewart papers that have been lurking in my stash and I really love the colors in them along with the silver foil!  I white heat embossed the sentiment from the Brutus Monroe “Holiday Essentials” stamp set and cut it out as a banner with my scissors and popped it up over the card with foam tape.  I finished the design with some Drip Drops from Taylored Expressions.

And of course, here’s my project for today’s challenge Day 3 ABC/Anything but a Card.  I make these little “snowman soup” containers every year for my family and sometimes sneak in an extra “surprise” or 2 inside!  You may have recalled these on my blog before, but they’re just recycled Crystal Light containers and they fit the hot cocoa, candy cane, marshmallows and a few chocolate kisses all in there perfectly together.  I’ve decorated them in many different ways.  CLICK HERE to see a previous post that shows another way I’ve made them in the past.  This time, I just made tags to attach around the containers.  I have made another set of 3 of these containers (different images) that I will show in a future post too!

I’ve used these adorable snowmen from Bugaboo Stamps called “Snowman Snowflakes” (right) and “Snowman Snowballs” (left).  I colored them up with Copics and added a sentiment that was stamped at the bottom from Whimsy Stamps Holiday Mini Sentiments stamp set.

I’ve had this “snowman soup” poem for years and years and just printed it out on my computer and attached it to the back of the containers.  The top of the lids are also covered with pattern papers.  P.S.  If you haven’t tried the “Hot Cocoa Hershey Kisses”…oh my goodness they’re so good! 😋

UPDATE:

I also wanted to share an update on the “Christmas Cards for Danny” post you may remember that I posted about a few weeks back.  I’ve actually seen an update in my own hometown newspaper about all the cards he’s received and as of December 10th, he’s received 2,544 Christmas cards from ALL OVER THE WORLD! How cool is that?!   This really touches my heart and uplifts me about the kindness in the human spirit.  Thank you to those that took the time to send a Christmas card his way!  It’s really what Christmas is all about.

Challenges:

  1. Catch the Bug – Holiday Chaos Day 1: Reindeer Games (card 1)
  2. Catch the Bug – Holiday Chaos Day 2: Sketch (card 2)
  3. Catch the Bug – Holiday Chaos Day 3: ABC Anything but a Card (snowmen soup)
  4. Christmas Crafts All Year ‘Round – December Gifts/Containers (snowmen soup)
  5. 2 Crafty Critter Crazies – #45 Anything Goes + critter (card 2)
  6. Crafty Animals – #45 Anything Goes + animal (card 2)
  7. Daring Cardmakers – Animal Antics at Christmas (card 1)
  8. The Sisterhood of Crafters – Anything Christmas/Winter (snowmen soup)
  9. Crazy 4 Challenges – C4C565 past sketch from 2020 (I used sketch C4C553 for card 1)

Bright Birthday and More Whimsy Retreat Projects!💡

Hello friends!  Hope that you’re having a great week so far!  Hubby and I are trying to figure out how this “retirement thing” goes together! LOL!  I think we’ll be having so much fun and we’re just really excited about the future and what we’ll be doing.

Speaking of which, this past Sunday he also celebrated a birthday and of course I had to make him a card that was suited for an electrician.  I had to add a bit of humor about his age on the inside, but this is what I came up with:

I’ve had this Stampin’ Up! Sunburst die and stamp set and haven’t used it that much since I bought it. (Quite a while ago! Not quite sure how old. LOL) I thought it would make a great light beam for my VERY old Simon Says Stamp ‘Watts Up’ stamp set that was from a past card kit. (circa 2014/2015) …yep, all old!

I die cut the sunburst from some yellow and gold glitter stock that I glued together slightly off-set and then attached it over a side folding A2 sized black card base.  I stamped the sentiments over a couple of the yellow strips with black ink taking care to make room for the circle panel.

I then stamped the lightbulb over a white piece of cardstock and colored the base with Copics and used a marker draw a line above it for the string.  I took a solid heart from the stamp set and heat embossed it with some Gold Metallic Gilded EP and then sponged some yellow ink over the bulb for some glow.  I die cut it out with a circle die and then layered over another die cut circle black piece and popped it up over the sunburst layers with foam tape.

I tied a bow with some black twine and glued it to the light bulb base.  I also stamped the bulb in a lighter gray ink over the envelope and added a string to that as well with a gray marker. (The inside of the card said:  “Old is the new black.” 😆)

———————————————————————————————————–

And I also wanted to share that I’m still plugging away on the several kits that I received from the Whimsy Stamps Virtual Retreat last month!  These are really amazing projects and I’m having lots of fun putting them together still! (Christmas will be coming next. So, stay tuned for those!):

This is a fun interactive card with a pull tab at the top where this cut little dragon slides upwards towards the sky! This kit 9 came with an A2 sized envelope, but I had to make my own envelope slightly larger to accommodate for the pull tab sticking above the card. I’ve added doodle lines around the edges and shadow stamped a sentiment at the bottom for my own added details.
This set was from kit 14. The hexagon shaped box was super fun and even came with the candy! There was also an extra stamped and cut out bee, so I used it to make another card… shaker style! I used the left over honeycomb die cut piece as a stencil on the card as well. I used the envelope that was provided in the kit above and decorated it for this A2 sized card instead. (I know someone that loves these candies…so they might get a surprise at some point! 😉)
And lastly, this was from kit 15 and TOTALLY different than what was photographed in the booklet! First of all, I received a plant image with a die cut speech bubble sentiments and thought it might be cool for a Halloween card on another project, so I saved those to use later. I received an EXTRA stamped sunflower image from kit 22 that I had posted earlier and decided to use it for this card here. I colored it similar to that one and cut it out, but cut off a portion of it on this design. I also changed up the background ink blended colors and splattered some gold paint on this one. Love how it turned out. This will be for an Autumn anniversary card for someone coming soon.

Hope you’ve enjoyed all of my projects today!  Thanks so much for stopping by and I’ll be seeing you soon!

Challenges (For the Birthday Lightbulb card ONLY):

  1.  Retro Rubber – Anything Goes + stamps older than one year
  2. Cardz 4 Guys – Birthday for adult male
  3. Creative Moments – Anything Goes
  4. Crafty Calendar – Anything Goes
  5. Pammie’s Inky Pinkies – Anything Goes
  6. Shopping Our Stash – Tic Tac Toe (I used middle across: String/twine, 5 year old stamp, bright colors)
  7. Watercooler Wednesday – All About Occasions (birthday)

Boo!👻 It’s Halloween!!!🎃

Hello my crafty friends!!  Today is Halloween and I thought it would be a great time to share several Halloween themed creations that I had made during the Whimsy Stamps Virtual Retreat!  I’m actually STILL working on the project kits because there were SO MANY of them and I’m such a slow crafter there was no way that I could’ve done them within that weekend time frame!  It sure was so much fun and so many treats along with it!  So happy that I decided to join the virtual event!  I encourage everyone to join the next!!

So what I decided to do was to go through all of my 23 kits and pick out the Halloween themed ones to get them finished up before Halloween so that I would have them to share and give out!  Enjoy the spooky creative fun:

Kit 1 – spooky green behind the eyes! Slimline design
Kit 2 – Slimline design with a spooky graveyard! The cockroach bugs were a nice little “surprise gift” from our lovely instructor for the first two kits! LOL
Kit 5 – All Copic coloring and something brand new to me was coloring a scene freehand! So scary!! But I made it!
Kit 7 – a slimline die used two different ways…LOVED the ink blending!
Kit 10 – Cutest little treat box! Added crystal eyeballs to my skull and sparkled it up with sparkly clear EP. I’ve rubbed white ink around the black edges.
Kit 11 – The ink blending on this was awesome too! I have so many new combos now! The black sparkly die cut is my fave!
Kit 16 – Last but not least, this really adorable card made me giggle the whole time! I’ve added some glossy accents to the eyeballs.

So there are still SO many more kits left to do and I look forward to crafting them and sharing more with you as I go too!  Obviously these kits were created and put together by the talented group of people for Whimsy Stamps, so they’re the ones that get the credit for the creativity on these, and therefore, I won’t enter these into any challenges.

Hope you’ve enjoyed my share from the retreat and I’ll be sharing more soon!


I also have finished one more treat bag that I’ve made with the special Halloween Creative Kit from Brutus Monroe:

I used the stencil from the kit to ink over the stencil from the kit and then added the fun stamped and colored elements over the pattern paper from the kit.  I used the spooky graveyard stamp and heat embossed it over the pattern paper with Raven Sparkle EP including the moon image at the top left.

I even used the ribbon and sequins from the kit to decorate with and then added a tag from my stash to tie on the bow.

This is the little poem that I’ve attached to the back of the bag that was a fun little print out from Brutus Monroe as well as the colorful strips that I’ve used on the top and bottom portions of the image panel on the front of the treat bag.  I thought they were fun little elements to add and give out to my goblins this year! LOL!

Hope you’ve enjoyed my Halloween projects and thanks so much for dropping in!

**Please don’t forget to add your “Monsters/Ghouls” projects to the {Cupcake Inspirations} challenge too!

Want to wish all a very happy, spooky and SAFE Halloween!🎃💀👻

Color Challenge Reminder Bagged for {Cupcake Inspirations}

Happy Monday morning to you friends!  As I have pre-scheduled this post, I’m sure that I’m probably worn out from a weekend of crafty fun!🥱  Sleeping is over-rated anyway, right?!😆  (I will share some fun things with you all later though!)  But for now, I’d like to remind you about our color combo challenge for {Cupcake Inspirations} and hope you will join in the fun with us using Olive, Red & Lavender:

From my last post, I’m continuing on with making Halloween treat bags for my grands so I thought I’d pull out the colors that would work for this color combo challenge too! Plus, I’m also adding this to another entry for the Whimsy Stamps 31 Nights of Halloween:


I fell in LOVE with those Whimsy Stamps Haunted papers!  I thought it would be a fun backdrop for this darling little Whimsy Stamps Frankie digital stamp to be in front of!  I colored her up with Copics and fussy cut her out and popped her up over the background paper.

Before I placed the background paper over the bag, I took the Batty Stencil from Brutus Monroe and went over the paper sack with some Black Soot Distress Ink.  I cut a couple of strips of cardstock to go with the color combo and white heat embossed the sentiment from the Whimsy Stamps Corny Candy Corns stamp set.  I’ve also added a couple of the silver mirror cardstock stars around it and then used some foam squares to pop up the Frankie girl with.

To close up the treat bag, I folded over the top and then punched a couple of holes in the top and added a tag from a paper pack in my stash, rubbed some Black Soot Distress Ink around it and tied it on the bag with the olive colored yarn string that was tied in a bow.

Here’s a closer look at the colored up image and how I’ve incorporated the colors into it.  I did use a silver metallic gel pen to color in the “bolts” on the sides of her head and then used a white gel pen to dot her eyes and cheeks with.  I think that hair is my favorite part about her!  She’s just too cute to spook, I think!😁 

Thanks so much for dropping in today!  I hope you’ve enjoyed my project and I’ll be seeing you again soon!

Challenges:

  1. The Cutie Pie Challenge – Too Cute to Spook
  2. Aud Sentiments – #262 Halloween/Fall Sentiment
  3. A Bit More Time to Craft – #126 Anything Goes
  4. QKR Stampede – #406 Anything Goes
  5. Crafty Catz – #523 Anything Goes
  6. Creative Fingers – #195 Anything Goes
  7. My Time to Craft – #443 Halloween or Cats
  8. This is Halloween – #2 Anything Goes Halloween (3rd and last entry) NEW!!!
  9. Two Old Bats Halloween – #1 Anything Goes Halloween “Jump Start” (3rd entry) NEW!!!

👻🦇🕷👁🎃(Please support the Halloween challenges and get them going!  All lovers of Halloween unite!)