Crafty Chefs Cooking Up Some BOOs and Stamp Joy Results!👻

Hello there friends!  I know that my blog doesn’t appear to look as if I’ve been doing much, but the exact opposite is happening right now! LOL!  I’ve been busy crafting away and feeling a bit overwhelmed to say the least!  Now that I have my computer issues solved, hoping I can get back into things and get caught up!  Videos are in cache and I also am REALLY excited to be doing the Whimsy Stamps Virtual Retreat this weekend and it starts tonight and lasts through Sunday too!  Woohoo!! – – – – So more crafting is coming!  Snacks are stocked and the craft table is ready to go!!😉


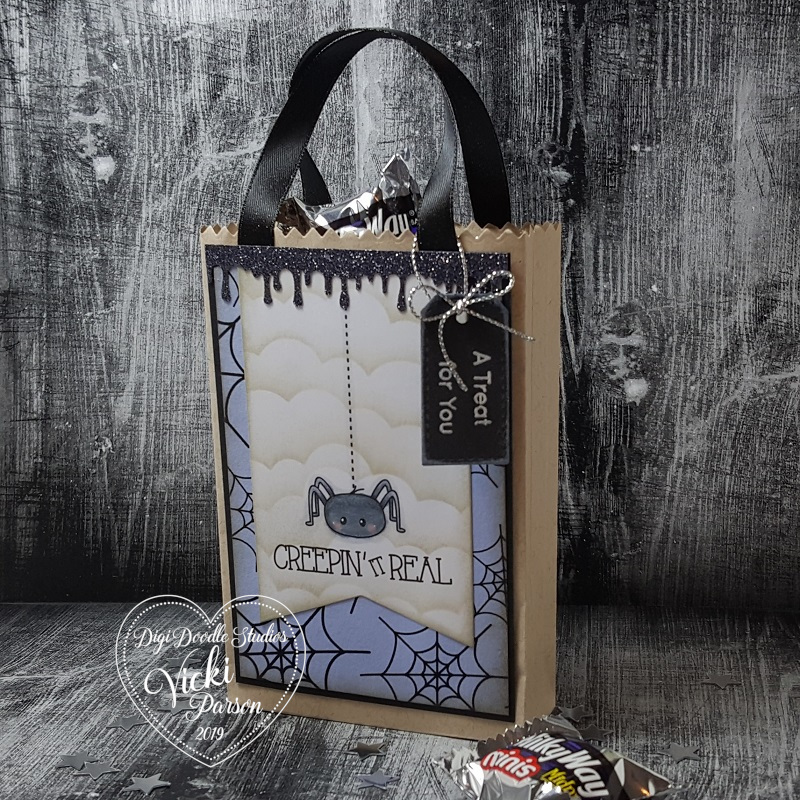
Today I have this fun little Halloween treat bag to share that I’ve made for one of the grands and I thought I’d pair it with the Crafty Chefs October Recipe. (Check out the link if you’re interested in joining in the recipe fun with us!) AND I’m also including this into the fun annual Whimsy Stamps 31 Nights of Halloween too!

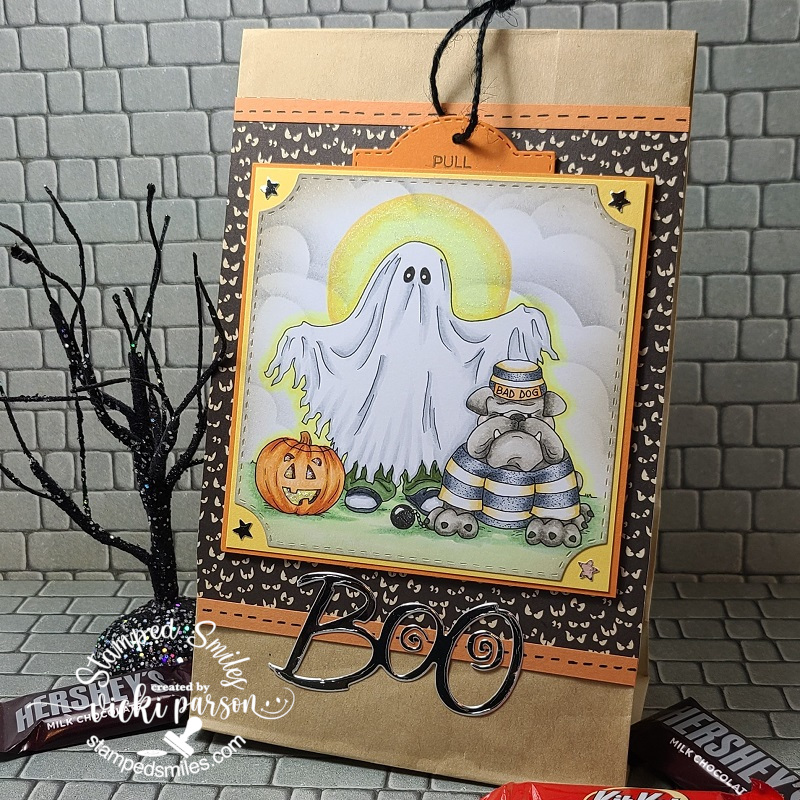
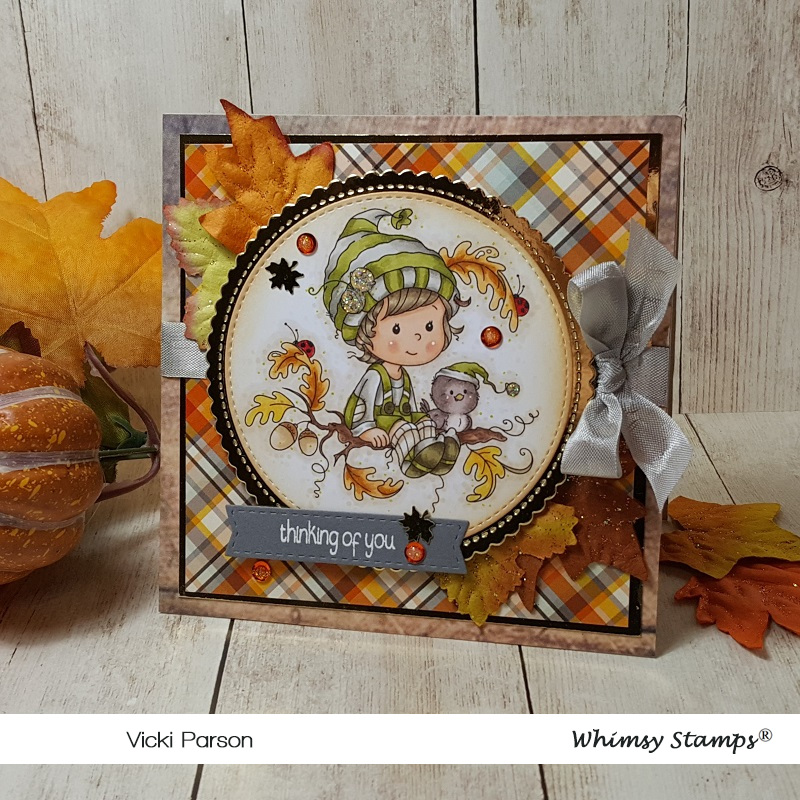
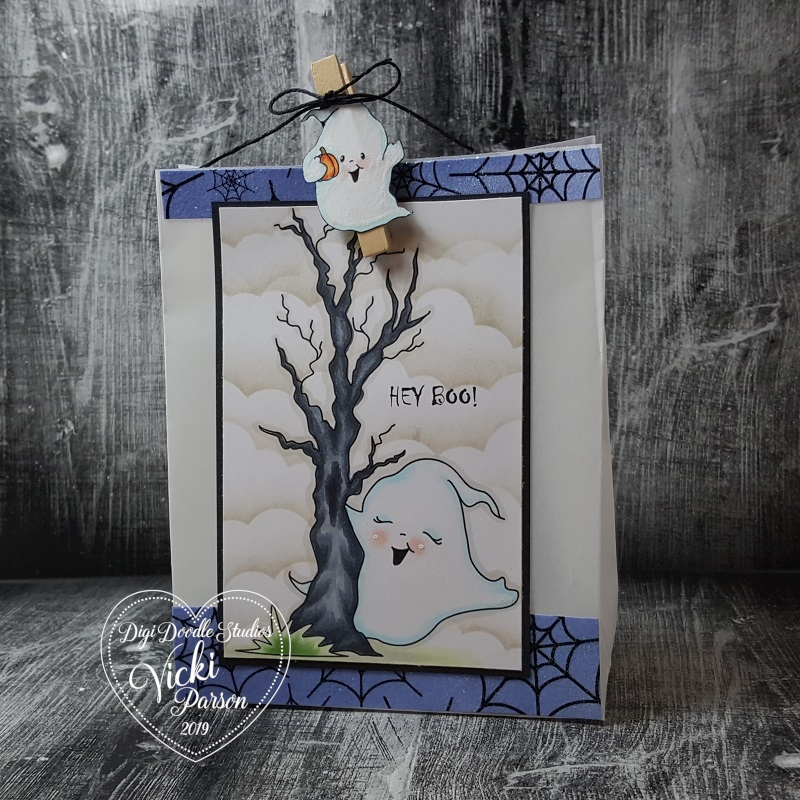
So I pulled out these stack of paper lunch bags I had and thought it would be a great little bag to decorate for the grands…I have more coming, but I’ve pulled out some papers and I had so much fun coloring up this darling digital image by Crissy Armstrong from Whimsy Stamps called “Boo!” – of course!

For the Crafty Chefs October recipe, the lovely Carol has given the following recipe for us this month:

Must Have:

  1. Add a Tag (from previous chef)
  2. Have or create a pocket
  3. 2-3 colors next to each other on the color wheel
  4. Use a die 

Can Have:

  1. Mirror Cardstock (passing onto next chef)
  2. Charm
  3. Stitching

I cut out the image with the Whimsy Stamps Notched Square Dies and then cut out a yellow and an orange panel to layer behind it. (colors for recipe)  I’ve also used a strip of the orange cardstock to go above and below the spooky eyes decorative paper from my stash.  I used a black marker to add stitch marks to the strips. (stitching for recipe)  I’ve also used some silver mirror cardstock to cut out the “boo” letters from the Whimsy Stamps Boo die set and attached it at the bottom with the swirly eyes too. (mirror cardstock for recipe)  I also added some tiny stars from the mirror cardstock to each corner of the image panel. 

And lastly for the Crafty Chefs recipe, I’ve used foam tape to pop up the image panel and left a section that fit around my orange die cut tag from an older Whimsy Stamps die.  I stamped the “pull” word on it, punched a hole and added a string so it was easier to grab.  Check it out below to see the tag…

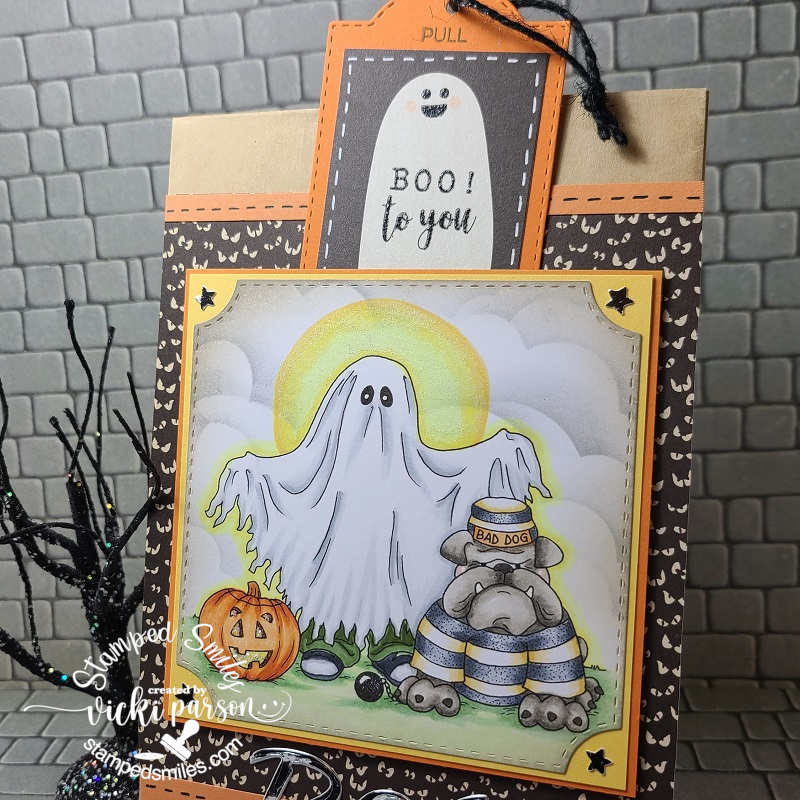
When you lift the tag up, you can see the cute little ghost with a message. It was from a Halloween paper pack in my stash that I glued over the orange die cut tag. I took a white gel pen to add more stitching detail to it.

Here’s also a closer view of the image I colored up with Copic markers. I thought it would be fun to add a moon behind the ghost, so I just drew it in with my Copic markers and added a fun yellow glow behind the images. I also covered it with a glitter brush pen and then I took some Stickles glitter and added it to the pumpkin’s face. I also took a white gel pen and dotted the inside of the ghost’s eyes…thought it would give it character.

For the background behind the image, I took a cloud stencil to blend in some clouds with Black Soot Distress Ink.

I hope you’ve enjoyed my Halloween treat bag today! Check out the challenges I’m entering it for below!


So last weekend I was involved in another virtual stamp retreat from Taylored Expressions called Stamp Joy.  As I had mentioned, it’s so much fun to experience the “in person” part of it, but I think they did such an amazing job with it and it was so much fun to be apart of the crafty fun and laughter.  Here’s my results:

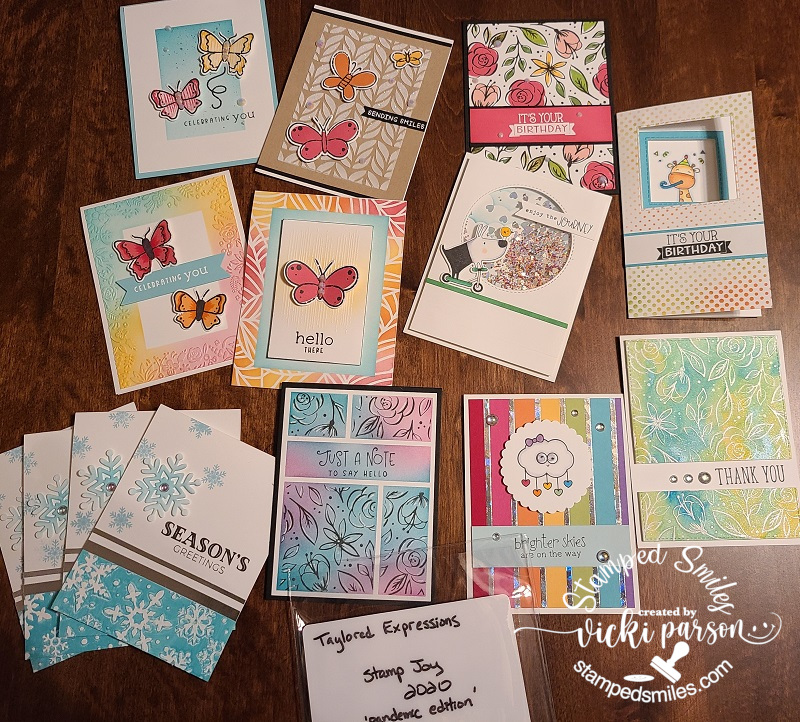
I have so many cards and I have even started up a collection of FOUR Christmas cards for the year! Yay!

I decided to participate in the FULL experience of it, so I opted to do the Friday classes which are the top left 4 butterfly cards I completed. I love the projects we received for everything and I know I’ll be making more things!

The other cards were all created for the 7 different Make-n-Takes on Saturday. One of the seven was the total of mass produced set of 4 snowflake cards. I have tweaked a few things about the cards here and there, but not much was changed as we were pretty much provided everything needed including some cool products!😀

At the bottom, I took a photo of one of the stamp sets that was provided to use for the event. There was no graphic photo on this stamp set as it was left blank because it was especially put together for this event. It’s a collection of certain stamps in several of the most popular sets from their store which we used throughout the Make-n-Takes. So what I did was take a sharpie marker and wrote: “Taylored Expressions Stamp Joy 2020 Pandemic Edition”. LOL


Thanks so much for stopping in today my friends!  I will be very busy crafting away this weekend, so I’ll be having fun and seeing you all very soon!  Hope you have a wonderful weekend ahead!

Challenges (for treat bag only):

  1. Cute Card Thursday – Halloween 
  2. Crafty Creations – #414 Anything Goes
  3. Colour Crazy Craft – Anything Goes + coloring
  4. Sweet Stampers – #49 Autumn or Halloween
  5. Not Just Cards – Anything Goes
  6. International Art & Soul – Halloween
  7. Pammie’s Inky Pinkies – PIP2041 Anything Goes
  8. Creatalicious – #197 Anything Goes optional Halloween
  9. This is Halloween Anything Goes Halloween (entry 2) **NEW!!
  10. Two Old Bats Halloween Anything Goes Halloween (entry 2) **NEW!!

Spooky Undertaker Tag for {Cupcake INspirations} Color Challenge

Hello there friends!  I’ve been a bit MIA lately but that’s because I’ve actually been having fun attending a virtual stamp event which I will be sharing some things I’ve done with you later and I’ll be doing it all over again this weekend as well!🥳  Although it doesn’t replace an in-person live event, it was lots of fun!  I’ve also been enjoying time visiting with my son who stopped by for the weekend!


Today I’m stopping in to share my creation with you for the brand new challenge over at {Cupcake Inspirations} using this unique color combo:  OLIVE, RED and LAVENDER  The first thing I had thought of was the inspirational photo to go along with it and it reminded me of this cool Tim Holtz stamps/stencil set I bought a few years ago:

I thought it would be fun to play around a bit with my Distress Spray Stains over one of those Distress Tags.  So I sprayed a few of the colors over it and then also sprayed water over it as well to get the colors moving and blending together.  I think it turned out pretty cool.  I used the Distress Sprays I used were Crushed Olive, Fired Brick and Seedless Preserves.

I then took the stencil from the Tim Holt “Halloween 2 Stamps/Stencil” set and used some Black Soot distress ink to sponge the bats in the center of the tag.  I then used the coordinating distress ink colors and used the other portion of the stencil to sponge the colors with.  I took a thin strip of black cardstock to attach above and below the stenciled bat areas.

I took the skull image from the Tim Holtz “Halloween 2” stamp set and stamped it with black pigment ink over a piece of vanilla style cardstock and heat set it with clear embossing powder.  I fussy cut him out and added a piece of purple metallic ribbon around his hat and then glued on a purple flower along the side before popping him with foam tape in the center of the oval die cut piece from silver foil cardstock.

I stamped the “undertaker” sentiment from the stamp set with black permanent ink along with some scripty words in random places over the tag.  I also had some Tim Holtz Halloween rub-ons that I used for the spider and the “31” numbers.  I finished the tag with some more of that purple metallic ribbon and the key charm at the top.

Here’s a closer view of the skull with the embossed details along with the shine from the foil cardstock and ribbons.

Really had fun putting this tag together and I think it will make a fun spooky treat to share with someone I love because I have several family members that are really into the spooky Halloween theme besides myself! Yay!

Thanks for stopping by and leaving your kind support! It’s very much appreciated and I’ll be seeing you again soon my friends!!

Challenges:

  1. Unicorn – Spooky and/or Cute
  2. Arty Divas Anything Goes
  3. Creative Craft Cottage Spooky and/or Cute
  4. The Paper Funday – #22 Anything Goes optional: Halloween/All Hallows Eve
  5. Creative Moments – #200 Anything Goes
  6. As You Like It – Fave non-card project and why? (I love making tags because I feel like you can “experiment” with different media on it and I like that I can use it for putting on gifts or even add to a card later.)
  7. This is Halloween Anything Halloween
  8. The Divas That Cut Paper – Autumn-Thoughts of Halloween + die cut/punch
  9. Crafty Cardmakers – Create a Tag
  10. Two Old Bats Halloween – Anything Halloween Goes *new challenge blog*

Sports Reminder for {Cupcake Inspirations} Challenge

Hello friends!  Stopping by with a reminder today that there are still a few days left to join our “Sports” themed challenge over at the {Cupcake Inspirations} blog!  Hope you will join in the fun with us!

It’s that time of the year over here in the U.S. for Fall football season and I have some male family members that enjoy watching it along with having birthdays around this time which brings me to making these type of cards for them!  So this challenge has worked out really well for that!  So here’s my second card for this challenge:

I’ve pulled out this older Stampin’ Up! stamp set that I refused to part with just for this reason because I knew that I would be using it down the line…which is the “Great Sport” stamp set.  (I think it’s maybe circa 2013?)

I think the embossing folder is just as old if not older than the stamp sets that I’ve used as it has that pattern on it that would remind you of the football texture.  (pigskin leather as the guys say)  I’ve recently picked up some sport themed decorative papers and thought I would use a strip down the center of my design and then I’ve also used the same pattern to stamp the wings and football images over that were all fussy cut out with scissors.

For the navy banner in the background, I’ve used a die cut to cut it out with and then stamped some stars with white ink over it and then sponged around the edged of it as well.  I took another strip of orange colored cardstock and stamped a fun birthday greeting over it and then added some stars around it that were punched out from navy cardstock.  All of these layered were attached over an A2 sized top folding navy card base.  

Really thought it would be fun to add an interactive detail to this card as well by adding a wobbler to the back of the football image.  So when you put your finger along the side of the ball, it will wobble.🏈😂  (something fun for the birthday guy to play with!)

For the decorative papers I’ve used, I took a sand block to distress the edges a bit and smooth out the edges of my fussy cutting details.

Hope this will help bring a smile!

Thanks so much for dropping in today and I’ll be seeing you soon friends!

Challenges:

  1. Watercooler Wednesday – WWC291 5th Week Anything Goes

2.  Krafty Chicks – #527 Stamp Act

3.  Love to Craft – LTCCB51 October Anything Goes

Pink Halloween for Digi Doodle Studios GDT

Hello friends!  I hope that you’re all having a wonderful week so far!  The weather has really been changing this week as we get into Fall now.  Speaking of that, it’s time for sharing some fun Halloween themed projects!

I’m VERY honored to have won a guest spot for this month over at the Digi Doodle Studios Challenge Blog!  So, for the October challenge, the theme is “Pink and/or Halloween” You can choose to use either or both…I’ve decided to use BOTH on my creation:

As a winner, I was given this darling image to play with called Gwendoline DDS Good Halloween Witch and I thought she would be so much fun to color up in the pink and black colors!  I think she turned out adorable in her pinkness!

I have also decided to print out a sentiment from the DDS Halloween Happiness Digital Sentiments Collection that I’ve used as a strip on the right side of my panel placed directly under the image panel.  Both of these panels have been sponged with some pink ink around the edges.  The witch image panel was popped up with some craft foam.

For the  papers, I have printed out the fun pink and black dotted patterns from the DDS Wonky Halloween Digi Paper Pack and then used a sander around the edges of them for a bit of distressed look.  Before attaching the black with pink dots strip in the center, I wrapped some pink metallic ribbon around it with a bow.  This strip was placed behind the image panel, but in front of the layers behind the image panel. Those layers are pink metallic mirror cardstock and a scallop die cut black cardstock which was also layered behind the sentiment strip.  All of the panels were placed over a black top folding 5″ card base.

I’ve added a couple of die cut spider webs from some white glitter paper and attached them in the corners of the design and then found some pink sequins with stars that I filled the centers with some pink glitter drops scattered around as well as placing an extra die cut star and sequins in the center of the bow.

And here’s a closer look at the coloring I’ve done over her using Copic markers.  I’ve used a white gel pen for the dots on her cheeks as well as highlights on her legs.

It’s always hard to really show all of the wonderful shimmer and sparkle, but I’ve used a glitter brush pen over the pink stars in her dress as well as the stars surrounding her. (Her pink earrings were covered with it too.)  I took a pink metallic gel pen to color in the dots on her dress and the ones surrounding her.  I then took the pink glitter drops that I’ve used in the center of the sequins and add a couple more around her trailing stars and the center of the star in her wand too.

I also very lightly sponged in some pink chalk for the stars and dots area around her after it was all dry.

I hope you’ve enjoyed my card for today and have been inspired in some way!

Thanks for dropping in today my friends and I’ll be seeing you again very soon!😉

Challenges:

  1.  Daring Cardmakers – 3 Things Starting with ‘S”:  Stars, Spider Webs, Sequins
  2.  Pammie’s Inky Pinkies – PIP 2039 Anything Goes
  3. Always Fun – Die-cutting (my fave is stitched scallop!)
  4. A Perfect Time to Craft – Anything Goes Oct
  5. Creatalicious – Anything Goes
  6. Simon Says Stamp Wednesday – Anything Goes

Pink & Main Video Hop with Hello Autumn Slimline

Hello friends!  I hope you’ve had a fantastic week!  It seems like this month is flying by!

I’m excited to share with you a fun video hop collaboration with Pink and Main on my You Tube Channel today! (Be sure to check it out on MY VIDEO because there is a giveaway and you’ll need to leave comments on the videos to be entered to win!)  So head on over to see the wonderful inspiration with the Pink and Main products going on!

Here’s the fun Autumn themed slimline card I’ve made for the video hop today:

So Pink and Main has come out with some fabulous new products which I’ve used for my card here and I’ve added some fun techniques to use with some of those products as well!

The background was really fun to create using the Pink & Main Blending Brushes along with the new Crackling Campfire Distress Oxide Ink color that just came out!  I’ve also used the wonderful Leafy Stencil from Pink & Main over the background too.  The cups and leaves were also colored using the oxide inks and a waterbrush which you can see in my video as well as how I’ve inked and cut out the one image backwards so I have two cups with the handles in opposite directions on my design here. 

You can check out how I’ve put this design together and the techniques I’ve used in this video below, or to leave a comment and see the link to the next person in the video hop, CLICK HERE to go to the video on You Tube.

I absolutely fell in love with that Need to Venti stamp set and coordinating dies!  I loved that older Christmas Mugs stamps they had previously came out, but Autumn is awesome to add to my collection because it’s my favorite time of the year!  So be sure to check out how to stretch out the use of this set in video above!

The Blessings slimline die was so fun to use on my card too and I love that the frame cuts out separately from the center and there was room to layer behind it before attaching to your slimline card base.  The Brutus Monroe Copper Glitterstock was the perfect accent behind the scallop frame. That frame was cut out with several layers of cardstock and stacked together for thickness.

The same Copper Glitterstock was used to cut out the sentiment dies as well.  I’ve used some vellum to layer behind the Autumn sentiment, which the backing diecut was also included in this same slimeline die set!  The final measurement of my slimline card was a piece of brown cardstock measuring 8.5″ x 7″ and scored at 3.5″ in the center.  The finished card will fit inside a #10 envelope when closed.

Here’s a closer view of the details with my colored cups using the distress oxide inks and waterbrush.  I’ve also used the same Need to Venti stamp set and oxide ink colors to stamp the leaves and die cut them out to arrange over my scene as well.

I popped up the cups with foam squares and added some drops over the whip topping in the cups with some Nuvo Honey Gold Crystal Drops.

Hopefully you can see the pretty Autumn colors and dimension in the card.  I sure had lots of fun putting all of this together!

Thanks so much for dropping in today and I’ll be seeing you soon!

Challenges:

  1. Challenge Up Your Life – Autumn Mood 
  2. The Paper Funday – #21 Anything Goes optional:  Fall/Autumn
  3. Dream Valley – Embossing wet/dry (embossed cup images)
  4. The Sisterhood of Crafters – Autumn Inspiration
  5. CCEE Stampers – CCEE2037 Slimline Cards
  6. Not Just Cards – Anything Goes
  7. Crafting Happiness – Anything Goes
  8. Pammie’s Inky Pinkies – PIP2037 Anything Goes
  9. Simon Says Stamp Monday – Frame It

Sending a Smile to a Hunter and Winner on You Tube!

Hello friends! Welcome to the month of September! I cannot believe that Fall is at the door here! The weather has already started to cool us down a bit and Summer is starting to fade as you can see the flowers starting to die off. Now I will look forward to the changing color of leaves which is always amazing.

Today I have a project to share that I’ve made for the Splitcoaststampers Teapot “Make it Pop” challenge. This card is in need of a special SCS friend’s father who is having some difficulties with health and I wanted to help with a smile for him if I could:

“Pop” as he is lovingly called, enjoys the outdoors and hunting which is something that several men in my own life enjoy, so I knew that this would be a direction I was going in with some stamps I have from Newton’s Nook.

For the background, I took a woodgrain embossing folder before fully assembling the card.

Since this is a hunting theme, I thought it would be fun to make a camouflage background and so I’ve used the fabulous tutorial on SCS HERE to create the look.  I also cut off a thin strip towards the bottom to add some interest to the design as well.  Over top of the background, I layered the sentiment from MFT and also cut it out with a banner die.  I used a grassy feilds border die from MFT for the strip at the bottom of the panel and stamped the “Pop…” over it in brown ink.  I stamped and cut out the deer from the Newton’s Nook Serene Silhouettes set with coordinating dies.  I also die cut a few green leaves with an older MFT die for a few accents inside and out.

When you open up the card…

vicki-mmtpt632-forpop-open-1

Because of the name “Pop”, the challenge was “Make it Pop”, we needed to show some sort of element like this on our design.  So I found this really fun “Pop-Up Diorama” card tutorial on SCS for my design.

I’ve used an oval die to cut the center of my card and then used a piece of cardstock for the background to attach behind it.  On this panel, I created a scene with blending inks and adding stamped and die cut elements from the Newton’s Nook Whispering Pines stamp set that I’ve also used the sentiment from on the inside.

For the rest of the card, I’ve used the same stamp set that I used on the outside of the card and arranged them to create this scene with different layers that are popped up.

Hope this helps bring a smile over to “Pop”.  Thanks so much for stopping in today and I hope you were inspired in some way too!

Have a great day friends and I’ll see you soon!

Challenges:

  1.  Splitcoaststampers Teapot Tuesday – Make it Pop
  2. International Art & Soul – Include an animal
  3. Crafting Happiness Anything Goes
  4. 2 Crafty Critter Crazies – Anything Goes + animal
  5. Moving Along with the Times – Create a Scene
  6. Crafty Animals – Anything Goes + animal

Spooky Ombre & Welcome Gnomes for Dare to Get Dirty

Hello friends!  I’m back again today to share a couple more cards that I’ve made for the Splitcoaststampers “Dare to Get Dirty” event!  They’ve released another batch of challenge over there today!  There is certainly lots of crafty fun going on lately, isn’t there?!😀

My first card was made for a challenge from the lovely Lee:

Vicki-DTGD20LuvLee-ombre

This card was so much fun to create!  I’ve used only purple shades to make this entire design!  I started out with a white piece of cardstock using the MFT Rolling Clouds stencil and ink blended them in with several Stampin’ Up! inks that I’ve had in my stash for quite a while now! LOL!  After I was done, I spritzed it with a water bottle.

I took the awesomely spooky Trick or Treat stamp set and used some SU! Elegant Eggplant ink to stamp the witch image, bat and the sentiment at the bottom.  I used my MISTI to stamp several times to darken the ink up on them.

I cut out the panel with a stitched rectangle and then cut out an additional piece of Potion Cardstock with a stitched scallop rectangle die from MFT. I layered it over an A2 sized top folding Elegant Eggplant card base.

Vicki-DTGD20LuvLee-ombre-close

I then took a glitter brush pen to “color in” the inside of the moon around the witch that gave a really cool shimmer look to it. I then started noticing that it was taking away some of the purple ink while doing this, which was really awesome as it made the moon glow even more!  (I just had to be careful around the witch because she was stamped with regular dye purple ink and I didn’t want to blur it.)

I finished the design with some Lilac Matte Sequins that I filled with some Violet Galaxy Crystal Nuvo Drops.  It’s much more sparkly in person!


My next card was made for a challenge from the lovely Kelly:

Vicki-DTGD20MiamiKel4-gnomes

This scene was really fun to put together!  I fell in the love with the little house and gnomes from the Simon Says Stamp Gnome School.  I thought it would make a nice “new home” type of card.  I colored them up and cut them out with the coordinating dies to arrange over my scene.

The scene started with a piece of kraft that was ran over with the SSS Petal Plate die for the texture in the background.  I cut out some clouds and a border of grass with dies and inked them up with some inks for shadows.  I then took this panel and cut it all out with a stitched rectangle die and mounted it over a top folding A2 sized black card base.  I also took a sentiment strip from the SSS Gnome School Sentiment Strips to place over the design while arranging the images over the scene.

Vicki-DTGD20MiamiKel4-gnomes-close

For the sign on top of the “home”, I used one of the sentiments made for that spot and white heat embossed it over my coloring.  Hard to tell in the photo, but I’ve also covered the heart on the gnome’s hat as well as the glasses on the gnome with a glitter brush pen.  I also did the same for the windows on the home.

I hope you’ve enjoyed my creations for today and I sure appreciate you stopping in to check out all of the happenings that are going on!  Hope you’re able to join in some of what’s going on too!  See you soon!

Challenges:

  1.  Simon Says Stamp Wednesday – Oh So cute (bottom card only)
  2. Stamps & Fun = Creativity – #372 Lavender or Purple (top card)
  3. Always Fun – #177 In the Sky Scene (top card)
  4. Crafting Happiness – #63 Anything Goes

Happy Thanksgiving with Gold at Cute Card Thursday!

Happy Thanksgiving!  (For those that celebrate the Holiday)  I will be busy today visiting with my family and having dinner.  I look forward to seeing my boys as it’s been a few months without seeing them!  So it will be fun!

Today starts up a brand new challenge over at Cute Card Thursday and the theme for this week is “GOLD!”  Really fun and versatile metallic to use in your creations, so I look forward to seeing what everyone comes up with for this!

In conjunction with the Thanksgiving Holiday today, I thought my creation for this week’s challenge needed to reflect that:

Vicki-CCT610-BMGold

Since the main goal of the challenge is using gold, I kept the main focus on doing that, plus there are a couple of challenges going on that helped me figure out how to put it all together.  (see bottom of post for challenges.)

I have pulled out a stamp set called Plaid Tidings and used a plaid foilable toner sheet for the strip in the background.

I started out with an A2 sized top folding white card base and used a Darice embossing folder to emboss the leaves over the kraft background panel.  I took the toner printed plaid sheet and Gold Static Foil Transfer sheets and layered it over a piece of Bazzil Gold Mirror Cardstock and another piece of white cardstock.  I attached this to the embossed background.

For the background panel and the cut out leaves, I’ve used the “Kissing Technique” to add the plaid image over the leaves.  I sponged around this panel along with the leaves with some kraft colored ink and attached the white panel to another piece of the gold mirror cardstock.  I’ve added some gold ribbon around it and used some foam tape to pop it up a bit.

Vicki-CCT610-BMGold-close

Here’s a closer view at some of the details in my card design.  (You can better see the foiling done over the plaid with that Gold Static foil!)

For the sentiment, I heat embossed it over white cardstock with some Gilded Embossing Powder.  I die cut it out with a circle die and sponged some more kraft colored ink around this and then attached it to another circle layer of the gold mirror cardstock.

I attached this over the square leaves and ribbon panel and added a gold ribbon bow at the top of it.  To finish it off I added some gold sequins filled with Ranger Gold Stickles.

Vicki-CCT610-BMGold-flat

Hope you’ve enjoyed my GOLD Thanksgiving card today!

Have a beautiful day!  I’m thankful today for my wonderful family and lovely crafty friends that I have right here!  I appreciate you being here with me!

Challenges:

  1.  Try Stamping On Tuesday – TSOT436 sketch
  2. Daring Cardmakers – Natural, Gold and White
  3. Shopping Our Stash – SOS409 So Thankful
  4. Stamp, Ink, Paper– SIP206 Thankful
  5. Crafter’s Castle – Anything goes November
  6. Pammie’s Inky Pinkies – PIP1947 Anything Goes

Oak Tree Boy Hanging Onto Fall

Hello friends!  I hope that you’ve enjoyed the weekend and having a great start to your week so far!  Right now the weather guy is saying that we could reach freezing temps on Halloween night!  About 3 weeks ago we were still in hot temps and then ran right into this cold weather!  I wish I could’ve had a couple of days to open windows and it doesn’t look like I’m going to get that!  I’m trying to hang onto the Fall Season for as long as I possibly can!

Speaking of Fall, I have this really sweet image from Whimsy Stamps to share with you today!  He’s literally hanging on a tree limb for Fall!

Vicki-WSOakTreeBoy

This adorable image is one from Syliva Zet for Whimsy Stamps called Oak Tree Boy and I have him and his little bird friend all colored up in Autumn colors!

I knew I wanted to grab the papers from the Whimsy Stamps Rustic Wood and Brick digital paper collection, so I grabbed some more plaid papers from my stash and layered it with some gold mirror cardstock that I’ve also used for the scalloped circle layer behind the image.  I attached some seam binding ribbon around these layers and added them to a 5″ square kraft card base.

I took some sparkly Prima leaves from my stash and glued them on before adding the circle image panel with some craft foam behind it.  I glued on the seam binding bow and then I took the sentiment from the Whimsy Stamps Everyday Mini Sentiments and white heat embossed it over a piece of grey cardstock.  I then cut it out with the Whimsy Stamps Quick Strips die set and attached it over top of the image panel.

Lastly, I added a few sequins and filled the centers with some Nuvo Glitter Drops.

Vicki-WSOakTreeBoy-close

Here’s a closer view of the image and how I’ve colored him in!  For the “bells” on his hat and the little bird’s hat, I colored them, but then they were covered with a glue pen and some clear loose glitter.  I took my Copic colors and did little “dots” (pointillism technique) around the image.  I did this with a gold gel pen as well.

You can view the Copic markers that I’ve used on my creation below:

  • Boy’s Outfit – YG97, YG95, W5, W3, W1, E43, E40, / Shoes & buttons:  E87, E84
  • Boy’s Hair – E47, E44, E42 / Skin:  E21, E11, E02, E00, E000, R20, R00
  • Bird – E77, E74, E70, R20 / hat: YG97, YG95, W3, W1
  • Ladybugs – R29 and black pen
  • Bells on hats – Y28, Y26
  • Leaves – YR27, YR24, YR21, Y38, Y35
  • Acorns – E35, E33, E31
  • Tree Limb – E27, E25, E23
  • Pointillism and shading – E43, E41 and gold gel pen

Vicki-WSOakTreeBoy-flat

I hope you’ve enjoyed my my little Autumn card today and were inspired or at least brought a smile your way!

Thanks so much for dropping in today!  I enjoy hearing from you, so please say hello and I’ll be seeing you again soon!

Challenges:

  1.  The House That Stamps Built – Fall Colors Inspiration Palette
  2. Stamping Sensations – October Trees/Leaves/Autumn
  3. {Cupcake Inspirations} – CIC481 Fall
  4. Crafty Catz – Anything Goes #479
  5. QKR Stampede – Anything Goes #368
  6. Creative Fingers – Anything Goes
  7. Pammie’s Inky Pinkies – PIP1942 Anything Goes

Ghostly Haunts with Digi Doodle Studios + a Bag-a-lope Video Tutorial!

Hello friends and happy weekend to you!  Hope that you have some fun included in your weekend.

Today I’m sharing this really adorable digital stamp set from Digi Doodle Studios called “Ghotstly Haunts” and I had SO much fun with it that I made several projects using it including a fun video tutorial that may give you ideas for not only your favorite goblin, but for other fun ideas that I’ll reference:

Vicki-DDS-Bag-a-lope video

Now how cute are the ghosts in this set?!  As you can see, I had tons of fun creating several projects using the Ghostly Haunts Pairables digital stamp set!

The two projects on the ends are actually what I’ve created for the “bag-a-lope” video tutorial.  If you’ve been crafting for as long as I have, then I’m sure you’ve heard of this idea somewhere along the way.  People buy up those dies, but this way seems so much easier and cheaper to deal with to me.  Here’s the project idea that I share in the video:

Vicki-DDS-Bag-a-lope1

This is such a fun and easy bag to create and fill with treats for your favorite goblin!  You can fill with yummy treats or a small gift.  It would be great to put a gift card inside with some tissue or bag fill too!  Not only for Halloween, but for Christmas too!

In the video below, I share how I created this bag along with another fun project using the same idea with just a plain old envelope!  That’s all you need to make these along with your own ideas!  I’ve used the Ghostly Haunts Pairables set to create the fun spider web paper in the background as well as the spider and sentiment.

If you’d like to see how to create this treat bag along with some other fun ideas with tips and tricks, then be sure to watch my video tutorial below or CLICK HERE to view it on You Tube. – If you haven’t yet, please be sure to hit “like”, comment and subscribe to my channel!

Vicki-DDS-Bag-a-lope2

As seen in the video, I have also used this adorable set using the same “bag-a-lope” idea to create a fun Lumiere using a vellum envelope.  I have printed out an additional ghost and attached him to the clip on the top of the bag.  LOL!

For the spider web strips at the top and bottom, they were the same left over papers that I’ve used on the treat bag above, but for these strips I’ve heat embossed over them with some clear sparkle EP.  It’s hard to see in the photos, but I’ve taken a sparkle glitter brush pen and covered every single ghost on my projects.  I’ve used my Copic markers to color in all of the images after printing out my scenes from the computer.  The sentiment for this project was actually made by myself using a font from my computer.

Vicki-DDS-Bag-a-lope-candle

Here you can see how the battery tea light candles are glowing through the vellum Lumiere bag.  I also thought this would be a fun idea for Christmas time as well!

Vicki-DDS-Ghostely Haunts

Lastly, I HAD to create a card using this adorable digital set too!

For this card, I created the scene on my computer and printed it out.  I printed it out again over some masking paper.  I cut the images out of masking paper and put them over the printed out scene so I could do the ink blended background.  I actually fussy cut the ghost and popped him up over the tombstone.  I covered him with a glitter brush pen too!  (I’ve also added a touch of “moon glow” on the top of his head.

I die cut the scene and attached it over a piece of purple glitterstock and then die cut the black frame to go over top of the card.  Before adding the frame, I attached the die cut fence and a couple more pieces of “grass” from the digital stamp set.  That sentiment cracks me up!  I sponged over it, added to a black strip and attached it over the card front panel.  This was all attached to an A2 sized top folding card base.

Hope you’ve had as much looking at my projects as I had making them! Thank you so much for dropping by today and I’ll be seeing you soon!

Challenges:

  1.  Try it On Tuesday – Witches/Wizards/Halloween
  2. The Creative Crafters – Anything Goes
  3. Creatalicious – October Anything Goes with optional Autumn/Halloween
  4. Simon Says Stamp Wednesday – Halloween
  5. The Male Room – Halloween
  6. Krafty Chicks – #477 Ghost Card
  7. CRAFT – Box or Bag
  8. Creative Knockouts – Halloween
  9. TGIF Challenges! – #tgifc234 – Happy Halloween